
Setting Up Replication
In general, SQL Server 2000 data replication is exceptionally easy to set up via Enterprise Manager and wizards. However, please be warned: If you use the wizards, be sure to generate SQL scripts for every phase of replication configuration. In a production environment, you most likely will rely heavily on scripts and will not have the luxury of having much time to set up and break down production replication configurations via wizards.
You always will have to define any data replication configuration in the following order:
1. | Create or enable a distributor to enable publishing. |
2. | Enable/configure publishing. (A distributor must be designated for a publisher.) |
3. | Create a publication and define articles within the publication. |
4. |
Enable a Distributor
Before setting up a publisher, you will have to designate a distribution server to be used by that publisher. As has already been discussed, you can either configure the local server as the distribution server (the Microsoft default), or choose a remote server as the distributor. This is done via the Configure Publishing, Subscribers, and Distribution Wizard. Since any high availability configuration using data replication is best served with a remote distributor, this is what will be shown here. Oh, and you must be a member of the sysadmin server role to use this wizard.
Use the following steps to configure a remote server as a distributor:
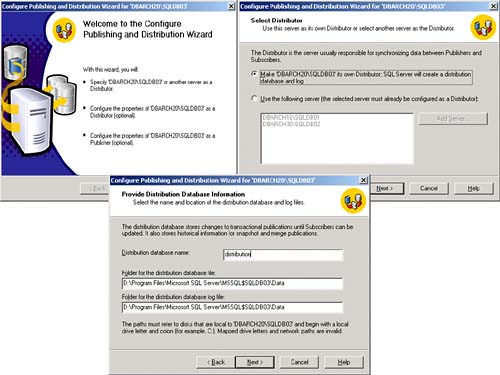
1. | From Enterprise Manager and with the remote SQL Server (registered server) that will be the distributor highlighted, choose the Tools, Replication, Configure Publishing, Subscribers, and Distribution selection. In our example, this is the DBARCH20 SQLDB03 SQL Server (the remote distributor). As you can see in Figure 7.24 (upper left), this will start you through the wizard to accomplish two primary tasks:
You are not going to enable this remote SQL Server as a publisher, only as a distributor. Figure 7.24 (bottom) also shows the full specification of the physical file location for the new distribution database that will be created and used by the distribution server. These wizard steps will create a few SQL agent tasks as well. |
2. | Next, as seen in Figure 7.25 (upper left), you'll be asked to specify a snapshot folder. Give it the proper network full pathname. Remember: Tons of data will be moving through this snapshot folder, so it should be on a drive that can support the snapshot concept without filling up the drive. Figure 7.25. Specify the snapshot folder and choose Yes for customizing the configuration.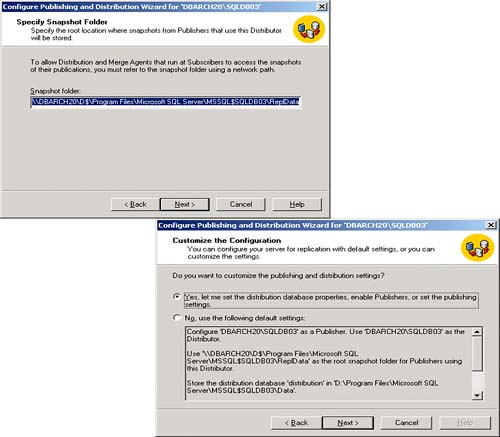 |
3. | You are then asked to customize the configuration using the default settings or your own settings. Because we are configuring a remote distribution server, we will choose Yes to making a customized configuration. Looking back at Figure 7.25 (bottom right), you can see all of the items that will be configured using this setting option. |
4. | As you now see in Figure 7.26, you are prompted for information regarding which servers this distribution server will distribute for. In our example, we will select DBARCH10SQLDB01 as the SQL Server that this distributor will be used to distribute data for. This is our publisher. If you click the properties button (the ellipsis button just to the right of the Distribution DB entry for DBARCH10SQLDB01), you will see the full configuration that this publisher will use during distribution (upper right hand publisher properties dialog in Figure 7.26). This even includes what login the replication agents will use to communicate with the publisher. Figure 7.26. Specifying the publisher to distribute data for and completing the distribution server configuration summary.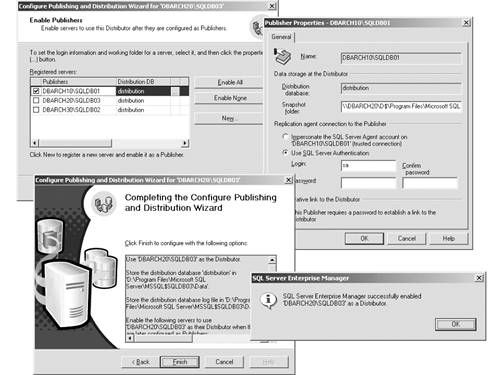 Oh, by the way, a distributor can distribute for more than one publisher! Once all properties are specified, a summary dialog of what the wizard is about to do is shown (bottom left of Figure 7.26). When this is executed, you will be presented with a message indicating that this server has been “enabled for distribution” (final dialog in the lower right of Figure 7.26). |
5. | The end result will yield a distribution database being created, the distribution server set up, Replication Monitor being added to Enterprise Manager, and publishing enabled for our publication server (just enabled, nothing more). If you look closely at Figure 7.27, you will see four replication agents being set up as a byproduct of this wizard completing its tasks and the message dialog letting you know that the Replication Monitor has been added to Enterprise Manager. Figure 7.27. The four replication agents created during the distribution server setup and a note that a Replication Monitor branch has been added to Enterprise Manager under the distribution server.
|
Now, you can get to the business of creating a publisher and publications.
Enable Publishing/Configure the Publisher
Because we have created a remote distributor, we only need to “configure” a publisher and create the publications that are to be published. We already enabled the publisher as the last part of the prior step.
Use the following steps to configure a server as a publisher:
1. | From Enterprise Manager, highlight the SQL Server (registered server) that will be the publisher, and then choose the Tools, Replication, Configure Publishing, Subscribers, and Distribution selection. In our example, this is the DBARCH10SQLDB01 SQL Server. As you can see in Figure 7.28, this invokes the same configuration wizard we used before, but this time we will focus on the publisher configuration only. As part of this wizard's invocation, Enterprise Manager looks at what account is defined to start the SQL Server Agent service. You might need to change this account so that replication won't fail (this warning message is also shown in the bottom right of Figure 7.28). Figure 7.28. Replication, Configure Publishing, Subscribers, and Distributors.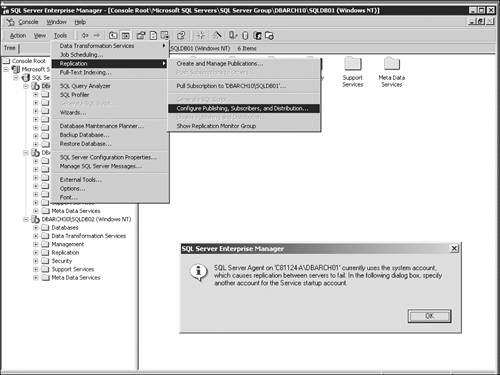 |
2. | The initial wizard dialog describes the configuration options that are possible (upper left of Figure 7.29). First up is the selection of the distributor for this publisher (as seen in the upper right of Figure 7.29). In our case, we will select the remote distributor of DBARCH20/SQLDB03 that we have already enabled for distribution. Figure 7.29. Select the remote distributor for this publisher and don't use any customized configuration for the publisher.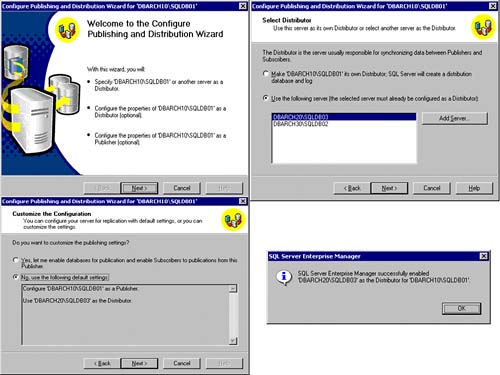 |
3. | The next dialog provides us with an opportunity to customize this configuration or not (as seen in the lower left of Figure 7.29). We will just select No and take the defaults for Customize the Configuration dialog since it will correctly configure DBARCH10/SQLDB01 as the publisher and use DBARCH20SQLDB03 as the distributor. |
4. | You will then complete the wizard and be given a message indicating that you have successfully enabled your distributor for this publisher (as you can see in the lower right of Figure 7.29). Great! Now you are ready to create a publication! |
Creating a Publication
Now that the distribution database has been created and publishing has been enabled and configured, you can create and configure a publication. From your publisher, select the Replication option from the Tools menu (as shown in Figure 7.30):
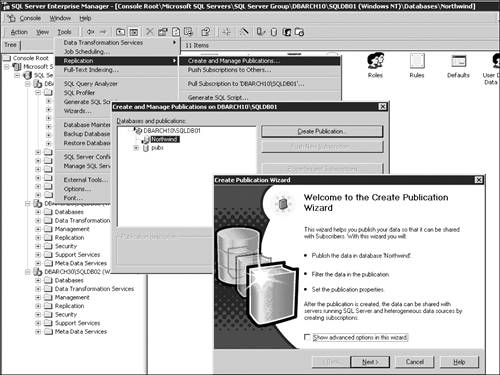
1. | From Enterprise Monitor, choose the Tools, Replication, Create and Manage Publications selection. |
2. | You will be immediately prompted to select the database you are going to set up a publication for (also shown in Figure 7.30). We chose the Northwind database. This immediately launches the Create Publication Wizard dialogs. |
3. | We will then be prompted to, again, identify the database that you are creating the publication for (top left dialog in Figure 7.31) and asked to specify the type of replication method for this publication (middle dialog in Figure 7.31). This will be either snapshot replication, transactional replication, or merge replication. We have selected transactional replication. And, identify what server type (like SQL Server 2000, SQL Server 7.0, or other heterogeneous server types) the subscriber will be (bottom right of Figure 7.31). Figure 7.31. Choose the publication database, specify the publication type, and identify what server type the subscribers will be.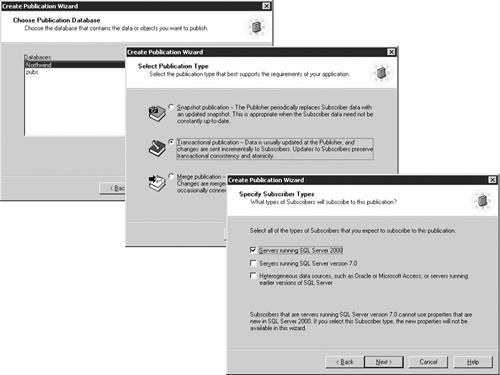 |
4. | From the Specify Articles dialog, you are prompted to identify articles in your publication (see top middle of Figure 7.32). You must include at least one article in your publication. These can be tables, views, or stored procedures. After you select an article, a button with an ellipsis ([el]) appears after the article name. If you click this button, you are presented the article properties dialog and can specify options for your article. In our example we selected to see the properties of the Customers (table) article. The General tab of the Table Article Properties for Customers shows both the source table name and the destination table name (lower left of Figure 7.32). For snapshot and transactional replication, you can determine how the snapshot portion of the replication will occur (as seen in the Snapshot tab of the Table Article Properties in the lower right of Figure 7.32). The default snap shot approach (taken by the wizard) will be to drop the existing table (on the destination side), to only create its indexes (clustered/non-clustered indexes), and to convert user defined datatypes to base datatypes. In our example, we will want this table and all of its objects created at the subscriber (referential integrity, clustered indexes, non-clustered indexes, and so on). Remember, we are trying to create an exact image of the publisher to use as a warm standby and it must have all objects included. If your table has triggers, you may elect to leave this item unchecked and then run a script on the subscription side with the trigger code that contains the NOT FOR REPLICATION option (as discussed earlier in this chapter). Figure 7.32. The Specify Articles screen allows you to choose which tables you want to publish and see each article's properties.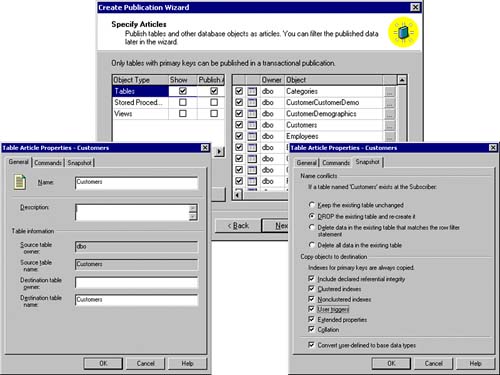 |
5. | If any article issues exist, they will be presented to you here. Identity columns might be an issue because of the way they will be treated in replication. In addition, you can choose to see an article's properties and alter the defaults that are being set up. CAUTION If the publication is to be used to create a warm standby for high availability, you need to define a custom script for SQL Server to run when applying the snapshot to create the tables with the IDENTITY property and the NOT FOR REPLICATION option set (which was described earlier in this chapter). |
6. | You can now name your publication something meaningful. In our example we name it “Northwind2Northwind” because we are creating an exact image of the Northwind database on our subscription (fail-over) server. |
7. | You are given a chance to customize the properties of the publication. This includes adding data filters and allowing anonymous subscribers. If you select that you do want to create anonymous subscribers, SQL Server will allow any server to connect to and receive data from your publication. |
8. | As you finish this wizard, it displays what it is doing in a nice dialog box. When this finishes, you will have a valid publication that simply needs to be subscribed to. |
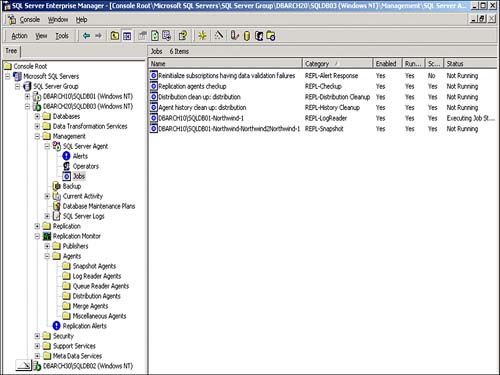
As you can see from Enterprise Manager in Figure 7.33, after the publication has been defined, the snapshot agent (REPL-SnapShot) is created along with the log reader agent (REPL-LogReader—because we chose transactional replication).
Now that you have installed and configured the remote distributor, enabled publishing, and created a publication, you need to create a subscription.
Creating Subscriptions
Remember that two types of subscriptions can be created: push and pull. Pull subscriptions allow remote sites to subscribe to any publication that they are allowed to, but you must be confident that the administrators at the other sites have properly configured the subscriptions at their sites. Push subscriptions are easier to create because all of the subscription processes are performed and administered from one machine. This also makes them the most common approach taken. Since we are creating this subscriber to be a fail-over server, we will always choose to use the push subscription approach. Following are the steps to create a push subscription:
1. | From Enterprise Manager, choose the Tools, Replication, Create and Manage Publications selection. The Push New Subscription option is now active (because a publication exists now). This will allow you to
|
2. | First, make sure you have enabled the subscriber. This can be done from Enterprise Manager by choosing the Tools, Replication, and the Configure Publishing, Subscribers, and Distribution selection. You will be presented with the Publisher and Distributor Properties box. Go to the Subscribers tab and enable the desired SQL Server as a subscriber, as shown in the upper left of Figure 7.34 (by selecting the SQL Server instance and clicking Apply and then close the properties box). Now you can create a subscription to this subscriber. Figure 7.34. Enabling subscribers via publisher and distributor properties, creating a push subscription, and choosing the destination database (at the subscriber).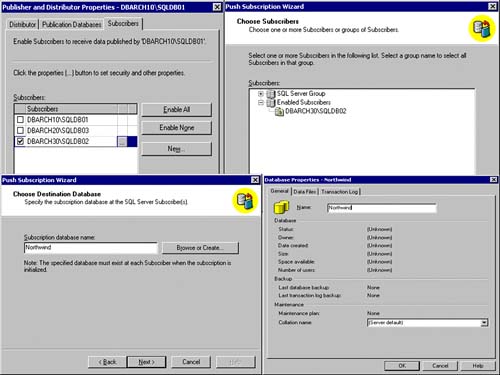 |
3. | Creating a push subscription can be done by first selecting the publishing server and then choosing the Tools, Replication, and the Create and Manage Publications selection. Now, go ahead and drill down to the publication that has been created for the Northwind database (the one we named Northwind2Northwind). Once you highlight this publication, the Push New Subscription button becomes active. Select this now. You will then specify the subscriber from the list that has been registered in Enterprise Manager (upper right of Figure 7.34) and has been enabled for subscribing (from what we just enabled up in step 2). |
4. | From the Choose Destination Database screen (lower left of Figure 7.34), you are prompted to identify the subscription database that you will publish to. If you click the Browse Database button, you can see a list of all the databases on the destination server (the new subscribing server). If you want to create a new database on the destination server, click the Create New button. In our example, we want this subscription process to create a new, complete image of the Northwind database. This will entail naming the database and specifying the proper data and transaction file location properties for this database on the subscriber (as seen in the lower right of Figure 7.34). |
5. | As you can see in Figure 7.35 (the dialog in the upper left), we will configure how the distribution agent will run. If you want to provide the shortest latency, select the Run Continuously option (the default). This would most likely be the option if you are configuring replication as your high availability solution. Figure 7.35. Setting the distribution agent schedule, initializing the schema and data, and making sure the SQL Server Agent is started on the subscriber.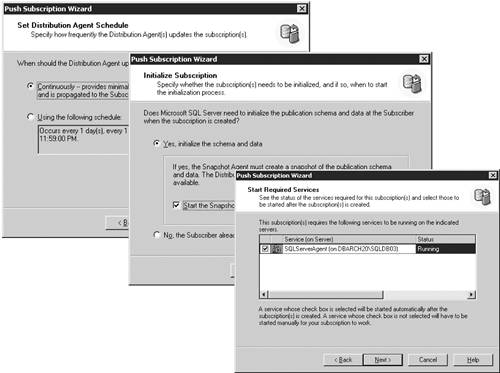 |
6. | You are then prompted to set the initialization of the database schema and data (middle of Figure 7.35). You will have an option to create the schema and data at the subscriber (and also to do it immediately) or to skip this initialization altogether because you have already created the schema and loaded the data manually. We choose to have the initialization create the schema and initialize the data immediately. |
7. | The next part of the process, the Start Required Services dialog box, checks whether the required services are running on the server (as you can also see in the lower right of Figure 7.35). |
Now replication is set up, and the only thing left to do is wait. If you have specified that the schema and data are to be created immediately, things will start happening quickly.
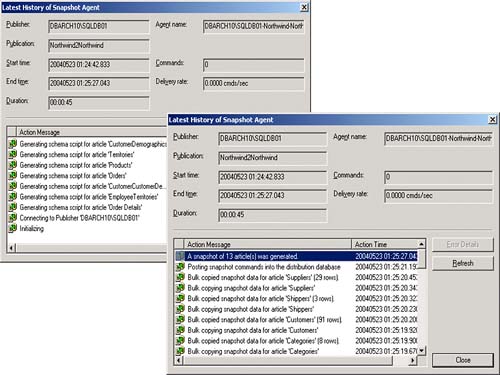
If you head over to the Replication Monitor item in Enterprise Manager and drill down to the Snapshot agent (under the Agents item), you will first see the snapshot agent start up and begin creating schema files (.SCHs), extracting the data into .BCP files (.BCPs), and putting everything in the snapshot folder on the distribution server. You read these latest history windows from the bottom up. What's on top is the last thing to have completed. In Figure 7.36, the upper left shows the initialization steps (the start of the snapshot processing) and the final steps of the snapshot are shown in the bottom right.
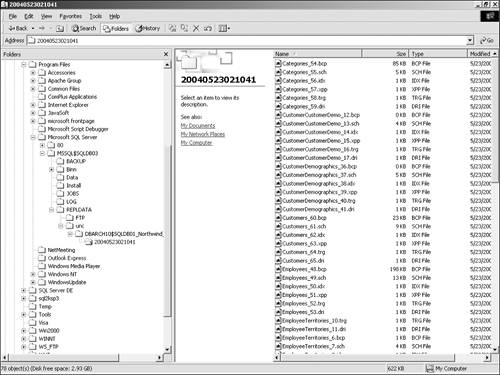
In addition, in Figure 7.37, we took a quick peek, via Windows Explorer, at the contents of the snapshot working directory to see all of our .SCHs and .BCPs being created. This is often where trouble is encountered because of the lack of space on the disk drive.
Figure 7.37. Snapshot folder as the schema and data files are being created and used.
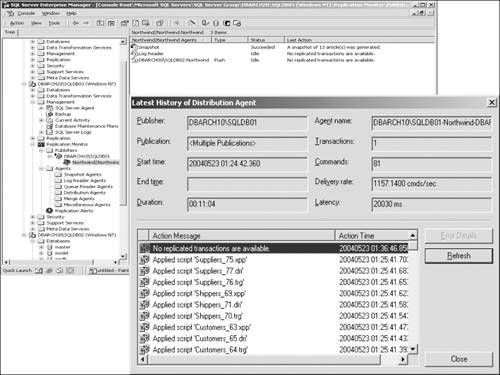
Taking a quick look at the upper left of Figure 7.38, you can see the snapshot agent has succeeded. And, now, the distribution agent finishes the job. As you can also see in the Latest History details for the distribution agent (in the bottom right of Figure 7.38), the distribution agent applies the schemas to the subscriber. The bulk copying of the data into the tables on the subscriber side will follow accordingly. After this bulk copying is done, the initialization step is completed and active replication begins.
Figure 7.38. The snapshot agent status and the distribution agent detail steps of applying schemas and initializing data at the subscriber.
That's it! You are now in active replication. As any change is made to the publisher, it is continuously replicated to the subscriber. In most cases, this is within a few seconds.
If the publisher fails for any reason, and cannot be recovered normally, the subscriber server can be put into service by pointing all the client applications to this new server.
1. | You would first want to stop the log reader agent because it will be in a “retrying” mode and will experience a failure since it cannot connect to the publisher. Figure 7.39 shows the Log Reader in retrying mode. Figure 7.39. Log reader agent retrying due to failure to connect to the publisher. |
2. |