In this chapter, you will learn how to:
Publish an XML Web service to a UDDI registry
Search a UDDI registry to discover an XML Web service
Use DISCO files to advertise XML Web services
Enable automatic discovery of XML Web services
Use a DISCO file to discover an XML Web service
Deploy an XML Web service
In previous chapters, we’ve covered the information you need to be able to develop basic XML Web services and the client applications that consume them. Before we move on to more advanced development topics in Part III of this book, we’ll discuss publishing, discovering, and deploying XML Web services.
One of the major goals of the XML Web service model is to provide globally accessible services that can be used to create software solutions. Before people can use an XML Web service, however, they must know that the service exists, where to access it, and how to make use of it. In Chapter 1, we mentioned two technologies that you can use to publish and discover XML Web services, specifically Universal Description, Discovery, and Integration (UDDI) and discovery (DISCO) files. In this section, we show you how to use UDDI to make your XML Web services accessible to consumers. We will discuss DISCO files in the section "Publishing and Discovering XML Web Services Using DISCO files" later in this chapter.
You should register your XML Web service in a UDDI registry if you want to advertise your service to the largest possible audience. UDDI is still in its early stages of development, and it is yet to be widely adopted, but there is little doubt that UDDI registries will eventually become the cornerstone of global XML Web service discovery on the Internet.
A UDDI registry provides a globally accessible database in which you publish information about your business and the XML Web services you offer. Potential customers can search the UDDI registry to find a business that provides the services they require. UDDI registries are primarily designed to be used programmatically, however, a discussion of the UDDI API is beyond the scope of this book. Fortunately, most UDDI registries also provide Web-based interfaces that enable you to work with the registry information interactively.
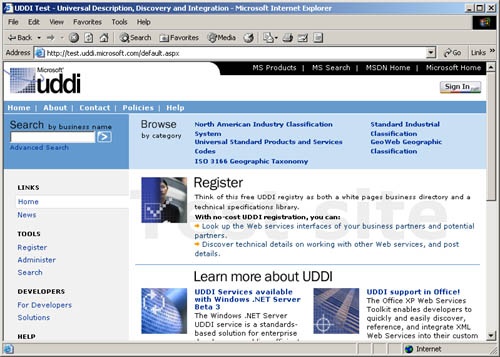
Microsoft provides a test UDDI registry at http://test.uddi.microsoft.com. You can experiment with this site prior to registering your services with the production UDDI registry (http://uddi.microsoft.com). We will use this test UDDI registry to demonstrate the steps necessary to register yourself, your company, and your XML Web service. We will create a business entity named "Freeman and Jones" that offers a credit card number validation service.
To publish an XML Web service so that other people can use it, you must register three key items of information: your business, your service, and something called a tModel. A tModel (defined in the UDDI specification) provides information about the technical interface of a service. For example, many credit card number validation services might be available, but not all of them expose the same methods or take the same arguments as ours. By indicating that our service implements a specific tModel, we make clear to potential consumers exactly what interface our credit card number validation service exposes. The best technical description of an XML Web service interface is the service description document (WSDL document), so when we define our tModel, we will include a reference to it. By providing this reference, we give people everything they need to generate a proxy class for our XML Web service. Other businesses can provide services that use the same tModel. If you write a client application that consumes a service that’s based on a specific tModel, you should be able to consume any service that uses that tModel.
The UDDI registry also allows you to include information about your business and service. Some of this information helps consumers identify your business and some provides generally useful data. We detail some of the key information elements in the following table.
Information | Description |
|---|---|
Contacts | Contact information for one or more people at your business, including name, e-mail address, phone number, and address. |
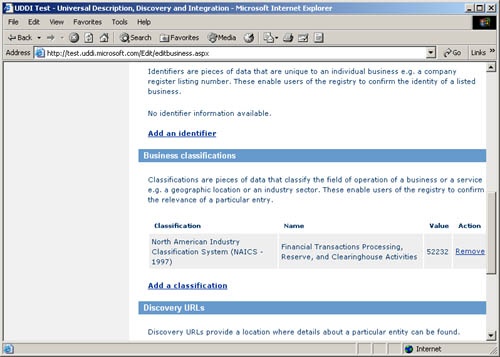
Identifiers | Unique identifiers for your business or tModel. The UDDI registry defines some standard types of identifiers, including D-U-N-S Numbers and RealNames Keywords, but the registry also lets you enter custom identifiers. For example, you could use a custom identifier to contain your company registration number, enabling potential customers to identify your business. |
Business classifications | Business classifications are used to categorize your business, service, and tModel into standard taxonomies. You specify which classifications to use by selecting them from a collection of standard business, service, and geographic taxonomies built into the UDDI registry. We demonstrate the use of a business classification when we publish our XML Web service later in this section. |
Discovery URLs | Discovery URLs provide a location where a UDDI user can find more information about your business. This location would commonly be the home page of your company’s Web site. |
Before commencing with the registration process, you must have your own .NET Passport account so that you can log in to the Microsoft UDDI registry. If you do not have a .NET Passport account, go to http://www.passport.com and create one. We will use the account [email protected]—all Hotmail and MSN accounts are valid .NET Passport accounts.
Important
The personal registration process we describe in the following section will vary depending on the configuration of your .NET Passport account. If you configure your .NET Passport account to make account details available to other Passport-enabled applications, the UDDI registration service will use your .NET Passport profile to obtain default values for registration details and will not require you to validate your e-mail address before granting you publisher access to the UDDI registry. The [email protected] account, which we use in the example, has all information sharing disabled.
Procedure 9-1. Register Yourself with the UDDI Business Registry
Open your Web browser, and then navigate to the URL http://test.uddi.microsoft.com.
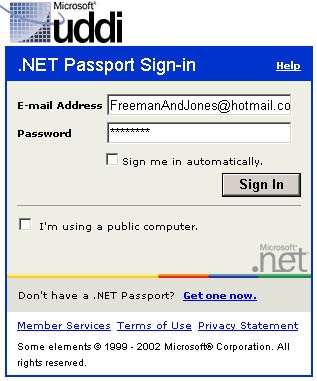
Click the .NET Passport Sign In button at the top right corner of the page.
Enter your .NET Passport account name and password, and then click Sign In. If your account details are correct, you will return to the Microsoft test UDDI homepage.
Under Tools on the left side of the page, click Register.
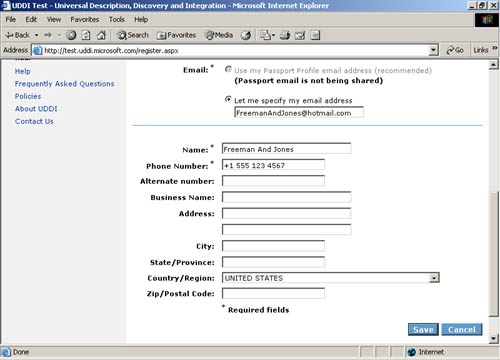
The UDDI registry determines that your .NET Passport account has not yet been registered with the UDDI service and presents a page on which you complete your registration details. You must fill in these details before you can publish information to or administer information already in the UDDI registry.
Enter your e-mail address, name, and phone number, and then click Save. You can fill in other details if you choose to. E-mail address, name, and phone number are the only mandatory fields.
Read the UDDI registry terms of use. If you agree to them, click the Accept button at the bottom of the page.
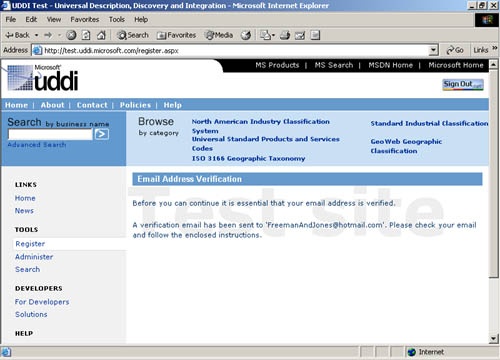
Upon acceptance, and if the registration process did not obtain your e-mail address through your .NET Passport profile, you will see the Email Address Verification screen. It is important that your e-mail address is correct because the UDDI registry service sends you an e-mail containing a URL that you must visit to complete your registration.
Check your e-mail inbox for a message with the subject "Validate your UDDI publisher address" and open it.
Here are the contents of the e-mail message; the URL will have a different key that uniquely identifies your registration request.
Thank you for choosing Microsoft UDDI!

Before you can begin publishing your business data to the UDDI
registry, it is important that you validate the email address you
specified on the UDDI registration form.

Validating your email address is simple: if your mail reader supports
HTML links, you may simply click the link below. If your mail reader
does not allow you to click the link directly, simply copy the
complete link into your web browser address box.

http://test.uddi.microsoft.com/validate.aspx?key=ca195127-
b4c5-419c-a068-f31a9d2f27dc
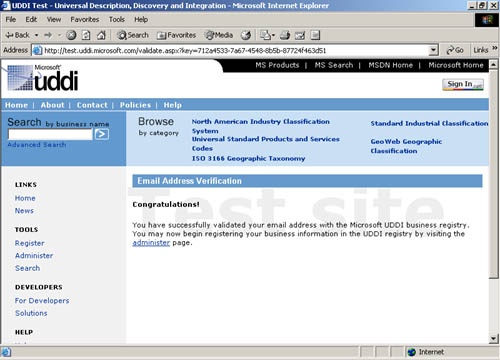
Click on the URL in the e-mail message, or enter the URL into the address box of your Web browser.
Navigating to the link completes your UDDI registration. You will see the following message of congratulations, informing you that you can now go ahead and publish businesses and services to the UDDI registry.
Procedure 9-2. Register a tModel in the UDDI Registry
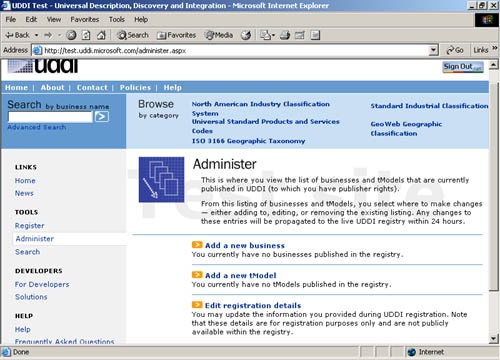
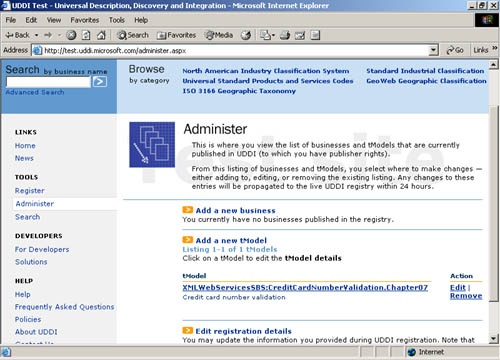
Under Tools on the left side of the test UDDI registry homepage, click Administer.
On the Administer page, shown in the following screenshot, click Add A New tModel.
We are going to publish a tModel for the credit card number validation interface exposed by the ValidatorService service we built previously. Later, when we publish our service, we’ll use this tModel to define the service interface, which means the tModel must exist before we publish our service.
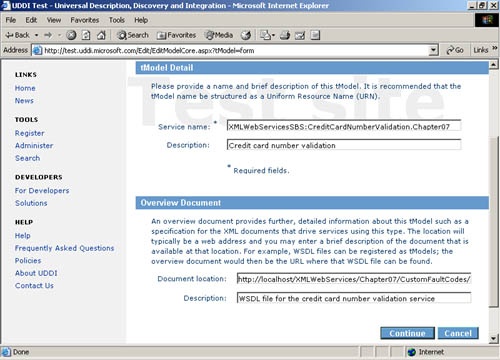
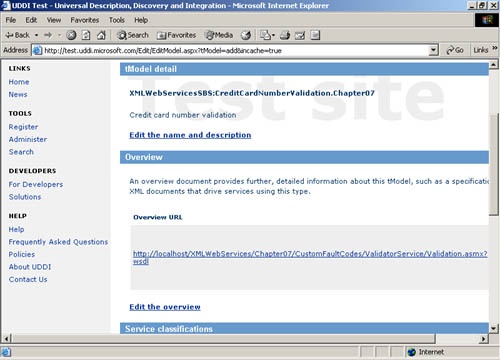
Enter a name and a description in the tModel Detail section.
We will use the name "XMLWebServicesSBS:CreditCardNumberValidation.Chapter07" and "Credit card number validation" as the description. You should choose a name and a description that will uniquely identify your tModel. Although there is no technical requirement that names and descriptions must be unique, the number of people working through this example means that the test UDDI registry will become full of tModels that are identical to the one we demonstrate in this chapter. As a result, you will not be able to identify your tModel when you want to search for and use it later in this process.
In the Overview Document section, enter the URL of the WSDL file for ValidatorService in the Document Location box: http://localhost/XMLWebServices/Chapter07/CustomFaultCodes/ValidatorService/Validation.asmx?wsdl.
If you are using the localhost host name as we are, you will be able to follow the URL links, but nobody else will be able to access them successfully. This restricted access is fine for this demonstration, but if you are publishing an XML Web service for use by others, remember that they need access to the URLs you use.
In the Overview Document section, enter WSDL file for the credit card number validation service as the description.
Click Continue.
The next page displays a summary of the tModel information you entered and allows you to associate service classifications and business identifiers with the tModel. We will not assign any classifications or identifiers to this tModel.
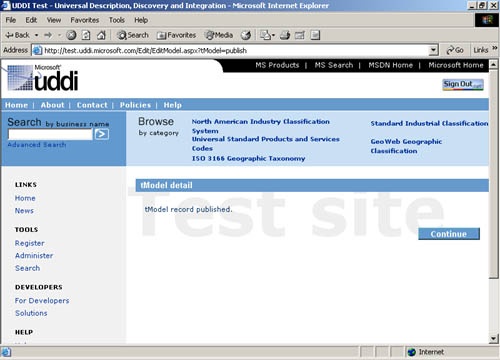
Scroll to the bottom of the page and click the Publish button. This publishes the tModel to the UDDI registry, as you can see here.
Click Continue to return to the test UDDI registry Administer page. The page now lists the published tModel. You can use the links on this page to edit or remove the tModel.
Procedure 9-3. Register a Business in the UDDI Registry
On the Administer page, click Add A New Business.
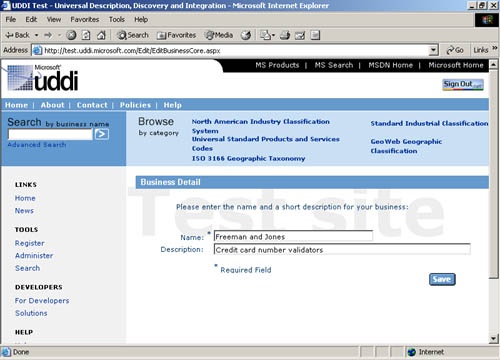
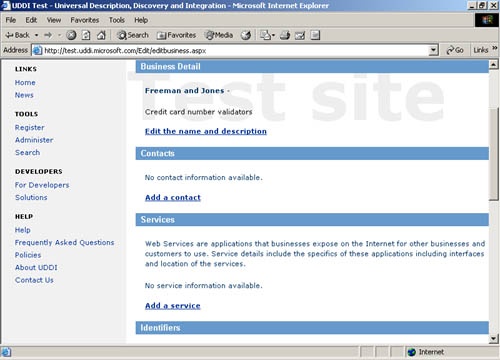
On the Business Detail page, enter the name and a short description of your business. For example, we use the name "Freeman and Jones" for our business and "Credit card number validators" as a description. As with the tModel above, you should enter a unique name and description so that you can distinguish your business from the business of every other reader who is working through this example.
Click Save.
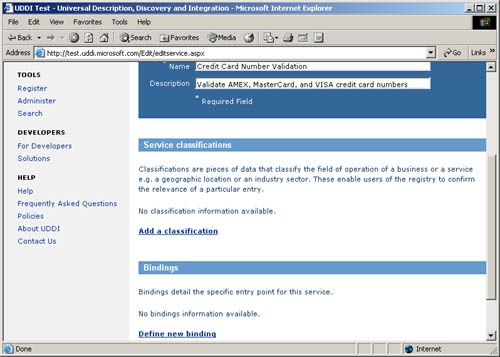
This event does not publish your business information but takes you to a page, shown in the following illustration, on which you can enter further details about your business and the services you offer. The links in each section allow you to enter different types of information about your business and services. Full coverage of each section is beyond the scope of our discussion, but we will add our service and a business classification in the following steps.
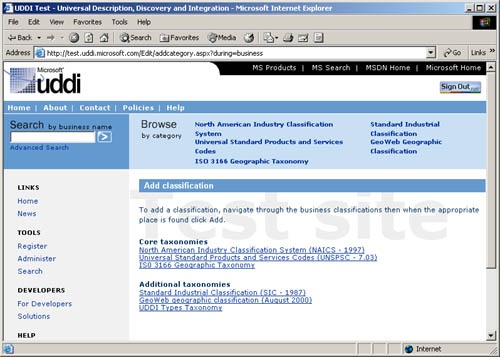
In the Business Classifications section, click Add A Classification. You’ll see the following page.
We want people to know that we are involved in credit card processing, so we use the business classifications mechanism to advertise this.
Go through the classification taxonomies to locate the appropriate classification.
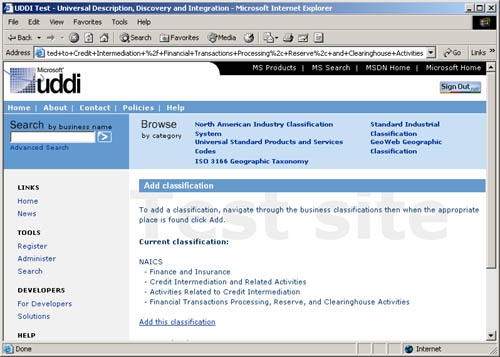
For this example, click North American Industry Classification System (NAICS - 1997) and then the following: Finance and Insurance; Credit Intermediation and Related Activities; Activities Related to Credit Intermediation; Financial Transactions Processing, Reserve, and Clearinghouse Activities.
You return to the Business Details page. If you scroll down you will see that your business now has a business classification.
Click Add This Classification.
Procedure 9-4. Register a Service in the UDDI Registry
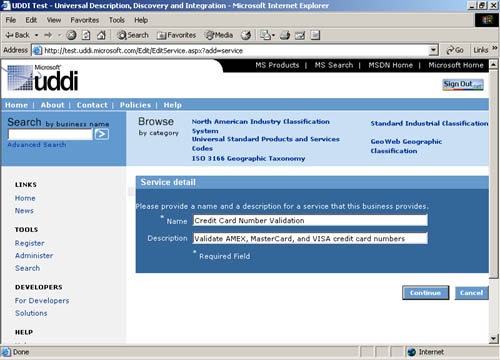
In the Service section, click Add A Service.
Enter Credit Card Number Validation as the name of the service and Validate AMEX, MasterCard, and VISA credit card numbers as the service description. Click Continue.
Scroll down the page and click Define New Binding in the Bindings section.
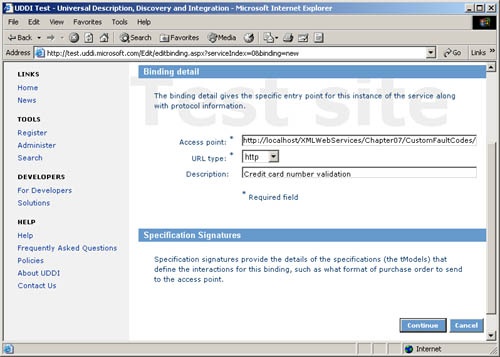
Enter the URL of the ValidatorService’s .asmx file as the access point. The URL is http://localhost/XMLWebServices/Chapter07/CustomFaultCodes/ValidatorService/Validation.asmx. Leave URL type as http, and enter Credit card number validation as the description. Click Continue.
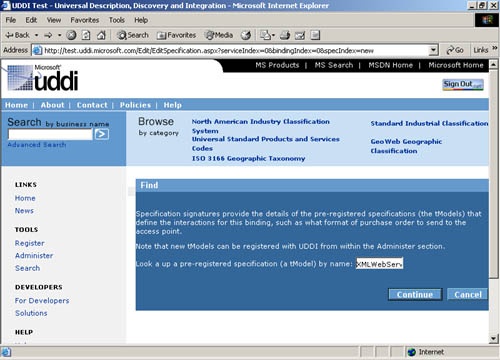
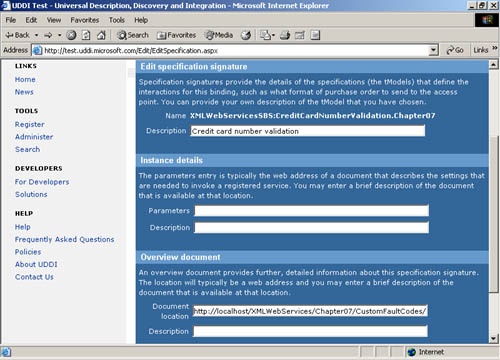
Scroll down the page to the Specification Signatures section, and then click Add Specification Signature.
We are going to indicate that the service we just added uses the XMLWebServicesSBS:CreditCardNumberValidation.Chapter07 tModel that we defined earlier in the registration process.
Type XMLWebServicesSBS into the search field, and then click Continue.
Select your tModel from the list of results, and then click Continue.
Enter Credit card number validation as the description for the specification signature.
In the Overview Document section, enter the URL of the ValidatorService in the document location: http://localhost/XMLWebServices/Chapter07/CustomFaultCodes/ValidatorService/Validation.asmx. Click Continue.
We use this address because ASP.NET displays the service help page if the user navigates to the address using a browser.
Click Continue to complete the Binding definition.
Click Continue to complete the Service definition.
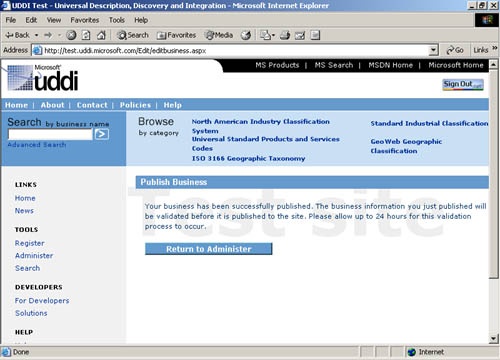
Click Publish to complete the registration of your business and service.
The final screen informs you that you have successfully published your business. If you were publishing to the production UDDI registry, the details would be validated before being published, which can take up to 24 hours. However, because we are using the test registry, your published information is available immediately.
Click Return To Administer.
The Administer screen now lists your business as well as the tModel that we registered earlier. You can use the links on this page to edit or remove the business.


In the previous sections, we discussed UDDI from the perspective of publishing an XML Web service. Now we will look at how to use UDDI to assist in discovering an XML Web service.
The goal of XML Web service discovery is to obtain a copy of the service’s description document. Remember, the service description is an XML document written in WSDL that contains a complete specification of the XML Web service’s interface. Most importantly, the service description document enables you to generate a .NET client proxy automatically.
Using the Microsoft UDDI registry Web interface, you can search for registered businesses, services, and tModels. You don’t need to register with or log on to the UDDI registry to search it. Unfortunately, the current search capabilities are rudimentary; you can search using a number of criteria, including business name and tModel name, as well business identifiers and classifications. You can also go down through the classification taxonomies to find businesses, services, and tModels in particular categories.
We will now show you how to use the Microsoft test UDDI registry to find companies involved in financial transaction processing, in the hopes of finding a company that offers a credit card number validation service.
Procedure 9-5. Search For an XML Web Service Using Business Classification
Open the home page for the Microsoft test UDDI registry using your Web browser. The URL is http://test.uddi.microsoft.com.
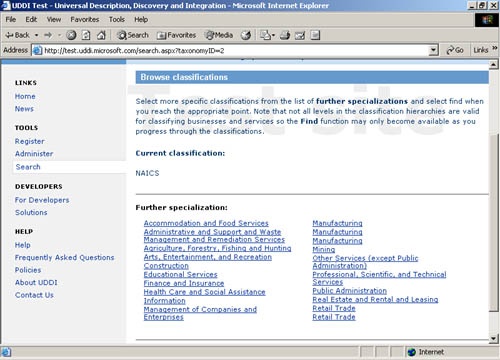
In the Browse By Category panel at the top of the page, click North American Industry Classification System.
Go through the classifications to locate the category associated with financial transaction processing.
For this example, click the following links: Finance and Insurance; Credit Intermediation and Related Activities; Activities Related to Credit Intermediation; Financial Transactions Processing, Reserve, and Clearinghouse Activities.
Click the Search For Businesses In This Classification button.
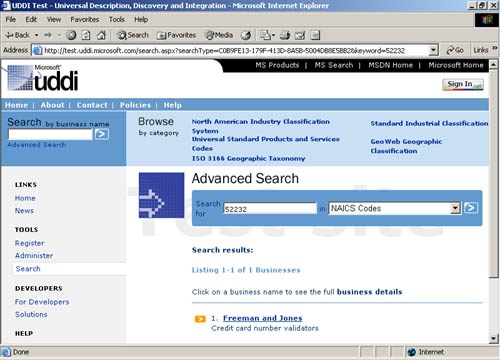
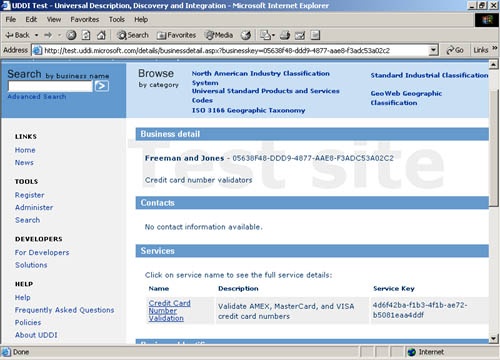
In the list of results, click the entry for your business’s name to display details of your company.
In our case, it is the entry for Freeman and Jones.
In the Services section, click Credit Card Number Validation.
Scroll the page to the right and click Details.
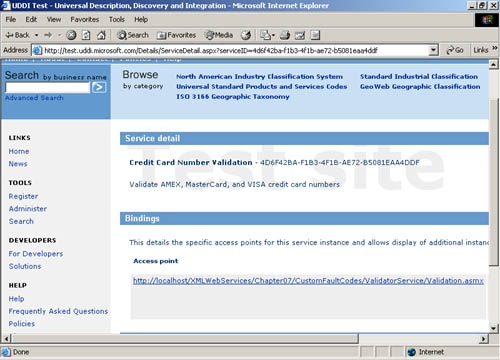
Although the Service Detail page displays the access point for the XML Web service, we are looking for the service description document so that we can generate our client proxy class. Because we know this XML Web service was created with ASP.NET, we could obtain the WSDL document through the access point URL; however, we will go a little farther in order to demonstrate how to get a direct reference to the service description from the tModel information for this service.
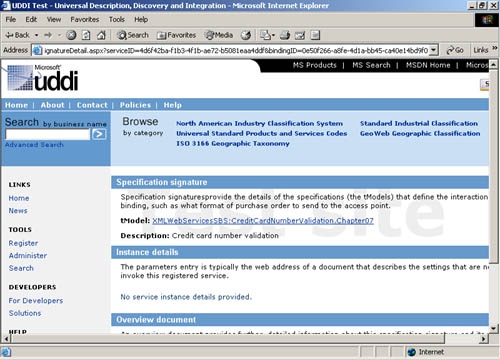
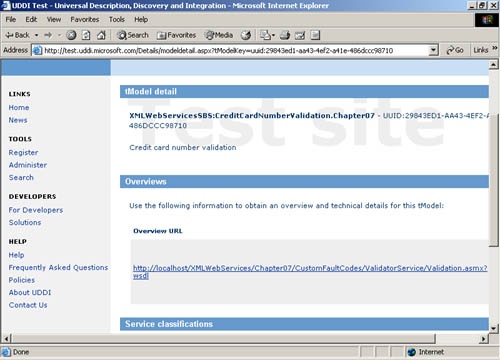
In the Specification Signature section, click the name of your tModel. In our case, this is XMLWebServicesSBS:CreditCardNumberValidation.Chapter07.
The overview URL contains the link to the service description for this XML Web service. You can add a Web reference in Visual Studio .NET that points to this URL to generate your proxy class.
The second technology that facilitates the publishing and discovery of XML Web services is DISCO files. Unlike UDDI, which enjoys the support of hundreds of organizations, DISCO files are a Microsoft-only initiative.
DISCO files are XML documents. They have the extension .disco and can contain two types of information:
URL references to XML Web service description documents (WSDL documents)
URL references to other DISCO files
Visual Studio .NET can process DISCO files through the Add Web Reference feature and retrieve referenced service description documents. As Visual Studio .NET processes a DISCO file, it recursively processes any references it finds to other DISCO files. This means that you can create a DISCO file that gives a developer access to the service descriptions for some or all of your XML Web services through a single file. In many instances, DISCO files will be sufficient to make your XML Web services available to those that need them, avoiding the need to use UDDI.
Because DISCO files are XML documents, you can create them using a text editor; however, creating them manually is time consuming and error prone. The simplest way to create DISCO files to advertise a collection of XML Web services is to create a DISCO file that contains only links to other DISCO files. ASP.NET will generate a DISCO file automatically for an individual XML Web service if you append ?DISCO to the URL of the service’s .asmx file. For example, to get the DISCO file for the ValidatorService project that we developed in Chapter 7, you can use the URL http://localhost/XMLWebServices/Chapter07/CustomFaultCodes/ValidatorService/Validation.asmx?DISCO.
Procedure 9-6. Advertise Multiple XML Web Services Using a DISCO File
Create a file in your text editor. The file must be accessible through your IIS server.
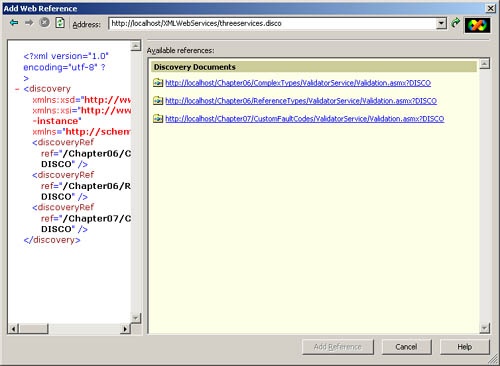
We will create the file C:InetpubwwwrootXMLWebServices threeservices.disco, which is accessible at the URL http://localhost/XMLWebServices/threeservices.disco.
The content of the file is listed below (we have inserted line breaks in the discoveryRef elements to fit them on the page). Each <discoveryRef> element contains a reference to an external DISCO file; the ref attribute specifies the file’s URL. We have added three references to XML Web services that we created in previous chapters, and we rely on ASP.NET to generate the DISCO files for each service by using the ?DISCO argument discussed earlier.
<?xml version="1.0" encoding="utf-8" ?>
<discovery xmlns:xsd="http://www.w3.org/2001/XMLSchema"
    xmlns:xsi="http://www.w3.org/2001/XMLSchema-instance"
    xmlns="http://schemas.xmlsoap.org/disco/">
    <discoveryRef ref="/XMLWebServices/Chapter06/ComplexTypes
/ValidatorService/Validation.asmx?DISCO" />
    <discoveryRef ref="/XMLWebServices/Chapter06/ReferenceTypes
/ValidatorService/Validation.asmx?DISCO" />
    <discoveryRef ref="/XMLWebServices/Chapter07/CustomFaultCodes
/ValidatorService/Validation.asmx?DISCO" />
</discovery>
Start Visual Studio .NET.
Press Ctrl+Shift+N to open the New Project dialog box.
Create a new Windows application using either C# or Visual Basic .NET. We do not want to develop the application; we merely want to demonstrate the Web reference functionality to access the threeservices.disco file that we just created.
Right-click on the References folder in Solution Explorer and select Add Web Reference from the shortcut menu.
Navigate to the following URL of the threeservices.disco file: http://localhost/XMLWebServices/threeservices.disco.
The result will look something like the following screenshot. You can navigate using the links until you find the XML Web service you want to use and then click the Add Reference button to generate the client proxy class. Once you have finished browsing, you can close the Visual Studio .NET project.
ASP.NET also provides a feature known as automatic discovery. Automatic discovery is disabled by default, and on the recommendation of Microsoft, it should not be enabled on production systems. Automatic discovery can be an expensive operation, placing a heavy load on an IIS server and can easily lead you to inadvertently expose the existence of an XML Web service that you did not want advertised publicly.
With automatic discovery enabled, you can create .vsdisco files that give developers easy access to the service description files for the XML Web services on your IIS server. When a developer accesses a .vsdisco file, ASP.NET searches the folder where the .vsdisco file is located, and all that folder’s subfolders, and generates a DISCO file that contains references to service description files for each of the XML Web services that it finds. In simple terms, .vsdisco files are XML documents that contain a list of subfolders that should not be included in the automated search. We give an example of a .vsdisco file shortly, but you should consult the .NET Framework documentation for more details about how to use .vsdisco and .disco files to control the automated discovery process.
Procedure 9-7. Enable Automatic Discovery
Locate the machine.config file. It will be in the config subdirectory of the .NET Framework directory. On Windows 2000 machines, this file is in C:WINNTMicrosoft.NETFrameworkv1.03705CONFIG by default. On Windows XP machines, it is in C:WINDOWSMicrosoft.NETFrameworkv1.0.3705CONFIG. The version number in the path will change based on the version of the .NET Framework that you are running.
Open the machine.config file with a text editor.
Locate the following commented out line.
<!--<add verb="*" path="*.vsdisco" type="System.Web.Services.Discovery.DiscoveryRequestHandler,
System.Web.Services, Version=1.0.3300.0, Culture=neutral,
PublicKeyToken=b03f5f7f11d50a3a" validate="false"/>-->
Remove the comment tokens <!-- and --> so that the line appears as follows, and then save the file. You do not need to restart the IIS server for the changes to take effect.
<add verb="*" path="*.vsdisco" type="System.Web.Services.Discovery.DiscoveryRequestHandler,
System.Web.Services, Version=1.0.3300.0, Culture=neutral,
PublicKeyToken=b03f5f7f11d50a3a" validate="false"/>
Create a file (with the content shown below) named myservices.vsdisco in the C:InetpubwwwrootXMLWebServices folder.
Each <exclude> element identifies a subfolder of the current folder that you do not want included in the automated search; the directories we have excluded in the example are those directories automatically created by IIS. Because we stored the file in the folder C:InetpubwwwrootXMLWebServices, all of our XML Web services are included in the automatic discovery search.
<?xml version="1.0" encoding="utf-8" ?>
<dynamicDiscovery
    xmlns="urn:schemas-dynamicdiscovery:disco.2000-03-17">
    <exclude path="vti_cnf" />
    <exclude path="vti_pvt" />
    <exclude path="vti_log" />
    <exclude path="vti_script" />
    <exclude path="vti_txt" />
</dynamicDiscovery>
Start Visual Studio .NET.
Press Ctrl+Shift+N to open the New Project dialog box.
Create a new Windows application using either C# or Visual Basic .NET. We do not want to develop the application; we merely want to demonstrate the Web reference functionality to access the myservices.vsdisco file that we just created.
Right-click on the References folder in Solution Explorer and select Add Web Reference from the shortcut menu.
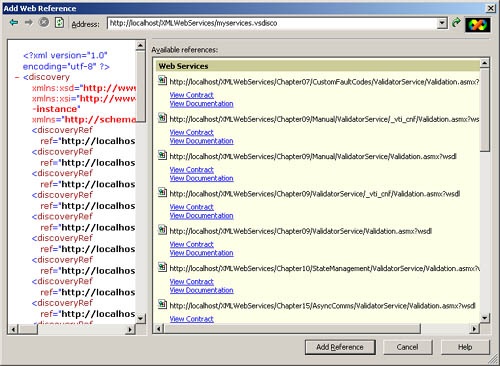
Navigate to the URL of the myservices.vsdisco file that we created earlier: http://localhost/XMLWebServices/myservices.vsdisco.
The result will look something like the following screenshot. The pane at the left contains the XML of the automatically generated DISCO document, and the pane at the right contains links to each of the discovered XML Web services. You can navigate by using the links until you find the XML Web service you want to use and then click the Add Reference button to generate the client proxy class. Once you have finished browsing, you can close the Visual Studio .NET project.
Throughout the book, we have used a single IIS server on which to develop and run our XML Web services. However, when you publish a finished XML Web service for use by others, you will almost certainly need to deploy it to a different IIS server—a production server that has the necessary security, support infrastructure, and processes in place to keep it running properly. This server could be an IIS server in your organization or a machine provided by one of the growing number of companies that offer XML Web service hosting.
The method you use to deploy your XML Web service will vary depending on the location of the IIS server you are deploying to, who manages the server, and the access permissions you have for the server. In some organizations, after you have developed the XML Web service, you might not be involved in its deployment; that function might be the responsibility of another person or group. Whatever the logistics of deployment, you should understand the options available. In this section we will discuss the following deployment alternatives:
Manual deployment
The Copy Project feature in Visual Studio .NET.
A Web Setup project
Ease of application deployment is one of the most powerful features of the Microsoft .NET platform. Applications created in the .NET Framework are architected to be self-contained and support deployment using a simple file copy. Whether this approach becomes reality depends on the programmer and the external dependencies that he or she introduces on items such as shared assemblies, DLLs, operating system resources like the Windows registry, and so on. However, all of the XML Web services that we’ve developed so far have no external dependencies, so we can deploy them by manually copying the project files onto an IIS server.
In Chapter 2, we listed the files created by the Visual Studio .NET Web Service project template, but we also mentioned that not all of these files are required by every project. In fact, the XML Web services we’ve developed in earlier chapters require only the following three files in order to run.
Validation.asmx
/bin/ValidatorService.dll
/bin/CreditCardValidator.dll
To deploy the ValidatorService XML Web service that we developed in Chapter 7, you must first create a folder on your IIS server in which to put the XML Web service files. You must configure this folder as an IIS application root. Application root folders are a mechanism used by IIS to ensure that Web applications cannot adversely affect each other at run time if problems occur. (Consult the IIS documentation for further details.) After you create and configure the IIS folder, copy the XML Web service files to the IIS folder, and the service is ready to run.
Note
In later chapters, we discuss the Global.asax and Web.config files. If your project uses these files, you should copy them along with Validation.asmx.
Procedure 9-8. Create the IIS Application Directory
Create a new folder, named C:InetpubwwwrootXMLWebServicesChapter09ManualValidatorService, in which to store the XML Web service files.
This folder needs to be accessible through the IIS server. You should create it where your other Web files are stored.
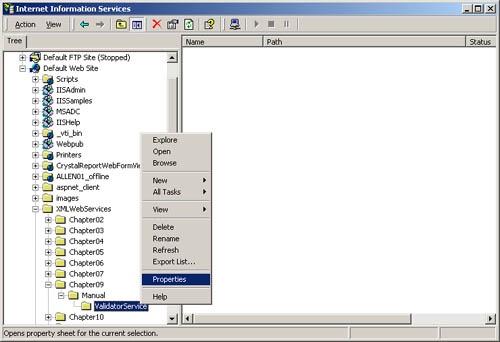
Start Internet Services Manager by clicking the Windows Start button and selecting Programs, Administrative Tools, Internet Information Services.
Expand the Web tree so that you can see the ValidatorService folder that we just created.
Right-click on the ValidatorService folder and choose Properties from the shortcut menu.
Click the Create button in the ValidatorService properties window, and then click OK.
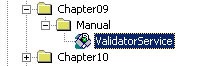
This step makes the ValidatorService directory an application root and replaces the folder icon with an application icon.
Close Internet Services Manager.
Procedure 9-9. Deploy the XML Web Service
Be sure that you have built the ValidatorService XML Web service project from Chapter 7.
Using Windows Explorer, copy the Validation.asmx file from the project directory to the ValidatorService directory we created in the previous section. Also copy ValidatorService.dll and CreditCardValidator.dll from the /bin subdirectory to a /bin subdirectory of the new ValidatorService directory.
For this example, copy the files from the directory C:InetpubwwwrootXMLWebServicesChapter07CustomFaultCodesValidatorService to our new directory at C:Inetpubwwwroot XMLWebServicesChapter09ManualValidatorService.
Test the newly deployed XML Web service by opening the service help page using the URL http://localhost/XMLWebServices/Chapter09/Manual/ValidatorService/Validation.asmx
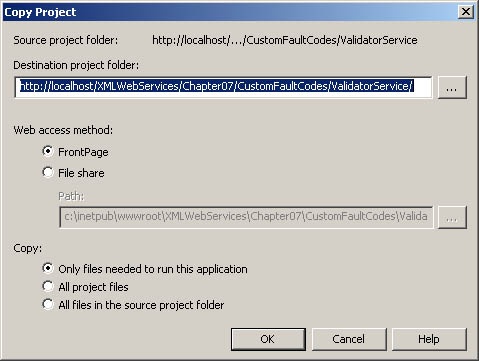
We introduced the Copy Project feature of Visual Studio .NET in Chapter 5, and have used it repeatedly in subsequent chapters. So far, we have used Copy Project to copy an XML Web service project for use as the base from which to do further development. You can also use Copy Project to deploy XML Web services to a production setting. You deploy only those files required to run the XML Web service and don’t include the source code files.
If you look at the Copy Project dialog box, shown below, you will see an option named Only Files Needed To Run This Application. If you select this option instead of All Project Files, which we’ve used previously, Visual Studio .NET copies only those files required to run the service. Be aware that once you have copied a project in this way, you cannot open the copy in Visual Studio .NET to perform further development.
The Copy Project feature of Visual Studio .NET gives you a simple and accessible means of deploying your XML Web services. However, it is not sufficient for most XML Web service deployments because it requires the user to have Visual Studio .NET and the technical knowledge of how to use it.
Graphical installation programs are by far the most common mechanism for installing applications onto the Windows platform. They allow people without extensive development or technical expertise to carry out complex installation tasks. In the more recent versions of Windows, the Microsoft Installer (MSI) provides an integrated graphical software installation and management system. Visual Studio .NET includes tools that enable you to quickly and easily build MSI packages to deploy your XML Web Services onto IIS servers.
The Visual Studio .NET Web Setup project provides a graphical interface that lets you configure every detail of the installation package and process, including the following key elements:
The XML Web service files to install
Windows registry settings to create
The screens to display to the user and the questions to ask during the installation process; this series of screens include splash screens, license agreements, and installation locations
Conditions that must be met before the installation can proceed; for example, a particular file or application being present on the target machine
The IIS configuration settings for the installation directory
The structure and content of the deployment package, including whether the MSI executables are included as part of the package
In the following sections, we will detail the creation of an MSI deployment package for the ValidatorService XML Web service that we developed in Chapter 7. We cannot demonstrate every feature of the Web Setup project because it provides too many options for us to cover here. Fortunately, most of the default settings are suitable for our demonstration, and we will focus on the features you will use most frequently to deploy your XML Web services.
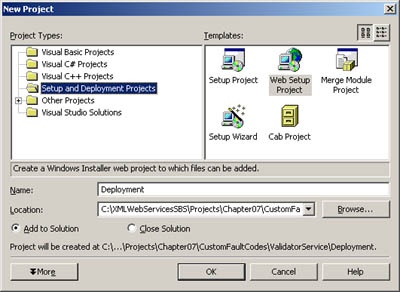
Procedure 9-10. Create a Web Setup Project
Start Visual Studio .NET.
Select Open Solution from the File menu and open the solution file for the XML Web service you want to package and deploy. We will use ValidatorService from Chapter 7.
Open the New Project dialog box by pressing Ctrl+Shift+N, or select New and then Project from the File menu.
In the New Project dialog box, select Setup and Deployment Projects in the Project Types pane and Web Setup Project in the Templates pane.
Type in the name Deployment for the project, and enter the location where you want to store the project.
The XML Web service project files are hosted on an IIS server, but the Visual Studio .NET solution files for the project are stored on your local disk. The deployment project files must also be stored on your local disk. We will specify the directory where the XML Web service solution files are located as the location for the Deployment project. The path to this location is C:XMLWebServicesProjectsChapter07CustomFaultCodesValidatorService.
Select the Add To Solution option so that the Deployment project becomes part of the currently open solution.
Click OK.
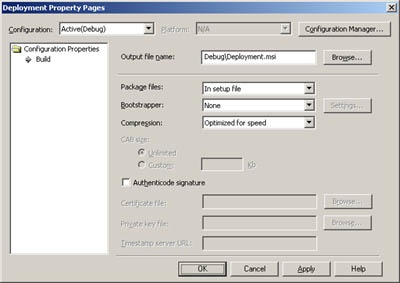
Procedure 9-11. Configure the Deployment Project Properties
In Solution Explorer, right-click the Deployment project folder and select Properties from the shortcut menu.
Using the options available on the Deployment Property Pages dialog box, configure how Visual Studio .NET will package your XML Web service files in the deployment application.
The Package Files setting controls how the project files are packaged for delivery. You have the option of As Loose Uncompressed Files, In Cabinet Files, or In Setup File. We will leave the default setting, In Setup File, meaning that our XML Web service project files will be compressed and contained within the MSI package that we use for deployment.
The Bootstrapper setting controls whether the MSI installer executables are included as part of the deployment package. If you know that the machine you want to deploy your service on has MSI installed, you can set this option to the value None. The MSI executables are a couple of megabytes, so for a small application such as this, their inclusion is a significant overhead. Go ahead and set the value to None.
Click OK to close the Deployment Property Pages dialog box.
Select the Deployment project entry in Solution Explorer, and then press F4 to display the Properties sheet for the Deployment project.
Some of the properties contain information displayed to the user during installation; others provide support information available after the application is installed. Still other properties control aspects of the installation process, such as whether the IIS server must be restarted after the installation and how the installer handles previous and newer versions of the service that are already installed.
Set the Deployment properties as specified in the following table
Property
Value
Description
Author
Adam and Allen
Appears in the support information available for the installed XML Web service available through the Add/Remove Programs utility in control panel.
Description
Credit card validation XML Web service
Manufacturer
Microsoft
ProductName
Validator Service
The name of the application used throughout the installation process.
Procedure 9-12. Configure the Deployment Directory
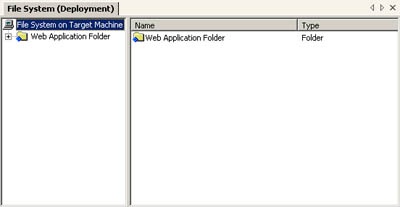
In Solution Explorer, right-click on the Deployment project entry and then select View followed by File System from the shortcut menu. The File System Editor window appears. The File System Editor allows you to specify the contents and configuration of the directories that the installation process creates on the target machine.
In the tree view on the left side of the File System Editor, right-click the Web Application Folder and then select Properties Window from the shortcut menu.
The Web Application Folder represents the target installation directory on the IIS server. The Properties Window allows you to specify the IIS properties for this directory. Don’t worry if you are not familiar with the configuration of IIS; most of the default settings are suitable for this example.
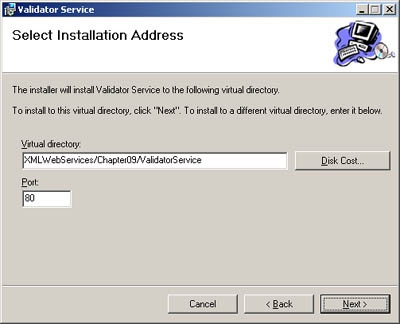
On the Web Applications Property sheet, change the VirtualDirectory property to the value XMLWebServices/Chapter09/MSI/ValidatorService.
The VirtualDirectory property specifies the name of the default IIS installation directory. During the installation process, the user can override this value.
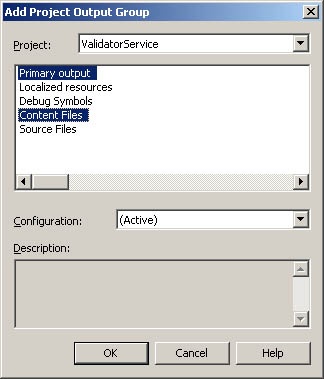
Right-click the Web Application Folder again and select Add followed by Project Output from the shortcut menu.
The Add Project Output Group dialog box allows you to select the components of projects from the current solution that we want to include in our deployment package. Notice that the Project field contains the value ValidatorService. If our solution contained other projects, we would be able to select the project we wanted to work with. We’ll choose the components of the ValidatorService to deploy by selecting them from the list below the Project name field.
Select both the Primary Output and Content Files entries from the list and click OK. Press and hold the Ctrl key and click on each list entry to select more than one at a time.
For this example, we want to deploy only the files necessary to run the XML Web service. Selecting Content Files includes the files Global.asax, Validation.asmx, and Web.config in our deployment package. Primary Output means the ValidatorService.dll assembly from the /bin directory is included, as is the CreditCardValidator.dll, which is identified as a dependency.
Selecting Debug Symbols would have included the debug symbols generated by Visual Studio .NET for the XML Web service. Including Source Files would copy all of the project source files, allowing further development of the deployed XML Web service.
Procedure 9-13. Edit the Installation Process
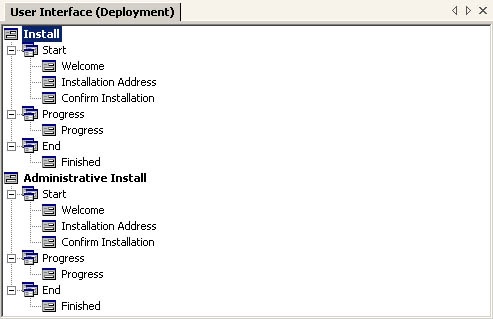
Right-click the Deployment project entry in Solution Explorer and select View followed by User Interface from the shortcut menu.
The User Interface Editor allows you to configure the sequence and content of screens that users see when they run your deployment application.
Under the Install entry, right-click on the Start folder and select Add Dialog from the shortcut menu.
We are going to add a license agreement that users must agree to before they can install our XML Web service.
Select License Agreement from the Add Dialog dialog box and click OK.
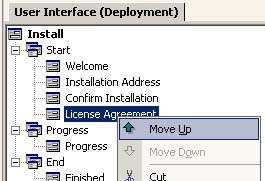
The User Interface Editor now contains an entry named License Agreement, but it is at the bottom of the list. We want to display the License Agreement to the user immediately after the Welcome screen.
Right-click on the License Agreement entry and select Move Up from the shortcut menu. Repeat this step so that the License Agreement entry is immediately below the Welcome screen entry.
Right-click on the Confirm Installation entry and select Delete from the shortcut menu.
If this entry wasn’t deleted, users would see an additional screen during installation asking them to confirm their intent to install the program. For our demonstration, this is not important.

Procedure 9-14. Create the License Agreement
Create a file that contains the following text and store the file in the C: emp directory with the name License.rtf.
The file must be stored in Rich Text Format (RTF) or the installation process will not display it. Many text editors and word processors, including WordPad (supplied free with Windows) and Microsoft Word, can create RTF files, but Notepad cannot.
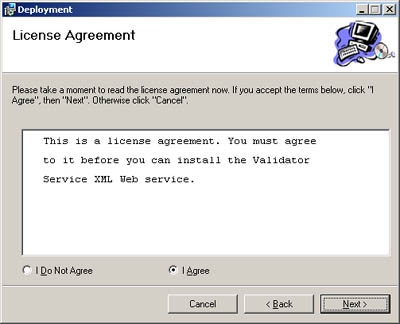
This is a license agreement. You must agree
to it before you can install the Validator
Service XML Web service.
In the File System Editor, right-click on the Web Application Folder and select Add followed by File from the shortcut menu.
In the Add Files dialog box, browse to the C: emp directory, where the License.rtf file is located, select it, and click Open.
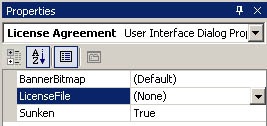
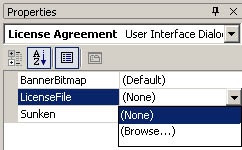
In the User Interface Editor, right-click the License Agreement entry and select Properties Window from the shortcut menu. You will see the properties page for the License Agreement screen.
Select the LicenseFile property, click the down arrow, and then select Browse.
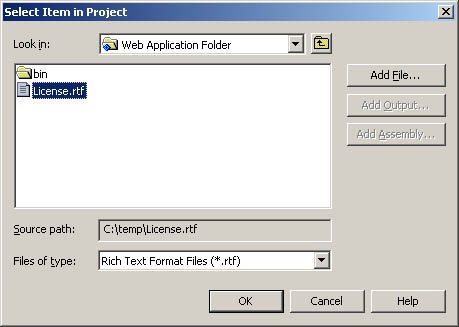
In the Select Item In The Project dialog box, select Web Application Folder from the Look In drop-down list.
Select the License.rtf file, and then click OK.
Press Ctrl+Shift+S to save the solution.
Finally, right-click the Deployment project entry in Solution Explorer and select Build from the shortcut menu.
Note
Selecting Build Solution from the Build menu will not build the Deployment project. You must use the Visual Studio .NET Configuration Manager to include the Deployment project in the general build process, a discussion of which is beyond the scope of this book.
Procedure 9-15. Run the Deployment Project
Right-click the Deployment project in Solution Explorer and select Install from the shortcut menu.
This launches the MSI installation package and is equivalent to running the installation through Windows Explorer or from the command line.
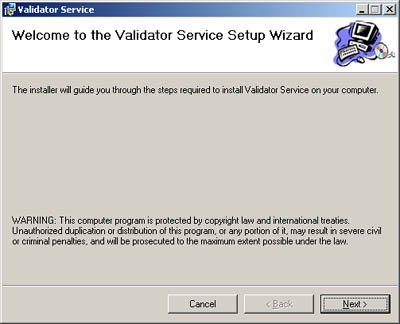
Click Next on the Validator Service Setup Wizard welcome screen.
Select I Agree on the License Agreement screen, and then click Next.
Enter a path for the IIS directory in which to install the Validator Service and click Next. Notice the default value is the one we configured earlier.
Because we removed the Confirm Installation screen, the installation package will start installing the Validator Service. Once installation is finished, you will see the Installation Complete screen.
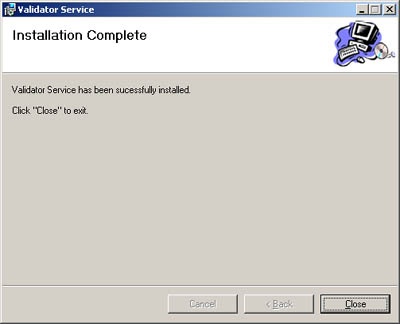
The Validator Service is now fully installed and can be consumed by client applications using the techniques we have described in previous chapters. As a quick test, you can use Internet Explorer to view the service help page, although you will not be able to invoke the Web methods because they use complex types. If you used the default directory we configured, the URL for the Validator Service is http://localhost/XMLWebServices/Chapter09/MSI/ValidatorService/Validation.asmx.
To | Do This |
|---|---|
Publish an XML Web service to a UDDI registry | Register yourself with a UDDI registry to get publisher and administration rights. Use the administration pages of the UDDI registry to publish details about your tModels, your business, and the XML Web services you provide. |
Discover XML Web services using a UDDI registry | Use the interactive search capabilities of a UDDI registry to locate a business that provides the services you require. Drill into the service information to locate a reference to the service description document for the service. |
Create a DISCO file for an XML Web service | Rely on the ?DISCO argument supported by ASP.NET that automatically generates a DISCO file for your XML Web service. |
Advertise multiple XML Web services using a DISCO file | Create a DISCO file that contains a <discoveryRef> element for each XML Web service you want to advertise; the value of the ref attribute contains the URL of the DISCO file for the individual XML Web service. |
Use a DISCO file to locate the service description document for an XML Web service | Use the Add Web Reference feature of Visual Studio .NET to open the URL of the DISCO file. Follow the hyperlinks to navigate to the service description file of the XML Web service you want to use. |
Enable automatic discovery | Edit the .NET machine.config file and uncomment the element that controls automatic discovery. |
Deploy an XML Web service manually | Create a folder on your IIS server and make it an application root. Copy the XML Web service files to the new folder. |
Create a graphical installation program for an XML Web service. | Open the Visual Studio .NET solution for the XML Web service project you want to deploy. Create a new project within the solution using the Web Setup Project template. Configure the deployment project using the various editors and property pages. |