
14 Collaborate with colleagues
In this chapter
Practice files
For this chapter, use the practice files from the Excel2019SBSCh14 folder. For practice file download instructions, see the introduction.
Many individuals provide input into business decisions. You and your colleagues can enhance the Excel 2019 workbook data you share by adding comments that offer insight into the information the data represents. If the workbook in which those projections and comments are stored is available on a network or an intranet, you can allow more than one user to access the workbook at a time by turning on workbook sharing, and you can track changes.
If you prefer to limit the number of colleagues who can view and edit your workbooks, you can add password protection to a workbook, worksheet, cell range, or even an individual cell. You can also hide formulas used to calculate values. If you work in an environment in which you exchange files frequently, you can use a digital signature to help verify that your workbooks and any macros they contain are from a trusted source. Finally, if you want to display information on a website, you can do so by saving a workbook as a webpage.
This chapter guides you through procedures related to sharing a workbook, saving workbooks for electronic distribution and for the web, managing comments in workbooks, tracking and managing colleagues’ changes, protecting workbooks and worksheets, finalizing and authenticating workbooks, importing and exporting XML data, and working with OneDrive and Excel Online.
Save workbooks for electronic distribution
Even though most businesses use Excel, there might be times when you want to distribute a copy of your data in a file other than an Excel workbook. You can create a read-only copy of a workbook for electronic distribution by saving it as a PDF or XML Paper Specification (XPS) file.
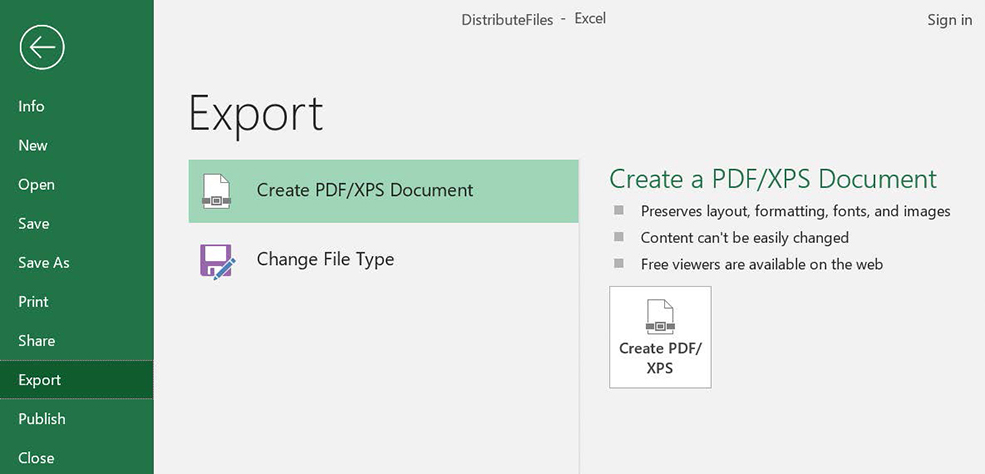
Publishing your workbook as a PDF or XPS document gives your colleagues the information they need to make decisions in an easily readable format that also preserves the integrity of your data.
![]() Tip
Tip
You can also save a workbook as a PDF or XPS document by clicking Save As in the Backstage view. Then, in the Save As dialog box, in the Save As Type list, select either PDF or XPS to create a file of the type you want.
To save a workbook as a PDF or XPS file
Display the Backstage view, and then click Export.
Click Create PDF/XPS Document.
In the Publish as PDF or XPS dialog box, in the File name box, enter a name for the file.
Click the Save as type arrow and select the target file type.
Use the navigation tools to display the folder in which you want to save the file.
Set the output options you want to apply to the file, choosing either to publish it at standard size, which is appropriate for publishing online or printing, or to minimize file size for online-only publishing.
Click Publish.
Manage comments
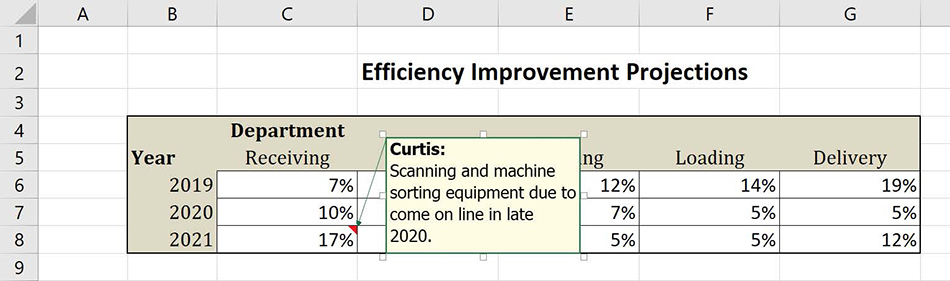
Excel makes it easy for you and your colleagues to insert comments in workbook cells, adding insights that go beyond the cell data. When you add a comment to a cell, a flag appears in the cell’s upper-right corner. When you point to a cell that contains a comment, the comment appears in a box next to the cell, along with the user name of the user who was logged on to the computer on which the comment was created.
![]() Important
Important
The name attributed to a comment might not be the same as the name of the person who actually created it. Access controls, such as those that require users to enter account names and passwords when they access a computer, can help you track who made a comment or change.
Normally, Excel displays a cell’s comment only when you point to the cell. You can change that behavior to display an individual comment or to show all comments within a worksheet. If you want to edit a comment, you can do so. You can also delete a comment from your workbook.

![]() Important
Important
When someone other than the original user edits a comment, that person’s input is marked with the new user’s name and is added to the original comment.
You can control whether a cell displays just the comment indicator or the indicator and the comment itself. Also, if you’ve just begun to review a worksheet, you can display all of the comments on the sheet or move through them one at a time.
To add a comment to a cell
Click the cell where you want to add a comment.
On the Review tab of the ribbon, in the Comments group, click New Comment.
Or
Right-click the cell, and then click Insert Comment.
In the comment box that appears, enter a comment.
Click away from the cell to close the comment box.
To display a comment
Point to the cell that contains the comment.
To show or hide a comment
Click the cell that contains the comment.
In the Comments group, click Show/Hide Comment.
Or
Right-click the cell, and then click Show/Hide Comments.
To edit a comment
Click the cell that contains the comment.
In the Comments group, click Edit Comment.
Or
Right-click the cell, and then click Edit Comment.
In the comment box that appears, edit the text of the comment.
Click away from the cell to close the comment box.
To delete a comment
Click the cell that contains the comment.
In the Comments group, click Delete.
Or
Right-click the cell, and then click Delete Comment.
To change how Excel indicates that a cell contains a comment
Display the Backstage view, and then click Options.
In the Excel Options dialog box, click Advanced.
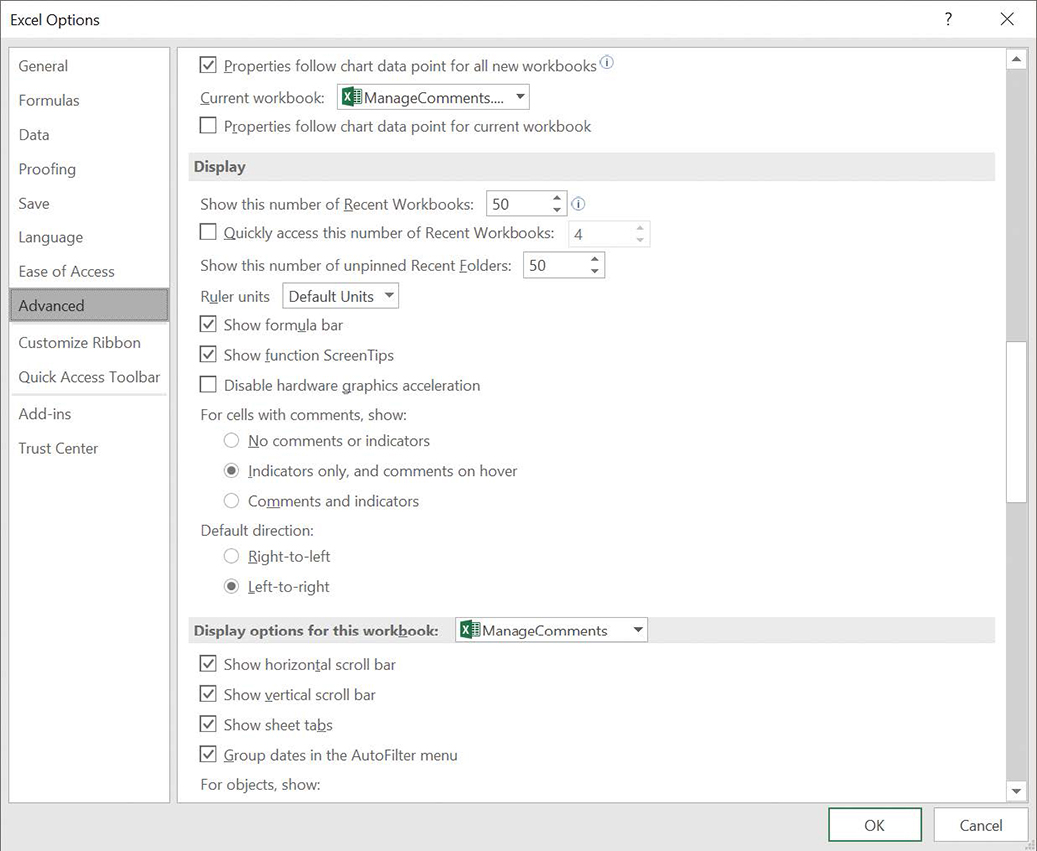
Manage how Excel displays comments. In the Display section of the Advanced page, select one of the three available comment display options:
No comments or indicators
Indicators only, and comments on hover
Comments and indicators
To display or hide all comments
On the Review tab of the ribbon, in the Comments group, click Show All Comments.
To move through worksheet comments
In the Comments group, do either of the following:
Click Previous to display the previous comment.
Click Next to display the next comment.
Protect workbooks and worksheets
You can use Excel to share your workbooks on the web, on a corporate intranet, or by copying files for other users—for example, to take on business trips. An important part of sharing files, however, is ensuring that only those users you want to have access to the files can open or modify them. It doesn’t help a company to have unauthorized personnel—even those with good intentions—accessing critical workbooks.
You can limit access to your workbooks or elements within workbooks by setting passwords. When you set a password for an Excel workbook, any users who want to access the workbook must enter its password first. If users don’t know the password, they cannot open the workbook. If you decide you no longer want to require users to enter a password to open the workbook, you can remove it.
![]() Tip
Tip
The best passwords are long strings of random characters, but random characters are hard to remember. One reasonable method of creating hard-to-guess passwords is to string two or more words and a number together. For example, the password genuinestarcalibration302 is 24 characters long, combines letters and numbers, and is easy to remember. If you must create a shorter password to meet a system’s constraints, avoid dictionary words and include uppercase letters, lowercase letters, numbers, and any special symbols such as ! or # if they are allowed.
If you want to allow anyone to open a workbook but want to prevent unauthorized users from editing a worksheet within that workbook, you can protect the individual worksheet. You can also set a password that a user must type in before protection can be turned off and choose which elements of the worksheet a user can change while protection is turned on. You do this from the Protect Sheet dialog box.
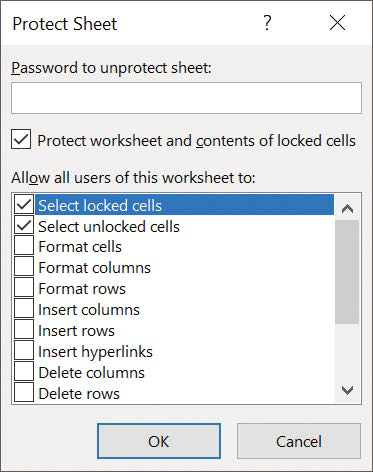
The check box at the top of the list of allowed actions in the Protect Sheet dialog box mentions locked cells. A locked cell is a cell that can’t be changed when worksheet protection is turned on.
You can lock or unlock a cell by changing the cell’s formatting. You do this in the Format Cells dialog box. When worksheet protection is turned on, selecting the Locked check box in the dialog box prevents unauthorized users from changing the contents or formatting of the locked cell, whereas selecting the Hidden check box hides the formulas in the cell.
You might want to hide the formula in a cell if you draw sensitive data, such as customer contact information, from another workbook and don’t want casual users to see the name of the workbook in a formula. This is also possible using the Format Cells dialog box.
Finally, you can password-protect a cell range. For example, you might want to let users enter values in most worksheet cells but also want to protect the cells with formulas that perform calculations based on those values.

![]() Tip
Tip
Remember that a range of cells can mean just one cell!
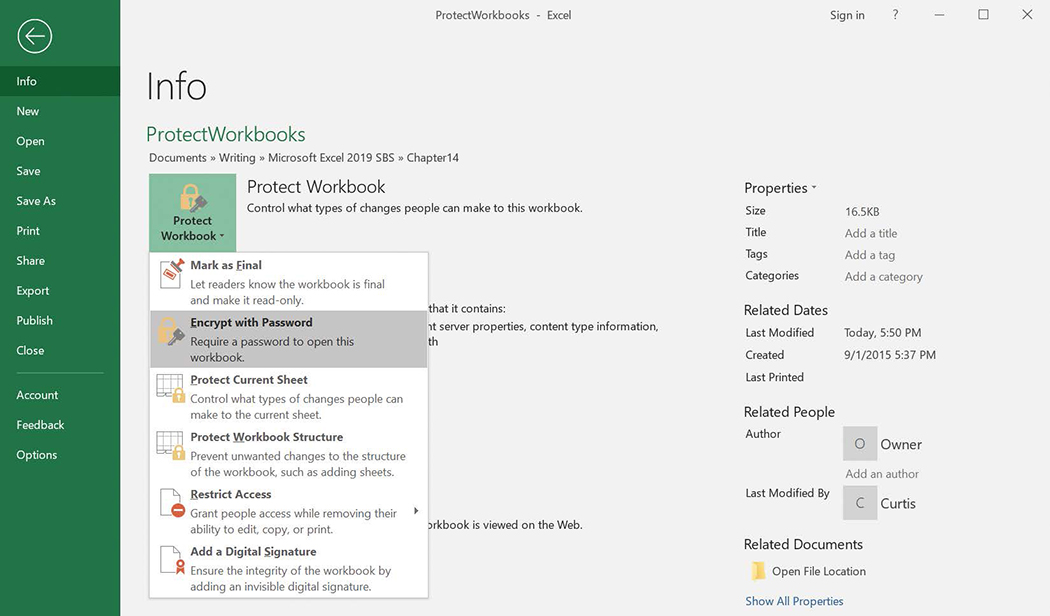
To require a password to open a workbook
Display the Backstage view, and then click Info.
Click Protect Workbook, and then click Encrypt with Password.
In the Encrypt Document dialog box, enter a password for the file.
Click OK.
In the Confirm Password dialog box, re-enter the password, and then click OK.
To remove a password from a workbook
Open the password-protected workbook.
On the Info page of the Backstage view, click Protect Workbook, and then click Encrypt with Password.
In the Encrypt Document dialog box, delete the existing password.
Click OK.
To require a password to change workbook structure
On the Review tab of the ribbon, in the Protect group, click Protect Workbook.
In the Protect Structure and Windows dialog box, enter a password for the workbook.
Click OK.
In the Confirm Password dialog box, re-enter the password.
Click OK.
To remove a password that protects a workbook’s structure
Click Protect Workbook.
In the Unprotect Workbook dialog box, enter the workbook’s password.
Click OK.
To protect a worksheet by setting a password
In the Protect group, click Protect Sheet.
In the Protect Sheet dialog box, enter a password in the Password to unprotect sheet box.
Select the check boxes next to the actions you want to allow users to perform.
Click OK.
In the Confirm Password dialog box, re-enter the password.
Click OK.
To remove a worksheet password
In the Protect group, click Unprotect Sheet.
In the Unprotect Sheet dialog box, enter the worksheet’s password.
Click OK.
To lock a cell to prevent editing
Right-click the cell you want to lock, and then click Format Cells.
In the Format Cells dialog box, click the Protection tab.
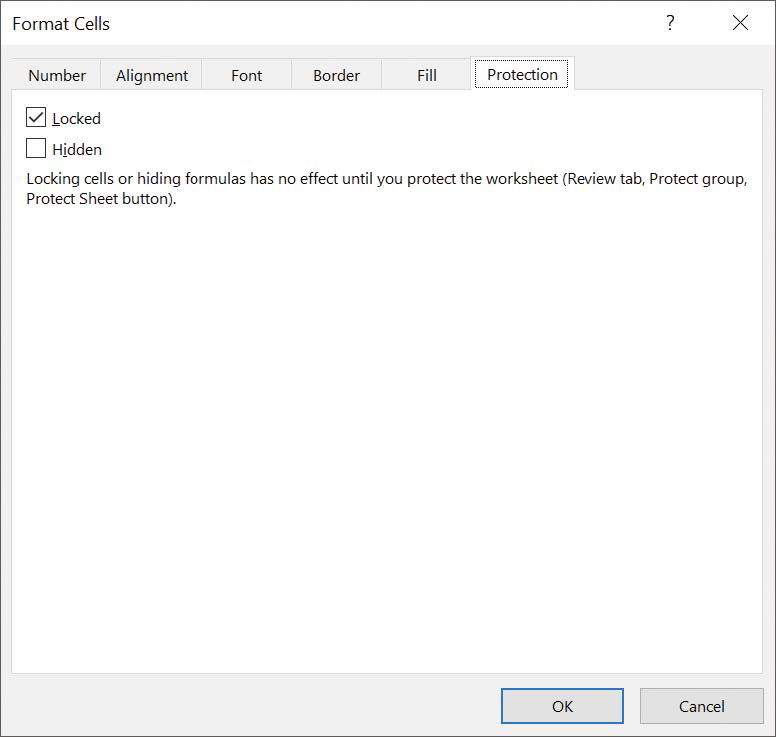
Prevent cell editing and hide formulas when you protect a sheet. Select the Locked check box.
Click OK.
To hide cell formulas
Right-click the cell you want to lock, and then click Format Cells.
Click the Protection tab.
Select the Hidden check box.
Click OK.
 Important
You must protect your worksheet for the Locked and Hidden settings to take effect.
To restrict editing of a cell range by using a password
In the Protect group, click Allow Edit Ranges.
In the Allow Users to Edit Ranges dialog box, click New.
In the New Range dialog box, in the Title box, enter a title for the range.
Click in the Refers to cells box and select the cell range you want to affect.
In the Range password box, enter the password for the range.
Click OK.
In the Confirm Password dialog box, re-enter the password.
Click OK.
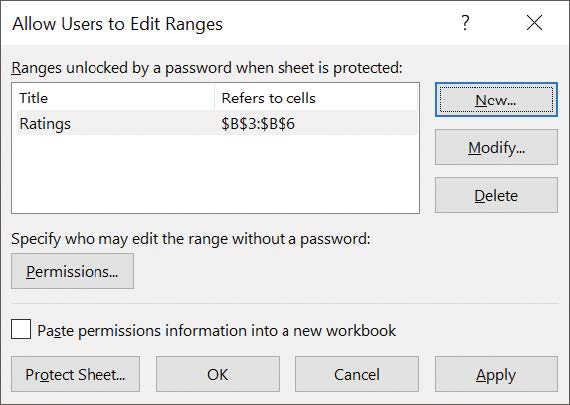
Define cell ranges users are allowed to edit. Repeat steps 2 through 8 to protect another cell range.
Click OK.
ImportantYou must protect your worksheet for the range password settings to take effect.
To remove a cell range password
Click Allow Edit Ranges.
In the Allow Users to Edit Ranges dialog box, click the range you want to edit.
Click Delete.
Click OK.
Finalize workbooks
Distributing a workbook to other users carries many risks—including the possibility that the workbook might contain information you don’t want to share with users outside your organization. With Excel, you can inspect a workbook for information you might not want to distribute to other people and create a read-only final version that prevents other people from making changes to the workbook content.
By using the Document Inspector, you can quickly locate comments and annotations, document properties and personal information, custom XML data, headers and footers, hidden rows and columns, hidden worksheets, and invisible content. You can then easily remove any hidden or personal information that the Document Inspector finds.
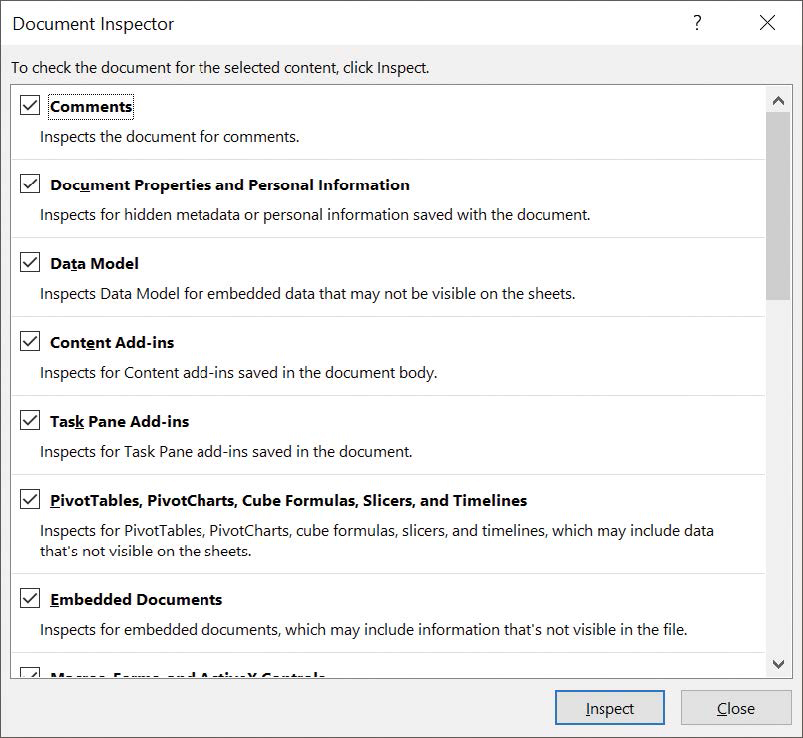
The Document Inspector checks your document for every category of information selected in the list. When the Document Inspector displays its results, you can select which pieces of personally identifiable information you want to remove.
When you’re done making changes to a workbook, you can mark it as final. Marking a workbook as final sets the status property to Final and disables data entry and editing commands. If you later decide that you want to make more changes, you can do so, save your changes, and mark the worksheet final again.
To remove personally identifiable information from a workbook
Press Ctrl+S to save the workbook.
Display the Backstage view and, if necessary, click Info.
Click Check for Issues, and then click Inspect Document.
 Tip
TipIf you didn’t save your workbook earlier, Excel will prompt you to do so now.
Select the check box next to each category of information for which you want the Document Inspector to look.
Click Inspect.
In the results list, click the Remove All button next to any category of information you want to remove.
If necessary, click Reinspect, and then click Inspect to ensure that no personal information remains in the file.
Click Close.
To mark a workbook as final
Press Ctrl+S to save the workbook.
On the Info page of the Backstage view, click Protect Workbook, and then click Mark as Final.
In the confirmation dialog box that appears, click OK.
In the informational dialog box that appears, click OK.
TipTo edit a file that has been marked as final, open the file. Then, on the message bar, click Edit Anyway.
Authenticate workbooks
When exchanging files over a network, especially the Internet, you need to be sure of the origin of the files you’re working with to avoid viruses or falsified data. One way an organization can achieve this is to authenticate every workbook by using a digital signature. A digital signature is a character string created by combining a user’s unique digital certificate with the contents of the workbook, which apps such as Excel can recognize and use to verify the identity of the user who signed the file. A good analogy for a digital signature is a wax seal, which was used for thousands of years to verify the integrity and origin of a document.
The technical details of and procedure for managing digital certificates are beyond the scope of this book, but your network administrator should be able to create or obtain a digital certificate for you. You can also directly purchase a digital signature from a third party; these signatures can usually be renewed annually for a small fee. For the purposes of this book, you can use the selfcert.exe Microsoft Office accessory app to generate a certificate with which to perform this topic’s practice task at the end of this chapter. This type of certificate is useful for certifying a document as part of a demonstration, but other users might not accept it as a valid certificate.
![]() Tip
Tip
When you click Add a Digital Signature in the Protect Workbook list on the Info page of the Backstage view, Excel checks your computer for usable digital certificates. If it can’t find one, Excel displays a dialog box indicating that you can buy a digital signature from a third-party provider. You won’t be able to add a digital signature to a file until you acquire a digital certificate, either by generating a test certificate using the included selfcert.exe app or by purchasing one through a third-party vendor.
If you have several certificates from which to choose, and the certificate you want doesn’t appear when you attempt to sign your file, you can change the chosen certificate and start the signing process again.
![]() Important
Important
Editing a workbook that has a digital signature invalidates the signature. To verify the file, you must sign it again.
To display available third-party vendors of digital certificates
Display the Backstage view and, if necessary, click Info.
Click Protect Workbook.
Click Add a Digital Signature.
TipIf your workbook is not saved in a file format that supports digital signatures, such as .xlsx, Excel will prompt you to save it accordingly.
In the Get a Digital ID dialog box, click Yes.
Or
Go to https://support.office.com in your web browser.
Enter Digital ID in the search box.
Click Get a digital ID.
To create a test certificate by using selfcert.exe
In File Explorer, open the C:Program Files (x86)Microsoft Office ootOffice16 folder and double-click selfcert.exe.
In the Create Digital Signature dialog box, enter a name for your certificate.
Click OK.
In the confirmation dialog box that appears, click OK.
To authenticate a workbook by using a digital signature
Press Ctrl+S to save the workbook.
On the Info page of the Backstage view, click Protect Workbook, and then click Add a Digital Signature.
In the Sign dialog box, click the Commitment Type arrow and select the role you played in creating and approving the document.
In the Purpose for signing this document box, enter a reason for signing the file.

Authenticate a workbook by signing it with a digital certificate. If necessary, click Change and use the tools in the Windows Security dialog box to select a digital certificate.
Click Sign.
Save workbooks for the web
You can use Excel to save your workbooks as web documents so that you and your colleagues can view workbooks over the Internet or on an organization’s intranet. For a document to be viewable on the web, it must be saved as an HTML file. HTML files, which end with either the .htm or the .html extension, include tags that tell a web browser such as Microsoft Edge how to display the contents of the file.
For example, you might want to set the data labels in a workbook apart from the rest of the data by having the labels displayed with bold text. The coding in an HTML file that indicates text to be displayed as bold text is <b>...</b>, where the ellipsis between the tags is replaced by the text to be displayed. So, the following HTML fragment would be displayed as Excel in a webpage:
<b>Excel</b>
![]() Tip
Tip
If the only sheet in your workbook that contains data is the one displayed when you save the workbook as a webpage, Excel saves only that worksheet as a webpage.
After you save an Excel workbook as a set of HTML documents, you can open it in your web browser. It’s also possible to save a workbook as a web file that retains a link to the original workbook. That way, whenever someone updates the workbook, Excel updates the web files to reflect the new content.
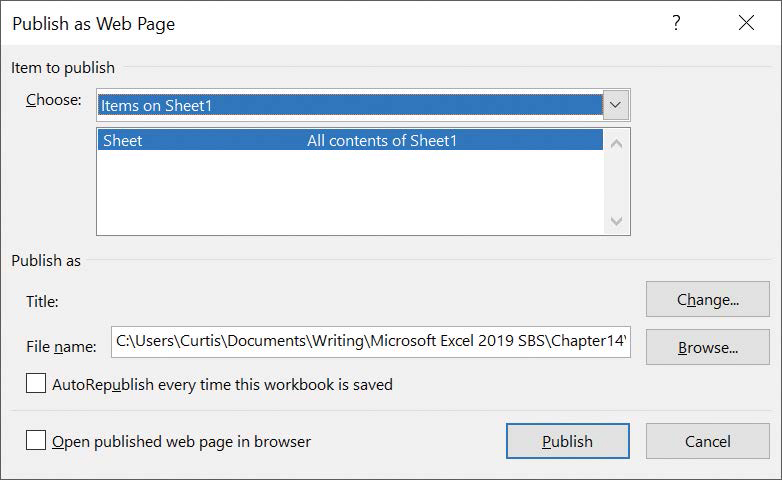
You can select which elements of your workbook to publish to the web in the Publish as Web Page dialog box. Clicking the Choose arrow displays a list of publishable items, including options to publish the entire workbook, items on specific sheets, or a range of cells. You can also specify which text appears on the webpage’s title bar.
To save a workbook as a web file
Display the Backstage view, and then click Save As.
Click Browse.
In the Save As dialog box, click the Save as type arrow, and then click Web Page.
If necessary, in the File name box, edit the name of the file.
Click Save.
If necessary, in the dialog box that appears, click Yes to acknowledge that some features might be lost when you save the workbook as a webpage.
To publish a workbook to the web
Display the Backstage view, and then click Save As.
Click Browse.
In the Save As dialog box, click the Save as type arrow, and then click Web Page.
If necessary, in the File name box, edit the name of the file.
Select Entire Workbook to publish the entire workbook.
Or
Select Selection: Sheet to publish the active worksheet.
Click Publish.
In the Publish as Web Page dialog box, click the item you want to publish—for example, the entire workbook.
Optionally, select the AutoRepublish every time this workbook is saved check box.
Click Publish.
Import and export XML data
HTML lets you determine how a document will be displayed in a web browser—for example, by telling Internet Explorer to display certain text in bold type or to start a new paragraph. However, HTML doesn’t tell you anything about the meaning of data in a document. Internet Explorer might “know” it should display a set of data in a table, but it wouldn’t “know” that the data represented an Excel worksheet.
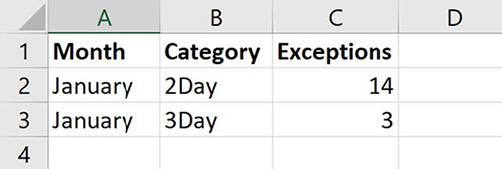
You can add metadata, or data about data, to web documents by using Extensible Markup Language (XML). Although a full discussion of XML is beyond the scope of this book, the following bit of XML code shows how you might identify two sets of three values (Month, Category, and Exceptions) by using XML:
<?xml version="1.0" encoding="UTF-8" standalone="yes"?> <ns2:exceptions xmlns:ns2=
"http://www.w3schools.com"> <exception> <Month>January</Month> <Category>2Day</
Category> <Exceptions>14</Exceptions> </exception> <exception> <Month>January</Month>
<Category>3Day</Category> <Exceptions>3</Exceptions> </exception> </ns2:exceptions>
XML is meant to be a universal language, allowing data to move freely from one app to another. Excel might display those two sets of exceptions data as rows of data in an Excel worksheet.
Other apps could display or process the XML file’s contents in other ways, but you wouldn’t have to change the underlying XML file. All the work is done by the other apps’ programmers.
To work with XML data in Excel, you must use the controls on the Developer ribbon tab, which you can display by using the ribbon customization commands available in the Excel Options dialog box.

You can bring XML data into Excel either by opening a workbook saved in a compatible XML format or by importing the data from a text file. XML data is organized according to a specified schema or structure. If the schema file isn’t available, you can have Excel look at the structure of the imported data and create one for you. If you export a worksheet to an XML file, you can have Excel create a schema for that operation, too.
![]() Tip
Tip
If you have imported an XML file but believe that the original XML data file has changed, click the Refresh Data button in the XML group on the Developer tab to update your worksheet.
To save a workbook as an XML file
Display the Backstage view, and then click Save As.
Click Browse.
In the Save As dialog box, click the Save as type arrow, and then click one of the following file types:
XML Data
XML Spreadsheet 2003
Strict Open XML Spreadsheet
If necessary, in the File name box, edit the name of the file.
Click Save.
To import an XML data file into a workbook
If necessary, use the tools in the Excel Options dialog box to add the Developer tab to the ribbon.
 See Also
For more information on displaying an existing ribbon tab, see “Customize the ribbon” in Chapter 1.
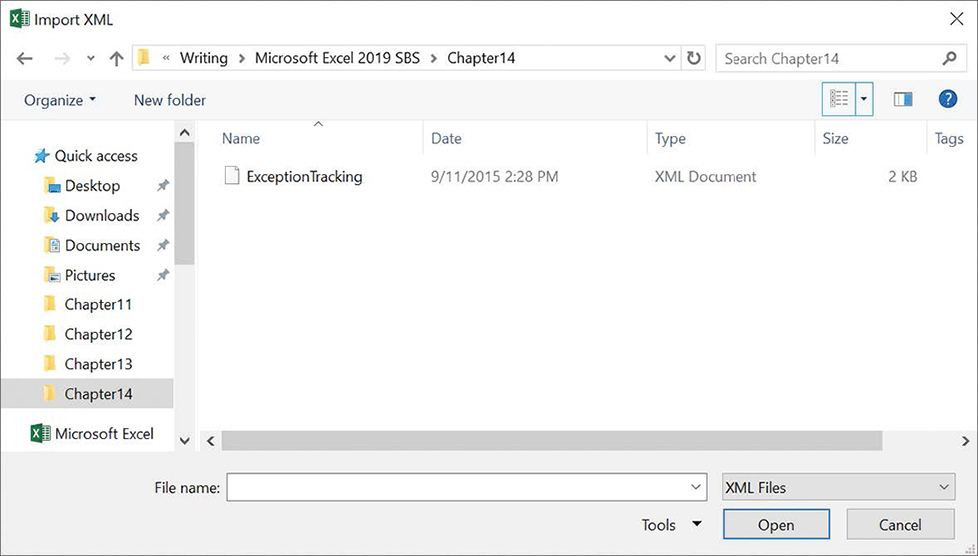
On the Developer tab of the ribbon, in the XML group, click Import.
In the Import XML dialog box, navigate to the folder that contains the file you want to import, click the file, and then click Open.
If necessary, in the dialog box that indicates that the XML source file does not refer to a schema, click OK to have Excel create a schema for you.
In the Import Data dialog box, do either of the following:
Select XML table in existing worksheet and click the cell where you want the XML table to start.
Select XML table in new worksheet.
Click OK.
To export a cell range as an XML data file
Click a cell in the range you want to export.
In the XML group, click Export.
In the Export XML dialog box, navigate to the folder where you want to export the XML data.
In the File name box, enter a name for the file.
Click Export.
Work with OneDrive and Excel Online
As information workers become increasingly mobile, they need to be able to access their data from anywhere and have a single version of a file to which they can turn. Excel 2019 is integrated with OneDrive, a Microsoft cloud service that stores your files remotely and provides you with access to them over the Internet.
![]() Important
Important
You can find OneDrive online at www.onedrive.com. You will need a Microsoft account to use OneDrive.
When you sign in to OneDrive, you’ll see the main directory of your OneDrive account, which you can navigate to reach your files.
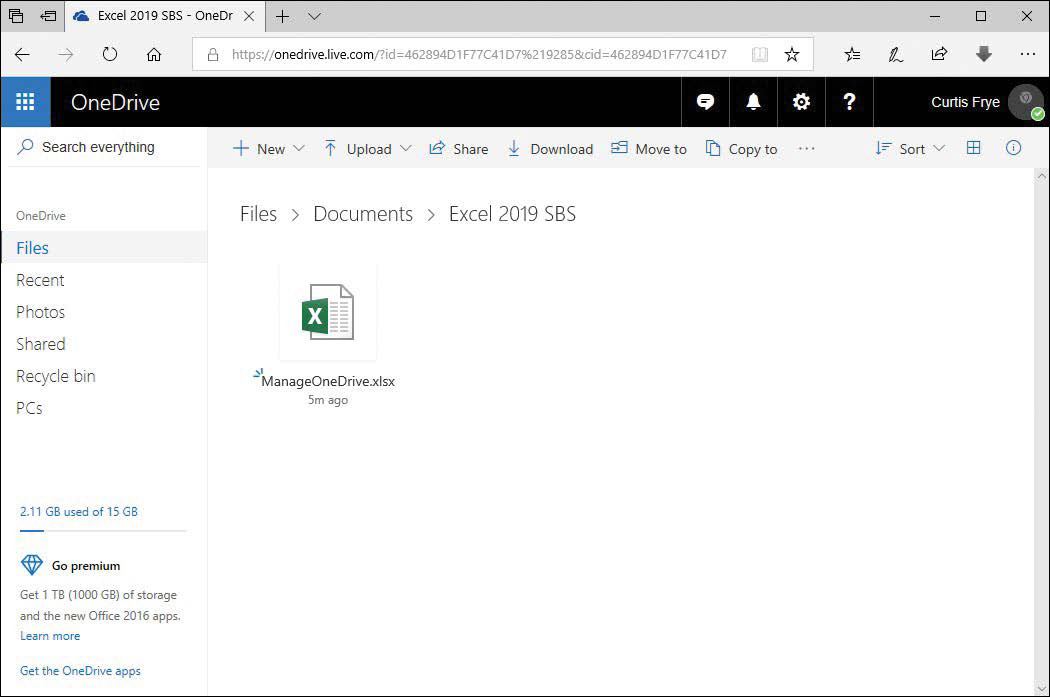
You can manage files by using the built-in interface, performing familiar tasks such as opening, creating, uploading, downloading, and copying files. You can also navigate the file structure, moving between folders and creating or deleting them as needed.
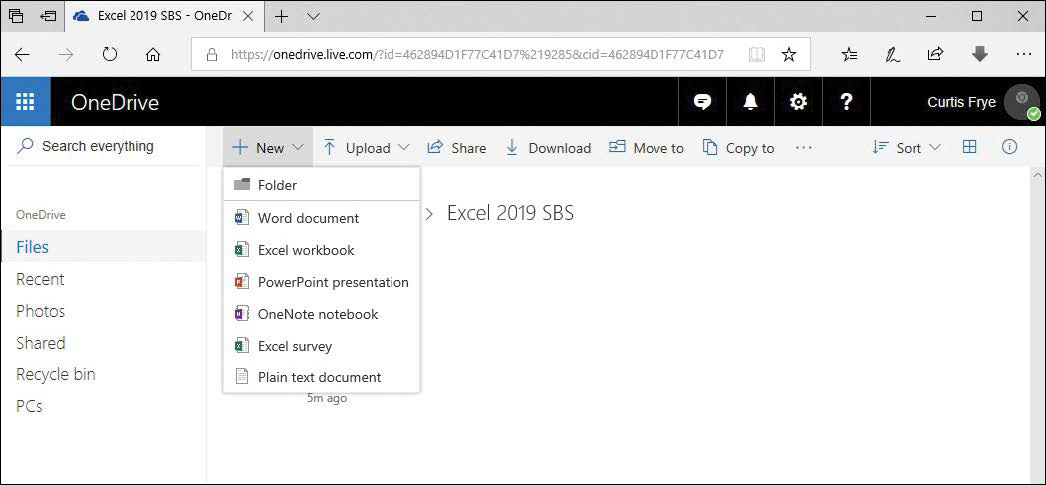
Clicking the New button also displays links to create a folder, Word document, Excel workbook, PowerPoint presentation, OneNote notebook, Excel survey, or plain text document. When you create a new Excel workbook from this menu, Excel Online starts and you can begin adding data to the new workbook.
![]() Tip
Tip
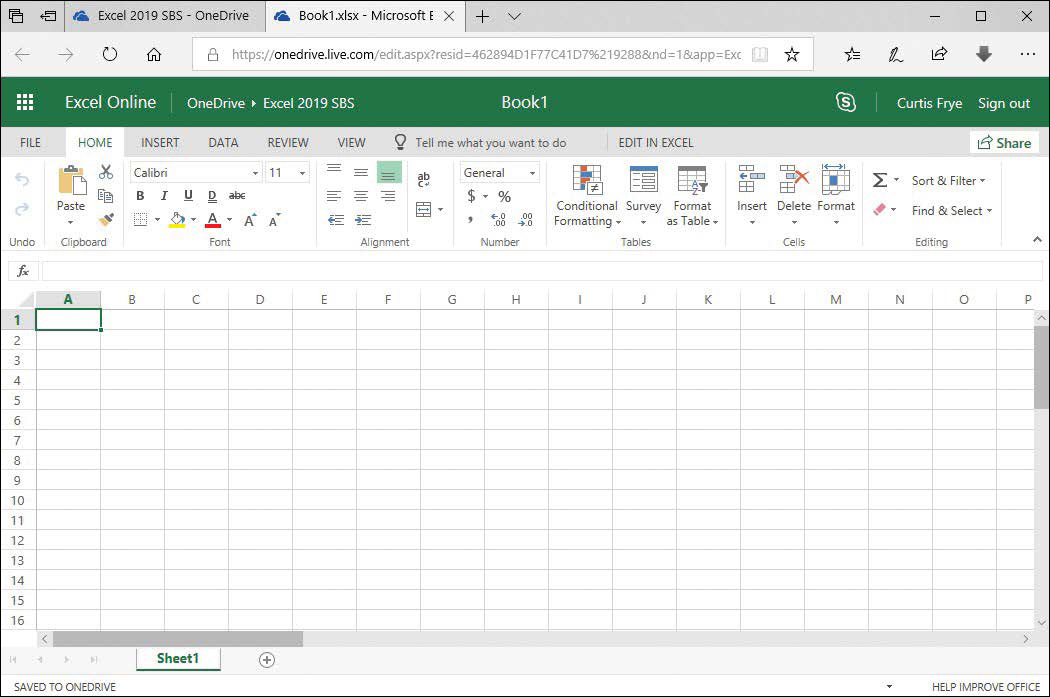
Excel Online saves your workbook every time you edit a cell, so there’s no Save button on the Quick Access Toolbar.
Excel Online provides a rich set of capabilities you can use to create new workbooks and edit workbooks you created in the desktop edition of the app. If you find you need some features that aren’t available in Excel Online, you can always open the file in the Excel 2019 desktop app.
![]() Important
Important
You might see a series of dialog boxes asking you to sign back in to your Microsoft account and to provide other information. These queries are normal and expected.
If you want to collaborate with colleagues who also have OneDrive accounts, you can share your Excel workbook with them online. You can choose how to share your workbook, either by allowing your colleagues to edit the file or just view it, or you can require them to access the file from a Microsoft account or just over the web.
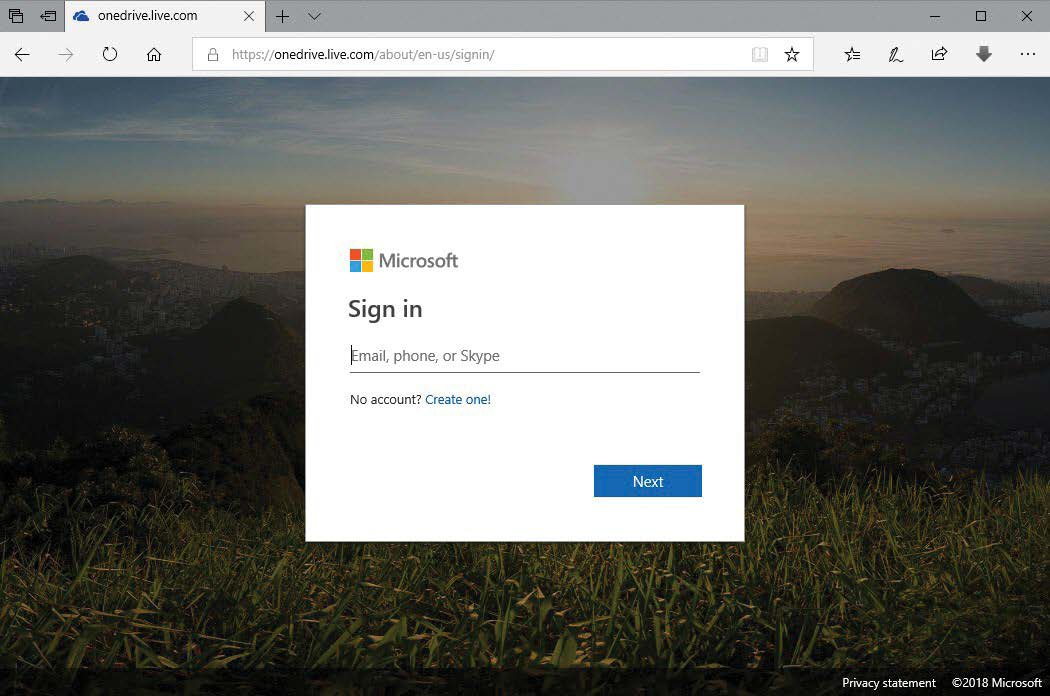
To sign in to OneDrive
In your web browser, go to www.onedrive.com.
Click Sign in.
Enter your account name (usually an email address) and press Enter.
Enter your password and press Enter.
To upload a file or folder to OneDrive
In OneDrive, click the Upload button on the toolbar.
In the Open dialog box, select the file or folder you want to upload.
Click Open.
To download a file from OneDrive
Point to the icon representing the file you want to download and select the round check box that appears in the upper-right corner of the icon.
On the menu bar, click Download to download the file to your computer’s Downloads folder.
To create a new Excel workbook in OneDrive
Open your OneDrive account in your web browser.
Click New, and then click Excel workbook.
To open an Excel workbook stored in OneDrive in the desktop edition of Excel
Open your OneDrive account in your web browser.
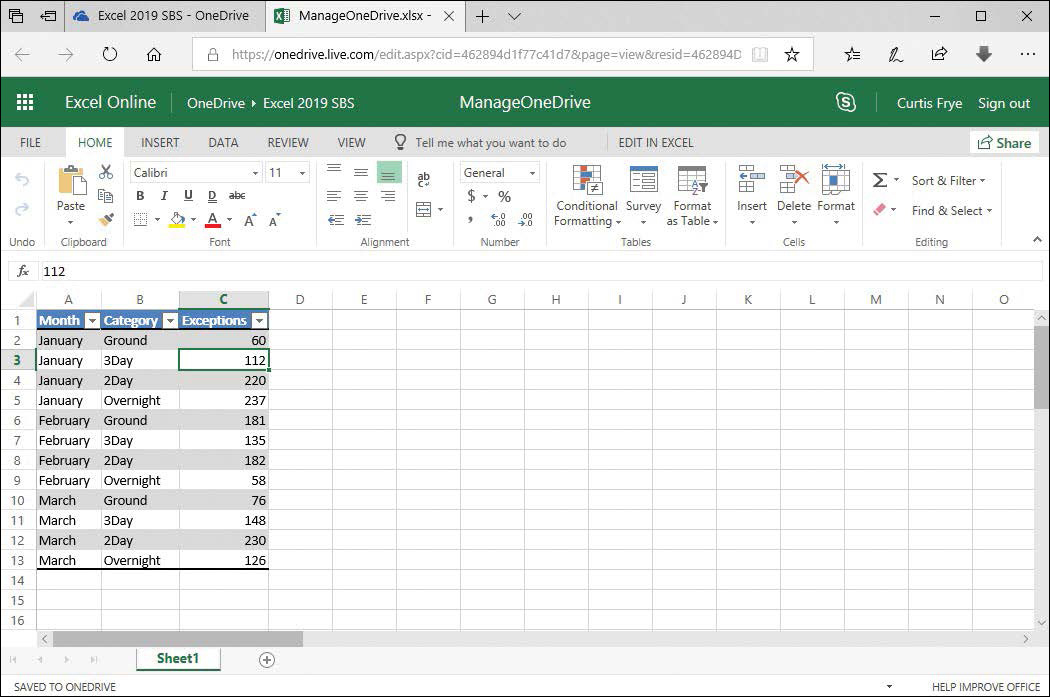
Click the file you want to work with to open it in Excel Online.
TipDepending on your computer’s settings, the order and appearance of dialog boxes and messages might differ slightly from what is described here.
Click Open in Excel.
In the External Protocol Request dialog box, click Launch Application.
In the alert dialog box that appears, click Yes.
If necessary, in the Sign in dialog box, enter your email address and password and click Sign in.
When you’re done working with the file in Excel, close Excel and any remaining dialog boxes from Excel Online.
To collaborate with colleagues by using Excel Online
Open a workbook in Excel Online.
Share a workbook by using Excel Online. In the upper-right corner of the screen, click Share.
In the Share dialog box, in the To box, enter the email addresses of individuals with whom you want to share the workbook.
To add multiple addresses, enter the first address and press the Tab key.
If you want to include a note, enter it into the Add a quick note box.
To change sharing characteristics, click Recipients can edit and then do any of the following:
Click Recipients can only view.
Click the Recipients don’t need a Microsoft account box, and then click Recipients need to sign in with a Microsoft account.
Click Share.
In the confirmation dialog box that appears, click Close.
Skills review
In this chapter, you learned how to:
Save workbooks for electronic distribution
Manage comments
Protect workbooks and worksheets
Finalize workbooks
Authenticate workbooks
Save workbooks for the web
Import and export XML data
Work with OneDrive and Excel Online
Practice tasks

The practice files for these tasks are located in the Excel2019SBSCh14 folder. You can save the results of the tasks in the same folder.
Save workbooks for electronic distribution
Open the DistributeFiles workbook in Excel, and then perform the following tasks:
Display the Sheet1 worksheet of the workbook and export it as a PDF file.
Export the entire workbook as an XPS file.
Manage comments
Open the ManageComments workbook in Excel, and then perform the following tasks:
Add comments to four or five cells.
Edit one of the comments to invite a colleague to provide input for that value.
Move through the comments, going forward and backward through the list.
Change the workbook so it displays all comments.
Delete a comment.
Add protection to workbooks and worksheets
Open the ProtectWorkbooks workbook in Excel, and then perform the following tasks:
By using the controls on the Info page of the Backstage view, encrypt the workbook with a password.
On the Performance worksheet, click cell B8 and format the cell so its contents are locked and hidden.
By using the controls on the Review tab, protect the active worksheet with a password after clearing the Select locked cells and Select unlocked cells check boxes in the dialog box.
On the Weights worksheet, select cells A3:B6 and define a protected range named AllWeights.
Protect the Weights worksheet by requiring users to enter a password to edit it.
Finalize workbooks
Open the FinalizeWorkbooks workbook in Excel, and then perform the following tasks:
Inspect the workbook by using the Document Inspector.
Remove any personally identifiable information from the file.
Use the tools on the Info page of the Backstage view to mark the file as final.
Close the workbook.
Reopen the workbook and click the Edit Anyway button on the message bar to work with the file.
Save any changes and close the workbook.
Authenticate workbooks
Open the AuthenticateWorkbooks workbook in Excel, and then perform the following tasks:
Acquire or create a digital certificate.
Sign the workbook and give the reason for signing it as Testing procedure for later use in business.
Save workbooks for the web
Open the SaveForWeb workbook in Excel, and then perform the following tasks:
Display the Sheet1 worksheet in the workbook, and then save that worksheet as a web file named ShipmentSummaryWeb.
Close the web file and, if necessary, reopen the SaveForWeb workbook.
Display Sheet2 of the workbook, and then publish the PivotTable on Sheet2 to the web.
Set the workbook to autorepublish the web file every time the original workbook changes.
Select the Open published web page in browser check box, and then publish the file.
Import and export XML data
Open the ImportXMLData workbook in Excel, and then perform the following tasks:
Import data from the ExceptionTracking.xml file in the Excel2019SBSCh14 folder.
Export the data you just imported to a new file named ExportXML.xml.
Save your workbook in one of the XML-based formats available in the Save As dialog box.
Work with OneDrive and Excel Online
Open the ManageOneDrive workbook in Excel, and then perform the following tasks:
If necessary, create a new OneDrive account.
Sign in to a OneDrive account.
Upload the ManageOneDrive workbook to your OneDrive account.
Open the ManageOneDrive file in Excel Online.
Open the file in the desktop edition of Excel.
Add a row of data showing April exceptions in the Ground category totaling 45 incidents.
Save your work, and then close your files.