
10
Create and manage slides
In this chapter
Most newly created PowerPoint presentations contain only a title slide, to which you add more slides. You can create slides based on slide templates designed to hold specific types of content, or you can copy existing slides from other presentations.
You can change the appearance of a presentation or individual slides by applying a different theme or theme variant or by changing one or more slide backgrounds.
When the presentation you’re developing includes a lot of slides, it can be useful to organize them into sections. Sections are not visible to the audience, but they make it easier to work with slide content in logical segments. A logical presentation and an overall consistent look, punctuated by variations that add weight exactly where it’s needed, can enhance the likelihood that your intended audience will receive the message you want to convey.
This chapter guides you through procedures related to adding, copying, and importing slides; importing slide content; hiding and deleting slides; applying themes; changing slide backgrounds; dividing presentations into sections; and rearranging slides and sections.
![]() Tip
Tip
The content in this chapter is about slides rather than slide content. Chapter 11, “Insert and manage simple graphics” and Chapter 12, “Add sound and movement to slides” are about working with various types of slide content.
Add and remove slides
The appearance and structure of slides is defined by the slide layouts associated with the design template. Slide layouts define the elements on specific types of slides, such as:
Slide backgrounds and incorporated graphics.
Text box locations, sizes, and formats.
Default paragraph and character formats for each text box location.
Standard headers or footers.
![]() Tip
Tip
Text boxes can contain static content that can’t be changed by the presentation author (for example, a company logo), or they can serve as placeholders that define the default formatting of content entered within the text box.
A template could have only one slide layout, but most have unique slide layouts for slides that display the presentation title, section titles, various combinations of slide titles and content, and a blank slide that contains only the background. Each slide layout is named; the name suggests the primary application of the slide layout, but you aren’t limited to that suggestion; you can enter any type of content in any slide layout and modify the layout of any slide. The slide layouts available in a presentation are displayed on the New Slide menu.
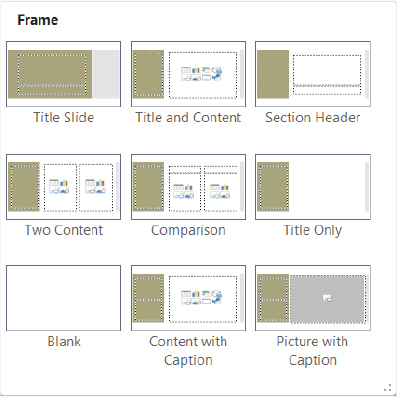
The New Slide menu displaying thumbnails of each available slide layout
You can modify the built-in slide layouts, create your own slide layouts, or create entirely new sets of slide layouts called slide masters, and you can reset slides to match their slide layouts or apply different slide layouts to existing slides.
Insert new slides
When you create a new slide, PowerPoint inserts it after the currently active slide. In a new presentation based on a standard PowerPoint template, a slide you add after the title slide has the Title And Content layout, and a slide added after a slide other than the title slide has the layout of the preceding slide.
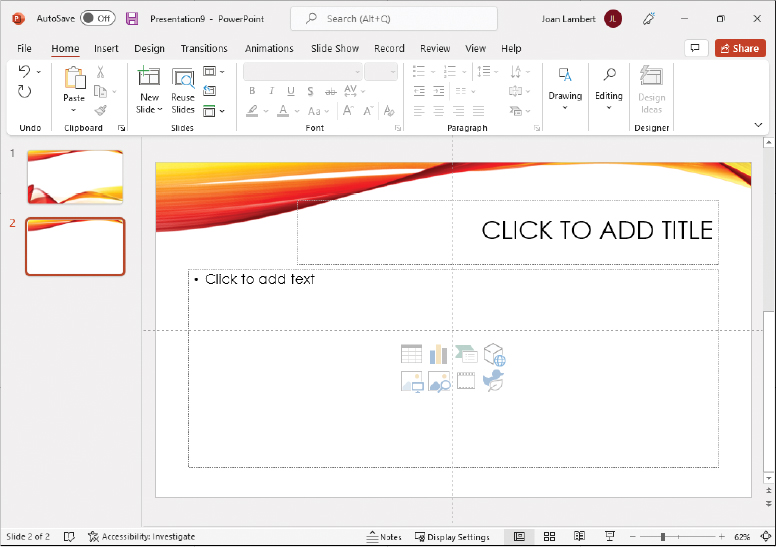
The Title And Content layout accommodates a title and either text or graphic content—a table, chart, diagram, picture, clip art image, or media clip
If you want to add a slide that has a different layout, you can select the layout when you insert the slide, or you can change the slide layout at any time after you create the slide.
To add a slide based on the default slide layout
Select the slide after which you want to add the new slide.
Do either of the following:
On the Home tab, in the Slides group, select the New Slide button (not its arrow).
Press Ctrl+M.
To add a slide based on any slide layout
Select the slide after which you want to add the new slide.
On the Home tab, in the Slides group, select the New Slide arrow to display the New Slide gallery and menu.
In the gallery, select a slide layout thumbnail to add a slide based on that slide layout.
Copy and import slides and content
You can reuse slides from one presentation in another, in one of two ways: you can copy the slides from the original presentation to the new presentation, or you can use the Reuse Slides tool, which displays the content of an original presentation and allows you to choose the slides you want to insert in the new presentation.
Within a presentation, you can duplicate an existing slide to reuse it as the basis for a new slide. You can then customize the duplicated slide instead of having to create it from scratch.
If you frequently include a certain type of slide in your presentations, such as a slide that introduces you to the audience, you don’t have to re-create the slide for each presentation. You can easily reuse a slide from one presentation in a different presentation. (You can use the same techniques to reuse a slide from someone else’s presentation to standardize the appearance or structure of slide content with other members of your organization.) Depending on the technique you use, the reused slide might automatically take on the destination theme.
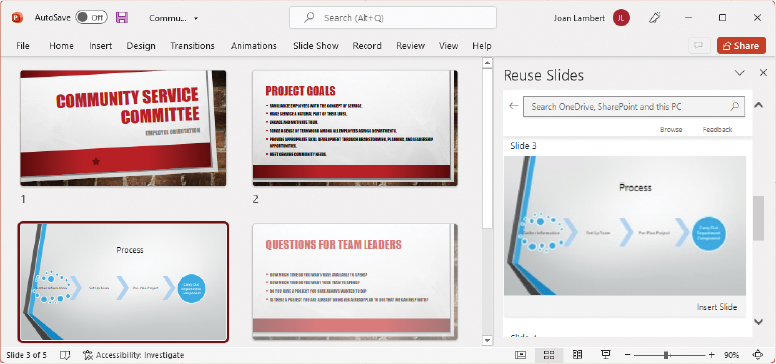
Reuse slides from existing presentations
If the content of your presentation exists in a document, you can configure that content in outline format and then import the outline into PowerPoint. For the import process to work smoothly, format as headings the document content that you want to import to the presentation. PowerPoint converts some styles into slide headings, converts some styles into bullet points, and ignores other styles.
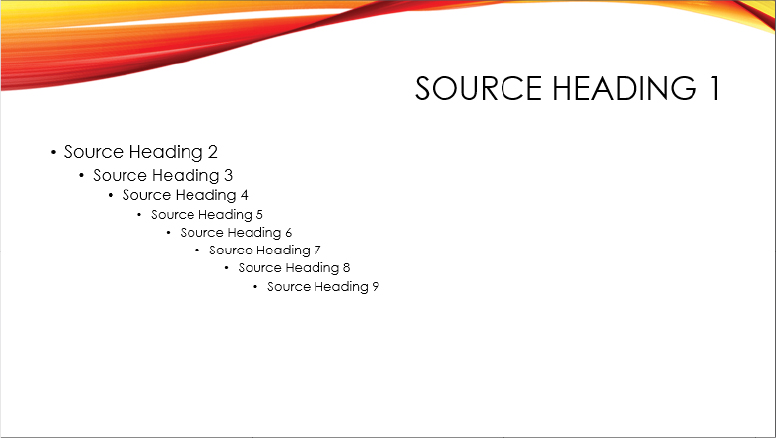
A slide created from an imported outline, showing document headings translated into PowerPoint content
The following table illustrates how PowerPoint converts Word document styles to PowerPoint slide elements.
Word document style | PowerPoint presentation style |
|---|---|
Title, Subtitle, Heading 1, any bulleted list level, or any numbered list level | Slide title |
Heading 2 | First-level bulleted list item |
Heading 3 | Second-level bulleted list item |
Heading 4 | Third-level bulleted list item |
Heading 5 | Fourth-level bulleted list item |
Heading 6 | Fifth-level bulleted list item |
Heading 7 | Sixth-level bulleted list item |
Heading 8 | Seventh-level bulleted list item |
Heading 9 | Eighth-level bulleted list item |
To select a single slide
In Normal view, select the slide in the Thumbnails pane.
In Outline view, select the slide header in the Outline pane.
In Slide Sorter view, select the slide in the Slide pane.
To select multiple slides
In Normal view, Outline view, or Slide Sorter view, click the first slide you want to select.
Do either of the following:
To select a contiguous series of slides, press and hold the Shift key and then click the last slide you want to select.
To select noncontiguous slides, press and hold the Ctrl key and then click each additional slide you want to select.
To insert a copy of a slide immediately following the original slide
Display the presentation in Normal view.
In the Thumbnails pane, right-click or long-press (tap and hold) the slide that you want to copy, and then select Duplicate Slide.
To insert a copy of one or more slides anywhere in a presentation
Display the source and destination presentations in Normal view or Slide Sorter view.
Do either of the following:
Select the thumbnail or thumbnails of the slide or slides you want to copy, and then press Ctrl+C or, on the Home tab, in the Clipboard group, select the Copy button.
Right-click the thumbnail of the slide that you want to copy, and then select Copy.
Do either of the following:
Select the thumbnail that you want to insert the slide copy or copies after, or select the empty space after the thumbnail. Then press Ctrl+V or, on the Home tab, in the Clipboard group, select Paste.
Right-click after an existing thumbnail where you want to insert the slide copy or copies, and then, in the Paste Options section of the shortcut menu, select the Use Destination Theme button or the Keep Source Formatting button.
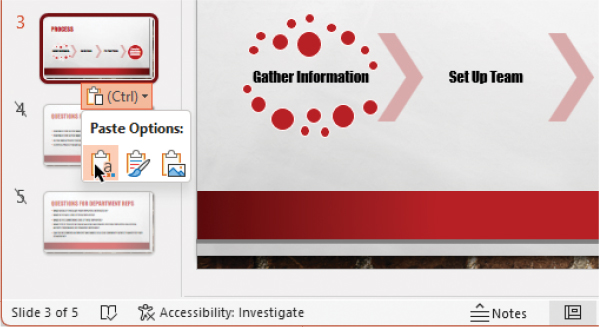
You can match the destination theme, retain the source theme, or paste as a picture
![]() Tip
Tip
When PowerPoint displays the paste options, press H to use the destination style or K to use the source style.
To insert a slide from another presentation
Open the source and destination presentations in PowerPoint. Display each presentation in Normal view or Slide Sorter view.
Display the two PowerPoint windows side by side.
In the source presentation, select the slide or slides you want to copy.
Drag the selection to the destination presentation. A horizontal line between slide thumbnails in Normal view or a vertical line between thumbnails in Slide Sorter view indicates the location at which PowerPoint will insert the slides.
PowerPoint creates copies of the slides and applies the destination theme to the copies.
Or
Display the destination presentation in Normal view.
On the Home tab or Insert tab, in the Slides group, select Reuse Slides to open the Reuse Slides pane on the right side of the screen.
The Reuse Slides pane displays thumbnails of the available presentations.
If necessary, enter search text in the Search PowerPoint Files for Slides box to narrow down the presentation choices.
In the Reuse Slides pane, select Choose Slides below the presentation from which you want to insert slides, to display only the slides in that presentation.
For each slide you want to insert into your presentation, select the slide thumbnail or Insert Slide.
 Tip
TipUse the Paste Options button to specify whether the inserted slide matches the source or destination formatting.
Close the Reuse Slides pane.
To prepare a source document to import as a presentation
Enter the content that you want to appear on the slides (and any other content) in a document.
Review the styles applied to the content you want to include in the presentation.
Title, Subtitle, Heading 1, and any list items will convert to slide titles.
Heading 2 through Heading 8 will convert to bulleted list items.
Save and close the document.
To create a presentation by importing a Word document
On the Open page of the Backstage view, select Browse.
In the file type list, select All Files (*.*).
Browse to the folder that contains the Word document that contains the slide title and bullet point information.
Double-click the document to create a new presentation.
Select all the slides in the new presentation, and then on the Home tab, in the Slides group, select the Reset button.
Apply the design template you want.
To create slides in an existing presentation by importing a Word document
Select the slide after which you want to insert the new slides.
On the Home tab or Insert tab, in the Slides group, select the New Slide arrow.
On the New Slide menu, below the gallery, select Slides from Outline to open the Insert Outline dialog, which resembles the Open dialog.
Use standard Windows techniques to browse to the folder that contains the Word document you want to use for the slide titles and content.
Double-click the document to insert slides based on its content.
Hide and delete slides
If you create a slide and then later realize that you don’t need it, you can delete it. If you don’t need the slide for a presentation to a specific audience but might need it later, you can hide the slide instead. Hidden slides aren’t presented in slideshows. They remain available from the Thumbnails pane, but their thumbnails are dimmed, and their slide numbers are crossed through with a backslash.
You can edit the content of hidden slides
When you select a hidden slide, the Hide Slide button on the Slide Show tab is shaded to indicate that the command is in effect. You can edit a hidden slide in the Slide pane just as you can any other, so you might use this feature to keep a slide that you’re still working on hidden until it’s final. You can unhide a slide to include it in the slideshow.
To hide or unhide slides
Right-click a single slide, and then select Hide Slide.
Or
Select the slide or slides you want to hide or unhide.
Do either of the following:
Right-click the selection, and then select Hide Slide.
On the Slide Show tab, in the Set Up group, select Hide Slide.
![]() Tip
Tip
The name of the Hide Slide command and button doesn’t change; when a hidden slide is active, the command and button are shaded.
To delete slides
Right-click a single slide, and then select Delete Slide.
Or
Select the slide or slides you want to delete.
Do any of the following:
Right-click the selection, and then select Delete Slide.
On the Home tab, in the Clipboard group, select Cut.
Press the Delete key.
![]() Tip
Tip
When you add or delete slides, PowerPoint renumbers all the subsequent slides.
Apply themes
The appearance of every presentation that you create is governed by a theme—a combination of colors, fonts, effect styles, and background graphics or formatting that coordinates the appearance of all the presentation elements. Even a blank presentation has a theme: the Office theme, which has a white slide background, a standard set of text and accent colors, and the Office font set, which uses Calibri Light for headings and Calibri for body text.
PowerPoint and the other Microsoft 365 apps (Office apps) share a common set of themes and theme elements. This enables you to easily produce coordinated print and presentation materials. Approximately 30 of these themes are available to you from the PowerPoint Themes gallery. Many of the themes come with predefined variants, which have a different color scheme or background graphic.
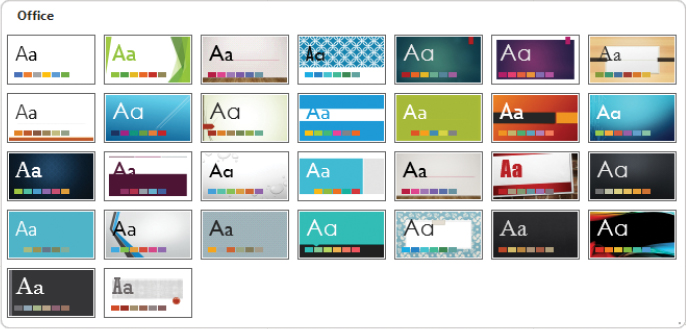
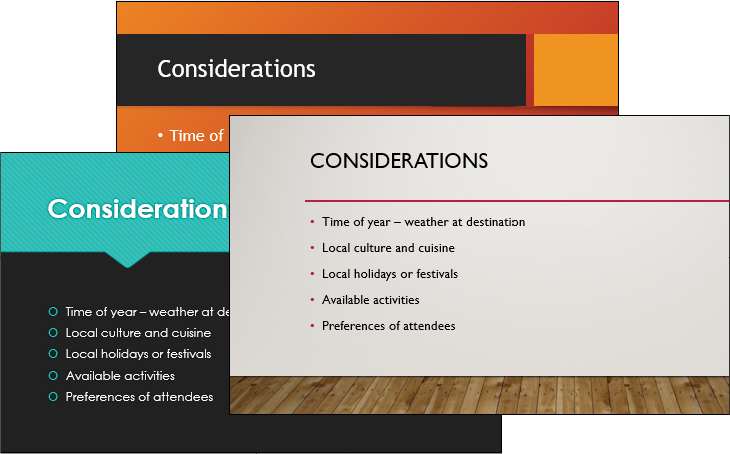
The built-in Office themes for PowerPoint
Each thumbnail in the PowerPoint Themes gallery displays a sample of the font set in the form of an uppercase and lowercase letter A (Aa) and the color scheme in the form of colored blocks over the default title slide. Title slides frequently have background graphics that set the tone for the presentation. The standard slides associated with the theme will often have a more subtle background graphic that coordinates with the title slide background. You can choose to hide the background graphic and use only a colored background if you want.
You can change the theme applied to an entire presentation or to only one section of the presentation. If you like the colors of one theme, the fonts of another, and the effects of another, you can mix and match theme elements. You can also create your own themes.
When working in Normal view, you can use the Live Preview feature to see how your presentation would look with a different theme applied. Simply point to any theme and pause. PowerPoint temporarily applies the selected formatting to the slide in the Slide pane. This makes it easy to try different themes and theme elements until you find the ones you want.
To apply a standard theme to a presentation
Display the presentation in Normal view.
On the Design tab, in the Themes group, select the More button (below the scroll arrows) to display the menu that includes the Office theme gallery.
TipThe menu displays the currently applied template and any custom Office templates on your computer above the Office themes.
Point to thumbnails in the gallery to display the theme names in tooltips and preview the effect of applying the themes to your presentation.
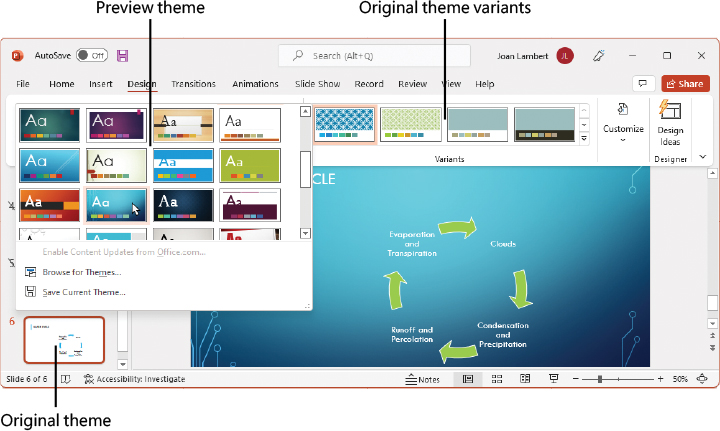
Choose a theme that enhances the content of your presentation
Select a theme thumbnail to apply that theme to the entire presentation.
To change the color scheme of the presentation
On the Design tab, in the Variants group, select a variant thumbnail.
Or
On the Design tab, in the Variants group, select the More button (below the scroll arrows) to expand the Variants menu.
On the Variants menu, select Colors.
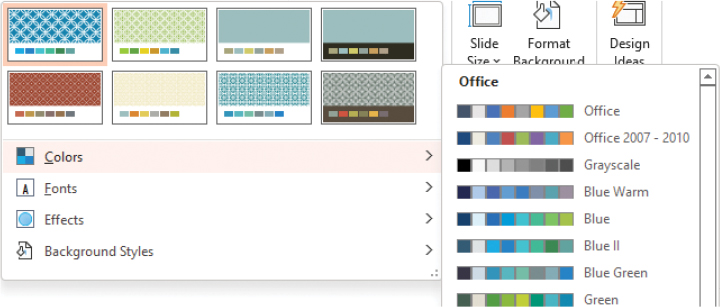
Choose from the dozens of standard color schemes
On the Colors menu, select the color set you want to apply.
![]() Tip
Tip
Changing the color scheme, font set, or effect style of a presentation doesn’t change the theme that is applied to the presentation.
To change the font set of the presentation
On the Design tab, in the Variants group, select the More button (below the scroll arrows) to expand the Variants menu.
On the Variants menu, select Fonts.
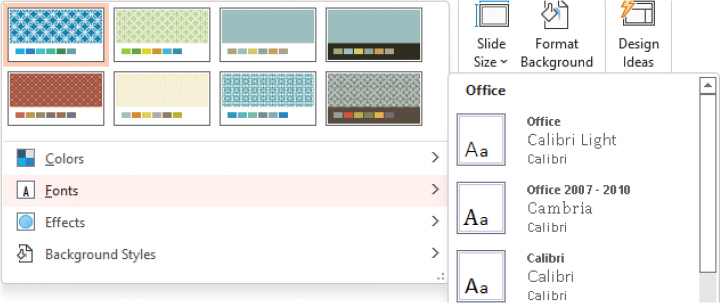
Choose from same-font or complementary-font heading/body font combinations
On the Fonts menu, select the font set you want to apply.
To change the effect style of the presentation
On the Design tab, in the Variants group, select the More button (below the scroll arrows) to expand the Variants menu.
On the Variants menu, select Effects.

The effect style preview color coordinates with the current color scheme
On the Effects menu, select the effect style you want to apply.
To apply a theme or theme variant to only part of a presentation
Create a section that contains the slides you want to have a different theme.
Click the section header to select the section.
Apply the theme or theme element.
Change slide backgrounds
The presentation theme includes a standard background. The background might be a color or range of colors and might include image elements.
A variety of thematic background graphics
You can customize slide backgrounds by removing the background graphic and filling the slide background with a solid color, a color gradient, a texture, a pattern, or a picture of your choice. You make these changes in the Format Background pane.
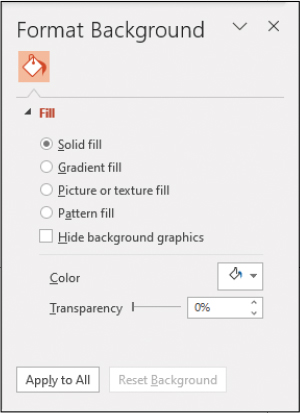
You can control the color, texture, pattern, or picture in the background of one or all slides
Each of the options in the Format Background pane has specific settings that appear when you select the option.
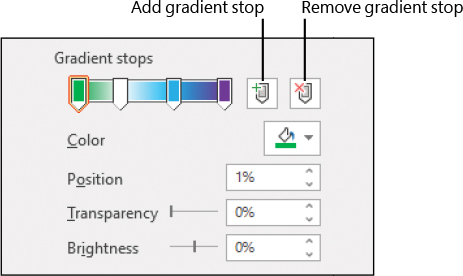
A solid color background is a good choice for readability, but if you want to add some interest without a lot of distraction, you can use a color gradient in which a solid color gradually changes to another. PowerPoint offers several light-to-dark and dark-to-light gradient patterns based on the color scheme. You can also create custom gradients of two, three, or more colors. Each change in color within a gradient is controlled by a gradient stop. For each gradient stop, you can specify the location and specific color (including the transparency and brightness of the color). A color gradient can have from 2 to 10 gradient stops.

A gradient can include up to 10 color changes
If you want something fancier than a solid color or a color gradient, you can give the slide background a texture or pattern. PowerPoint comes with several built-in textures that you can easily apply to the background of slides.
Choose a background that doesn’t overpower your presentation
If none of these meets your needs, you might want to use a picture of a textured surface. For a dramatic effect, you can even incorporate a picture of your own, although these are best reserved for small areas of the slide rather than the entire background.
If you prefer to use a simple pattern rather than a texture, you can choose from 48 patterns and set the background and foreground color to your liking.
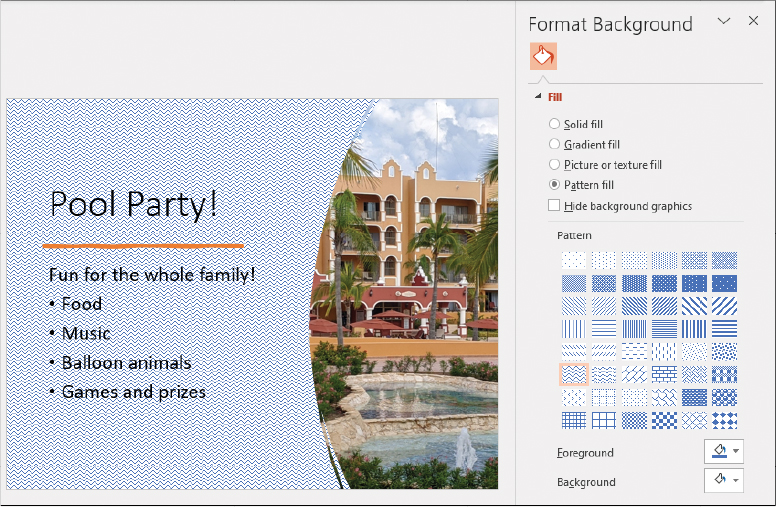
Click any pattern to preview it on the slide
To display the Format Background pane
On the Design tab, in the Customize group, select Format Background.
To close the Format Background pane
In the upper-right corner of the pane, select the Close button (the X).
To the right of the pane name, click the down arrow, and then select Close.
To apply a background change to all slides
In the Format Background pane, configure the slide background formatting you want.
At the bottom of the pane, select Apply to All.
To remove the slide background graphic applied by a theme
Display the Format Background pane.
In the Format Background pane, select the Hide background graphics checkbox.
To apply a solid background color to one or more slides
In the Format Background pane, select Solid fill.
Select the Color button to display the color palette.
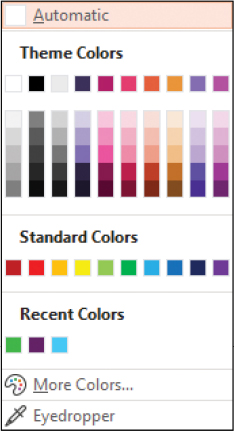
The color palette displays theme colors, standard colors, and recently used custom colors
 See Also
For information about the colors you can use, see the sidebar “Non-theme colors” later in this topic.
Select a theme color variant, a solid color, or a recent color, or select More Colors and select a custom color.
Move the Transparency slider to adjust the background color transparency, or set a specific transparency percentage.
To apply a gradient background color to one or more slides
In the Format Background pane, select Gradient fill.
Select the Preset gradients button, and then select a gradient option based on the current color palette.
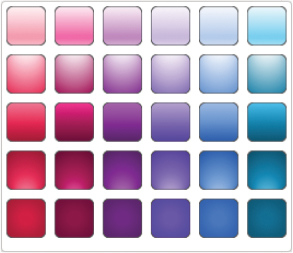
Preset color gradients offer linear and radial variants of the theme accent color
Or
In the Type list, select Linear, Radial, Rectangular, Path, or Shade from title.
In the Direction list, select the direction you want the gradient to flow.
If you chose the Linear type, you can specify the angle you want the gradient to move along. Enter the angle in the Angle box.
If you want to add gradient stops, do either of the following in the Gradient Stops area:
Select the Add gradient stop button, and then reposition the marker that appears on the slider.
Click the slider in the approximate location where you want to insert the gradient stop.
You can precisely control a color by adjusting the transparency and brightness
If you want to remove gradient stops, do either of the following in the Gradient stops area:
On the slider, select the marker for the gradient stop you want to remove. Then select the Remove gradient stop button.
Drag the gradient stop marker off the slider.
In the Gradient stops area, set the color, position, transparency, and brightness for each color in the gradient. Note the following:
You can select a color swatch or match an existing color by using the Eyedropper tool to select a color.
You can change the transparency and brightness by moving the markers on the sliders, by entering specific percentages, or by scrolling the dials.
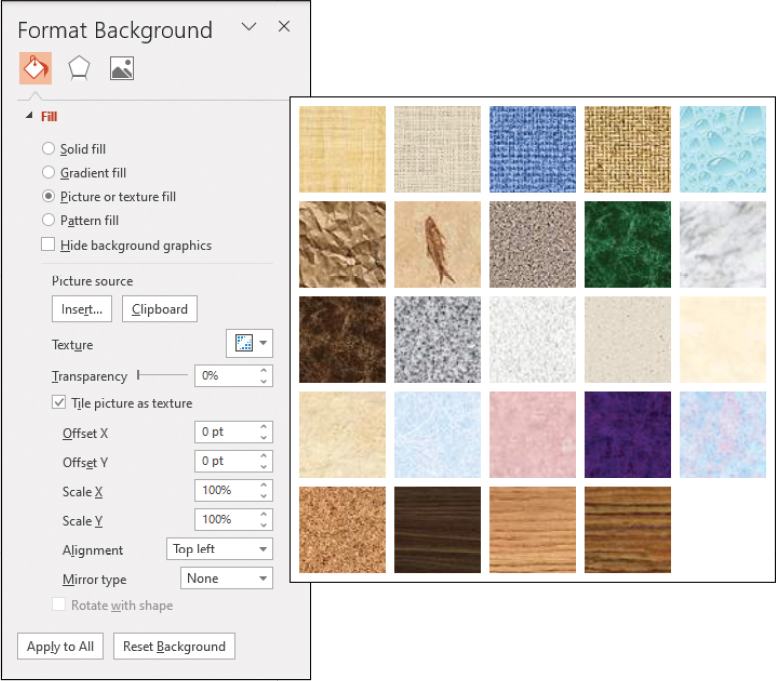
To apply a textured background to one or more slides
In the Format Background pane, select Picture or texture fill.
Select the Texture button to display the texture gallery. You can select from a variety of textures, including fabric, marble, granite, wood grain, and Formica-like textures in various colors.
In the texture gallery, select the texture you want to apply.
Move the Transparency slider to adjust the background color transparency, or set a specific transparency percentage.
To apply a patterned background to one or more slides
In the Format Background pane, select Pattern fill.
In the Pattern palette, select one of the 48 pattern swatches.
Select the Foreground button, and then select the primary pattern color.
Select the Background button, and then select the secondary pattern color.
![]() Tip
Tip
If you want to add a watermark, such as the word Draft or Confidential, to the background of all your slides, you can do so by adding the text to the background of the slide master.
Divide presentations into sections
To make it easier to organize and format a longer presentation, you can divide it into sections. In both Normal view and Slide Sorter view, sections are designated by titles above their slides. The titles do not appear in other views, and they do not create slides or otherwise interrupt the flow of the presentation.

You can rename, remove, move, collapse, and expand sections
Because you can collapse entire sections to leave only the section titles visible, the sections make it easier to focus on one part of a presentation at a time.
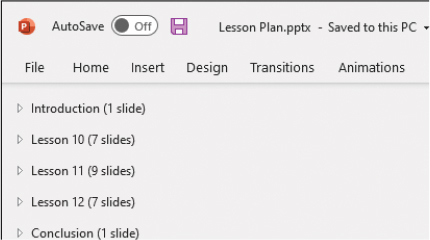
You can collapse sections to provide an “outline” of long presentations, with the number of slides in each section displayed in parentheses
![]() Tip
Tip
If you’re collaborating with other people on the development of a presentation, sections provide a convenient way of assigning slides to different people.
Some templates include a slide layout, similar to the title slide layout, that is specifically designed for section divider slides. If you divide a long presentation into sections based on topic, you might want to transfer your section titles to these slides to provide guidance to the audience or to mark logical points in the presentation to take breaks or answer questions.
To create a section
In Normal view or Slide Sorter view, select the slide that you want to be first in the new section.
On the Home tab, in the Slides group, select the Section button, and then select Add Section to insert a section title named Untitled Section before the selected slide.
To rename a section
In Normal view or Slide Sorter view, do either of the following to open the Rename Section dialog:
Right-click the section title you want to change, and then select Rename Section.
On the Home tab, in the Slides group, select the Section button, and then select Rename Section.
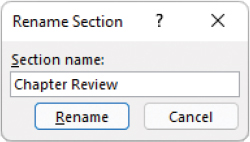
The current section name is selected so that you can easily replace it
In the Section name box, replace or edit the existing section name, and then press Enter or select Rename.
To collapse or expand one slide section
In Normal view or Slide Sorter view, click the arrow that precedes the section title.
![]() Tip
Tip
A right-pointing arrow indicates a collapsed section; an arrow that points to the lower-right corner indicates an expanded section.
To collapse or expand all slide sections
On the Home tab, in the Slides group, select the Section button, and then select Collapse All or Expand All.
Right-click any section name, and then select Expand All or Collapse All.
Rearrange slides and sections
After you’ve added several slides to a presentation, you might want to rearrange their order so that they more effectively communicate your message.
You can rearrange a presentation by moving individual slides or entire sections of slides.
To move a slide within a presentation
In Normal view or Slide Sorter view, drag the slide thumbnail to its new position. Notice as you drag that the other thumbnails move to indicate where the selected slide will appear when you release the mouse button.
Or
Select the slide thumbnail, and then press Ctrl+X or, on the Home tab, in the Clipboard group, select Cut.
Do either of the following:
Select the slide thumbnail that you want to insert the cut slide after, and then press Ctrl+V or, in the Clipboard group, select Paste.
Click between the other slide thumbnails to insert a thin red marker (horizontal in Normal view or vertical in Slide Sorter view) where you want to move the slide. Then press Ctrl+V or, in the Clipboard group, select Paste.
Or
Right-click the slide thumbnail, and then select Cut.
Right-click between the other slide thumbnails where you want to move the slide.
TipThe thin red destination marker appears only when you click between thumbnails, not when you right-click between thumbnails.
In the Paste Options section of the shortcut menu, select the Use Destination Theme button or the Keep Source Formatting button.
TipWhen PowerPoint displays the paste options, press H to use the destination style or K to use the source style.
To move a section within a presentation
Click the title of the section of slides you want to move, to select all the slides in the section.
Drag the section to its new location.
Or
Right-click the section title, and then select Move Section Up or Move Section Down to move the section and all its slides before the preceding section or after the following section.
![]() Tip
Tip
The Move Section commands aren’t available on the Section menu; they are available only on the shortcut menu that appears when you right-click a section title.
To merge a section into the preceding section by removing the section divider
Select the title of the section of slides you want to ungroup.
On the Home tab, in the Slides group, select the Section button, and then select Remove Section.
Or
Right-click the section title, and then select Remove Section.
To merge all sections by removing all section dividers
On the Home tab, in the Slides group, select the Section button, and then select Remove All Sections.
To delete a section of slides
Select the title of the section of slides you want to delete, to select all the slides in the section.
Press the Delete key.
Or
Right-click the section title, and then select Remove Section & Slides.

If the selected section is collapsed, PowerPoint prompts you to confirm the deletion
If PowerPoint prompts you to confirm the deletion, select Yes to delete the section title and all the slides in the section.
![]() Tip
Tip
The Remove Section & Slides command isn’t available on the Section menu; it is available only on the shortcut menu that appears when you right-click a section title.
Key points
You can add as many slides as you want to a presentation. Most templates provide a variety of readymade slide layouts to choose from. If you change your mind about a slide layout, you can easily switch to a different layout.
Grouping slides into sections makes it easy to focus on and format specific parts of a presentation.
If you need to change the order of slides or sections, you can rearrange them in Slide Sorter view or in the Thumbnails pane in Normal view.
Switching to another predefined theme or theme variant is an easy way to change the look of a presentation. Applying a different theme variant is a simple way to signal a topic change within a presentation.
To dress up the background of a slide or all the slides in a presentation, you can apply a solid color, color gradient, texture, pattern, or picture to the slide background.
Practice tasks

Before you can complete these tasks, you must copy the book’s practice files to your computer. The practice files for these tasks are in the Office365SBSCh10 folder. You can save the results of the tasks in the same folder.
The introduction includes a complete list of practice files and download instructions.
Add and remove slides
Open the AddRemoveSlides presentation in PowerPoint, and then perform the following tasks:
Add two slides after the title slide. First, add a slide that has the default Title and Content layout. Then add a slide that has the Two Content layout.
Add 7 more slides, so you have a total of 10 slides. Use each slide layout at least once.
In Normal view, delete slide 3.
Switch to Slide Sorter view, and then delete slides 5 through 8. The presentation now contains five slides.
Add seven slides to the end of the presentation by inserting the content of the ImportOutline document.
Use the Reuse Slides feature to insert the first slide from the ReuseSlides presentation as slide 2 in the AddRemoveSlides presentation. Then close the Reuse Slides pane.
Insert a duplicate copy of slide 2 as slide 3.
Hide slide 2, and then delete slide 8.
Save and close the presentation.
Apply themes
Open the ApplyThemes presentation in Normal view, and then perform the following tasks:
On slide 1, click the slide title. On the Home tab, in the Font group, notice that the title font is blue-gray, 44-point, Times New Roman.
Apply the Ion theme to the presentation. On the Home tab, in the Font group, notice that the title font is now white, 72-point, Century Gothic.
Switch to Slide Sorter view and adjust the magnification to display all the slides.
Apply the Circuit theme to the presentation. Notice that the slide background is blue.
Apply the gray variant of the Circuit theme to the Past section of the presentation.
Apply the red variant of the Circuit theme to the Present section of the presentation.
Apply the green variant of the Circuit theme to the Future section of the presentation.
Review the effects of your changes on the individual slides. Then save and close the presentation.
Change slide backgrounds
Open the ChangeBackgrounds presentation, and then perform the following tasks:
Apply a gradient fill background to slide 1.
Change the gradient type to Rectangular and set the direction to From Top Left Corner.
Configure the gradient to have the following four gradient stops:
Stop
Color
Position
Transparency
Brightness
1
Light Green
5%
0%
–10%
2
White
45%
0%
90%
3
Light Blue
75%
0%
0%
4
Purple
100%
20%
0%
Apply the custom gradient fill to all slides in the presentation.
For only slide 1, change the slide background to the Water droplets texture, and set the Transparency of the texture to 25%.
Review the effects of your changes on the individual slides. Then save and close the presentation.
Divide presentations into sections
Open the CreateSections presentation in Normal view, and then perform the following tasks:
Divide the presentation into two sections:
A section that contains slides 1 through 3
A section that contains slides 4 through 12
Change the name of the first section to Introduction.
Switch to Slide Sorter view, and then change the name of the second section to Process.
Collapse both sections, and then expand only the Process section.
Save and close the presentation.
Rearrange slides and sections
Open the RearrangeSlides presentation in Normal view, and then perform the following tasks:
Move the first slide in the Step 1 section so that it is the third slide in the Introduction section. Then delete the last slide in the Introduction section.
Switch to Slide Sorter view and scroll through the presentation, noticing the sections.
Collapse the sections, and then rearrange them so that the sections for steps 1 through 7 are in order and the End section is at the end of the presentation.
Merge the End section into the Step 7 section.
Save and close the presentation.