Certain features in Windows Server 2012 Hyper-V such as a synthetic fibre channel and live VM migration are not included in Client Hyper-V, as they don’t make sense on a client. More on this later in the chapter.
“Put Hyper-V from the server into the client” was the chant from IT professionals and developers after Windows 7 was released; their wish has been granted with Windows 8. Microsoft has taken the latest Hyper-V from Windows Server 2012, with nearly all its great new features, and put it straight into Windows 8 without sacrificing desktop capabilities like suspend and resume, and utilizing unique client requirements such as the use of wireless networks.
The Goals and Features of Client Hyper-V
As explained earlier, Client Hyper-V is targeted squarely at IT professionals and developers, enabling all the requirements those types of users require. Because Client Hyper-V is not designed for solving application compatibility issues, it does not currently work with MED-V. Client Hyper-V provides a virtualization platform that other vendors can build on to enable many scenarios, so although Microsoft targeted Client Hyper-V for IT professionals and developers, other usages may be offered in the future that extend the Client Hyper-V platform. In fact, some parts of Hyper-V have been built to be extended. The network switch, for example, is fully extensible, allowing third-party add-ins to be placed into the Hyper-V network stack. From a developer’s perspective, this is very useful, enabling deep monitoring of network traffic going across the network and even the injection of network traffic.
Client Hyper-V has all the same scalability as Server Hyper-V, which means the capability to create virtual machines with 32 vCPUs, 1TB of memory, and use of the new VHDX format allowing 64TB virtual disks. I doubt any desktop system, or for that matter many server systems, will be creating virtual machines with 1TB of memory, but this degree of scalability means the hypervisor will never be a limiting factor for required configurations.
The dynamic memory feature is also available in Client Hyper-V, which allows memory to be added to and removed from virtual machines based on the needs of the operating system and the applications running on them. This feature is really aimed at maximizing the density of virtual machines on a physical machine, which is primarily a server requirement because density is not typically a huge requirement for clients; but it is still potentially useful, considering that desktops and laptops typically have fewer resources, so it could help run more virtual machines.
Server Message Block (SMB) version 2.2, which is part of Windows Server 2012, is required to host virtual machines on a file share. It will also be available on certain third-party storage appliances because the SMB 2.2 specification is public.
Some of the Server Hyper-V storage features are great for client virtualization. It is possible to add (hot-add) storage to running virtual machines on the virtual SCSI bus, and this storage can physically reside on IDE, iSCSI, USB flash drives, and even via SMB, which means the virtual machines could reside on a Windows Server 2012 file share. File shares enable users to easily share demo environments between different client machines and even the snapshots for the virtual machines.
Storage Live Migration is also included in Client Hyper-V, which means virtual machines can be easily moved between different storage mediums without having to turn off the virtual machines. A great example is running a virtual machine stored on a corporate file share on a user laptop, enabling use both at the office and at home or offline. With Storage Live Migration, the virtual machine can be moved to the laptop, without ever stopping the virtual machine. You can also move a virtual machine from the machine’s local disk to an external USB drive; and it’s still possible to use BitLocker, the volume encryption technology, with Hyper-V, so there is no loss of security.
While Windows Virtual PC had a basic disk undo capability, with Client Hyper-V users have the full snapshot capability that is part of Hyper-V, enabling many different point-in-time views of a virtual machine to be saved and reverted back to as needed—another requirement for developers.
In terms of what can be run within the guest operating systems, anything that works in Server Hyper-V will also work in Client Hyper-V, which includes Windows 8, Windows 7, Windows Server operating systems (both 32-bit and 64-bit), and even Linux. Remember that Client Hyper-V does not include any license rights to run the guest operating systems, so any operating systems being run need to be licensed. One way to license the guest operating systems is with the virtual rights included with various Microsoft SKUs and agreements, which could be Software Assurance or Windows Virtual Desktop Access (VDA), both of which provide up to four guest virtual rights. Another option is just buying additional Windows operating system licenses for the virtual machines.
Client Hyper-V uses exactly the same virtual machine and hard disk format as Server Hyper-V, so virtual machines can easily be moved between client and server. For managing Client Hyper-V, the same Hyper-V manager tool, PowerShell, and WMI capabilities are shared between both client and server. Because the same tools are used on either platform, there is no need for additional training or ramp-up time when using Client Hyper-V if Server Hyper-V is already known.
Client Hyper-V Requirements and Installation
I highly recommend using SLAT-capable processors with Server Hyper-V for best performance, although they are not required.
The requirements for Client Hyper-V are slightly different from those for Server Hyper-V. Server Hyper-V requires that the processor support hardware virtualization, such as the Intel VT and AMD-V technologies, and must be 64-bit. For Client Hyper-V, the processor must also support Secondary Level Address Translation (SLAT), which is not a requirement for a server unless it is using RemoteFX technologies. The SLAT technologies are Intel EPT or AMD RVI. SLAT is required on Client Hyper-V because it enables the processor to perform memory mapping between the physical memory and the memory within the virtual machine, which means the hypervisor no longer has to do it. This mapping is very important when a Windows Device Driver Model (WDDM) graphics driver is used, because the graphics driver uses noncached and write-combined memory to achieve the best performance, which causes the Translation Lookaside Buffer (TLB) in the CPU to be constantly flushed and rebuilt. This is very bad for performance, but SLAT accommodates and solves this problem. It is always required for Client Hyper-V because the primary environment on the client is the Windows 8 desktop, which typically has a good graphics card with WDDM drivers, and users expect good media playback and overall responsiveness. Therefore, if Client Hyper-V is needed, then the processor must support SLAT in order to ensure a good user experience. Fortunately, any Intel Core I processor, and all AMD processors since early 2011, should have SLAT support. To check, you can download a utility called coreinfo from http://technet.microsoft.com/en-us/sysinternals/cc835722 and run it with the /v switch to determine whether the processor in your machine supports virtualization extensions and SLAT. The command must be run in an elevated command prompt, which means it has administrative rights. From the Start menu, type command, then right-click on the displayed command prompt search result and select to Run as administrator. The following example shows a system that has hardware-assisted virtualization and extended page table support:
D:	empcoreinfo>coreinfo /v

Coreinfo v3.04 - Dump information on system CPU and memory topology
Copyright (C) 2008-2012 Mark Russinovich
Sysinternals - www.sysinternals.com

Intel(R) Core(TM) i7-2640M CPU @ 2.80GHz
Intel64 Family 6 Model 42 Stepping 7, GenuineIntel
HYPERVISOR      -       Hypervisor is present
VMX             *       Supports Intel hardware-assisted virtualization
EPT             *       Supports Intel extended page tables (SLAT)
For several reasons, there is no policy to block enabling Client Hyper-V. One reason is because Windows features can be turned on and off even when the OS is offline, in which case such a policy would have no effect.
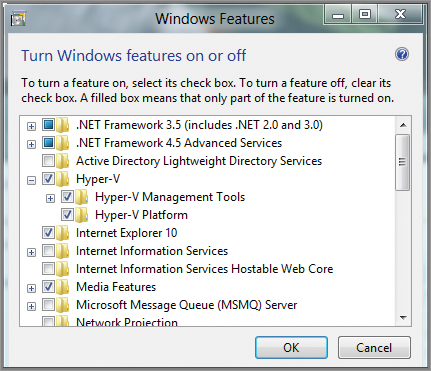
To install Client Hyper-V, open the Programs and Features control panel applet and select the “Turn Windows features on or off” action on the left side of the control panel. Select the Hyper-V feature as shown in Figure 3-12, and then click OK. A reboot is required to complete the installation, as the hypervisor has to be enabled.
Figure 3-12: Enabling Hyper-V in the Windows 8 client
The enablement was very simple because Hyper-V is just a part of Windows, a fact that brings additional benefits. For example, no separate infrastructure is required to deploy, patch, and manage Client Hyper-V; it uses the same infrastructure that is used to deploy, patch, and manage Windows. Therefore, Windows Update, System Center Configuration Manager, and WSUS will all be able to update Client Hyper-V. The virtual machines running on Client Hyper-V are themselves just operating system instances that are managed and patched per normal processes. For example, it is possible to run the SCCM agent inside the virtual machines to manage them, or leverage WSUS or Windows Update.
Differences between Client and Server Hyper-V
I don’t want to spend any time talking about how to manage Client Hyper-V, as the process is the same as Server Hyper-V, which is covered in detail in Chapter 8. Instead, it would be useful to look at the key differences. I have already mentioned the requirement for a processor that supports SLAT; and following are some of the key features with Client Hyper-V and its use of Remote Desktop Protocol 8 to communicate with the virtual machines from the Windows 8 desktop:
- Wireless networks can be connected to a virtual switch on Client Hyper-V, which is key for laptops.
- USB peripherals can be used within the virtual machine using the RDP 8 USB pass-through feature.
- Support is provided for up to 12 monitors on the virtual machine.
- You can save the virtual machine state when the client computer is put to sleep or hibernated, and resume the virtual machines when the computer is resumed. On a laptop this means that when you close your laptop lid, the virtual machine state is saved. When you open the lid again the virtual machines are started automatically.
- Support is provided for 3D graphics and rich multimedia in virtual machines.
- Bi-directional audio, including VOIP, is available.
- Touch support enables Metro applications in virtual machines.
Chapter 8 describes all the Server Hyper-V features; but as I mentioned earlier, some of those features are not present in Client Hyper-V. The following list includes the features not available in Client Hyper-V, and why (keep in mind that Client Hyper-V is aimed at running on a desktop machine):
- RemoteFX capability to virtualize the GPU and pass it to virtual machines, but Client Hyper-V does have the software GPU that is part of Windows 8 and RDP 8.
- Live migration and shared-nothing live migration of virtual machines, because moving virtual machines with no downtime is not a key requirement for IT professional use. Also, failover clustering is not available in client platforms, which normal live migration leverages (but not shared-nothing live migration, which enables virtual machines to be moved between hosts with no common infrastructure apart from a network connection).
- Hyper-V Replica, which enables an offsite replica of a virtual machine to be maintained. It’s highly unlikely for a virtual machine running on a desktop machine to need offsite disaster recovery capability, and if it does it shouldn’t be running on Client Hyper-V.
- SR-IOV network, which enables virtual machines to directly access SR-IOV-capable network adapters. No desktop machine would support SR-IOV, and the zero-latency network capability that SR-IOV provides isn’t a requirement for desktop workloads.
- Synthetic fibre channel, because desktops will not have connectivity to fibre channel.
Fabric refers to the components that make up the datacenter infrastructure.
- Network virtualization, which enables the creation of networks that are abstracted from the underlying physical network fabric. This is useful for multi-tenancy environments or multi-location infrastructures, but not for desktops.
If virtual machines are hosting non-Windows Server operating systems such as client operating systems or Linux, and the preceding features are needed, then the free Hyper-V Server product, which is covered in Chapter 8, can be used.
If you need any of the aforementioned features, you probably shouldn’t be using Client Hyper-V for hosting the virtual machines on a desktop. Use Server Hyper-V for virtual machines that require any of these features.
TIP Processor and memory configurations in your desktop machine are normally not easily changed, and typically client virtual machines will not require large amounts of processor use. If you want to run many virtual machines, it may be possible to install extra memory, and dynamic memory may also facilitate some additional workload. If you were limited to making only one investment, purchase a solid-state disk (SSD) for the virtual machines, as this will greatly improve the performance of the virtual environment. After I implemented SSDs, the time required to start all my virtual machines went from 20 minutes to about 45 seconds.
I want to next share a few PowerShell commands that can be very useful on Client Hyper-V. These are my top three very simple cmdlets and a couple of combinations. Chapter 8 covers this in more detail when I dive into Hyper-V, but for now you should be aware that more cmdlets are available just for Hyper-V in Windows Server 2012 than there were for all roles and features in Windows Server 2008 R2. When working with PowerShell, commands tend to be simple and very likely state the action you want to perform. For example, to create a new virtual machine, the command is New-VM.
A great way to learn the available cmdlets and switches is to work with the PowerShell ISE (Integrated Scripting Environment), which features IntelliSense to help automatically complete commands as you type.
For example, suppose you want to create a new virtual machine and then start it. The following command creates the VM and passes the path for the existing VHDX file:
New-VM VM1 -VHDPath d:virtualsvm1.vhdx
To start the VM in the same command, pipe the object created in the preceding command to the Start-VM cmdlet:
New-VM VMName -VHDPath d:pathvm.vhdx | start-vm
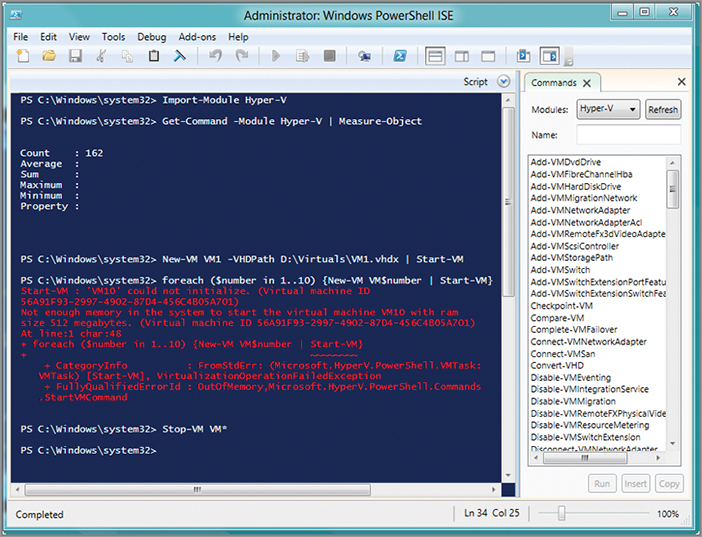
You can combine creation of the virtual machine with other loop logic to bulk create, which is useful for testing. For example, the following command creates 10 virtual machines (see Figure 3-13):
foreach ($number in 1..10) {New-VM VM$number | Start-VM}
Figure 3-13: Creating virtual machines using the PowerShell ISE. Notice that number 10 failed due to lack of memory.
Another useful command enables you to move the storage for a VM using PowerShell. The following example moves all the storage, including snapshots, to the new location (although it is possible to be more granular in the move operation):
Move-VmStorage VM -DestinationStoragePath D:
ewpath
The last PowerShell cmdlet I want to cover is great for cleaning up. The following command stops and deletes all the virtual machines with a certain name:
Get-VM VM* | Stop-VM -Passthru | Remove-VM -Force
TIP Windows 7 and Windows 2008 R2 included a new feature called Boot from VHD that enables a physical machine to boot from a virtual hard disk. It is possible to take a VHD that is used for a Client Hyper-V virtual machine and boot the desktop from it. There is no need to Sysprep or generalize the VHD; it can be taken from a VM and used directly to boot a machine. This enables an IT professional to test in a virtual machine and then take the environment to physical hardware to complete testing.
First, mount the VHD from the virtual machine, which you can do by just double-clicking it with Windows 8. It will be mounted as a drive visible in Explorer. Next, add a boot option to that new mounted drive using an elevated command prompt (right-click on the bottom left of the Windows 8 desktop and select the Command Prompt [Admin] option):
bcdboot <mounted drive>:windows
That’s it. Upon reboot, there will be an option to boot from the VHD. It is also still possible to start the VM from the VHD, provided the physical machine is not booted from the VHD.
Note that if you are using BitLocker on the host, you cannot boot using Boot to VHD from a VHD on a BitLockered drive. You would need an unencrypted volume to store the VHD.