CHAPTER 3
Writing methods and applying scope
After completing this chapter, you will be able to:
Declare and call methods.
Pass information to a method.
Return information from a method.
Define local and class scope.
Use the integrated debugger to step into and out of methods as they run.
In Chapter 2, “Working with variables, operators, and expressions,” you learned how to declare variables, how to create expressions using operators, and how precedence and associativity control the way in which expressions containing multiple operators are evaluated. In this chapter, you’ll learn about methods. You’ll see how to declare and call methods, how to use arguments and parameters to pass information to a method, and how to return information from a method by using a return statement. You’ll also see how to step into and out of methods by using the Microsoft Visual Studio 2017 integrated debugger. This information is useful when you need to trace the execution of your methods because they do not work quite as you expect. Finally, you’ll learn how to declare methods that take optional parameters and how to invoke methods by using named arguments.
Creating methods
A method is a named sequence of statements. If you have previously programmed by using a language such as C, C++, or Microsoft Visual Basic, you will see that a method is similar to a function or a subroutine. A method has a name and a body. The method name should be a meaningful identifier that indicates the overall purpose of the method (calculateIncomeTax, for example). The method body contains the actual statements to be run when the method is called. Additionally, methods can be given some data for processing and can return information, which is usually the result of the processing. Methods are a fundamental and powerful mechanism.
returnType methodName ( parameterList )
{
// method body statements go here
}
The following is a description of the elements that make up a declaration:
The returnType is the name of a type and specifies the kind of information the method returns as a result of its processing. This can be any type, such as int or string. If you’re writing a method that does not return a value, you must use the keyword void in place of the return type.
The methodName is the name used to call the method. Method names follow the same identifier rules as variable names. For example, addValues is a valid method name, whereas add$Values is not. For now, you should follow the camelCase convention for method names; for example, displayCustomer.
The parameterList is optional and describes the types and names of the information that you can pass into the method for it to process. You write the parameters between opening and closing parentheses, ( ), as though you’re declaring variables, with the name of the type followed by the name of the parameter. If the method you’re writing has two or more parameters, you must separate them with commas.
The method body statements are the lines of code that are run when the method is called. They are enclosed between opening and closing braces, { }.
![]()
Important If you program in C, C++, and Visual Basic, you should note that C# does not support global methods. You must write all your methods inside a class; otherwise, your code will not compile.
Here’s the definition of a method called addValues that returns an int result and has two int parameters, leftHandSide and rightHandSide:
int addValues(int leftHandSide, int rightHandSide)
{
// ...
// method body statements go here
// ...
}
![]()
Note You must explicitly specify the types of any parameters and the return type of a method. You cannot use the var keyword.
Here’s the definition of a method called showResult that does not return a value and has a single int parameter called answer:
void showResult(int answer)
{
// ...
}
Notice the use of the keyword void to indicate that the method does not return anything.
![]()
Important If you’re familiar with Visual Basic, notice that C# does not use different keywords to distinguish between a method that returns a value (a function) and a method that does not return a value (a procedure or subroutine). You must always specify either a return type or void.
Returning data from a method
If you want a method to return information (that is, its return type is not void), you must include a return statement at the end of the processing in the method body. A return statement consists of the keyword return followed by an expression that specifies the returned value and a semicolon. The type of the expression must be the same as the type specified by the method declaration. For example, if a method returns an int, the return statement must return an int; otherwise, your program will not compile. Here is an example of a method with a return statement:
int addValues(int leftHandSide, int rightHandSide)
{
// ...
return leftHandSide + rightHandSide;
}
The return statement is usually positioned at the end of the method because it causes the method to finish, and control returns to the statement that called the method, as described later in this chapter. Any statements that occur after the return statement are not executed (although the compiler warns you about this problem if you place statements after the return statement).
If you don’t want your method to return information (that is, its return type is void), you can use a variation of the return statement to cause an immediate exit from the method. You write the keyword return and follow it immediately with a semicolon. For example:
void showResult(int answer)
{
// display the answer
Console.WriteLine($"The answer is ");
return;
}
If your method does not return anything, you can also omit the return statement because the method finishes automatically when execution arrives at the closing brace at the end of the method. Although this practice is common, it is not always considered good style.
Using expression-bodied methods
Some methods can be very simple, performing a single task or returning the results of a calculation without involving any additional logic. C# supports a simplified form for methods that comprise a single expression. These methods can still take parameters and return values, and they operate in the same way as the methods that you have seen so far. The following code examples show simplified versions of the addValues and showResult methods written as expression-bodied methods:
int addValues(int leftHandSide, int rightHandSide) => leftHandSide + rightHandSide;
void showResult(int answer) => Console.WriteLine($"The answer is ");
The main differences are the use of the => operator to reference the expression that forms the body of the method and the absence of a return statement. The value of the expression is used as the return value; if the expression does not return a value, then the method is void.
There is actually no difference in functionality between using an ordinary method and an expression-bodied method; an expression-bodied method is merely a syntactic convenience. However, you will see examples later in the book where expression-bodied methods can clarify a program by removing lots of extraneous { and } characters, making the code easier to read.
In the following exercise, you will examine another version of the MathsOperators project from Chapter 2. This version has been improved by the careful use of some small methods. Dividing code in this way helps to make it easier to understand and more maintainable.
Examine method definitions
Start Visual Studio 2017, if it is not already running.
Open the Methods solution, which is in the Microsoft PressVCSBSChapter 3Methods folder in your Documents folder.
On the Debug menu, click Start Debugging.
Visual Studio 2017 builds and runs the application. It should look the same as the application from Chapter 2. Refamiliarize yourself with the application and how it works and then return to Visual Studio. On the Debug menu, click Stop Debugging.
Display the code for MainPage.xaml.cs in the Code and Text Editor window (in Solution Explorer, expand the MainPage.xaml file and then double-click MainPage.xaml.cs).
In the Code and Text Editor window, locate the addValues method, which looks like this:
private int addValues(int leftHandSide, int rightHandSide)
{
expression.Text = $" + ";
return leftHandSide + rightHandSide;
}
Note For the moment, don’t worry about the private keyword at the start of the definition of this method; you will learn what this keyword means in Chapter 7, “Creating and managing classes and objects.”
The addValues method contains two statements. The first statement displays the calculation being performed in the expression box on the form.
The second statement uses the int version of the + operator to add the values of the leftHandSide and rightHandSide int variables, and then returns the result of this operation. Remember that adding two int values together creates another int value, so the return type of the addValues method is int.
If you look at the methods subtractValues, multiplyValues, divideValues, and remainderValues, you will see that they follow a similar pattern.
In the Code and Text Editor window, locate the showResult method, which looks like this:
private void showResult(int answer) => result.Text = answer.ToString();
This is an expression-bodied method that displays a string representation of the answer parameter in the result box. It does not return a value, so the type of this method is void.
![]()
Tip There is no minimum length for a method. If a method helps to avoid repetition and makes your program easier to understand, the method is useful regardless of how small it is.
There is also no maximum length for a method, but usually, you want to keep your method code small enough to get the job done. If your method is more than one screen in length, consider breaking it into smaller methods for readability.
Calling methods
Methods exist to be called! You call a method by name to ask it to perform its task. If the method requires information (as specified by its parameters), you must supply the information requested. If the method returns information (as specified by its return type), you should arrange to capture this information somehow.
result = methodName ( argumentList )
The following is a description of the elements that make up a method call:
The methodName must exactly match the name of the method you’re calling. Remember, C# is a case-sensitive language.
The result = clause is optional. If specified, the variable identified by result contains the value returned by the method. If the method is void (that is, it does not return a value), you must omit the result = clause of the statement. If you don’t specify the result = clause and the method does return a value, the method runs, but the return value is discarded.
The argumentList supplies the information that the method accepts. You must supply an argument for each parameter, and the value of each argument must be compatible with the type of its corresponding parameter. If the method you’re calling has two or more parameters, you must separate the arguments with commas.
![]()
Important You must include the parentheses in every method call, even when calling a method that has no arguments.
To clarify these points, take a look at the addValues method again:
int addValues(int leftHandSide, int rightHandSide)
{
// ...
}
The addValues method has two int parameters, so you must call it with two comma-separated int arguments, such as this:
addValues(39, 3); // okay
You can also replace the literal values 39 and 3 with the names of int variables. The values in those variables are then passed to the method as its arguments, like this:
int arg1 = 99;
int arg2 = 1;
addValues(arg1, arg2);
If you try to call addValues in some other way, you will probably not succeed for the reasons described in the following examples:
addValues; // compile-time error, no parentheses
addValues(); // compile-time error, not enough arguments
addValues(39); // compile-time error, not enough arguments
addValues("39", "3"); // compile-time error, wrong types for arguments
The addValues method returns an int value. You can use this int value wherever an int value can be used. Consider these examples:
int result = addValues(39, 3); // on right-hand side of an assignment
showResult(addValues(39, 3)); // as argument to another method call
The following exercise continues with the Methods application. This time, you will examine some method calls.
Examine method calls
Return to the Methods project. (This project is already open in Visual Studio 2017 if you’re continuing from the previous exercise. If you are not, open it from the Microsoft Press VCSBSChapter 3Methods folder in your Documents folder.)
Display the code for MainPage.xaml.cs in the Code and Text Editor window.
Locate the calculateClick method, and look at the first two statements of this method after the try statement and opening brace. (You will learn about try statements in Chapter 6, “Managing errors and exceptions.”)
These statements look like this:
int leftHandSide = System.Int32.Parse(lhsOperand.Text);
int rightHandSide = System.Int32.Parse(rhsOperand.Text);These two statements declare two int variables, called leftHandSide and rightHandSide. Notice the way in which the variables are initialized. In both cases, the Parse method of the System.Int32 struct is called. (System is a namespace, and Int32 is the name of the struct in this namespace. You will learn about structs in Chapter 9, “Creating value types with enumerations and structures.”) You have seen this method before; it takes a single string parameter and converts it to an int value. These two lines of code take what the user has typed into the lhsOperand and rhsOperand text box controls on the form and converts it to int values.
Look at the fourth statement in the calculateClick method (after the if statement and another opening brace):
calculatedValue = addValues(leftHandSide, rightHandSide);
This statement calls the addValues method, passing the values of the leftHandSide and rightHandSide variables as its arguments. The value returned by the addValues method is stored in the calculatedValue variable.
Look at the next statement:
showResult(calculatedValue);
This statement calls the showResult method passing the value in the calculatedValue variable as its argument. The showResult method does not return a value.
In the Code and Text Editor window, find the showResult method you looked at earlier.
The only statement of this method is this:
result.Text = answer.ToString();
Notice that the ToString method call uses parentheses even though there are no arguments.
![]()
Tip You can call methods belonging to other objects by prefixing the method with the name of the object. In the preceding example, the expression answer.ToString() calls the method named ToString belonging to the object called answer.
Returning multiple values from a method
There may be occasions when you want to return more than one value from a method. For example, in the Methods project, you might want to combine the effects of the divideValues and remainderValues operations into a single method that returns the results of dividing the two operands together with the remainder. You can achieve this by returning a tuple.
A tuple is simply a small collection of values (strictly speaking, a tuple contains two values, but C# tuples can comprise bigger sets than this). You indicate that a method returns a tuple by specifying a list of types as part of the method definition; one type for each value returned. The return statement in the method returns a list of values, as shown by the following example:
(int, int) returnMultipleValues(...)
{
int val1;
int val2;
... // Calculate values for val1 and val2
return(val1, val2);
}
When you call the method, you provide an equivalent list of variables for holding the results:
int retVal1, retVal2;
(retVal1, retVal2) = returnMultipleValues(...);
The following exercise illustrates how to create and call a method that returns a tuple.
![]()
Note Tuples are a work in progress and are not yet fully integrated into the build of C# included with Visual Studio 2017. You must install an additional package if you want to use them. The steps for doing this are covered in the exercise.
Create and call a method that returns a tuple
Return to the Methods project and display the code for MainPage.xaml.cs in the Code and Text Editor window.
Locate the divideValues and remainderValues methods and delete them.
In place of these two methods, add the following method:
private (int, int) divide(int leftHandSide, int rightHandSide)
{
}This method returns a tuple containing two values. These values will contain the results of dividing the leftHandSide variable by the rightHandSide variable, and also the remainder.
In the body of the method, add the code shown below in bold. This code performs the calculations and returns a tuple containing the results:
private (int, int) divide(int leftHandSide, int rightHandSide)
{
expression.Text = $" / ";
int division = leftHandSide / rightHandSide;
int remainder = leftHandSide % rightHandSide;
return (division, remainder);
}Note Visual Studio will display red squiggles under the code that defines the tuples. If you hover over this code you will see the message “Predefined Type ‘System.ValueTuple’2’ is not defined or imported.” This is fine. As explained before the exercise, you have to add another package to the solution before Visual Studio can use tuples. You will do this shortly.
Scroll up to the calculateClick method, and locate the following code near the end of the method:
else if (division.IsChecked.HasValue && division.IsChecked.Value)
{
calculatedValue = divideValues(leftHandSide, rightHandSide);
showResult(calculatedValue);
}
else if (remainder.IsChecked.HasValue && remainder.IsChecked.Value)
{
calculatedValue = remainderValues(leftHandSide, rightHandSide);
showResult(calculatedValue);
}Delete this code; the divideValues and remainderValues methods no longer exist and have been replaced with the single divide method.
Add the following statements in place of the code you have just deleted:
else if (division.IsChecked.HasValue && division.IsChecked.Value)
{
int division, remainder;
(division, remainder) = divide(leftHandSide, rightHandSide);
result.Text = $" remainder ";
}This code calls the divide method. The values returned are displayed in the results text box.
In Solution Explorer, double-click the MainPage.xaml file to display the form in the Design View window.
Click the % Remainder radio button, and then press Delete to remove it from the form. This radio button is no longer required.
In the Tools menu above the Design View window, point to NuGet Package Manager, and then click Manage NuGet Packages for Solution.
The NuGet package manager enables you to install additional packages and libraries for a project. This is how you install support for tuples.
In the Manage Packages for Solution window, click Browse.
In the Search box, type ValueTuple.
In the list of packages that appears, click System.ValueTuple (this should be the first item in the list).
In the right-hand pane, check the Project check box, and then click Install.
In the Preview Changes dialog box, click OK to confirm that you want to install the package.
When the package has been installed, on the Debug menu, click Start Debugging to build and run the application.
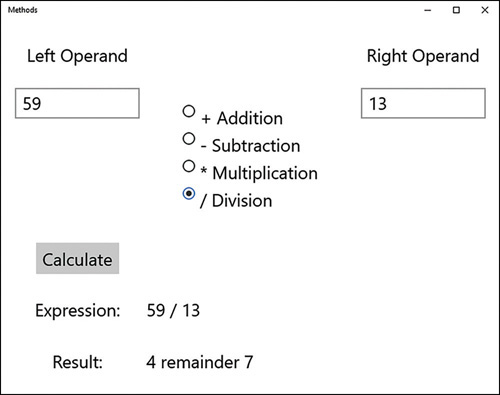
In the Left Operand text box, enter 59; in the Right Operand text box, enter 13; click Division, and then click Calculate.
Verify that the Result text box contains the message “4 remainder 7”:
Return to Visual Studio. On the Debug menu, click Stop Debugging.
Applying scope
You create variables to hold values. You can create variables at various points in your applications. For example, the calculateClick method in the Methods project creates an int variable called calculatedValue and assigns it an initial value of zero, like this:
private void calculateClick(object sender, RoutedEventArgs e)
{
int calculatedValue = 0;
...
}
This variable comes into existence at the point where it is defined, and subsequent statements in the calculateClick method can then use this variable. This is an important point: a variable can be used only after it has been created. When the method has finished, this variable disappears and cannot be used elsewhere.
When a variable can be accessed at a particular location in a program, the variable is said to be in scope at that location. The calculatedValue variable has method scope; it can be accessed throughout the calculateClick method but not outside that method. You can also define variables with different scope; for example, you can define a variable outside a method but within a class, and this variable can be accessed by any method within that class. Such a variable is said to have class scope.
To put it another way, the scope of a variable is simply the region of the program in which that variable is usable. Scope applies to methods as well as variables. The scope of an identifier (of a variable or method) is linked to the location of the declaration that introduces the identifier in the program, as you will learn next.
Defining local scope
The opening and closing braces that form the body of a method define the scope of the method. Any variables you declare inside the body of a method are scoped to that method; they disappear when the method ends and can be accessed only by code running in that method. These variables are called local variables because they are local to the method in which they are declared; they are not in scope in any other method.
The scope of local variables means that you cannot use them to share information between methods. Consider this example:
class Example
{
void firstMethod()
{
int myVar;
...
}
void anotherMethod()
{
myVar = 42; // error - variable not in scope
...
}
}
This code fails to compile because anotherMethod is trying to use the variable myVar, which is not in scope. The variable myVar is available only to statements in firstMethod that occur after the line of code that declares myVar.
Defining class scope
The opening and closing braces that form the body of a class define the scope of that class. Any variables you declare within the body of a class (but not within a method) are scoped to that class. The proper C# term for a variable defined by a class is field. As mentioned earlier, in contrast with local variables, you can use fields to share information between methods. Here is an example:
class Example
{
void firstMethod()
{
myField = 42; // ok
...
}
void anotherMethod()
{
myField++; // ok
...
}
int myField = 0;
}
The variable myField is defined in the class but outside the methods firstMethod and anotherMethod. Therefore, myField has class scope and is available for use by all methods in that class.
There is one other point to notice about this example. In a method, you must declare a variable before you can use it. Fields are a little different. A method can use a field before the statement that defines the field; the compiler sorts out the details for you.
Overloading methods
If two identifiers have the same name and are declared in the same scope, they are said to be overloaded. Often an overloaded identifier is a bug that is trapped as a compile-time error. For example, if you declare two local variables with the same name in the same method, the compiler reports an error. Similarly, if you declare two fields with the same name in the same class or two identical methods in the same class, you also get a compile-time error. This fact might seem hardly worth mentioning given that everything so far has turned out to be a compile-time error. However, there is a way that you can overload an identifier for a method that is both useful and important.
Consider the WriteLine method of the Console class. You have already used this method for writing a string to the screen. However, when you type WriteLine in the Code and Text Editor window when writing C# code, notice that Microsoft IntelliSense gives you 19 different options! Each version of the WriteLine method takes a different set of parameters. One version takes no parameters and simply outputs a blank line. Another version takes a bool parameter and outputs a string representation of its value (True or False). Yet another implementation takes a decimal parameter and outputs it as a string, and so on. At compile time, the compiler looks at the types of the arguments you are passing in and then arranges for your application to call the version of the method that has a matching set of parameters. Here is an example:
static void Main()
{
Console.WriteLine("The answer is ");
Console.WriteLine(42);
}
Overloading is primarily useful when you need to perform the same operation on different data types or varying groups of information. You can overload a method when the different implementations have different sets of parameters; that is, when they have the same name but a different number of parameters or when the types of the parameters differ. When you call a method, you supply a comma-separated list of arguments, and the number and type of the arguments are used by the compiler to select one of the overloaded methods. However, keep in mind that although you can overload the parameters of a method, you can’t overload the return type of a method. In other words, you can’t declare two methods with the same name that differ only in their return type. (The compiler is clever, but not that clever.)
Writing methods
In the following exercises, you’ll create a method that calculates how much a consultant would charge for a given number of consultancy days at a fixed daily rate. You will start by developing the logic for the application and then use the Generate Method Stub Wizard to help you write the methods that are used by this logic. Next, you’ll run these methods in a console application to get a feel for the program. Finally, you’ll use the Visual Studio 2017 debugger to step into and out of the method calls as they run.
Develop the logic for the application
Using Visual Studio 2017, open the DailyRate project, which is in the Microsoft PressVCSBSChapter 3DailyRate folder in your Documents folder.
In Solution Explorer, in the DailyRate project, double-click the file Program.cs to display the code for the program in the Code and Text Editor window.
This program is simply a test harness for you to try out your code. When the application starts running, it calls the run method. You add to the run method the code that you want to try. (The way in which the method is called requires an understanding of classes, which you look at in Chapter 7.)
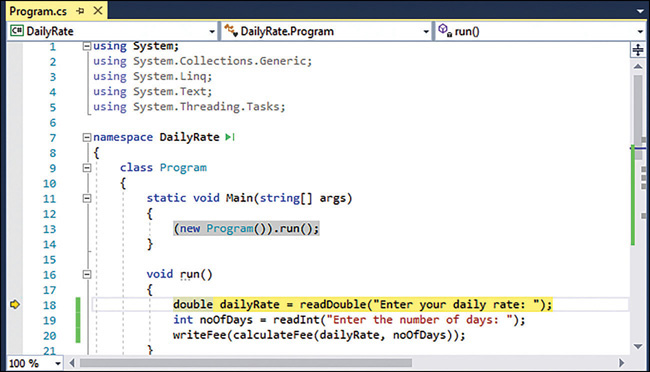
Add the following statements shown in bold to the body of the run method, between the opening and closing braces:
void run()
{
double dailyRate = readDouble("Enter your daily rate: ");
int noOfDays = readInt("Enter the number of days: ");
writeFee(calculateFee(dailyRate, noOfDays));
}The block of code you have just added to the run method calls the readDouble method (which you will write shortly) to ask the user for the daily rate for the consultant. The next statement calls the readInt method (which you will also write) to obtain the number of days. Finally, the writeFee method (to be written) is called to display the results on the screen. Notice that the value passed to writeFee is the value returned by the calculateFee method (the last one you will need to write), which takes the daily rate and the number of days and calculates the total fee payable.
![]()
Note You have not yet written the readDouble, readInt, writeFee, and calculateFee methods, so IntelliSense does not display these methods when you type this code. Do not try to build the application yet, because it will fail.
Write the methods by using the Generate Method Stub Wizard
In the Code and Text Editor window, in the run method, right-click the readDouble method call.
A shortcut menu appears that contains useful commands for generating and editing code, as shown here:
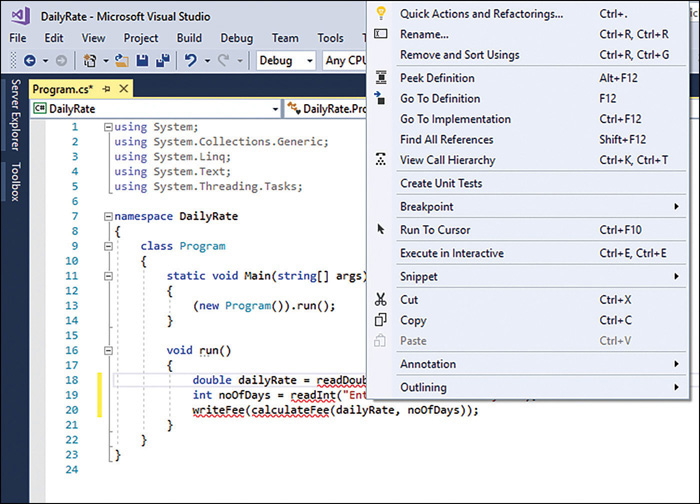
On the shortcut menu, click Quick Actions and Refactorings.
Visual Studio verifies that the readDouble method does not exist and displays a wizard that enables you to generate a stub for this method. Visual Studio examines the call to the readDouble method, ascertains the type of its parameters and return value, and suggests a default implementation, as shown in the following image:
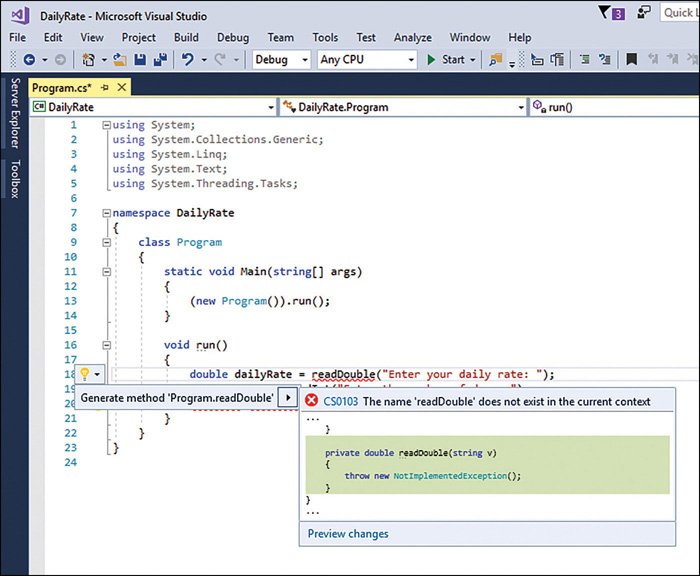
Click Generate Method ‘Program.readDouble’. Visual Studio adds the following method to your code:
private double readDouble(string v)
{
throw new NotImplementedException();
}The new method is created with the private qualifier, which is described in Chapter 7. The body of the method currently just throws a NotImplementedException exception. (Exceptions are described in Chapter 6.) You replace the body with your own code in the next step.
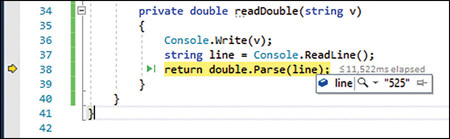
Delete the throw new NotImplementedException(); statement from the readDouble method and replace it with the following lines of code shown in bold:
private double readDouble(string v)
{
Console.Write(v);
string line = Console.ReadLine();
return double.Parse(line);
}This block of code displays the string in variable v to the screen. This variable is the string parameter passed in when the method is called; it contains the message prompting the user to type in the daily rate.
Note The Console.Write method is similar to the Console.WriteLine statement that you have used in earlier exercises, except that it does not output a newline character after the message.
The user types a value, which is read into a string using the ReadLine method and converted to a double using the double.Parse method. The result is passed back as the return value of the method call.
Note The ReadLine method is the companion method to WriteLine; it reads user input from the keyboard, finishing when the user presses the Enter key. The text typed by the user is passed back as the return value. The text is returned as a string value.
In the run method, right-click the call to the readInt method, click Quick Actions and Refactorings, and then click Generate Method ‘Program.readInt.’
The readInt method is generated like this:
private int readInt(string v)
{
throw new NotImplementedException();
}Replace the throw new NotImplementedException(); statement in the body of the readInt method with the following code shown in bold:
private int readInt(string v)
{
Console.Write(v);
string line = Console.ReadLine();
return int.Parse(line);
}This block of code is similar to the code for the readDouble method. The only difference is that the method returns an int value, so the string typed by the user is converted to a number using the int.Parse method.
Right-click the call to the calculateFee method in the run method, click Quick Actions and Refactorings, and then click Generate Method ‘Program.calculateFee.’
The calculateFee method is generated like this:
private object calculateFee(double dailyRate, int noOfDays)
{
throw new NotImplementedException();
}Notice in this case that Visual Studio uses the names of the arguments passed in to generate names for the parameters. (You can, of course, change the parameter names if they are not suitable.) What is more intriguing is the type returned by the method, which is object. Visual Studio is unable to determine exactly which type of value should be returned by the method from the context in which it is called. The object type just means a “thing,” and you should change it to the type you require when you add the code to the method. Chapter 7 covers the object type in greater detail.
Change the definition of the calculateFee method so that it returns a double, as shown in bold type here:
private double calculateFee(double dailyRate, int noOfDays)
{
throw new NotImplementedException();
}Replace the body of the calculateFee method and change it to an expression-bodied method with the following expression shown in bold; remove the curly braces and use => to indicate the expression that defines the body of the method. This statement calculates the fee payable by multiplying the two parameters together:
private double calculateFee(double dailyRate, int noOfDays) => dailyRate * noOfDays;
Right-click the call to the writeFee method in the run method, click Quick Actions and Refactorings, and then click Generate Method ‘Program.writeFee.’
Notice that Visual Studio uses the definition of the writeFee method to work out that its parameter should be a double. Also, the method call does not use a return value, so the type of the method is void:
private void writeFee(double v)
{
...
}
Tip If you feel sufficiently comfortable with the syntax, you can also write methods by typing them directly into the Code and Text Editor window. You do not always have to use the Generate menu option.
Replace the code in the body of the writeFee method with the following statement, which calculates the fee and adds a 10 percent commission before displaying the result. Again, notice that this is now an expression-bodied method:
private void writeFee(double v) => Console.WriteLine($"The consultant's fee is: {v * 1.1}");
On the Build menu, click Build Solution.
Occasionally, you will find yourself writing the same (or similar) code in more than one place in an application. When this occurs, highlight and right-click the block of code you have just typed, click Quick Actions and Refactoring, and then click Extract Method. The selected code is moved to a new method named NewMethod. The Extract Method Wizard is also able to determine whether the method should take any parameters and return a value. After the method has been generated, you should change its name (by overtyping) to something meaningful and also change the statement that has been generated to call this method with the new name.
Test the program
On the Debug menu, click Start Without Debugging.
Visual Studio 2017 builds the program and then runs it. A console window appears.
At the Enter Your Daily Rate prompt, type 525 and then press Enter.
At the Enter The Number of Days prompt, type 17 and then press Enter.
The program writes the following message to the console window:
The consultant's fee is: 9817.5
Press the Enter key to close the application and return to Visual Studio 2017.
In the next exercise, you’ll use the Visual Studio 2017 debugger to run your program in slow motion. You’ll see when each method is called (which is referred to as stepping into the method) and then see how each return statement transfers control back to the caller (also known as stepping out of the method). While you are stepping into and out of methods, you can use the tools on the Debug toolbar. However, the same commands are also available on the Debug menu when an application is running in debug mode.
Step through the methods by using the Visual Studio 2017 debugger
In the Code and Text Editor window, find the run method.
Move the cursor to the first statement in the run method:
double dailyRate = readDouble("Enter your daily rate: ");
Right-click anywhere on this line, and then click Run To Cursor.
The program starts, runs until it reaches the first statement in the run method, and then pauses. A yellow arrow in the left margin of the Code and Text Editor window indicates the current statement, and the statement itself is highlighted with a yellow background.
On the View menu, point to Toolbars, and then ensure that the Debug toolbar is selected.
If it was not already visible, the Debug toolbar opens. It might appear docked with the other toolbars. If you cannot see the toolbar, try using the Toolbars command on the View menu to hide it and look to see which buttons disappear. Then, display the toolbar again. The Debug toolbar looks like this:

On the Debug toolbar, click the Step Into button. (This is the sixth button from the left on the Debug toolbar.)
This action causes the debugger to step into the method being called. The yellow cursor jumps to the opening brace at the start of the readDouble method.
Click Step Into again to advance the cursor to the first statement:
Console.Write(v);
Tip You can also press F11 instead of repeatedly clicking Step Into on the Debug toolbar.
On the Debug toolbar, click Step Over. (This is the seventh button from the left.)
This action causes the method to execute the next statement without debugging it (stepping into it). This action is useful primarily if the statement calls a method, but you don’t want to step through every statement in that method. The yellow cursor moves to the second statement of the method, and the program displays the Enter Your Daily Rate prompt in a console window before returning to Visual Studio 2017. (The console window might be hidden behind Visual Studio.)
Tip You can also press F10 instead of Step Over on the Debug toolbar.
On the Debug toolbar, click Step Over again.
This time, the yellow cursor disappears, and the console window gets the focus because the program is executing the Console.ReadLine method and is waiting for you to type something.
Type 525 in the console window, and then press Enter.
Control returns to Visual Studio 2017. The yellow cursor appears on the third line of the method.
Hover the mouse over the reference to the line variable on either the second or third line of the method. (It doesn’t matter which.)
A ScreenTip appears, displaying the current value of the line variable (“525”). You can use this feature to ensure that a variable has been set to an expected value while you step through methods.
On the Debug toolbar, click Step Out. (This is the eighth button from the left.)
This action causes the current method to continue to run uninterrupted to its end. The readDouble method finishes and the yellow cursor is placed back at the first statement of the run method. This statement has now finished running.
Tip You can also press Shift+F11 instead of clicking Step Out on the Debug toolbar.
On the Debug toolbar, click Step Into.
The yellow cursor moves to the second statement in the run method:
int noOfDays = readInt("Enter the number of days: ");
On the Debug toolbar, click Step Over.
This time, you have chosen to run the method without stepping through it. The console window appears again, prompting you for the number of days.
In the console window, type 17 and then press Enter.
Control returns to Visual Studio 2017 (you might need to bring Visual Studio to the foreground). The yellow cursor moves to the third statement of the run method:
writeFee(calculateFee(dailyRate, noOfDays));
On the Debug toolbar, click Step Into.
The yellow cursor jumps to the expression that defines the body of the calculateFee method. This method is called first, before writeFee, because the value returned by this method is used as the parameter to writeFee.
On the Debug toolbar, click Step Out.
The calculateFee method call completes, and the yellow cursor jumps back to the third statement of the run method.
On the Debug toolbar, click Step Into again.
This time, the yellow cursor jumps to the statement that defines the body of the writeFee method.
Place the mouse over the v parameter in the method definition.
The value of v, 8925, is displayed in a ScreenTip.
On the Debug toolbar, click Step Out.
The message “The consultant’s fee is: 9817.5” is displayed in the console window. (You might need to bring the console window to the foreground to display it if it is hidden behind Visual Studio 2017.) The yellow cursor returns to the third statement in the run method.
On the toolbar, click Continue to cause the program to continue running without stopping at each subsequent statement.
Tip If the Continue button is not visible, click the Add Or Remove Buttons drop-down menu that appears at the end of the Debug toolbar, and then select Continue. The Continue button should now appear. Alternatively, you can press F5 to continue running the application without debugging.
The application completes and finishes running. Notice that the Debug toolbar disappears when the application finishes; by default, the Debug toolbar is displayed only when you are running an application in debug mode.
Nesting methods
Sometimes you want to break a large method down into smaller pieces. You can implement each piece as a helper method in its own right; this helps you to test methods that perform complex processes and to verify that each part of the large method functions as expected before bringing them together. It can also aid readability and make a large method easier to maintain.
![]()
Note The terms large method and helper method are not official vocabulary in C#. I have used them in this discussion to distinguish between a method that is broken down into smaller pieces (the large method) and the methods that implement these smaller pieces (the helper methods).
By default, methods (large and helper) are accessible across the class in which they are defined, and can be invoked from any other methods in that class. In the case of helper methods that are only utilized by one large method, it can make sense to keep these methods local to the large method that runs them. This approach can ensure that a helper method designed to operate in a given context is not used accidentally by another method for which it was not designed. This is also good practice for implementing encapsulation; the inner workings of a large method, including the helper methods that it invokes, can be kept separate from other methods. This practice reduces any dependencies between large methods; you can safely change the implementation of a large method and the helper methods that it invokes without accidentally impacting other elements of your application.
You can create helper methods by nesting them inside that large method that uses them, as shown in the next exercise. This exercise calculates factorials. You can use factorials to work out how many ways you can arrange a given number of items. The factorial of a positive integer, n, is defined in a recursive manner as n * factorial (n – 1), where the factorial of 1 is 1. For example, the factorial of 3 is 3 * factorial(2), which is in turn 2 * factorial(1), which is 1. This calculation evaluates as 3 * 2 * 1, or 6. If you have 3 items in a set, you can arrange them in 6 different ways. Similarly, if you have 4 items you can arrange them in 24 different ways (4 * factorial(3)), and you can arrange 5 items in 120 different ways (5 * factorial(4)).
Calculate factorials
Start Visual Studio 2017 if it is not already running.
Open the Factorial solution, which is in the Microsoft PressVCSBSChapter 3Factorial folder in your Documents folder.
In Solution Explorer, in the Factorials project, double-click the file Program.cs to display the code for the program in the Code and Text Editor window.
Add the following statements shown in bold to the body of the run method, between the opening and closing braces:
void run()
{
Console.Write("Please enter a positive integer: ");
string inputValue = Console.ReadLine();
long factorialValue = CalculateFactorial(inputValue);
Console.WriteLine($"Factorial() is ");
}This code prompts the user to enter a numeric value, and then calls the CalculateFactorial function (which you will write next) with this value, before displaying the result.
Add a new method named CalculateFactorial below the run method. This method should take a string parameter named input, and return a long integer value, as follows:
long CalculateFactorial(string input)
{
}In the CalculateFactorial method, after the initial opening brace, add the statement shown below in bold:
long CalculateFactorial(string input)
{
int inputValue = int.Parse(input);
}This statement converts the string value passed in as the parameter to an integer (the code does not currently check to make sure that the user has entered a valid integer; you will see how to do this in Chapter 6, “Managing errors and exceptions”).
Add a nested method named factorial to the CalculateFactorial function. The factorial method should take an int value and return a long. You will use this method to actually calculate the factorial of the input parameter:
long CalculateFactorial(string input)
{
int inputValue = int.Parse(input);
long factorial (int dataValue)
{
}
}In the body of the factorial method, add the statements shown below in bold. This code calculates the factorial of the input parameter using the recursive algorithm described earlier:
long CalculateFactorial(string input)
{
int inputValue = int.Parse(input);
long factorial (int dataValue)
{
if (dataValue == 1)
{
return 1;
}
else
{
return dataValue * factorial(dataValue - 1);
}
}
}In the CalculateFactorial method, call the factorial method using the integer value provided as input and return the result:
long CalculateFactorial(string input)
{
int inputValue = int.Parse(input);
long factorial (int dataValue)
{
if (dataValue == 1)
{
return 1;
}
else
{
return dataValue * factorial(dataValue - 1);
}
}
long factorialValue = factorial(inputValue);
return factorialValue;
}On the Debug menu, click Start Without Debugging.
Visual Studio 2017 builds the program and then runs it. A console window appears.
At the Please Enter a Positive Integer prompt, type 4, and then press Enter.
The program writes the following message to the console window:
Factorial(4) is 24
Press the Enter key to close the application and return to Visual Studio 2017.
Run the application and provide the value 5 when prompted. This time, the application should display the following message:
Factorial(5) is 120
Feel free to experiment with other values. Note that if you enter an input value that is too large (try 60, for example), the result will exceed that of the range that can be stored in a long integer, and you will get an incorrect result; most likely a negative number generated as a result of numeric overflow. You will learn more about how to handle this eventuality by using checked exceptions in Chapter 6.
Using optional parameters and named arguments
You have seen that by defining overloaded methods, you can implement different versions of a method that take different parameters. When you build an application that uses overloaded methods, the compiler determines which specific instances of each method it should use to satisfy each method call. This is a common feature of many object-oriented languages, not just C#.
However, developers can use other languages and technologies for building Windows applications and components that do not follow these rules. A key feature of C# and other languages designed for the .NET Framework is the ability to interoperate with applications and components written with other technologies. One of the principal technologies that underpins many Windows applications and services running outside the .NET Framework is the Component Object Model (COM). In fact, the common language runtime (CLR) used by the .NET Framework is also heavily dependent on COM, as is the Windows Runtime of Windows 10. COM does not support overloaded methods; instead, it uses methods that can take optional parameters. To make it easier to incorporate COM libraries and components into a C# solution, C# also supports optional parameters.
Optional parameters are also useful in other situations. They provide a compact and simple solution when it is not possible to use overloading because the types of the parameters do not vary sufficiently to enable the compiler to distinguish between implementations. For example, consider the following method:
public void DoWorkWithData(int intData, float floatData, int moreIntData)
{
...
}
The DoWorkWithData method takes three parameters: two ints and a float. Now suppose that you want to provide an implementation of DoWorkWithData that takes only two parameters: intData and floatData. You can overload the method like this:
public void DoWorkWithData(int intData, float floatData)
{
...
}
If you write a statement that calls the DoWorkWithData method, you can provide either two or three parameters of the appropriate types, and the compiler uses the type information to determine which overload to call:
int arg1 = 99;
float arg2 = 100.0F;
int arg3 = 101;
DoWorkWithData(arg1, arg2, arg3); // Call overload with three parameters
DoWorkWithData(arg1, arg2); // Call overload with two parameters
However, suppose that you want to implement two additional versions of DoWorkWithData that take only the first parameter and the third parameter. You might be tempted to try this:
public void DoWorkWithData(int intData)
{
...
}
public void DoWorkWithData(int moreIntData)
{
...
}
The issue here is that these two overloads appear identical to the compiler. Your code will fail to compile and will instead generate the error “Type ‘typename’ already defines a member called ‘DoWorkWithData’ with the same parameter types.” To understand why this is so, think what would happen if this code were legal. Consider the following statements:
int arg1 = 99;
int arg3 = 101;
DoWorkWithData(arg1);
DoWorkWithData(arg3);
Which overload or overloads would the calls to DoWorkWithData invoke? Using optional parameters and named arguments can help to solve this problem.
Defining optional parameters
You specify that a parameter is optional when you define a method by providing a default value for the parameter. You indicate a default value by using the assignment operator. In the optMethod method shown next, the first parameter is mandatory because it does not specify a default value, but the second and third parameters are optional:
void optMethod(int first, double second = 0.0, string third = "Hello") {
...
}
You must specify all mandatory parameters before any optional parameters.
You can call a method that takes optional parameters in the same way that you call any other method: you specify the method name and provide any necessary arguments. The difference with methods that take optional parameters is that you can omit the corresponding arguments and the method will use the default value when it runs. In the example that follows, the first call to the optMethod method provides values for all three parameters. The second call specifies only two arguments, and these values are applied to the first and second parameters. The third parameter receives the default value of “Hello” when the method runs.
optMethod(99, 123.45, "World"); // Arguments provided for all three parameters
optMethod(100, 54.321); // Arguments provided for first two parameters only
Passing named arguments
By default, C# uses the position of each argument in a method call to determine to which parameter the argument applies. Hence, the second example of the OptMethod method shown in the previous section passes the two arguments to the first and second parameters in the method because this is the order in which they occur in the method declaration. With C#, you can also specify parameters by name. This feature lets you pass the arguments in a different sequence. To pass an argument as a named parameter, you specify the name of the parameter, followed by a colon and the value to use. The following examples perform the same function as those shown in the previous section, except that the parameters are specified by name:
optMethod(first : 99, second : 123.45, third : "World");
optMethod(first : 100, second : 54.321);
Named arguments give you the ability to pass arguments in any order. You can rewrite the code that calls the optMethod method such as shown here:
optMethod(third : "World", second : 123.45, first : 99); optMethod(second : 54.321, first : 100);
optMethod(third : "World", second : 123.45, first : 99);
optMethod(second : 54.321, first : 100);
This feature also makes it possible for you to omit arguments. For example, you can call the optMethod method and specify values for the first and third parameters only and use the default value for the second parameter, like this:
optMethod(first : 99, third : "World");
Additionally, you can mix positional and named arguments. However, if you use this technique, you must specify all the positional arguments before the first named argument.
optMethod(99, third : "World"); // First argument is positional
Resolving ambiguities with optional parameters and named arguments
Using optional parameters and named arguments can result in some possible ambiguities in your code. You need to understand how the compiler resolves these ambiguities; otherwise, you might find your applications behaving in unexpected ways. Suppose that you define the optMethod method as an overloaded method, as shown in the following example:
void optMethod(int first, double second = 0.0, string third = "Hello")
{
...
}
void optMethod(int first, double second = 1.0, string third = "Goodbye", int fourth = 100 )
{
...
}
This is perfectly legal C# code that follows the rules for overloaded methods. The compiler can distinguish between the methods because they have different parameter lists. However, as demonstraeted in the following example, a problem can arise if you attempt to call the optMethod method and omit some of the arguments corresponding to one or more of the optional parameters:
optMethod(1, 2.5, "World");
Again, this is perfectly legal code, but which version of the optMethod method does it run? The answer is the version that most closely matches the method call, so the code invokes the method that takes three parameters and not the version that takes four. That makes good sense, so consider this one:
optMethod(1, fourth : 101);
In this code, the call to optMethod omits arguments for the second and third parameters, but it specifies the fourth parameter by name. Only one version of optMethod matches this call, so this is not a problem. This next example will get you thinking, though:
optMethod(1, 2.5);
This time, neither version of the optMethod method exactly matches the list of arguments provided. Both versions of the optMethod method have optional parameters for the second, third, and fourth arguments. So, does this statement call the version of optMethod that takes three parameters and use the default value for the third parameter, or does it call the version of optMethod that takes four parameters and use the default value for the third and fourth parameters? The answer is that it does neither. This is an unresolvable ambiguity, and the compiler does not let you compile the application. The same situation arises with the same result if you try to call the optMethod method, as shown in any of the following statements:
optMethod(1, third : "World");
optMethod(1);
optMethod(second : 2.5, first : 1);
In the final exercise in this chapter, you will revisit the DailyRate project and practice implementing methods that take optional parameters and calling them by using named arguments. You will also test common examples of how the C# compiler resolves method calls that involve optional parameters and named arguments.
Define and call a method that takes optional parameters
Using Visual Studio 2017, open the DailyRate solution, which is in the Microsoft PressVCSBSChapter 3DailyRate Using Optional Parameters folder in your Documents folder.
In Solution Explorer, in the DailyRate project, double-click the file Program.cs to display the code for the program in the Code and Text Editor window.
This version of the application is empty apart from the Main method and the skeleton version of the run method.
In the Program class, after the run method, add the calculateFee method below the run method. This is the same version of the method that you implemented in the previous set of exercises, except that it takes two optional parameters with default values. The method also prints a message indicating the version of the calculateFee method that was called. (You will add overloaded implementations of this method in the following steps.)
private double calculateFee(double dailyRate = 500.0, int noOfDays = 1)
{
Console.WriteLine("calculateFee using two optional parameters");
return dailyRate * noOfDays;
}Add another implementation of the calculateFee method to the Program class, as shown in the code below. This version takes one optional parameter, called dailyRate, of type double. The body of the method calculates and returns the fee for a single day only.
private double calculateFee(double dailyRate = 500.0)
{
Console.WriteLine("calculateFee using one optional parameter");
int defaultNoOfDays = 1;
return dailyRate * defaultNoOfDays;
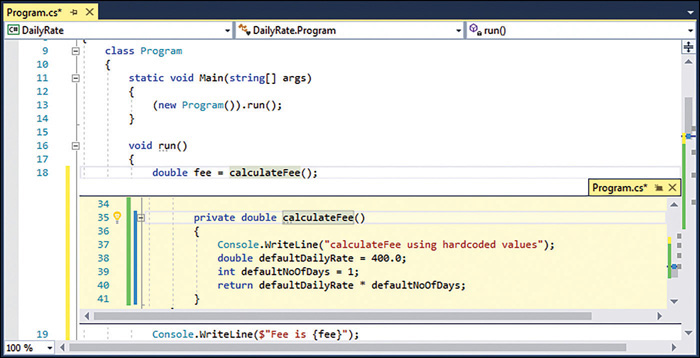
}Add a third implementation of the calculateFee method to the Program class. This version takes no parameters and uses hardcoded values for the daily rate and number of days.
private double calculateFee()
{
Console.WriteLine("calculateFee using hardcoded values");
double defaultDailyRate = 400.0;
int defaultNoOfDays = 1;
return defaultDailyRate * defaultNoOfDays;
}At the Beginning of the run method, add the following statements in bold that call calculateFee and display the results:
public void run()
{
double fee = calculateFee();
Console.WriteLine($"Fee is ");
}Tip You can quickly view the definition of a method from the statement that invokes it. To do so, right-click the method call and then click Peek Definition. The following image shows the Peek Definition window for the calculateFee method.
This feature is extremely useful if your code is split across multiple files, or even if it is in the same file, but the file is very long.
On the Debug menu, click Start Without Debugging to build and run the program.
The program runs in a console window and displays the following messages:
calculateFee using hardcoded values
Fee is 400The run method called the version of calculateFee that takes no parameters rather than either of the implementations that take optional parameters because that version most closely matches the method call.
Press any key to close the console window and return to Visual Studio.
In the run method, modify the statement that calls calculateFee to match the code shown in bold here:
public void run()
{
double fee = calculateFee(650.0);
Console.WriteLine($"Fee is ");
}On the Debug menu, click Start Without Debugging to build and run the program.
The program displays the following messages:
calculateFee using one optional parameter
Fee is 650This time, the run method called the version of calculateFee that takes one optional parameter. As before, this is the version that most closely matches the method call.
Press any key to close the console window and return to Visual Studio.
In the run method, modify the statement that calls calculateFee again:
public void run()
{
double fee = calculateFee(500.0, 3);
Console.WriteLine($"Fee is ");
}On the Debug menu, click Start Without Debugging to build and run the program.
The program displays the following messages:
calculateFee using two optional parameters
Fee is 1500As you might expect from the previous two cases, the run method called the version of calculateFee that takes two optional parameters.
Press any key to close the console window and return to Visual Studio.
In the run method, modify the statement that calls calculateFee and specify the dailyRate parameter by name:
public void run()
{
double fee = calculateFee(dailyRate : 375.0);
Console.WriteLine($"Fee is ");
}On the Debug menu, click Start Without Debugging to build and run the program.
The program displays the following messages:
calculateFee using one optional parameter
Fee is 375As earlier, the run method calls the version of calculateFee that takes one optional parameter. Changing the code to use a named argument does not change the way in which the compiler resolves the method call in this example.
Press any key to close the console window and return to Visual Studio.
In the run method, modify the statement that calls calculateFee and specify the noOfDays parameter by name.
public void run()
{
double fee = calculateFee(noOfDays : 4);
Console.WriteLine($"Fee is ");
}On the Debug menu, click Start Without Debugging to build and run the program.
The program displays the following messages:
calculateFee using two optional parameters
Fee is 2000This time, the run method called the version of calculateFee that takes two optional parameters. The method call has omitted the first parameter (dailyRate) and specified the second parameter by name. The version of the calculateFee method that takes two optional parameters is the only one that matches the call.
Press any key to close the console window and return to Visual Studio.
Modify the implementation of the calculateFee method that takes two optional parameters. Change the name of the first parameter to theDailyRate and update the return statement to match that shown in bold in the following code:
private double calculateFee(double theDailyRate = 500.0, int noOfDays = 1)
{
Console.WriteLine("calculateFee using two optional parameters");
return theDailyRate * noOfDays;
}In the run method, modify the statement that calls calculateFee and specify the theDailyRate parameter by name.
public void run()
{
double fee = calculateFee(theDailyRate : 375.0);
Console.WriteLine("Fee is ");
}On the Debug menu, click Start Without Debugging to build and run the program.
The program displays the following messages:
calculateFee using two optional parameters
Fee is 375The previous time that you specified the fee but not the daily rate (step 12), the run method called the version of calculateFee that takes one optional parameter. This time, the run method called the version of calculateFee that takes two optional parameters. In this case, using a named argument has changed the way in which the compiler resolves the method call. If you specify a named argument, the compiler compares the argument name to the names of the parameters specified in the method declarations and selects the method that has a parameter with a matching name. If you had specified the argument as
aDailyRate:375.0 in the call to the calculateFee method, the program would have failed to compile because no version of the method has a parameter that matches this name.Press any key to close the console window and return to Visual Studio.
Summary
In this chapter, you learned how to define methods to implement a named block of code. You saw how to pass parameters into methods and how to return data from methods. You also saw how to call a method, pass arguments, and obtain a return value. You learned how to define overloaded methods with different parameter lists, and you saw how the scope of a variable determines where it can be accessed. Then, you used the Visual Studio 2017 debugger to step through code as it runs. Finally, you learned how to write methods that take optional parameters and how to call methods by using named parameters.
If you want to continue to the next chapter, keep Visual Studio 2017 running and turn to Chapter 4, “Using decision statements.”
If you want to exit Visual Studio 2017 now, on the File menu, click Exit. If you see a Save dialog box, click Yes and save the project.
Quick reference
To |
Do this |
Declare a method |
Write the method within a class. Specify the method name, parameter list, and return type, followed by the body of the method between braces. For example: int addValues(int leftHandSide, int rightHandSide) { ... } |
Return a value from within a method |
Write a return statement within the method. For example: return leftHandSide + rightHandSide; |
Return multiple values from within a method |
Write a return statement that returns a tuple. For example: return (division, remainder); |
Return from a method before the end of the method |
Write a return statement within the method. For example: return; |
Define an expression-bodied method |
Use the => sequence followed by the expression that defines the body of the method and a closing semicolon. For example: double calculateFee(double dailyRate, int noOfDays) |
Call a method |
Write the name of the method followed by any arguments between parentheses. For example: addValues(39, 3); |
Call a method that returns a tuple |
Invoke the method as above, but assign the result to a set of variables enclosed in parenthesis. There should be one variable for each value of the tuple being returned. For example: int division, remainder; (division, remainder) = divide(leftHandSide, rightHandSide); |
Use the Generate Method Stub Wizard |
Right-click a call to the method, and then click Generate Method Stub. |
Create a nested method |
Define the method within the body of another method. For example: long CalculateFactorial(string input) |
Display the Debug toolbar |
On the View menu, point to Toolbars, and then click Debug. |
Step into a method |
On the Debug toolbar, click Step Into. or On the Debug menu, click Step Into. |
Step out of a method |
On the Debug toolbar, click Step Out. or On the Debug menu, click Step Out. |
Specify an optional parameter to a method |
Provide a default value for the parameter in the method declaration. For example: void optMethod(int first, double second = 0.0, string third |
Pass a method argument as a named parameter |
Specify the name of the parameter in the method call. For example: optMethod(first : 100, third : "World"); |