CHAPTER 15
Implementing properties to access fields
After completing this chapter, you will be able to:
Encapsulate logical fields by using properties.
Control read access to properties by declaring get accessors.
Control write access to properties by declaring set accessors.
Create interfaces that declare properties.
Implement interfaces containing properties by using structures and classes.
Generate properties automatically based on field definitions.
Use properties to initialize objects.
This chapter looks at how to define and use properties to encapsulate fields and data in a class. Previous chapters emphasize that you should make the fields in a class private and provide methods to store values in them and to retrieve their values. This approach ensures safe and controlled access to fields, and you can use it to encapsulate additional logic and rules concerning the values that are permitted. However, the syntax for accessing a field in this way is unnatural. When you want to read or write a variable, you normally use an assignment statement, so calling a method to achieve the same effect on a field (which is, after all, just a variable) feels a little clumsy. Properties are designed to alleviate this awkwardness.
Implementing encapsulation by using methods
First, let’s recap the original motivation for using methods to hide fields.
Consider the following structure that represents a position on a computer screen as a pair of coordinates, x and y. Assume that the range of valid values for the x-coordinate lies between 0 and 1279, and the range of valid values for the y-coordinate lies between 0 and 1023.
struct ScreenPosition
{
public int X;
public int Y;
public ScreenPosition(int x, int y)
{
this.X = rangeCheckedX(x);
this.Y = rangeCheckedY(y);
}
private static int rangeCheckedX(int x)
{
if (x < 0 || x > 1279)
{
throw new ArgumentOutOfRangeException("X");
}
return x;
}
private static int rangeCheckedY(int y)
{
if (y < 0 || y > 1023)
{
throw new ArgumentOutOfRangeException("Y");
}
return y;
}
}
One problem with this structure is that it does not follow the golden rule of encapsulation—that is, it does not keep its data private. Public data is often a bad idea because the class cannot control the values that an application specifies. For example, the ScreenPosition constructor checks its parameters to ensure that they are in a specified range, but no such check can be done on the “raw” access to the public fields. Sooner or later (probably sooner), an error or misunderstanding on the part of a developer using this class in an application can cause either X or Y to stray out of this range:
ScreenPosition origin = new ScreenPosition(0, 0);
...
int xpos = origin.X;
origin.Y = -100; // oops
The common way to solve this problem is to make the fields private and add an accessor method and a modifier method to read and write the value of each private field respectively. The modifier methods can then check the range for new field values. For example, the code that follows contains an accessor (GetX) and a modifier (SetX) for the X field. Notice that SetX checks the parameter passed in.
struct ScreenPosition
{
...
public int GetX()
{
return this.x;
}
public void SetX(int newX)
{
this.x = rangeCheckedX(newX);
}
...
private static int rangeCheckedX(int x) { ... }
private static int rangeCheckedY(int y) { ... }
private int x, y;
}
The code now successfully enforces the range constraints, which is good. However, there is a price to pay for this valuable guarantee—ScreenPosition no longer has a natural field-like syntax; it uses awkward method-based syntax instead. The example that follows increases the value of X by 10. To do so, it has to read the value of X by using the GetX accessor method and then write the value of X by using the SetX modifier method.
int xpos = origin.GetX();
origin.SetX(xpos + 10);
Compare this with the equivalent code if the X field were public:
origin.X += 10;
There is no doubt that, in this case, using public fields is syntactically cleaner, shorter, and easier. Unfortunately, using public fields breaks encapsulation. By using properties, you can combine the best of both worlds (fields and methods) to retain encapsulation while providing a field-like syntax.
What are properties?
A property is a cross between a field and a method—it looks like a field but acts as a method. You access a property by using the same syntax that you use to access a field. However, the compiler automatically translates this field-like syntax into calls to accessor methods (sometimes referred to as property getters and property setters).
The syntax for a property declaration looks like this:
AccessModifier Type PropertyName
{
get
{
// read accessor code
}
set
{
// write accessor code
}
}
A property can contain two blocks of code, starting with the get and set keywords. The get block contains statements that execute when the property is read, and the set block contains statements that run upon writing to the property. The type of the property specifies the type of data read and written by the get and set accessors.
The next code example shows the ScreenPosition structure rewritten by using properties. When looking at this code, notice the following:
Lowercase _x and _y are private fields.
Uppercase X and Y are public properties.
All set accessors are passed the data to be written by using a hidden, built-in parameter named value.
struct ScreenPosition
{
private int _x, _y;
public ScreenPosition(int X, int Y)
{
this._x = rangeCheckedX(X);
this._y = rangeCheckedY(Y);
}
public int X
{
get { return this._x; }
set { this._x = rangeCheckedX(value); }
}
public int Y
{
get { return this._y; }
set { this._y = rangeCheckedY(value); }
}
private static int rangeCheckedX(int x) { ... }
private static int rangeCheckedY(int y) { … }
}
In this example, a private field directly implements each property, but this is only one way to implement a property. All that is required is for a get accessor to return a value of the specified type. Such a value can easily be calculated dynamically rather than being simply retrieved from stored data, in which case there would be no need for a physical field.
![]()
Note Although the examples in this chapter show how to define properties for a structure, they are equally applicable to classes; the syntax is the same.
For simple properties, you can use expression-bodied members rather than full-blown method syntax for get and set accessors. For example, you can simplify the X and Y properties shown in the previous example like this:
public int X
{
get => this._x;
set => this._x = rangeCheckedX(value);
}
public int Y
{
get => this._y;
set => this._y = rangeCheckedY(value);
}
Notice that you don’t need to specify the return keyword for the get accessor; you simply provide an expression that is evaluated every time the property is read. This syntax is less verbose and arguably more natural, although functionally the properties perform the same task. It is a matter of personal preference which you should use, but for simple properties, I would recommend adopting the expression-bodied syntax. Of course, you can mix and match; you could implement a simple get accessor as an expression-bodied member, but a more complex set accessor could still utilize the method syntax.
Properties and field names: A warning
The section “Naming variables” in Chapter 2, “Working with variables, operators, and expressions,” describes some recommendations for naming variables. In particular, it states that you should avoid starting an identifier with an underscore. However, you can see that the ScreenPosition struct does not completely follow this guidance; it contains fields named _x and _y. There is a good reason for this anomaly. The sidebar “Naming and accessibility” in Chapter 7, “Creating and managing classes and objects,” describes how it is common to use identifiers that start with an uppercase letter for publicly accessible methods and fields and to use identifiers that start with a lowercase letter for private methods and fields. Taken together, these two practices can cause you to give properties and private fields a name that differs only in the case of the initial letter, and many organizations do precisely this.
If your organization follows this approach, you should be aware of one important drawback. Examine the following code, which implements a class named Employee. The employeeID field is private, but the EmployeeID property provides public access to this field.
class Employee
{
private int employeeID;
public int EmployeeID
{
get => this.EmployeeID;
set => this.EmployeeID = value;
}
}
This code will compile perfectly well, but it results in a program raising a StackOverflow-Exception exception whenever the EmployeeID property is accessed. The exception occurs because the get and set accessors reference the property (uppercase E) rather than the private field (lowercase e), which causes an endless recursive loop that eventually causes the process to exhaust the available memory. This type of bug is very difficult to spot! For this reason, the examples in this book name the private fields used to provide the data for properties with a leading underscore; it makes them much easier to distinguish from the names of properties. All other private fields will continue to use camelCase identifiers without a leading underscore.
Using properties
When you use a property in an expression, you can use it in a read context (when you are retrieving its value) and in a write context (when you are modifying its value). The following example shows how to read values from the X and Y properties of the ScreenPosition structure:
ScreenPosition origin = new ScreenPosition(0, 0);
int xpos = origin.X; // calls origin.X.get
int ypos = origin.Y; // calls origin.Y.get
Notice that you access properties and fields by using identical syntax. When you use a property in a read context, the compiler automatically translates your field-like code into a call to the get accessor of that property. Similarly, if you use a property in a write context, the compiler automatically translates your field-like code into a call to the set accessor of that property.
origin.X = 40; // calls origin.X.set, with value set to 40
origin.Y = 100; // calls origin.Y.Set, with value set to 100
The values being assigned are passed into the set accessors by using the value variable, as described in the preceding section. The runtime does this automatically.
It’s also possible to use a property in a read/write context. In this case, both the get accessor and the set accessor are used. For example, the compiler automatically translates statements such as the following into calls to the get and set accessors:
origin.X += 10;
![]()
Tip You can declare static properties in the same way that you can declare static fields and methods. You can access static properties by using the name of the class or structure rather than an instance of the class or structure.
Read-only properties
You can declare a property that contains only a get accessor. In this case, you can use the property only in a read context. For example, here’s the X property of the ScreenPosition structure declared as a read-only property:
struct ScreenPosition
{
private int _x;
...
public int X
{
get => this._x;
}
}
The X property does not contain a set accessor; therefore, any attempt to use X in a write context will fail, as demonstrated in the following example:
origin.X = 140; // compile-time error
Write-only properties
Similarly, you can declare a property that contains only a set accessor. In this case, you can use the property only in a write context. For example, here’s the X property of the ScreenPosition structure declared as a write-only property:
struct ScreenPosition
{
private int _x;
...
public int X
{
set => this._x = rangeCheckedX(value);
}
}
The X property does not contain a get accessor; any attempt to use X in a read context will fail, as illustrated here:
Console.WriteLine(origin.X); // compile-time error
origin.X = 200; // compiles OK
origin.X += 10; // compile-time error
![]()
Note Write-only properties are useful for secure data such as passwords. Ideally, an application that implements security should allow you to set your password but never allow you to read it back. When a user attempts to log on, the user can provide the password. The logon method can compare this password with the stored password and return only an indication of whether they match.
Property accessibility
You can specify the accessibility of a property (using the keywords public, private, or protected) when you declare it. However, it is possible within the property declaration to override the property accessibility for the get and set accessors. For example, the version of the ScreenPosition structure shown in the code that follows defines the set accessors of the X and Y properties as private. (The get accessors are public because the properties are public.)
struct ScreenPosition
{
private int _x, _y;
...
public int X
{
get => this._x;
private set => this._x = rangeCheckedX(value);
}
public int Y
{
get => this._y;
private set => this._y = rangeCheckedY(value);
}
...
}
You must observe some rules when defining accessors that have different accessibility from one another:
You can change the accessibility of only one of the accessors when you define it. It wouldn’t make much sense to define a property as public only to change the accessibility of both accessors to private anyway.
The modifier must not specify an accessibility that is less restrictive than that of the property. For example, if the property is declared to be private, you cannot specify the read accessor as public. (Instead, you would make the property public and make the write accessor private.)
Understanding the property restrictions
Properties look, act, and feel like fields when you read or write data by using them. However, they are not true fields, and certain restrictions apply to them:
You can assign a value through a property of a structure or class only after the structure or class has been initialized. The following code example is illegal because the location variable has not been initialized (by using new):
ScreenPosition location;
location.X = 40; // compile-time error, location not assigned
![]()
Note This might seem trivial, but if X were a field rather than a property, the code would be legal. For this reason, you should define structures and classes from the beginning by using properties rather than fields that you later migrate to properties. Code that uses your classes and structures might no longer work after you change fields into properties. You will return to this matter in the section “Generating automatic properties” later in this chapter.
You can’t use a property as a ref or an out argument to a method (although you can use a writable field as a ref or an out argument). This makes sense because the property doesn’t really point to a memory location; rather, it points to an accessor method, such as in the following example:
MyMethod(ref location.X); // compile-time error
A property can contain at most one get accessor and one set accessor. A property cannot contain other methods, fields, or properties.
The get and set accessors cannot take any parameters. The data being assigned is passed to the set accessor automatically by using the value variable.
You can’t declare properties by using const, such as is demonstrated here:
const int X
{
get => ...
set => ...
} // compile-time error
Using properties appropriately
Properties are a powerful feature and used correctly, they can help to make code easier to understand and maintain. However, they are no substitute for careful object-oriented design that focuses on the behavior of objects rather than on the properties of objects. Accessing private fields through regular methods or through properties does not, by itself, make your code well designed. For example, a bank account holds a balance indicating the funds available in the account. You might, therefore, be tempted to create a Balance property on a BankAccount class, like this:
class BankAccount
{
private decimal _balance;
...
public decimal Balance
{
get => this._balance;
set => this._balance = value;
}
}
This is a poor design because it fails to represent the functionality required when someone withdraws money from or deposits money into an account. (If you know of a bank that allows you to change the balance of your account directly without physically putting money into the account, please let me know!) When you’re programming, try to express the problem you’re solving in the solution and don’t get lost in a mass of low-level syntax. As the following example illustrates, provide Deposit and Withdraw methods for the BankAccount class rather than a property setter:
class BankAccount
{
private decimal _balance;
...
public decimal Balance { get => this._balance; }
public void Deposit(decimal amount) { ... }
public bool Withdraw(decimal amount) { ... }
}
Declaring interface properties
You encountered interfaces in Chapter 13, “Creating interfaces and defining abstract classes.” Interfaces can define properties as well as methods. To do this, you specify the get or set keyword or both, but you replace the body of the get or set accessor with a semicolon, as shown here:
interface IScreenPosition
{
int X { get; set; }
int Y { get; set; }
}
Any class or structure that implements this interface must implement the X and Y properties with get and set accessor methods (or expression-bodied members).
struct ScreenPosition : IScreenPosition
{
...
public int X
{
get { ... } // or get => ...
set { ... } // or set => ...
}
public int Y
{
get { ... }
set { ... }
}
...
}
If you implement the interface properties in a class, you can declare the property implementations as virtual, which enables derived classes to override the implementations.
class ScreenPosition : IScreenPosition
{
...
public virtual int X
{
get { ... }
set { ... }
}
public virtual int Y
{
get { ... }
set { ... }
}
...
}
![]()
Note This example shows a class. Remember that the virtual keyword is not valid when creating a struct because structures do not support inheritance.
You can also choose to implement a property by using the explicit interface implementation syntax covered in Chapter 13. An explicit implementation of a property is nonpublic and nonvirtual (and cannot be overridden).
struct ScreenPosition : IScreenPosition
{
...
int IScreenPosition.X
{
get { ... }
set { ... }
}
int IScreenPosition.Y
{
get { ... }
set { ... }
}
...
}
Replacing methods with properties
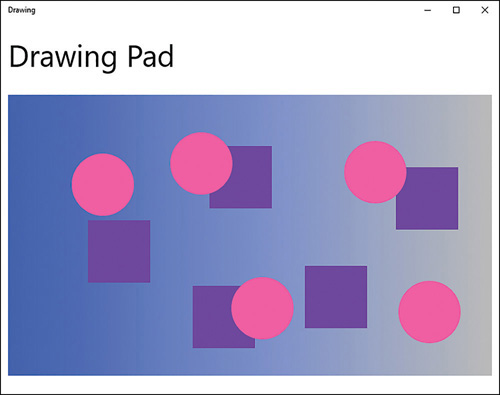
Chapter 13 teaches you how to create a drawing application with which a user can place circles and squares on a canvas in a window. In the exercises in that chapter, you factor the common functionality for the Circle and Square classes into an abstract class called DrawingShape. The DrawingShape class provides the SetLocation and SetColor methods, which the application uses to specify the position and color of a shape on the screen. In the following exercise, you will modify the DrawingShape class to expose the location and color of a shape as properties.
Use properties
Start Visual Studio 2017 if it is not already running.
Open the Drawing solution, which is located in the Microsoft PressVCSBSChapter 15Drawing Using Properties folder in your Documents folder.
Display the DrawingShape.cs file in the Code and Text Editor window.
This file contains the same DrawingShape class that is in Chapter 13 except that, following the recommendations described earlier in this chapter, the size field has been renamed as _size, and the locX and locY fields have been renamed as _x and _y.
abstract class DrawingShape
{
protected int _size;
protected int _x = 0, _y = 0;
...
}Open the IDraw.cs file for the Drawing project in the Code and Text Editor window.
This interface specifies the SetLocation method, like this:
interface IDraw
{
void SetLocation(int xCoord, int yCoord);
...
}The purpose of this method is to set the _x and _y fields of the DrawingShape object to the values passed in. This method can be replaced with a pair of properties.
Delete this method and replace it with the definition of a pair of properties named X and Y, as shown here in bold:
interface IDraw
{
int X { get; set; }
int Y { get; set; }
...
}In the DrawingShape class, delete the SetLocation method and replace it with the following implementations of the X and Y properties:
public int X
{
get => this._x;
set => this._x = value;
}
public int Y
{
get => this._y;
set => this._y = value;
}Display the DrawingPad.xaml.cs file in the Code and Text Editor window and locate the drawingCanvas_Tapped method.
This method runs when a user taps the screen or clicks the left mouse button. It draws a square on the screen at the point where the user taps or clicks.
Locate the statement that calls the SetLocation method to set the position of the square on the screen. It is located in the if statement block as highlighted in the following:
if (mySquare is IDraw)
{
IDraw drawSquare = mySquare;
drawSquare.SetLocation((int)mouseLocation.X, (int)mouseLocation.Y);
drawSquare.Draw(drawingCanvas);
}Replace this statement with code that sets the X and Y properties of the Square object, as shown in bold in the following code:
if (mySquare is IDraw)
{
IDraw drawSquare = mySquare;
drawSquare.X = (int)mouseLocation.X;
drawSquare.Y = (int)mouseLocation.Y;
drawSquare.Draw(drawingCanvas);
}Locate the drawingCanvas_RightTapped method.
This method runs when the user taps and holds a finger on the screen or clicks the right mouse button. It draws a circle at the location where the user taps and holds or right-clicks.
In this method, replace the statement that calls the SetLocation method of the Circle object and set the X and Y properties instead, as shown in bold in the following example:
if (myCircle is IDraw)
{
IDraw drawCircle = myCircle;
drawCircle.X = (int)mouseLocation.X;
drawCircle.Y = (int)mouseLocation.Y;
drawCircle.Draw(drawingCanvas);
}Open the IColor.cs file for the Drawing project in the Code and Text Editor window. This interface specifies the SetColor method, like this:
interface IColor
{
void SetColor(Color color);
}Delete this method and replace it with the definition of a property named Color, as presented here:
interface IColor
{
Color Color { set; }
}This is a write-only property, providing a set accessor but no get accessor. You define the property this way because the color is not stored in the DrawingShape class and is specified only as each shape is drawn; you cannot actually query a shape to find out which color it is.

Note It is common practice for a property to share the same name as a type (Color in this example).
Return to the DrawingShape class in the Code and Text Editor window. Replace the SetColor method in this class with the Color property shown here:
public Color Color
{
set
{
if (this.shape != null)
{
SolidColorBrush brush = new SolidColorBrush(value);
this.shape.Fill = brush;
}
}
}Note The code for the set accessor is almost the same as the original SetColor method except that the statement that creates the SolidColorBrush object is passed the value parameter. Additionally, this is an example where the method syntax is more appropriate than using an expression-bodied member.
Return to the DrawingPad.xaml.cs file in the Code and Text Editor window. In the drawingCanvas_ Tapped method, modify the statement that sets the color of the Square object to match the following code in bold:
if (mySquare is IColor)
{
IColor colorSquare = mySquare;
colorSquare.Color = Colors.BlueViolet;
}Similarly, in the drawingCanvas_RightTapped method, modify the statement that sets the color of the Circle object as shown in bold.
if (myCircle is IColor)
{
IColor colorCircle = myCircle;
colorCircle.Color = Colors.HotPink;
}On the Debug menu, click Start Debugging to build and run the project.
Verify that the application operates in the same manner as before. If you tap the screen or click the left mouse button on the canvas, the application should draw a square, and if you tap and hold or click the right mouse button, the application should draw a circle:
Return to the Visual Studio 2017 programming environment and stop debugging.
Generating automatic properties
As mentioned earlier in this chapter, the principal purpose of properties is to hide the implementation of fields from the outside world. This is fine if your properties actually perform some useful work, but if the get and set accessors simply wrap operations that just read or assign a value to a field, you might be questioning the value of this approach. However, there are at least two good reasons why you should define properties rather than expose data as public fields even in these situations:
Compatibility with applications Fields and properties expose themselves by using different metadata in assemblies. If you develop a class and decide to use public fields, any applications that use this class will reference these items as fields. Although you use the same C# syntax for reading and writing a field that you use when reading and writing a property, the compiled code is actually quite different—the C# compiler just hides the differences from you. If you later decide that you really do need to change these fields to properties (maybe the business requirements have changed, and you need to perform additional logic when assigning values), existing applications will not be able to use the updated version of the class without being recompiled. This is awkward if you have deployed the application on a large number of devices throughout an organization. There are ways around this, but it is generally better to avoid getting into this situation in the first place.
Compatibility with interfaces If you are implementing an interface and the interface defines an item as a property, you must write a property that matches the specification in the interface, even if the property just reads and writes data in a private field. You cannot implement a property simply by exposing a public field with the same name.
The designers of the C# language recognized that programmers are busy people who should not have to waste their time writing more code than they need to. To this end, the C# compiler can generate the code for properties automatically, like this:
class Circle
{
public int Radius{ get; set; }
...
}
In this example, the Circle class contains a property named Radius. Apart from the type of this property, you have not specified how this property works—the get and set accessors are empty. The C# compiler converts this definition to a private field and a default implementation that looks similar to this:
class Circle
{
private int _radius;
public int Radius{
get
{
return this._radius;
}
set
{
this._radius = value;
}
}
...
}
So with very little effort, you can implement a simple property by using automatically generated code, and if you need to include additional logic later, you can do so without breaking any existing applications.
![]()
Note The syntax for defining an automatic property is almost identical to the syntax for defining a property in an interface. The exception is that an automatic property can specify an access modifier such as private, public, or protected.
You can create a read-only automatic property by omitting the empty set accessor from your property declaration, like this:
class Circle
{
public DateTime CircleCreatedDate { get; }
...
}
This is useful in scenarios where you want to create an immutable property; a property that is set when the object is constructed and cannot subsequently be changed. For example, you might want to set the date on which an object was created or the name of the user who created it, or you might want to generate a unique identifier value for the object. These are values that you typically want to set once and then prevent them from being modified. With this in mind, C# allows you to initialize read-only automatic properties in one of two ways. You can initialize the property from a constructor, like this:
class Circle
{
public Circle()
{
CircleCreatedDate = DateTime.Now;
}
public DateTime CircleCreatedDate { get; }
...
}
Alternatively, you can initialize the property as part of the declaration, like this:
class Circle
{
public DateTime CircleCreatedDate { get; } = DateTime.Now;
...
}
Be aware that if you initialize a property in this way and also set its value in a constructor, the value provided by the constructor will overwrite the value specified by the property initializer; use one approach or the other, but not both!
![]()
Note You cannot create write-only automatic properties. If you attempt to create an automatic property without a get accessor, you will see a compile-time error.
Initializing objects by using properties
In Chapter 7, you learned how to define constructors to initialize an object. An object can have multiple constructors, and you can define constructors with varying parameters to initialize different elements in an object. For example, you could define a class that models a triangle, like this:
public class Triangle
{
private int side1Length;
private int side2Length;
private int side3Length;
// default constructor - default values for all sides
public Triangle()
{
this.side1Length = this.side2Length = this.side3Length = 10;
}
// specify length for side1Length, default values for the others
public Triangle(int length1)
{
this.side1Length = length1;
this.side2Length = this.side3Length = 10;
}
// specify length for side1Length and side2Length,
// default value for side3Length
public Triangle(int length1, int length2)
{
this.side1Length = length1;
this.side2Length = length2;
this.side3Length = 10;
}
// specify length for all sides
public Triangle(int length1, int length2, int length3)
{
this.side1Length = length1;
this.side2Length = length2;
this.side3Length = length3;
}
}
Depending on how many fields a class contains and the various combinations you want to enable for initializing the fields, you could end up writing a lot of constructors. There are also potential problems if many of the fields have the same type: you might not be able to write a unique constructor for all combinations of fields. For example, in the preceding Triangle class, you could not easily add a constructor that initializes only the side1Length and side3Length fields because it would not have a unique signature; it would take two int parameters, and the constructor that initializes side1Length and side2Length already has this signature. One possible solution is to define a constructor that takes optional parameters and specify values for the parameters as named arguments when you create a Triangle object. However, a better and more transparent solution is to initialize the private fields to a set of default values and expose them as properties, like this:
public class Triangle
{
private int side1Length = 10;
private int side2Length = 10;
private int side3Length = 10;
public int Side1Length
{
set => this.side1Length = value;
}
public int Side2Length
{
set => this.side2Length = value;
}
public int Side3Length
{
set => this.side3Length = value;
}
}
When you create an instance of a class, you can initialize it by specifying the names and values for any public properties that have set accessors. For example, you can create Triangle objects and initialize any combination of the three sides, like this:
Triangle tri1 = new Triangle { Side3Length = 15 };
Triangle tri2 = new Triangle { Side1Length = 15, Side3Length = 20 };
Triangle tri3 = new Triangle { Side2Length = 12, Side3Length = 17 };
Triangle tri4 = new Triangle { Side1Length = 9, Side2Length = 12, Side3Length = 15 };
This syntax is known as an object initializer. When you invoke an object initializer in this way, the C# compiler generates code that calls the default constructor and then calls the set accessor of each named property to initialize it with the value specified. You can specify object initializers in combination with non-default constructors as well. For example, if the Triangle class also provided a constructor that took a single string parameter describing the type of triangle, you could invoke this constructor and initialize the other properties, like this:
Triangle tri5 = new Triangle("Equilateral triangle")
{
Side1Length = 3,
Side2Length = 3,
Side3Length = 3
};
The important point to remember is that the constructor runs first and the properties are set afterward. Understanding this sequencing is important if the constructor sets fields in an object to specific values and the properties that you specify change these values.
You can also use object initializers with automatic properties that are not read-only, as you will see in the next exercise. In this exercise, you will define a class for modeling regular polygons that contains automatic properties for providing access to information about the number of sides the polygon contains and the length of these sides.
![]()
Note You cannot initialize automatic read-only properties in this way; you have to use one of the techniques described in the previous section.
Define automatic properties and use object initializers
In Visual Studio 2017, open the AutomaticProperties solution, which is located in the Microsoft PressVCSBSChapter 15AutomaticProperties folder in your Documents folder.
The AutomaticProperties project contains the Program.cs file, defining the Program class with the Main and doWork methods that you have seen in previous exercises.
In Solution Explorer, right-click the AutomaticProperties project, point to Add, and then click Class to open the Add New Item – AutomaticProperties dialog box. In the Name box, type Polygon.cs, and then click Add.
The Polygon.cs file, holding the Polygon class, is created and added to the project and appears in the Code and Text Editor window.
Add the automatic properties NumSides and SideLength to the Polygon class, as shown here in bold:
class Polygon
{
public int NumSides { get; set; }
public double SideLength { get; set; }
}Add the following default constructor shown in bold to the Polygon class:
class Polygon
{
...
public Polygon()
{
this.NumSides = 4;
this.SideLength = 10.0;
}
}This constructor initializes the NumSides and SideLength fields with default values. In this exercise, the default polygon is a square with sides 10 units long.
Display the Program.cs file in the Code and Text Editor window.
Add the statements shown here in bold to the doWork method, replacing the // TODO: comment:
static void doWork()
{
Polygon square = new Polygon();
Polygon triangle = new Polygon { NumSides = 3 };
Polygon pentagon = new Polygon { SideLength = 15.5, NumSides = 5 };
}These statements create Polygon objects. The square variable is initialized by using the default constructor. The triangle and pentagon variables are also initialized by using the default constructor, and then this code changes the value of the properties exposed by the Polygon class. In the case of the triangle variable, the NumSides property is set to 3, but the SideLength property is left at its default value of 10.0. For the pentagon variable, the code changes the values of the SideLength and NumSides properties.
Add to the end of the doWork method the following code shown in bold:
static void doWork()
{
...
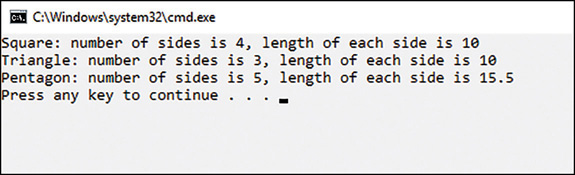
Console.WriteLine($"Square: number of sides is {square.NumSides}, length of each side is {square.SideLength}");
Console.WriteLine($"Triangle: number of sides is {triangle.NumSides}, length of each side is {triangle.SideLength}");
Console.WriteLine($"Pentagon: number of sides is {pentagon.NumSides}, length of each side is {pentagon.SideLength}");
}These statements display the values of the NumSides and SideLength properties for each Polygon object.
On the Debug menu, click Start Without Debugging.
Verify that the program builds and runs, writing the messages shown here to the console window:
Press the Enter key to close the application and return to Visual Studio 2017.
Summary
In this chapter, you saw how to create and use properties to provide controlled access to data in an object. You also saw how to create automatic properties and how to use properties when initializing objects.
If you want to continue to the next chapter, keep Visual Studio 2017 running and turn to Chapter 16, “Handling binary data and using indexers.”
If you want to exit Visual Studio 2017 now, on the File menu, click Exit. If you see a Save dialog box, click Yes and save the project.
Quick reference
To |
Do this |
Declare a read/write property for a structure or class |
Declare the type of the property, its name, a get accessor, and a set accessor. For example: struct ScreenPosition |
Declare a read-only property for a structure or class |
Declare a property with only a get accessor. For example: struct ScreenPosition |
Declare a write-only property for a structure or class |
Declare a property with only a set accessor. For example: struct ScreenPosition |
Declare a property in an interface |
Declare a property with just the get or set keyword or both. For example: interface IScreenPosition |
Implement an interface property in a structure or class |
In the class or structure that implements the interface, declare the property and implement the accessors. For example: struct ScreenPosition : IScreenPosition |
Create an automatic property |
In the class or structure that contains the property, define the property with empty get and set accessors. For example: class Polygon If the property is read-only, then initialize the property either in the object constructor or as the property is defined. For example: class Circle |
Use properties to initialize an object |
Specify the properties and their values as a list enclosed in braces when constructing the object. For example: Triangle tri3 = |