
When we build out systems and networks, we look at availability in 9s, as in 99.9xx. No one thinks it realistic that software, hardware, or the network will be available 100% of the time. Ironically, one of the key challenges of developing connected systems is connectivity itself.
In practical terms, sometimes this is the result of the network leaving us—network connectivity and hardware have temporary or extended outages. Other times, it’s a case of us leaving the network—moving in and out of Wi-Fi coverage areas where we disconnect and reconnect silently behind the scenes.
When disruptions occur, there is an increased likelihood for the unpredictable. If the outage occurs during a multipart operation, the system we’re communicating with may be left in an unstable state. Messages may be dropped. Messages may be delivered out of sequence. On restarting, messages may be duplicated.
These disruptions can introduce unplanned variables into the way an application was designed to run, rendering it potentially unreliable as a result. This is not acceptable for the connected systems being developed today.
Regardless of where they originate and why, these temporary losses of connectivity will occur, and your applications need to offset these impacts because they could make the system unreliable.
The instigating outages are rarely predictable, so applications must be designed to adapt and compensate for these challenges. Fortunately, the problem of reliability has been addressed inside the firewall by a number of middleware vendors for a number of years.
While these solutions have had a number of recurring features in common, they have typically been tied to a particular OS platform or vendor(s) product(s). With the advent of services, it became critical to introduce a standard provided the ability to ensure reliability while being platform and product agnostic.
The industry recognized this and began work on a standard. In doing so, they consciously acknowledged that in a service-oriented world, it was very likely that in addition to being able to being agnostic to platform and product, it also needed the ability to survive multiple hops. Between endpoint A and endpoint B, a number of intermediaries could be used. Also recognized was that if this was also protocol agnostic, it would need to define the standard in such a way that reliability could be added to messaging that utilized unreliable transports as well.
The resulting standard, WS-Reliable Messaging, was put forth by major players in the industry, among them Microsoft, IBM, and Tibco. That specification defines the following reliability features:
Guaranteed message delivery, or At-Least-Once delivery semantics
Guaranteed message duplicate elimination, or At-Most-Once delivery semantics
Guaranteed message delivery and duplicate elimination, or Exactly-Once delivery semantics
Guaranteed message ordering for delivery within a group of messages
A number of vendors either have built implementations or have implementations under development. Table 5.1 identifies the status of WS-Reliable Messaging development by major companies in the industry, at the time of this writing.
In WCF, Reliability can be broken down into two distinct areas of functionality, Reliable Sessions and Queued Messaging. Each of these applies to scenarios with certain characteristics, which we will delve into in the next two sections of the chapter.
In the world of TCP/IP, reliability and the issues discussed earlier in the chapter are handled by the protocol. WCF’s Reliable Sessions provide that same functionality for SOAP messages.
Specifically, the reliable channel provides the capability to handle three of the potential scenarios that can lead to unreliability:
Lost messages
Duplicated messages
Messages received out of order
Although WCF and TCP/IP may both handle these reliable messaging challenges, WCF goes about it in a different way. SOAP is defined to allow the use of multiple transports—some of which are not inherently reliable. In addition, between Endpoint A and Endpoint B, WCF messages can travel across multiple intermediaries and across multiple protocols. To accommodate all of this, WCF handles these issues at the message level.
In instances in which a client has gone silent in a session beyond a designated time, the server will free up resources associated with that session. Reliable Sessions will also help manage network congestion, adjusting the rate at which the server sends out messages.
The WS-Reliability specification contains specific guarantees that combine to form the requirements of reliable messaging. For those who have read the specification, you’ll see that there is something noticeably absent from it, specifically rules around durability. More to the point, the WS-RM specification has no requirements for endpoints to place messages in a durable store at any point in the conversation.
The reality is that the specification as it stands today does not have any requirements in this area. Although the industry will possibly address this in a future iteration of the WS-* specs, this does not necessarily eliminate the need to provide durability in a number of scenarios.
In WCF v1.0 this can be accomplished using queues. Queues store messages from a sending application on behalf of a receiving application. The receiving application—at some point after the message has been placed on the queue—receives the message. Queues ensure reliable transfer of messages from sending applications to receiving applications. Queuing is supported in WCF through the use of Microsoft Message Queuing (MSMQ) transport.
Queued messaging can be done in scenarios in which WCF integrates with an existing non-WCF MSMQ application, as well as in situations in which client and server are using WCF for communications. This chapter focuses on the WCF-WCF scenario, and integration is handled in a later chapter.
When you remove the need for client and server to communicate in real-time and use a queue as a midpoint, a number of opportunities are provided.
This loose coupling helps avoid issues if the sender or receiver applications fail. When using services in real-time request-response patterns, if the receiver suffers a failure and is offline for a significant period, the client also is offline. New and existing work is stalled as a result. When using queues in this same scenario, the sender will happily send to his queue and business will continue to function. Once the receiver application is back online, she will begin processing messages again. This failure isolation provides increases in availability and reliability.
The same holds true for scenarios in which both the sender and the receiver are online, but network connectivity between the two becomes unavailable. There is no dependency on the server being available, allowing for applications to exist when no connectivity is present. After the connectivity is restored, the receiver happily receives the messages from the queue for processing.
In addition, because the application is not sending messages across the network, potential blocking that might result due to the speed and reliability of connectivity between sender and receiver are limited.
For the receiver, this helps avoid becoming overwhelmed, as a result of being forced to handle large spikes of message traffic. The use of queues provides the capability for the receiver to manage the rate at which it processes messages, regardless of the speed and volume of messages sent from the sender.
The use of queues also provides benefits in the production environment, as the management interface used is the standard MMC snap-in already used by MSMQ. From the perspective of the individuals who need to support a Queued Messaging scenario, this is ideal because it does not require new training and leverages any existing knowledge of MSMQ.
Both Reliable Sessions and Queued Messaging have compelling features, and you may be wondering which one is right for your particular project. This varies on the requirements of the project, but the intent of this section is to provide some guidance on how to make that determination.
Reliable Sessions should be used in scenarios in which it is likely that client and server will be online and connected to the network at the same time. In that environment, Reliable Sessions provide the functionality to overcome failures at the transport level (that is, loss of network connectivity due to wireless, dial-up, or VPN) and the transport intermediary level (that is, the Web proxy), as well as the SOAP intermediary level (that is, SOAP router).
Queued Messaging really makes sense for those scenarios in which the business does not require real-time interaction with services and it is desirable to be able to work offline. Regarding Reliable Sessions, it was stated that they were ideal for scenarios in which both client and server are online at the same time. When there is no guarantee that the client and server will be online at the same time, and a more loosely coupled approach is desired, Queued Messaging is a good option for you.
As you saw in Table 5.1, WCF does have support for WS-Reliable Messaging. The implementation of this functionality for scenarios in which both endpoints are online is referred to as Reliable Sessions.
Reliable Sessions provide end-to-end reliability between endpoints. Because the specification provides support at the message level, messages can reliably traverse multiple intermediaries on its way from endpoint A to endpoint B, and they may travel via various transport protocols.
Support for reliable messaging begins with creating an endpoint that supports a reliable session. WCF ships with six predefined bindings that support reliable messaging, as well as the capability to add reliability in custom bindings.
Of the out-of-the-box bindings that support reliable messaging, three of them—wsDualHttpBinding, NetNamedPipeBinding, and MsmqIntegrationBinding—have reliability enabled by default.
The complete list of bindings that support reliable messaging can be seen in Table 5.2.
In this first exercise, we will showcase how to create code that utilizes Reliable Sessions.
Create a new WinFX Service project in
C:WCFHandsOnChapter5PartIBefore.Specify a name of ConsumerBankingService as the name of the project, and ReliableSessions as the name of the solution.
Within Visual Studio, add a new class and name it
ConsumerBankingCore.cs.Add a reference to
System.ServiceModel.Add
using System.ServiceModel;to the top of theProgram.csfile:using System; using System.Collections.Generic; using System.Text; using System.ServiceModel;Next, create the service interface and service implementation. Specify that this Service Contract will use reliable sessions by specifying (
Session=true):namespace ConsumerBankingService { [ServiceContract(Session=true)] public interface IConsumerBankingCore { [OperationContract] bool Deposit(int accountNumber, decimal amount); [OperationContract] bool Withdraw(int accountNumber, decimal amount); [OperationContract] decimal GetBalance(int accountNumber); } // This will share the information per a single session // [ServiceBehavior(InstanceContextMode=InstanceContextMode.PerSession)] // This will share the information in a single session, across multiple // clients // [ServiceBehavior(InstanceContextMode = InstanceContextMode.Shareable)] [ServiceBehavior(InstanceContextMode = InstanceContextMode.PerCall)] class ConsumerBankingCore : IConsumerBankingCore { private decimal _balance = default(decimal); public bool Deposit(int accountNumber, decimal amount) { _balance = _balance + amount; Console.WriteLine("Depositing {0} into Account {1}", amount, accountNumber); Console.WriteLine("Balance:" + _balance.ToString()); return true; } public bool Withdraw(int accountNumber, decimal amount) { _balance = _balance - amount; Console.WriteLine("Withdrawing {0} from Account {1}", amount accountNumber); Console.WriteLine("Balance:" +_balance.ToString()); return true; } public decimal GetBalance(int accountNumber) { return _balance; } } }
The next step is to create the host for the service.
Open
Program. cs.Add a reference to
System.ServiceModel.Add a reference to
System.Configuration:Modify
Program.csto use theConsumerBankingServicenamespace and contain the following code:using System; using System.Collections.Generic; using System.Text; using System.ServiceModel; using System.Configuration; namespace ConsumerBankingService { class Program { static void Main(string[] args) { // Get base address from app settings in configuration Uri baseAddressCore = new Uri(ConfigurationManager.AppSettings["baseAddressCore"]); // Instantiate new ServiceHost ServiceHost CoreServiceHost = new ServiceHost(typeof (ConsumerBankingCore),
 baseAddressCore);
CoreServiceHost.Open();
Console.WriteLine("Consumer Banking Service is Online.");
Console.WriteLine("-----------------------------------");
Console.WriteLine("Press any key to terminate service.");
Console.ReadKey();
CoreServiceHost.Close();
}
}
}
baseAddressCore);
CoreServiceHost.Open();
Console.WriteLine("Consumer Banking Service is Online.");
Console.WriteLine("-----------------------------------");
Console.WriteLine("Press any key to terminate service.");
Console.ReadKey();
CoreServiceHost.Close();
}
}
}The next step is to create the application configuration file for the banking service.
Within Visual Studio, add a new application configuration file named
App.Config.Using Solution Explorer, open the
App.Configfile and populate it to resemble the following code listing:<xml version="1.0"; encoding="utf-8"?> <configuration> <appSettings> <!-- use appSetting to configure base address provided by host --> <add key="baseAddressCore" value="http://localhost:8080/ConsumerBankingService" /> </appSettings> <system.serviceModel> <services> <service type="ConsumerBankingService.ConsumerBankingCore"; <!-- use base address provided by host --> <endpoint address="" binding="wsHttpBinding" contract="ConsumerBankingService.IConsumerBankingCore" /> </service> <service type="ConsumerBankingService.ConsumerBankingBillPayment" > <!-- use base address provided by host --> <endpoint address="" binding="wsHttpBinding" contract="ConsumerBankingService.IConsumerBankingBillPayment" /> </service> </services> </system.serviceModel> </configuration>
Having created the service, you will now create a client to interact with it.
In the open solution, add a new project.
Create a new Windows Forms application named ATMClient in
C:WCFHandsOnChapter5BeforePartI.Create the proxy for the banking service.
Right-click on the ConsumerBankingService project, click Debug, and select Start New Instance.
This will start the ConsumerBankingService, making it available for us to query it for metadata with the svcutil utility.
Enter the following at the command prompt:
"C:Program FilesMicrosoft SDKsWindowsv1.0BinSvcUtil.exe" http://localhost:8080
/ConsumerBankingServiceStop the Debugger.
Open a Visual Studio command prompt and navigate to the directory
C:WCFHandsOnChapter5BeforePartI.Using Solution Explorer, add
ConsumerBankingCoreProxy.csto the ATMClient project.Using Solution Explorer, add
output.configto the ATMClient project.Rename
output.config to App.config.Open the
App.Config file.Modify the endpoint element to include the attribute name with a value of
CoreBanking:<?xml version="1.0" encoding="utf-8"?> <configuration> <system.serviceModel> <client> <endpoint name="CoreBanking" address="http://localhost:8080/ConsumerBankingService"
bindingConfiguration="WSHttpBinding_IConsumerBankingCore"
binding="customBinding" contract="IConsumerBankingCore" />
</client>
<bindings>
<customBinding>
<binding name="Secure conversation bootstrap binding
5d58043f-7615-48c7-80e6-95668c8117f3"
<security defaultAlgorithmSuite="Default"
authenticationMode="SspiNegotiated"
defaultProtectionLevel="EncryptAndSign" requireDerivedKeys="true"
securityHeaderLayout="Strict" includeTimestamp="true"
keyEntropyMode="CombinedEntropy"
messageProtectionOrder="SignBeforeEncrypt" protectTokens="false"
requireSecurityContextCancellation="true"
securityVersion="WSSecurityXXX2005"
requireSignatureConfirmation="false">
<localClientSettings cacheCookies="true" detectReplays="true"
replayCacheSize="900000" maxClockSkew="00:05:00"
maxCookieCachingTime="10675199.02:48:05.4775807"
replayWindow="00:05:00" sessionKeyRenewalInterval="10:00:00"
sessionKeyRolloverInterval="00:05:00"
reconnectTransportOnFailure="true"
timestampValidityDuration="00:05:00"
cookieRenewalThresholdPercentage="90" />
<localServiceSettings detectReplays="true" issuedCookieLifetime="10:00:00"
maxStatefulNegotiations="1024" replayCacheSize="900000"
MaxClockSkew="00:05:00"
negotiationTimeout="00:02:00" replayWindow="00:05:00"
inactivityTimeout="01:00:00"
sessionKeyRenewalInterval="15:00:00"
sessionKeyRolloverInterval="00:05:00"
reconnectTransportOnFailure="true" maxConcurrentSessions="1000"
timestampValidityDuration="00:05:00" />
</security>
<textMessageEncoding maxReadPoolSize="64" maxWritePoolSize="16"
messageVersion="Default"writeEncoding="utf-8" />
</binding>
<binding name="WSHttpBinding_IConsumerBankingCore">
<security defaultAlgorithmSuite="Default"
authenticationMode="SecureConversation"
bootstrapBindingConfiguration="Secure conversation bootstrap binding
5d58043f-7615-48c7-80e6-95668c8117f3"
bootstrapBindingSectionName="customBinding"
defaultProtectionLevel="EncryptAndSign"
requireDerivedKeys="true" securityHeaderLayout="Strict"
includeTimestamp="true"
keyEntropyMode="CombinedEntropy"
messageProtectionOrder="SignBeforeEncrypt"
protectTokens="false" requireSecurityContextCancellation="true"
securityVersion="WSSecurityXXX2005" requireSignatureConfirmation="false"
<localClientSettings cacheCookies="true" detectReplays="true"
replayCacheSize="900000"maxClockSkew="00:05:00"
maxCookieCachingTime="10675199.02:48:05.4775807"
replayWindow="00:05:00" sessionKeyRenewalInterval="10:00:00"
sessionKeyRolloverInterval="00:05:00"
reconnectTransportOnFailure="true"
timestampValidityDuration="00:05:00"
cookieRenewalThresholdPercentage="90" />
<localServiceSettings detectReplays="true"
issuedCookieLifetime="10:00:00"
maxStatefulNegotiations="1024" replayCacheSize="900000"
maxClockSkew="00:05:00"
negotiationTimeout="00:02:00" replayWindow="00:05:00"
inactivityTimeout="01:00:00"
sessionKeyRenewalInterval="15:00:00"
sessionKeyRolloverInterval="00:05:00"
reconnectTransportOnFailure="true" maxConcurrentSessions="1000"
timestampValidityDuration="00:05:00"/>
</security>
<textMessageEncoding maxReadPoolSize="64" maxWritePoolSize="16"
messageVersion="Default" writeEncoding="utf-8" />
<httpTransport manualAddressing="false" maxBufferPoolSize="524288"
maxMessageSize="65536" allowCookies="false"
authenticationScheme="Anonymous"
bypassProxyOnLocal="false" hostNameComparisonMode="StrongWildcard"
mapAddressingHeadersToHttpHeaders="false"
proxyAuthenticationScheme="Anonymous"
realm="" transferMode="Buffered"
unsafeConnectionNtlmAuthentication="false"
useDefaultWebProxy="true" />
</binding>
<binding name="Secure conversation bootstrap binding
d58973a4-c474-42f2-8fb8-f2a64bc07c96">
<security defaultAlgorithmSuite="Default" authenticationMode="SspiNegotiated"
defaultProtectionLevel="EncryptAndSign" requireDerivedKeys="true"
securityHeaderLayout="Strict" includeTimestamp="true"
keyEntropyMode="CombinedEntropy"
messageProtectionOrder="SignBeforeEncrypt" protectTokens="false"
requireSecurityContextCancellation="true" securityVersion="WSSecurityXXX2005"
requireSignatureConfirmation="false">
<localClientSettings cacheCookies="true" detectReplays="true"
replayCacheSize="900000" maxClockSkew="00:05:00"
maxCookieCachingTime="10675199.02:48:05.4775807"
replayWindow="00:05:00" sessionKeyRenewalInterval="10:00:00"
sessionKeyRolloverInterval="00:05:00" reconnectTransportOnFailure="true"
timestampValidityDuration="00:05:00"
cookieRenewalThresholdPercentage="90" />
<localServiceSettings detectReplays="true" issuedCookieLifetime="10:00:00"
maxStatefulNegotiations="1024" replayCacheSize="900000" maxClockSkew="00
:05:00"
negotiationTimeout="00:02:00" replayWindow="00:05:00"
inactivityTimeout="01:00:00"
sessionKeyRenewalInterval="15:00:00" sessionKeyRolloverInterval="00:05:00"
reconnectTransportOnFailure="true" maxConcurrentSessions="1000"
timestampValidityDuration="00:05:00" />
</security>
<textMessageEncoding maxReadPoolSize="64" maxWritePoolSize="16"
messageVersion="Default" writeEncoding="utf-8" />
</binding>
</customBinding>
</bindings>
</system.serviceModel>
</configuration>Next, open the code view for
Form1.cs.Add the line
ConsumerBankingCoreProxy proxy = new ConsumerBankingCoreProxy(“CoreBanking”); to theForm1 class:public partial class Form1 : Form { ConsumerBankingCoreProxy proxy = new ConsumerBankingCoreProxy("CoreBanking"); public Form1() { InitializeComponent(); }Next, design the Windows Form that will comprise the user interface.
Double-click on
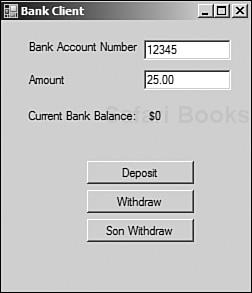
Form1.csin Solution Explorer to modify the form in the designer.Add a label named
lblBankAccountNumber.Set the text property for this label to
“Bank Account Number”.Add a label named
lblAmount.Set the text property for this label to
“Amount”.Add a textbox named
tbAccountNumber.Set the text property for this textbox to
“12345”.Add a textbox named
tbAmount.Set the text property for this textbox to
“25.00”.Add a label named
lblBankBalance.Set the text property for this label to
“Current Bank Balance”.Add a label named
lblBalance.Set the text property for this label to
“0”.Add a button named
“btnDeposit”.Set the text property for this button to
“Deposit”.Add a button named
“btnWithdraw”.Set the text property for this button to
“Withdrawal”.Add a button named
“btnSonWithdraw”.Set the text property for this button to
“Son Withdrawal”.Arrange these controls to resemble what’s shown in Figure 5.1.
Now add the code to execute a deposit.
In the Windows Form designer double-click on the
btnDepositcontrol.This will open the code view. Add the following code to the
btnDeposit_Clickevent:private void btnDeposit_Click(object sender, EventArgs e) { bool success = proxy.Deposit (Convert.ToInt32(tbAccountNumber.Text), Convert.ToDecimal(tbAmount.Text));
decimal balance = proxy.GetBalance(Convert.ToInt32(tbAccountNumber.Text));
if (success)
{
lblBalance.Text = balance.ToString();
}
else
{
System.Windows.Forms.MessageBox.Show("Unable to make deposit");
}
}In the Windows Form designer, double-click on the
btnWithdrawcontrol.This will open the code view. Add the following code to the
btnWithdraw_Clickevent:private void btnWithdraw_Click(object sender, EventArgs e) { bool success = proxy.Withdraw(Convert.ToInt32(tbAccountNumber.Text), Convert.ToDecimal(tbAmount.Text));
decimal balance = proxy.GetBalance(Convert.ToInt32(tbAccountNumber.Text));
if (success)
{
lblBalance.Text = balance.ToString();
}
else
{
System.Windows.Forms.MessageBox.Show("Unable to make withdrawal");
}
}You will now add the code that uses a second proxy that uses that same session:
In the Windows Form designer, double-click on the
btnSonWithdrawcontrol.This will open the code view.
Add the following code to the
btnSonWithdraw_Clickevent:private void btnSonWithdraw_Click(object sender, EventArgs e) { using (ConsumerBankingCoreProxy proxySon = new ConsumerBankingCoreProxy("CoreBanking")) { System.ServiceModel.EndpointAddress proxyAddress = proxy.InnerChannel.ResolveInstance();
proxySon.Endpoint.Address = proxyAddress;
bool success = proxySon.Withdraw(Convert.ToInt32(tbAccountNumber.Text),25);
decimal balance = proxySon.GetBalance(Convert.ToInt32(tbAccountNumber.Text));
if (success)
{
lblBalance.Text = balance.ToString();
}
else
{
System.Windows.Forms.MessageBox.Show("Unable to make withdrawal");
}
}
}
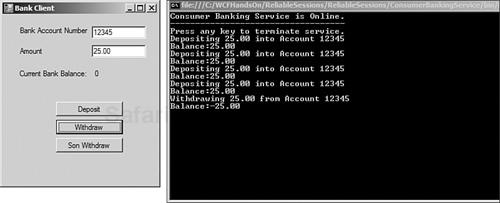
In this first test, we will run the client and service without the benefit of sessions.
Run the Service.
Run the Client.
Click the Deposit and Withdraw buttons.
You will notice that there is no information being shared between calls. Each call starts with no shared state of the prior actions. There is no session. The expected outcome of this test is shown in Figure 5.2.
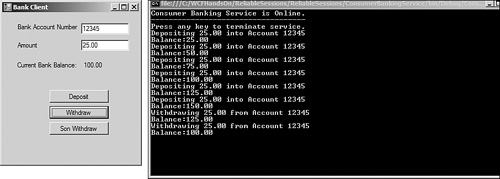
In this next test, we will enable sessions. This will be done by modifying the InstanceContextMode of the Service Behavior.
Stop the client and service.
Modify the service contract, commenting out the
ServiceBehaviorthat specifies theInstanceContextModeofPerCalland uncommenting out the code for aServiceBehaviorofPerSession:// This will share the information per a single session [ServiceBehavior(InstanceContextMode=InstanceContextMode.PerSession)] // This will share the information in a single session, across multiple // clients // [ServiceBehavior(InstanceContextMode = InstanceContextMode.Shareable)] // [ServiceBehavior(InstanceContextMode = InstanceContextMode.PerCall)]
Run the Service.
Run the Client.
Click the Deposit and Withdraw buttons.
Note that when you perform deposits and withdrawals now, there is obvious knowledge of prior states.
The expected outcome of this test is shown in Figure 5.3.
There will be scenarios where you wish to share the same session among multiple clients. As in the last test, this can be done by modifying the InstanceContextMode.
Stop the client and service.
Modify the service contract, commenting out the
ServiceBehaviorthat specifies theInstanceContextMode. ofPerSessionand uncommenting out the code for aServiceBehaviorofSharable:// This will share the information per a single session // [ServiceBehavior(InstanceContextMode=InstanceContextMode.PerSession)] // This will share the information in a single session, across multiple // clients [ServiceBehavior(InstanceContextMode = InstanceContextMode.Shareable)] // [ServiceBehavior(InstanceContextMode = InstanceContextMode.PerCall)]
In this test, you will see that you can have multiple proxies that can share the same session:
Run the Service.
Run the Client.
Click the Deposit and Withdraw buttons.
Click the Son Withdraw button.
The code for the click event of the Son Withdraw button resolves the address of the first proxy. It creates an EndpointAddress object and assigns that to the second proxy:
System.ServiceModel.EndpointAddress proxyAddress = proxy.InnerChannel
That proxy, SonProxy, can now share the same session as the main proxy. Both proxies can interact with the shared state information.
Queued Messaging in Windows Communication Foundation enables clients and services to send and receive messages without requiring both applications to be running at the same time. The programming model for using queues basically consists of choosing the appropriate predefined binding or configuring your own custom binding.
Before we dive into Queued Messaging, it’s important to review MSMQ and queuing in general.
If you were to call John Smith’s office and ask a question, you would be engaging in synchronous messaging with John. You would be making a request and John would be providing a response in real-time.
If you were to call John Smith’s office before he arrived, you would leave a voice-mail message with the question. When John Smith arrived at his office, he would see a blinking light to indicate that he had new voice-mail messages. From there, he would dial his voice-mail system and retrieve that message. He would then send a response with the answer by either phone or email.
Your message is being placed in a durable store, John Smith is notified that there are messages available, and he connects to the system to retrieve them.
Queuing is analogous to the voice-mail scenario. Conceptually, a sender initiates a communication by sending a message. Instead of going to voice mail, this message goes to a queue, where it is stored. A receiver application monitors that queue and receives messages at some point after they were delivered.
Microsoft Message Queue (MSMQ) is the technology Microsoft has provided to support queued messaging on the windows platform. Although MSMQ is not a new feature being introduced with WCF, it may be new to some readers. As such, this next section provides a primer.
We’ve given an overview of what queued messaging is; now we will begin to look at how queued messaging is done with MSMQ. To begin with, know that there are actually multiple types of queues within MSMQ. They can be placed into one of two buckets—user-created queues and system queues.
There are several types of user-created queues. Public queues are queues that are visible on the network and listed in Active Directory. Private queues are local to the computer on which they are created. Because their information is not published, an application must know the full path or label of the private queue to access it.
In addition to private and public queues, there are two other types of user-created queues: Administration Queues and Response Queues. Administration queues contain the acknowledgment messages for messages sent within a network. Response queues contain response messages. Response messages are returned to the sender by the receiver, after a message is received.
Systems queues have several types as well: journal, dead-letter, report, and private system queues.
Journal queues can be set up to store copies of messages sent and retrieved from a queue. Separate journals exist on both the client and the server. On the client, there is a single journal queue that logs messages sent to/from that computer. On the server side, a separate journal queue is created for each individual queue, and it tracks only those messages attached to that queue.
When messages are undeliverable or have expired, they are placed in another type of system queue, a dead-letter queue. Dead letters are stored on the computer on which the message expired. When a transactional message dies, it is placed in a variant of dead-letter queue called a transaction dead-letter queue.
Report queues contain messages that identify the route a message took to its destination. In addition, it can also contain test messages. There is one report queue per computer.
The last type is private system queues. These queues store administrative and notification messages needed by the system to process messaging actions.
The dead-letter queue was discussed earlier in the chapter, and it is essentially the queue where expired or otherwise undeliverable messages are sent.
Messages can end up in the dead-letter queue for a number of reasons. This can happen if a queue quota is exceeded, if there is an authorization failure, or if a message expires.
Message delivery can be time sensitive, and the content within messages may have a set lifetime. In these cases, after the expected lifetime, the message should no longer be considered valid. The lifetime of the message can be specified in the binding, specifically the TimeToLive value.
After the TimeToLive has passed, the message is considered expired and sent to the dead-letter queue.
On Windows Vista, WCF v1.0 moves away from a traditional shared dead-letter queue across all applications, providing instead a dead-letter queue for each sending application. By moving away from a traditional shared dead-letter queue, these application-specific dead-letter queues provide a level of isolation between applications and the processing of dead letters targeted for those applications.
When a message exceeds the maximum number of delivery attempts to the receiving application, it is called a poison message.
This situation can arise, for example, when applications that read messages from a queue cannot process the message immediately because of errors. Aborting the transaction in which the queued message was received leaves the message in the queue so that the message is retried under a new transaction. If the problem that is causing the abort is not corrected, the receiving application can get stuck in an infinite loop, receiving and aborting the same message until the maximum number of delivery attempts has been exceeded and a poison message results.
Poison message handling in WCF provides a way for the receiving application to handle poison messages. Poison message handling is configured via the bindings for an endpoint.
The binding exposes four properties that can be set: MaxRetries, MaxRetryCycles, RetryCycleDelay, and RejectAfterLastRetry.
MaxRetries determines the number of times redelivery of a message from the main queue to the application should be attempted. This is typically sufficient if there is a temporary situation that will resolve itself between the initial and final attempts. A common example cited here is a point-in-time deadlock on SQL Server.
MaxRetryCycles identifies the maximum number of retry cycles. A retry cycle consists of putting a message back into the application queue from the retry queue to attempt delivery again.
RetryCycleDelay determines the delay between retry cycles. The combination of the retry cycle and the retry cycle delay provides a way to handle issues in which a longer delay between retries resolves the issue. The delay, which defaults to 10 minutes, provides the capability to compensate for scenarios in which periodic outages interrupting message delivery can be handled smoothly.
RejectAfterLastRetry specifies how to react when the last attempt fails to deliver the message. When true, a negative acknowledgment will be sent to the sender. When false, the message will be sent to the poison queue.
If the message is sent to the poison queue, it can be processed by a separate WCF Queued Message service.
WCF has two bindings for use with MSMQ as a transport: NetProfileMsmqBinding and MsmqIntegrationBinding. The criteria for selecting the appropriate binding concern the type of application used by the client and service, in particular whether they are WCF or MSMQ applications.
In a scenario in which both the client and the server will be using WCF to communicate, the NetProfileMsmqBinding should be used. If either the sender or the receiver is not using WCF for communications, the MsmqIntegrationBinding should be used. This binding maps messages to/from WCF to MSMQ messages based on the direction of the integration (sending or receiving).
Using MSMQ in an integration scenario is covered in Chapter 6, “Legacy Integration.”
Imagine that the bank wanted to provide a value-added service to its customers in the form of bill payment. In this particular scenario, the electric company is one of the payees that the bank would like to support.
This next example is the code used by the bank to implement bill payments using queues:
Open Visual Studio and create a new project. Create a new Windows Console application in
C:WCFHandsOnChapter5BeforePartII.Name the project Service and name the solution Queues.
Add a reference to
System.ServiceModel.Add a reference to
System.messaging.Add a reference to
System.Configuration.Add a reference to
System.Transactions.Rename
Program.cstoservice.cs.Open
service.csand addusingstatements such that the top of the file resembles the following:using System; using System.Configuration; using System.Messaging; using System.ServiceModel;
Define the service contract for
IBillPayment. We have one operation,PayBill, and it is defined as a one-way operation:{ // Define a service contract. [ServiceContract] public interface IBillPayment { [OperationContract(IsOneWay=true)] void PayBill(int AccountNbr, int ElectricAccountNbr, double Amount); }Define the implementation of the class, and insert code for the
PayBilloperation. Here we will write out the information that is received to the console.Note
Note that this service is using queues, but the interface is the same as we’ve seen for other transports. WCF interacts with the queues behind the scenes, and allows us to focus on writing implementation code for our business logic.
In the future, if we choose to use the
wsHttpBindingrather than queuing, it can be done in the configuration file with no changes to the code. This underscores the power of the declarative model within WCF that provides you the ability to change the underlying protocols and bindings for transport totally outside the actual application logic.// Service class which implements the service contract. // Added code to write output to the console window public class BillPaymentService : IBillPayment { [OperationBehavior] public void PayBill(int AccountNbr, int ElectricAccountNbr, double Amount) { Console.WriteLine("Received Request to Pay Electric Company Account {0} the amount of {1} from local account {2}", ElectricAccountNbr, Amount.ToString(), AccountNbr);
}In the
service.csfile, add the code to host the service.Note
Note that we use
System.Messagingsolely for the purpose of creating queues; we do not useSystem.Messagingfor anything related to the actual service:// Host the service within this EXE console application. public static void Main() { // Get MSMQ queue name from app settings in configuration string queueName = ConfigurationManager.AppSettings["queueName"]; // Create the transacted MSMQ queue if necessary. if (!MessageQueue.Exists(queueName)) MessageQueue.Create(queueName, true); // Get the base addresses. // Including an Http base address for // WS-MetaDataExchange requests is // useful to generate a proxy for the client string httpBaseAddress = ConfigurationManager.AppSettings["httpBaseAddress"]; string queueBaseAddress = ConfigurationManager.AppSettings["queueBaseAddress"]; // Create a ServiceHost for the BillPayment type. using (ServiceHost serviceHost = new ServiceHost( typeof(BillPaymentService), new Uri[]{ new Uri(httpBaseAddress), new Uri(queueBaseAddress)})) { serviceHost.Open(); Console.WriteLine("The Bill Payment Service is online."); Console.WriteLine("Press <ENTER> to terminate service."); Console.WriteLine(); Console.ReadLine(); // Close the ServiceHostBase to shut down the service. serviceHost.Close(); } }Create a new application configuration file and populate the file with the following configuration settings.
Note that we provide an http endpoint for the base address. This is used to expose metadata for our service using http, whereas the service itself uses MSMQ and the
netMsmqBinding:<?xml version="1.0” encoding="utf-8" ?> <configuration> <appSettings> <add key="queueName" value=".private$BillPay" /> <add key ="httpBaseAddress" value="http://localhost:8000/BillPay"/> <add key ="queueBaseAddress" value="net.msmq://localhost/private/”/> </appSettings> <system.serviceModel> <services> <service type="WCFHandsOn.BillPaymentService”> <endpoint address="BillPay" binding="netMsmqBinding" bindingConfiguration="DefaultMsmqBinding" contract="WCFHandsOn.IBillPayment” /> </service> </services> <bindings> <netMsmqBinding> <binding name="DefaultMsmqBinding" /> </netMsmqBinding> </bindings> </system.serviceModel> </configuration>
It is now time to create the client to interact with our service.
Add a new project to the solution.
Create a new Windows Console application in
C:WCFHandsOnChapter5BeforePartII.Name the project Client.
Add a reference to
System.ServiceModel.Add a reference to
System.Messaging.Add a reference to
System.Configuration.Add a reference to
System.Transactions.Rename
Program.cstoclient.cs.Start the Service application.
Because the metadata for the service is exposed using http, you can query it using
SvcUtil.exe.Run
SvcUtil.exeagainst the endpoint specified in the servicesApp.Config file. This will query the metadata for the service and generate a proxy class for the service.From the command prompt, execute the following:
"C:Program FilesMicrosoft SDKsWindowsv1.0BinSvcUtil.exe" http://localhost:8000/BillPay
This will generate two files,
BillPaymentService.csandOutput.config.Add both files to the Client project.
Rename
Output.configtoApp.Config.With the proxy for the service created, you can now write the code to call the queued service.
In the main method of
client.cs, add the following lines of code:static void Main() { // Create a proxy using (BillPaymentProxy proxy = new BillPaymentProxy()) { //Create a transaction scope. using (TransactionScope scope = new TransactionScope(TransactionScopeOption.Required)) { proxy.PayBill(12345,67890,50); Console.WriteLine("Paying $50 towards acount 67890"); proxy.PayBill(22345, 77890, 100); Console.WriteLine("Paying $100 towards account 77890"); // Complete the transaction. scope.Complete(); } } Console.WriteLine(); Console.WriteLine("Press <ENTER> to terminate client."); Console.ReadLine(); }
You are now ready to test your queued messaging solution.
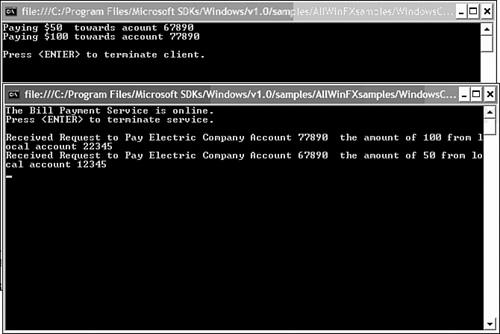
The first test will show how the solution will respond in an ideal scenario where both client and service are online at the same time.
Start the Service.
Start the Client.
The client will call the service, which will utilize queues behind the scenes. The service will pick up the messages from the queue and write out that the bill payments have occurred.
The expected outcome is shown in Figure 5.4.
In this test, we will simulate a disconnected scenario.
Start the client.
The client will call the service, which again utilizes queues behind the scenes.
Stop the client.
Start the service.
Notice that the service comes online, detects the messages, and processes the messages the client sent earlier.
This is because the messages were placed on the queue by the client, and the service retrieved the messages from the queue when it went online.
If you go to a bank and transfer $100 from your savings account to your checking account, you are engaging in a transaction. There are two actions that need to occur—a withdrawal from your savings account and a deposit to your checking account.
If for some reason one of those actions were to succeed and the other were to fail, there would be a problem. If the transfer from the withdrawal from your savings account was successful, and the deposit failed, your $100 would disappear. This is not a desirable outcome for you.
If the withdrawal from your savings account failed, but the deposit to the checking account for that amount was successful, you would essentially have gained $100 in funds at the expense of the bank. Although this would possibly be a nice situation for you, this is a less-than-ideal situation for the bank.
For this transaction to reach a satisfactory conclusion for all parties involved, the activities need to complete as expected. If one of them fails, any changes that have occurred need to be “rolled back” to a state where they were before the transaction occurred.
Transactions have four key characteristics. Transactions must be Atomic, Consistent, Isolated, and Durable (ACID). Definitions of each of these characteristics are listed in the text that follows.
For a transaction to be atomic, either all the actions must be successfully committed, or any state that has been affected must be rolled back to values that existed prior to the actions occurring.
In our example, this would mean that the money would be successfully withdrawn from the savings account and deposited into the checking account, or the funds would remain as they were at the start of the transaction.
Consistency guarantees a predictable transformation of state. In our example, the account being debited by $100 and $100 being deducted from the account is consistent with our expectation.
Whereas atomic was defined essentially as an all-or-nothing application of the actions within a transaction, isolated ensures that the transaction, and the changes being made within it, are opaque to the outside world.
When the work and state changes made within the transaction are isolated, the world outside the transaction continues to work with a state that is valid.
Assume, in our example, that the accounts in question were joint accounts shared with a spouse. If John Smith was in the middle of making a fund transfer and Jane Smith was making a withdrawal from an ATM, both transactions would be invisible to the other. The transactions would become visible after they were committed (that is, after the transfer was completed or the funds were dispensed).
As mentioned in Chapter 1, “Prerequisites—Generics and Transactions,” Version 2.0 of the .NET framework introduced new additions for transactional programming. The System.Transactions namespace was introduced, as were two transaction managers (the Lightweight Transaction Manager [LTM] and the OleTx Transaction Manager). These were added to provide .NET developers the ability to develop more agile and performant transactional applications.
The Lightweight Transaction Manager provides support for transactions that exist in a single app domain; that have at most one durable store, for example SQL Server; and that do not require writes to the Transaction Log. For those transactions that involve multiple durable stores or cross app domains, the OleTx Transaction Manager would be used.
Through the System.Transactions namespace, .NET removes the need for the developer to make an upfront determination of which of these transaction managers to choose. System.Transactions provides the capability to promote transactions as required. By default, all transactions will utilize the Lightweight Transaction Manager and then be promoted to use the OleTx Transaction Manager in scenarios in which multiple durable stores are part of the transaction, or the transaction crosses multiple app domains.
Transactions and transactional behavior can be specified either declaratively using attributes or explicitly in .NET code. Examples of both can be seen here:
[Transaction(TransactionOption.Required)] public class WireTransfer : ServicedComponent { [AutoComplete] public double Transfer( int sourceAccountNbr, int targetAccountNbr, double amount); { ... } } public double Transfer( int sourceAccountNbr, int targetAccountNbr, double amount) { TransactionOptions options = new TransactionOptions(); options.IsolationLevel = IsolationLevel.ReadCommitted; using (TransactionScope scope = new TransactionScope( TransactionScopeOption.Required, options)) { //Code that will be part of the transaction } }
As with security and reliability, the industry grew tired of patchwork solutions that were only relatively interoperable and went to work on standards in the area of transactions as well.
The most implemented of these standards is WS-Atomic Transaction (WS-AT). WS-AT defines a specific set of protocols for implementing two-phase atomic transactions.
WS-AT allows you to leverage existing software investments when moving toward a service-oriented enterprise. WS-AT incorporates transactions at the message level, providing the capability to implement all-or-nothing transactions with closely coupled systems that may span platforms.
WCF provides the capability to flow transactions from a client to a service. In a Windows-only environment, WCF provides the capability to use the transactional capability inherent in .NET and the Windows platform. For cross-platform scenarios, it provides the capability to utilize WS-Atomic Transactions.
Note
WCF provides an implementation of WS-AT that is built into the Microsoft Distributed Transaction Coordinator (MSDTC). It supports authentication using Windows identities, and, for cross-platform interoperability, authentication using certificates. For the latter case, a trusted certificate must be installed into the machine's certificate store, and communication must be via HTTPS with client certificate authentication.
WCF uses policy assertions to control transaction flow. These assertions can be found in the service’s policy document, which clients can access using HTTP GET or WS-MEX. With the document, clients and/or tools can determine how to interact with a service.
The assertions within the document are the result of a combination of information specified in attributes, contracts, and the configuration file.
With the TransactionFlow attribute, WCF provides the capability to associate transaction flow assertions with a specific operation.
Through this attribute, you can specify whether individual operations may support transactions (Allowed), must require transactions (Mandatory), or do not allow transactions (NotAllowed):
[TransactionFlow(TransactionFlowOption.Mandatory)]
bool PayBill(int account, decimal amount);The enumeration TransactionFlowOption is used for this, and the default value is NotAllowed.
Behaviors provide a way to declaratively specify how the service should behave, in this case in respect to transactions. Here you can specify whether an operation auto-completes on successful execution, and specify whether a transaction scope is required:
[ServiceContract]
public interface IElectricBillPay
{
[OperationContract]
[OperationBehavior(TransactionAutoComplete=true, TransactionScopeRequired=true)]
bool PayBill(int account, decimal amount);
[OperationContract]
decimal GetBalance(int account);
}The protocol to use for transaction flow is specified in the configuration file. WCF provides three protocol options: OleTx, Wsat, or TxNego.
As you might imagine based on the text from earlier in the chapter, OleTx would be used for transactions that will occur only on the Microsoft platform, whereas Wsat is for support of transactions across platforms using WS-Atomic transactions. The third option, TxNego, actually provides the capability to let the service expose both. Reading the resulting policy file, services could determine the protocol they want to support.
As is noted in the documentation, the choice of protocol influences two separate factors:
The format of the SOAP headers used to flow the transaction from client to server
The protocol used between the client’s transaction manager and the server’s transaction to resolve the outcome of the transaction
For the out-of-the-box bindings provided with WCF, some default to OleTx protocol, whereas others default to WS-AT. The choice of transaction protocol within a binding can also be influenced programmatically.
Table 5.3. Default Support for Transactions in WCF’s Preconfigured Bindings
Binding | Transaction Support | Default Protocol |
|---|---|---|
| No | N/A |
| Yes | WS-AT |
| Yes | WS-AT |
| Yes | WS-AT |
| Yes | OleTx |
| Yes | OleTx |
| Yes | OleTx |
| No | N/A |
| Yes | OleTx |
When creating the configuration file for services that use one of the preconfigured bindings, within the bindings section, you will add the transactionFlow attribute to the binding element and provide the value true:
<system.serviceModel>
<services>
<service
type="GenericElectricCompany.ElectricBillPay"
>
<!-- use base address provided by host -->
<endpoint address=""
binding="wsHttpBinding"
bindingConfiguration="transactionBinding"
contract="GenericElectricCompany.IElectricBillPay"/>
</service>
</services>
<bindings>
<wsHttpBinding>
<binding name="transactionBinding" transactionFlow="true" />
</wsHttpBinding>
</bindings>
</system.serviceModel>In many cases, only one protocol is supported; in that case the transactionFlow attribute is all that is required. In the case of several bindings, such as the netTcpBinding and the netNamedPipeBinding, a specific protocol can be specified. Here, you would add the transactionProtocol attribute and identify the preferred protocol, OleTx, Wsat, or TxNego:
<bindings>
<netTcpBinding>
<binding name="test"
closeTimeout="00:00:10"
openTimeout="00:00:20"
receiveTimeout="00:00:30"
sendTimeout="00:00:40"
transactionFlow="true"
transactionProtocol="TxNego"
hostNameComparisonMode="WeakWildcard"
maxBufferSize="1001"
maxConnections="123"
maxMessageSize="1000"
portSharingEnabled="true">
<reliableSession ordered="false"
inactivityTimeout="00:02:00"
enabled="true" />
<security mode="Message">
<message clientCredentialType="Windows" />
</security>
</binding>
</netTcpBinding>
</bindings>
</system.ServiceModel>When developing your own custom bindings, you will create a transactionFlow element for the binding and specify the transaction protocol using the transactionProtocol attribute:
<customBinding>
<binding name="WCFHandsOnTxBinding">
<transactionFlow transactionProtocol="Wsat"/>
</binding>
</customBinding>In this exercise, you will create a solution that consists of an ATM Client, a Web Service for a Bank, and a Bill Payment Web Service for the Electric Company.
In this scenario you will enable customers to pay their electric bill through the ATM. The ATM will connect to the Banking Web Service, which in turn creates a transaction when connecting to the Electric Company.
In this example the Banking Service is a client to a service at the Electric Company, and the transaction occurs between the Bank and the Electric Company.
The electric company would like to be able to enable banks to connect to their bill payment service. Because many of the electric company’s customers are also customers of the bank, this will make it easier for those customers to pay their bills.
To facilitate this task, we will now create the Electric Company Service:
Open Visual Studio and create a new project. Create a new Windows Console application in
C:WCFHandsOnChapter5BeforePartIII.Name the project GenericElectricCompany and name the solution Transactions.
Add a reference to
System.Workflow.Add a reference to
System.Transactions.Add a reference to
System.Configuration.Add a new class named
ElectricBillPay.cs.Modify the content of the
App.Configfile to resemble the following:using System; using System.Collections.Generic; using System.Text; using System.ServiceModel; using System.Transactions; namespace GenericElectricCompany { [ServiceContract] public interface IElectricBillPay { [OperationContract] [TransactionFlow(TransactionFlowOption.Required)] //Added for Transaction Support bool PayBill(int account, decimal amount); [OperationContract] decimal GetBalance(int account); } //Added for Sessions [ServiceBehavior(InstanceContextMode = InstanceContextMode.PerSession)] class ElectricBillPay : IElectricBillPay { public bool PayBill(int account, decimal amount) { Console.WriteLine("Paying {0} towards bill on Account {1}", amount, account); return true; } public decimal GetBalance(int account) { return 0; } } }Add a new application configuration file to the project named
App.Config.Modify the content of the
App.Configfile to resemble the following:<?xml version="1.0" encoding="utf-8" ?> <configuration><appSettings> <!-- use appSetting to configure base address provided by host --> <add key="baseAddress" value="http://localhost:8080/GenericElectricBillPayService" /> </appSettings> <system.serviceModel> <services> <service type="GenericElectricCompany.ElectricBillPay" > <!-- use base address provided by host --> <endpoint address="" binding="wsHttpBinding" bindingConfiguration="transactionBinding" contract="GenericElectricCompany.IElectricBillPay" /> </service> </services> <bindings> <wsHttpBinding> <binding name="transactionBinding" transactionFlow="true" /> </wsHttpBinding> </bindings> </system.serviceModel> </configuration>Note that the configuration file includes a binding to flow transactions.
Transactions will be used when paying a bill with this service. Because we’re using the
wsHttpBinding, we will be using WS-AT.Modify the content of the
Program.csfile to resemble the following:using System; using System.Collections.Generic; using System.Text; using System.Configuration; using System.ServiceModel; namespace GenericElectricCompany { class Program { static void Main(string[] args) { // Get base address from app settings in configuration Uri baseAddressBillPay = new Uri(ConfigurationManager.AppSettings["baseAddress"]); // Instantiate new ServiceHost ServiceHost BillPayHost = new ServiceHost(typeof(ElectricBillPay), baseAddressBillPay);
BillPayHost.Open();
Console.WriteLine("Generic Electric Bill Payment Service is Online.");
Console.WriteLine("-----------------------------------");
Console.WriteLine("Press any key to terminate service.");
Console.ReadKey();
BillPayHost.Close();
}
}
}
Next, you will consume the Electric Bill Payment Service at the bank, which will then expose that functionality to ATM customers.
Create a proxy for the Bill Pay Service.
Start the Generic Electric Bill Payment Service.
Open a Visual Studio command prompt and navigate to the directory
C:WCFHandsOnChapter5BeforePartIII.Enter the following at the command prompt:
"C:Program FilesMicrosoft SDKsWindowsv1.0BinSvcUtil.exe " http://localhost:8080
/GenericElectricBillPayService/out:GenericElectricBillPay.csSvcUtil.exewill generate two files,GenericElectricBillPay.csandoutput.config.GenericElectricBillPay.cswill contain a generated proxy class for the Bill Pay service.Output.configcontains the configuration information for the service that can be renamed toApp.Config.Open Visual Studio, and create a new project in the current solution. Create a new Windows Console application in
C:WCFHandsOnChapter5BeforePartIII.Name the project ConsumerBankingService.
Add a reference to
System.ServiceModel.Add a reference to
System.Transactions.Add a reference to
System.Runtime.Serialization.Open the
GenericElectricBillPay.csand note that the proxy specifies thatTransactionFloWis required:[System.ServiceModel.OperationContractAttribute (Action="http://tempuri.org
/IElectricBillPay/PayBill", ReplyAction="http://tempuri.org/IElectricBillPay/PayBillResponse")]
[System.ServiceModel.TransactionFlowAttribute(System.ServiceModel.TransactionFlowOption
.Required)]
bool PayBill(int account, decimal amount);Add a new class file named
ConsumerBankingCore.cs.Modify the class to contain the following code:using System; using System.Collections.Generic; using System.Text; using System.ServiceModel; namespace ConsumerBankingService { [ServiceContract] public interface IConsumerBankingCore { [OperationContract] bool Deposit(int accountNumber, decimal amount); [OperationContract] bool Withdraw(int accountNumber, decimal amount); [OperationContract] decimal GetBalance(int accountNumber); } class ConsumerBankingCore : IConsumerBankingCore { public bool Deposit(int accountNumber, decimal amount) { Console.WriteLine("Depositing {0} into Account {1}", amount, accountNumber); return true; } public bool Withdraw(int accountNumber, decimal amount) { Console.WriteLine("Withdrawing {0} from Account {1}", amount, accountNumber); return true; } public decimal GetBalance(int accountNumber) { return 0; } } }Add a new class file named
ConsumerBankingBillPayment.cs.Modify the class to contain the following code:
using System; using System.Collections.Generic; using System.Text; using System.ServiceModel; namespace ConsumerBankingService { [ServiceContract] public interface IConsumerBankingBillPayment { [OperationContract] bool PayBill(int accountNumber, int accountNumberToPay, decimal amount); [OperationContract] string GetRegisteredBills(int accountNumber); } class ConsumerBankingBillPayment : IConsumerBankingBillPayment { public bool PayBill(int accountNumber, int accountNumberToPay, decimal amount) { bool success = false; ConsumerBankingCore banking = new ConsumerBankingCore(); success = banking.Withdraw(accountNumber,amount); ElectricBillPayProxy proxy = new ElectricBillPayProxy("BillPay"); success = success && proxy.PayBill(accountNumberToPay, amount); Console.WriteLine("Paying {0} from Account {1} towards GenericElectric account {2}", amount, accountNumber,accountNumberToPay);
return success; }
public string GetRegisteredBills(int accountNumber)
{ return "result"; }
}
}Modify the content of the
Program.csfile to resemble the following:using System; using System.Collections.Generic; using System.Text; using System.ServiceModel; using System.Configuration; namespace ConsumerBankingService { class Program { static void Main(string[] args) { // Get base address from app settings in configuration Uri baseAddressCore = new Uri(ConfigurationManager.AppSettings ["baseAddressCore"]); Uri baseAddressBillPay = new Uri (ConfigurationManager.AppSettings["baseAddressBillPay"]);
// Instantiate new ServiceHost
ServiceHost CoreServiceHost = new ServiceHost(typeof(ConsumerBankingCore),
baseAddressCore);
CoreServiceHost.Open();
Console.WriteLine("Consumer Banking Service is Online.");
Console.WriteLine("-----------------------------------");
ServiceHost BillPayServiceHost = new ServiceHost(typeof
(ConsumerBankingBillPayment), baseAddressBillPay);
BillPayServiceHost.Open();
Console.WriteLine("Consumer Bill Pay Service is Online.");
Console.WriteLine("-----------------------------------");
Console.WriteLine("Press any key to terminate service.");
Console.ReadKey();
CoreServiceHost.Close();
BillPayServiceHost.Close();
}
}
}Open the
App.Configfile.The configuration file contains the configuration information to be a client for the Generic Electric Company Bill Payment Service.
Modify the file to include references to the base addresses, and service endpoints.
Your
App.configfile should resemble the following:<?xml version="1.0" encoding="utf-8" ?> <configuration> <appSettings> <!-- use appSetting to configure base address provided by host --> <add key="baseAddressCore" value="http://localhost:8080/ConsumerBankingService" /> <add key="baseAddressBillPay" value="http://localhost:8080/ConsumerBankingService/BillPay" />
</appSettings>
<system.serviceModel>
<client>
<endpoint name="BillPay" address="http://localhost:8080/GenericElectricBillPayService"
bindingConfiguration="WSHttpBinding_IElectricBillPay" binding="customBinding"
contract="IElectricBillPay" />
</client>
<services>
<service
type="ConsumerBankingService.ConsumerBankingCore"
>
<!-- use base address provided by host -->
<endpoint address=""
binding="wsHttpBinding"
contract="ConsumerBankingService.IConsumerBankingCore" />
</service>
<service
type="ConsumerBankingService.ConsumerBankingBillPayment"
>
<!-- use base address provided by host -->
<endpoint address=""
binding="wsHttpBinding"
contract= "ConsumerBankingService.IConsumerBankingBillPayment" />
</service>
</services>
<bindings>
<customBinding>
<binding name="Secure conversation bootstrap binding
51a11de1-ed0b-47b4-9893-c880ceaf4e22">
<security defaultAlgorithmSuite="Default" authenticationMode="SspiNegotiated"
defaultProtectionLevel="EncryptAndSign" requireDerivedKeys="true"
securityHeaderLayout="Strict" includeTimestamp="true"
keyEntropyMode="CombinedEntropy"
messageProtectionOrder="SignBeforeEncrypt" protectTokens="false"
requireSecurityContextCancellation="true" securityVersion="WSSecurityXXX2005"
requireSignatureConfirmation="false">
<localClientSettings cacheCookies="true" detectReplays="true"
replayCacheSize="900000" maxClockSkew="00:05:00"
maxCookieCachingTime="10675199.02:48:05.4775807"
replayWindow="00:05:00" sessionKeyRenewalInterval="10:00:00"
sessionKeyRolloverInterval="00:05:00" reconnectTransportOnFailure="true"
timestampValidityDuration="00:05:00" cookieRenewalThresholdPercentage="90" />
<localServiceSettings detectReplays="true" issuedCookieLifetime="10:00:00"
maxStatefulNegotiations="1024" replayCacheSize="900000" maxClockSkew="00:05:00"
negotiationTimeout="00:02:00" replayWindow="00:05:00" inactivityTimeout="01:00:00"
sessionKeyRenewalInterval="15:00:00" sessionKeyRolloverInterval="00:05:00"
reconnectTransportOnFailure="true" maxConcurrentSessions="1000"
timestampValidityDuration="00:05:00" />
</security>
<textMessageEncoding maxReadPoolSize="64" maxWritePoolSize="16"
messageVersion="Default" writeEncoding="utf-8" />
</binding>
<binding name="WSHttpBinding_IElectricBillPay">
<security defaultAlgorithmSuite="Default" authenticationMode="SecureConversation"
bootstrapBindingConfiguration="Secure conversation bootstrap binding
51a11de1-ed0b-47b4-9893-c880ceaf4e22"
bootstrapBindingSectionName="customBinding" defaultProtectionLevel="EncryptAndSign"
requireDerivedKeys="true" securityHeaderLayout="Strict" includeTimestamp="true"
keyEntropyMode="CombinedEntropy" messageProtectionOrder="SignBeforeEncrypt"
protectTokens="false" requireSecurityContextCancellation="true"
securityVersion="WSSecurityXXX2005" requireSignatureConfirmation="false">
<localClientSettings cacheCookies="true" detectReplays="true"
replayCacheSize="900000" maxClockSkew="00:05:00" maxCookieCachingTime="10675199
.02:48:05.4775807"
replayWindow="00:05:00" sessionKeyRenewalInterval="10:00:00"
sessionKeyRolloverInterval="00:05:00" reconnectTransportOnFailure="true"
timestampValidityDuration="00:05:00" cookieRenewalThresholdPercentage="90" />
<localServiceSettings detectReplays="true" issuedCookieLifetime="10:00:00"
maxStatefulNegotiations="1024" replayCacheSize="900000" maxClockSkew="00:05:00"
negotiationTimeout="00:02:00" replayWindow="00:05:00" inactivityTimeout="01:00:00"
sessionKeyRenewalInterval="15:00:00" sessionKeyRolloverInterval="00:05:00"
reconnectTransportOnFailure="true" maxConcurrentSessions="1000"
timestampValidityDuration="00:05:00" />
</security>
<textMessageEncoding maxReadPoolSize="64" maxWritePoolSize="16"
messageVersion="Default" writeEncoding="utf-8" />
<httpTransport manualAddressing="false" maxBufferPoolSize="524288"
maxMessageSize="65536" allowCookies="false" authenticationScheme="Anonymous"
bypassProxyOnLocal="false" hostNameComparisonMode="StrongWildcard"
mapAddressingHeadersToHttpHeaders="false" proxyAuthenticationScheme="Anonymous"
realm="" transferMode="Buffered" unsafeConnectionNtlmAuthentication="false"
useDefaultWebProxy="true" />
</binding>
</customBinding>
</bindings>
</system.serviceModel>
</configuration>
Create a proxy for the Bill Pay Service.
Start the Generic Electric Bill Payment Service.
Start the Consumer Banking Service.
Open a Visual Studio command prompt and navigate to the directory
C:WCFHandsOnChapter5BeforePartIII.Enter the following at the command prompt:
"C:Program FilesMicrosoft SDKsWindowsv1.0BinSvcUtil.exe " http://localhost:8080
/ConsumerBankingService/BillPay /out:ConsumerBankingBillPay.csSvcUtil.exewill generate two files,ConsumerBankingBillPay.csandoutput.config.ConsumerBankingBillPay.cswill contain a generated proxy class for the Bill Pay service.Output.configcontains the configuration information for your service; rename the fileapp.config.Open Visual Studio, and create a new project in the current solution. Create a new Windows Forms application in
C:WCFHandsOnChapter5BeforePartIII.Name the project ATMClient.
Add a reference to
System.ServiceModel.Add a reference to
System.Transactions.Add a reference to
System.Runtime.Serialization.Add the file
ConsumerBankingBillPay.csto the project.Add the file
App.Configto the project.Open Form 1, and add three text boxes, three labels, and a button.
The text boxes should be named
tbAccountNumber,tbElectricAccountNumber, andtbAmountToPay.One label should be to the left of each text box, identifying the type of information that should be entered:
Account Number,Electric Account Number, andAmounttoPay.The button should be named
btnPayBilland have the captionPay Bill.Double-click on the button and modify the
btnPayBill_Clickmethod to resemble the following:private void btnPayBill_Click(object sender, EventArgs e) { ConsumerBankingBillPaymentProxy proxyBillPay = new ConsumerBankingBillPaymentProxy("BillPay"); bool success = proxyBillPay.PayBill( Convert.ToInt32(tbAccountNumber.Text), Convert.ToInt32(tbElectricAccountNumber.Text), Convert.ToDecimal(tbAmountToPay.Text)); if (success) { System.Windows.Forms.MessageBox.Show( "Bill payment successful!"); } else { System.Windows.Forms.MessageBox.Show( "Bill payment failed!"); } }
You are now ready to test your solution end-to-end.
Start the Electric Company Service.
Start the Banking Service.
Start the ATM Client.
Enter
12345in the Bank Account Number field.Enter
67890in the Electric Account Number field.Enter
50in the Amount to Pay field.Press the button. Your screen should resemble what’s shown in Figure 5.5.
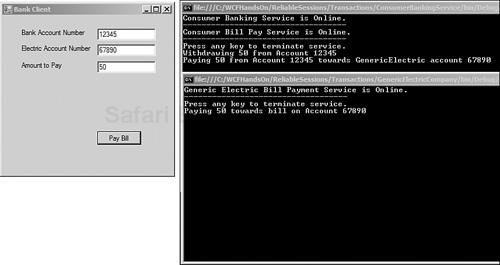
Our consumer is at an ATM, requesting an action on the part of the bank, specifically to pay the consumer’s electric bill.
The bank consumes a service from the electric company to perform the transaction.
The chapter was introduced with a discussion of reliability in the development of connected systems. Whether it’s dealing with lost connections, lost messages, or interrupted transactions, it should be clear that reliability is critical for your distributed applications.
WCF clearly provides solutions to these issues through its Reliable Sessions, Queued Messaging, and Transaction-related functionality.
And as distributed applications often cross vendor OS boundaries, this chapter has shown how WCF provides support for reliability and transactions across all platforms that support the industry specifications.