Chapter 13. Customizing Expression Web
What You’ll Do
Set General Page Editor Options
Add and Remove Toolbar Buttons
Edit Toolbar Buttons and Menu Entries
Change Menu and Toolbar Options
Understand How Macros Automate Your Work
Automate Your Work with Macros
Introduction
Once you’ve become familiar with Microsoft Expression Web and all the features it contains, you might want to customize the way you work with Expression Web. You can change the way Expression Web starts up and whether you want to check if Expression Web is the default editor for Web pages. You can also configure Expression Web to associate editors on your computer with a specific file type you want to use, which makes it easy to open and work with the files, or specify options to determine what information appears in reports.
You can set general options to specify when files are considered “Recent” or “Older”, or the download time that qualifies a Web page for inclusion in the Slow Pages report. You can also set the connection speed, display row and column gridlines when viewing reports, and the maximum number of months shown in usage reports.
You can change the configuration of the menus and toolbars that you use. You can also create your own toolbar or menu for just the commands that you use when creating and formatting your pages.
Macros can simplify common repetitive tasks that you use regularly in Expression Web. Macros can even reside on a Expression Web toolbar for easy access. If a macro has a problem executing a task, Expression Web can help you debug, or fix the error in your macro.
If you need functionality not currently provided by Expression Web, you can install and load an add-in program, which provides add features to Expression Web. For example, you can install an add-in to use with Paypal, an e-commerce shopping cart. Add-ins are developed by Microsoft and third-party developers. You can search the Web to find Expression Web add-ins.
Changing General Options
You can customize several settings in the Expression Web work environment to suit the way you like to work. You can customize the way Expression Web starts up and whether it warns you about certain actions that you cannot undo. For example, one option automatically opens the last Web site you worked on when you start Expression Web. You can also set an option to show or hide the Status bar at the bottom of the Expression Web window.
Change General Options
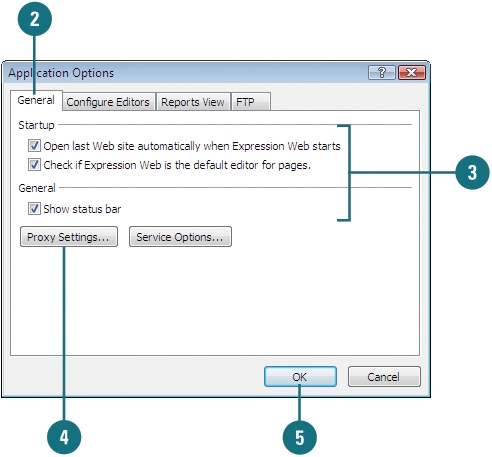
![]() Click the Tools menu, and then click Application Options.
Click the Tools menu, and then click Application Options.
![]() Click the General tab.
Click the General tab.
![]() Select the startup and general options you want. Some of the common options include:
Select the startup and general options you want. Some of the common options include:
- Open last Web site automatically when Expression Web starts. Opens the Web site you most recently worked on.
- Check if Expression Web is the default editor for pages. Verifies Expression Web is the standard editor for Web pages.
- Show status bar. Shows or hides the status bar.
![]() To change proxy firewall settings for the Internet, click Proxy Settings.
To change proxy firewall settings for the Internet, click Proxy Settings.
![]() Click OK.
Click OK.
Configuring External Editors
You can configure Expression Web to associate any editor on your computer with any file type you want to use, which makes it easy to open and work with files. You can associate several editors with a file type. However, one of the editors is the default. Expression Web starts the default editor when you double-click the file in the Folder List, Folders view, and other file locations, or when you right-click the file and choose Open from the shortcut menu.
Configure External Editors
![]() Click the Tools menu, and then click Application Options.
Click the Tools menu, and then click Application Options.
![]() Click the Configure Editors tab.
Click the Configure Editors tab.
![]() To add a new extension, click the New Extension button, type the extension, select the editor you want to use, and then click OK.
To add a new extension, click the New Extension button, type the extension, select the editor you want to use, and then click OK.
![]() To add a new editor, click the New Editor button, select the editor you want to use (if necessary, click Browse for more), and then click OK.
To add a new editor, click the New Editor button, select the editor you want to use (if necessary, click Browse for more), and then click OK.
![]() To add, rename, or remove an existing extension, select the extension, click the Modify Extension button, type the changes you want, and then click OK.
To add, rename, or remove an existing extension, select the extension, click the Modify Extension button, type the changes you want, and then click OK.
![]() To set a default editor, select the extension, select the editor you want as the default, and then click Make Default.
To set a default editor, select the extension, select the editor you want as the default, and then click Make Default.
![]() Click OK.
Click OK.

Customizing Reports View
You can customize the way information appears in Reports view by changing settings on the Reports View tab in the Applications Options dialog box. You can set general options to specify when files are considered “Recent” or “Older”, or the download time that qualifies a Web page for inclusion in the “Slow Pages” report. You can also set the connection speed, display row and column gridlines when viewing reports, and the maximum number of months shown in usage reports.
Customize Reports View
![]() Click the Tools menu, and then click Application Options.
Click the Tools menu, and then click Application Options.
![]() Click the Reports View tab.
Click the Reports View tab.
![]() Select the general and usage options you want. Some of the common options include:
Select the general and usage options you want. Some of the common options include:
- “Recent” files are less than X days old. Determines which files appear in the Recently Added Files report.
- “Older” files are more than X days old. Determines which files appear in the Older Files report.
- “Slow pages” take as least X seconds to download. Determines whether a Web page appears in the Slow Pages report.
- Number of months shown. Determines the maximum number of months shown in usage reports.
![]() To display a grid, select the Display gridlines when viewing reports check box.
To display a grid, select the Display gridlines when viewing reports check box.
![]() To include a chart, select the Include chart when usage report is saved check box.
To include a chart, select the Include chart when usage report is saved check box.
![]() Click OK.
Click OK.

Customizing FTP Options
Expression Web allows you to customize FTP transfer options for text files. If you transfer text files between a PC and Unix, click the FTP tab in the Application Options dialog box, and then specify the extensions you want to be treated as text files. You can add more extensions to the list; any extension not on the list is transferred as binary. If you no longer want an extension in the list, you can remove it.
Customize FTP Options
![]() Click the Tools menu, and then click Application Options.
Click the Tools menu, and then click Application Options.
![]() Click the FTP tab.
Click the FTP tab.
![]() To add a new extension, type the extension, and then click Add.
To add a new extension, type the extension, and then click Add.
![]() Select the extension you want to remove, and then click Remove.
Select the extension you want to remove, and then click Remove.
![]() Click OK.
Click OK.

Did You Know?
You can customize ASP options. If Expression Web allows you configure two settings applicable to Microsoft ASP.NET pages in your Web site. You can specify the folder that contains compiled versions of ASP.NET user controls available to the entire Web server and to the current Web site only. You can specify a folder or leave it blank to use the system default location. Click the Tools menu, click Application Options, click the ASP.NET tab, specify the default location for ASP.NET Control Assemblies, and then click OK. If Framework 2.0 is not installed correctly, the ASP.Net tab may not appear in the Application Options dialog box. Reinstall to show the tab.
Setting General Page Editor Options
Expression Web allows you to configure the way most features and functions work in a single location using the Page Editor Options dialog box. The Page Editor Options dialog box consists of 12 tabs that allows you set options in the following areas: General, Authoring, Auto-Thumbnail, Picture, Code Snippets, Ruler and Grid, IntelliSense, CSS, Code Formatting, Code Coloring, Default Fonts, and Font Families. The General tab provides varied options that don’t fit in any of the other tabs.
Set General Page Editor Options
![]() Click the Tools menu, and then click Page Editor Options.
Click the Tools menu, and then click Page Editor Options.
![]() Click the General tab.
Click the General tab.
![]() Select the general and usage options you want. Some of the common options include:
Select the general and usage options you want. Some of the common options include:
- Automatically enclose form fields within a form. Happens on first field you insert.
- Assign unique IDs to new tables. Adds ID attribute to new tables; existing ones unchanged.
- Make ID unique on paste. Makes sure no duplicate IDs when you paste.
- Use <strong> and <em> when using bold and italic toolbar buttons. Uses updates tags for bold and italic; recommended.
- Automatically switch keyboard to match language of surrounding text. Use when you use different virtual keyboard layouts.
- Prompt form accessibility properties when inserting images. Prompts for accessibility information when you insert a picture.
![]() Click OK.
Click OK.

Change General Code Options
![]() Click the Tools menu, and then click Page Editor Options.
Click the Tools menu, and then click Page Editor Options.
![]() Click the General tab.
Click the General tab.
![]() Select the general code usage options you want. Some of the common options include:
Select the general code usage options you want. Some of the common options include:
- Word wrap. Select to automatically word wrap in Code view.
- Auto indent. Select to automatically indent based on the level and structure of the code.
- Line numbers. Select to display line numbers along the left side of Code view.
- Selection margin. Select to add a left margin in Code view to make selecting code easier.
- Highlight invalid HTML. Select to highlight invalid HTML code.
- Highlight incompatible HTML. Select to highlight incompatible HTML code with the current schema.
![]() Click OK.
Click OK.

Setting Code Formatting Options
The Page Editor Options dialog box provides two tabs—Color Coding and Code Formatting—to make it easier to work with code. The Color Coding tab allows you to change the way individual elements appear in color while you work in Code or Design view. The Code Formatting tab provides options to format individual tag and CSS elements to suit your preferences and work habits. The settings at the top apply to all new code in Code view, while the CSS options at the bottom of the Code Formatting tab apply to existing and new CSS code.
Set Code Formatting Options
![]() Click the Tools menu, and then click Page Editor Options.
Click the Tools menu, and then click Page Editor Options.
![]() Click the Color Coding tab.
Click the Color Coding tab.
![]() Select the element you want to change.
Select the element you want to change.
![]() Use the Item foreground and Item background list arrows to select the colors you want.
Use the Item foreground and Item background list arrows to select the colors you want.
![]() Select or clear the Font, Italic, or Underline check boxes.
Select or clear the Font, Italic, or Underline check boxes.
![]() Repeat steps 3 through 5 for the elements you want to change.
Repeat steps 3 through 5 for the elements you want to change.
![]() Click OK.
Click OK.

Set Code Formatting Options
![]() Click the Tools menu, and then click Page Editor Options.
Click the Tools menu, and then click Page Editor Options.
![]() Click the Code Formatting tab.
Click the Code Formatting tab.
![]() Select the tab, indent, margin, and and other related settings you want at the top of the dialog box.
Select the tab, indent, margin, and and other related settings you want at the top of the dialog box.
![]() Select the tag you want to change, and then specify the line break and related options to the right you want.
Select the tag you want to change, and then specify the line break and related options to the right you want.
![]() Select the CSS element you want to change, and then specify the formatting options to the right you want.
Select the CSS element you want to change, and then specify the formatting options to the right you want.
![]() Select the Use shorthand properties when generating styles check box to combine CSS properties in one element when needed to create complex CSS.
Select the Use shorthand properties when generating styles check box to combine CSS properties in one element when needed to create complex CSS.
![]() Click OK.
Click OK.

Changing Code Snippet Options
Code snippets allow you to reuse code while you work in Code view, which can save you time and cut down on errors. Expression Web comes installed with pre-existing snippets you can use. If you’re not sure what is available, you can view a list of installed code snippets on the Code Snippets tab in the Page Editor Options dialog box, where you can also add, modify, or remove ones you no longer use. To insert a code snippet, switch to Code view, press Ctrl+Enter, and then select the code snippet you want from the dropdown list.
Change Code Snippet Options
![]() Click the Tools menu, and then click Page Editor Options.
Click the Tools menu, and then click Page Editor Options.
![]() Click the Code Snippets tab.
Click the Code Snippets tab.
![]() Perform the options you want:
Perform the options you want:
- Add. Click Add, type a unique keyword, description, the code you want to use as a snippet, and then click OK.
- Modify. Select the code snippet you want, click Modify, make the changes you want, and then click OK.
- Remove. Select the code snippet you want, and then click Remove to delete it.
![]() Click OK.
Click OK.

Did You Know?
You can reuse code snippets on other computers. When you add your code snippets, Expression Web stores them in an XML file called Snippets.xml located in the AppRoamingMicrosoftExpressionWeb DesignerSnippets folder, which you can move to other computers and reuse.
Applying XML Formatting
XML, or Extensible Markup Language, is an alternative to HTML. This format is ideal for producing extensive, highly-structured data from an application in a consistent manner. The difference between XML and HTML is subtle but profound: XML describes a Web document’s content, while HTML tags describe how the document looks. HTML tags assign certain characteristics to the text they surround. XML is ideal for data-intensive Web environments and, unlike HTML, supports customized tags for specific data. XML tags, however, employ a much tighter rule system with regard to XML syntax. So much as a single missing tag or mis-formatted attributes makes the entire document unreadable.
Apply XML Formatting
![]() Open and display the Web page you want to use.
Open and display the Web page you want to use.
![]() Click the Code button at the bottom of the window.
Click the Code button at the bottom of the window.
![]() Right-click anywhere on the page, and then click Apply XML Formatting Rules. Expression Web scans the XML code for missing or incomplete tags.
Right-click anywhere on the page, and then click Apply XML Formatting Rules. Expression Web scans the XML code for missing or incomplete tags.

Customizing the Menu Bar
You can customize the existing Expression Web menu bar by adding buttons, commands, and macros that you use frequently. Adding items to the menu bar is a great way to have easy access to features without adding more buttons or toolbars. The ability to drag features from different parts of the program window makes it easy to add items to the menu bar. Imagine, having a menu with all of your most commonly used formatting, sorting, or printing commands.
Customize the Menu Bar
![]() Click the Tools menu, and then click Customize.
Click the Tools menu, and then click Customize.
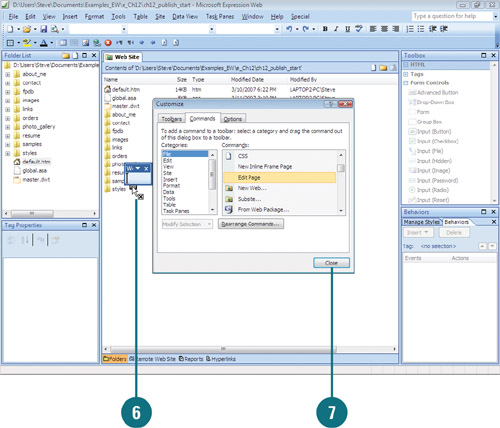
![]() Click the Commands tab.
Click the Commands tab.
![]() Select a category.
Select a category.
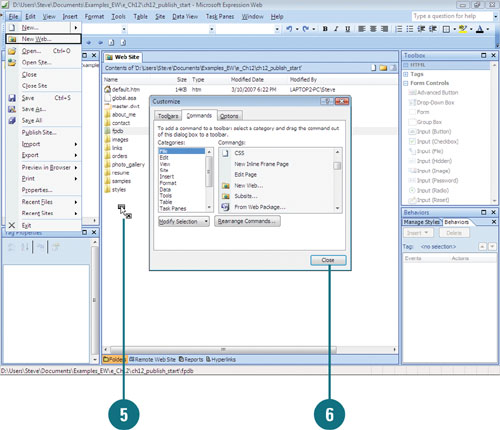
![]() To add a command, drag the command to the appropriate place on the menu you want to modify. A solid horizontal line appears below the place where the new menu command will be placed.
To add a command, drag the command to the appropriate place on the menu you want to modify. A solid horizontal line appears below the place where the new menu command will be placed.

![]() To remove a command, drag the menu command you want to remove to an empty area in the workspace.
To remove a command, drag the menu command you want to remove to an empty area in the workspace.
![]() Click Close.
Click Close.
Did You Know?
You can assign an accelerator key to a menu. An accelerator key is the key you press to display a menu or run a menu command. For example, the accelerator key for the File menu is “F.” To add an accelerator key to a menu item, type an ampersand (&) before the letter that will be the accelerator key. For example, enter the menu name “&New Menu” to create the menu entry New Menu with the accelerator key “N.”
Create a New Menu
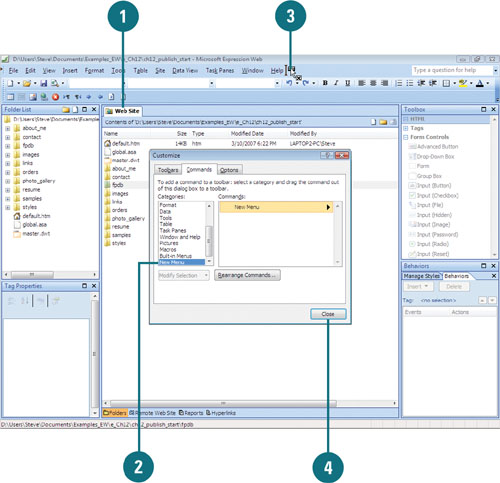
![]() Click the Tools menu, click Customize, and then click the Commands tab.
Click the Tools menu, click Customize, and then click the Commands tab.
![]() Click New Menu in the Categories box.
Click New Menu in the Categories box.
![]() Drag New Menu from the Commands list to an empty spot on the menu bar.
Drag New Menu from the Commands list to an empty spot on the menu bar.
![]() Click Close.
Click Close.
Name a New Menu
![]() Click the Tools menu, and then click Customize.
Click the Tools menu, and then click Customize.
![]() Click New Menu on the menu bar.
Click New Menu on the menu bar.
![]() Click Modify Selection.
Click Modify Selection.
![]() Click the Name box on the menu, and then type a new name.
Click the Name box on the menu, and then type a new name.
![]() Press Enter.
Press Enter.
![]() Click Close.
Click Close.

Did You Know?
You can copy a command to toolbars and menus. Copy commands from other menus or toolbars to new menus and toolbars by pressing and holding Ctrl as you drag the new command.
Adding and Removing Toolbar Buttons
Each toolbar initially appears in a default configuration, but many toolbars actually contain many more commands than are displayed. When monitors are set to low resolution, sometimes not all toolbar buttons are visible. You can modify Expression Web’s toolbars so that they display only the buttons you want. For example, you can add buttons to a toolbar for commands you frequently use, or you can remove buttons from toolbars that have too many. You can also use the Add Or Remove command on the Toolbar Options menu to quickly show or hide buttons on a toolbar. If a button doesn’t appear on the button list for a toolbar, you can add it. If you no longer need a button on the button list, you can remove it.
Show or Hide a Toolbar Button
![]() Click the Toolbar Options list arrow on the toolbar.
Click the Toolbar Options list arrow on the toolbar.
![]() Point to Add or Remove Buttons.
Point to Add or Remove Buttons.
![]() Click to select or clear the check box next to the button you want to show or hide.
Click to select or clear the check box next to the button you want to show or hide.
![]() Click outside the toolbar to deselect it.
Click outside the toolbar to deselect it.

Did You Know?
You can use the Customize dialog box to show and hide toolbars. Click the Tools menu, click Customize, click the Toolbars tab, select or clear the check box next to the toolbar name you want to show or hide, and then click Close.
Add or Remove a Toolbar Button
![]() Click the Tools menu, and then click Customize.
Click the Tools menu, and then click Customize.
![]() Click the Commands tab.
Click the Commands tab.
![]() Click the category containing the toolbar button you want to add.
Click the category containing the toolbar button you want to add.
![]() Drag a command from the Commands tab to the toolbar to add a button, or drag a button off a toolbar to a blank area to remove it.
Drag a command from the Commands tab to the toolbar to add a button, or drag a button off a toolbar to a blank area to remove it.
![]() Click Close.
Click Close.

See Also
See “Changing Menu and Toolbar Options” on page 333 for information on changing general options for menus and toolbars.
Did You Know?
The Customize dialog box uses a special operating mode. When you use the Customize dialog box, menus and toolbars don’t act in the normal way. The special mode allows you to drag-and-drop items on menus and toolbars.
Customizing a Toolbar
You can create your own toolbars to increase your efficiency. You might, for example, create a toolbar that contains formatting and other features that you use most often when you are performing a particular task, such as editing Web pages. This will give you a greater workspace, since you will not have to have all the various toolbars up at once. Using one toolbar will help you achieve this.
Create a Custom Toolbar
![]() Click the Tools menu, and then click Customize.
Click the Tools menu, and then click Customize.
![]() Click the Toolbars tab.
Click the Toolbars tab.
![]() Click New.
Click New.
![]() Type a name for the new toolbar.
Type a name for the new toolbar.
![]() Click OK.
Click OK.

![]() Add buttons to the new toolbar by dragging commands found on the Commands tab.
Add buttons to the new toolbar by dragging commands found on the Commands tab.
![]() Click Close.
Click Close.
Delete a Custom Toolbar
![]() Click the Tools menu, and then click Customize.
Click the Tools menu, and then click Customize.
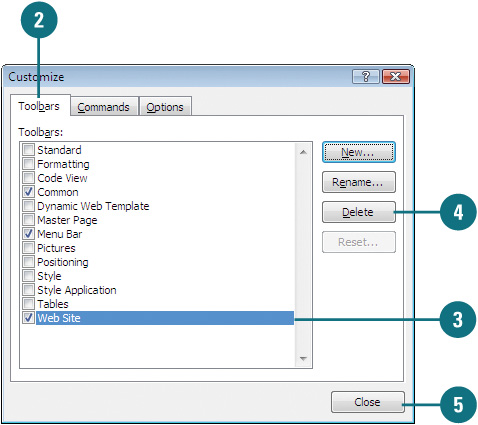
![]() Click the Toolbars tab.
Click the Toolbars tab.
![]() Click the toolbar name you want to delete.
Click the toolbar name you want to delete.
![]() Click Delete.
Click Delete.
![]() Click Close.
Click Close.
Rename a Custom Toolbar
![]() Click the Tools menu, and then click Customize.
Click the Tools menu, and then click Customize.
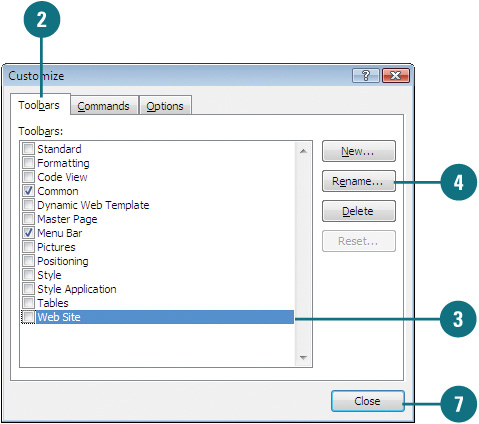
![]() Click the Toolbars tab.
Click the Toolbars tab.
![]() Click the toolbar name you want to rename.
Click the toolbar name you want to rename.
![]() Click Rename.
Click Rename.
![]() Type a name for the toolbar.
Type a name for the toolbar.
![]() Click OK.
Click OK.
![]() Click Close.
Click Close.

Editing Toolbar Buttons and Menu Entries
Expression Web includes tools that allow you to edit toolbar buttons and menu entries. You can specify whether the button or menu item will display text, an image, or both text and an image. If you choose to display an image, you can edit the image, copy it from another button or use one of Expression Web’s predefined images. You can also use the Customize dialog box to makes these and other changes to your buttons and menus.
Edit a Button or Menu Entry
![]() Click the Tools menu, and then click Customize.
Click the Tools menu, and then click Customize.
![]() Select the button on the toolbar or command on the menu you want to edit.
Select the button on the toolbar or command on the menu you want to edit.
![]() Click Modify Selection.
Click Modify Selection.
![]() Choose the commands that will modify the selection in the way you prefer.
Choose the commands that will modify the selection in the way you prefer.
- Click Copy Button Image to copy the button image.
- Click Paste Button Image to paste the button image.
- Click Reset Button Image to reset the selected item to its default image.
- Click Edit Button Image to edit the button image.
- Click Change Button Image to select from a group of predefined images, as shown.
- Click Image and Text to paste a button image into the selected item.
- Click Begin a Group to begin a group of menu items, separated by horizontal lines.
![]() Click Close.
Click Close.

Changing Menu and Toolbar Options
In addition to creating, adding, or removing menu command and toolbar buttons, you can also use the Customize dialog box to make global changes to menus and toolbars to personalize the Expression Web interface. The Options tab allows you to reset menu and toolbar changes, show the Standard and Formatting toolbars on one row to save space, and always show full menus so you don’t have to wait or click the expand arrow. If you do not want to view ScreenTips, you can turn them off.
Change Menu and Toolbar Options
![]() Click the Tools menu, and then click Customize.
Click the Tools menu, and then click Customize.
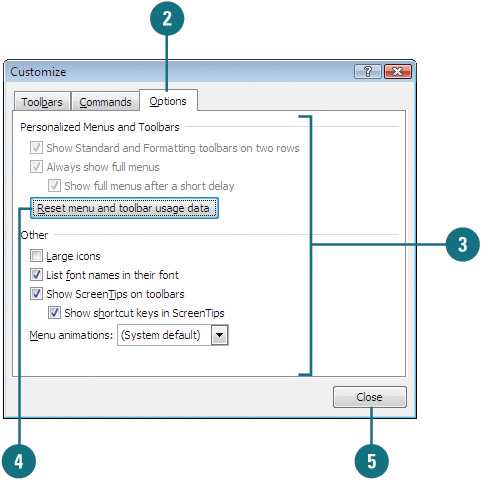
![]() Click Options tab.
Click Options tab.
![]() Select the general options you want. Some of the common options include:
Select the general options you want. Some of the common options include:
- Show Standard and Formatting toolbars on two rows. Displays the Standard and Formatting toolbars on two rows.
- Always show full menus. Displays the full contents of a menu as soon as you open the menu.
- List font names in their font. Displays fonts in the Font menu using the actual font.
- Show ScreenTips on toolbars. Displays descriptive text when you move the pointer over a toolbar button.
- Show shortcut keys in ScreenTips. Displays the shortcut key for a button along with the ScreenTip.
![]() To reset personalized menus and toolbars to the default, click Reset menu and toolbar usage data.
To reset personalized menus and toolbars to the default, click Reset menu and toolbar usage data.
![]() Click Close.
Click Close.
Creating Custom Colors
RGB (red, green, blue) is a set of color values that describe colors. RGB identifies a color by a set of hexadecimal numbers, an internal computer numbering scheme, that specify the amounts of red, green, and blue needed to create the color. RGB colors appear best over the Web (true color representation without dithers or substitutes) when you use only browser safe colors, which is a standard set of 216 color combinations. These RGB values are 0, 51, 102, 153, 204, or 255 in decimal or 00, 33, 66, 99, CC, or FF in hexadecimal. When you use the color dialog boxes, you use decimal values. In Code view, you use hexadecimal values. You can access and create colors using any Expression Web color menu. You can define up to 16 different colors, and then save them to a custom palette. The custom colors become available on all color menus.
Define a Custom Color Palette
![]() Open and display the Web page you want to use.
Open and display the Web page you want to use.
![]() Click any color list arrow (such as Font Color button list arrow) to open a color palette.
Click any color list arrow (such as Font Color button list arrow) to open a color palette.
![]() Click More Colors on the color palette.
Click More Colors on the color palette.
![]() Click Custom.
Click Custom.
![]() Click a blank box.
Click a blank box.
![]() Select a color by entering a combination of numerical values, or selecting one of the basic colors in the main palette or a custom color in the color spectrum palette.
Select a color by entering a combination of numerical values, or selecting one of the basic colors in the main palette or a custom color in the color spectrum palette.
![]() Click Add to Custom Colors.
Click Add to Custom Colors.
![]() When you’re done, click OK.
When you’re done, click OK.
![]() Click OK again to close the More Colors dialog box.
Click OK again to close the More Colors dialog box.


![]() Click OK to close the Page Properties dialog box.
Click OK to close the Page Properties dialog box.
Remove a Custom Color
![]() Open and display the Web page you want to use.
Open and display the Web page you want to use.
![]() Click any color list arrow (such as Font Color button list arrow) to open a color palette.
Click any color list arrow (such as Font Color button list arrow) to open a color palette.
![]() Click More Colors on the color palette.
Click More Colors on the color palette.
![]() Click Custom.
Click Custom.
![]() Click the box with the color you want to remove.
Click the box with the color you want to remove.
![]() Click the white color in the standard color palette.
Click the white color in the standard color palette.
![]() Click Add to Custom Colors.
Click Add to Custom Colors.
![]() When you’re done, click OK.
When you’re done, click OK.
![]() Click OK again to close the More Colors dialog box.
Click OK again to close the More Colors dialog box.


![]() Click OK to close the Page Properties dialog box.
Click OK to close the Page Properties dialog box.

Understanding How Macros Automate Your Work
To complete many tasks in Expression Web, you need to execute a series of commands and actions. If you often need to complete the same task, you’ll find yourself repeatedly taking the same series of steps. It can be tiresome to continually repeat the same commands and actions when you can create a mini-program, or macro, that accomplishes all of them with a single command.
When you create a macro, Expression Web stores the list of commands with any name you choose. You can store your macros in Microsoft Expression Web or All Open Projects. Storing your macros in Expression Web makes the macros available to you from any location in Expression Web, even when no project is open.
Once a macro is created, you can make modifications to it, add comments so other users will understand its purpose, and test it to make sure it runs correctly. You can run a macro by choosing the Macro command on the Tools menu, or by using a shortcut key or clicking a toolbar button you’ve assigned to it. When you click the Tools menu, point to Macro, and then click Macros. The Macro dialog box opens, where you can run, edit, test, or delete any Expression Web macro on your system, or create a new one.
If you have problems with a macro, you can step through the macro one command at a time, known as debugging. Once you identify any errors in the macro, you can edit it.

You can create and edit a macro with the Microsoft Visual Basic Editor, which comes with Expression Web. Macro code is written in Microsoft Visual Basic, a programming language.
Each action listed in a macro either performs a step or states what attributes are turned on (true) or off (false). Quotation marks are used to indicate typed text, and the terms Sub and End Sub are used to indicate the beginning and ending of subroutines, respectively.
Because not everyone wants to read through codes to figure out what a macro does, comments are often included within the code. The comments don’t affect the macro; they simply clarify its purpose or actions for a person viewing the code. Comments can be used to help you remember why you took the steps you did, or to help co-workers understand what is going on in the macro and how the macro should be used. A comment always begins with an apostrophe to distinguish it from a command code.
To learn more about macro code, check out Visual Basic titles on the Que Publishing Web site at www.quepublishing.com.

Automating Your Work with Macros
Do you often redo many tasks that require the same, sometimes lengthy, series of steps? Rather than repeat the same actions, you can work faster by recording the entire series of keystrokes and commands in a custom command, or macro. A macro is a sequence of commands and entries that can be activated collectively by clicking a toolbar button, clicking a menu command, typing a key combination, or clicking the Run command in the Macros dialog box. Macros are a perfect way to speed up routine formatting, combine multiple commands, and automate complex tasks. Any time you want to repeat that series of actions, you can “play,” or run, the macro.
Record a Macro
![]() Click the Tools menu, point to Macro, and then click Macros.
Click the Tools menu, point to Macro, and then click Macros.
![]() Type a name for the new macro.
Type a name for the new macro.
![]() Click Create.
Click Create.
The Microsoft Visual Basic window opens, where you can create a macro.

![]() Type your macro code.
Type your macro code.
![]() When you’re done, click the File menu, and then click Close and Return to Microsoft Expression Web.
When you’re done, click the File menu, and then click Close and Return to Microsoft Expression Web.

Run a Macro
![]() Click the Tools menu, point to Macro, and then click Macros.
Click the Tools menu, point to Macro, and then click Macros.
![]() If necessary, click the Macros In list arrow, and then click the page that contains the macro you want to run.
If necessary, click the Macros In list arrow, and then click the page that contains the macro you want to run.
![]() Click the name of the macro you want to run.
Click the name of the macro you want to run.
![]() Click Run.
Click Run.

Delete a Macro
![]() Click the Tools menu, point to Macro, and then click Macros.
Click the Tools menu, point to Macro, and then click Macros.
![]() Select the macro you want to remove.
Select the macro you want to remove.
![]() Click Delete.
Click Delete.

![]() Click Yes to confirm the deletion.
Click Yes to confirm the deletion.
Modifying a Macro
If a macro doesn’t work exactly the way you want it to, you can fix the problem. Expression Web allows you to debug, or repair, an existing macro so that you can change only the actions that aren’t working correctly. When beginning the process, Expression Web will step through each of the actions that you supplied when you created the macro. Look carefully for any mistakes, and then correct as necessary.
Debug a Macro Using Step Mode
![]() Click the Tools menu, point to Macro, and then click Macros.
Click the Tools menu, point to Macro, and then click Macros.
![]() Click the name of the macro you want to debug.
Click the name of the macro you want to debug.
![]() Click Step Into.
Click Step Into.
The Microsoft Visual Basic window opens, where you can edit your macro.

![]() Click the Debug menu, and then click Step Into to proceed through each action.
Click the Debug menu, and then click Step Into to proceed through each action.
![]() When you’re done, click the File menu, and then click Close and Return to Microsoft Expression Web.
When you’re done, click the File menu, and then click Close and Return to Microsoft Expression Web.

![]() Click OK to stop the debugger.
Click OK to stop the debugger.
Loading and Unloading Add-ins
Add-ins are additional programs designed to run and add functionality within Expression Web. Component Object Model (COM) add-ins are designed to run in one or more programs and use the file name extension .dll or .exe. Some add-ins are installed when you run the Setup program, while others can be downloaded from Microsoft or purchased from third-party vendors. You can use the COM Add-Ins dialog box to add (load) or remove (unload) add-ins. When you load an add-in, the feature may add a command to a menu or toolbar. You can load one or more add-ins. If you no longer need an add-in, you should unload it to save memory and reduce the number of commands. When you unload an add-in, you also may need to restart Expression Web to remove an add-in command from a menu or toolbar.
Load or Unload a COM Add-in
![]() Click the Tools menu, and then click Add-Ins.
Click the Tools menu, and then click Add-Ins.
![]() Select the check box next to the add-in you want to load, or clear the check box you want to unload.
Select the check box next to the add-in you want to load, or clear the check box you want to unload.
TROUBLE? If the add-in is not available in the list, click Add, locate and select the add-in you want, and then click OK.
![]() To remove the selected add-in, click Remove.
To remove the selected add-in, click Remove.
![]() Click OK.
Click OK.

Did You Know?
You can get more information about COM online. Visit www.microsoft.com/com.
You can get add-ins from WebAssist; some are free. Visit www.webassist.com, and then search for Expression Web add-ins.