
Chapter 1 Installing or Upgrading to the SQL Server 2008 Database Engine
SQL Server 2008 Database Engine Services, formerly referred to as “The Database Engine,” is the nucleus of SQL Server 2008. Its features are nothing short of impressive. Many organizations today run complex data applications that command the use of a feature like SQL Server’s Database Engine that can process, store, and secure data. From a transactional perspective, it is used to store, process, and secure data for the most demanding data-consuming applications within your enterprise. Moreover, the Database Engine offers many other benefits and advantages for organizations. It controls authorization to SQL Server objects, provides high-availability functionality, and includes subfeatures such as Replication and Full-Text Search.
This chapter describes the step-by-step process for installing a clean version of SQL Server 2008 Database Engine and/or upgrading an existing SQL Server Database Engine implementation to SQL Server 2008. In addition, this chapter covers how to leverage the planning tools to ensure a successful installation, upgrade, or transition.
Even though the SQL Server 2008 installation process is very intuitive and has been simplified, a DBA must make several key decisions to ensure that the completed installation or upgrade will meet the needs of the organization. For example, is it beneficial to upgrade an existing SQL Server implementation to SQL Server 2008, or is it preferred to conduct a clean install from scratch? What are the ramifications of these alternatives? Will you lose your existing SQL Server settings, databases, and configurations? This chapter covers these prerequisite planning tasks to address the questions and concerns of DBAs.
In addition, this chapter also covers the hardware and software prerequisites, supported SQL Server 2008 upgrade paths, supported Windows operating systems for running SQL Server 2008, and benefits of running SQL Server 2008 on the highly anticipated Windows Server 2008 family of operating systems.
SQL Server continues to deliver a robust experience when installing or upgrading to SQL Server 2008. Moreover, SQL Server 2008 introduces significant enhancements to make the installation or upgrade process even more simple and seamless compared to its predecessors. The new installation features for SQL Server 2008 consist of the following:
![]() A new SQL Server 2008 Installation Center landing page, which includes a tremendous number of options for planning, installing, and maintaining a SQL Server implementation. The Installation Center is also a one-stop shop for planning and reviewing SQL Server documentation before getting started.
A new SQL Server 2008 Installation Center landing page, which includes a tremendous number of options for planning, installing, and maintaining a SQL Server implementation. The Installation Center is also a one-stop shop for planning and reviewing SQL Server documentation before getting started.
![]() A new planning tool known as the System Configuration Checker, which checks for conditions that could impede a SQL Server installation prior to the actual installation.
A new planning tool known as the System Configuration Checker, which checks for conditions that could impede a SQL Server installation prior to the actual installation.
![]() Another great planning tool is the newly refined Install Upgrade Advisor. The Install Upgrade Advisor tool allows a DBA to fully analyze existing SQL Server 2005 and SQL Server 2000 installations for issues that may surface when upgrading to SQL Server 2008. By fixing these issues before conducting the upgrade, an organization will have a smoother experience when transitioning to SQL Server 2008.
Another great planning tool is the newly refined Install Upgrade Advisor. The Install Upgrade Advisor tool allows a DBA to fully analyze existing SQL Server 2005 and SQL Server 2000 installations for issues that may surface when upgrading to SQL Server 2008. By fixing these issues before conducting the upgrade, an organization will have a smoother experience when transitioning to SQL Server 2008.
![]() New maintenance tasks have been introduced in the installation process, which allow DBAs to either repair a corrupt SQL Server 2008 installation or conduct a Feature Upgrade. The Feature Upgrade tool is a wizard that allows organizations to upgrade or change their existing edition of SQL Server 2008 after the initial installation or upgrade is complete.
New maintenance tasks have been introduced in the installation process, which allow DBAs to either repair a corrupt SQL Server 2008 installation or conduct a Feature Upgrade. The Feature Upgrade tool is a wizard that allows organizations to upgrade or change their existing edition of SQL Server 2008 after the initial installation or upgrade is complete.
![]() A discovery report that will provide a detailed report of all SQL Server 2000, 2005, and 2008 components, features, and settings associated with an installation.
A discovery report that will provide a detailed report of all SQL Server 2000, 2005, and 2008 components, features, and settings associated with an installation.
![]() The potential to automate SQL Server installations by using an existing configuration file.
The potential to automate SQL Server installations by using an existing configuration file.
![]() An Advanced Cluster Preparation tool, which streamlines and prepares a SQL Server 2008 failover cluster installation—which is typically deemed a very difficult task in the industry.
An Advanced Cluster Preparation tool, which streamlines and prepares a SQL Server 2008 failover cluster installation—which is typically deemed a very difficult task in the industry.
![]() A tool that will allow for a smooth transition of packages by automatically upgrading them from SQL Server 2005 to the SQL Server 2008 Integration Services format.
A tool that will allow for a smooth transition of packages by automatically upgrading them from SQL Server 2005 to the SQL Server 2008 Integration Services format.
Not only is it essential to understand the new features and functionality associated with the Database Engine, but it is equally important to understand older elements that have been deprecated in SQL Server 2008. Let’s examine the list of deprecated elements that are no longer supported or associated with the Database Engine.
![]() The
The DUMP statement associated with backups has been deprecated and replaced with BACKUP.
![]() The
The LOAD statement associated with restores has been replaced with RESTORE.
![]()
BACKUP LOG WITH NO_LOG and BACKUP LOG WITH TRUNCATE_ONLY are no longer available as the transaction log is automatically truncated with the database using the Simple recovery model.
![]() The
The sp_addalias procedure has been removed.
![]() SQL Server 60, 65, and 70 compatibility levels are no longer supported. Databases must at least maintain a compatibility level of 80.
SQL Server 60, 65, and 70 compatibility levels are no longer supported. Databases must at least maintain a compatibility level of 80.
![]() The
The sp_addgroup, sp_dropgroup, and sp_helpgroup stored procedures have been replaced with roles.
![]() Sample databases such as Northwind, Pubs, and AdventureWorks are no longer included as optional installation features with the installation program. If you want to use the sample databases, they are offered as out-of-band downloads from Microsoft’s samples website.
Sample databases such as Northwind, Pubs, and AdventureWorks are no longer included as optional installation features with the installation program. If you want to use the sample databases, they are offered as out-of-band downloads from Microsoft’s samples website.
![]() The Surface Area Configuration (SAC) tool has been replaced with Policy Based Management.
The Surface Area Configuration (SAC) tool has been replaced with Policy Based Management.
![]() Remote servers have been replaced with Linked servers.
Remote servers have been replaced with Linked servers.
Before you begin the actual installation of SQL Server 2008 Database Engine, you must make several decisions concerning preliminary tasks. How well you plan these steps will determine how successful your installation is—as many of these decisions cannot be changed after the installation is complete.
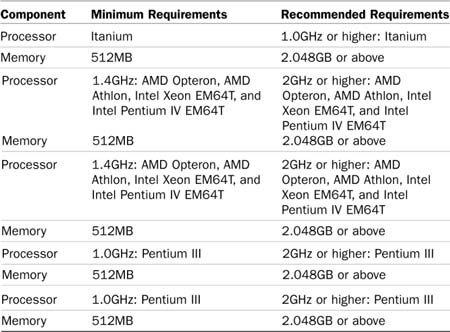
Whether you are installing SQL Server 2008 in a lab or production environment, you need to ensure that the hardware chosen meets the minimum system requirements. In most situations, the minimum hardware requirements presented will not suffice; therefore, Table 1.1 provides not only the minimum requirements, but also the recommended and optimal system requirements for the hardware components.
Note
This book is tailored toward the Standard and Enterprise Editions. As such, the minimum hardware and software requirements documented in Table 1.1 and Table 1.2 of this chapter only cover “core editions” of SQL Server 2008, also known as Standard and Enterprise Editions. To review the hardware and software requirements for the “specialized editions,” refer to the section on “Hardware and Software Requirements for Installing SQL Server 2008” in SQL Server 2008 Books Online (BOL).
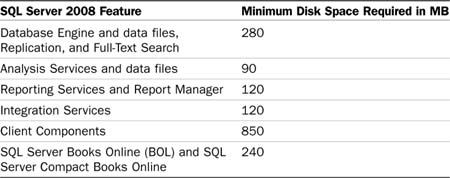
The minimum disk space requirements differ depending on which SQL Server 2008 feature will be installed. Table 1.2 depicts these minimum disk space specifications itemized by feature.
Note
When designing and selecting the system specifications for a SQL Server implementation, even the optimal system requirements recommendations from Microsoft might not suffice. It is a best practice to assess the server specifications of the planned server role while taking the load during the time of deployment and future growth into consideration. For example, a SQL Server 2008 system running 50 instances of the Database Engine will require much more than the recommended specification of 2GB of RAM to run adequately. In addition, SQL Server 2008 running on a Windows 2008 server that is providing business intelligence solutions for 10,000 users might require 32GB of RAM. Therefore, size the system accordingly and test the load before going live into production.
Before installing SQL Server 2008, it is also important to get acquainted with the software prerequisites, as many of these prerequisites outline best practices. As such, you should take the time to review the prerequisites before implementation to ensure installation or upgrade success. The SQL Server 2008 software prerequisites include
![]() .NET Framework 3.5
.NET Framework 3.5
![]() Windows Installer 4.5 or later
Windows Installer 4.5 or later
![]() Microsoft Data Access Components (MDAC) 2.8 SP1 or later
Microsoft Data Access Components (MDAC) 2.8 SP1 or later
![]() Internet Explorer 6 SP1 or later
Internet Explorer 6 SP1 or later
![]() Latest version of PowerShell
Latest version of PowerShell
![]() Latest Windows Server hot fixes are recommended
Latest Windows Server hot fixes are recommended
![]() If SQL Server 2008 will be virtualized, then Hyper-V is required and supported.
If SQL Server 2008 will be virtualized, then Hyper-V is required and supported.
Note
For more information and consolidating and virtualizing SQL Server 2008 on Windows Server 2008 Hyper-V, refer to Chapter 21, “Consolidating and Virtualizating with Hyper-V.”
The SQL Server installation wizard will first verify if these software prerequisites are already installed. If they are not, don’t panic—the SQL Server 2008 installation wizard is very intuitive and will most likely prompt, and then install all of these software prerequisites automatically. Therefore, you won’t have to spend hours conducting Google searches, trying to nail down the appropriate downloads, including versions.
SQL Server 2008 comes in a variety of editions that are tailored to suit the needs and requirements of different organizations and applications. The SQL Server 2008 Editions include the Enterprise, Standard, Workgroup, Express, Compact, and Developer Editions, as described in the following sections.
The SQL Server 2008 Enterprise Edition is the complete feature set of the product and is designed to support the needs of the largest enterprises. It includes all the features for scalability, performance, high availability, enterprise security, data warehousing, business intelligence, and enterprise manageability. The Enterprise Edition is fully 64-bit capable, is optimized to run on 64-bit platforms and can support all the processors and memory found in the operating system.
Some other new features only found in the Enterprise edition include Partitioned Table Parallelism, enhanced database mirroring features, Resource Governor, Backup Compression, online operations, Hot Add CPU, Performance Data Collector, Extensible Key Management, Failover Clustering, Transparent Data Encryption, and Change Data Capture.
The SQL Server 2008 Standard Edition includes the core set of functionality needed to support data warehouses, electronic commerce applications, and line-of-business applications. It is designed to support the needs of small to medium organizations. The Standard Edition is fully 64-bit capable and can support a maximum of four processors. It is worth mentioning that two nodes of failover clustering is also supported within the Standard Edition.
The SQL Server 2008 Workgroup Edition is designed for small organizations and includes the core database features needed for applications.
The SQL Server 2008 Express Edition is the free edition that is designed to support small or targeted applications with a core set of secure database requirements. This edition replaces the Microsoft SQL Server Desktop Engine (MSDE) platform available in SQL Server 2000 and augments the Express Edition in SQL Server 2005.
The SQL Server 2008 Compact Edition is the free edition that runs on mobile devices as well as desktops. This provides a single lightweight database platform for client applications. This edition replaces the SQL Server Mobile product and augments the SQL Server 2005 Compact Edition.
The SQL Server 2008 Developer Edition provides all the same features and functionality as the Enterprise Edition but is licensed only for development purposes.
The following link includes the full list of features supported based on the Editions of SQL Server 2008.
SQL Server 2008 can run on a number of Windows operating systems. SQL Server 2008 can run on top of Windows Server 2008, Windows Server 2003 SP2, Windows VISTA, and Windows XP. When referring to Windows Server 2008, either the Windows Server 2008 edition with or without Hyper-V can be utilized. Please note that SQL Server 2008 does not support running Windows 2000 or Windows NT 4.0.
Hands down, the Windows Server 2008 family of operating systems is the best choice for running SQL Server 2008. By combining the two products, the highest level of security, scalability, reliability, high availability and compliance can be achieved. Some of the major benefits of running SQL Server 2008 on Windows Server 2008 include the following:
![]() Authentication— The Windows Server 2008 authentication mechanism provides the highest level of security for authorization when running Active Directory Domain Services. SQL Server can leverage the following: Active Directory role-based security for authorization and administration, two-factor authentication with SmartCard-based certificates and biometric devices, and integration with certificate services. Finally, Kerberos is now supported for all SQL Server protocols.
Authentication— The Windows Server 2008 authentication mechanism provides the highest level of security for authorization when running Active Directory Domain Services. SQL Server can leverage the following: Active Directory role-based security for authorization and administration, two-factor authentication with SmartCard-based certificates and biometric devices, and integration with certificate services. Finally, Kerberos is now supported for all SQL Server protocols.
![]() Encryption— By combining the encryption technologies included in both SQL Server 2008 and Windows Server 2008, it is finally possible to achieve encryption from an end-to-end perspective.
Encryption— By combining the encryption technologies included in both SQL Server 2008 and Windows Server 2008, it is finally possible to achieve encryption from an end-to-end perspective.
![]() Minimized Footprint— Both Windows Server 2008 and SQL Server 2008 provide a modularized installation process that is very granular. Therefore, you only install what you need. This strategy minimizes the attack surface, which in turn, mitigates breaches and compromises.
Minimized Footprint— Both Windows Server 2008 and SQL Server 2008 provide a modularized installation process that is very granular. Therefore, you only install what you need. This strategy minimizes the attack surface, which in turn, mitigates breaches and compromises.
![]() Compliance— New features and functionality such as integrating Audit and Audit Specifications directly with the Windows Server 2008 event and security logs allows for stronger auditing functionality, which is a requirement of many major regulatory compliances.
Compliance— New features and functionality such as integrating Audit and Audit Specifications directly with the Windows Server 2008 event and security logs allows for stronger auditing functionality, which is a requirement of many major regulatory compliances.
![]() Dynamic Hardware Partitioning— Allows for both CPU and RAM to be added to the SQL Server system on the fly, without causing a server outage.
Dynamic Hardware Partitioning— Allows for both CPU and RAM to be added to the SQL Server system on the fly, without causing a server outage.
![]() High Availability Clustering— Windows Server 2008 supports up to 16 nodes within a SQL Server 2008 failover cluster. In addition, the requirement of having all nodes within the same subnet has been alleviated. Consequently, with the new quorum model and no subnet restriction, it is easier to achieve geographically dispersed clusters.
High Availability Clustering— Windows Server 2008 supports up to 16 nodes within a SQL Server 2008 failover cluster. In addition, the requirement of having all nodes within the same subnet has been alleviated. Consequently, with the new quorum model and no subnet restriction, it is easier to achieve geographically dispersed clusters.
![]() Policy Based Management— By leveraging the Windows Server 2008 group policy and the configuration management strategies, policies can be created to manage SQL Server databases settings and configurations.
Policy Based Management— By leveraging the Windows Server 2008 group policy and the configuration management strategies, policies can be created to manage SQL Server databases settings and configurations.
![]() PowerShell— The latest scripting technology geared toward effectively managing Windows Server and Microsoft applications has extended to SQL Server 2008. DBAs can use the powerful command-line scripting technologies to automate administrator tasks for both Windows Server 2008 and SQL Server 2008.
PowerShell— The latest scripting technology geared toward effectively managing Windows Server and Microsoft applications has extended to SQL Server 2008. DBAs can use the powerful command-line scripting technologies to automate administrator tasks for both Windows Server 2008 and SQL Server 2008.
![]() Performance Management— Windows Server 2008 introduces Windows Reliability and a newly refined performance monitor tool for troubleshooting and monitoring SQL Server system performance. In addition, the Windows performance framework has been augmented through the introduction of SQL Server 2008 Performance Data Collector. As a result, collecting, analyzing, and troubleshooting SQL Server data in a centralized solution for end-to-end monitoring can be achieved.
Performance Management— Windows Server 2008 introduces Windows Reliability and a newly refined performance monitor tool for troubleshooting and monitoring SQL Server system performance. In addition, the Windows performance framework has been augmented through the introduction of SQL Server 2008 Performance Data Collector. As a result, collecting, analyzing, and troubleshooting SQL Server data in a centralized solution for end-to-end monitoring can be achieved.
![]() Consolidation and Virtualization— Hyper-V has been introduced with Windows Server 2008. Hyper-V is Microsoft’s virtualization technology. By using Hyper-V in conjunction with SQL Server 2008, you can consolidate SQL Servers into a virtualized environment, reduce SQL Server hardware, and reduce total cost of ownership within the infrastructure.
Consolidation and Virtualization— Hyper-V has been introduced with Windows Server 2008. Hyper-V is Microsoft’s virtualization technology. By using Hyper-V in conjunction with SQL Server 2008, you can consolidate SQL Servers into a virtualized environment, reduce SQL Server hardware, and reduce total cost of ownership within the infrastructure.
In the Windows 2008 family of operating systems, there are four main editions, and SQL Server 2008 can run on any of them. These editions include Windows Server 2008 Standard, Windows Server 2008 Enterprise Edition, Windows Server 2008 Datacenter Edition, and Windows Web Server 2008.
Organizations and DBAs must understand their workload needs and requirements when selecting the appropriate Windows Server 2008 operating system edition to utilize. In addition, the Windows Server edition selected must also coincide with requirements pertaining to the edition of SQL Server 2008 selected. For example, the Windows Server 2008 Enterprise Edition might be selected if there is a need to sustain an eight-node SQL Server failover cluster; the Standard Edition may be selected in order to save on licensing costs; or Windows Server 2008 Enterprise Edition with Hyper-V may be selected if there is a need to virtualize the SQL Server environment.
Each edition supports both the 32-bit and 64-bit processor architectures and the Standard, Enterprise, and Datacenter editions ship with or without Hyper-V. Hyper-V is the latest Microsoft virtualization technology based on Windows Server 2008.
Finally, when running SQL Server 2008 on Windows Server 2008, the maximum amount of RAM supported by the operating system on 32-bit systems is 4GB when running the Standard Edition and 64GB when running the Enterprise and Datacenter Editions. For a 64-bit system, the numbers increase as the Standard Edition can support 32GB and the Enterprise and Datacenter Editions can support up to 2TB of RAM. Hence it is strongly recommended to be using the x64 versions of the operating system whenever possible as it allows for greater flexibility and upgradability.
Caution
When installing Windows Server 2008, it is possible to select a Server Core installation. Windows Server 2008 Server Core is a stripped-down minimal installation that provides a low-maintenance environment through limited functionality. The present version of Server Core is not intended to be an application platform. Since there are SQL Server dependencies that are not part of the Server Core, SQL Server 2008 cannot run on a Windows Server Core installation.
For an overview of the editions and a complete list of Windows 2008 features and functionality, refer to the Microsoft Windows Server 2008 home page at the following link: http://www.microsoft.com/windowsserver2008/en/us/default.aspx.
Organizations that have conducted a SQL Server implementation in the past may need to perform a new SQL Server 2008 installation, a side-by-side installation or upgrade their existing SQL Server system, which is commonly referred to as an in-place upgrade. Finally, organizations may choose to transition to SQL Server 2008 by first installing a new installation and then migrating SQL Server databases and objects from the legacy environment. There are benefits to each of these options. The next two sections detail the benefits.
The primary benefit of a new installation is that, by installing the operating system from scratch, you are starting with a known good server and a brand new SQL Server 2008 implementation. You can avoid migrating problems that might have existed on your previous server—whether due to corrupt software, incorrect configuration settings, or improperly installed applications. Moreover, a new installation provides an opportunity for housecleaning as legacy SQL Server items are not carried over.
For example, it is common for an old SQL Server system to have many outdated databases, packages, user accounts, and stored procedures that have not been touched in over 10 years. Keep in mind, however, that you will also lose all configuration settings from your previous installation. In addition, all SQL Server elements, such as databases, user accounts, packages, and so on, will need to be migrated/transitioned. Moreover, required applications on the legacy server will need to be reinstalled after the installation of the new operating system and the SQL Server 2008 implementation are complete. Make sure you document your server configuration information and back up any data that you want to keep.
When running SQL Server 2008, there may be situations where installing a new installation from scratch is the only option. For example, it is not possible to upgrade a legacy SQL Server Failover Cluster from SQL Server 2005 running on Windows Server 2003 to SQL Server 2008 Failover Clustering running on Windows Server 2008.
Note
When performing a new installation of SQL Server 2008, it is possible to install a new SQL Server 2008 instance on an existing system with SQL Server 2005. Therefore, a side-by-side installation is supported and a migration of existing data from SQL Server 2005 to SQL Server 2008 can be achieved all within the same server.
Upgrading, on the other hand, replaces your current SQL Server binaries but keeps existing databases, components, features, packages, users, settings, groups, rights, and permissions intact. In this scenario, you don’t have to reinstall applications or restore data. Before choosing this option, keep in mind that you should test your applications and databases for compatibility before migration. Just because they worked on previous versions of SQL Server does not mean they will work on SQL Server 2008.
As always, before performing any type of server maintenance such as a SQL Server or Windows Server 2008 in-place upgrade, you should perform a complete backup of the SQL Server environment, any applications residing on the server, and data that you want to preserve. Do not forget to include the System State when backing up the SQL Server system. It is required when performing a restore if you want to maintain the existing Windows settings.
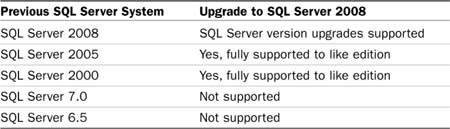
Table 1.3 lists the upgrade paths for SQL Server 2008.
Note
In-place upgrades can only be accomplished when using the same edition. For example, an upgrade from SQL Server 2005 Standard to SQL Server 2008 Enterprise cannot be achieved. Nevertheless, there is a way around this situation. It is possible to upgrade from SQL Server 2005 Standard to SQL Server 2008 Standard and then conduct an edition upgrade to SQL Server 2008 Enterprise.
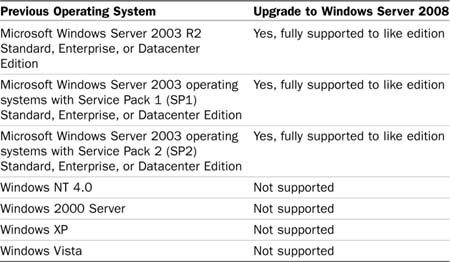
On another note, when upgrading an existing system to SQL Server 2008, there may be situations when an organization would also want to upgrade the underlying operating system to Windows Server 2008. To upgrade to Windows 2008, you must be running a server-level operating system. You cannot upgrade Workstation or Home Editions of operating systems such as Windows XP or Windows Vista to Windows 2008. To upgrade your existing SQL Server’s operating system, you must be running Windows Server 2003. An upgrade from Windows NT 4.0 and Windows 2000 Server is not permitted. Table 1.4 lists the available upgrade paths to Windows 2008.
During the installation of SQL Server 2008, you will have to tell the setup wizard how you want your server configured. The wizard will take the information you provide and configure the server settings to meet your specifications.
Taking the time to gather the information described in the following sections before starting your installation or upgrade will likely make your SQL Server 2008 installation go faster, smoother, and easier.
The first and most major decision when moving toward SQL Server 2008 is debating whether to implement a brand new SQL Server installation from scratch or to conduct an in-place upgrade. If you don’t already have SQL Server in your existing infrastructure, it is a “no-brainer,” and a new installation is warranted. However, if a legacy version of SQL Server resides in the infrastructure, the organization must decide between an in-place upgrade or a new installation. If a new installation is chosen, it is necessary to transition existing SQL Server data from the legacy system to the newly established SQL Server 2008 system. As mentioned earlier, each alternative has benefits and disadvantages.
Another major decision needs to be made in the planning phases: Should SQL Server 2008 be installed in a stand-alone system or should Failover Clustering be utilized? Failover Clustering provides high availability for a SQL Server instance and should be leveraged if an organization needs maximum availability, protection against server hardware failure, seamless failover that does not require DBA intervention, and finally, automatic client redirects. A stand-alone installation is also sufficient, as it is cheaper, easier to administer, and does not require specific failover clustering hardware.
Note
To install SQL Server 2008 Failover Cluster, review Chapter 12, “Implementing and Managing Failover Clustering.”
For years now, discussions on the topic of single-instance versus multiple-installation have both engulfed and engaged the SQL Server community. Should you install a single-instance SQL Server installation and place all databases on one instance, or scale up and create a multiple-instance SQL Server installation and spread databases across each of these instances? This question continues to echo through every organization. Here are some best practices to assist in making such an arduous decision.
One of the main drawbacks of placing all databases on a single-instance installation involves the tempdb database. The tempdb database is a shared resource between all databases contained within the same SQL Server instance. Performance degradation may occur as the tempdb database is the single point of contention for all temporary database workloads. In multiple-instance installations, a tempdb database is created for each instance, minimizing contention and performance degradation.
Many DBAs implement multiple instances for other reasons, including regulatory compliance, administrator autonomy, different global security policies, global server settings, and compatibility requirements.
Organizations also have the option to install a brand new installation of SQL Server 2008 on a server that is already running a legacy instances of SQL Server 2005. Based on this methodology, more than one version of SQL Server will reside on the system.
Typically, the preference is to either conduct an in-place upgrade or install SQL Server 2008 on new hardware to minimize hardware contention and performance degradation. However, side-by-side installations are sometimes warranted. Let’s look at the situations that support this installation. SQL Server 2008 will coexist with SQL Server 2005 and SQL Server 2000. Unfortunately, SQL Server 7.0 is not supported, but hopefully the majority of the organizations out there have already transitioned out of SQL Server 7.0 because it is no longer supported by Microsoft.
Give serious thought to the SQL Server 2008 features before installing them. The modular setup of SQL Server 2008 is made up of many independent features, previously referred to as components, allowing for complete customization by organizations. This typically results in minimal surface area and more granularity compared with older editions of SQL Server. This improved modular installation process is said to be “slim and efficient” like other new Microsoft products such as Windows Server 2008 and Exchange Server 2007.
The following bullets depict the modular installation including shared features that can be selected during the installation of SQL Server 2008:
![]() Database Engine Services— This is the core service for storing, processing, and securing data. It is designed to provide a scalable, fast, and high-availability platform for access and the other components. Two subfeatures within the Database Engine are
Database Engine Services— This is the core service for storing, processing, and securing data. It is designed to provide a scalable, fast, and high-availability platform for access and the other components. Two subfeatures within the Database Engine are
![]() SQL Server Replication— Replication allows DBAs to copy databases to different locations and keep the copies synchronized. This can be used for data distribution, synchronization, fault tolerance, disaster recovery, load balancing, or testing. The Replication component manages database replication and interacts primarily with the Database Engine features.
SQL Server Replication— Replication allows DBAs to copy databases to different locations and keep the copies synchronized. This can be used for data distribution, synchronization, fault tolerance, disaster recovery, load balancing, or testing. The Replication component manages database replication and interacts primarily with the Database Engine features.
![]() Full-Text Search— The Full-Text Search engine populates and manages the full-text catalogs. The Full-Text engine also makes full-text searches easier by maintaining indexes, a thesaurus, noise words, and linguistic analysis of the full-text indexes.
Full-Text Search— The Full-Text Search engine populates and manages the full-text catalogs. The Full-Text engine also makes full-text searches easier by maintaining indexes, a thesaurus, noise words, and linguistic analysis of the full-text indexes.
![]() Analysis Services— The SQL Server 2008 Analysis Services (SSAS) feature provides online analytical processing (OLAP) and data mining. OLAP is a modification of the original database concept of online transaction processing (OLTP). OLAP is designed to provide immediate answers to analytical and ad hoc queries from a multidimensional cube known as an OLAP cube. Data mining is the process of searching large volumes of data for patterns and trends. SSAS allows SQL Server 2008 to provide both these capabilities and is the core feature of business intelligence.
Analysis Services— The SQL Server 2008 Analysis Services (SSAS) feature provides online analytical processing (OLAP) and data mining. OLAP is a modification of the original database concept of online transaction processing (OLTP). OLAP is designed to provide immediate answers to analytical and ad hoc queries from a multidimensional cube known as an OLAP cube. Data mining is the process of searching large volumes of data for patterns and trends. SSAS allows SQL Server 2008 to provide both these capabilities and is the core feature of business intelligence.
![]() Reporting Services— The Microsoft SQL Server 2008 Reporting Services (SSRS) feature allows for the presentation and delivery of data in a variety of ways. The reports can include tables, matrices, and free-form data. The source data for the reports can be provided by the Database Engine component, the Analysis Services component, or any Microsoft .NET data provider such as ODBC or OLE DB to access data sources such as Oracle or file-based data.
Reporting Services— The Microsoft SQL Server 2008 Reporting Services (SSRS) feature allows for the presentation and delivery of data in a variety of ways. The reports can include tables, matrices, and free-form data. The source data for the reports can be provided by the Database Engine component, the Analysis Services component, or any Microsoft .NET data provider such as ODBC or OLE DB to access data sources such as Oracle or file-based data.
![]() Shared Features— Features designated as “Shared Features” include
Shared Features— Features designated as “Shared Features” include
![]() Business Intelligence Development Studio— The Business Intelligence Development Studio is essentially Microsoft Visual Studio 2008 with some additional SQL Server 2008 business intelligence project types. It is an applications development environment that allows developers to build applications that include Analysis Services, Integration Services, and Reporting Services.
Business Intelligence Development Studio— The Business Intelligence Development Studio is essentially Microsoft Visual Studio 2008 with some additional SQL Server 2008 business intelligence project types. It is an applications development environment that allows developers to build applications that include Analysis Services, Integration Services, and Reporting Services.
![]() Client Tools Connectivity— This feature includes the installation of communication components between clients and servers.
Client Tools Connectivity— This feature includes the installation of communication components between clients and servers.
![]() Integration Services— The SQL Server 2008 Integration Services (SSIS) feature integrates data from different sources. This integration includes importing, exporting, and transforming data from disparate sources. The data can be copied, merged, restructured, and cleaned as part of the integration processing, which makes the integration services a powerful tool in the development of data warehouses. It is imperative to mention that the Integration Services component fills an important gap in the extract.
Integration Services— The SQL Server 2008 Integration Services (SSIS) feature integrates data from different sources. This integration includes importing, exporting, and transforming data from disparate sources. The data can be copied, merged, restructured, and cleaned as part of the integration processing, which makes the integration services a powerful tool in the development of data warehouses. It is imperative to mention that the Integration Services component fills an important gap in the extract.
![]() Client Tools Backward Compatibility— This feature was heavily requested by the SQL Server community. When Client Tools Backward Compatibility is installed, a DBA can manage legacy SQL Server systems.
Client Tools Backward Compatibility— This feature was heavily requested by the SQL Server community. When Client Tools Backward Compatibility is installed, a DBA can manage legacy SQL Server systems.
![]() Client Tools SDK— This feature includes the Software Development Kit containing resources for developers.
Client Tools SDK— This feature includes the Software Development Kit containing resources for developers.
![]() SQL Server Books Online— SQL Server Books Online (BOL) is Microsoft’s documentation for SQL Server 2008.
SQL Server Books Online— SQL Server Books Online (BOL) is Microsoft’s documentation for SQL Server 2008.
![]() Management Tools Complete— When installed, SQL Server 2008 will possess all the management tools, including but not limited to Management Studio, support for Reporting Services, Analysis Services, Integration Services, SQL Server Profiler, and Database Tuning Advisor.
Management Tools Complete— When installed, SQL Server 2008 will possess all the management tools, including but not limited to Management Studio, support for Reporting Services, Analysis Services, Integration Services, SQL Server Profiler, and Database Tuning Advisor.
![]() Management Tools Basic— This refers to the scaled-down version of the management toolset. It only includes management studio support for the Database Engine, SQL Server Express, SQL Server Command-Line Utility, and PowerShell.
Management Tools Basic— This refers to the scaled-down version of the management toolset. It only includes management studio support for the Database Engine, SQL Server Express, SQL Server Command-Line Utility, and PowerShell.
![]() SQL Client Connectivity SDK— This feature includes the Software Development Kit containing connectivity resources for developers.
SQL Client Connectivity SDK— This feature includes the Software Development Kit containing connectivity resources for developers.
![]() Microsoft Sync Framework— This is a comprehensive synchronization platform enabling collaboration and offline of applications, services and devices with support for any data type, any data store, any transfer protocol, and network topology.
Microsoft Sync Framework— This is a comprehensive synchronization platform enabling collaboration and offline of applications, services and devices with support for any data type, any data store, any transfer protocol, and network topology.
When installing the SQL Server 2008 Database Engine, the additional optional subfeatures to install include
The following sections depict the step-by-step instructions for installing a clean version of the SQL Server 2008 Database Engine feature including supplementary subfeatures such as SQL Server Replication, Full-Text Search, Integration Services, and Shared Components.
1. Log in to the server with administrative privileges and insert the SQL Server 2008 media. Autorun should launch the SQL Server 2008 Installation Center landing page; otherwise, click Setup.exe
Note
If SQL Server’s setup software prerequisites have not been met, the installation wizard will prompt, and then install the prerequisites. After the prerequisites have been installed, the SQL Server installation process will resume. SQL Server 2008 software prerequisites may include hotfixes, .NET Framework 3.5 and the latest Windows Installer, version 4.5. In addition, system restarts may be required after SQL Server’s setup software prerequisites are installed. If so, rerun setup after the reboot to continue with the SQL Server installation.
2. On the SQL Server Installation Center landing page, first select the Installation page, and then click the New SQL Server Stand-alone Installation or Add Features to an Existing Installation link, as displayed in Figure 1.1.

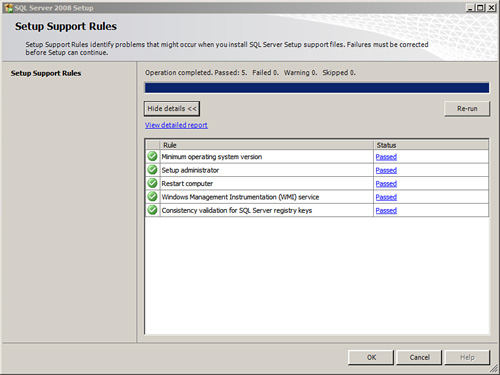
3. On the Setup Support Rules page, review the outcome of the System Configuration Checker. Ensure that all tests associated with the operation passed without any failures, warnings, or skipped elements. Alternatively, you can review a standard or comprehensive report by selecting the Show Details button or View Detailed Report. To continue with the installation, click OK, as illustrated in Figure 1.2.
4. On the Product Key page, enter the SQL Server Product Key and click Next.
5. On the License Agreement page, Accept the Licensing Terms, and then click Next.
6. On the Setup Support Files page, the wizard will prompt whether or not additional setup support files are required for the installation. If additional files are required, review the status of the files required, and then click Install.
7. The Setup Support Rules page will be displayed again and will identify any outstanding items that may hinder the installation process associated with the SQL Server installation. Review and correct failures and warnings before commencing the installation. If failures are not displayed, click Next to start the installation. Once any outstanding installation are complete, review the details, and then click Next.
Note
Some of the items that will be tested for in step 7 are: Fusion Template Library, Unsupported SQL Server products, whether the server is a Domain Controller, the version of Windows PowerShell, and Windows Firewall Settings.
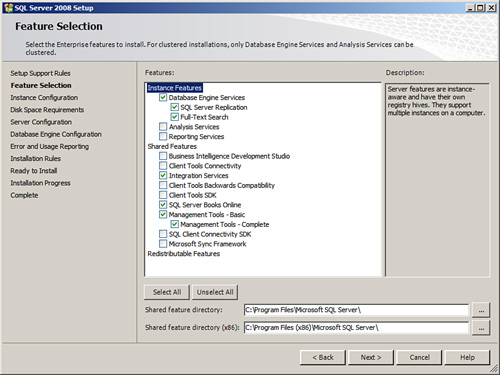
8. On the Feature Selection page, select the desired features to be installed and provide the path for the Shared Feature Directory. For this example, the Database Engine Services, SQL Server Replication, Full-Text Search, and appropriate Shared Features such as Integration Services and the Management Tools have been selected. Click Next to proceed as illustrated in Figure 1.3.
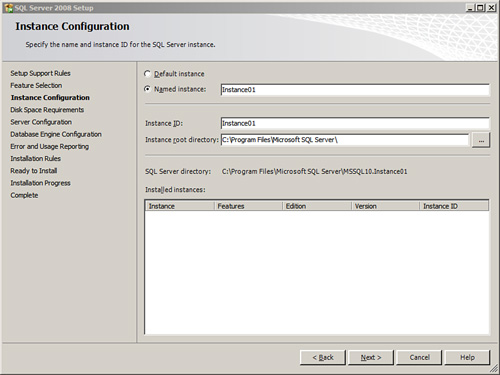
9. On the Instance Configuration page, specify the Name and Instance ID for the SQL Server installation. The options include either the Default Instance name, which is MSSQLServer, or a Named Instance. In addition, click the ellipsis button in the Instance Root Directory area and specify the path for the installation. Click Next as displayed in Figure 1.4.
Note
Each instance name provided must be unique and there can only be one default instance per SQL Server system.
10. The next page is the Disk Space Requirements. Review the disk space summary for the SQL Server components and features selected to be installed, and then click Next.
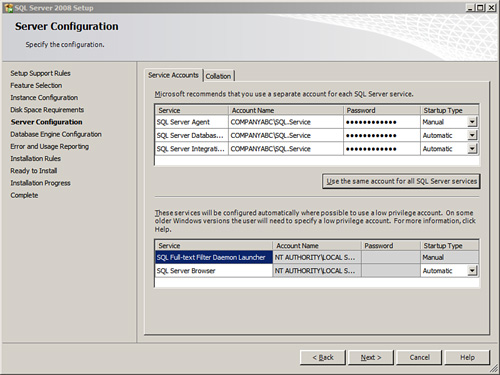
11. The Server Configuration page includes configuration settings for both Service Accounts and Collation. On the Service Accounts tab, enter a valid low-privilege service account name and password for each service account. Next, specify the Startup Type for each service account listed, as illustrated in Figure 1.5. Options include Automatic, Manual or Disabled. Before proceeding to the next step, click the Collation tab,
Note
From a hardening perspective, Microsoft recommends entering a separate service account for each SQL Server component and feature being installed. In addition, the account specified should follow the principle of least privilege. For more information on selecting the desired service account, and hardening a SQL Server implementation, see Chapter 8, “Hardening a SQL Server Implementation.”
12. On the Collation tab, enter the desired collation option for the Database Engine. It is possible to change default collation settings used by the Database Engine and Analysis Services for language and sorting by selecting Customize. Click Next to continue.
13. The Database Engine Configuration page consists of three tabs. The tabs include Account Provisioning, Data Directories, and FILESTREAM. On the first tab, in the Account Provisioning section, specify the Authentication Mode, which consists of either Windows Authentication Mode or Mixed Mode (SQL Server authentication and Windows authentication). If mixed mode is selected, enter and confirm the password for the Built-in SQL Server administrator account. The next step is to provision a SQL Server Administrator by either selecting the option Add Current User or clicking Add and specifying a SQL Server administrator account.
Note
New to SQL Server 2008 is the opportunity to rename the SA account during installation. Renaming the SA account increases security as the account name is well known in the industry.
14. The second tab, Data Directories, located still within the Database Engine Configuration page, is used for specifying the location of the default directories associated with the installation of this SQL Server instance. The directories include Data Root Directory, System Database Directory, User Database Directory, User Database Log Directory, TempDB Directory, TempDB Log Directory, and Backup Directory. Either maintain the default directories or specify a new directory for performance and availability.
Tip
Because I/O to log files is sequential and I/O to database files is random, for increased performance, it is a best practice to place log files on a separate disk from database files. In addition, placing the tempdb on its own disk also bolsters performance.
15. The final tab on the Database Engine Configuration page is FILESTREAM. Here, decide whether you want to enable FILESTREAM. If FILESTREAM is enabled, additional parameters must be entered such as Enable FILESTREAM for File I/O Streaming Access, Windows Share Name, and whether to allow remote clients to have streaming access to FILESTREAM data. Click Next to proceed.
16. On the Error and Usage Reporting page, help Microsoft improve SQL Server features and services by sending error reports and feature usage to Microsoft. Specify the level of participation, and then click Next.
17. The final check will take place to ensure that the installation process will not be blocked. On the Installation Rules page, review for any outstanding errors or warnings and then click Next to continue.
18. Before commencing the SQL Server 2008 Installation, review the features to be installed on the Ready to Install page, and then click Install.
19. When the installation process starts, you can monitor its progress accordingly. When the installation setup completes, review the success status based on each SQL Server feature and then click Next.
20. On the Complete page, review the location of the SQL Server summary upgrade log file and additional items, which can be found in the supplemental information section. Click Close to finalize the installation.
21. To conduct post-installation tasks, review the upcoming section “Finalizing the SQL Server 2008 Installation or Upgrade” in this chapter.
When upgrading an existing SQL Server system to SQL Server 2008, all SQL Server databases, configuration settings, security settings, and programs are retained from the previous installation. However, there are still several important prerequisite tasks that you perform before the upgrade, as discussed in the following sections.
Tip
It is not possible to change the installation path when upgrading a system to SQL Server 2008. In addition, there must be enough free space on the system and SQL Server partition to support the upgrade; otherwise, the upgrade will come to a halt.
One of the first tasks a DBA should conduct when upgrading an existing SQL Server system to SQL Server 2008 is to create a discovery report. A SQL Server discovery report, ultimately, is an inventory of the SQL Server components and features installed on an existing SQL Server installation. SQL Server 2008 comes with a new tool called the SQL Server Feature Discovery Report, which will generate a list of features and products. This report can automatically be generated for SQL Server 2008, SQL Server 2005, and SQL Server 2000, by selecting Installed SQL Server Features Discovery Report, on the Tools page, located on the SQL Server Installation Center landing page.
Whenever you are making a major change on a server, something could go wrong. A complete backup of the SQL Server environment, including the SQL Server system databases and Windows Server System State, can make the difference between confidently telling the boss you had a setback so you conducted a rollback, or quivering while you try to find a way to tell your boss a complete disaster has taken place.
The first action when upgrading an existing SQL Server system to SQL Server 2008 is running the System Configuration Checker. Launch the System Configuration Checker by first selecting Planning and then System Configuration Checker via the SQL Server 2008 Installation Center landing page.
The System Configuration Checker is an informative tool that conducts a scan on the existing system and indicates problems that might occur when the SQL Server support files are installed. After the scan is completed, a detailed report is presented that indicates the operations that passed, failed, skipped, or presented warnings. View the detailed report, correct any issues, and rerun the scan to ensure absolute success. Then move on to the next prerequisite task, which is running the SQL Server 2008 Upgrade Advisor.
Make it a prerequisite task to test the existing SQL Server system that you plan on upgrading for compatibility issues. Accomplish this by running the SQL Server Upgrade Advisor. The SQL Server Upgrade Advisor is an intuitive tool included with the SQL Server 2008 installation media.
When invoked, the wizard will first analyze previously installed SQL Server components and then produce a detailed report indicating possible upgrade anomalies. In addition, the report provides links to information on how to resolve the issues identified—how convenient!
Caution
Before conducting an in-place upgrade, it is imperative to acknowledge and fix all anomalies. If anomalies go unresolved, the upgrade is sure to fail, resulting in a production outage.
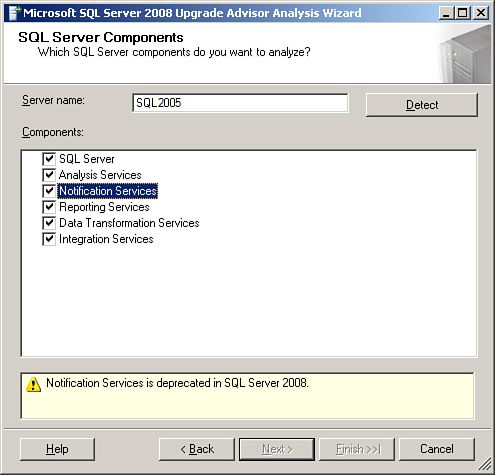
It is important to mention that the Upgrade Advisor can be installed on a remote system and still analyze the following SQL Server components: the Database Engine, Analysis Services, Reporting Services, Integration Services, and Data Transformation Services. Notification Services is not included as this component has been deprecated in SQL Server 2008.
Note
The exhaustive analysis performed by the wizard is unable to examine stored procedures if they are encrypted. Moreover, it is necessary to input a password if DTS or Integration Services packages are password protected.
1. Launch the SQL Server Installation Center.
2. Select the Planning link and then click Install Upgrade Advisor.
3. Click Next on the SQL Server 2008 Upgrade Advisor Setup Welcome screen.
4. Accept the License Agreement, and then click Next.
5. On the Registration Information screen, enter your name and company name, and then click Next.
6. Provide the installation path on the Feature Selection page. Click Next to continue.
7. Click Install to initiate the installation, and then click Finish to finalize.
When running the SQL Server 2008 Upgrade Advisor, the high-level steps include identifying SQL Server components to analyze, providing credentials for authentication, providing additional parameters, executing analysis, and finally, reviewing the results. Conduct the following steps on the SQL Server system you plan on upgrading in order to perform a compatibility test using the SQL Server 2008 Upgrade Advisor:
1. Click Start, All Programs, SQL Server 2008, SQL Server 2008 Upgrade Advisor.
2. On the Welcome to SQL Server 2008 Upgrade Advisor page, select the link Launch Upgrade Advisor Analysis Wizard, and then click Next.
3. On the SQL Server Components page, provide the name of the SQL Server and then specify the components that will be analyzed. Click Next as displayed in Figure 1.6.
4. Provide the authentication mechanism for the SQL Server instance and then click Next.
5. On the SQL Server Parameters page, indicate what additional elements should be analyzed. Options include databases, trace files, and SQL Server batch files. Click Next to continue.
6. The Reporting Services Parameters page is an optional step. If a reporting services scan was selected, enter the name of the Reporting Services instance and then choose the authentication mechanism that will be used. Click Next.
7. The Analysis Services Parameters page is an another optional step. If an Analysis Services scan was selected, enter the name of the Analysis Services instance. Next, choose the authentication mechanism that will be used. Click Next.
8. The next optional screen focuses on DTS parameters for DTS packages. Select either the Analyze DTS Packages on Server option or the Analyze DTS Package Files option. If the second option is selected, specify the path to the DTS packages. Click Next to continue.
9. On the final page, SSIS Parameters, indicate whether you want to analyze SSIS packages on the server or files. If the second option is selected, specify the path to the SSIS packages. In addition, if the packages are password protected, enter a password. Click Next to continue.
10. Confirm the Upgrade Advisor Settings and then click Run to commence the analysis.
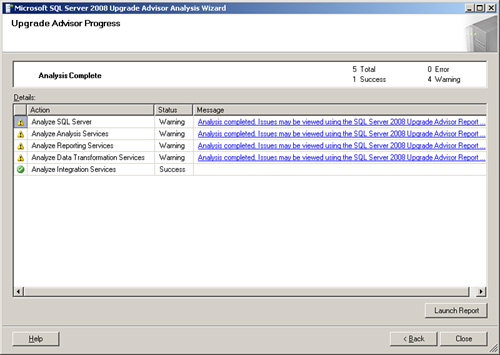
11. The Upgrade Advisor Progress page provides progress messages for each component being analyzed. The status message includes any of the words error, failure, or success. View the status messages in the details pane or alternatively, launch the report. Click Close as indicated in Figure 1.7.
Note
The analysis output is written to a file; therefore, the report can be viewed from the Upgrade Advisor Progress page or at a later date. To review the report at another time, launch the Upgrade Advisor Report Viewer from the Upgrade Advisor start page.
The report can be viewed by server and then by instance or component. Moreover, the report can be filtered by All Issues, All Upgrade Issues, Pre-Upgrade Issues, All Migration issues, Resolved Issues, or Unresolved Issues. The output report also indicates when issues should be addressed. For instance, the report may indicate the issue should be addressed before the upgrade or after the upgrade. It is beneficial to review each message to ensure there are no issues when upgrading the existing SQL Server system to SQL Server 2008. When drilling through each message, it is possible to expand upon an issue and gain additional information on how to resolve the anomaly by clicking the link titled Tell Me More About This Issue and How to Fix It.
The following additional considerations apply before upgrading the Database Engine to SQL Server 2008:
![]() Even though this book does not focus on Analysis Services, if you are upgrading a 64-bit edition of SQL Server, it is imperative to upgrade Analysis Service first and then the Database Engine.
Even though this book does not focus on Analysis Services, if you are upgrading a 64-bit edition of SQL Server, it is imperative to upgrade Analysis Service first and then the Database Engine.
![]() Run the appropriate
Run the appropriate DBCC commands to ensure that both the system and user databases are in good health. A maintenance plan can be generated to complete these tasks.
![]() Make certain that all databases, specifically the system databases, are configured to autogrow. The system databases includes master, model, msdb, and tempdb.
Make certain that all databases, specifically the system databases, are configured to autogrow. The system databases includes master, model, msdb, and tempdb.
![]() Ensure that you have administrative access to all user and system databases and that each database has logon information in the master system database.
Ensure that you have administrative access to all user and system databases and that each database has logon information in the master system database.
![]() Configure the Max Worker Threads setting to a value of 0.
Configure the Max Worker Threads setting to a value of 0.
![]() Disable all startup stored procedures as the upgrade process may restart the server.
Disable all startup stored procedures as the upgrade process may restart the server.
![]() If Replication is enabled, stop replication during the upgrade process.
If Replication is enabled, stop replication during the upgrade process.
![]() Conduct a rolling upgrade if Database Mirroring is used. First upgrade the mirrored instance, failover services, and then upgrade the principal instance (which is now the mirror). It is also recommended to remove the witness and change the operation mode to high safety during the upgrade.
Conduct a rolling upgrade if Database Mirroring is used. First upgrade the mirrored instance, failover services, and then upgrade the principal instance (which is now the mirror). It is also recommended to remove the witness and change the operation mode to high safety during the upgrade.
![]() In SQL Server 2000, Log Shipping was established with a Database Maintenance Plan. Because the installation in SQL Server 2005 and SQL Server 2008 no longer uses a maintenance plan to implement Log Shipping, it is not possible to upgrade a SQL Server 2000 system running log shipping to SQL Server 2008.
In SQL Server 2000, Log Shipping was established with a Database Maintenance Plan. Because the installation in SQL Server 2005 and SQL Server 2008 no longer uses a maintenance plan to implement Log Shipping, it is not possible to upgrade a SQL Server 2000 system running log shipping to SQL Server 2008.
At this point, you have accomplished quite a few tasks. Let’s review: your data is backed up, you have read the release notes, you ran the SQL Server System Configuration Checker and the SQL Server Upgrade Advisor, and you addressed the issues or warnings identified. It is now time to upgrade to SQL Server 2008.
1. Log in to the server and insert the SQL Server 2008 media. Autorun should launch the SQL Server 2008 Installation Center landing page; otherwise, click Setup.exe.
2. On the SQL Server Installation Center landing page, first select the Installation link, and then Upgrade from SQL Server 2000 or SQL Server 2005.
3. On the Setup Support Rules page, review the outcome of the System Configuration Checker. Ensure that all tests associated with the operation passed without any failures, warnings, or skipped elements. Alternatively, you can review a standard or comprehensive report by selecting the Show Details button or View Detailed Report. Click OK to continue with the installation.
4. On the Setup Support Files page, the wizard will prompt whether or not additional setup support files are required for the installation. If additional files are required, review the status of the files required and click Install.
5. The Setup Support Rules page will be displayed again and will identify any outstanding items that may hinder the installation process associated with the SQL Server cluster. Review and correct failures and warnings before commencing the installation. If failures are not displayed, click Next to start the installation.
6. On the Product Key page, enter the SQL Server Product Key and click Next.
7. On the License Agreement page, accept the Licensing Terms, and then click Next.
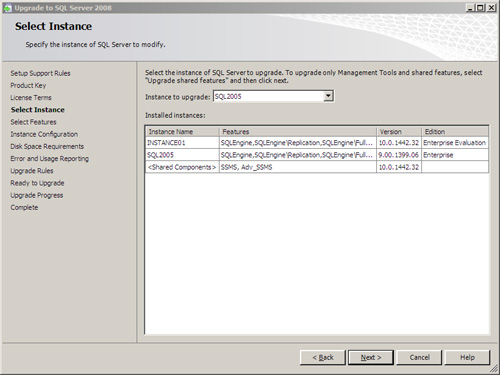
8. On the Select Instance page, use the drop-down menu and specify a SQL Server instance to upgrade. Click Next as displayed in Figure 1.8.
Note
The Installed Instances section displays all the instances installed on the system. In addition, to upgrade only SQL Server Management Tools, choose the option Upgrade Shared Features Only in the Instance to Upgrade drop-down list.
9. Review the features to be upgraded in the Select Features page, and then Click Next.
10. Review the name and InstanceID for the SQL Server instance being upgraded and click Next.
11. The next page is the Disk Space Requirements. Review the disk space summary for the SQL Server components and features selected to be upgraded, and then click Next.
12. On the Full-Text Upgrade page, specify an option of how the existing Full-Text catalogs will be processed after the upgrade. Click Next as displayed in Figure 1.9.

![]() Import— Full-Text catalogs are imported “as is” and are ready to serve queries. This process is much faster than rebuilding the Full-Text catalogs; however, the import does not leverage the new Full-Text features and functionality associated with SQL Server 2008.
Import— Full-Text catalogs are imported “as is” and are ready to serve queries. This process is much faster than rebuilding the Full-Text catalogs; however, the import does not leverage the new Full-Text features and functionality associated with SQL Server 2008.
![]() Rebuild— When this option is selected, the Full-Text catalogs are rebuilt using the new and enhanced word breakers associated with SQL Server 2008. This process is typically slower, and a significant amount of processor and memory will be required to tackle this operation.
Rebuild— When this option is selected, the Full-Text catalogs are rebuilt using the new and enhanced word breakers associated with SQL Server 2008. This process is typically slower, and a significant amount of processor and memory will be required to tackle this operation.
![]() Reset— The final option is Reset. The Full-Text catalogs will be removed; therefore, after the upgrade is complete, the catalogs will remain empty until they are manually processed with a full population.
Reset— The final option is Reset. The Full-Text catalogs will be removed; therefore, after the upgrade is complete, the catalogs will remain empty until they are manually processed with a full population.
13. On the Error and Usage Reporting page, help Microsoft improve SQL Server features and services by sending error reports and feature usage to Microsoft. Specify the level of participation, and then click Next.
14. The final check will take place to ensure that the upgrade process will not be blocked. On the Upgrade Installation Rules page, review for any outstanding errors or warnings and then click Next to continue.
15. Before commencing the SQL Server 2008 upgrade, review the features to be upgraded on the Ready to Upgrade page, and then click Install.
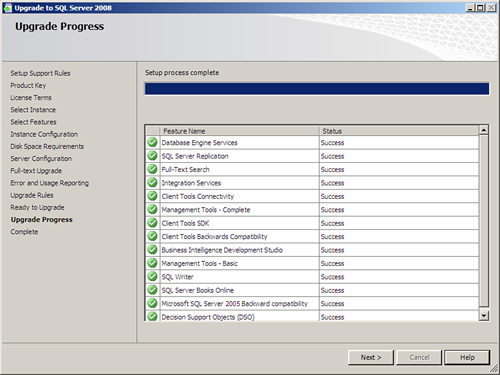
16. When the upgrade process starts, you can monitor its progress accordingly. When the upgrade setup completes, review the success status based on each SQL Server feature. Click Next as illustrated in Figure 1.10.
17. On the Complete page, review the location of the SQL Server summary upgrade log file and items in the Supplemental Information section. Click Close to finalize the upgrade.
18. To conduct post-installation tasks, review the upcoming section “Finalizing the SQL Server 2008 Installation or Upgrade.”
Once the installation or upgrade of SQL Server 2008 is complete, it is beneficial to review the following tasks in order to finalize the installation.
When the installation or upgrade is complete, it is best practice to review the setup log file, review the Windows application log, and review SQL Server logs for any issues or warnings. As noted earlier, the location to the SQL Server 2008 installation setup file can be found on the Complete page during the final stages of the installation or upgrade.
Even though the Windows Server 2008 system may be configured to automatically obtain server updates, it is still a best practice to check for missing SQL Server 2008 and Windows Server 2008 service packs and critical fixes. These outstanding service packs and critical fixes can be installed with Microsoft Update or a software distribution tool such as System Center 2007 Configuration Manager.
Another important step to finalize the SQL Server 2008 installation or upgrade is hardening the SQL Server implementation. There are a number of tasks that should be completed in order to harden the SQL Server installation. Some of these tasked include using Policy Based Management to reduce the surface attack area, enabling a Windows Server 2008 advanced firewall, and leveraging the SQL Server Configuration Manager Tool to disable unnecessary protocols and features.
This section describes additional items to take into consideration after an upgrade to SQL Server 2008 is complete.
After the upgrade is complete and you launch SQL Server Management Studio for the first time, you will be prompted to import customized user settings from SQL Server 2005 Management Studio. Click Yes or No and be aware that some SQL Server 2008 default settings might be changed after you import your customized settings.
When SQL Server systems are upgraded to SQL Server 2008, it is beneficial to understand how compatibility level settings affect databases. The compatibility levels include
![]() SQL Server 2008—Version 100
SQL Server 2008—Version 100
![]() SQL Server 2005—Version 90
SQL Server 2005—Version 90
![]() SQL Server 2000—Version 80
SQL Server 2000—Version 80
If you select one of these options, the database behaviors are to be compatible with that specified version of SQL Server. This setting only affects a specific database and not all databases associated with a SQL Server instance.
Note
After the upgrade, SQL Server automatically sets the compatibility level to the earlier version of SQL Server.
The settings can be changed by right-clicking a database and specifying the compatibility level on the Database Options page or by using the ALTER DATABASE command. The following Transact-SQL sample illustrates how to change the compatibility level.
From a best-practice perspective, it is recommended to change the database to single-user mode before changing the database compatibility settings. This prevents inconsistent results if active queries are executed.
![]() Update Statistics on all users and system databases.
Update Statistics on all users and system databases.
![]() Execute
Execute DBCC_UPDATEUSAGE on all databases to ensure that all databases have the correct row and page counts.
![]() With SQL Server 2008, queries on partitioned tables and indexes are processed differently. Therefore, it is recommended to remove the
With SQL Server 2008, queries on partitioned tables and indexes are processed differently. Therefore, it is recommended to remove the USE PLAN hint from the query.
The following sections explain how to manage SQL Server 2008 installations.
As mentioned earlier, many organizations decide on scaling up their SQL Server infrastructure by creating consolidated SQL Server systems with multiple-instance installations. To achieve the goal of installing additional instances on an existing system, a DBA must relaunch the SQL Server 2008 installation utility, and then select the option New SQL Server Stand-alone Installation or Add Features to an Existing Installation.
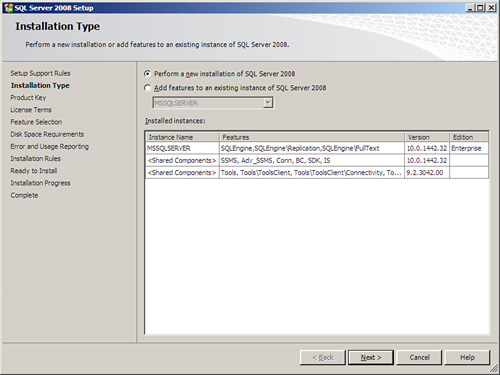
When the new SQL Server installation wizard begins, follow the steps in the earlier section “Installing a Clean Version of SQL Server 2008”; however, on the Installation Type page, select the option Perform a New Installation of SQL Server 2008, as displayed in Figure 1.11. Then on the Feature Selection page, select the desired features to be installed for the new instance. Finally, on the Instance Configuration page, provide the instance with a unique name and proceed with the installation.
The process for adding and removing SQL Server features to an existing Installation is similar to the steps involved when adding additional SQL Server instances. The DBA must select New SQL Server Stand-alone Installation or Add Features to an Existing Installation from the SQL Server 2008 Installation Center’s Installation page. However, on the Installation Type screen, the option Add Features to an Existing Instance of SQL Server 2008 must be selected. Then on the Feature Selection page, select the features to be added and continue through the wizard.
Another feature included with SQL Server 2008 is the potential to conduct an Edition upgrade after SQL Server 2008 has been installed. For example, if an organization is running the Standard Edition and decides that they want to leverage the features and functionality associated with the Enterprise Edition, they simply conduct an edition upgrade instead of formatting and reinstalling from scratch. Another advantageous scenario includes moving from SQL Server 2005 Standard to SQL Server 2008 Enterprise Edition. This objective would be achieved by first upgrading the SQL Server system from SQL Server 2005 Standard to SQL Server 2008 Standard, and then running the Edition Upgrade to upgrade the installation Enterprise Edition of SQL Server 2008.
To conduct an Edition Upgrade on SQL Server 2008, the Edition Upgrade must be selected from the Maintenance page on the SQL Server 2008 Installation Center landing screen.
The SQL Server 2008 installation process and deployment tools bear similarities to those found in previous versions of SQL Server. However, feature and performance enhancements associated with the new SQL Server 2008 Installation Center tool have improved the installation experience—whether you are installing a single SQL Server implementation from scratch or upgrading an existing system to SQL Server 2008.
The following are best practices from this chapter:
![]() Verify that your hardware, devices, and drivers are supported by SQL Server 2008.
Verify that your hardware, devices, and drivers are supported by SQL Server 2008.
![]() Stick to using the recommended or optimal hardware and software requirements when installing or upgrading to SQL Server 2008.
Stick to using the recommended or optimal hardware and software requirements when installing or upgrading to SQL Server 2008.
![]() Leverage the planning tools and documentation associated with the SQL Server Installation Center when installing or upgrading to SQL Server 2008.
Leverage the planning tools and documentation associated with the SQL Server Installation Center when installing or upgrading to SQL Server 2008.
![]() Run the System Configuration Checker tool as a prerequisite task when either installing or upgrading to SQL Server 2008.
Run the System Configuration Checker tool as a prerequisite task when either installing or upgrading to SQL Server 2008.
![]() Install and run the Upgrade Advisor to identify any upgrade anomalies when upgrading a system to SQL Server 2008.
Install and run the Upgrade Advisor to identify any upgrade anomalies when upgrading a system to SQL Server 2008.
![]() When performing an upgrade, make sure you document your SQL Server system and database configuration information and perform a backup of any SQL Server data and objects that you want to keep.
When performing an upgrade, make sure you document your SQL Server system and database configuration information and perform a backup of any SQL Server data and objects that you want to keep.
![]() Leverage Windows Server 2008 as the operating system when running SQL Server 2008.
Leverage Windows Server 2008 as the operating system when running SQL Server 2008.
![]() Finalize a SQL Server implementation by hardening the system based on the best practices listed in Chapter 8.
Finalize a SQL Server implementation by hardening the system based on the best practices listed in Chapter 8.
![]() Because the SAC tool has been deprecated, utilize Policy Based Management to configure the surface area of one or many SQL Server systems.
Because the SAC tool has been deprecated, utilize Policy Based Management to configure the surface area of one or many SQL Server systems.
![]() The Windows Server 2008 Advanced Firewall is enabled by default; therefore, review Chapter 8 to understand how to configure the firewall for SQL Server access.
The Windows Server 2008 Advanced Firewall is enabled by default; therefore, review Chapter 8 to understand how to configure the firewall for SQL Server access.
![]() Review Books Online if you need to upgrade other SQL Server 2008 features above and beyond the Database Engine.
Review Books Online if you need to upgrade other SQL Server 2008 features above and beyond the Database Engine.
![]() Data, log, and tempdb directories should be on separate physical disks or Logical Unit Numbers (LUNs) for performance whenever possible.
Data, log, and tempdb directories should be on separate physical disks or Logical Unit Numbers (LUNs) for performance whenever possible.