
Chapter 8 Hardening a SQL Server Implementation
SQL Server is regularly targeted by hackers because it is a repository of sensitive data for organizations. If the server is breached, hackers can gain access to confidential information, including credit card numbers, Social Security numbers, or marketing information.
To prevent cybercrime or, at the very least, reduce it, Microsoft has been working very hard since 2002 in bringing the community more secured products with the Microsoft Trustworthy Computing Initiative. Although Microsoft products are being transformed and are more secure by default and design due to Trustworthy Computing, the company is not delusional about where things stand today. Microsoft knows it still has much work to do to bolster security. This is important for all database administrators to understand because it means that you should take additional steps to further harden your SQL Server implementation until you can rely fully on Trustworthy Computing.
This chapter shows how important it is to harden the SQL Server implementation when the SQL Server installation is complete. The chapter explains how to manage a secure SQL Server implementation based on industry best practices so that vulnerabilities and security breaches are minimized. The following security topics are covered to harden a SQL Server implementation: using configuration tools to minimize the attack surface, deciding which authentication method to use, enforcing strong passwords, using SQL Server security logs, choosing the appropriate service account, verifying security with Microsoft Baseline Security Analyzer, and installing Windows and SQL Server Service Packs.
![]() The Surface Area Configuration Tool (SAC), used for enabling or disabling services and features within SQL Server 2005, has been deprecated and replaced with Policy Based Management. Policy Based Management enables DBAs to create system policies in order to enforce granular configuration settings for one or more SQL Server systems.
The Surface Area Configuration Tool (SAC), used for enabling or disabling services and features within SQL Server 2005, has been deprecated and replaced with Policy Based Management. Policy Based Management enables DBAs to create system policies in order to enforce granular configuration settings for one or more SQL Server systems.
![]() In the past, Kerberos was only available when using the TCP/IP protocol. Now, Kerberos authentication has been expanded to include all protocols in the SQL Server stack such as named pipes and shared memory protocols.
In the past, Kerberos was only available when using the TCP/IP protocol. Now, Kerberos authentication has been expanded to include all protocols in the SQL Server stack such as named pipes and shared memory protocols.
![]() SQL Server 2008 is tightly integrated with Windows Server 2008 and Active Directory Domain Services. Windows Server 2008 offers the most secure platform, the strongest authentication mechanism, the ability to leverage Active Directory Certificates Services, and multiple-factor authentication with items such as smart cards.
SQL Server 2008 is tightly integrated with Windows Server 2008 and Active Directory Domain Services. Windows Server 2008 offers the most secure platform, the strongest authentication mechanism, the ability to leverage Active Directory Certificates Services, and multiple-factor authentication with items such as smart cards.
![]() It is now possible to rename the SA account during a fresh installation or upgrade of SQL Server 2008. Renaming the SA account is a recommended step when hardening a SQL Server implementation as it minimizes the chances of the account being hacked and misused.
It is now possible to rename the SA account during a fresh installation or upgrade of SQL Server 2008. Renaming the SA account is a recommended step when hardening a SQL Server implementation as it minimizes the chances of the account being hacked and misused.
![]() The local Windows Group BUILTINAdministrator is no longer included in the SQL Server sysadmin server role.
The local Windows Group BUILTINAdministrator is no longer included in the SQL Server sysadmin server role.
![]() SQL Server accounts are following the principle of least privilege as they are better protected and now further isolated from the operating system.
SQL Server accounts are following the principle of least privilege as they are better protected and now further isolated from the operating system.
Note
Policy Based Management is a hardening technique; however, this book includes a dedicated chapter on this subject. For more information, see Chapter 10, “Administering Policy Based Management.”
Authentication is commonly identified as a security measure designed to establish the validity of a user or application based on criteria such as an account, password, security token, or certificate. After a user or an application’s validity is verified, authorization to access the desired object is granted.
At present, SQL Server 2008 continues to support two modes for validating connections and authenticating access to database resources: “Windows Authentication Mode” and “SQL Server and Windows Authentication mode.” Both of these authentication methods provide access to SQL Server and its resources.
Note
During installation, the default authentication mode is Windows. The authentication mode can be changed after the installation, however.
Windows Authentication mode is the default and recommended authentication mode. It leverages local accounts, Active Directory user accounts, and groups when granting access to SQL Server. In this mode, you, as the database administrator, are given the opportunity to grant domain or local server users access to the database server without creating and managing a separate SQL Server account.
When Windows Authentication mode is used, Active Directory user accounts are subject to enterprise-wide policies enforced by the Active Directory domain such as complex passwords, password history, account lockouts, minimum password length, maximum password length, and the Kerberos protocol. If the server is not partaking in a domain, then the local security policies will govern the account’s password and lockout behavior.
SQL Server and Windows Authentication mode, which is regularly referred to as mixed mode authentication, uses either Active Directory user accounts or SQL Server accounts when validating access to SQL Server. Like SQL Server 2005, SQL Server 2008 continues to support a means to enforce password and lockout policies for SQL Server login accounts when using SQL Server authentication. These SQL Server policies include enforcing password complexity, password expiration, and account lockouts. As a reminder, this functionality, which was introduced with SQL Server 2005, was not available in SQL Server 2000, and this was a major security concern for most organizations and database administrators. Essentially, this security concern played a role in helping define Windows authentication as the recommended practice for managing authentication in the past. Today, SQL Server and Windows Authentication mode (Mixed Mode) may be able to successfully compete with Windows Authentication mode.
When you are aware of the authentication methods, the next step is choosing one to manage SQL Server security. Although SQL Server 2008 now can enforce policies, Windows Authentication mode is still the recommended alternative for controlling access to SQL Server because this mode carries added advantages; Active Directory provides an additional level of protection with the Kerberos protocol. As a result, the authentication mechanism is more mature and robust; therefore, administration can be reduced by leveraging Active Directory groups for role-based access to SQL Server. In addition, it is now possible to utilize Kerberos with all network protocols associated with SQL Server 2008. Network protocols include TCP, Named Pipes, Shared Memory, and Virtual Interface Adapter (VIA).
Nonetheless, this mode is not practical for everything out there. Mixed authentication is still required if there is a need to support legacy applications, application requires it or clients coming in from platforms other than Windows and a need for separation of duties exists.
It is common to find organizations where the SQL Server and Windows teams do not trust one another. Therefore, a clear separation of duties is required because SQL Server accounts are not managed via Active Directory.
Using Windows authentication is a more secure choice. However, if mixed mode authentication is required, you must make sure to leverage complex passwords and the SQL Server 2008 password and lockout policies to further bolster security.
To select or change the server authentication mode, follow these steps:
1. In SQL Server Management, right-click on a desired SQL Server and then click Properties.
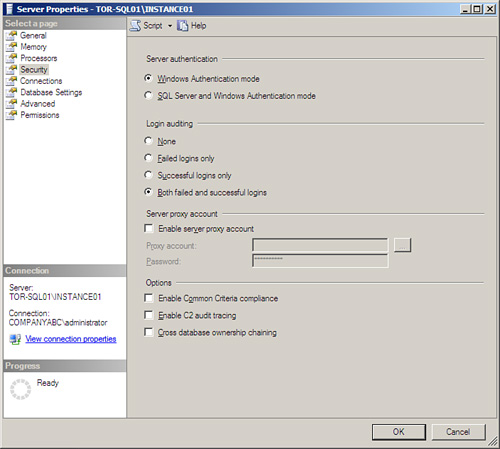
2. On the Security page, as shown in Figure 8.1, select the desired server authentication mode under Server Authentication and then click OK.

3. In the SQL Server Management Studio dialog box, click OK to acknowledge the need to restart SQL Server.
4. In Object Explorer, right-click on a desired server and then click Restart. If the SQL Server Agent is running, it requires a restart also.
Note
If Windows Authentication mode is selected during installation, the SA login is disabled by default. If the authentication mode is switched to SQL Server mixed mode after the installation, the SA account is still disabled and must be manually enabled. It is a best practice to reset the password when the mode is switched.
If SQL Server Authentication mode is used, a strong SA password should also be used. By default, the SA account has full administrative privileges over a SQL Server installation; therefore, in the event this account is compromised, the intruder will have full access to SQL Server and all databases.
In the past, it was common to find production SQL Server installations with a weak or blank SA password, which naturally increased the risk of security vulnerabilities and compromises. Microsoft introduced the idea of checking for blank SA passwords during the installation of Service Pack 4 on SQL Server 2000. Database administrators were further informed of the security vulnerabilities associated with maintaining a blank password; however, they were not forced to enter a password, which again left the account and server in a vulnerable state.
This situation is no longer an issue since SQL Server 2005.
If you use SQL Server authentication, you must enter a strong SA password; otherwise, you cannot continue with the SQL Server installation. A strong password for SQL Server must contain at least six characters and satisfy at least three of the following four criteria:
![]() The password must contain uppercase letters.
The password must contain uppercase letters.
![]() The password must contain lowercase letters.
The password must contain lowercase letters.
![]() The password must contain numbers.
The password must contain numbers.
![]() The password must contain non-alphanumeric characters such as #, %, or ^.
The password must contain non-alphanumeric characters such as #, %, or ^.
In addition, a strong password cannot use typical or commonplace words that everyone in the IT field is accustomed to, such as Password, Admin, Administrator, SA, or Sysadmin, and cannot use either the name of the user logged on to the computer or the computer name. These are all considered weak passwords.
Not allowing a weak or blank password reinforces the fact that Microsoft is serious about its ongoing Trustworthy Computing Initiative. In the past few years, Microsoft has invested significant time and resources in enhancing the security of each of its products, including SQL Server 2008.
To change or assign a strong SA password, do the following:
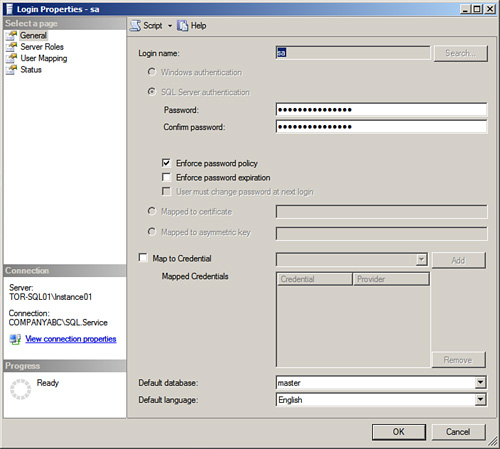
1. In Object Explorer, first expand the Security folder and then the Logon folder. Right-click on the SA account and then click Properties.
2. On the General page in the Login Properties dialog box, as shown in Figure 8.2, enter a new complex SA password, confirm it, and then click OK.
3. Restart Microsoft SQL Server Services, including SQL Server Agent.
When attackers want to compromise a SQL Server, they don’t want to access the system as common users; they want complete control of the server so that they can gain access to all the data within it. Because most hackers already know the SA account exists, this makes hacking one step easier because this account would grant them complete control of the SQL Server if compromised. Similar to the way you use a Windows Administrator account, it is a best practice to rename and disable the SA account in SQL Server 2008 when running in mixed authentication mode. This technique increases security one step further because most hackers are familiar with the SA account and the rights associated with it.
Note
Don’t forget that SQL Server 2008 now provides you with the option to rename the SA account during the installation of SQL Server 2008.
The following syntax first disables the SA account and then renames it to something not easily identified. This example uses the name Ross-Mistry:
Tip
Before renaming or disabling the SA account, make sure another account exists with administrator privileges; otherwise, you will not have access to the SQL Server.
Also, it is a best practice to rename the account to something that is not related to an administrator, SA, or service, or is easily identifiable so that it’s not so obvious that this account was previously SA.
After you’ve installed SQL Server 2008, you should run the SQL Server Configuration Manager to harden the SQL Server implementation.
It is beneficial to maintain a slim and efficient installation of SQL Server 2008 by minimizing its footprint. This can be achieved by reducing the SQL Server system’s surface area by only installing necessary components and disabling unwanted services and features. These hardening techniques make SQL Server less susceptible to hackers and malicious attacks.
The Surface Area Configuration tool (SAC), which was included in SQL Server 2005, has been replaced with the Policy Based Management framework; therefore, Policy Based Management should be utilized in order to manage the SQL Server surface area.
The SQL Server Configuration Manager tool is a tool that you can use when hardening a SQL Server implementation. This tool should be used to configure and lock down unwanted services and features associated with a SQL Server implementation. Elements that can be configured include services, network configurations, native client configurations, client protocols, and aliases installed on a server.
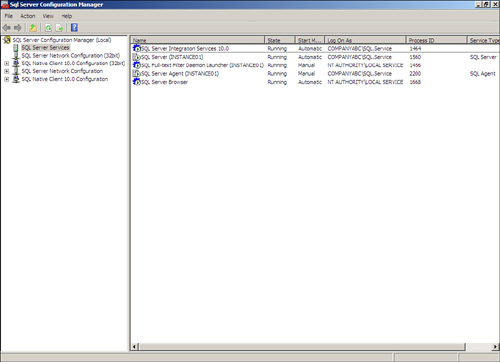
To launch this tool, choose Start, All Programs, Microsoft SQL Server 2008, Configuration Tools, SQL Server Configuration Manager. The SQL Server Configuration Manager window is shown in Figure 8.3. The following nodes appear in the tool:
![]() SQL Server Services— This node enables you to start, stop, pause, resume, or configure services. In addition, you should use the tool when changing service account names and passwords.
SQL Server Services— This node enables you to start, stop, pause, resume, or configure services. In addition, you should use the tool when changing service account names and passwords.
![]() SQL Server Network Configuration— This node is the place where you can configure, enable, or disable SQL Server network protocols for the SQL Server Services installed on a server. In addition, you can configure encryption and expose or hide a SQL Server database instance.
SQL Server Network Configuration— This node is the place where you can configure, enable, or disable SQL Server network protocols for the SQL Server Services installed on a server. In addition, you can configure encryption and expose or hide a SQL Server database instance.
![]() SQL Native Client Configuration— This node enables you to lock down network protocols or make changes to settings associated with ports for client connections.
SQL Native Client Configuration— This node enables you to lock down network protocols or make changes to settings associated with ports for client connections.
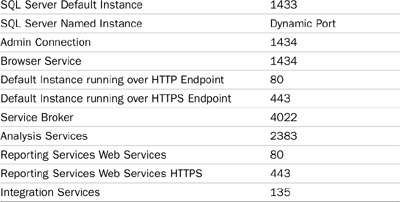
A default installation of SQL Server 2008 uses TCP port 1433 for client requests and communications. These ports are well known in the industry, which makes them a common target for hackers. Therefore, it is a best practice to change the default ports associated with the SQL Server installation to put off hackers from port-scanning the default ports of the SQL Server installation. Unfortunately, SQL Server requires an open port for network communications. Therefore, this procedure prolongs the inevitable, as the used port will eventually be found.
Note
SQL Server 2008 does not automatically listen on port UDP 1434. Similar to SQL Server 2005, the task has been turned over to SQL Server Browser Services, which listens and resolves client connection requests made to the server. It also provides name and port resolution to clients when multiple instances are installed.
Follow these steps to change the default port using SQL Server Manager Configuration tools:
1. Choose Start, All Programs, Microsoft SQL Server 2008, Configuration Tools, SQL Server Configuration Manager.
2. Expand the SQL Server 2008 Network Configuration node and select Protocols for the SQL Server instance to be configured.
3. In the right pane, right-click the protocol name TCP/IP and choose Properties.
4. In the TCP/IP Properties dialog box, select the IP Addresses tab.
5. There is a corresponding entry for every IP address assigned to the server. Clear the values for both the TCP Dynamic Ports and TCP Port for each IP address except for the IP addresses under IPAll.
6. In the IPAll section for each instance, enter a new port that you want SQL Server 2008 to listen on, as shown in Figure 8.4.

7. Click Apply and restart the SQL Server Services.
Note
The TCP Port for the default instance is automatically set to 1433 and the TCP Dynamic Ports setting is blank. The second and subsequent instances by default do not have the TCP Port set and have TCP Dynamic Ports set to 0. Using Dynamic Ports requires the use of the SQL Server Browser Service in order to direct incoming connections to the current port for that instance. This however makes it more difficult to setup firewalls etc as the port can change each restart.
It is possible for SQL Server clients to browse the current infrastructure and retrieve a list of running SQL Server instances. The SQL Server Browser service enumerates SQL Server information on the network. When the SQL Server is found, the client obtains the server name and can connect to it if it has the appropriate credentials. This can present a large security threat to organizations because sensitive production data can be compromised. Note, that the SQL Server Browser service is required when running multiple instances on a single server. As indicated earlier, the Browser Service directs incoming connections to specific ports associated to an instance.
Organizations don’t need to worry—there is help for this type of situation. The SQL Server Configuration Manager tool can be used to hide an instance of SQL Server. This is typically a best practice for mission-critical production database servers that host sensitive data because there is no need to broadcast this information. Clients and applications still can connect to SQL Server if needed; however, they need to know the SQL Server name, protocol, and which port the instance is using to connect.
To hide a SQL Server instance with SQL Server Configuration Manager, follow these steps:
1. Choose Start, All Programs, Microsoft SQL Server 2008, Configuration Tools, SQL Server Configuration Manager.
2. Expand the SQL Server 2008 Network Configuration node and select Protocols for the SQL Server instance to be configured.
3. Right-click Protocols for [ServerInstance Name] and then choose Properties.
4. In the Hide Instance box on the Protocols for [ServerInstance Name] Properties page, shown in Figure 8.5, select Yes.
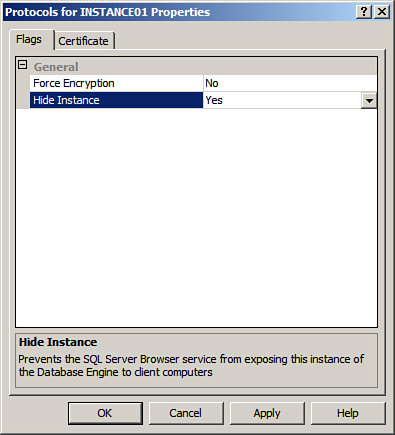
5. Click OK and restart the services for the change to take effect.
The most impressive hardening tool and useful addition to the Windows Server operating system has to be the Security Configuration Wizard (SCW). SCW was first introduced as an add-in with Windows Server 2003 Service Pack 1; however, it is now included out of the box with Windows Server 2008. SCW is an attack-surface reduction tool that allows you to completely lock down a server, except for the particular services that it requires to perform specific duties. The role-based security policies are predefined and assist you by configuring services, network security, auditing, Registry settings, and more. This way, a WINS server responds only to WINS requests, a DNS server has only DNS enabled, and a SQL Server responds only to SQL requests. Windows Server 2008 continues to deliver this type of long-sought-after functionality.
SCW allows you to build custom role-based templates that can be exported to additional servers, thus streamlining the security process when setting up multiple systems. In addition, current security templates can be imported into SCW so that existing intelligence can be maintained. The SCW included with Windows Server 2008 includes new improved features and functionality such as more server role configurations and security settings out of the box, the possibility to disable unneeded services based on the server role, the capability to establish restrictive audit policies, advanced firewall configurations, and the power to transform a SCW policy into a Group Policy object (GPO) and link it to an Organizational Unit (OU) for centralized SQL Server infrastructure management when using Active Directory Domain Services (AD DS).
The advantages to using the SCW service on SQL Server are immediately identifiable. SQL Server, because it houses sensitive data and is often indirectly exposed to the Internet by web service applications, is vulnerable to attack and therefore should have all unnecessary services and ports shut down. A properly configured firewall normally drops this type of activity, and although the preceding section focused on minimizing surface attacks, it is always a good idea to put in an additional layer of security for good measure.
The Security Configuration Wizard can be run to lock down SQL Server based on a SQL Server role-based template, therefore, only the bare necessities required will be operational. This includes SQL access, web and ASP-related web access, and any other access methods required for the server. In addition, network security, port configuration, and Registry settings can be configured. Each SQL Server implementation differs, so it is important to run the wizard on a prototype to determine what settings are right for each individual SQL Server.
Note
For best results, when you’re locking down a server with the Security Configuration Wizard, it is a best practice to first harden the SQL Server installation with the configuration tools described in the previous sections and then run this tool.
To launch the Security Configuration Wizard, choose Start, All Programs, Administrative Tools, Security Configuration Wizard. Use the wizard to create a role-based SQL Server security policy that locks down unnecessary services, network security, ports, Registry settings, and audit policies.
Like Windows Server 2008, Microsoft SQL Server 2008 also requires the latest service packs and updates to reduce known security vulnerabilities. Microsoft offers an intuitive, free downloadable tool called the Microsoft Baseline Security Analyzer (MBSA). This tool identifies common security vulnerabilities on SQL Servers by identifying incorrect configurations and missing security patches for SQL Server, Windows Server 2008, and Internet Information Services (IIS).
Not only MBSA can scan a single SQL Server, but it can also scan multiple instances of SQL Server. The MBSA SQL Server scan works by detecting and displaying SQL Server vulnerabilities, including the following: members of the sysadmin role, weak or blank SQL Server local accounts and SA passwords, SQL Server Authentication mode, SQL Server on a domain controller, and missing service packs and critical fixes.
Note
Unfortunately, MBSA does not provide all the scanning bells and whistles for SQL Server 2008 administration vulnerabilities yet. Microsoft is currently working on upgrading the tool to support SQL Server 2008. In the meantime, the tool still identifies missing security patches and service packs. In addition, it will find vulnerabilities on existing SQL Server 2005 installations.
Before installing MBSA, you should become acquainted with some specific Microsoft system requirements for the installation. Being familiar with the following list will help you on your way to a successful installation:
![]() The operating system must be Windows Server 2008, Windows Server 2003, Windows Vista, or Windows XP.
The operating system must be Windows Server 2008, Windows Server 2003, Windows Vista, or Windows XP.
![]() Internet Explorer must be version 5.01 or higher.
Internet Explorer must be version 5.01 or higher.
![]() An XML parser such as the one available with Internet Explorer 5.01 or MSXML version 3.0 SP2 must be available.
An XML parser such as the one available with Internet Explorer 5.01 or MSXML version 3.0 SP2 must be available.
Installation of MBSA is predictably straightforward. It can be installed on any workstation or server in the network. To install, complete these steps:
1. Download the latest version of the MBSA from the Microsoft website. The current link is http://www.microsoft.com/mbsa.
2. Double-click the MBSA installation file such as mbsasetup-en.msi to launch the installation.
MBSA can scan a single computer or a range of computers, or all computers in a domain based on an IP address, range of IP addresses, or computer name. The security scanner can identify known security vulnerabilities on several Microsoft technologies such as Windows, IIS, or SQL Server.
To scan SQL Server for known SQL or Windows vulnerabilities, weak passwords, and security updates, follow these steps:
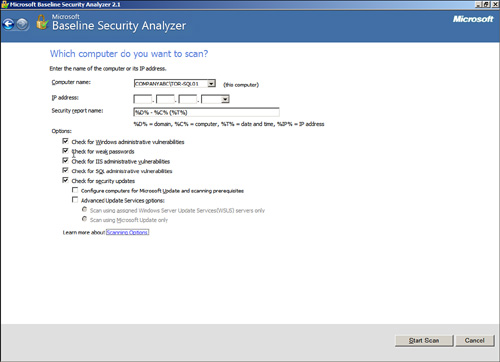
1. Choose Start, All Programs, Microsoft Baseline Security Analyzer.
2. Click on Scan a Computer to pick the system to scan. You can scan more than one computer here by entering either a valid IP address range or domain name.
3. In the next window, which is Which Computer Do You Want to Scan?, enter the computer name or IP address of the desired SQL Server. Select all options you want, as shown in Figure 8.6, and click Start Scan.
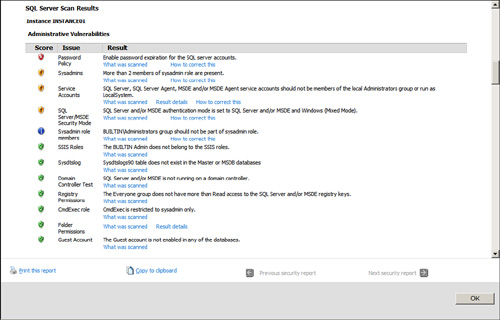
A separate security report is generated for the desired SQL Server on completion of the computer scan. This report is generated regardless of whether a local or remote scan is conducted. In addition, scanned reports are stored for future viewing on the same computer where the Microsoft Baseline Security Analyzer is installed.
The information yielded in the MBSA security reports is quite intuitive and addresses each vulnerability detected. For example, if MBSA detects a missing SQL Server service pack, Windows patch, or hot fix, it displays the vulnerability in the Security Update Scan section and provides the location that focuses on the fix.
In the security report example shown in Figure 8.7, note that each section scanned has a score associated with it. An end user or administrator can easily browse each section identifying known security vulnerabilities, verifying what was scanned, checking the results, and analyzing how to correct anomalies that MBSA detected.
Another tool that is typically a database administrator’s best friend is the much-awaited SQL Server 2008 Best Practice Analyzer (BPA) tool. The BPA gathers data from Microsoft Windows and SQL Server configuration settings. The BPA is a database management tool that uses a predefined list of SQL Server 2008 recommendations and best practices to determine whether there are potential issues in the database environment. The BPA also covers security hardening best practices.
You are prompted to enter a service account during the initial installation of SQL Server. Services can run under domain-based accounts, local service accounts, or built-in accounts such as Local System or Network Service. You can select to use a single service account for all instances and components being installed or to customize the installation by entering a dedicated service account for each instance and component.
The following SQL Server service accounts are available:
![]() SQL Server Database Engineer Service— This account provides core database functionality by facilitating storage, processing, and controlled access of data and rapid transaction processing.
SQL Server Database Engineer Service— This account provides core database functionality by facilitating storage, processing, and controlled access of data and rapid transaction processing.
![]() SQL Server Agent Service— This account provides auxiliary functionality by executing jobs, monitoring SQL Server, creating alerts, and automating administrative tasks.
SQL Server Agent Service— This account provides auxiliary functionality by executing jobs, monitoring SQL Server, creating alerts, and automating administrative tasks.
![]() SQL Server Integration Services Service— This account provides management support for SSIS package storage and execution.
SQL Server Integration Services Service— This account provides management support for SSIS package storage and execution.
![]() SQL Server Analysis Services Service— This account provides business intelligence applications by supplying online analytical processing (OLAP) and data mining functionality.
SQL Server Analysis Services Service— This account provides business intelligence applications by supplying online analytical processing (OLAP) and data mining functionality.
![]() SQL Server Reporting Services— This account acts as a liaison between Reporting Services and SQL Server by managing, executing, rendering, and delivering reports.
SQL Server Reporting Services— This account acts as a liaison between Reporting Services and SQL Server by managing, executing, rendering, and delivering reports.
![]() SQL Server Full-Text Filter Daemon Launcher— This account manages full-text indexes on content and properties of structured and semistructured data to allow fast linguistic searches on this data.
SQL Server Full-Text Filter Daemon Launcher— This account manages full-text indexes on content and properties of structured and semistructured data to allow fast linguistic searches on this data.
![]() SQL Server Browser— This account acts as a liaison with client computers by enumerating SQL Server connection information.
SQL Server Browser— This account acts as a liaison with client computers by enumerating SQL Server connection information.
![]() SQL Server Active Directory Helper— This account enables integration between SQL Server and Active Directory.
SQL Server Active Directory Helper— This account enables integration between SQL Server and Active Directory.
![]() SQL Server VSS Writer— This account provides the interface to back up and restore SQL Server via the Windows Server Volume Shadow Copy Service (VSS) infrastructure.
SQL Server VSS Writer— This account provides the interface to back up and restore SQL Server via the Windows Server Volume Shadow Copy Service (VSS) infrastructure.
There aren’t necessarily any hard and fast rules to follow when trying to determine the type of service account to use. The main objective is to understand the limitations and positive offerings of the service account being used. It is equally important to analyze the value of the data residing within SQL Server and the risks and amount of security exposure that would take place if the SQL Server database was compromised. Lastly, when hardening and choosing SQL Server service accounts, you should employ the principle of least privilege and isolation.
It is a best practice to configure a service account based on the principle of least privilege. According to the principle of least privilege, SQL Server service accounts should be granted the least number of rights and permissions to conduct a specific task. Based on this recommendation, you should not grant a service account unnecessary elevated privileges such as domain administrator, enterprise administrator, or local administrator privileges. This enhances the protection of data and functionality from faults. Also, you should recognize that these highly elevated privileges are really not required. In fact, gone are the days when the SQL Server service accounts required domain administrator or local administrator privileges.
For isolation purposes, a separate account should be created for each SQL Server instance and component being installed. Therefore, if the service account is compromised, only the one instance or component associated with the service account is breached. For example, suppose a bank is running 100 SQL Server instances and each instance maintains financial information. If one service account is used for all these instances, all 100 instances would be compromised in the event of a service account breach. This type of situation could be disastrous for a bank, especially with today’s laws and regulatory requirements.
The need to create and manage more than one service account definitely increases administration and can be monotonous; however, it is a best practice to isolate each instance or component. One other notable benefit of isolation is witnessed with the amount of control organizations achieve through it. Organizations can grant specific permissions to one service account without elevating permissions to another service account that does not need elevated permissions.
The following types of service accounts are available to choose from:
![]() Local System Account— This account grants full administrative rights to users on the local computer, which makes it a highly privileged account. As such, its use should be closely monitored. Note that this account does not grant network access rights.
Local System Account— This account grants full administrative rights to users on the local computer, which makes it a highly privileged account. As such, its use should be closely monitored. Note that this account does not grant network access rights.
![]() Network Service Account— This built-in account grants users the same level of access as members of the User group. This account allows services to interrelate with other services on the network infrastructure.
Network Service Account— This built-in account grants users the same level of access as members of the User group. This account allows services to interrelate with other services on the network infrastructure.
![]() Domain User Account— This account is used if the service will interrelate with other services on the network infrastructure.
Domain User Account— This account is used if the service will interrelate with other services on the network infrastructure.
![]() Local Service Account— Users of this built-in account have the same level of access that is designated to members of the Users group. This limited access protects against service breaches.
Local Service Account— Users of this built-in account have the same level of access that is designated to members of the Users group. This limited access protects against service breaches.
The question that always surfaces regarding service accounts is, “Which service account should be used with implementing SQL Server 2008?” The answer depends on your intended use of the service account and the relationship it will have to the server and network.
Services that run as the local service account access network resources with no credentials. As a result, this account should not be used if you want the services to interact with other network resources.
If you are looking for a service account that grants limited privileges like the local service account but also runs services that can interrelate with other services on the network infrastructure, you should consider using a network service account. This account uses the credentials of the computer account to gain access to the network. It is not recommended that you use this account for either the SQL Server service or the SQL Server Agent service account.
Consideration should also be given to the domain user account if its services will interact with other services on the network infrastructure. If you also want to perform certain activities including replication, remote procedure calls, or network drive backups, a domain user account is preferred over a network service account because only this account allows server-to-server activity. One point to keep in mind when using a domain account is that it must be authenticated on a domain controller.
The local system account is not recommended for use for the SQL Server service or SQL Server Agent services. The reason is that it is a best practice to configure a service so that it runs effectively with the least number of privileges granted. The local system account is a highly privileged account, which means it should be used very carefully. In addition, it probably has privileges that neither SQL Server Agent services nor SQL Server services actually require.
Tip
Microsoft recommends that you do not use a network service account if an account with lesser privileges is available. The reason is that the network service account is a shared account and can be utilized by other services running on the Windows Server system. Local User or Domain User accounts are preferred, specifically if they are not associated with highly privileged groups such as Domain Administrator.
Typically, server administrators use the Services Snap-in component included with Windows Server 2008 Server Manager or the Administrative tools to make changes to Windows Services. There are serious negative ramifications if SQL Server service accounts are changed using this tool. SQL Server service accounts require special Registry settings, NTFS file system permissions, and Windows user rights to be set, which the Windows tool does not address, thus causing a SQL Server outage. Fortunately, these additional permission requirements can be updated automatically if you use SQL Server native configuration tools such as the SQL Server Configuration Manager or SQL Server Surface Area Configuration. Therefore, it is a best practice to use the native SQL Server configuration tools when making changes to SQL Server service accounts; changes should not be made using the Windows Server 2008 Services tool.
Follow these steps to change the user account, including credentials for a SQL Server service such as the SQL Server Agent, using the SQL Server Configuration Manager:
1. Choose Start, All Programs, Microsoft SQL Server 2008, Configuration Tools, SQL Server Configuration Manager.
2. Select the SQL Server Services node.
3. In the right pane, double-click on the SQL Server Agent Service.
4. In the SQL Server Agent box, enter a new service account name and password.
5. Confirm the password by retyping it, as shown in Figure 8.8, and click Apply.
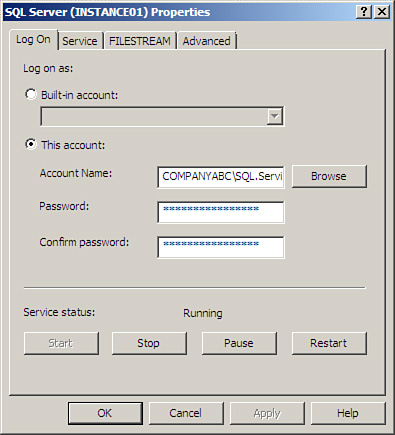
6. Accept the message to restart the services and click OK.
The SQL Server Agent now uses the new service account credentials for authentication. In addition, Registry settings, NTFS permissions, and Windows rights are updated automatically.
SQL Server 2008, like all other Microsoft applications and server products, is subject to periodic software updates. Interim updates can be downloaded and installed through the Microsoft/Windows Update option on the system or by visiting the Windows Update website (http://update.microsoft.com), which initiates the installer to check for the latest updates for Windows.
Likewise, major updates are essentially bundled as service packs that roll up patches and updates into a single installation. Installation of the latest service pack brings a server up to date, which means to the point in time when the service pack was issued. It is also worth noting that the future service packs for both SQL Server 2008 will most likely be cumulative. You can install a service pack update in one of three ways:
![]() Microsoft/Windows Update— The service pack can be downloaded and automatically installed as part of the normal update process.
Microsoft/Windows Update— The service pack can be downloaded and automatically installed as part of the normal update process.
![]() Download and Install— The service pack can be downloaded as a file. This file can then be launched to install the update. This is frequently done when a system is not connected to the Internet or when a scheduled installation is desired as opposed to an immediate installation after downloading from the Internet.
Download and Install— The service pack can be downloaded as a file. This file can then be launched to install the update. This is frequently done when a system is not connected to the Internet or when a scheduled installation is desired as opposed to an immediate installation after downloading from the Internet.
![]() Automated Patch Management and Deployment Tools— Software distribution tools can be used to install service pack updates. Systems Center 2007 Configuration Manager and Windows Software Update Services (WSUS) are examples of two tools you can use to accomplish the task.
Automated Patch Management and Deployment Tools— Software distribution tools can be used to install service pack updates. Systems Center 2007 Configuration Manager and Windows Software Update Services (WSUS) are examples of two tools you can use to accomplish the task.
In addition to the patches that are installed as part of a SQL Server 2008 service pack, security updates and patches are constantly being released by Microsoft. It is advantageous to install these updates made available for SQL Server and the operating system. These patches can be manually downloaded and installed, or they can be automatically applied by using Microsoft Update.
It is a best practice to install critical fixes for both SQL Server and the operating system when they are released. In addition, major service packs and security rollups should be installed in a timely manner. All patches should be tested in a prototype lab before being installed in production, and it is recommended that you conduct a full backup of the system prior to the installation of the patches.
In the previous sections, you learned ways of minimizing security vulnerabilities on SQL Server. Now that SQL Server is hardened, it is beneficial to enable auditing. SQL Server security auditing monitors and tracks activity to log files that can be viewed through Windows application logs or SQL Server Management Studio. SQL Server offers the following four security levels with regards to security auditing:
![]() None— Disables auditing so no events are logged
None— Disables auditing so no events are logged
![]() Successful Logins Only— Audits all successful login attempts
Successful Logins Only— Audits all successful login attempts
![]() Failed Logins Only— Audits all failed login attempts
Failed Logins Only— Audits all failed login attempts
![]() Both Failed and Successful Logins— Audits all login attempts
Both Failed and Successful Logins— Audits all login attempts
At the very least, security auditing should be set to Failed Logins Only. As a result, failed logins can be saved, viewed, and acted on when necessary. Unless a change is made, security auditing is set, by default, to Failed Logins Only. On the other hand, it is a best practice to configure security auditing to capture Both Failed and Successful Logins. All logins are captured in this situation and can be analyzed when advanced forensics are required.
To configure security login auditing for both failed and successful logins, follow these steps:
1. In SQL Server Management Studio, right-click on a desired SQL Server and then click Properties.
2. On the Security page, as shown in Figure 8.9, under Login Auditing, select the desired auditing criteria option button, such as Both Failed and Successful Logins, and then click OK.
3. Restart the SQL Server Database Engine and SQL Server Agent to make the auditing changes effective.
SQL Server systems are strong candidates to fall subject to the rules and regulations governed by regulatory requirements. SQL Server is typically a repository for organizations’ and customers’ data that tends to be both mission-critical and sensitive if it falls into the wrong hands.
One of the latest compliance rules some organizations are subject to includes the ability to successfully log events in a central repository and produce reports of all activity being captured. Microsoft understands the push toward better logging and auditing capabilities and has introduced new features and functionality in SQL Server 2008 that facilitate stronger auditing for compliance reasons.
By introducing two new objects, Audit object and Audit Specification object, organizations can now log every SQL Server action to the Windows Application Log, Windows Security Log, or to a file. In addition, when using Windows Server 2008 or System Center 2007 Operations Manager, it is possible to create a central repository for all events collected across many SQL Server systems within the enterprise.
Note
For more information on “how-to” topics associated with enhanced auditing, review Chapter 17, “Monitoring SQL Server 2008 with Native Tools.”
The following sections focus on additional hardening techniques to further lock down SQL Server. The items include removing the BUILTINAdministrators Windows group, using a firewall to filter out unwanted traffic, and hardening IIS.
In the past, many database administrators in the industry were concerned about the BUILTINAdministrators Windows group having sysadmin privileges by default over a SQL Server instance. Some people believe that this situation was one of the biggest out-of-the-box security flaws for SQL Server. The reason is that all local Windows administrators, including domain administrators, are given full control over SQL Server because they are part of the BUILTINAdministrators Windows group. This led to a best practice to remove the BUILTINAdministrators group to address this situation. Doing this hardens the SQL Server installation.
Microsoft realized that this was a major security flaw, and with SQL Server 2008 BETA versions the local Windows Group BUILTINAdministrator is no longer included in the SQL Server sysadmin server role. When the official RTM version released, Microsoft removed the group outright. Therefore, it is up to you to decide whether there is still a need to add this group, if desired.
If the group existed from previous versions of SQL Server or using BETA code, the following Transact-SQL (TSQL) syntax removes the BUILTINAdministrators Windows Group from a SQL Server instance. If you decide to run this syntax, you should execute it on each SQL Server instance installed in the organization:
Use Master
IF EXISTS (SELECT * FROM sys.server_principals
WHERE name = N'BUILTINAdministrators')
DROP LOGIN [BUILTINAdministrators]
GO
Now that the default SQL Server ports have been changed according to the instructions in the previous section, the next step is to enable a firewall that will filter out unwanted traffic and allow connections only to the SQL Server designated from within the organization’s infrastructure. The Windows firewall included with Windows Server 2008 should be sufficient. However, if more advanced firewall features are sought, a full-fledged hardware-based firewall or software-based firewall should be used, such as Internet Security and Acceleration (ISA) Server 2006.
Note
A common problem in the past was that some organizations had their SQL Server reside within the demilitarized zone (DMZ) or configured with a public IP address. This made their SQL Server public-facing and, therefore, accessible from the outside world. As a rule of thumb, when you’re implementing SQL Server from within an infrastructure, it should never be Internet-facing, within the DMZ, or publicly accessible.
The following table summarizes the default ports utilized by common SQL Server components.
Windows Server 2008 includes a vastly improved integrated firewall that is turned on by default in all installations of the product. The firewall, administered from a Microsoft Management Console (MMC) snap-in shown in Figure 8.10 gives unprecedented control and security to a server. It can be accessed by choosing Start, All Programs, Administrative Tools, Windows Firewall with Advanced Security.
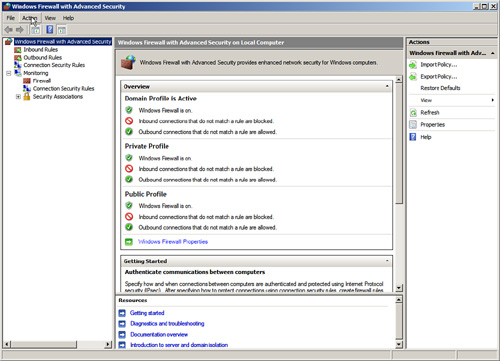
The firewall is fully integrated with the Server Manager utility and the Server Roles Wizard. Both the Server Manager utility and the Server Roles Wizard are new management tools included with Windows Server 2008. For example, if an DBA runs the Server Roles Wizard and chooses to make the server a file server or a domain controller, only then are those ports and protocols that are required for file server or domain controller access opened on the server. Unfortunately, this is not the case with SQL Server, and firewall rules must be created and configured manually.
Note
It is instinctive for most DBAs or Windows administrators to disable software firewalls on servers, as they have caused problems with functionality in the past. This is not recommended in Windows Server 2008, however, as the product is tightly integrated with its firewall, and the firewall provides for a much greater degree of security than previous versions of Windows Server provided.
In certain cases, when a third-party application is not integrated with Server Manager, or when needing to open specific individual ports, it may become necessary to create firewall rules for individual services to run properly. This is the case when working with SQL Server 2008. Both inbound rules addressing traffic to the server, and outbound rules, addressing how the server can communicate out, can be created. Rules can be created based on the following factors:
![]() Program— A rule can be created that allows a specific program executable access. For example, you can specify that the
Program— A rule can be created that allows a specific program executable access. For example, you can specify that the C:Program FilesCustom Programmyprogram.exe file has full outbound access when running. The Windows Firewall program will then allow any type of connections made by that program full access. This can be useful in scenarios when a specific application server uses multiple varied ports, but the overall security that the firewall provides is still desired.
![]() Port— Entering a traditional UDP or TCP port into the Add Rules Wizard is supported. This covers traditional scenarios such as “We need to open port 1433 on the SQL Server system.”
Port— Entering a traditional UDP or TCP port into the Add Rules Wizard is supported. This covers traditional scenarios such as “We need to open port 1433 on the SQL Server system.”
![]() Predefined— Windows Server also has built-in, predefined rules, such as those that allow AD DS, DFS, BITS, HTTP, and many more. The advantage to using a predefined rule is that Microsoft has done all the legwork in advance, and it becomes much easier to allow a specific service.
Predefined— Windows Server also has built-in, predefined rules, such as those that allow AD DS, DFS, BITS, HTTP, and many more. The advantage to using a predefined rule is that Microsoft has done all the legwork in advance, and it becomes much easier to allow a specific service.
![]() Custom— The creation of custom rule types not covered in the other categories is also supported.
Custom— The creation of custom rule types not covered in the other categories is also supported.
When configuring the Windows firewall, you can either create an exception for SQL Server based on the instance’s port number or by adding the path to the SQL Server program. The default instance of SQL Server uses port 1433; however, ports are assigned dynamically when running more than one instance. Therefore, it is a best practice to utilize the path of the program.
Follow these steps to create a SQL Server exception on the Windows firewall by adding the path of the SQL Server program:
1. Open the Windows Firewall MMC Console (Start, All Programs, Administrative Tools, Windows Firewall with Advanced Security).
Note
A message box will be displayed if the Windows Firewall/Internet Connection Sharing (ICS) service is not running. Click Yes to activate the service and the firewall. In addition, another warning will appear indicating that your computer is not protected and you must turn on Windows Firewall if the firewall setting is configured to Off.
2. Click on the Inbound Rules node in the node pane.
3. In the Action Pane, click the link labeled New Rule.
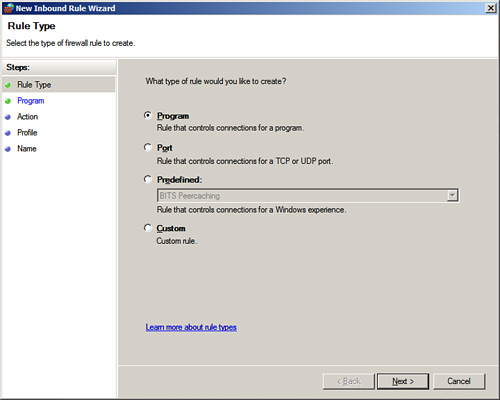
4. In the Rule Type dialog box, shown in Figure 8.11, select to create a rule based on Add Program and click Next to continue.
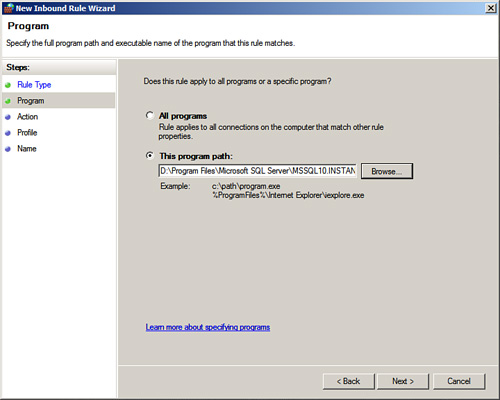
5. Select the SQL Server instance from the program list. If the program is not available in the list, click Browse to search for it and provide the path for the appropriate SQL Server instance, for example, D:Program FilesMicrosoft SQL ServerMSSQL10.Instance01MSSQLBinnsqlservr.exe, as illustrated in Figure 8.12. Then click Open.
Note
Microsoft SQL Server provides an instance ID for every SQL Server instance installed on a server. Typically, the ID is incremented by 1 when more than one instance is installed on a server. Use the SQL Server Configuration Manager tool to obtain the instance ID and installation path of a SQL Server instance. To find it, double-click the server name, and the Advanced tab displays the instance ID and installation path to the SQL Server instance.
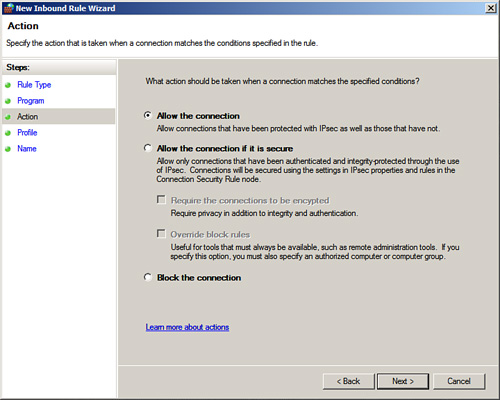
6. In the next window, on the Action tab, specify the action that should be taken when a connection matches the condition of the rule. The options are Allow the Connection, Allow the Connection If It Is Secure, and Block the Connection. Select Allow the Connection as displayed in Figure 8.13 and then click Next.
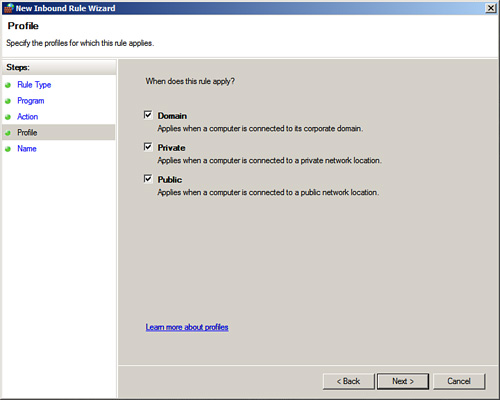
7. On the Profile page, shown in Figure 8.14, specify the desired profile box. This allows a DBA to specify that a rule only applies when connected to specific networks. Click Next to continue.
8. Enter a descriptive name for the rule and click Finish.
9. Repeat these steps for every SQL Server instance or SQL component that requires an exception, such as Analysis Services, Integration Services, and so on.
10. Test the connection to the SQL Server from a desired client to validate both that the firewall is enabled and the appropriate exceptions were created.
Note
Create an exception for the SQL Server Browser service if there is a need to broadcast SQL Server information to clients over the network. Otherwise, SQL Server clients must know the names and ports of the clients when connecting.
Using the Integrated Windows Firewall is no longer just a good idea—it’s a vital part of the security of the product. The addition of the ability to define rules based on factors such as scope, profile, IPSec status, and the like further positions the Server OS as one with high levels of integrated security.
One of the best features of SQL Server 2008 is that it’s secure by default; however, when the SQL Server installation is complete, it is imperative that you harden the SQL Server implementation. You should understand all hardening techniques available so that you can determine which hardening strategies work best for your organization. Not every hardening technique works for everyone.
Additional security strategies such as encrypting SQL Server data and communications, Policy Based Management, and administering SQL Server authorization and security are covered in the upcoming chapters.
Following is a summary of best practices for hardening a SQL Server environment:
![]() When the SQL Server installation is complete, harden the SQL Server environment.
When the SQL Server installation is complete, harden the SQL Server environment.
![]() Install the most recent critical fixes and service packs for both Windows and SQL Server.
Install the most recent critical fixes and service packs for both Windows and SQL Server.
![]() When you’re selecting authentication modes, Windows Authentication is a more secure choice; however, if mixed mode authentication is required, leverage complex passwords and SQL Server 2008 password and lockout policies to further bolster security.
When you’re selecting authentication modes, Windows Authentication is a more secure choice; however, if mixed mode authentication is required, leverage complex passwords and SQL Server 2008 password and lockout policies to further bolster security.
![]() Do not use the SA account for day-to-day administration, logging on to the server remotely, or having applications use it to connect to SQL. It is best if the SA account is disabled and renamed.
Do not use the SA account for day-to-day administration, logging on to the server remotely, or having applications use it to connect to SQL. It is best if the SA account is disabled and renamed.
![]() Create a role-based security policy with the Security Configuration Wizard tool.
Create a role-based security policy with the Security Configuration Wizard tool.
![]() After SQL Server 2008 is installed, run the SQL Server Configuration Manager tool to disable unnecessary features and services and create policies with Policy Based Management.
After SQL Server 2008 is installed, run the SQL Server Configuration Manager tool to disable unnecessary features and services and create policies with Policy Based Management.
![]() Install only required components when installing SQL Server.
Install only required components when installing SQL Server.
![]() After the server has been hardened, periodically asses the server’s security using the MBSA and SQL Server BPA.
After the server has been hardened, periodically asses the server’s security using the MBSA and SQL Server BPA.
![]() For production SQL Servers running mission-critical databases, either hide the instance or disable the SQL Server Browser service.
For production SQL Servers running mission-critical databases, either hide the instance or disable the SQL Server Browser service.
![]() Change the default ports associated with the SQL Server installation to put off hackers from port-scanning the server.
Change the default ports associated with the SQL Server installation to put off hackers from port-scanning the server.
![]() Enable a firewall to filter unnecessary and unknown traffic.
Enable a firewall to filter unnecessary and unknown traffic.
![]() At the very least, set security auditing to failed login attempts; otherwise, both failed and successful logins should be captured and monitored.
At the very least, set security auditing to failed login attempts; otherwise, both failed and successful logins should be captured and monitored.
![]() If upgrading previous versions of SQL Server, remove the BUILTIN/Administrators group from the SQL Server Logins.
If upgrading previous versions of SQL Server, remove the BUILTIN/Administrators group from the SQL Server Logins.