
Chapter 12 Implementing and Managing Failover Clustering
Failover clustering is one of four SQL Server 2008 high-availability alternatives. Other SQL Server 2008 high-availability alternatives include database mirroring, log shipping, and peer-to-peer replication. These other high-availability technologies are discussed in other chapters in this book.
This chapter first focuses on an overview of SQL Server 2008 failover clustering based on Windows Server 2008, then on the new features associated with both SQL Server 2008 and Windows Server 2008 failover clustering, and finally, on hardware and software prerequisites.
The chapter also includes step-by-step procedures for installing a two-node single-instance and multiple-instance SQL Server 2008 failover cluster based on Windows Server 2008. The final portion of the chapter includes management tasks for managing a SQL Server failover cluster when running on Windows Server 2008.
Failover clustering with SQL Server 2008 running on Windows Server 2008 provides server-level redundancy by supporting the shared-nothing cluster model. In a shared-nothing cluster, two or more independent servers share resources; however, each computer, or node, owns and manages its local resources and provides nonsharing data services. In case of a node failure, the disks, resources, and services running on the failed node fail over to a surviving node in the cluster. With SQL Server failover clustering, specifically, only one node manages one particular SQL Server instance, set of disks, and associated services at any given time.
Note
SQL Server failover clustering provides high availability for mission-critical databases and server nodes. However, it does not replace the need for a comprehensive backup and recovery strategy for a SQL Server environment. Equally important, you should not rely on clustering as a replacement for disaster recovery and business continuity strategies.
Both Windows Server 2008 and SQL Server 2008 make significant enhancements to failover clustering. The majority of the noteworthy improvements are based on the radical redesign related to the underlying Windows Server 2008 Failover Clustering feature. The list of enhancements for both SQL Server 2008 and Windows Server 2008 failover clustering includes the following:
![]() The terminology for referencing clusters has changed, and they are now known as “failover clusters.”
The terminology for referencing clusters has changed, and they are now known as “failover clusters.”
![]() Windows Server 2008 introduces a new Cluster Validation Tool that must be run before installing a cluster. The tool performs a test against all the components associated with the failover cluster to ensure that the components are suitable, meet the minimum requirements, and are configured correctly. There are over 100 tests with the central theme focusing on inventory, network, storage, and system configuration.
Windows Server 2008 introduces a new Cluster Validation Tool that must be run before installing a cluster. The tool performs a test against all the components associated with the failover cluster to ensure that the components are suitable, meet the minimum requirements, and are configured correctly. There are over 100 tests with the central theme focusing on inventory, network, storage, and system configuration.
![]() The SQL Server 2008 failover cluster installation has been redesigned and is done on a per-node basis. Using the installation wizard, you first install the first node of the SQL Server failover cluster and then run the installation again, on all subsequent nodes. Using the new installation process, it is now possible to conduct rolling patches, upgrades, and service pack installations without causing downtime, something which was not achievable with SQL Server 2005.
The SQL Server 2008 failover cluster installation has been redesigned and is done on a per-node basis. Using the installation wizard, you first install the first node of the SQL Server failover cluster and then run the installation again, on all subsequent nodes. Using the new installation process, it is now possible to conduct rolling patches, upgrades, and service pack installations without causing downtime, something which was not achievable with SQL Server 2005.
![]() The SQL Server 2008 Installation Center includes a new tool for both advanced cluster preparation and advanced cluster completion. These tools allow a wizard to prepare a SQL Server 2008 failover cluster installation and another wizard to complete the installation.
The SQL Server 2008 Installation Center includes a new tool for both advanced cluster preparation and advanced cluster completion. These tools allow a wizard to prepare a SQL Server 2008 failover cluster installation and another wizard to complete the installation.
![]() Windows Server 2008 introduces new installation wizards, which simplify the installation process so that a Windows Server 2008 failover cluster creation can be achieved in one step.
Windows Server 2008 introduces new installation wizards, which simplify the installation process so that a Windows Server 2008 failover cluster creation can be achieved in one step.
![]() The failover cluster installation process for both Windows Server 2008 and SQL Server 2008 is fully scriptable—making it effortless to automate the installation of more than one failover cluster.
The failover cluster installation process for both Windows Server 2008 and SQL Server 2008 is fully scriptable—making it effortless to automate the installation of more than one failover cluster.
![]() The cluster management interface in Windows Server 2008 has been completely revamped and optimized in order to enhance the administrator’s day-to-day management experience.
The cluster management interface in Windows Server 2008 has been completely revamped and optimized in order to enhance the administrator’s day-to-day management experience.
![]() In previous releases of Windows, the quorum drive was a potential single point of failure as it maintained all the cluster configuration. With Windows Server 2008, a new quorum model eliminates the single point of failure associated with the quorum resource. It is possible to configure the quorum with the majority node cluster setting. Therefore, the cluster configuration is stored in multiple locations.
In previous releases of Windows, the quorum drive was a potential single point of failure as it maintained all the cluster configuration. With Windows Server 2008, a new quorum model eliminates the single point of failure associated with the quorum resource. It is possible to configure the quorum with the majority node cluster setting. Therefore, the cluster configuration is stored in multiple locations.
![]() From a network and security perspective, Windows Server 2008 failover clusters support the latest IP protocol, known as Internet Protocol version 6 (IPv6).
From a network and security perspective, Windows Server 2008 failover clusters support the latest IP protocol, known as Internet Protocol version 6 (IPv6).
![]() Windows Server 2008 eliminates the need to have all nodes in a failover cluster reside in the same subnet, making it easier to establish a geographically dispersed failover cluster.
Windows Server 2008 eliminates the need to have all nodes in a failover cluster reside in the same subnet, making it easier to establish a geographically dispersed failover cluster.
Note
An in-place upgrade from a previous SQL Server failover cluster to a SQL Server 2008 failover cluster running on Windows Server 2008 is not supported. It is necessary to build a new failover cluster with SQL Server 2008 and then conduct a data migration from the legacy cluster. This is based on the redesign of failover clustering with Windows Server 2008. Because of the enhanced security, backward compatibility with Windows Server 2003 failover clustering could not be achieved.
Typically, organizations implement a SQL Server 2008 failover cluster to address the following situations:
![]() To increase server availability for mission-critical applications and network services
To increase server availability for mission-critical applications and network services
![]() To provide high-availability support for an entire instance of SQL Server, not just a database
To provide high-availability support for an entire instance of SQL Server, not just a database
![]() To provide a seamless failover which minimizes the impact to client applications and end users
To provide a seamless failover which minimizes the impact to client applications and end users
![]() To provide an automatic failover that does not require database administrator intervention
To provide an automatic failover that does not require database administrator intervention
![]() To reduce downtime during routine maintenance or unplanned failures
To reduce downtime during routine maintenance or unplanned failures
![]() To perform Windows Server 2008 and SQL Server 2008 patches and service pack rolling upgrades
To perform Windows Server 2008 and SQL Server 2008 patches and service pack rolling upgrades
Before installing failover clustering, it is beneficial to understand the terminology associated with SQL Server 2008 and Windows Server 2008 failover clustering. Let’s examine the terminology in the following list:
![]() SQL Server virtual server— A SQL Server virtual server is, in fact, a cluster-configured resource group that contains all resources necessary for SQL Server to operate on the cluster. This includes the NetBIOS name of the virtual server, a TCP/IP address for the virtual server and all disk drives, and vital SQL Server services required to operate in a clustered configuration. In a multiple instance, two or more node clusters and one SQL Server virtual server are created per node, whereas the NetBIOS name and TCP/IP address of the cluster form the virtual server. When failover occurs in this configuration, the entire SQL Server virtual server fails over to the surviving node in the cluster dynamically.
SQL Server virtual server— A SQL Server virtual server is, in fact, a cluster-configured resource group that contains all resources necessary for SQL Server to operate on the cluster. This includes the NetBIOS name of the virtual server, a TCP/IP address for the virtual server and all disk drives, and vital SQL Server services required to operate in a clustered configuration. In a multiple instance, two or more node clusters and one SQL Server virtual server are created per node, whereas the NetBIOS name and TCP/IP address of the cluster form the virtual server. When failover occurs in this configuration, the entire SQL Server virtual server fails over to the surviving node in the cluster dynamically.
![]() Heartbeat— A single User Datagram Protocol (UDP) packet is sent every 500 milliseconds between nodes in the cluster across the internal private network. This packet relays health information about the cluster nodes as well as health information about the clustered application. If there is no response during a heartbeat to indicate that the node is alive, the cluster begins the failover process. In SQL Server 2008, this interval can be changed. This capability is useful when you are using a geographically dispersed cluster.
Heartbeat— A single User Datagram Protocol (UDP) packet is sent every 500 milliseconds between nodes in the cluster across the internal private network. This packet relays health information about the cluster nodes as well as health information about the clustered application. If there is no response during a heartbeat to indicate that the node is alive, the cluster begins the failover process. In SQL Server 2008, this interval can be changed. This capability is useful when you are using a geographically dispersed cluster.
![]() Failover— Failover is the process of one node in the cluster changing states from offline to online, resulting in the node taking over responsibility of the SQL Server virtual server. The Cluster Service fails over a group in the event that node becomes unavailable or one of the resources in the group fails.
Failover— Failover is the process of one node in the cluster changing states from offline to online, resulting in the node taking over responsibility of the SQL Server virtual server. The Cluster Service fails over a group in the event that node becomes unavailable or one of the resources in the group fails.
![]() Failback— Failback is the process of moving a SQL Server virtual server that failed over in the cluster back to the original online node.
Failback— Failback is the process of moving a SQL Server virtual server that failed over in the cluster back to the original online node.
![]() Quorum resource— The quorum resource, also referred to as the witness disk in Windows Server 2008, is the shared disk that holds the cluster server’s configuration information. All servers must be able to contact the quorum resource to become part of a SQL Server 2008 cluster. In Windows Server 2003, the entire cluster’s health and vitality depends on the quorum drive being available. With Windows Server 2008, a majority quorum model can be leveraged to eliminate this single point of failure.
Quorum resource— The quorum resource, also referred to as the witness disk in Windows Server 2008, is the shared disk that holds the cluster server’s configuration information. All servers must be able to contact the quorum resource to become part of a SQL Server 2008 cluster. In Windows Server 2003, the entire cluster’s health and vitality depends on the quorum drive being available. With Windows Server 2008, a majority quorum model can be leveraged to eliminate this single point of failure.
![]() Resource group— A resource group is a collection of cluster resources such as the SQL Server NetBIOS name, TCP/IP address, and the services belonging to the SQL Server cluster. A resource group also defines the items that fail over to the surviving nodes during failover. These items also include cluster resource items such as a cluster disk. It is also worth noting that a resource group is owned by only one node in the cluster at a time.
Resource group— A resource group is a collection of cluster resources such as the SQL Server NetBIOS name, TCP/IP address, and the services belonging to the SQL Server cluster. A resource group also defines the items that fail over to the surviving nodes during failover. These items also include cluster resource items such as a cluster disk. It is also worth noting that a resource group is owned by only one node in the cluster at a time.
![]() Cluster resource— Cluster resources contain vital information for the SQL Server virtual server and include its network TCP/IP addresses, NetBIOS name, disks, and SQL Server services, such as the System Attendant. These cluster resources are added to services or applications when the virtual server is created to form SQL Server virtual servers. With Windows Server 2008, a clustered resource is known as an application and a service.
Cluster resource— Cluster resources contain vital information for the SQL Server virtual server and include its network TCP/IP addresses, NetBIOS name, disks, and SQL Server services, such as the System Attendant. These cluster resources are added to services or applications when the virtual server is created to form SQL Server virtual servers. With Windows Server 2008, a clustered resource is known as an application and a service.
![]() Dependency— A dependency is specified when creating cluster resources. Similar to a dependency on SQL Server services, a cluster resource identified as a dependency indicates that a mandatory relationship exists between resources. Before a cluster resource is brought online, the resource defined as a dependent must be brought online first. For instance, the virtual server NetBIOS name is dependent on the TCP/IP address; therefore, the TCP/IP address of the virtual server must be brought online before the NetBIOS name is brought online.
Dependency— A dependency is specified when creating cluster resources. Similar to a dependency on SQL Server services, a cluster resource identified as a dependency indicates that a mandatory relationship exists between resources. Before a cluster resource is brought online, the resource defined as a dependent must be brought online first. For instance, the virtual server NetBIOS name is dependent on the TCP/IP address; therefore, the TCP/IP address of the virtual server must be brought online before the NetBIOS name is brought online.
![]() Majority Node cluster— In this configuration, each node is responsible for contributing one local disk to the quorum disk set that is used as storage disks. This configuration limits the majority node resource to one owner at a time. Because the quorum does not require a shared disk, the solution is typically used for geographically dispersed clusters.
Majority Node cluster— In this configuration, each node is responsible for contributing one local disk to the quorum disk set that is used as storage disks. This configuration limits the majority node resource to one owner at a time. Because the quorum does not require a shared disk, the solution is typically used for geographically dispersed clusters.
![]() Failover Cluster Management— Formerly known as Cluster Administrator, Failover Cluster Manager in Windows Server 2008 is a tool used by cluster and database administrators for accessing, creating, and administering Windows clusters. The Failover Cluster Administrator console is included in Windows Server 2008 and can be launched from any active node within the cluster. Additional administration and management tasks include viewing, creating, and deleting services or applications, cluster resources, and nodes.
Failover Cluster Management— Formerly known as Cluster Administrator, Failover Cluster Manager in Windows Server 2008 is a tool used by cluster and database administrators for accessing, creating, and administering Windows clusters. The Failover Cluster Administrator console is included in Windows Server 2008 and can be launched from any active node within the cluster. Additional administration and management tasks include viewing, creating, and deleting services or applications, cluster resources, and nodes.
![]() Cluster witness disk or file share— The cluster witness or the witness file share are used to store the cluster configuration information, and to help determine the state of the cluster when some if not all of the cluster nodes cannot be contacted.
Cluster witness disk or file share— The cluster witness or the witness file share are used to store the cluster configuration information, and to help determine the state of the cluster when some if not all of the cluster nodes cannot be contacted.
![]() LUNs— LUN stands for Logical Unit Number. An LUN is used to identify a disk or a disk volume that is presented to a host server or multiple hosts by the shared storage device. Of course, there are shared storage controllers, firmware, drivers, and physical connections between the server and the shared storage, but the concept is that an LUN or set of LUNs is presented to the server for use as a local disk. LUNs provided by shared storage must meet many requirements before they can be used with failover clusters, but when they do, all active nodes in the cluster must have exclusive access to these LUNs. More information on LUNs and shared storage is provided later in this chapter.
LUNs— LUN stands for Logical Unit Number. An LUN is used to identify a disk or a disk volume that is presented to a host server or multiple hosts by the shared storage device. Of course, there are shared storage controllers, firmware, drivers, and physical connections between the server and the shared storage, but the concept is that an LUN or set of LUNs is presented to the server for use as a local disk. LUNs provided by shared storage must meet many requirements before they can be used with failover clusters, but when they do, all active nodes in the cluster must have exclusive access to these LUNs. More information on LUNs and shared storage is provided later in this chapter.
SQL Server failover clustering is based on the Windows shared-nothing model. Two or more nodes can control a single set of media that hold the application data. In the case of SQL Server 2008, this refers to a virtual instance where there is only a single copy of the database and logs residing on shared disks. Multiple nodes are available and can control these resources one at a time.
Before installing SQL Server clustering, ensure that the following prerequisites are met:
![]() A minimum of two identical servers running Windows Server 2008 Enterprise or Datacenter Edition are required.
A minimum of two identical servers running Windows Server 2008 Enterprise or Datacenter Edition are required.
![]() Two network interfaces are needed per server: one for the private heartbeat and the other for the public network. The public network should be the first network in the binding order.
Two network interfaces are needed per server: one for the private heartbeat and the other for the public network. The public network should be the first network in the binding order.
![]() Shared disk storage is needed for the witness (quorum), database, and log files. This could be a storage area network (SAN), small computer system interface (SCSI), Serial Attached SCSI (SAS), or Internet SCSI (ISCSI) storage solution. All shared disks must be configured as basic because clustering does not support dynamic disks. In addition, all shared disks must be online, configured with NTFS, and be seen from all nodes.
Shared disk storage is needed for the witness (quorum), database, and log files. This could be a storage area network (SAN), small computer system interface (SCSI), Serial Attached SCSI (SAS), or Internet SCSI (ISCSI) storage solution. All shared disks must be configured as basic because clustering does not support dynamic disks. In addition, all shared disks must be online, configured with NTFS, and be seen from all nodes.
![]() Distributed Transaction Coordinator (DTC) may need to be installed and configured prior to the installation of SQL Server. DTC is not required if only the Database Engine feature will be installed. However, it is required if the following components will be installed in conjunction with one another: Database Engine, Integration Services, and Shared components.
Distributed Transaction Coordinator (DTC) may need to be installed and configured prior to the installation of SQL Server. DTC is not required if only the Database Engine feature will be installed. However, it is required if the following components will be installed in conjunction with one another: Database Engine, Integration Services, and Shared components.
![]() Ensure that the shared disks have the same drive letter mappings on both nodes.
Ensure that the shared disks have the same drive letter mappings on both nodes.
![]() If the Windows Server 2008 Firewall is enabled, then ensure that the SQL Server port, SQL Browser port, File and Printer Sharing (TCP 139/445 and UDP 137/138), and Remote Procedure Call (TCP port 135) have been allowed.
If the Windows Server 2008 Firewall is enabled, then ensure that the SQL Server port, SQL Browser port, File and Printer Sharing (TCP 139/445 and UDP 137/138), and Remote Procedure Call (TCP port 135) have been allowed.
![]() The Failover Clustering feature of Windows Server 2008 must be configured prior to the installation of SQL Server. The clustering groups and resources should be available, operational, and online.
The Failover Clustering feature of Windows Server 2008 must be configured prior to the installation of SQL Server. The clustering groups and resources should be available, operational, and online.
![]() Separate service accounts are needed for both the Microsoft Failover Cluster Server and SQL Server services.
Separate service accounts are needed for both the Microsoft Failover Cluster Server and SQL Server services.
![]() All nodes should be identical and have the same service pack hotfixes and identical software. This also includes the same processor version.
All nodes should be identical and have the same service pack hotfixes and identical software. This also includes the same processor version.
![]() NETBIOS must be disabled on all network adapters being used for the private heartbeat network.
NETBIOS must be disabled on all network adapters being used for the private heartbeat network.
![]() All hardware and software being used must be certified by Microsoft and be on its Windows Catalog and Hardware Compatibility List (HCL).
All hardware and software being used must be certified by Microsoft and be on its Windows Catalog and Hardware Compatibility List (HCL).
![]() Ensure that the network adapters are listed in the order in which they are accessed by network services. For example, the Public adapter should be listed first and then the Heartbeat adapter. This setting can be modified by going to Control Panel, Network Connections, Advanced, Advanced Settings.
Ensure that the network adapters are listed in the order in which they are accessed by network services. For example, the Public adapter should be listed first and then the Heartbeat adapter. This setting can be modified by going to Control Panel, Network Connections, Advanced, Advanced Settings.
![]() Create a spreadsheet with the network names, IP addresses, and cluster disks that will be used for the administrative cluster and the High Availability “Services and Applications” group or groups that will be deployed in the failover cluster. Each “Services and Applications” group will require a separate network name and IPv4 Address, but if IPv6 is used, the address can be added separately in addition to the IPv4 address or a custom or generic “Services and Applications” group will need to be created. The servers in the cluster must be using DNS for name resolution. All servers in the cluster must be in the same AD domain, and should have the same domain role (recommended member server).
Create a spreadsheet with the network names, IP addresses, and cluster disks that will be used for the administrative cluster and the High Availability “Services and Applications” group or groups that will be deployed in the failover cluster. Each “Services and Applications” group will require a separate network name and IPv4 Address, but if IPv6 is used, the address can be added separately in addition to the IPv4 address or a custom or generic “Services and Applications” group will need to be created. The servers in the cluster must be using DNS for name resolution. All servers in the cluster must be in the same AD domain, and should have the same domain role (recommended member server).
The following list describes the types of clustering options available with SQL Server 2008:
![]() Single-instance failover— In a SQL Server 2008 single-instance failover configuration, the cluster runs a single virtual instance of SQL Server on all nodes in the cluster. Only one node in the cluster can service end users at any one time; this is known as the active node. The passive node, on the other hand, is on standby. If a failure occurs, the clustered resources are shifted to the passive node, which then begins to service clients. In this configuration, one virtual SQL Server instance is configured and shared by one or both nodes.
Single-instance failover— In a SQL Server 2008 single-instance failover configuration, the cluster runs a single virtual instance of SQL Server on all nodes in the cluster. Only one node in the cluster can service end users at any one time; this is known as the active node. The passive node, on the other hand, is on standby. If a failure occurs, the clustered resources are shifted to the passive node, which then begins to service clients. In this configuration, one virtual SQL Server instance is configured and shared by one or both nodes.
![]() Multiple-instance failover— In a multiple-instance failover configuration, each active node runs its own virtual instance of SQL Server. Each instance of SQL Server includes a separate installation of the full service and can be managed, upgraded, and stopped independently. If you want to apply a multiple-instance failover configuration, at least two instances of SQL Server need to be installed on the cluster, and each instance should be configured to run on a certain node as its primary server.
Multiple-instance failover— In a multiple-instance failover configuration, each active node runs its own virtual instance of SQL Server. Each instance of SQL Server includes a separate installation of the full service and can be managed, upgraded, and stopped independently. If you want to apply a multiple-instance failover configuration, at least two instances of SQL Server need to be installed on the cluster, and each instance should be configured to run on a certain node as its primary server.
![]() N+1— This is a deviation of the multiple-instance failover clustering topology just discussed. In this scenario, more than two nodes are configured within the failover cluster solution and share the same failover node in the event of a failure. For example, in a four-node cluster, there may be three active nodes and one passive node. The passive node acts as a hot standby for any or all of the three active nodes. This solution reduces hardware costs because there isn’t a one-to-one mapping between active and passive nodes. However, the major disadvantage is that the passive node must have enough hardware resources to take on the load of all three active nodes if they crash at the same time. The chances of three nodes crashing is highly unlikely; however, in the computer industry, we all know there is a first time for everything.
N+1— This is a deviation of the multiple-instance failover clustering topology just discussed. In this scenario, more than two nodes are configured within the failover cluster solution and share the same failover node in the event of a failure. For example, in a four-node cluster, there may be three active nodes and one passive node. The passive node acts as a hot standby for any or all of the three active nodes. This solution reduces hardware costs because there isn’t a one-to-one mapping between active and passive nodes. However, the major disadvantage is that the passive node must have enough hardware resources to take on the load of all three active nodes if they crash at the same time. The chances of three nodes crashing is highly unlikely; however, in the computer industry, we all know there is a first time for everything.
![]() N+M— Sometimes there is more than one active node in the cluster, so having a single dedicated failover node such as in the N+1 scenario is not sufficient enough to provide redundancy. Therefore, more than one standby node (M) is included in the cluster and available for failover. The number of standby servers is a trade-off between cost and reliability requirements.
N+M— Sometimes there is more than one active node in the cluster, so having a single dedicated failover node such as in the N+1 scenario is not sufficient enough to provide redundancy. Therefore, more than one standby node (M) is included in the cluster and available for failover. The number of standby servers is a trade-off between cost and reliability requirements.
![]() Geographically dispersed clusters— SQL Server 2008 also offers geographically dispersed clusters. This scenario does not require a quorum drive to be configured on a shared disk, thus allowing active and passive nodes to be in separate physical locations. If you want to implement this solution, specific hardware is required from a vendor. This hardware must be certified from the vendor and Microsoft. This is a different list from the Microsoft Clustering HCL. Implementing geographically dispersed clusters is expensive. It is recommended to use database mirroring instead of building a geographical cluster because database mirroring is much cheaper and also provides high availability, seamless failover, and automatic client failover.
Geographically dispersed clusters— SQL Server 2008 also offers geographically dispersed clusters. This scenario does not require a quorum drive to be configured on a shared disk, thus allowing active and passive nodes to be in separate physical locations. If you want to implement this solution, specific hardware is required from a vendor. This hardware must be certified from the vendor and Microsoft. This is a different list from the Microsoft Clustering HCL. Implementing geographically dispersed clusters is expensive. It is recommended to use database mirroring instead of building a geographical cluster because database mirroring is much cheaper and also provides high availability, seamless failover, and automatic client failover.
Note
Server load and performance degradation should be analyzed when working with multiple instances within a single SQL Server failover cluster. You must ensure that the surviving node can handle the load if running more than one SQL Server instance on a single server. This can be achieved by manually tuning processor and memory settings within SQL Server Management Studio.
A discussion on cluster basics is always essential because it can help organizations define a suitable operating system for their business. SQL Server 2008 Enterprise Edition on Windows 2008 Enterprise or Windows 2008 Datacenter Edition can support up to 16 nodes within a single cluster. SQL Server 2008 Standard Edition can support up to 2 nodes. Failover clustering of SQL Server 2008 can be configured in two ways: a single-instance failover configuration or a multiple-instance failover configuration. When using multiple-instance failover clustering, SQL Server 2008 scales up to 50 instances on Enterprise Edition, whereas the Standard Edition supports up to 16.
The SQL Server 2008 Database Engine Services, Analysis Services, and Full-Text Search features are cluster aware. This means that these features can be installed on a failover cluster, they have failover capabilities, and they show up as cluster resources in the Windows Server 2008 Failover Cluster Management console. Unfortunately, Reporting Services and Integration Services are not cluster aware.
Other SQL Server high-availability alternatives can be combined with failover clustering for maximum availability, business continuity, and disaster recovery. For example, CompanyABC may have a two-node failover cluster residing in its Toronto office. This cluster provides high availability for a production database at the server level in that physical location. Regulatory legislation such as the Sarbanes-Oxley Act may have a requirement that CompanyABC maintain a disaster recovery site, and all production databases must be available in another location in the event of a disaster in the Toronto location. Therefore, CompanyABC can implement database mirroring in conjunction with clustering and mirror the production databases from the Toronto location to its disaster recovery location in San Francisco. The production database would be available in San Francisco in the event of the total cluster failure (which is highly unlikely) or in the event that the Toronto site is unavailable.
On a side note, database mirroring is not the only other high-availability alternative that works with failover clustering: Log shipping and replication can also be used.
Some additional elements DBAs should be aware of include enhancements associated with the Quorum models on Windows Server 2008 and the different types of shared storage available when configuring a failover cluster.
As previously stated, Windows Server 2008 failover clusters support four different Cluster Quorum models. Each of these four models is best suited for specific configurations, but if all the nodes and shared storage are configured, specified, and available during the installation of the failover cluster, the best suited Quorum model will be automatically selected.
The Node Majority Quorum model has been designed for Failover Cluster deployments that contain an odd number of cluster nodes. When determining the quorum state of the cluster, only the number of available nodes is counted. A cluster using the Node Majority Quorum is called a Node Majority cluster. A Node Majority cluster will remain up and running if the number of available nodes exceeds the number of failed nodes. As an example, in a five-node cluster, three nodes must be available for the cluster to remain online. If three nodes fail in a five-node Node Majority cluster, the entire cluster will be shut down. Node Majority clusters have been designed and are well suited for geographically or network dispersed cluster nodes, but in order for this configuration to be supported by Microsoft it will take serious effort, quality hardware, a third-party mechanism to replicate any back-end data, and a very reliable network. Again, this model works well for clusters with an odd number of nodes.
The Node and Disk Majority Quorum model determines whether a cluster can continue to function by counting the number of available nodes and the availability of the cluster witness disk. Using this model the cluster quorum is stored on a cluster disk that is accessible and made available to all nodes in the cluster through a shared storage device using SAS, Fibre Channel (FC), or ISCSI connections. This model is the closest to the traditional single-quorum device cluster configuration model and is composed of two or more server nodes that are all connected to a shared storage device. In this model, only one copy of the quorum data is maintained on the witness disk. This model is well suited for failover clusters using shared storage, all connected on the same network with an even number of nodes. For example, on a two-, four-, six-, or eight-node cluster using this model, the cluster will continue to function as long as half of the total nodes are available and can contact the witness disk. In the case of a witness disk failure, a majority of the nodes will need to remain up and running. To calculate this, take half of the total nodes and add one; this will give you the lowest number of available nodes that are required to keep a cluster running. For example, on a six-node cluster using this model, if the witness disk fails, the cluster will remain up and running as long as four nodes are available.
The Node and File Share Majority Quorum model is very similar to the Node and Disk Majority Quorum model, but instead of a witness disk, the quorum is stored on file share. The advantage of this model is that it can be deployed similarly to the Node Majority Quorum model, but as long as the witness file share is available, this model can tolerate the failure of half of the total nodes. This model is well suited for clusters with an even number of nodes that do not utilize shared storage.
The No Majority: Disk Only Quorum model is best suited for testing the process and behavior of deploying built-in or custom services and/or applications on a Windows Server 2008 failover cluster. In this model the cluster can sustain the failover of all nodes except one, as long as the disk containing the quorum remains available. The limitation of this model is that the disk containing the quorum becomes a single point of failure and that is why this model is not well suited for production deployments of failover clusters.
As a best practice, before deploying a failover cluster, determine whether shared storage will be used and verify that each node can communicate with each LUN presented by the shared storage device. When the cluster is created, add all nodes to the list. This will ensure that the correct recommended cluster quorum model is selected for the new failover cluster. When the recommended model utilizes shared storage and a witness disk, the smallest available LUN will be selected. This can be changed if necessary after the cluster is created.
Shared disk storage is a requirement for SQL Server 2008 failover clusters when running on Windows Server 2008 when using the Node and Disk Majority quorum and the Disk Only Quorum models. Shared storage devices can be a part of any cluster configuration and when they are used, the disks, disk volumes, or LUNs presented to the Windows systems must be presented as basic Windows disks.
All storage drivers must be digitally signed and certified for use with Windows Server 2008. Many storage devices certified for Windows Server 2003 may not work with Windows Server 2008 and either simply cannot be used for failover cluster shared storage, or may require a firmware and driver upgrade to be supported. One main reason for this is that all failover shared storage must comply with SCSI-3 Architecture Model SAM-2. This includes any and all legacy and serial attached SCSI controllers, Fibre Channel host bus adapters, and ISCSI hardware- and software-based initiators and targets. If the cluster attempts to perform an action on an LUN or shared disk and the attempt causes an interruption in communication to the other nodes in the cluster or any other system connected to the shared storage device, data corruption can occur and the entire cluster and each SAN-connected system may lose connectivity to the storage.
When LUNS are presented to failover cluster nodes, each LUN must be presented to each node in the cluster. Also, when the shared storage is accessed by the cluster and other systems, the LUNs must be masked or presented only to the cluster nodes and the shared storage device controllers to ensure that no other systems can access or disrupt the cluster communication.
There are strict requirements for shared storage support, especially with failover clusters. Storage Area Networks (SANs) or other types of shared storage must meet the following list of requirements:
![]() All Fibre Channel, SAS, and ISCSI host bus adapters (HBAs) and Ethernet cards used with ISCSI software initiators must have obtained the “Designed for Microsoft Windows” logo for Windows Server 2008 and have suitable signed device drivers.
All Fibre Channel, SAS, and ISCSI host bus adapters (HBAs) and Ethernet cards used with ISCSI software initiators must have obtained the “Designed for Microsoft Windows” logo for Windows Server 2008 and have suitable signed device drivers.
![]() SAS, Fibre Channel, and ISCSI HBAs must use Storport device drivers to provide targeted LUN resets and other functions inherent to the Storport driver specification. SCSIport drivers were at one point supported for two-node clusters, but if a Storport driver is available it should be used, to ensure support from the hardware vendors and Microsoft.
SAS, Fibre Channel, and ISCSI HBAs must use Storport device drivers to provide targeted LUN resets and other functions inherent to the Storport driver specification. SCSIport drivers were at one point supported for two-node clusters, but if a Storport driver is available it should be used, to ensure support from the hardware vendors and Microsoft.
![]() All shared storage HBAs and back-end storage devices including ISCSI targets, Fibre Channel, and SAS storage arrays must support SCSI-3 standards and must also support persistent bindings or reservations of LUNs.
All shared storage HBAs and back-end storage devices including ISCSI targets, Fibre Channel, and SAS storage arrays must support SCSI-3 standards and must also support persistent bindings or reservations of LUNs.
![]() All shared storage HBAs must be deployed with matching firmware and driver versions. Failover clusters using shared storage require a very stable infrastructure, and applying the latest storage controller driver to an outdated HBA firmware can cause a very undesirable situation and may disrupt access to data.
All shared storage HBAs must be deployed with matching firmware and driver versions. Failover clusters using shared storage require a very stable infrastructure, and applying the latest storage controller driver to an outdated HBA firmware can cause a very undesirable situation and may disrupt access to data.
![]() All nodes in the cluster should contain the same HBAs and use the same version of drivers and firmware. Each cluster node should be an exact duplicate of each other node when it comes to hardware selection, configuration, drivers, and firmware revisions. This allows for a more reliable configuration and simplifies management and standardization.
All nodes in the cluster should contain the same HBAs and use the same version of drivers and firmware. Each cluster node should be an exact duplicate of each other node when it comes to hardware selection, configuration, drivers, and firmware revisions. This allows for a more reliable configuration and simplifies management and standardization.
![]() When ISCSI software initiators are used to connect to ISCSI software-or hardware-based targets, the network adapter used for ISCSI communication must be connected to a dedicated switch, cannot be used for any cluster communication, and cannot be a teamed network adapter.
When ISCSI software initiators are used to connect to ISCSI software-or hardware-based targets, the network adapter used for ISCSI communication must be connected to a dedicated switch, cannot be used for any cluster communication, and cannot be a teamed network adapter.
![]() For ISCSI shared storage, configure an additional, dedicated network adapter or hardware-based ISCSI HBA.
For ISCSI shared storage, configure an additional, dedicated network adapter or hardware-based ISCSI HBA.
![]() Configure all necessary IPv4 and IPv6 addresses as static configurations. DHCP is supported but not recommended.
Configure all necessary IPv4 and IPv6 addresses as static configurations. DHCP is supported but not recommended.
![]() Verify that any and all HBAs and other storage controllers are running the proper firmware and matched driver version suitable for Windows Server 2008 failover clusters.
Verify that any and all HBAs and other storage controllers are running the proper firmware and matched driver version suitable for Windows Server 2008 failover clusters.
![]() If shared storage will be used, plan to utilize at least two separate LUNs, one to serve as the witness disk and the other to support DTC.
If shared storage will be used, plan to utilize at least two separate LUNs, one to serve as the witness disk and the other to support DTC.
![]() Ensure that proper LUN masking and zoning has been configured at the FC or Ethernet switch level for FC or ISCSI shared storage communication, suitable for failover clustering. Each node in the failover cluster, along with the HBAs of the shared storage device should have exclusive access to the LUNs presented to the failover cluster.
Ensure that proper LUN masking and zoning has been configured at the FC or Ethernet switch level for FC or ISCSI shared storage communication, suitable for failover clustering. Each node in the failover cluster, along with the HBAs of the shared storage device should have exclusive access to the LUNs presented to the failover cluster.
![]() If multiple HBAs will be used in each failover node or in the shared storage device, ensure that a suitable Multipath I/O driver has been installed. The Microsoft Windows Server 2008 Multipath I/O feature can be used to provide this function if approved by the HBA, the switch and storage device vendors, and Microsoft.
If multiple HBAs will be used in each failover node or in the shared storage device, ensure that a suitable Multipath I/O driver has been installed. The Microsoft Windows Server 2008 Multipath I/O feature can be used to provide this function if approved by the HBA, the switch and storage device vendors, and Microsoft.
![]() Shut down all nodes except one and on that node, configure the shared storage LUNS as Windows basic disks, format as a single partition/volume for the entire span of the disk, and define an appropriate drive letter or mount point and volume label. Shut down the node used to set up the disks, bring each other node up one at a time, verify that each LUN is available, and if necessary configure the appropriate drive letter if it does not match what was configured on the first node.
Shut down all nodes except one and on that node, configure the shared storage LUNS as Windows basic disks, format as a single partition/volume for the entire span of the disk, and define an appropriate drive letter or mount point and volume label. Shut down the node used to set up the disks, bring each other node up one at a time, verify that each LUN is available, and if necessary configure the appropriate drive letter if it does not match what was configured on the first node.
![]() As required, test Multipath I/O for load balancing and/or failover using the appropriate diagnostic or monitoring tool to ensure proper operation on each node one at a time.
As required, test Multipath I/O for load balancing and/or failover using the appropriate diagnostic or monitoring tool to ensure proper operation on each node one at a time.
The final topic for storage that a DBA must fully understand is the different types of storage associated with Windows Server 2008. The storage items consist of:
![]() SAS (Serial Attached SCSI) Storage Arrays
SAS (Serial Attached SCSI) Storage Arrays
![]() Fibre Channel Storage Arrays
Fibre Channel Storage Arrays
![]() ISCSI Storage
ISCSI Storage
![]() Multipath I/O
Multipath I/O
SAS (Serial Attached SCSI) disks are one of the newest additions to the disk market. SAS storage arrays can provide organizations with affordable entry-level hardware-based Direct Attached Storage arrays suitable for Windows Server 2008 clusters. SAS storage arrays commonly are limited to four hosts, but some models support extenders to add additional hosts as required. One of the major issues not with SAS but with Direct Attached Storage is that replication of the data within the storage is usually not achievable without involving one of the host systems and software.
Using Fibre Channel (FC) HBAs, Windows Server 2008 can access both shared and nonshared disks residing on a SAN connected to a common FC Switch. This allows both the shared storage and operating system volumes to be located on the SAN, if desired, to provide diskless servers. In many cases, however, diskless storage may not be desired if the operating system performs many paging actions as the cache on the storage controllers can be used up very fast and can cause delay in disk read and write operations for dedicated cluster storage. If this is desired, however, the SAN must support this option and be configured to present the operating system dedicated LUNs to only a single host exclusively. The LUNs defined for shared cluster storage must be zones and presented to every node in the cluster, and no other systems. The LUN zoning or masking in many cases is configured on the Fibre Channel switch that connects the cluster nodes and the shared storage device. This is a distinct difference between Direct Access Storage and FC or ISCSI share storage. Both FC and ISCSI require a common Fibre Channel or Ethernet switch to establish and maintain connections between the hosts and the storage.
A properly configured FC zone for a cluster will include the World Wide Port Number (WWPN) of each cluster host’s FC HBAs and the WWPN of the HBA Controller(s) from the shared storage device. If either the server or the storage device utilize multiple HBAs to connect to a single or multiple FC switches to provide failover or load-balancing functionality, this is known as Multipath I/O and a qualified driver for MPIO management and communication must be used. Also, the function of either MPIO failover and/or MPIO load balancing must be verified as approved for Windows Server 2008. Consult the shared storage vendor including the Fibre Channel switch vendor for documentation and supported configurations, and check the cluster HCL on the Microsoft website to find approved configurations.
When organizations want to utilize ISCSI storage for Windows Server 2008 failover clusters, security and network isolation is highly recommended. ISCSI utilizes an initiator or the host that requires access to the LUNs or ISCSI targets. Targets are located or hosted on ISCSI target portals. Using the Target Portal interface, the target must be configured to be accessed by multiple initiators in a cluster configuration. Both the ISCSI initiators and target portals come in software- and hardware-based models, but both models utilize IP networks for communication between the initiators and the targets. The targets will need to be presented to Windows as a basic disk. When standard network cards will be used for ISCSI communication on Windows Server 2008 systems, the built-in Windows Server 2008 ISCSI Initiator can be used, provided that the ISCSI target can support the authentication and security options provided, if used.
Regardless of the choice of the Microsoft ISCSI initiator, software-based or hardware-based initiators or targets, ISCSI communication should be deployed on isolated network segments and preferably dedicated network switches. Furthermore, the LUNs presented to the failover cluster should be masked from any systems that are not nodes participating in the cluster by using authentication and IPSec communication as possible. Within the Windows Server 2008 operating system, the ISCSI HBA or designated network card should not be used for any failover cluster configuration and cannot be deployed using network teaming software, or it will not be supported by Microsoft.
Hopefully by now it is very clear that Microsoft only wants to support organizations that deploy failover clusters on tested and approved entire systems, but in many cases, failover clusters can still be deployed and can function as the Create a Cluster Wizard will allow a cluster to be deployed that is not in a supported configuration.
Windows Server 2008 supports Multipath I/O to external storage devices such as SANs and ISCSI targets when multiple HBAs are used in the local system or by the shared storage. Multipath I/O can be used to provide failover access to disk storage in case of a controller or HBA failure, but some drivers also support load balancing across HBAs in both stand-alone and failover cluster deployments. Windows Server 2008 provides a built in Multipath I/O driver that can be leveraged when the manufacturer conforms to the necessary specifications to allow for the use of this built in driver.
The Volume Shadow Copy Service (VSS) is supported on shared storage volumes. Volume Shadow Copy can take a point-in-time snapshot of an entire volume, enabling administrators and users to recover data from a previous version. Furthermore, failover clusters and the entire Windows Backup architecture utilize VSS to store backup data. Many of today’s services and applications that are certified to work on Windows Server 2008 failover clusters are VSS compliant, and careful choice and consideration should be made when choosing an alternative backup system, unless the system is provided by the shared storage manufacture and certified to work in conjunction with VSS, Windows Server 2008, and the service or application running on the failover cluster.
Based on the previous sections in this chapter, there are a tremendous number of prerequisites that must be configured from a hardware perspective before we can start the implementation of a single-instance SQL Server 2008 failover cluster. When the prerequisite tasks are completed, the Windows Server 2008 Failover Cluster feature can be installed. SQL Server 2008 failover clusters are deployed using a series of high-level steps:
![]() Configure the shared storage for the failover cluster.
Configure the shared storage for the failover cluster.
![]() Install the Failover Cluster feature.
Install the Failover Cluster feature.
![]() Run the Validate Cluster Configuration Wizard.
Run the Validate Cluster Configuration Wizard.
![]() Create the Windows Server 2008 failover cluster.
Create the Windows Server 2008 failover cluster.
![]() Implement DTC (depending on which features will be installed).
Implement DTC (depending on which features will be installed).
![]() Install the first SQL Server 2008 failover cluster node.
Install the first SQL Server 2008 failover cluster node.
![]() Add additional SQL Server 2008 failover cluster nodes.
Add additional SQL Server 2008 failover cluster nodes.
The following example illustrates the implementation of a two-node single-instance SQL Server 2008 failover cluster running on Windows Server 2008 Enterprise Edition for a fictitious organization called CompanyABC.
Note
Tables 12.1 and 12.2 and Figure 12.1 depict the layout of the failover cluster including settings that will be used for this example, “Implementing a Single-Instance SQL Server 2008 Failover Cluster” and the upcoming example, “Implementing a Multiple-Instance SQL Server 2008 Failover Cluster.”
The values in the table include the cluster node names, drives, IP addresses, network card, and NetBIOS information used for this example in this chapter.
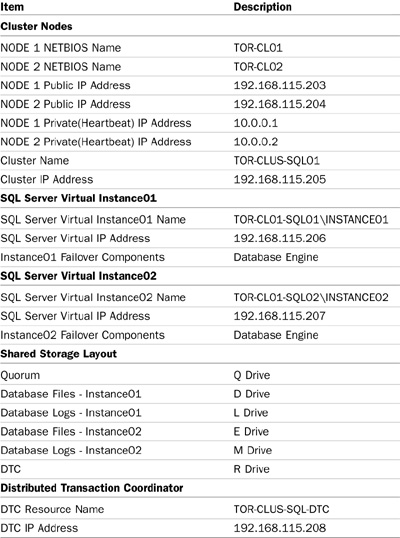
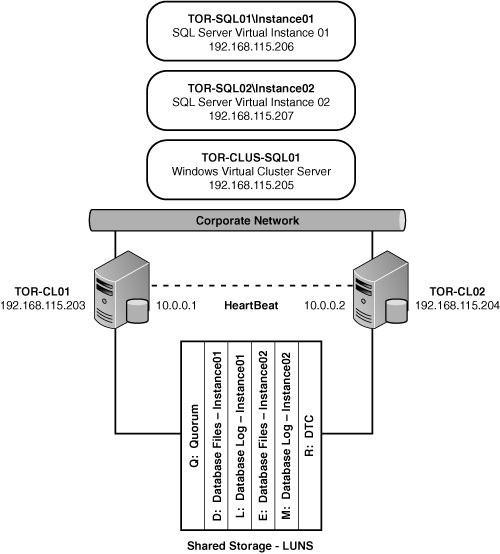
Using the information in Table 12.1 and Figure 12.1, you can now turn your attention to preparing the operating system and configuring the Windows Server 2008 failover cluster.
For this example, creating a SQL Server 2008 single-instance failover cluster starts out with a standard installation of Windows Server 2008, Enterprise or Datacenter Edition. Follow these steps to build the operating system based on the assumption that Windows Server 2008 Enterprise Edition will be leveraged:
1. For each node in the two-node cluster, install Windows Server 2008 Enterprise Edition. Use the typical settings when setting up Windows Server 2008.
2. Join the nodes to an Active Directory domain that will host the SQL Cluster such as CompanyABC.
3. Create a heartbeat network between the two nodes by addressing a network interface card (NIC) on a different IP space from the production network. Isolate these heartbeat NICs to an isolated VLAN or a separate network switch or use a crossover cable. This network will be used by the cluster nodes to communicate with each other. For this example, use the IP addresses based on the values in Table 12.1—10.0.0.1 for node 1 and 10.0.0.2 for node 2. Disable NetBIOS on the heartbeat adapters. Ensure the public network card is the first in the network binding order.
4. Install the latest Windows service packs and hotfixes.
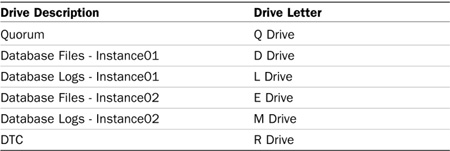
The next step in the process is configuring the shared storage for the failover cluster. In the case of a two-node single-instance failover cluster, you need to configure several shared drives to be accessible by both nodes. These drives include the quorum drive, the DTC drive, 2x database drives and 2x log drives, as shown in Table 12.2.
Tip
When running Windows Server 2008, it is possible to create a MS DTC resource for each cluster group within the failover cluster. This strategy prevents performance degradation and isolation for disparate applications within multiple cluster groups in the failover cluster. It is still recommended that the DTC resource should be placed on its own shared disk.
After the shared storage has been presented to the nodes in the failover cluster, it is necessary to initialize and format the disk using the Disk Management snap-in in Windows Server 2008.
1. Open the Disk Management snap-in by choosing Start, All Programs, Administrator Tools, and Server Manager.
2. In Server Manager, expand the Storage icon and then select Disk Management.
3. Most likely the shared disks will be offline and are required to be in an online state in order to initialize them. Therefore, right-click each shared disk and select Online.
4. When the shared disks are online, right-click each shared disk and initialize them.
5. In the Initialize Disk dialog box, select the disks to initialize and select the partition style to use, either master boot record (MBR) or GUID partition table (GPT), and then click OK.
Note
A GPT disk takes advantage of a GUID partition table disk partitioning system. GPT disks allow up to 128 partitions per disk, volume sizes of over 2 terabytes, and in general are more reliable and scalable. MBR, which is the traditional partition style, has a limitation of four primary partitions and a maximum size of 2 terabytes.
6. The disks that are initialized as basic disks, however, show up as unallocated. On each shared disk, create a new simple volume, specify a volume size, assign a drive letter, and format the drive with NTFS. Be sure to create them as primary partitions, and do not convert the disks to dynamic disks. For this example, the disk configuration is based on Table 12.2 and Figure 12.2.
Now that the nodes are prepared and the shared storage is created, initialized, and formatted, the Windows Server 2008 failover cluster can be formed. Be sure to have the following items ready for the cluster configuration: unique names for each node, unique name for the cluster identity, unique name for each SQL Server instance, and unique IP addresses for each of the names created previously. The following steps should be conducted in the order presented.
With Windows Server 2008, the Failover Cluster feature is no longer installed by default. Before a failover cluster can be deployed, the necessary feature must be installed. To install the Failover Cluster feature, perform the following steps on a Windows Server 2008 node:
1. Log on to the Windows Server 2008 cluster node with an account with administrator privileges.
2. Click Start, All Programs, Administrative Tools, and then select Server Manager.
3. When Server Manager opens, in the Tree pane select the Features node.
4. In the Tasks pane, select the Add Features link.
5. In the Add Features window, select Failover Clustering and click Install.
6. When the installation completes, click the Close button to complete the installation and return to Server Manager.
7. Close Server Manager and install the Failover Cluster feature on each of the remaining cluster nodes.
Failover Cluster Management is the new MMC Snap-in used to administer the Failover Cluster feature. After the feature is installed, the next step is to run the Validate a Configuration Wizard from the Tasks pane of the Failover Cluster Management console. All nodes should be up and running when the wizard is run. To run the Validate a Configuration wizard, perform the following steps:
1. Log on to one of the Windows Server 2008 cluster nodes with an account with administrator privileges over all nodes in the cluster.
2. Click Start, All Programs, Administrative Tools, and then select Failover Cluster Management.
3. When the Failover Cluster Management console opens, click the Validate a Configuration link in the Actions pane.
4. When the Validate a Configuration wizard opens, click Next on the Before You Begin page.
5. In the Select Servers or a Cluster page, enter the name of a cluster node and click the Add button. Repeat this process until all nodes are added to the list. For this example TOR-CL01 and TOR-CL02 were specified. Click Next to continue.
6. In the Testing Options page, read the details that explain the requirements for all tests to pass in order to be supported by Microsoft. Select the Run All Tests (Recommended) radio button and click Next to continue.
7. In the Confirmation page, review the list of servers that will be tested and the list of tests that will be performed, and click Next to begin testing the servers.
8. When the tests complete, the Summary window will display the results and whether the tests passed. Click Finish to complete the Validate a Configuration wizard. If the test failed, click the View Report button to review the details of the results and determine which test failed and why the test failed.
Note
Disks Even if the Validate a Configuration wizard does not pass every test, depending on the test, creating a cluster may still be possible. After the Validate a Configuration wizard is completed successfully, the cluster can be created.
Caution
You may stumble upon an error indicating that duplicate IP addresses were found on the Teredo Tunneling Pseudo-Interface network adapters among both nodes within the cluster. This error message is not accurate, but it will prevent you from going ahead and installing the failover cluster. The workaround is to disable the Teredo driver in Windows Server 2008 Device Manager on all nodes within the cluster.
When the Windows Server 2008 Failover Cluster is first created, all nodes in the cluster should be up and running. The exception to that rule is when failover clusters utilize direct attached storage such as Serial Attached SCSI devices that require a process of creating the cluster on a single node and adding other nodes one at a time. For clusters that will not use shared storage or clusters that will connect to shared storage using ISCSI or Fibre Channel connections, all nodes should be powered on during cluster creation. To create the failover cluster, perform the following steps:
1. Log on to one of the Windows Server 2008 cluster nodes with an account with administrator privileges over all nodes in the cluster.
2. Click Start, All Programs, Administrative Tools, and then select Failover Cluster Management.
3. When the Failover Cluster Management console opens, click the Create a Cluster link in the Actions pane.
4. When the Create Cluster Wizard opens, click Next on the Before You Begin page.
5. In the Select Servers page, enter the name of each cluster node and click Add. When all the nodes are listed, click the Next button to continue.
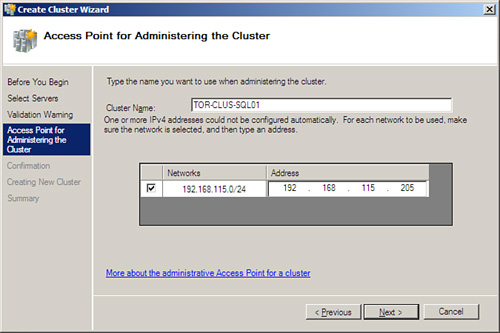
6. In the Access Point for Administering the Cluster page, type the name of the cluster (TOR-CLUS-SQL01), specify the IPv4 address (192.168.115.205), and click Next, as shown in Figure 12.2.
7. On the Confirmation page, review the settings and click Next to create the cluster.
8. On the Summary page, review the results of the cluster creation process and click Finish to return to the Failover Cluster Management console. If there are any errors, click the View Report button to reveal the detailed cluster creation report.
9. Back in the Failover Cluster Management console, select the cluster name in the Tree pane. In the Tasks pane review the configuration of the cluster.
10. In the Tree pane, select and expand the Nodes folder to list all of the cluster nodes.
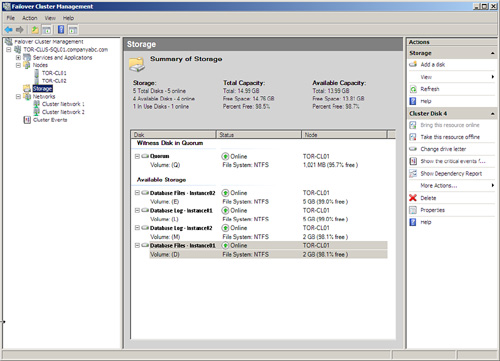
11. Select Storage and review the cluster storage in the Tasks pane listed under Summary of Storage, as shown in Figure 12.3.
12. Expand Networks in the Tree pane to review the list of networks. Select each network and review the names of the adapters in each network.
13. When you have completed reviewing the cluster, close the Failover Cluster Management console and log off the cluster node.
After the cluster is created, additional tasks should be performed before any Services and Application groups are created using the High Availability Wizard. These tasks can include, but may not require, customizing the cluster networks, adding storage to the cluster, adding nodes to the cluster, changing the cluster Quorum model, and installing DTC.
As discussed earlier in the chapter, DTC is required as a prerequisite for installing SQL clustering. To create the DTC resource, follow these steps:
1. In Failover Cluster Management, expand the failover cluster created in the previous steps and then expand the Services and Applications node.
2. In the Actions pane, double-click Configure a Service or Application.
3. Read the information presented on the Before You Begin page and then click Next.
4. On the Select Service or Application page, select Distributed Transaction Coordinator (DTC) and then click Next.
5. On the Client Access Point page, specify a name for the DTC service and then a dedicated IP Address. For this example, the DTC name is TOR-CLUS-SQL-DTC and the IP Address is 192.168.115.208. Click Next to continue.
6. The next page is Select Storage. On this page, select the storage volume that you want to assign to the DTC clustered resource. For this example, use the DTC drive, which is the letter R. Click Next to continue.
7. Review the settings on the confirmation page, and then click Next.
8. Review the progress bar on the Configure High Availability page, then view the status on the installation on the Summary page and click Finish.
Follow the next set of steps to install failover clustering for the first virtual instance of SQL Server 2008. The features installed for this virtual instance are strictly for the Database Engine. These steps should be conducted on the first node of the Windows Cluster. The installation steps are based on the examples provided in Figure 12.1. Validate that the first node (TOR-CL01) is the owner for all cluster resources and then do the following:
1. Log into the first node with administrative privileges and insert the SQL Server 2008 media. Autorun should launch the SQL Server 2008 Installation Center landing page; otherwise, click Setup.exe.
Note
If SQL Server’s setup software prerequisites have not been met, the installation wizard will prompt, and then install the prerequisites. After the prerequisites have been installed, the SQL Server installation process will resume. SQL Server 2008 software prerequisites may include .NET framework 3.5 and the latest Windows Installer, version 4.5. In addition, system restarts may be required after SQL Server’s setup software prerequisites are installed. If so, rerun setup after the reboot to continue with the SQL Server installation.
2. To install a single-node SQL Server failover cluster, on the SQL Server Installation Center screen, first click the Installation link, and then New SQL Server Failover Cluster Installation, as illustrated in Figure 12.4.

3. On the Setup Support Rules page, review the outcome of the System Configuration Checker. Ensure that all tests associated with the operation passed without any failures, warnings, or skipped elements. Alternatively, you can review a standard or comprehensive report by selecting the Show Details button or View Detailed Report. To continue with the installation, click OK.
4. On the Product Key page, enter the SQL Server Product Key and click Next.
5. On the License Agreement page, Accept the Licensing Terms, and then click Next.
6. On the Setup Support Files screen, the wizard will prompt if additional setup support files are required for the failover cluster installation. If additional files are required, review the status of the files required and click Install.
7. The Setup Support Rules page will be displayed again and will identify any outstanding items that may hinder the installation process associated with the SQL Server failover cluster. Review and correct failures and warnings before commencing the installation. If failures are not displayed, then click Next to start the installation.
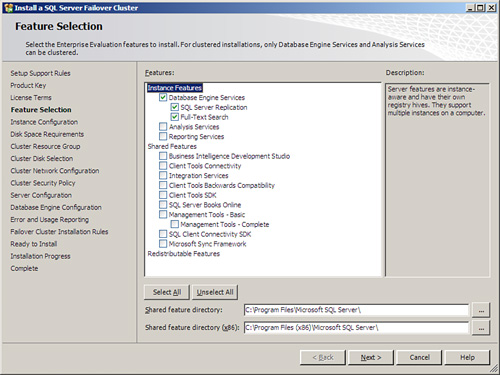
8. On the Feature Selection page, select the desired clustered components and features to install. Then specify the installation path for the Shared Feature Directory and Shared Feature Directory (x86) folders. Click Next to continue as displayed in Figure 12.5. For this example, the Database Engine Services component, SQL Server Replication, and Full-Text Search features were selected.
Note
Only the Database Engine Services and Analysis Services features are failover-cluster aware. In addition, if you want to install SSMS, select Management Tools in the Shared Features options.
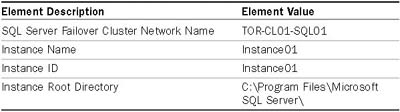
9. On the Instance Configuration page, specify the SQL Server Failover Cluster Network Name, Instance Name, and Instance ID for the SQL Server failover cluster instance. In addition, provide the path for the Instance Root Directory, and then click Next. For this example, the items specified in the Instance Configuration page are based on Table 12.3.
10. The next page is the Disk Space Requirements. Review the disk space summary for the SQL Server components and features selected and then click Next.
11. On the Cluster Resource Group page, specify a name for the new SQL Server resource group, and then click Next. The resource group is where the SQL Server virtual resources will be placed. This page also displays existing cluster resource groups installed within the failover cluster.
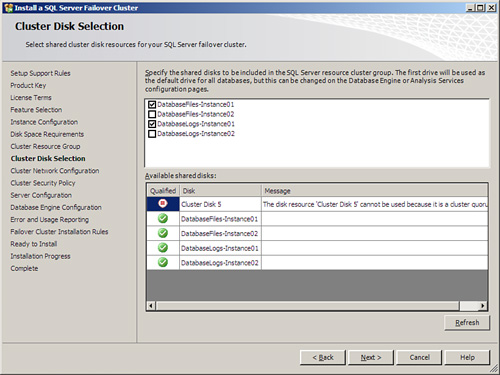
12. Now you must specify the shared cluster disks that will be used with the new SQL Server failover cluster installation. For this example, the DatabaseFiles-Instance-01 and DatabaseLogs-Instance01 shared disks will be used. Click Next to continue as displayed in Figure 12.6.
NOTE
By default, the first available disk located in the Available Shared Disks section will be selected for the installation. However, you can change this by specifying an alternative shared disk. Also, any disks already associated to another service or application, such as the quorum, will be unavailable.
13. A SQL Server 2008 failover cluster on Windows Server 2008 supports both IPv4 and IPv6. On the Cluster Network Configuration page, first indicate which IP Type will be utilized; IPv4 and/or IPv6 and then enter a virtual IP address and subsequent Subnet Mask, and then Click Next. For this example, the IP address of 192.168.115.206 with a subnet mask of 255.255.255.0 was used.
Tip
When you’re entering network configuration settings on a SQL Server 2008 cluster running Window Server 2008, it is possible to obtain a dynamic IP address via DHCP for the virtual instance. Using DHCP addresses for mission-critical services is not an industry best practice, hence not recommended.
14. On the Cluster Security Policy page, select the option to use either Service SIDs or Domain Groups; Service SIDs is recommended when using Windows Server 2008. If the Domain Groups option is selected, an already created domain group must be entered for each SQL Server service presented on this screen. Click Next to continue.
Note
During a SQL Server installation, SQL Server Setup creates a service group for each feature of SQL Server being installed. When running Windows Server 2008, it is possible to leverage service SIDs instead of creating predefined Service Account groups in Active Directory, which was a requirement of Windows Server 2003. When using service SIDs with Windows Server 2008, a higher level of service isolation is achieved as the service SID is added to the local security group instead of the SQL Server service account.
15. On the Collation tab, enter the desired collation option for the Database Engine. It is possible to change default collation settings used by the Database Engine and Analysis Services for language and sorting by selecting Customize. Click Next to continue.
16. The Database Engine Configuration page consists of three tabs: Account Provisioning, Data Directories, and FILESTREAM.
a. On the first tab, in the Account Provisioning section, specify the Authentication Mode, which consists of either Windows Authentication Mode or Mixed Mode (SQL Server authentication and Windows authentication). If Mixed Mode is selected, enter and confirm the password for the Built-in SQL Server administrator account. The next step is to provision a SQL Server Administrator by either selecting the option Add Current User or clicking Add and specifying a SQL Server administrator account.
Note
From a hardening perspective, Microsoft recommends entering a separate service account for each SQL Server component and feature being installed. In addition, the account specified should follow the principle of least privilege. For more information on selecting the desired service account, and hardening a SQL Server implementation, reference Chapter 8, “Hardening a SQL Server Implementation.”
b. The second tab, Data Directories, located on the Database Engine Configuration page, is used for specifying the location of the default directories associated with the installation of this SQL Server instance. The directories include: Data Root Directory, System Database Directory, User Database Directory, User Database Log Directory, TempDB Directory, Temp DB Log Directory, and Backup Directory. Either maintain the default directories or specify a new directory residing on the shared disks.
Tip
Because I/O to log files is sequential and I/O to database files is random, it is a best practice for increased performance to place log files on separate disks from database files. In addition, placing the tempdb on its own disk also bolsters performance. Because this is a failover cluster configuration, all disks need to be shared disks—accessible by both nodes in the cluster.
c. The final tab on the Database Engine Configuration page is FILESTREAM. Here, decide whether or not you want to enable FILESTREAM. If FILESTREAM is enabled, additional parameters must be entered such as Enable FILESTREAM for File I/O Streaming Access, Windows Share Name, and whether or not to allow remote clients to have streaming access to FILESTREAM data. Click Next to proceed. When working with clustering, FILESTREAM filegroups must be placed on shared disks with a cluster. In addition, FILESTREAM must be enabled on each node in the cluster.
17. On the Error and Usage Reporting page, help Microsoft improve SQL Server features and services by sending error reports and feature usage to Microsoft. Specify the level of participation, and then click Next.
18. The final check will take place to ensure that the failover cluster installation will not be blocked. On the Upgrade Installation Rules, review for any outstanding errors or warnings and then click Next to continue.
19. Before commencing the SQL Server 2008 failover installation, review the features to be upgraded on the Ready to Install page, and then click Install.
Note
If you need to review the installation and configuration logs after the installation is complete, please note the location of this file and path.
20. When the installation process starts, you can monitor its progress accordingly. When the installation setup completes, review the success status based upon each SQL Server Failover Cluster feature and then click Next.
21. On the Complete page, review the location of the SQL Server summary upgrade log file and additional items that can be found in the supplemental information section. Click Close to finalize the installation.
These steps conclude the installation of the first node associated with the single-instance failover cluster. As mentioned earlier, the SQL Server failover cluster installation is no longer a single-step process as the installation process is now on a per-node basis. Therefore, in order to finalize the SQL Server failover cluster, the steps in the following section must be completed and repeated for every additional nodes within the cluster.
Based on conducting the steps in the previous section, we have successfully established the first node associated with the SQL Server 2008 failover cluster for TOR-CL01-SQL01Instance01. As mentioned earlier, the failover clustering installation process in SQL Server 2008 has changed significantly. Each node within the cluster is a peer and completely independent of each other. Therefore, we now have to conduct the following steps to add additional nodes to the existing failover cluster configuration.
Note
The steps are very similar to adding the first node in the SQL Server 2008 failover cluster; however, the major difference is that you select the option Add Node to a SQL Server Failover Cluster instead of New SQL Server Failover Cluster Installation on SQL Server Installation Center.
1. Log in to the second node with administrative privileges and insert the SQL Server 2008 media. Autorun should launch the SQL Server 2008 Installation Center landing page; otherwise, click Setup.exe.
2. To install the additional node into the SQL Server failover cluster, on the SQL Server Installation Center page, first click the Installation link, and then Add Node to a SQL Server Failover Cluster.
3. On the Setup Support Rules page, review the outcome of the System Configuration Checker. Ensure that all tests associated with the operation passed without any failures, warnings, or skipped elements. Alternatively, you can review a standard or comprehensive report by selecting the Show Details button or View Detailed Report. To continue with the installation, click OK.
4. On the Product Key page, enter the SQL Server Product Key, and click Next.
5. On the License Agreement page, accept the Licensing Terms, and then click Next.
6. On the Setup Support Files page, the wizard will prompt if additional setup support files are required for the installation. If additional files are required, review the status of the files required and click Install.
7. The next page, Setup Support Rules, will identify any outstanding items that may hinder the installation process associated with the SQL Server cluster. Review and correct failures and click Next.
8. The Cluster Node Configuration page is now invoked. Use the drop-down box and select the name of the SQL Server instance name to join. The Name field of this node text box is prepopulated with the name of the associated node from which the installation is being conducted. For this example, use TOR-CL01-SQL01Instance01. Click Next, as displayed in Figure 12.7.
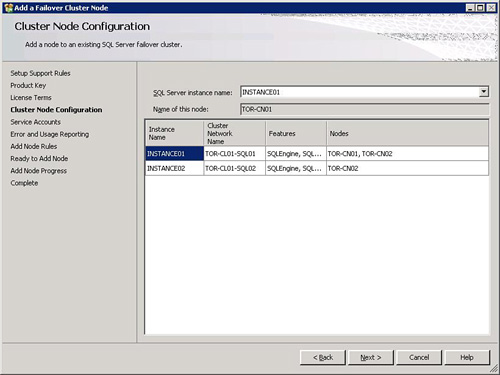
9. On the Service Accounts page, specify the password for the accounts associated with each service, and then click Next.
10. On the Error and Usage Reporting page, help Microsoft improve SQL Server features and services by sending error reports and feature usage to Microsoft. Specify the level of participation, and then click Next.
11. Setup will run a final set of rules to ensure that the Add Node process will not be blocked. To continue, Click Next on the Add Node Rules page.
12. Before adding the node to the existing failover cluster, in the Read to Add Node page, review the components and features that will be installed and click Next.
13. Review the progress of the installation on the Add Node Progress page, and then click Next to finalize the installation.
14. On the final page, Complete, information about the setup operation, the location of the summary log file, and the next steps is presented. Review this information, and then click Close to exit the SQL Server Installation Wizard.
15. Repeat steps 1 to 13 if additional nodes exist within the SQL Server failover Configuration.
One of the challenges that many DBAs face is understanding the concept of how to employ a multiple-instance SQL Server 2008 failover cluster. Implementing a multiple-instance failover cluster is as simple as creating a single-instance failover cluster; however, the new instance requires a dedicated SQL server name, instance name, instance ID, IP address, and shared cluster disks.
When working with multiple-instance configurations, it is also beneficial to configure the preferred node settings in Failover Cluster Management for maximum performance. For example, Instance01 would be operating on Node1 and Instance02 would be operating on Node2.
Note
Before installing additional instances onto a failover cluster, ensure that the first instance has been successfully established by following the steps in the previous sections. The steps include “Installing the First Node in the Single-Instance SQL Server 2008 Failover Cluster” and “Installing Additional Nodes in the Single-Instance SQL Server 2008 Failover Cluster.”
The following example illustrates the implementation of a multiple-instance SQL Server 2008 failover cluster implementation using Windows Server 2008 Enterprise Edition for CompanyABC. This example is based upon implementing the second instance, TOR-SQL02Instance02, for the fictitious organization ABC. The example is also depicted in Figure 12.1 and uses the data found in Table 12.1, specifically items associated with the SQL Server Virtual Instance02.
In order to start, a single-instance failover cluster that has already been established by following the preceding steps must exist. In addition, ensure that the additional shared cluster drives E and M are present within Failover Cluster Management before starting.
Using the information in Figure 12.1 and Table 12.1, you can now turn your attention to the following steps to install the first node in the multiple-instance SQL Server 2008 failover cluster.
To employ a multiple-instance failover configuration, follow the 21 steps in the section “Installing the First Node in the Single-Instance SQL Server 2008 Failover Cluster;” to be steps 9, 11, 12, and 13 with the following alternatives.
1. On the Instance Configuration page, which was step 9, specify the SQL Server Failover Cluster Network Name, Instance Name, and Instance ID for the new SQL Server failover cluster instance based on the values in Table 12.4. In addition, provide the path for the Instance Root Directory, and then click Next.
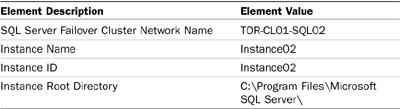
2. On the Cluster Resource Group page, which was step 11, specify a unique name for the new SQL Server resource group (TOR-CL01-SQL02Instance02), and then click Next. The cluster resource group is where the new SQL Server virtual resources associated with Instance02 will be placed. This page also displays existing cluster resource groups installed within the failover cluster. Click Next as illustrated in Figure 12.8.
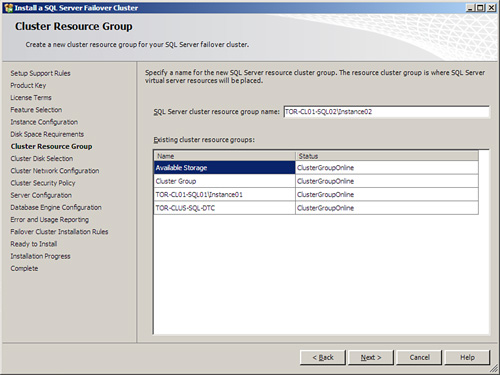
3. On the Cluster Disk Selection page, which was formerly step 12, specify the shared cluster disks to be included in the SQL Server resource cluster group associated with the new multiple-instance SQL Server failover cluster installation. For this example, the DatabaseFiles-Instance-02 and DatabaseLogs-Instance02 shared disks will be used. Click Next to continue as displayed in Figure 12.9.
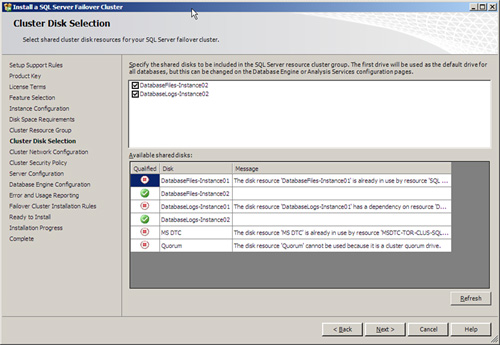
4. On the Cluster Network Configuration page, which was step 13, first indicate which IP Type will be utilized; IPv4 and/or IPv6 and then enter a virtual IP address and subsequent subnet mask. For this example, the IP address of 192.168.115.207 with a subnet mask of 255.255.255.0 was used. Click Next.
Finalize the remainder of the steps to complete the installation of the first node associated with the new multiple-instance failover cluster called TOR-CL01-SQL02INSTANCE02.
Conduct the following steps in order to finalize the additional nodes associated with the multiple-instance SQL Server 2008 failover cluster TOR-CL01-SQL02Instance02.
1. Follow the 14 steps in the section “Installing Additional Nodes in the Single-Instance SQL Server 2008 Failover Cluster,” but replace step 8 as follows.
2. The Cluster Node Configuration page, which was step 8, is now invoked. Use the drop-down box and select the name of the SQL Server instance name to join (TOR-CL01-SQL02Instance02). The Name field of this node text box is prepopulated with the name of the associated node from which the installation is being conducted. Click Next to continue, as displayed in Figure 12.10.
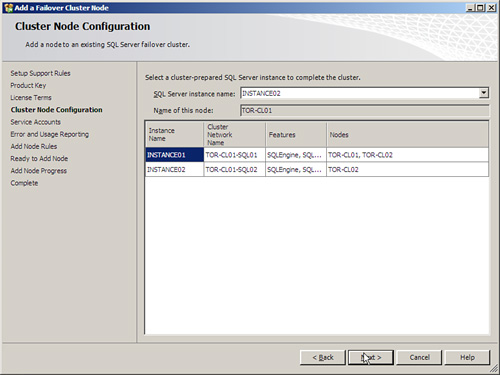
3. Repeat steps 1 to 13 for any additional nodes that exist within the SQL Server failover configuration.
The following sections focus on management tasks after a SQL Server 2008 failover cluster has been implemented. These tasks are in no particular order and focus on the SQL Server aspect of failover clustering. The subsequent section of the chapter, “Managing Failover Clusters from a Windows Server 2008 Perspective,” will focus on failover cluster management tasks from a Windows Server 2008 point of view.
As database administrator, you frequently need to know which node is the owner of each clustered group, service, and application, whether or not a node is operational, status on storage, and whether any health issues are occurring. The first level of defense when reviewing status is to check cluster events. Cluster events can be found by expanding a cluster name in Failover Cluster Management, and then in the Tree pane selecting Cluster Events. Alternatively, status of a failover cluster element can be determined by following these steps.
To manage service or application failovers, follow these steps:
1. In Failover Cluster Management, expand the desired failover cluster name.
2. Expand Services and Applications and then select a SQL Server Failover Service or Application, also formerly known as a cluster group.
3. From the Actions pane, select Move This Service or Application to Another Node and then specify the node to move to.
4. In the Please Confirm Action dialog box, read the warning message and select the option Move.
Sometimes a service account or a service account password needs to be changed for the failover cluster instance. Similar to a stand-alone SQL Server installation, all SQL Service account changes should be conducted with the SQL Server 2008 Configuration Manager tool. In addition, when you’re working with clusters, all nodes must be online when a service account changes. As a reminder, when allocating service accounts, follow the practice of least privilege and isolation; as a result, the SQL Cluster Service Account should be a different account from the service account running the Windows cluster.
For each service or application, you can assign a preferred owner. In the example, there are two instances of SQL Server installed within the cluster. From a performance perspective, it is possible to configure node 1 to be the preferred owner of TOR-SQL/Instance01 and node 2 to be the preferred owner of TOR-SQL02/Instance02. Therefore, when the servers are brought online, the preferred owners maintain service operations of the desired Service or Application and SQL Server virtual instance. It is worth mentioning that preferred owners are necessary when you are running more than two nodes within a cluster. The preferred owners list dictates the failover behavior to the next available node based on the nodes in the list. For example, in an eight-node cluster, you may have dedicated passive standbys by having node 1 first fail over to node 3, then node 4, and then node 5.
Tip
When the cluster nodes are turned on, the cluster administrator tries to assign the SQL Server virtual server to the first node in the preferred owners list. If this node is not available, the server is assigned to the next server name in the list. This behavior is similar to the failover process. If a failover occurs, the SQL Server cluster fails over to the available passive nodes based on the preferred owners list.
Follow the next set of steps to configure preferred owners for a SQL Server failover cluster. For example, based on our example, TOR-CL01-SQL01INSTANCE01 should be homed in on node 1 (TOR-CL01), and TOR-CL01-SQL02INSTANCE02 should be homed in on node 2 (TOR-CL02). Follow these steps to make preferred node changes on a failover cluster:
1. In Failover Cluster Management, expand the desired failover cluster name.
2. Expand Services and Applications and then select a SQL Server failover service or application.
3. Right-click a SQL Server failover service or application and select Properties.
4. In the Service or Application Properties dialog box, specify the preferred owners of the service or application.
5. If more than one node is selected, use the Up and Down buttons to move the desired node owner to the top of the list.
6. In order to have the Service or Application automatically move to the particular node when the node becomes available, ensure that the Allow Failback option is selected on the Failover tab.
7. Click OK to finalize.
There are a few ways to control how many failures will be allowed in a given period of time until the resource is left in a failed state. First, a global setting controls the threshold and period of a failover. This setting affects the whole service or application and dictates how many times a failover can occur during a period of time. Second, advanced parameters can be configured on each individual resource. Advanced parameters dictate whether the individual resource failure will affect the whole service or application and interval settings such as Looks Alive and Is Alive.
Follow these steps to configure failover settings for a Service or Application such as TOR-CL01-SQL01INSTANCE01:
1. In Failover Cluster Management, expand the desired failover cluster name.
2. Expand Services and Applications and then select a SQL Server Failover Service or Application you plan on modifying.
3. Right-click the SQL Server failover service or application and select Properties.
4. In the Service or Application Properties box, select the Failover tab and specify the number of times the Cluster service will attempt to restart in a specified period.
5. Finally, in the Failback section, specify whether or not Failback is allowed.
6. Click OK to finalize.
When a primary node fails, you can control the behavior of the failback after the primary node becomes active again. The failback can be set to immediately, between a specific time of the day, or can be prevented. For mission-critical production clusters, it is a best practice to either prevent automatic failback or set the failback during hours of nonpeak usage. By using these settings, you can fail back the node manually or during nonpeak usage. As a result, the end-user community and application are not affected, resulting in downtime when the node fails back.
Follow these steps to configure failback settings for a service or application such as TOR-CL01-SQL01INSTANCE01:
1. In Failover Cluster Management, expand the desired failover cluster name.
2. Expand Services and Applications and then select a SQL Server failover service or application.
3. Right-click a SQL Server failover service or application and select Properties.
4. In the Service or Application Properties box, select the Failover tab and specify whether or not failback is allowed.
5. If the Allow Failback option is selected, specify the option to fail back immediately or between a desired interval.
6. Click OK to finalize.
Because the SQL Server 2008 Enterprise Edition supports up to 16 nodes in a cluster, sometimes you may need to remove a node from an existing SQL Server 2008 clustered instance. Unfortunately, to achieve this goal, you must rerun Setup and from the SQL Server Installation Center, select the Maintenance link and then double-click Remove Node from a SQL Server Failover Cluster. The good news is that the wizard for removing nodes is intuitive and the removal process does not negatively affect surviving nodes in the cluster because each node is an independent peer. Run the following steps on the node or nodes you plan on evicting from the SQL Server failover cluster:
1. On the SQL Server Installation Center screen, click the Maintenance link and then click Remove Node from a SQL Server Failover Cluster.
2. On the Setup Support Rules screen, review the outcome of the System Configuration Checker. Ensure that all tests associated with the operation passed without any failures, warnings, or skipped elements. Alternatively, you can review a standard or comprehensive report by selecting the Show Details button or View Detailed Report. Click OK to continue with the installation.
3. The Cluster Node Configuration page is now invoked. Use the drop-down box and specify an existing SQL Server failover cluster to modify. The Name field of this node text box is prepopulated with the name of the associated node from which the installation is being conducted. Therefore, as a reminder you must conduct these steps from the node you plan on removing. Click Next.
4. On the Ready to Remove Node page, verify the SQL Server 2008 features to be removed as part of the removed node operation and click Remove.
5. Review the remove node process on the Remove Node Progress page, and then click Next to finalize the removal process.
6. On the final page, Complete, information about the removal operation, the location of the summary log file, and the next steps is presented. Review this information, and then click Close to exit the SQL Server Installation Wizard.
There are multiple steps involved when removing SQL Server Failover Clustering completely from a Windows Server 2008 environment. First use the Remove Node functionality found in the SQL Server Installation Center, as depicted in the preceding section. Repeat this process on all SQL Server nodes within the cluster. Then, using Windows Server 2008 Program and Features, remove each SQL Server element. Repeat steps for each node within the cluster. Windows Server 2008 Programs and Features can be invoked by selecting Start, Control Panel, and then Programs and Features.
The upcoming section include step-by-step tasks for managing failover cluster from a Windows Server 2008 perspective.
Similar to a traditional non-clustered SQL Server, the operating system and SQL Server application require ongoing patch management to keep the servers up to date. Patch management includes installing service packs and critical hotfixes for both the operating system and SQL Server. When you’re working in a clustered environment, each node within the cluster should have the exact same service pack and hotfixes to ensure consistency.
One of the main benefits of using failover clusters is your ability to install software, service packs, and critical updates on a node without interrupting service of the cluster. This process is known as a rolling upgrade. For example, when you install service packs and critical fixes for Windows Server 2008, all the services or applications can be failed over to the second node, and the installation can then be conducted on the first node without affecting client operations. The node can be rolled back to node 1, and Windows Server 2008 service packs and critical fixes can be applied to the second node. The rolling upgrade strategy has been reintroduced in SQL Server 2008.
When you’re conducting maintenance or rolling upgrades, it is common to pause a node. When a node is paused, the existing services or applications and resources stay online; however, additional groups and resources cannot be brought online. Follow these steps to pause and resume a SQL Server cluster node:
If additional Windows nodes need to be added to the cluster after the initial cluster creation process, perform the following steps:
1. In Failover Cluster Management, select and expand the cluster name.
2. Select and expand Nodes in the Tree pane.
3. Right-click Nodes and select Add Node.
4. When the Add Node Wizard opens, click Next on the Before You Begin page.
5. In the Select Server page, type the name of the cluster node and click the Add button. After the node has been added to the list, click Next to continue.
6. In the Confirmation page, review the names of the node or nodes that will be added and click Next to continue.
7. When the process completes, review the results in the Summary page and click Finish to close the wizard.
When shared storage is used with failover clusters, all of the LUNs or targets presented to the cluster hosts may not have been added to the cluster during the initial configuration. When this is the case, and additional storage needs to be added to the cluster, perform the following steps:
1. In Failover Cluster Management, select and expand the cluster name.
2. In the Tree pane, select Storage, right-click and select Add a Disk.
3. If suitable storage is ready to be added to the cluster, it will be listed in the Add Disks to a Cluster window. If a disk is listed, check the box next to the desired disk or disks and click OK to add the disk(s) to the cluster.
4. When the process completes, if necessary, change the drive letter of the new disk.
5. Close the Failover Cluster Management console.
6. Click the Start button and select Computer.
7. Review the list of disks on the cluster node and note that disks managed by the cluster are listed as clustered disks instead of local disks. This is a distinct change from server clusters in previous versions of Windows Server.
8. Close the Explorer windows and log off the server.
Unless otherwise specified, a SQL Server virtual instance uses only one shared hard drive during the installation of SQL Server failover clustering. Therefore, even though additional share drives are available in the cluster, such as the log and backup drives, a SQL Server instance cannot leverage those shared drives unless each additional shared drive is added as a resource dependency for the SQL Server Name clustered resource in Failover Cluster Management. These tasks should be configured prior to installing a SQL Server failover cluster. However, if they haven’t then these steps are a great way for adding additional shared disks to an existing cluster.
Note
In the past you had to take the service or application offline when adding additional shared disk resources; however, when running failover clustering with Windows Server 2008, this is no longer the case.
To add cluster drive dependencies, conduct the following steps in Failover Cluster Management.
1. In Failover Cluster Management, expand the desired failover cluster name.
2. Expand Services and Applications and then select SQL Server Name resource, which is located in the central pane.
3. From the Actions pane, select Properties and then the Dependencies tab.
4. On the Dependencies tab, click Insert and select the desired shared disk, such as DatabaseLogs-Instance01.
5. Click Apply and then Close to finalize this task.
6. Run the Show Dependency Report from the Action pane to verify that the newly added resource dependency drives are available to SQL Server.
If all of the cluster nodes and shared storage was available during the creation of the cluster, the best suited Quorum model was automatically selected during the cluster creation process. When the existing cluster quorum needs to be validated or changed, perform the following steps:
1. In Failover Cluster Management, select and expand the cluster name.
2. In the Tree pane, select the Cluster name and in the Tasks pane the current Quorum model will be listed.
3. Review the current Quorum model and if it is correct, close the Failover Cluster Management console.
4. If the current Quorum model is not the desired model, right-click the cluster name in the Tree pane, click More Actions, and select Configure Cluster Quorum Settings.
5. In the Select Quorum Configuration page, select the radio button of the desired Quorum model or select the radio button of the recommended model and click Next to continue, as shown in Figure 12.11.
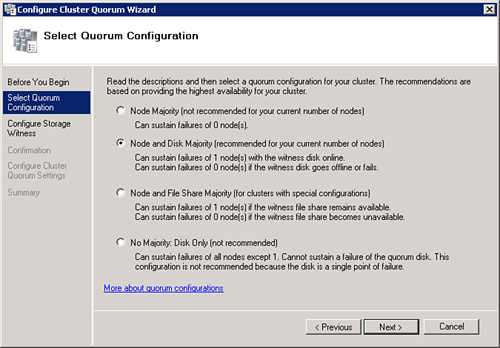
6. If a Quorum model contains a witness disk or file share, select the designated disk or specify the path to the file share and click Next.
7. In the confirmation page, review the settings and click Next to update the Cluster Quorum model for the Failover Cluster.
8. Review the results in the Summary page and click Finish to return to the Failover Cluster Management console.
Failover clustering is a great high-availability alternative for maintaining maximum uptime for mission-critical databases and the whole SQL Server instance. Failover is seamless and transparent to end users and clients. The correct clustering topology must be selected based on Service Level Agreements, availability requirements, and budget.
![]() Before installing SQL Server failover clustering, understand the prerequisites and verify that the clustering hardware is supported and certified by both the hardware vendor and Microsoft.
Before installing SQL Server failover clustering, understand the prerequisites and verify that the clustering hardware is supported and certified by both the hardware vendor and Microsoft.
![]() Leverage the Cluster Validation Tool included with Windows Server 2008 to ensure that all nodes within the cluster meet the prerequisites for deploying failover clustering.
Leverage the Cluster Validation Tool included with Windows Server 2008 to ensure that all nodes within the cluster meet the prerequisites for deploying failover clustering.
![]() Use identical hardware for all nodes in the cluster. This includes processor, memory, and firmware.
Use identical hardware for all nodes in the cluster. This includes processor, memory, and firmware.
![]() Configure Failover Clustering Feature from a Windows Server 2008 perspective prior to SQL Server 2008 Failover Clustering.
Configure Failover Clustering Feature from a Windows Server 2008 perspective prior to SQL Server 2008 Failover Clustering.
![]() Ensure disk drive letters are identical on all nodes within the cluster.
Ensure disk drive letters are identical on all nodes within the cluster.
![]() Avoid having the quorum resource and other cluster resources from sharing the same disk.
Avoid having the quorum resource and other cluster resources from sharing the same disk.
![]() Ensure that the public network adapter is the first adapter in the network binding list.
Ensure that the public network adapter is the first adapter in the network binding list.
![]() Disable NETBIOS on the private/heartbeat network adapters.
Disable NETBIOS on the private/heartbeat network adapters.
![]() Disable write-back caching on host controllers.
Disable write-back caching on host controllers.
![]() Do not configure dynamic disks because clustering supports only basic disk configurations.
Do not configure dynamic disks because clustering supports only basic disk configurations.
![]() Determine whether a single-instance or multiple-instance configuration will be implemented. Plan the disk layout accordingly while taking future growth into account.
Determine whether a single-instance or multiple-instance configuration will be implemented. Plan the disk layout accordingly while taking future growth into account.
![]() Identify which SQL Server features will be installed.
Identify which SQL Server features will be installed.
![]() Do not use the same service account for Windows and SQL Server failover clustering.
Do not use the same service account for Windows and SQL Server failover clustering.
![]() Configure dependencies for shared disks so that they can be recognized and leveraged by SQL Server 2008.
Configure dependencies for shared disks so that they can be recognized and leveraged by SQL Server 2008.
![]() Before using multiple instances, understand the impact of multiple-instance configurations and performance degradation on the surviving node if a failover occurs.
Before using multiple instances, understand the impact of multiple-instance configurations and performance degradation on the surviving node if a failover occurs.
![]() Change the service accounts only via SQL Server Configuration Manager.
Change the service accounts only via SQL Server Configuration Manager.
![]() Do not configure DTC resources within the same service or application as the SQL Server virtual instances.
Do not configure DTC resources within the same service or application as the SQL Server virtual instances.
![]() Use the SQL Server Installation Center to modify a SQL Server failover cluster installation.
Use the SQL Server Installation Center to modify a SQL Server failover cluster installation.
![]() Ensure that each virtual server name is unique on the Active Directory domain.
Ensure that each virtual server name is unique on the Active Directory domain.
![]() Understand the benefit and impact associated with the different quorum models included in Windows Server 2008.
Understand the benefit and impact associated with the different quorum models included in Windows Server 2008.
![]() For advanced SQL Server 2008 failover clustering installations, use the planning and deployment tools included with the SQL Server Installation Center.
For advanced SQL Server 2008 failover clustering installations, use the planning and deployment tools included with the SQL Server Installation Center.