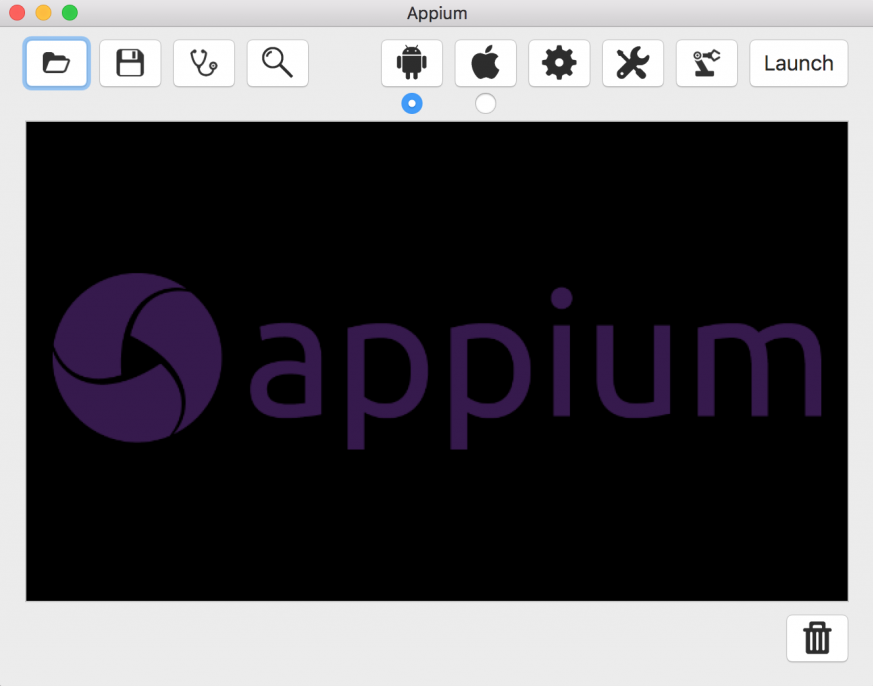
Let's take a detailed look at the Appium GUI app. Here's a snapshot of the Appium GUI app (on Mac OSX), which has a couple of icons on top, a console window, and a trash bin icon at the bottom. Windows Appium app has couple of options lesser than the Mac OS X, however functionally it represent the same as described below. Let's take a look at each of the icons and what it helps us to do:
- Open Configuration: This lets you select any previously saved Appium configuration and load.
- Save Configuration: This saves the current Appium config, which is basically the settings you selected with Android or iOS or General.
- Doctor: It runs the appium-doctor.js program and tells you whether all the wirings are proper. By wiring, I mean it performs the following checks:
- Xcode path
- Xcode command-line tool
- Checks for DevToolsSecurity to be enabled
- Node.js installation
- ANDROID_HOME to be set
- JAVA_HOME to be set
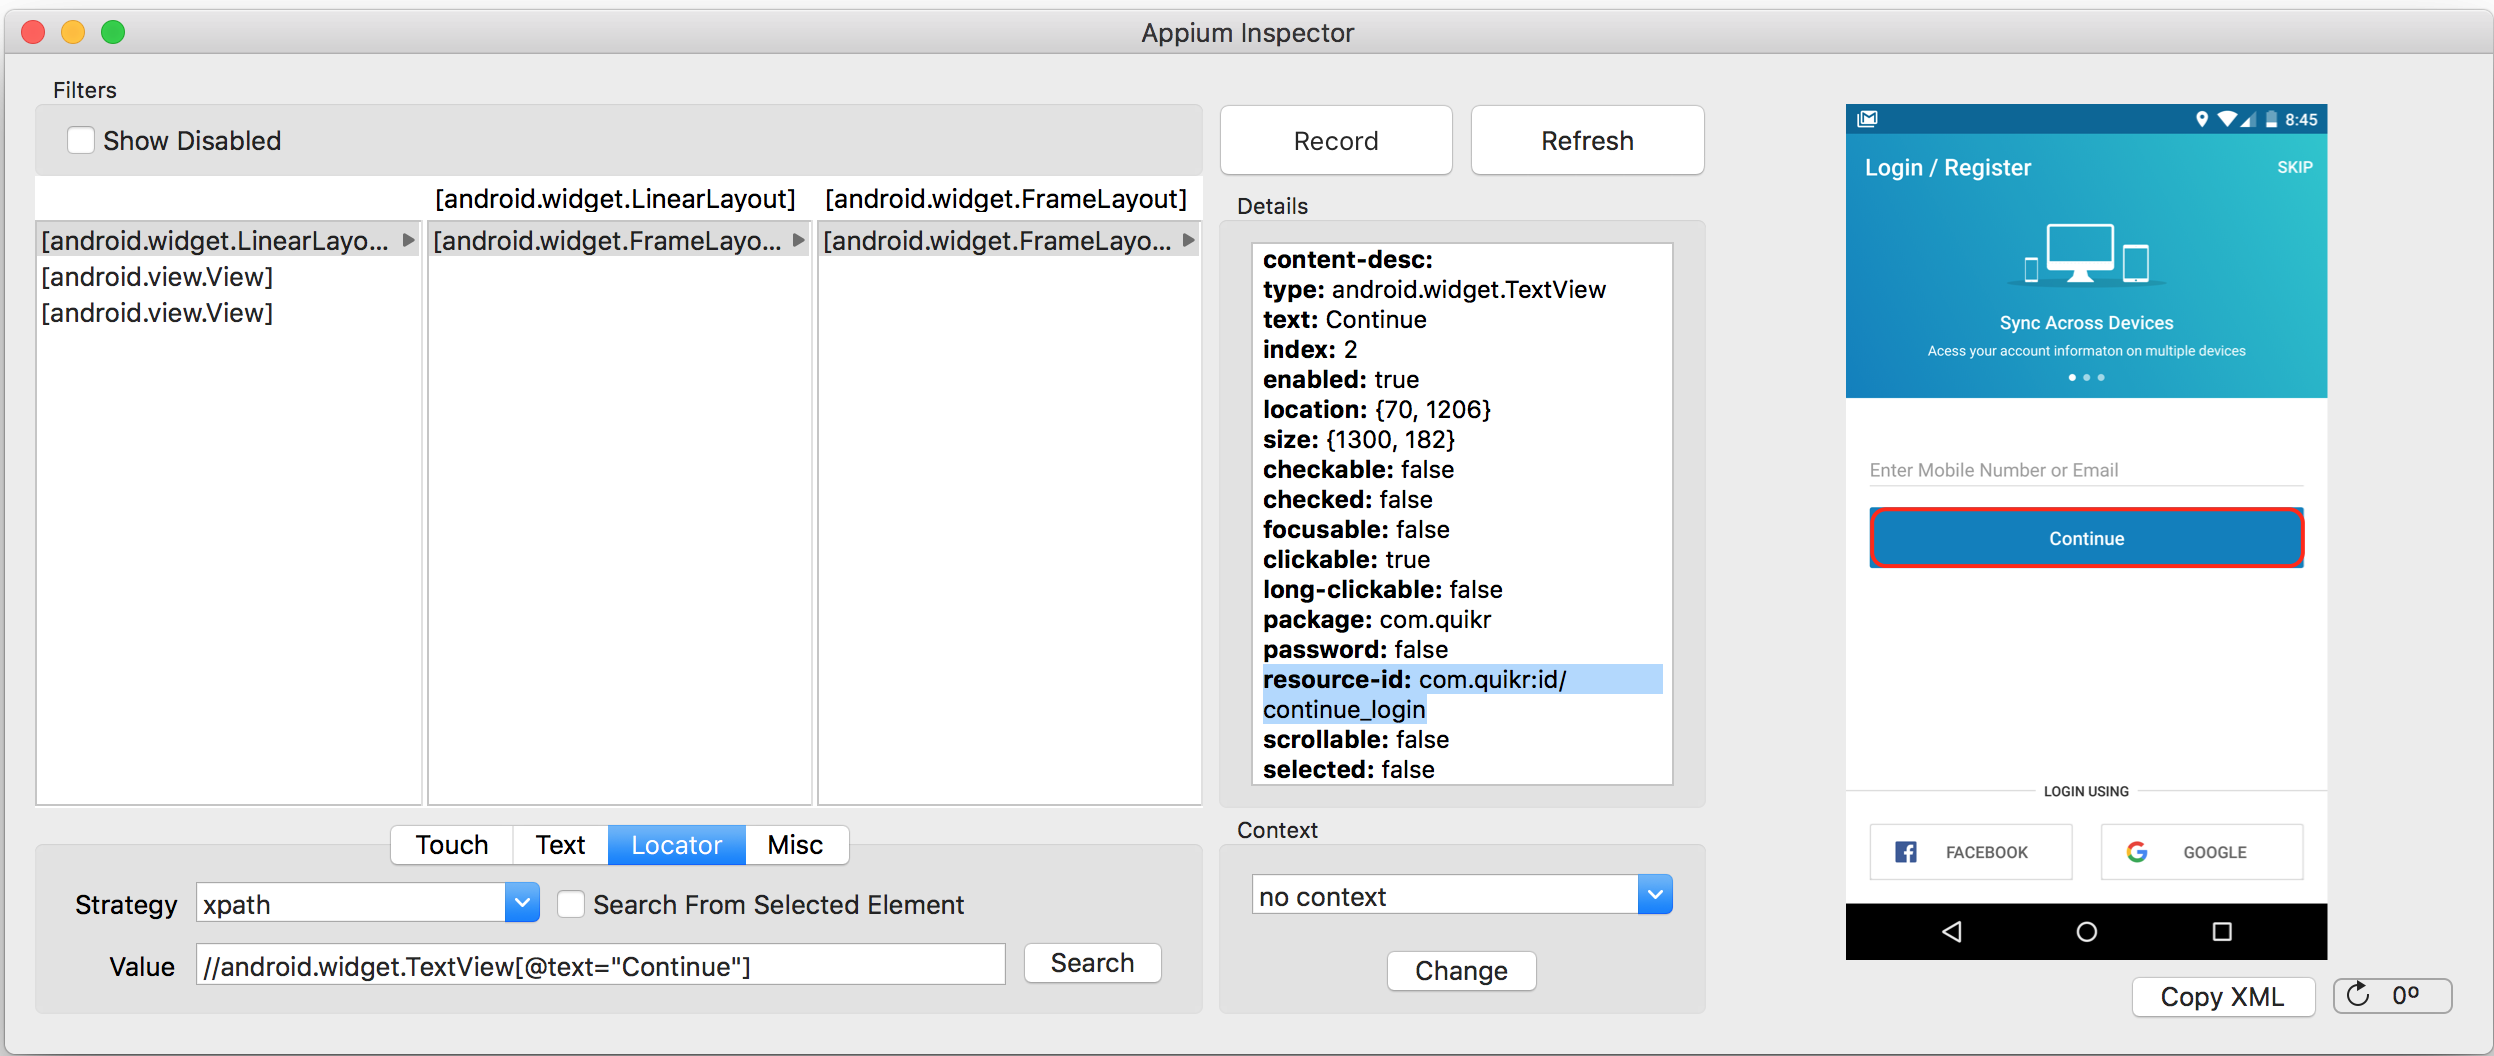
- Inspector: It brings up the Appium inspector window. With the recent version of Appium, it launches the app on the device or emulator and shows the captured UI state of the application. The following is a snapshot of the same. The panel on the extreme right is clickable. Once you click on any UI element, the panel on the left shows the UI hierarchy and the panel named Details shows the UI attribute of the element clicked on. The right-hand side of the panel lets you click on any element that you need to interact with as part of your test code. On the Details pane, you can find attributes such as type, text, index, and resource-id:

On the top of the Appium Inspector, you find the Record button, clicking on which generates the boiler plate code; it records the action on the element, based on the XPath of the element. Clicking on Refresh refreshes the panel on the left-hand side to load the latest UI snapshot on the right of the inspector screen and reloads the UI hierarchy and details panel as well.
Android Settings: Clicking on this brings up a window that lets you fill the android app-related details. The following is its snapshot. It is divided into two parts: Basic and Advanced. Under Basic, there are some mandatory settings and some optional ones:

To launch an Appium session for a particular app, we need the app to be installed on the device, in which case we need the Package name and Launch Activity. If we want to install the app on the device and then start the Appium session, we need to pass in the App Path parameter, which is the location of the apk. So, we need to pass either the App Path or the Package and Launch Activity for the application section.
For the Launch Device section, Launch AVD will work if you have android emulator created via Android SDK. It doesn't work with Genymotion Emulator.
For the Capabilities section, there are four mandatory parameters, described here, and two optional, which are Language and Locale:
- Platform Name: It gives you an option of selecting Android if it's an android device or FirefoxOS.
- Automation Name: It can be either Appium or Selendroid. For this book, we will primarily be using Appium.
- Platform Version: It gives you the option to select different versions of android (such as API 22 and 21).
- Device Name: It is mandatory again and can be any text.
Under the Advanced Section, you have the option to choose Android SDK path, Chromedriver Path, and any Keystore settings. All these are optional parameters.
- iOS Settings: Clicking on this brings up a window that lets you fill the iOS app-related details:

Before we proceed with any steps on iOS app automation using Appium, one of the important prerequisites is that the app must be signed with a developer identity:
- App Path: If you want to deploy the app using Appium, enter the location of .ipa (for physical device) or .app (for simulators).
- BundleID: If you want to invoke the existing app, then pass the Bundle ID.
- Platform Version: This lets you select the version of iOS that you want to connect Appium with.
- UDID: This is needed when you want to run the test on a physical device.
- Force Device: This lets you select the device on which you want the test to connect.
- Full Reset: This tells Appium to reset the state of the application we are testing every time we run a test.
On the Advanced tab, you need to be sure that Appium knows the path of Xcode on your machine. You can even change the path to Xcode using the Change button.
In the bottom section of the screen, you can see the buttons highlighted, such as Touch, Text, Locator, and Misc.
Clicking on Touch gives you an option, such as Tap, Swipe, and Shake, to be performed on the element you have selected on the right. Similarly, when you click on Text, it brings up a textbox to send in the text you want:

When you click on Locator, it brings up the option to choose the strategy with which you want to select the element, as illustrated in the following screenshot. The options available as part of strategy are accessibility id, android uiautomator, class name, id, ios uiautomation, name, and xpath. These are the different ways of identifying a UI element on a mobile app:

For example, in the following screenshot, the Continue button (on the right panel) on the app can be identified in two ways:
- Using id, we can use the ID as strategy and give the continue_login value that is taken from resource-id, highlighted in blue in the Details panel.
- Using xpath, we can construct a meaningful xpath that can be derived from the type of element and some unique attribute, which is text in this case. Hence, the xpath for the Continue button can be //android.widget.TextView[@text="Continue"], same is illustrated below in the Appium inspector snapshot:
When you click on Misc, it gives you a button that performs the function of accepting or dismissing alerts.
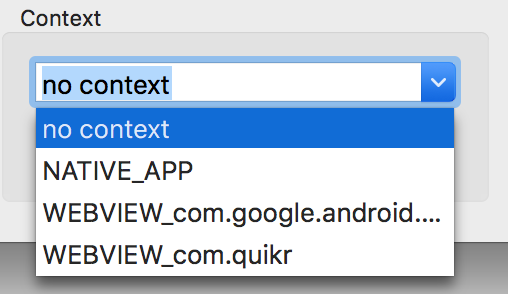
Context: Following is a small section of the Details panel, called Context. It's a dropdown that shows you the context available for the app, be it native or web view. The next screenshot shows that the contexts available are both the native and web view. Appium lets you switch the context within the web driver protocol itself so that testing the native and web view parts becomes seamless. So, we can select one of the values in the dropdown and change the context: