
Setting Up the Environment
The main learning goal of this chapter is to get used to setting up the testing environment for writing end-to-end tests using TestCafe. You will learn how to set up a Node.js environment (including TestCafe itself), create a basic configuration file to run the tests, and structure the test code to follow the best practices.
This is especially important because in real life, each new project/repository usually requires a testing infrastructure to be set up to prevent regressions and to keep the code quality high.
To sum up, this chapter will cover the following main topics:
- Setting up the test project environment.
- Creating the test project configuration file.
- Structuring the test code.
Technical requirements
All the code examples for this chapter can be found on GitHub at https://github.com/PacktPublishing/Modern-Web-Testing-with-TestCafe/tree/master/ch3.
Setting up the test project environment
It is important to set up the environment properly now as we will be using it for the rest of the chapter and up to the end of this book. Doing so will also help you understand the basics of how Node.js deals with different packages and how to spin up pretty much any JavaScript/Node.js-based testing framework. We will divide the setup process into two sections:
So, let's go through the whole process, starting from the beginning—installing Node.js.
Installing Node.js
JavaScript is a client-side programming language that mostly deals with the frontend, which means it is usually processed by the browser of each user that opens your website or web application. Node.js was developed as a JavaScript runtime environment to provide the ability to use JavaScript as a server-side backend language.
In order to launch almost any development tools written in JavaScript, you'll need to use Node.js and Node Package Manager (npm). This package manager is a tool that helps you install, update, and keep your Node.js project dependencies (packages) all in one place (the node_modules folder).
Node.js is available for a variety of operating systems, macOS, Ubuntu/Linux, and Windows being among them. The easiest way to install Node.js and npm is to follow these steps:
- Open https://nodejs.org/en/download/.
- Select the long-term support (LTS) version.
- Select your operating system.
- Download the installation file and run it.
Another slightly more complex but reusable way is to install Node.js through Node Version Manager (nvm – https://github.com/nvm-sh/nvm) or n (https://github.com/tj/n). Version managers give you the ability to install several versions of Node.js simultaneously and switch between them whenever you like, which is quite useful during test development.
Once the installation is finished, you can check whether both Node.js and npm are working properly by opening any shell (for example, Terminal or PowerShell) and executing the following:
$ node -v
$ npm -v
That should output the version number for Node.js and npm, respectively.
Installing TestCafe
As we already have Node.js and npm installed, let's proceed with installing TestCafe. It can be installed from npm locally (to run from your project folder) or globally (to run from any location).
Installing TestCafe locally
To install TestCafe locally to your project directory and save it to the dependencies list, open any shell, go to your project folder, and execute the following two commands:
$ npm init --yes
$ npm install testcafe --save-dev
The first command will create a simple package.json file to store all the dependencies. The second command will install the testcafe package and save it to the list of your project's dependencies in package.json.
Installing TestCafe globally
To install TestCafe globally, open any shell and execute the following command:
$ npm install testcafe --global
This will install TestCafe globally, and it will be accessible from any folder.
You can always check the version of the testcafe package that is installed by executing the following command:
$ npx testcafe -v --no-install
Note
On macOS (starting from v10.15 Catalina and up), TestCafe requires screen recording permission to carry out test actions and take screenshots and videos. When TestCafe tests launch for the first time, macOS will ask you to allow screen recording for TestCafe browser tools. Go to System Preferences - Security and Privacy - Privacy and check TestCafe Browser Tools to grant permission. When you update macOS or TestCafe, security permissions may be purged—in this case, the system will repeat the request. So, when the Security and Privacy popup opens again, just uncheck and recheck the TestCafe Browser Tools checkbox.
Now, as we have Node.js, npm, and TestCafe installed and ready, let's proceed with creating a configuration file for our tests.
Creating the test project configuration file
In this section, we will see how to configure TestCafe. However, before reviewing the main configuration options, let's set a convention for some coding style standards.
Accepting code styling convention
When writing code throughout this book, we will follow some simple rules, such as indenting with two spaces for .json files and four spaces for .js files. We will also use semicolons and single-quotes. Most popular code editors support a .editorconfig configuration file to automatically apply the rules:
root = true [*]indent_style = space indent_size = 4 end_of_line = lf insert_final_newline = true charset = utf-8 trim_trailing_whitespace = true max_line_length = 120 [*.json]indent_size = 2
You can copy the basic config file that we will be using from https://github.com/PacktPublishing/Modern-Web-Testing-with-TestCafe/blob/master/.editorconfig.
Exploring the configuration settings
The TestCafe configuration settings are usually stored in the .testcaferc.json file in the root folder of your project. Let's look at the main options that can be specified:
- browsers is a string, or an array of strings, that sets one or more browsers to launch tests in. Browser aliases should be specified for any locally installed browsers, such as chrome, firefox, safari, ie, edge, or opera (https://devexpress.github.io/testcafe/documentation/guides/concepts/browsers.html#locally-installed-browsers). You can see the list of all the available browsers in your system—just open any shell and run the following command:
$ npx testcafe --list-browsers
To run tests in Chrome only, .testcaferc.json will look like this:
To run tests in Firefox and Chrome, your test will look like this:
{ "browsers": ["firefox", "chrome"]}
To run tests in remote browsers (such as SauceLabs, BrowserStack, CrossBrowserTesting, and so on) with a browser provider plugin, set the browser provider name, together with the browser alias and operating system, as follows:
{ "browsers": "saucelabs:[email protected]:Windows 10"}
Postfixes to browser aliases can be used to launch tests in headless mode or to apply Chrome device emulation (https://devexpress.github.io/testcafe/documentation/guides/concepts/browsers.html#use-chromium-device-emulation):
{ "browsers": ["firefox:headless", "chrome:emulation:device=iphone X"]}
Note
TestCafe starts Chrome and Firefox with a fresh profile by default, without any extensions or profile settings. If you need to launch a browser with the current user profile, add the :userProfile postfix flag after the browser alias.
- src is a string, or an array of strings, that sets a path to files or directories from where the tests should be launched. To run tests from one file, use the following code:
{ "src": "tests/login-test.js"}
Global patterns can be used to parse a set of files:
- reporter is a string or an array of objects that sets the name of a built-in or custom reporter for generating test reports (https://devexpress.github.io/testcafe/documentation/guides/concepts/reporters.html). By default, a spec reporter is used. To specify any other reporters—for example, minimal—use the following:
Multiple reporters can be set at the same time, but only one reporter can write to the console output (standard output, or stdout), and all other reporters should write to the files:
{ "reporter": [ { "name": "minimal" }, { "name": "json", "output": "tests/reports/report.json" }, { "name": "xunit", "output": "tests/reports/report.xml" } ]}
You can also explore and use any of the available reporters from https://www.npmjs.com/search?q=testcafe-reporter.
- screenshots is an object that allows you to set the screenshot options. These options include path, which is a string for the directory where screenshots are saved; takeOnFails, which is a boolean for whether a screenshot should be captured whenever a test fails; pathPattern, which is a string for the custom pattern to create a relative path and a name for the screenshot; and fullPage, which is a boolean for whether a screenshot should be taken of the full page (including any content that is not visible because of the overflow):
{ "screenshots": { "path": "tests/screenshots/", "takeOnFails": true, "pathPattern": "${DATE}_${TIME}/test-${TEST_ INDEX}/${USERAGENT}/${FILE_INDEX}.png", "fullPage": true }}
Note
See the full list of the placeholder path patterns that can be used for screenshots and videos at https://devexpress.github.io/testcafe/documentation/guides/advanced-guides/screenshots-and-videos.html#path-pattern-placeholders.
- videoPath is a string for the directory where videos of test runs are saved:
- videoOptions is an object that allows you to set the video options. These options include failedOnly, which is a boolean that should be set to true to enable recording for the failed tests only or to false (the default) to record all the tests; singleFile, which is a boolean that should be set to true to save the whole record in a single file or to false (the default) for a separate file per test; and pathPattern, which is a string for the custom pattern to compose the relative path and the name of the video file:
{ "videoOptions": { "failedOnly": true, "singleFile": true, "pathPattern": "${TEST_INDEX}/${USERAGENT}/${FILE_INDEX}.mp4" }}
- videoEncodingOptions is an object that sets the video encoding options (all the FFmpeg library options are supported, which you can find at https://ffmpeg.org/ffmpeg.html#Options). For example, let's set the frame rate and video display aspect ratio:
- quarantineMode is a boolean to switch failed tests to quarantine mode (to rerun the unstable tests):
If quarantine mode is turned on, tests run will follow the next logic:
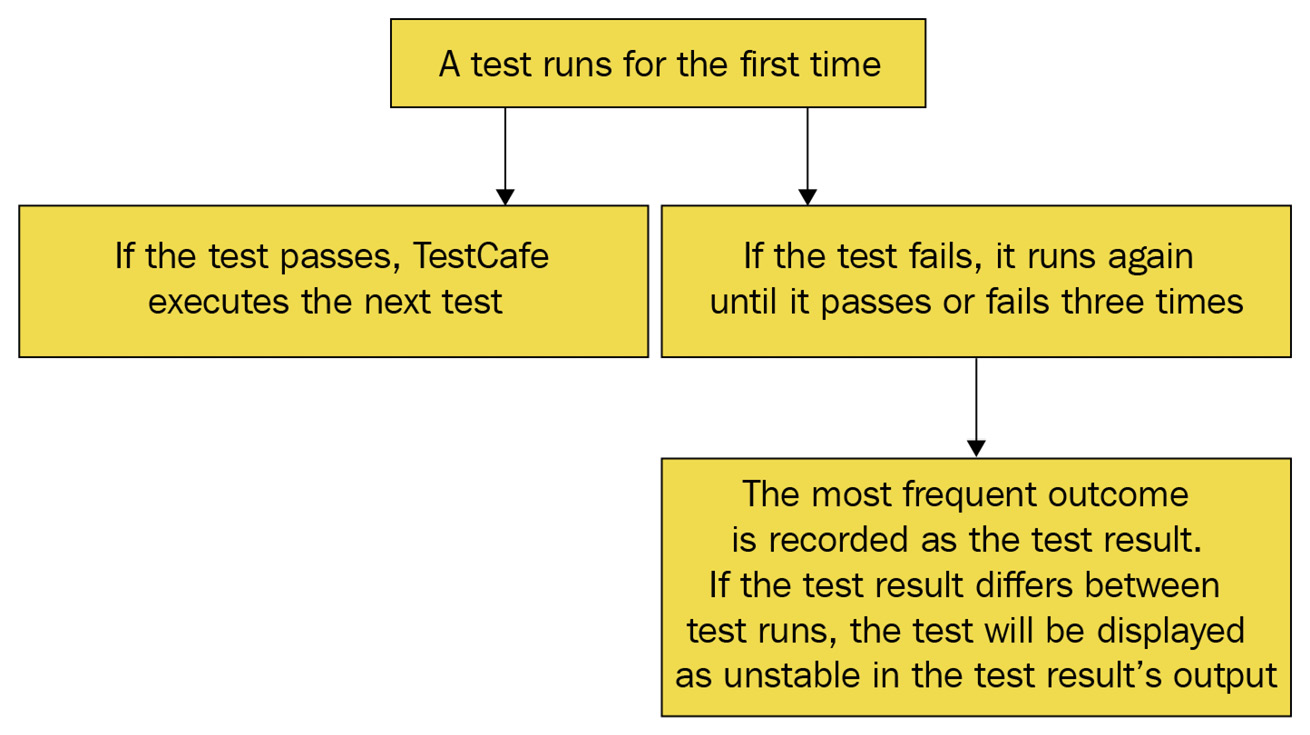
Figure 3.1 – Tests run logic in quarantine mode
- debugMode is a boolean to run tests in debugging mode:
Note
If debug mode is on, test execution will be paused before the first action or assertion so that you can open the developer tools and start debugging. To make it easier, a status bar will be displayed in the footer showing the available debug actions: Unlock page, Resume, and Next step.
- debugOnFail is a boolean to automatically enable debug mode after a test fails. If this option is set to true (it's set to false by default), TestCafe will pause during the test failure so that you can view the tested page, open the developer tools, and figure out why it failed:
- skipJsErrors is a boolean to ignore JavaScript errors on a tested web page (by default, when these errors occur, TestCafe will stop running the test and post an error message with a stack trace to the output report):
- skipUncaughtErrors is a boolean to ignore uncaught JavaScript errors and unhandled promise rejections on a tested web page (by default, when these errors or promise rejections occur, TestCafe will stop running the test and post an error message with a stack trace to the output report):
- appCommand is a string to execute the specified shell command before tests are started. This option is often used to launch the application you need to run tests over (such application will be automatically stopped after all the tests are executed):
- appInitDelay is the time TestCafe will wait before launching the tests (in milliseconds; the default value is 1000). So, this delay is used to give an application launched with the appCommand option some time to start:
- concurrency is the number of browser instances spawned to run tests in parallel. TestCafe will start with a specified number of browser instances and create a pool of those instances. Tests will be launched simultaneously against this pool; each test will take the first free browser instance from the pool and run inside this instance:
- selectorTimeout is the time within which the selector sends requests to retrieve a web element node (in milliseconds; the default value is 10000):
- assertionTimeout is the time during which TestCafe performs assertion requests (in milliseconds; the default value is 3000). This timeout will be applied only if a selector property or a client function is used in an assertion as an actual value:
- pageLoadTimeout is the time after the DOMContentLoaded event within which TestCafe waits for the window.load event to be fired (in milliseconds; the default value is 3000). TestCafe starts the test after the window.load event is triggered or the timeout passes (whichever happens first):
- speed is the test execution speed (1 is the fastest and 0.01 is the slowest; 1 is the default). This option can be used to slow down the tests:
Note
If the speed is set in .testcaferc.json and also within the test for an individual action, the action's speed setting will have a higher priority and will override the speed set in the configuration file.
- clientScripts is an object, an array of objects, or a string for the scripts to be injected into any pages opened during the tests. This property is often used to add client-side mock functions, modules, or helper scripts. You can set content, which is a string with the code to inject the JavaScript code; module, which is a string with the module name to inject the module; and path, which is a string with the path to the file to inject the JavaScript file. Any of these settings can be paired with the optional page setting to set a specific page that the provided scripts should be injected into:
{ "clientScripts": [ { "content": "Date.prototype.getTimestamp = () => new Date().getTime().toString();" }, { "module": "js-automation-tools" }, { "path": "scripts/helpers.js", "page": "https://test-site.com/page/" } ]}
- port1 and port2 are numbers in the range of 0 to 65535 that represent a custom port, which TestCafe uses to launch the testing infrastructure (if ports are not set, TestCafe automatically selects them):
- hostname is a string for the hostname of your computer, used when you run tests within remote browsers. If hostname is not set, TestCafe will use the operating system hostname or the network IP address of the current machine:
- proxy is a string for the proxy server used in your local network to access the internet:
{ "proxy": "123.123.123.123:8080"}
Authentication credentials can also be set with the proxy host:
{ "proxy": "username:[email protected]est-site.com"}
- proxyBypass is a string (or an array of strings) that requires TestCafe to bypass the proxy server to access the specified resources:
{ "proxyBypass": ["localhost:8080", "internal.corp.test-site.com"]}
- developmentMode is a boolean to diagnose errors (if you want to report an issue to TestCafe Support, you should set this option to true):
- stopOnFirstFail is a boolean to stop a test run right after any of the tests fail:
- tsConfigPath is a string to enable TestCafe to use a custom TypeScript configuration file and set its location (https://devexpress.github.io/testcafe/documentation/guides/concepts/typescript-and-coffeescript.html#customize-compiler-options). A relative or an absolute path can be used:
{ "tsConfigPath": "/Users/john/testcafe/tsconfig.json"}
In the case of relative paths, they will be resolved against the directory from which you run TestCafe.
- disablePageCaching is a boolean to prevent the page's content from being cached by the browser:
{ "disablePageCaching": true }
When browsers open a cached page inside the role code, the localStorage and sessionStorage content will not be saved. To keep the storage items after navigation, set disablePageCaching to true.
Note
Here is a good example of a .testcaferc.json file with all the main settings: https://github.com/DevExpress/testcafe/blob/master/examples/.testcaferc.json.
Creating a basic configuration for the test project
Now, let's assemble all that we have learned in this section and create a folder with the basic configuration for our test project by opening any shell (for example, we will use Terminal with Bash) and executing the following steps:
- As we have already downloaded and installed Node.js, let's check its version:
$ node -v
- Then, create a folder for your future test project:
$ mkdir test-project
- Now, go to that folder and initiate a basic package.json file to store all the dependencies:
$ cd test-project/
$ npm init --yes
- After that, install the TestCafe package and save it to your list as a development dependency:
$ npm install testcafe --save-dev
- As a final step (for now), create a .testcaferc.json configuration file with a minimal set of options:
{ "browsers": "chrome", "src": [ "tests/**/*.js", "tests/**/*.feature" ], "screenshots": { "path": "tests/screenshots/", "takeOnFails": true, "pathPattern": "${DATE}_${TIME}/test-${TEST_INDEX}/${USERAGENT}/${FILE_INDEX}.png" }, "quarantineMode": false, "stopOnFirstFail": true, "skipJsErrors": true, "skipUncaughtErrors": true, "concurrency": 1, "selectorTimeout": 3000, "assertionTimeout": 1000, "pageLoadTimeout": 1000, "disablePageCaching": true }
We have covered the options from this file in the Exploring the configuration settings section, so you can always refer back to it to understand this example.
You can also review and download this configuration file from GitHub at https://github.com/PacktPublishing/Modern-Web-Testing-with-TestCafe/blob/master/ch3/test-project/.testcaferc.json.
As we installed Node.js and TestCafe and created a basic config file, let's continue setting up our test project by organizing our test code structure.
Structuring the test code
To gain a better understanding of test code structure organization, let's divide it into several parts: fixtures, tests, the starting web page, metadata, and skipping tests.
Fixtures
TestCafe tests are usually grouped into test suites, called fixtures (which are the same as the describe blocks in the Jasmine and Mocha test frameworks). Any JavaScript, TypeScript, or CoffeeScript files with TestCafe tests should contain one or more fixtures. Test fixtures can be declared with the fixture function, which only accepts one argument—fixtureName—which is a string for the name of the fixture (set of tests):
fixture('Name for the set of the tests');
Alternatively, you can write this without the brackets:
fixture `Name for the set of the tests`;
A fixture is basically a wrapper to indicate the beginning of a set of tests. Let's see how these tests should be structured.
Tests
Tests are usually written right after the fixture declaration. To create a test, call the test function, which accepts two arguments:
- testName: A string for the name of the test.
- function: An asynchronous function that contains the test code and accepts one argument — t, which is an object for the test controller used to access all actions and assertions.
A simple test with the block of code usually looks like this:
test('Go to the main page', async (t) => { await t.click('#button-main-page'); await t.expect(Selector('#logo-main-page').visible).ok();});
Due to the fact that TestCafe tests are executed on the server side, you can use any additional packages or modules. Also, inside the test, you can do the following:
- Use test actions to interact with the tested web page.
- Use selectors and client functions to get information regarding page element states or obtain other data from the client side.
- Use assertions to verify whether the page elements have the expected parameters.
Now, let's see how to specify a starting page for all tests in a fixture.
The starting web page
You can set the initial web page that will be the starting point for all tests in a fixture with the fixture.page function. It only accepts one argument—url, which is a string for the URL of the web page where all tests in a fixture start:
fixture('Contacts page').page('http://test-site.com/example');test('Test Contact form', async (t) => { // Starts at http://test-site.com/example });
Next, let's see how to specify metadata for fixtures and tests.
Metadata
In TestCafe, you can also provide additional information for tests, such as key-value metadata. This can be used to filter tests and display this data in reports. To define metadata, use the fixture.meta and test.meta methods. They accept two string arguments:
- name: A string for the name of the metadata entry.
- value: A string for the value of the metadata entry.
Alternatively, they can accept one argument—metadata, which is an object for key-value pairs of metadata.
Both styles of setting metadata can be combined, which will look like this:
fixture('Contacts page') .meta('env', 'production') .meta('fixtureId', 'f0001') .meta({ author: 'John', creationDate: '01.06.2020' });test.meta('testId', 't0001') .meta({ testType: 'fast', testedFeatureVersion: '1.1' }) ('Test Contact form', async (t) => { // Your test code });
Fixtures or tests can be launched by the specific metadata values that they contain. To filter tests by metadata, add the filter.testMeta and filter.fixtureMeta properties to the .testcaferc.json configuration file:
{ "filter": { "fixtureMeta": { "env": "production", "author": "John" }, "testMeta": { "testType": "fast", "testedFeatureVersion": "1.1" } }}
This configuration will run only tests that have the testType property of metadata set to fast and testedFeatureVersion set to 1.1, as well as tests whose fixture's metadata has the env property set to production and the author property set to John.
You can use custom reporters (https://devexpress.github.io/testcafe/documentation/guides/extend-testcafe/reporter-plugin.html) to display fixture's and test's metadata in reports.
Skipping tests
In TestCafe, you can also specify a fixture or test to skip while all the other tests run. This is achieved with the fixture.skip and test.skip methods:
fixture.skip('Contacts page');test('Test Contact form', async (t) => { // Your test code });test('Test Review form', async (t) => { // Your test code });fixture('About page');test('Test Reviews block', async (t) => { // Your test code });test.skip('Test More info form', async (t) => { // Your test code });test('Test Our mission block', async (t) => { // Your test code });
In this example, all tests from the Contacts page fixture will be excluded from running. The Test More info form test will not be executed either.
Another pair of useful methods is fixture.only and test.only. They are used to specify that only a particular fixture or test should be launched, and all others should be skipped. If several fixtures or tests are marked with .only, then all fixtures or tests marked with .only will be executed:
fixture.only('Contacts page');test('Test Contact form', async (t) => { // Your test code });test('Test Review form', async (t) => { // Your test code });fixture('About page');test('Test Reviews block', async (t) => { // Your test code });test.only('Test More info form', async (t) => { // Your test code });test('Test Our mission block', async (t) => { // Your test code });
In this example, only the tests from the Contacts page fixture and the Test More info form test will be executed.
Summary
In this chapter, we learned how to set up the testing environment for writing end-to-end tests using TestCafe. We installed Node.js and TestCafe, reviewed the configuration options, and created a basic .testcaferc.json file to store them. In addition to that, we found out about several techniques to structure TestCafe code, including fixtures, tests, the starting web page, metadata, and skipping tests.
The lessons of this chapter are important as you will be going through the configuration phase for any new project that you'll start.
Now, we are well prepared and ready to proceed with utilizing this knowledge in writing TestCafe tests for our test project. We will learn how to create and debug a test, and will start building a real-life test suite right after that.