
2. Accessing Amazon’s Cloud Services
,
In this chapter, you learn how to load Amazon and other content onto your Kindle Fire and use Amazon’s Cloud to access content from your computer. Topics include the following:
→ Kindle Reader Applications and Kindle Cloud Reader
→ Transferring files from your computer
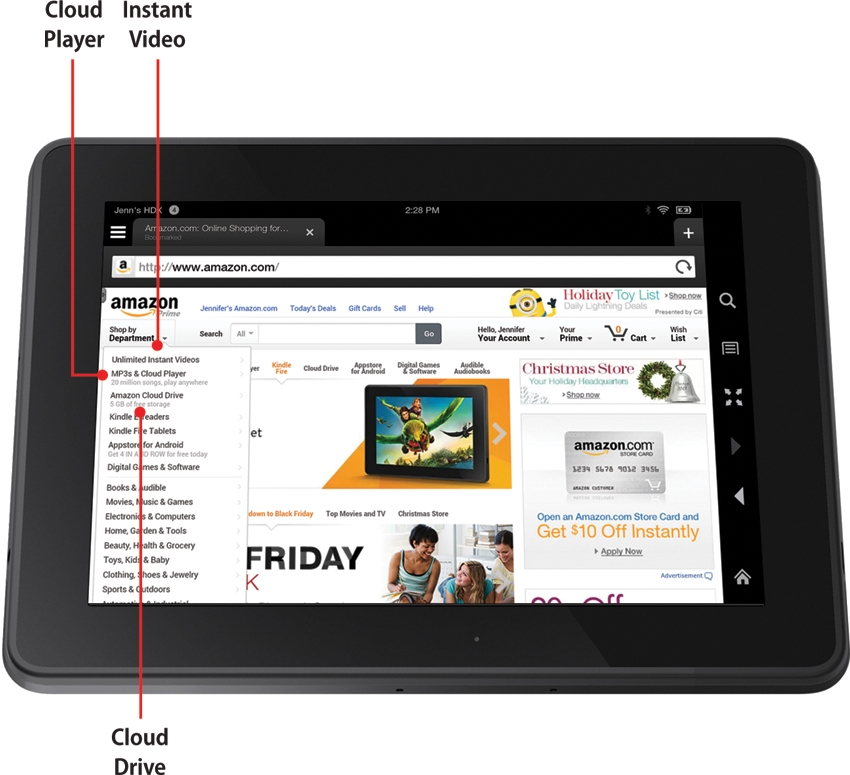
Amazon offers a collection of cloud services that augment the functionality of the Kindle Fire. In fact, your Kindle Fire is designed to be a handheld conduit into these cloud services. You can set up the Amazon Cloud Player, add all your music, and have that music immediately available to you on your Kindle Fire anywhere you can connect to the Internet. You can get a movie or TV show from Amazon on your computer or set-top box, watch part of it on your television, and then pick right up to watch the rest on your Kindle Fire while in bed or while traveling. You can also use Amazon’s Cloud Services to load your personal photos and documents onto your Kindle Fire. Even if you leave your Kindle Fire behind, all your music, books, videos, and personal files are accessible from any computer with an Internet connection or from many mobile devices.
Amazon Prime
The key to accessing Amazon’s Cloud Services is your Amazon account. A standard Amazon account enables you to manage your Kindle Fire device (more on that in Chapter 3, “Using Amazon’s Manage Your Kindle Page”) and to purchase books, music, and much more. To get the full value from your Kindle Fire, however, consider upgrading to an Amazon Prime account.
An Amazon Prime account costs $79 per year. For that price, you get the following:
• Prime Instant Videos: Unlimited, instant streaming of more than 40,000 movies and television shows. You can watch on your Kindle Fire or on any other Internet-connected TV or game machine you own.
• Kindle Lending Library: You can check out one book per month from the Kindle Lending Library catalog without any due dates and load it on your Kindle Fire. The Kindle Lending Library has more than 350,000 titles, so you’re sure to find something to read each month.
• Free two-day shipping: When you shop for material goods on the Amazon site, you get free two-day shipping on most items. One-day shipping costs only $3.99 per item for eligible purchases. The Amazon Store sells everything from toys to food to clothing, so it’s easy to see a return on your $79 Prime membership investment if you frequently shop online.

Extended Prime Benefits for Caregivers and Students
If you are the primary caregiver (mom, dad, grandparent, and so forth) of a young child, you can get 20 percent off diapers, wipes, and certain other family goods by joining Amazon Mom as a member of Amazon Prime. Browse to www.amazon.com/prime for details.
If you are a college student, you can get a free 6-month subscription to Amazon Prime and then continue for $39 per year, a 50% discount over the regular membership fee.
Setting Up Amazon Prime
When you went through the setup process for your Kindle Fire, you either connected to an existing Amazon account or created a new one. You can set up a free trial of Prime on the same account. You do this on your Kindle Fire using the Silk browser or via the web browser on your computer.
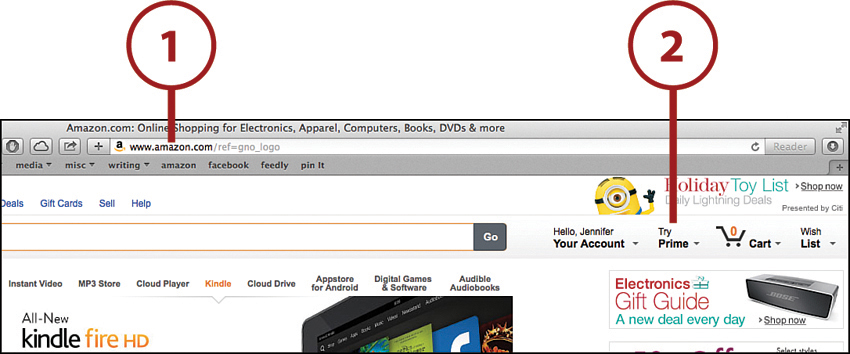
1. Open a web browser and navigate to www.amazon.com.
2. Click Try Prime. If you are not already logged in to your Amazon account, enter your email address and password.
3. Click Start Your 30-Day Free Trial.

4. Enter your billing information.
5. Select Start Your 30-Day Free Trial.
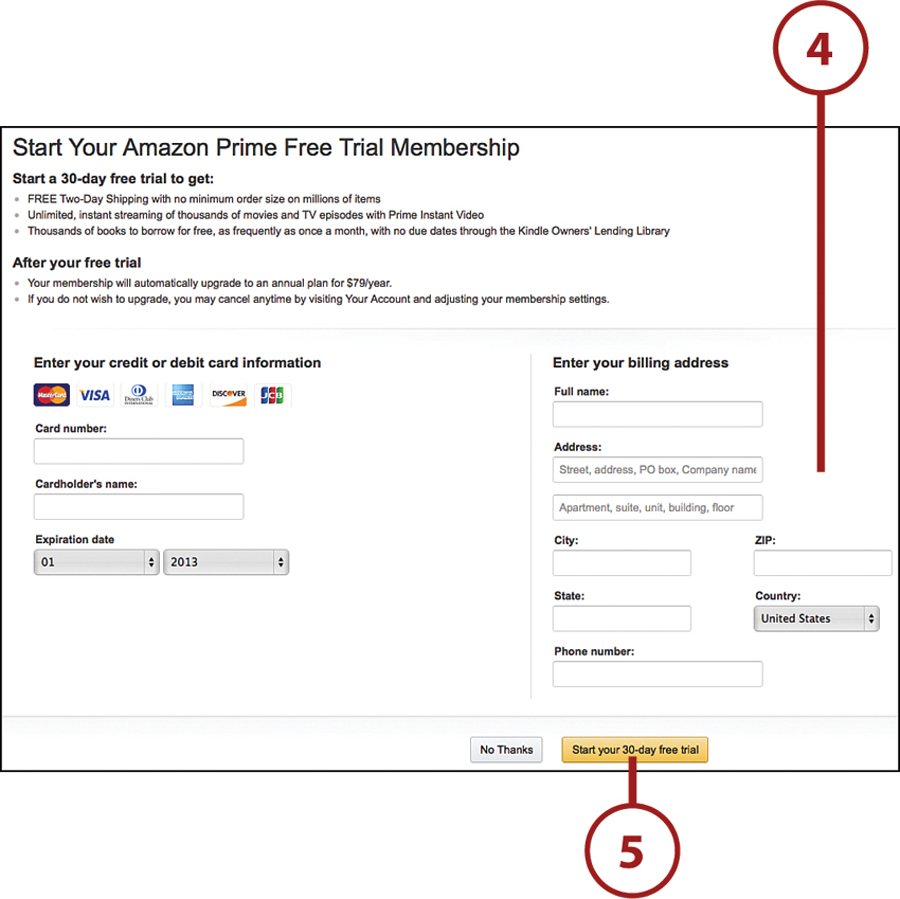
At the end of your free trial, Amazon automatically bills you for $79 to extend your Prime membership for a full year. If you decide that you don’t want to keep Prime, go to the Amazon.com site, select Your Account, and then select Do Not Upgrade sometime before the end of your 30-day trial.
Amazon Cloud Drive
Your computer has a hard drive in it where you can store your stuff. When you’re sitting at your computer, that stuff is easy to access, but what about when you’re not at your computer? The cloud is like having a hard drive available from anywhere you have Internet access.
Amazon provides 5GB of free storage that you can use for photos, personal documents, or anything else you want to store in the cloud. This space is in addition to the unlimited cloud storage Amazon provides for books, music, and videos you purchase directly from Amazon. If you need additional storage, Amazon offers plans from 20GB for $10 a year to 1,000GB for $500 a year. As a frame of reference, a typical HD movie is approximately 2GB (2,000MB). A single song is 3MB to 6MB, and a complete album is around 50MB. A high-quality photo is about 2MB to 3MB. As you see, if you start putting all these items onto your cloud storage, it can fill up quickly.
Content you purchase on Amazon is automatically accessible from your Amazon Cloud account and, thus, from your Kindle Fire. But to access your personal photos and documents, you must upload them to your Cloud Drive.

Accessing Your Cloud Drive
You can access your Cloud Drive using Silk on your Kindle Fire or using the web browser on your computer.
1. Open your web browser and go to www.amazon.com.
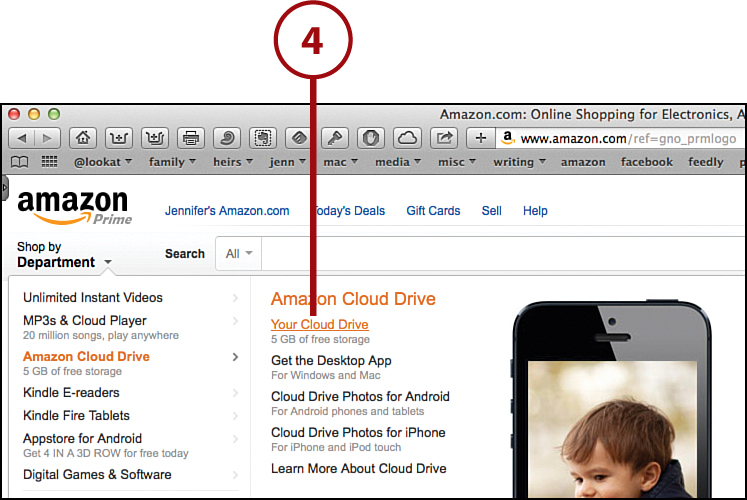
2. Hover over Shop by Department. If you access the Amazon website from Silk, tap Shop by Department.
3. When the Shop by Department menu opens, point to Amazon Cloud Drive.

4. Select Your Cloud Drive from the menu. You might get a prompt to install the desktop application, which I explain later in this chapter. You can install it at this time or click Continue to Your Cloud Drive. (Enter your email address and Amazon password, if prompted.)
After you log in, you’ll see your Cloud Drive and a big Upload button to get you started. I show you how to create folders and upload files next.
Creating Folders
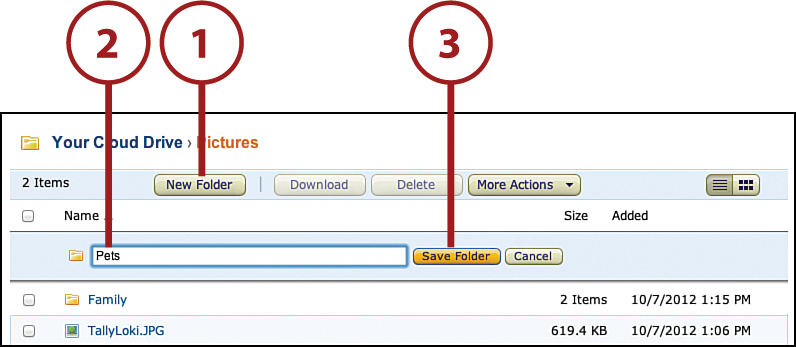
By default, your Cloud Drive contains folders for the common file types. You’ll see folders for pictures, documents, and videos. Those folders are a good starting point, but you might want to create additional folders. For example, if you’re uploading pictures of your pets, you might want to first create a folder inside the Pictures folder called Pets and then upload those pictures there.
1. Click New Folder. If you want to place the new folder within another folder, first click that folder from the Folders sidebar.
2. Enter a name for the folder.
3. Click Save Folder.
More Actions
You can copy, move, and rename files and folders using the More Actions button.
Deleting Folders
You can delete folders from your Cloud Drive that you no longer need or to free up some space.
1. Click Your Cloud Drive so that your folders are visible.
2. Check the box to the left of the folder(s) you want to delete.
3. Click Delete. You will not see confirmation of this action, so be sure you choose your files correctly.

Recovering Deleted Items
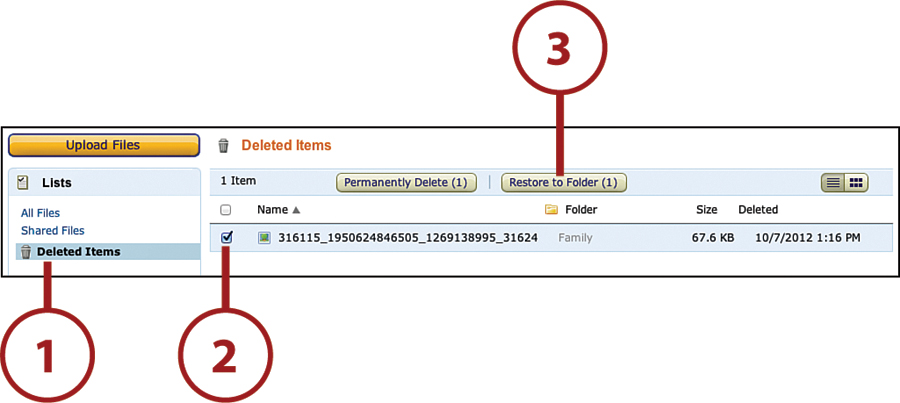
If you accidentally delete your files, you can recover them. If you delete a folder that contains files, the files are deleted along with the folder. Recovering a folder also recovers the files that were originally inside the folder.
1. Click Deleted Items.
2. Check the box to the left of the files or folders you want to recover.
3. Click Restore to Folder.
Permanently Deleting Files
When you delete a file or folder, it is moved to a Deleted Items folder and continues to use space in your Cloud Drive. To permanently delete these items, click the Permanently Delete button in Deleted Items.
1. Click the Upload Files button near the top-left corner of the Cloud Drive screen.
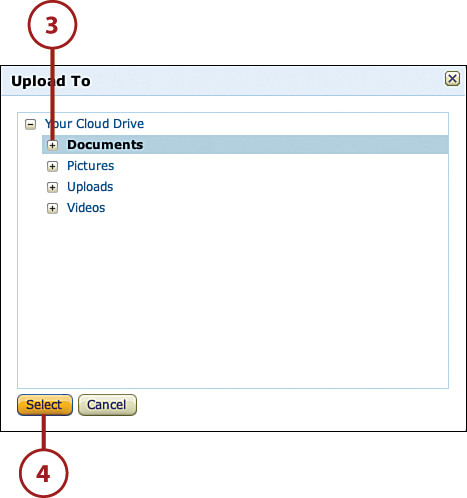
2. Click the drop-down list to select a folder for your uploaded files.
3. Select your folder.
4. Click Select.
5. Click Select Files to Upload, locate the files on your computer, and select them.

After step 1, you might see a notice about the Amazon Cloud Drive application. You can choose to follow the prompts and download this application or proceed uploading your files using your web browser.
Downloading the Cloud Drive Application
If you use your Cloud Drive on a regular basis, you might find it easier to download and use the Amazon Cloud Drive application. You can download and install it when you see the prompt as you attempt to upload from your web browser, or you can install it at any other time.
1. On your computer, go to www.amazon.com.
2. Hover over the Shop by Department menu.
3. Point to Amazon Cloud Drive.
4. Click Get the Desktop App.

5. On the page that appears, click Free Download. The application downloads to your computer.

6. When the download is complete, double-click the file to initiate the installation procedure and follow the instructions to install the Amazon Cloud Drive application on your computer.

7. Open the Amazon Cloud Drive application and enter your Amazon account username and password.
8. Click Sign In.

9. Click Create Cloud Drive Folder.

Using the Amazon Cloud Drive Application
To add files and folders to your Cloud Drive on a PC, drag files over the Amazon Cloud Drive icon in the taskbar. On a Mac, drag files over the Amazon Cloud Drive icon in the menu bar. On either computer, you can also paste files and folders directly into the Cloud Drive folder that was created earlier in step 9.
Accessing Cloud Drive Files from Your Kindle Fire
Your Kindle Fire automatically syncs with your Cloud Drive whenever you have an Internet connection. Files on your Cloud Drive are automatically sorted into the appropriate content library on the Kindle Fire. If you want to view the photos you uploaded to your Cloud Drive, for example, you can find them in Photos. Personal documents are found in the Docs library.
1. Use the Navigation menu to access the library for the files you want to view. In this example, we access the Docs library.

2. Press the Cloud button if it’s not already selected.
3. View a list of the files you have in the cloud for that library.

Folders and Subfolders
Folders and subfolders keep your documents organized. When you view your Docs library By Name, By Recent, or By Type, all your documents are listed, no matter how they’re grouped in your Cloud Drive. View your docs By Folder to see only documents within a particular folder or subfolder.
Saving Files to Your Device
When you select a document from the Docs library on your Kindle Fire, it is automatically saved onto your device, and you can then open it from either the Cloud or On Device options. The process for transferring photos from your Cloud Drive onto your device is a bit different.
1. Select Photos from the Navigation bar.

2. Select a photo or folder from the Cloud library.

4. Select Download.

Amazon Cloud Player
Amazon Cloud Player is a convenient way to manage music on your Cloud Drive. You can also use it to listen to your music when you don’t have your Kindle Fire with you, because it is available from any computer with Internet access or on most mobile devices.

Launching Cloud Player
You can also elect to download the Amazon Cloud Player application onto your PC or Mac.
1. Open your web browser and go to www.amazon.com.
2. Point to MP3s & Cloud Player on the menu.
3. Click Play Your Music at Home.

4. Click Download for PC and Mac.

5. When the download is complete, double-click the file to initiate the installation procedure and follow the instructions to install the Amazon Cloud Player app on your computer.

6. Open the Amazon Cloud Player application and enter your Amazon account username and password.
7. Click Sign In.

Amazon Cloud Player Is Also on the Web
You can also access Amazon Cloud Player from your web browser at www.amazon.com/cloudplayer.
Importing Your Music
You can easily upload your music from iTunes and other music apps to Amazon Cloud Player, which then makes it available on your Kindle Fire. You can upload up to 250 songs for free or upgrade to a Premium account that stores up to 250,000 songs for $24.99 a year.
1. Open the Amazon Cloud Player app.

2. In the menu bar, click File, Import Music to Cloud Library.

3. Click Continue to launch the Cloud Player website.

4. Click Import Your Music.

5. Click the Download Now button to download the Amazon Music Importer application, and follow the installation instructions.

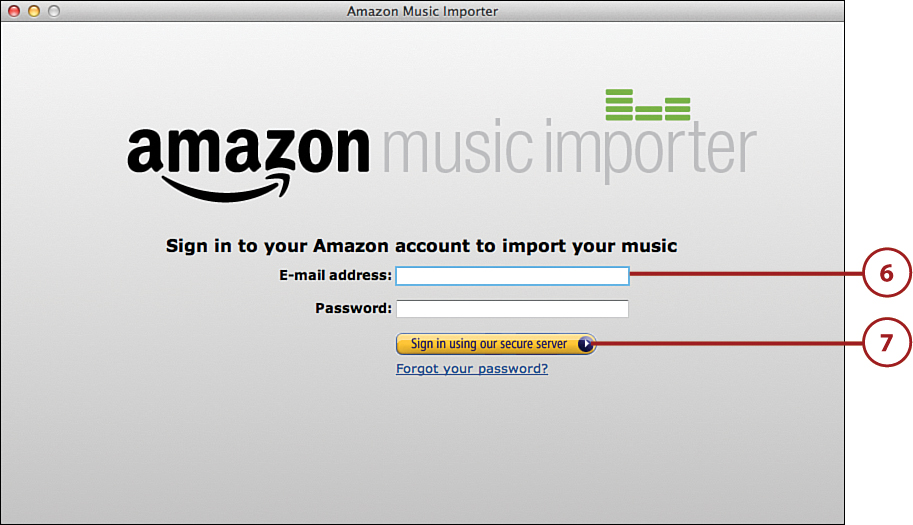
6. Open the Amazon Music Importer application, and enter your Amazon account information.
7. Press Sign In Using Our Secure Server.
8. Click Start Scan. The Amazon Music Importer application scans your hard drive, including your iTunes folders (if you have one), for music.

9. After the scan is complete, you might be prompted to choose to upgrade to Cloud Player Premium for $24.99 a year or to select up to 250 songs free. If you have previously imported songs to your Amazon Cloud Player, the number of free songs remaining in your limit appears on the Import button.

10. To select which songs to import into your Cloud Player, check the boxes to the left of the song, album, artist, or playlist title.
11. Click Import Selected.

12. When the import is finished, click Close.

Importing Directory from the Cloud Player Website
You can bypass steps 1–3 by opening your browser and navigating directly to www.amazon.com/cloudplayer.
Music that you purchase directly from Amazon’s MP3 Store is automatically added to your Amazon Cloud Player, which makes it almost instantly available on your Kindle Fire. It also does not count against the 250 song or Premium storage limitation on your Amazon account.
Playing Music on Your Computer
You can stream music from the Cloud Player app without downloading the music to your computer.
1. Locate the music you want to play. You can browse by song, album, artist, or genre.
2. Double-click an album to see all the songs on that album.

3. Double-click the song you want to play. You can also press the Play button at the top of the list to play all the songs that are displayed.
4. To play the songs in a list in a random order, press the Shuffle button.
5. To pause the song that is playing, click the Pause button. To continue playing, press the Play button that appears in its place.
6. To go to the next song, click the Next button.
7. To go to the previous song, click the Previous button.

Creating Playlists
You can create playlists of songs to play only the songs you want to hear. Playlists are a great way to make a song list for a party or special event. Playlists you create in Cloud Player are also available on your Kindle Fire.
1. In the Amazon Cloud Player app, drag the songs you want to add to a playlist to the playlist sidebar.

2. Enter a name for the playlist.
3. Click Save.

4. Browse to other songs and drag them to your playlist as desired.
5. Click the Back button when you’ve completed your playlist.

Refreshing Cloud Drive
Your Cloud Drive refreshes on your Kindle Fire every 10 minutes. Songs or playlists that you add appear after a refresh. If you’re in a hurry to get your songs or playlists onto your Kindle Fire, swipe down from the status bar on your Kindle Fire to open the Quick Settings, and then tap Settings and Sync All Content.
Downloading Songs to Your Kindle Fire
If you plan to be away from an Internet connection, you can still play your music by first downloading it to your Kindle Fire.
1. On the Navigation bar of your Kindle Fire, press Music.

2. In the Cloud tab, select a playlist, artist, album, or song.

3. Click the Download All button.

4. If you want to exclude some songs for an artist or album from being downloaded, select the X to the right of the song title. When the download is complete, press Device to confirm that only the music you wanted is now stored on your Kindle Fire.

>>>Go Further: Downloading Music to Your Computer

Amazon Instant Video
Amazon has a huge selection of videos, including both movies and television programs, that you can watch on your Kindle Fire. You can also watch those videos on your computer. You can even purchase or rent videos on your computer and watch them on your Kindle Fire, or vice versa.
When you rent or purchase a video, it becomes available on any computers and devices that are connected to your Amazon account. To view free Prime Instant Videos, however, you must order them directly from the computer or device on which you want to watch them.
Getting Videos from Amazon Instant Video
You can use your computer to buy, rent, or stream Amazon Instant Video. Videos that you buy or rent are available on your computer, on your Kindle Fire, or on any other device that supports Amazon Instant Video.
1. Open your web browser and go to www.amazon.com/instant-video. Or go to www.amazon.com and select Unlimited Instant Videos from the Shop by Department menu; then click Amazon Instant Video Store.
2. Select the movie or TV show that you want to watch.

3. Choose to purchase, rent, or watch your video. Not all options are available for all titles.

Watching Prime Instant Videos Offline
When you purchase or rent a video, you can download it to your computer or device for offline viewing, but you cannot watch free Prime Instant Videos on your computer if you’re offline. The Kindle Fire HDX, however, allows you to download select Prime Instant Videos so you can watch them later, even when you’re not connected to the Internet. This feature is not available for all Prime Instant Videos. Learn more in Chapter 6, “Watching Video on Your Kindle.”
Kindle Reader Applications and Kindle Cloud Reader
In addition to reading on your Kindle Fire, Amazon offers free Kindle Reading apps for the PC, the Mac, and most mobile and tablet devices. All these applications enable you to access your Kindle books from the Amazon Cloud and save them to your computer or device to read offline. You can also access your Kindle books from the Kindle Cloud Reader on the Internet. If you purchase new books from the Kindle Store while on your computer or mobile/tablet device, it appears in your Cloud account so you can also read it on your Kindle Fire.
Accessing Kindle Reader Applications
Before you can read Kindle books on your computer, tablet, or smartphone, you must download and install the appropriate app.
1. In a web browser, go to www.amazon.com.
2. In the Shop By Department menu, choose Kindle E-readers, and then choose Free Kindle Reading Apps.

3. Select your computer or device and follow the directions for downloading and installing the appropriate app.

Downloading Smartphone and Tablet Apps
The information pages for each of the smartphone and tablet apps (iPhone and iPod Touch, Android, Windows Phone, BlackBerry, iPad, Android Tablet, and Windows 8 tablet) have links to the appropriate store or marketplace to download the required application.
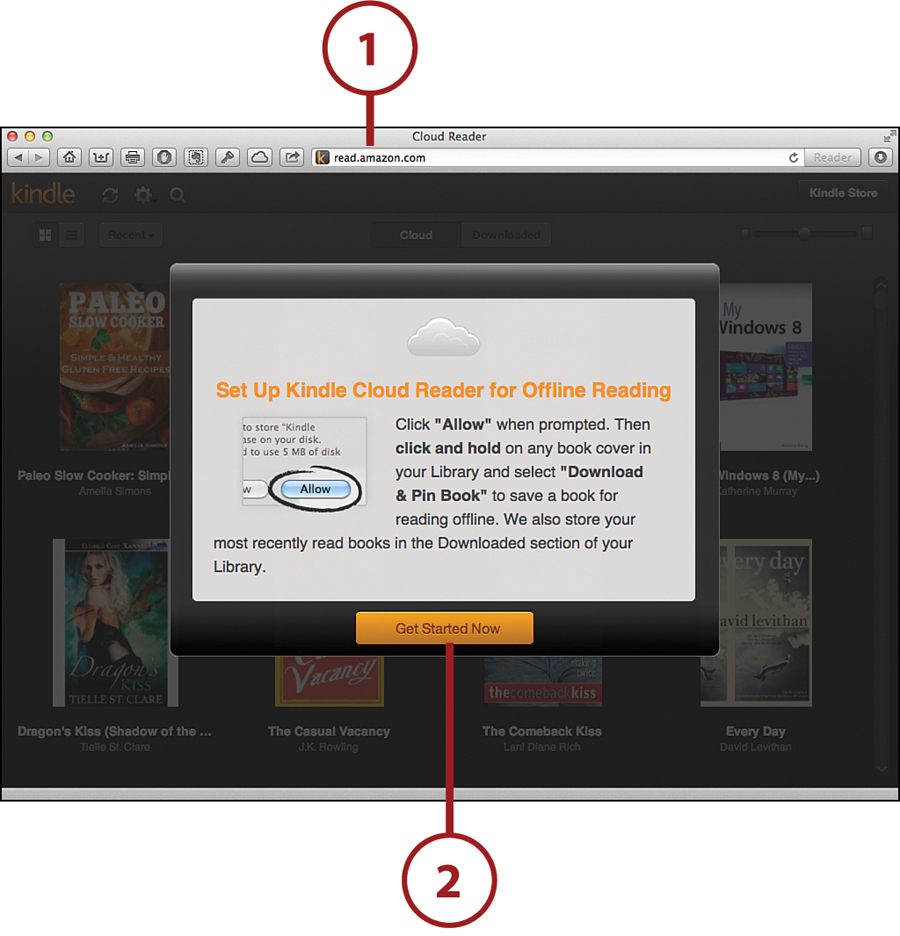
Accessing Kindle Cloud Reader
The Kindle Cloud Reader makes it possible to read your Kindle books in your web browser from any location with Internet access. Kindle Cloud Reader requires a current version of either Google Chrome (www.google.com/chrome), Apple Safari (www.apple.com/safari), or Firefox (www.getfirefox.com). It does not run on Microsoft Internet Explorer.
1. Browse to read.amazon.com using your web browser. You can also go to www.amazon.com, choose Kindle from the Shop by Department menu, and then select Kindle Cloud Reader.
2. Click the Get Started Now button.
3. Enter your email address and Amazon password, and then click Sign In.
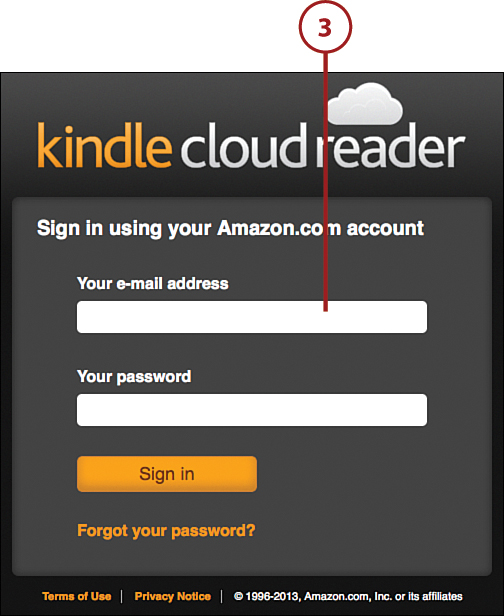
4. View your Kindle Library in your browser window.

Opening and Downloading Books
When you select a book, the Kindle Reader app or Amazon Cloud Reader automatically begins downloading it to your device or computer. This makes the book available even if you continue reading offline.
1. Locate the book you want to read. You can click the magnifying glass at the top of the screen to search for books, if necessary.
2. Click a book to start reading it. If you are using the Kindle Cloud Reader, the book begins downloading to your computer as you read. If you are using one of the other Kindle Reader apps, the book downloads to your device and then allows you to read it.
3. If you want to download a book without immediately beginning to read in the Kindle Cloud Reader and computer Kindle Reader apps, right-click the book and click Download & Pin Book. In the smartphone and tablet Kindle Reader apps, press and hold the book until a Download button appears; then press that button.

Reading Books on the Kindle Cloud Reader
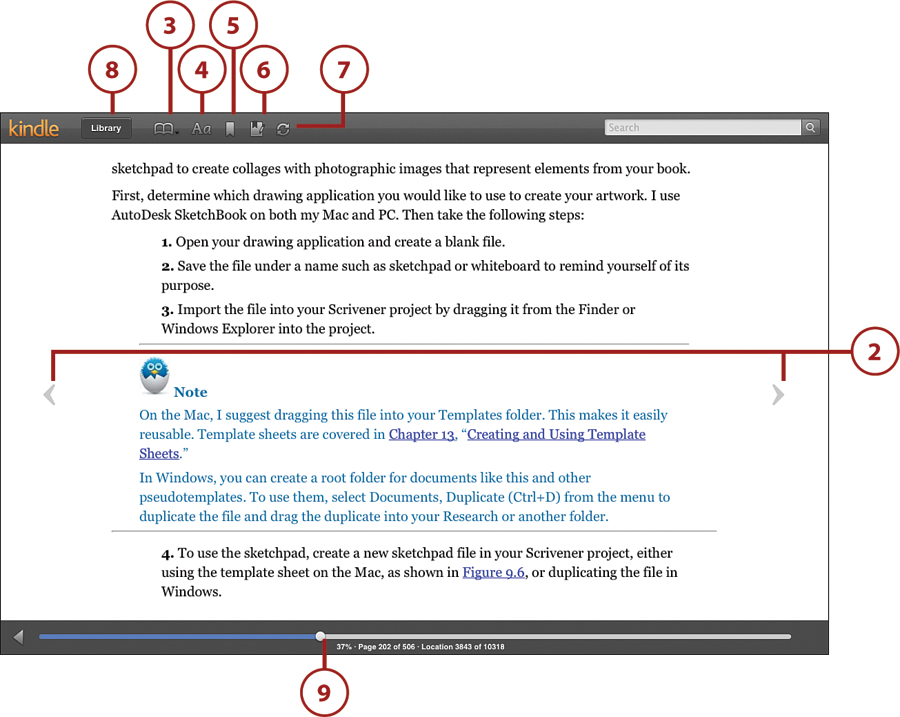
The Kindle Cloud Reader has many features to make reading a book more enjoyable. The other Kindle Reader applications are similar but might have slight differences in the location and method for accessing some features.
1. Open a book as described in the previous section. If the book has been opened previously on any Kindle device, it automatically opens at the farthest point read.
2. To turn pages, use the arrow keys on your keyboard or click the arrows on the left and right sides of the page.
3. Quickly access a part of the book using the Go To menu.
4. Change font size, margins, and color settings using the View Settings button.
5. Bookmark a page using the Bookmark button.
6. View notes and highlights using the Show Notes and Marks button.
7. Synchronize with your other Kindle devices using the Synchronize button.
8. Click the Library button to return to your library.
9. See where you are in the book using the location bar.
10. To add Notes or Highlights, use your mouse to select the passage you want to mark; then right-click and choose to create a Note or Highlight.
11. To bookmark a page to return to it later, tap the Bookmark icon in the top-right corner of the page.

Transferring Files from Your Computer
Most of the content you view on your Kindle Fire is available directly from Amazon and can be easily accessed from the Amazon Cloud. You can also transfer books, videos, music, and other files from additional online sources or your personal library. This is known as sideloading. To get this content onto your Kindle Fire, transfer the files via the micro-USB cable that came with your device.
Kindle File Types
You can transfer the following types of files onto your Kindle Fire:
• Books and documents: AZW, TXT, PDF, MOBI, PRC, DOC, and DOCX formats
• Audio (Music): MP3, Non-DRM AAC (.m4a), MIDI, OGG, and WAV formats
• Video: MP4 format
• Images: JPEG, GIF, PNG, and BMP formats
The Kindle Fire cannot read Mobipocket files that utilize Digital Rights Management (DRM) protection. The Kindle Fire also does not support EPUB books.
Transferring Files from a PC
If you’re using Windows Vista or later, the Kindle Fire automatically shows up as an available external USB drive. After connecting your Kindle Fire to your PC using the micro-USB cable, follow these steps:
1. In Windows Explorer, click Computer.
2. Click Kindle.
3. Double-click Internal Storage.

4. Copy your files from their original location on your PC into the appropriate folders in the Internal Storage folder.

Transferring Files from a Mac
If you’re using a Mac, you must download Android File Transfer, a free app, before you can transfer files using USB.
1. In your web browser, go to www.android.com/filetransfer.
2. Click the Download Now button, and follow the instructions to install Android File Transfer to your Applications folder.

3. Use the micro-USB cable to connect your Kindle Fire to your Mac.
4. Double-click the Android File Transfer app to open it. After you’ve opened it for the first time, it automatically opens whenever you connect your Kindle Fire to your Mac.
5. Copy your files from their original location on your Mac into the appropriate folders in the Android File Transfer app.
