
4. Communicating Online with Your MacBook
In this chapter, you’ll learn how to use your MacBook to access Online Services, including:
• Connecting to email accounts
• Accessing Microsoft Exchange Servers
• Using threading and spam-filtering features
• Configuring instant messaging in iChat
• Conducting video and audio chats
• Sending text messages to mobile devices
• Browsing the Web using Safari 5.x
• Creating web clippings
• Using Safari Extensions
Introduction
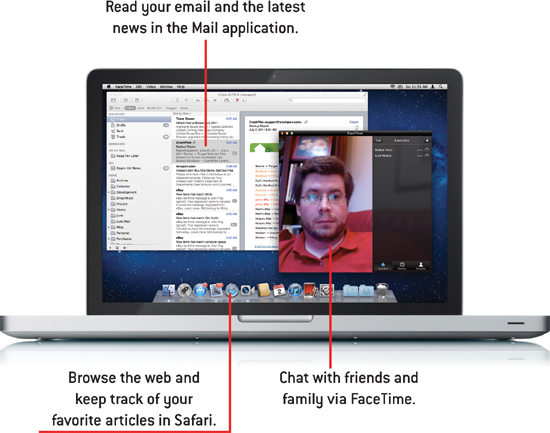
The Internet has de-shackled us from our desks. We can communicate instantly with family, friends, and colleagues no matter where we are in the world as long we can access an Internet connection. Your MacBook comes with everything you need to keep in touch when you’re on the road or kicked back on your couch.
In this chapter, you learn how to use some of the unique features of the Lion’s Mail, Web, and Instant/Video Messaging applications. Even if you’re working in a Microsoft-centric environment, you’ll find that your MacBook’s tools are up to the job.
Getting Started with Accounts
For all the fun and information the Internet has brought us, it has also created a mess in terms of managing all the accounts we use to communicate online. If you’re like many people, you have multiple email accounts—possibly one through iCloud, one from work, and one through your ISP. You have accounts for chatting with instant messenger. You have accounts for sharing contacts and calendars. In other words, you’ve got tons of different usernames and passwords that all need to be configured in different applications, just so you can be connected.
In Lion, Apple has recognized the problem of account overload and worked to consolidate all your online account management in a single centralized preference panel—Mail, Contacts, and Calendars. Here you can set up email, instant messenger, iCloud, Exchange, iCal, and other account types—without needing to figure out where they’re managed in your individual applications.
I’ll be showing the use of this panel as needed in the chapters, but let’s take a very brief look at how you’ll interact with this tool on your MacBook.
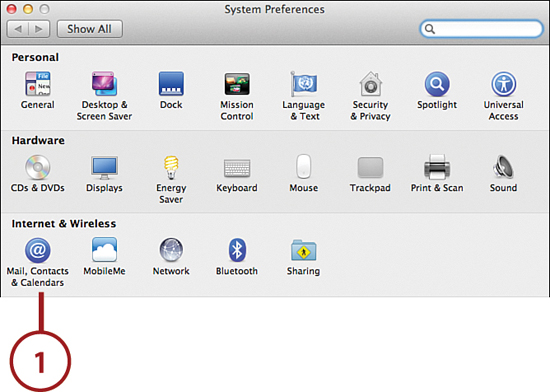
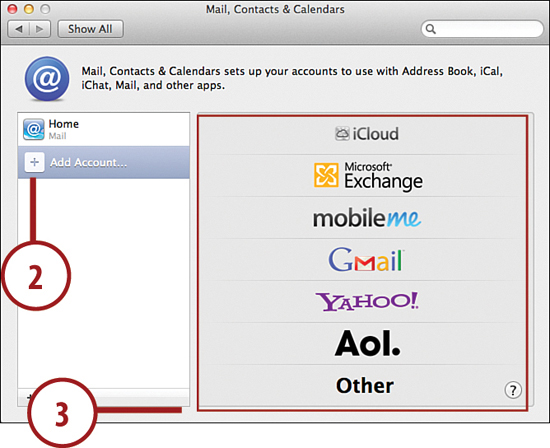
Adding an Account
To add an account for an online service (email, contacts, calendars, iCloud, Exchange, etc.), follow these steps:
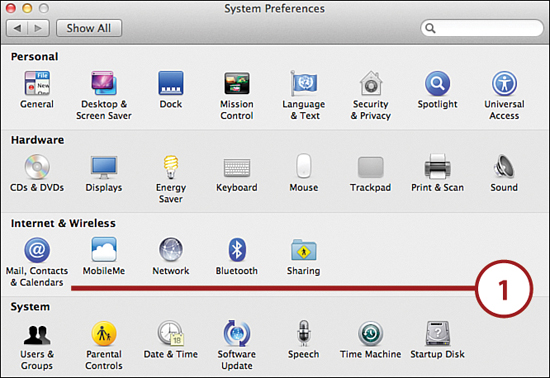
1. Open the Mail, Contacts, and Calendars System Preference Panel.
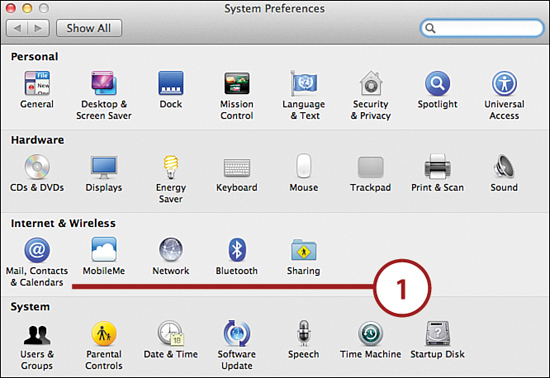
2. Make sure the Add Account item is highlighted on the left.
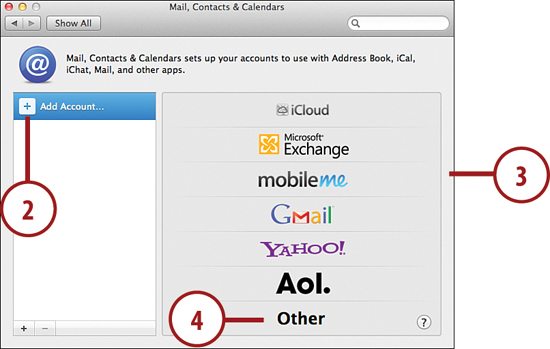
3. Choose an online service that you want to configure by clicking its name on the right.
4. Click Other to choose from a list of additional service types.
5. Fill in the requested information in the setup wizard that appears.
6. The completed account is listed in the preference panel.
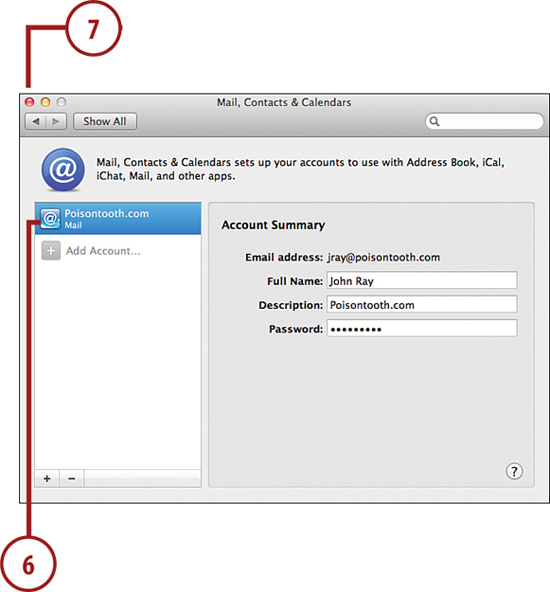
7. Close System Preferences when finished.
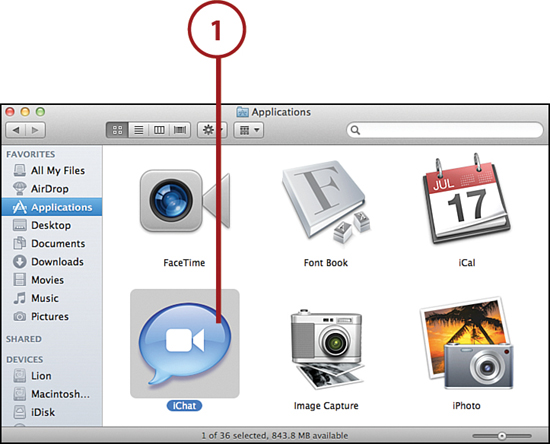
Using Mail
The first thing that many of us do when we have an Internet connection is check our email. Email is now a way to exchange rich media—such as photos, files, and movies—in addition to a way to exchange written messages. The email application, Mail (found in the Applications folder by clicking the Mail icon), is provided with your MacBook. With Mail, you can connect to a variety of different mail servers, including Microsoft Exchange, with only a few clicks of your mouse.
Things You Need Before Setting up an Email Connection
As with the networking information in the last chapter, configuring your email account isn’t a matter of guessing. Apple’s Mail application can automatically set up several popular email services (such as Google and Yahoo), but if you’re connecting to a corporate email server, you should collect as much information as possible from your email system administrator or ISP before proceeding. This includes your email address, password, email server, email server type (POP, IMAP, or Exchange), and SMTP server:
• Incoming Mail Server—The server that you connect to when retrieving your email.
• Incoming Mail Server Type—The type of server that you’re connecting to. Apple’s Mail application supports Exchange, IMAP, and POP servers.
• Outgoing (SMTP) Server—The server that sends your messages.
• Authentication—Typically, a user name and password required to retrieve or send messages.
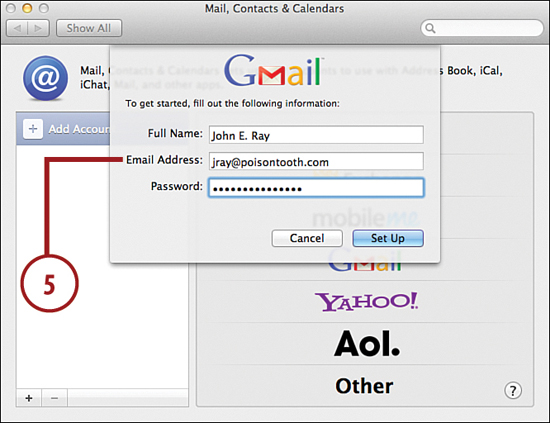
Adding an Email Account (Simple)
If you have an email account that Lion recognizes, configuration couldn’t be easier—you just need your email address, name, and password to make a connection. Lion attempts to identify and configure your account. If for some reason it fails, you can continue with an advanced manual configuration (see the next task).
1. Open the Mail, Contacts, and Calendars System Preference Panel.
2. Make sure the Add Account item is highlighted on the left.
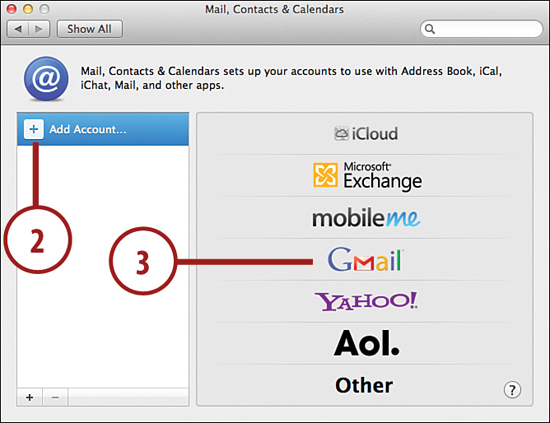
3. Choose an email service that you want to configure by clicking its name on the right.
4. The Add Account window displays. Type your name (as you want it to appear in outgoing messages), email address, and password for the account.
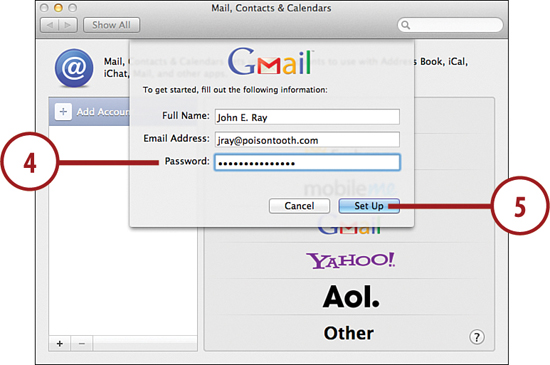
5. Click Set Up.
6. Lion attempts to automatically configure your account. If additional features are determined to be available from the email provider, they are listed in the window. Choose which services you want to use by checking/unchecking the checkboxes.
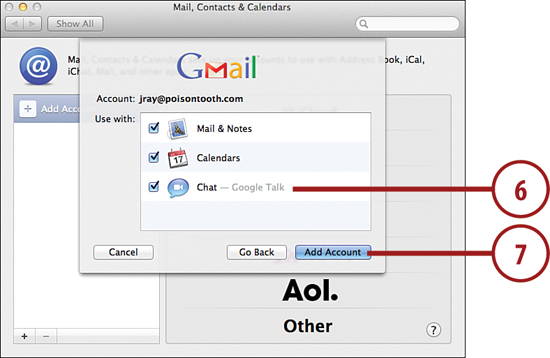
7. Click Add Account to finish adding the account.
8. If it’s successful, the newly configured email account appears in the account list. If the setup fails, cancel setup and skip ahead to the next section, “Adding an Email Account (Advanced).”
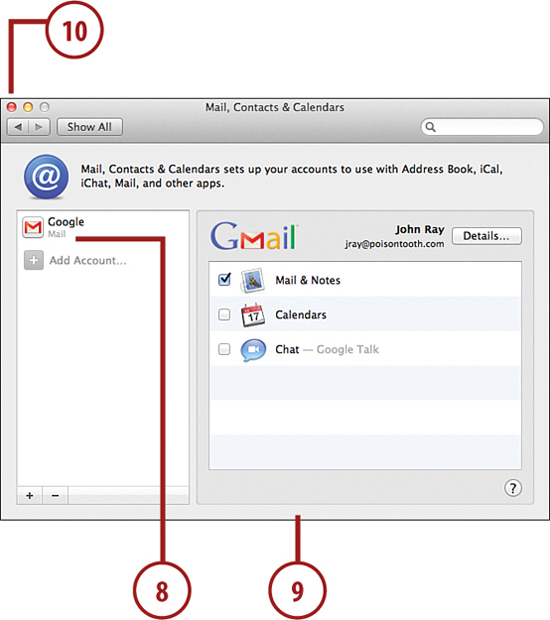
9. Clicking the account name in the list displays the account details on the right. You can edit these values if you want to change your display name or the name of your account.
10. You can now close System Preferences and begin using your account in Mail.
Adding an Email Account (Advanced)
Email accounts that aren’t immediately recognized by Lion require more information to be entered before they can be used. This is the case for some ISP email accounts, corporate, and educational systems. Be sure you have all the information listed previously under the “Things You Need Before Setting Up an Email Connection.”
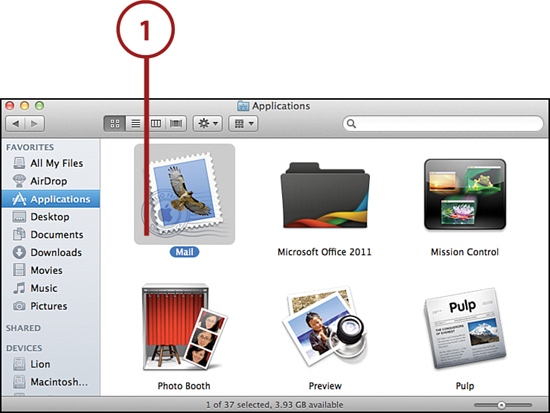
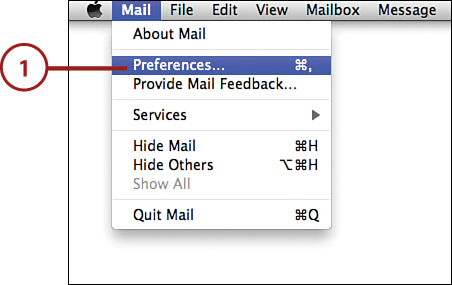
1. Open the Mail application from the Dock or Applications folder.
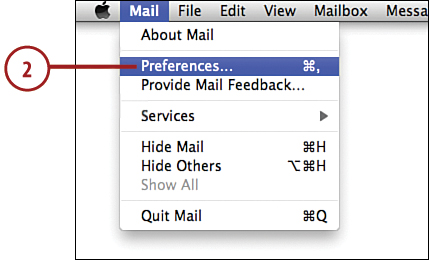
2. Choose Preferences from the Mail menu.
3. Click the Accounts button within the Mail preferences window.
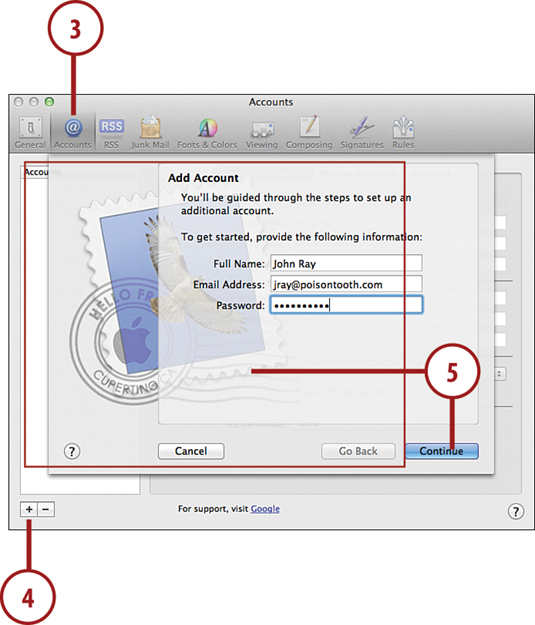
4. Click + to add a new account.
5. Provide the basic account information when prompted and click Continue.
6. When Mail cannot automatically configure the account, it displays a new dialog to collect information about your incoming mail server.
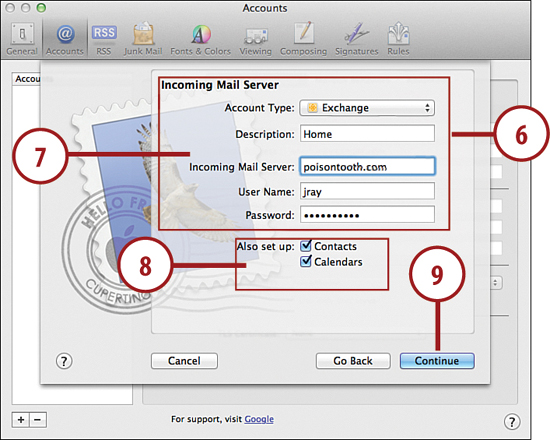
7. Enter the account information provided by your system administrator or ISP (the incoming mail server, username, and password). Use the description field to name the account with something meaningful that helps you differentiate it from other accounts.
8. If you are setting up an Exchange account, click the Address Book Contacts and iCal Calendars checkboxes if you would like your MacBook to have access to your Exchange-based address book and calendars directly within Address Book and iCal (discussed in Chapter 5, “Managing Contacts and Appointments”).
9. Click Continue. Mail automatically tests the information you’ve provided. If a failure occurs, recheck your information. After it is correct, click Continue again.
10. Mail displays the security settings for your incoming mail server. Typically, you are prompted for whether or not to use Secure Sockets Layer. If it’s available, this option is recommended.
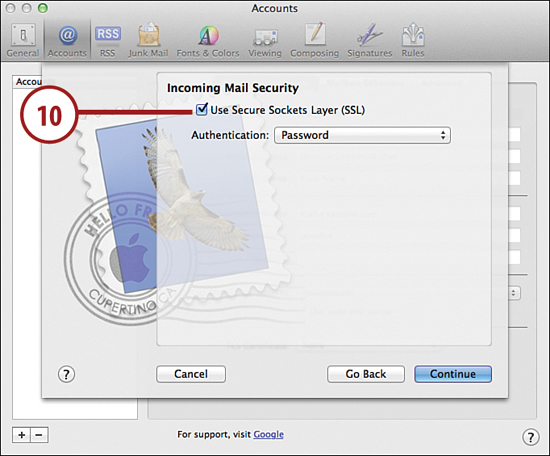
11. Use the Authentication dropdown menu to choose how you authenticate with the server. Typically you choose password (some complex configurations might use more advanced authentication methods).
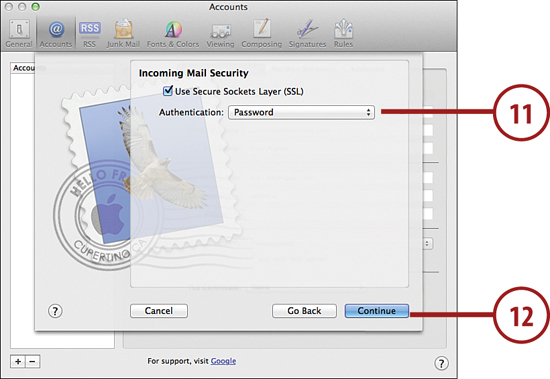
12. Click Continue.
13. Mail displays the outgoing mail server settings, known as the SMTP server settings. You should enter the information provided by your system administrator or ISP, or choose an existing outgoing server from the Outgoing Mail server dropdown menu. Again, use the description field to provide a meaningful name for the mail server.
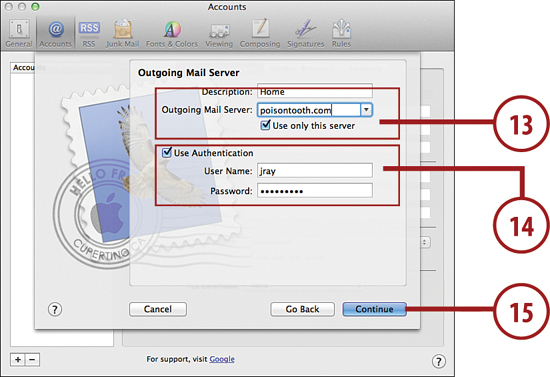
14. If your outgoing mail server requires authentication (many do!), click the Use Authentication checkbox and then provide a user name and password.
15. Click Continue.
16. Now you are prompted for whether or not to use Secure Sockets Layer for outgoing mail, as well as the authentication type. (Again, you would typically choose Password here.)
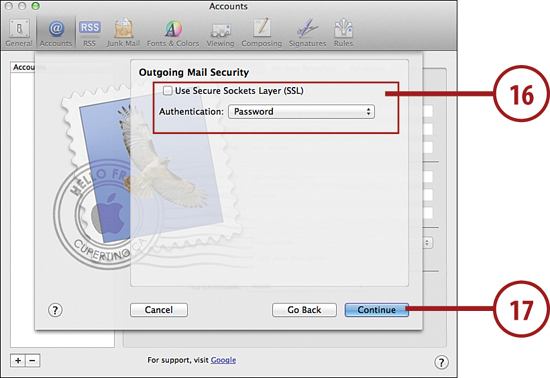
17. Click Continue to review your final settings. If an error occurs, check your settings, or click Continue to proceed with the settings you provided.
18. Make sure the Take Account Online checkbox is selected so that you can begin using your account.
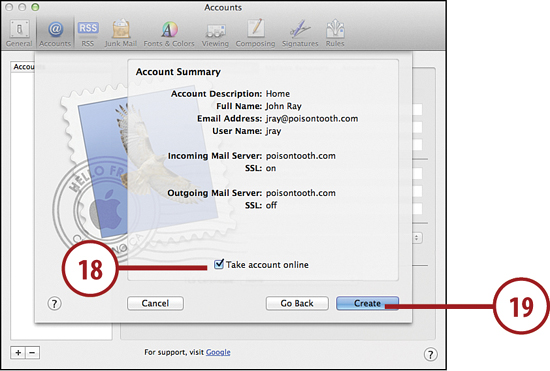
19. Click Create to finish setting up the account.
Finding Your Way Around Mail
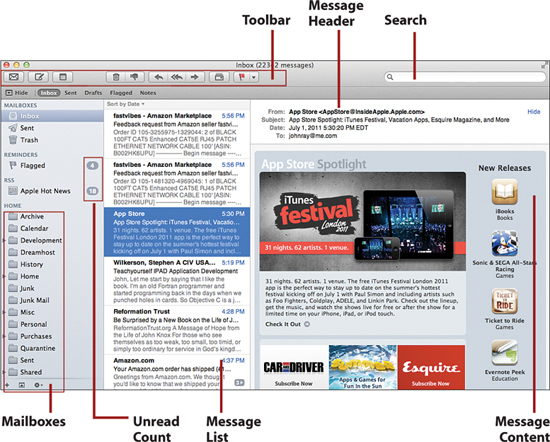
After your email account is configured, Mail connects and retrieves your messages. The Mail application workspace is split into three columns, from left to right: mailboxes, a message list, and message content.
On the left, the mailbox list shows different mailboxes (or folders) for categorizing your messages. To review the messages in one of your mailboxes (such as Inbox), click the mailbox. The message list, to the immediate right of the mailboxes, refreshes to show all of the email within the mailbox, including a several-line preview of the contents. Any message that you click in the Message list is displayed in the message content area on the right.
Now that you know the basics of finding your way around Mail, let’s take a look at the common tasks you should familiarize yourself with.
Reading Email
Reading messages is typically a matter of finding a message in the message list, clicking it, and reading. Even so, you can improve the experience by taking advantage of several tools built into Mail.
Sorting Mail
In previous versions of mail, it used to be that you’d click a column heading and “poof,” your mail was sorted. In Lion’s Mail application, however, the message list doesn’t have columns, so you’ll need to follow this approach:
1. Choose View, Sort By, and a message attribute to use as your sorting criteria.
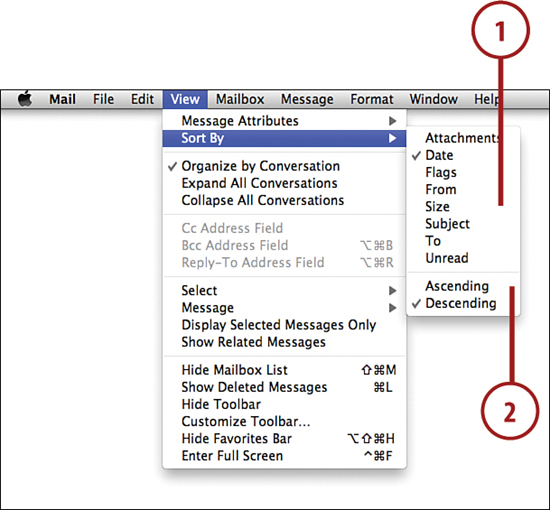
2. Choose View, Sort By, and Ascending or Descending to set the order of your sorting preferences.
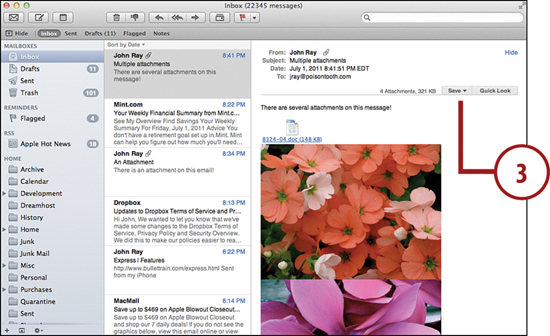
Previewing Attachments
In Chapter 1, “Managing Your MacBook Desktop,” you learned about the Quick Look system for previewing files in the Finder. In Mail, if your message contains an attachment, you can also use the Quick Look system.
1. Choose a message with an attachment—represented by a paperclip in the message list.

2. Click the Details link at the top of the message content to show buttons for saving and viewing Attachments.
3. Click the Quick Look button at the top of the message content area.
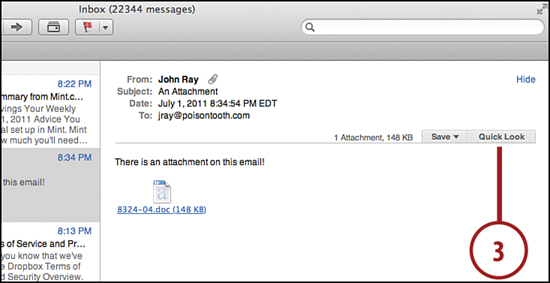
4. A Quick Look window appears, displaying the selected content.
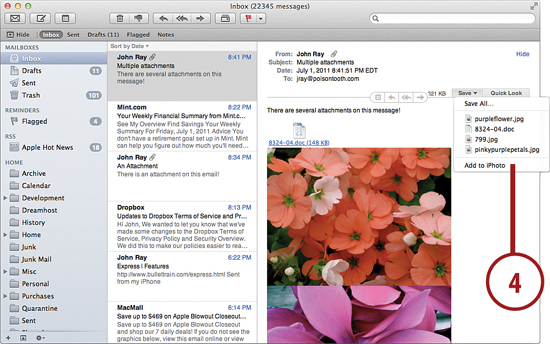
Saving Attachments
You can easily save one or more attachments to your MacBook’s hard drive, and even add images to iPhoto, directly from Mail.
1. Choose a message with an attachment—represented by a paperclip in the message list.

2. Click the Details link at the top of the message content to show buttons for saving and viewing Attachments.
3. Click the Save button at the top of the message content area.
4. A menu appears, enabling you to Save All, choose an individual file to save, or, if applicable, add the file to iPhoto.
Viewing Web Pages within an Email
Have you ever gotten a link to a webpage in email and wanted to view it without having to launch Safari? In Lion, you can. To preview a web link directly in Mail, follow these steps:
1. Position your cursor over the link within the message content, but do not click!
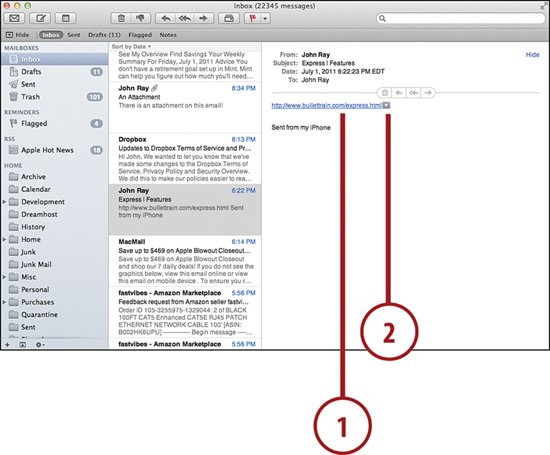
2. A small downward-pointing arrow appears to the right of the link. Click it.
3. A popover window appears displaying the web page.
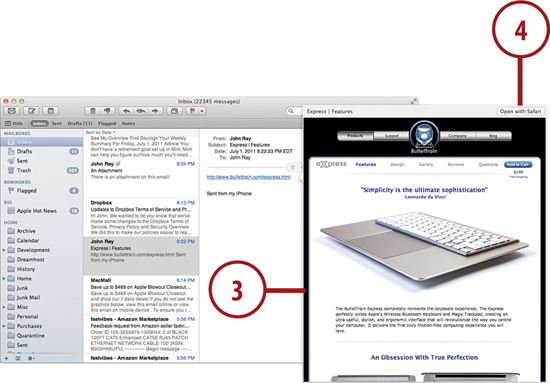
4. Click Open in Safari to open the full page in your web browser.
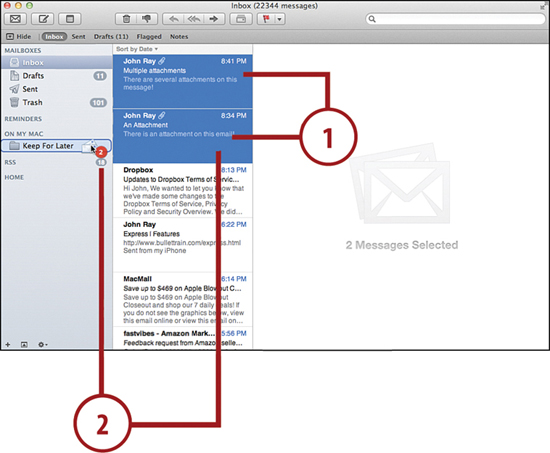
Organizing with Email Conversations
Email conversations can grow quite lengthy with back-and-forth replies. To help keep long conversations under control, Lion’s Mail, by default, collapses your conversations into a single entry in your message list. You can expand the entry to show the individual messages whenever you need to see one.
1. Conversations are denoted by a number within an entry in the message list.
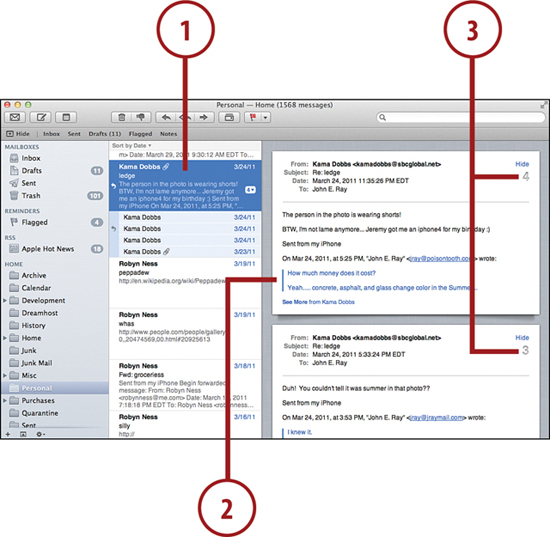
2. Click the message list entry to show all the messages in the conversation within the content area.
3. Messages are numbered at the top to show the order in which they were received.
4. To focus on a single message, click the arrow beside the number in the message list to show a list of individual senders and dates.
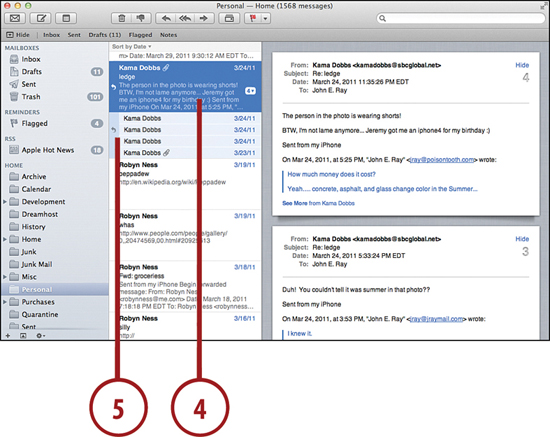
5. Click the individual name/date to show only that message.
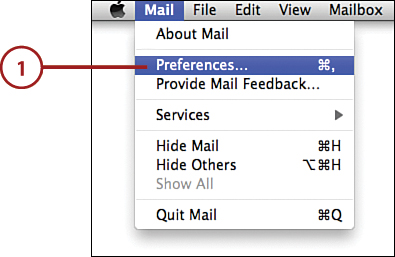
Managing Spam Filtering
Mail can learn (with some help) which messages in your inbox are spam and then filter similar messages so you don’t have to see them. To manage your spam filtering, follow these steps:
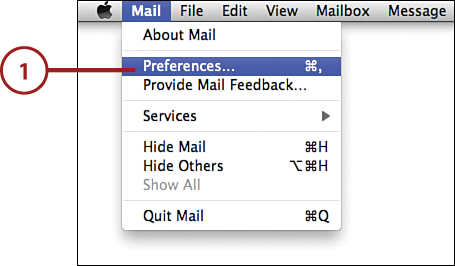
1. Choose Mail, Preferences from the menu bar.
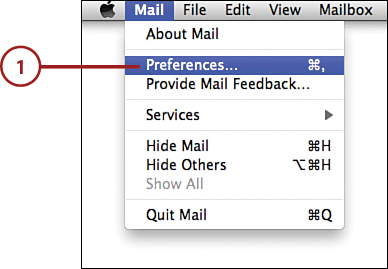
2. Click the Junk Mail toolbar icon.
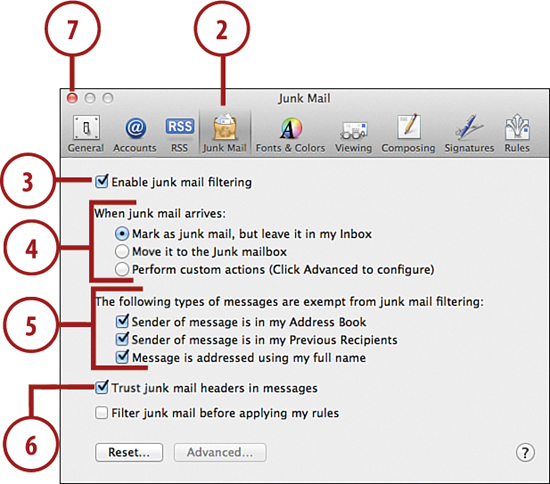
3. Click Enable Junk Mail Filtering to turn on spam filtering. You can disable it by unchecking this box at any time.
4. Choose where Mail should file spam messages. Moving messages to the Junk mailbox is a good choice.
5. To help prevent getting false positives, use the spam exemptions to identify types of messages that you don’t consider to be spam.
6. If your ISP offers spam filtering (and you trust it), make sure the Trust Junk Mail Headers in Messages option is set.
7. Close the Mail Preferences.
Changing How Often Mail Is Retrieved
You can force Mail to retrieve messages using the Get Mail toolbar button, but to change the frequency with which it forces a check you need to access the preferences.
1. Choose Mail, Preferences from the menu bar.
2. Click the General icon in the Preferences Toolbar.
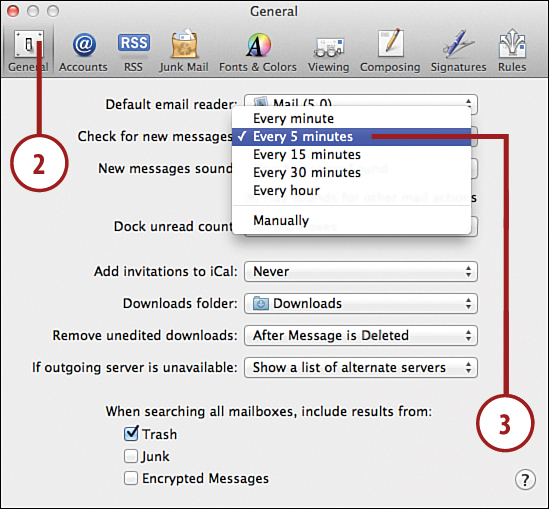
3. Use the Check for New Messages pop-up menu to set how frequently Mail looks for new messages.
Composing Email
Email today is a bit more than just typing a message—it can include sending photos, files, or even professionally designed invitations and announcements. Lion’s Mail on your MacBook enables you to do all of these things.
Let’s take a look at what you can do beyond simple text.
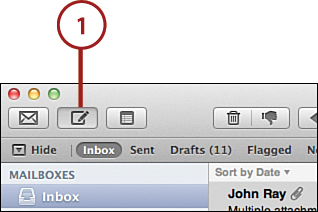
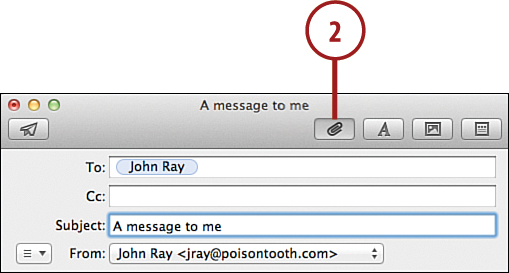
Sending Messages with Attachments
Mail can attach virtually any type of file to your messages with ease. Follow these steps to add Windows-compatible attachments to a mail message.
1. Start a new message by clicking the new message icon (pencil and paper) in the Mail toolbar.
2. Click the Attach icon (paperclip) in the New Message window.
3. Choose the files or folders to send from the file chooser dialog. Select multiples by holding down the ![]() key and clicking.
key and clicking.
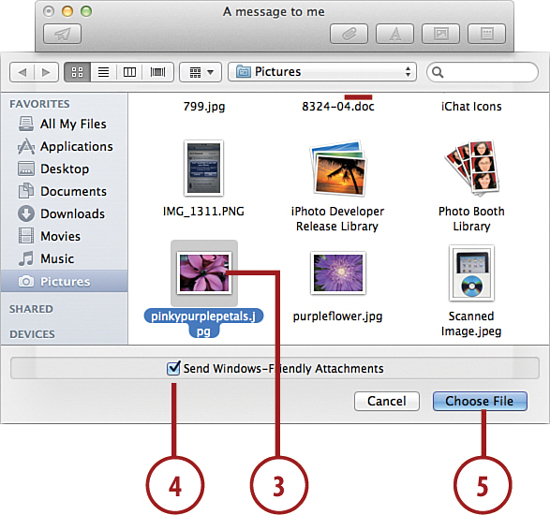
4. Check the Send Windows-Friendly Attachments checkbox to ensure that anyone (regardless of their platform choice) can open the attachments.
5. Click Choose File to add the attachments.
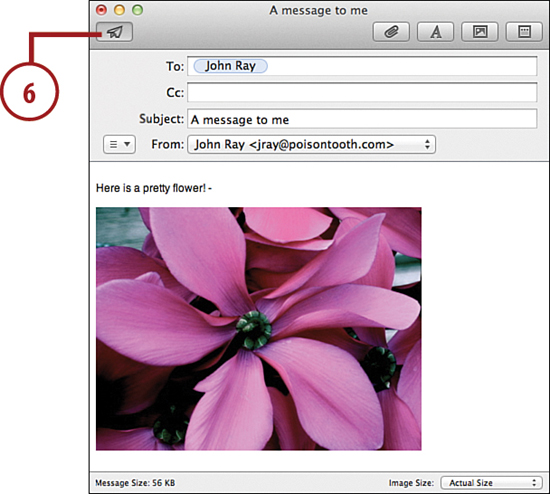
6. Compose the message as normal and then click the send icon (paper airplane).
Using Stationery Templates
If you’d like to send an invitation or a fancy greeting, you can make use of prebuilt templates, called “Stationery,” that come with Lion’s Mail application. Stationery is available whenever you’re composing a message:
1. Start a new message by clicking the new message icon (pencil and paper) in the Mail toolbar.
2. Click the Show Stationery icon (paper with dots) in the New Message toolbar.
3. Choose a category of templates on the left side of the Stationery bar.
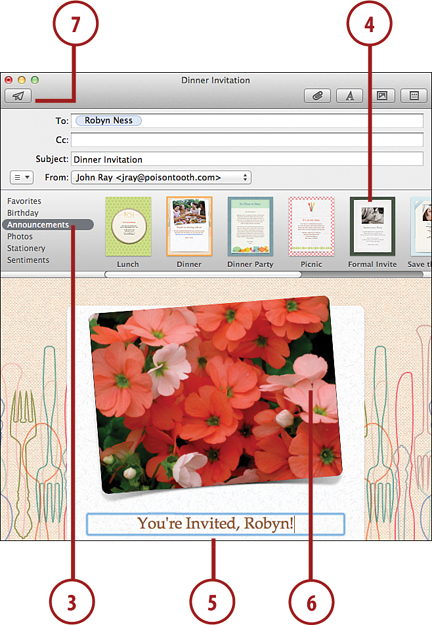
4. Click the thumbnail of the template you want to apply.
5. Click to edit the text within the template.
6. If the template contains images, replace them by dragging photo files from the Finder onto the template image (or use the Photo Browser button to locate an image).
7. Click the send icon (paper airplane) when you are finished with the message.
Creating Signatures
When you send a lot of email, you probably get a bit tired of typing the same thing at the end of each message—your name, email, and other contact information. To add this information automatically to the end of each message you write, create a signature.
1. Choose Mail, Preferences from the menu bar.
2. Click the Signatures icon in the preferences toolbar.

3. Choose an account that the signature should be used with, or choose All Signatures to not associate the signature with a specific account.
4. Click + to add a new signature.
5. Type a name for the signature.
6. Enter the text for the signature in the space to the right.
7. Click Always Match My Default Message Font so that the signature always matches the font you’re using.
8. If you’re adding the signature to an account, use the signature popup menu to choose which signature is displayed when you write a message. You can also choose a signature using the Choose Signature pop-up menu in the message composition window.

9. Close the Mail Preferences window.
Managing Your Email
Email can be overwhelming, especially if you have several different accounts and dozens of incoming messages each day. To help you cope with the incoming mail, you can create mailboxes in which to file or copy messages. You can also set up smart mailboxes that automatically display messages that match certain criteria.
Creating Mailboxes
To create a new mailbox, follow these steps:
1. Click the + button at the bottom of the Mailbox list.
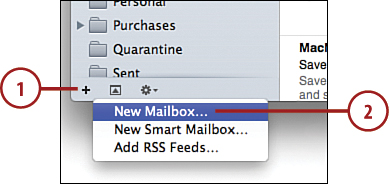
2. Choose New Mailbox.
3. Using the Location pop-up menu, choose where the mailbox should be stored. You see all of your existing Mailboxes in the menu, as well as On My Mac. Choosing an existing location creates the new mailbox inside of that location.
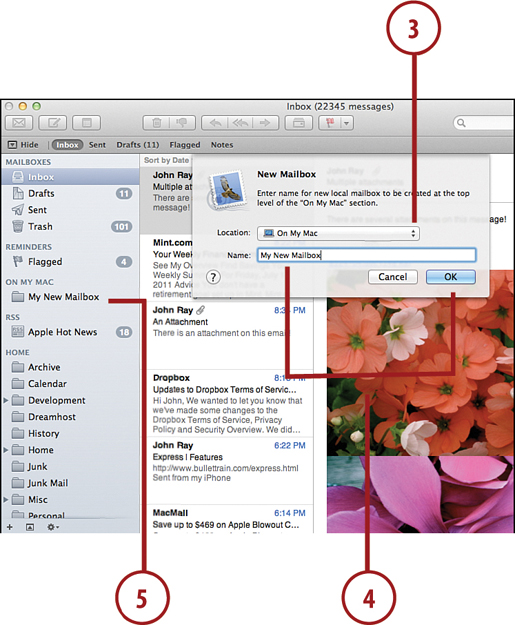
4. Enter a name for the new mailbox and then click OK.
5. The new mailbox is created and displayed in the Mailbox list.
Deleting and Renaming Mailboxes
If you find yourself with extra mailboxes or mailboxes that are no longer serving their original purposes, you can delete or rename them.
1. Select the mailbox you want to change in your mailbox list.
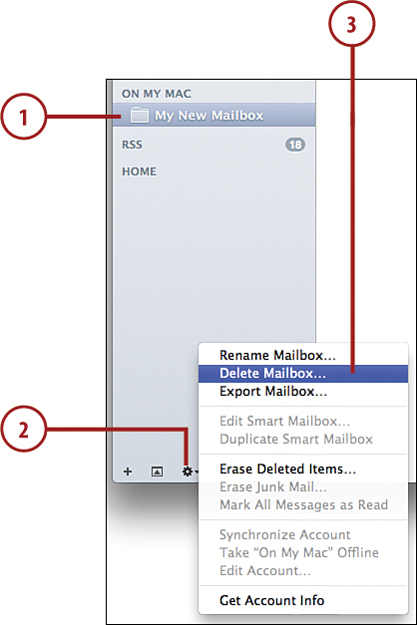
2. Click the Action icon (the gear) at the bottom of the mailbox list.
3. Choose Delete Mailbox or Rename Mailbox as needed. Any messages stored in a mailbox being deleted are also deleted.
Filing Messages in Mailboxes
Mailboxes are only useful if you file your messages in them. You can either copy or move messages one at a time or en masse to a mailbox. This can be done either manually, as described here, or automatically using Smart Mailboxes or Email Rules, discussed in the tasks following this one.
1. Select a message by clicking it in the message list. You can select a contiguous range of messages by holding down Shift and clicking another message, or select several scattered messages by holding down ![]() and clicking multiple messages.
and clicking multiple messages.
2. Move the messages to a mailbox by dragging them onto the desired mailbox. To copy—rather than move—the messages, hold down the Option key while you’re dragging the messages. The messages are moved (or copied) to the other mailbox.
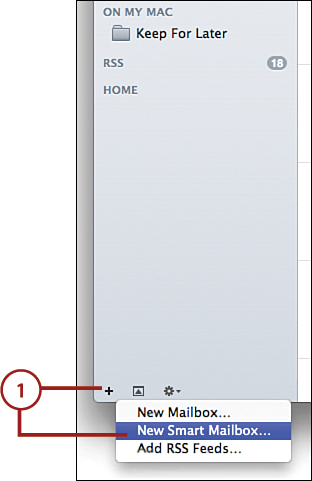
Automatic Email Organization with Smart Mailboxes
Much as Smart Folders in the Finder can help you keep track of files that share certain attributes, Smart Mailboxes can do the same for your email. Using information such as the sender, recipient, and even attachment names, you can group messages together in a Smart Mailbox, regardless of what mailbox, or even what email account, they’re associated with.
1. To create a new Smart Mailbox, click the + button at the bottom of the Mailbox list and choose New Smart Mailbox.
2. Type a name for the mailbox.
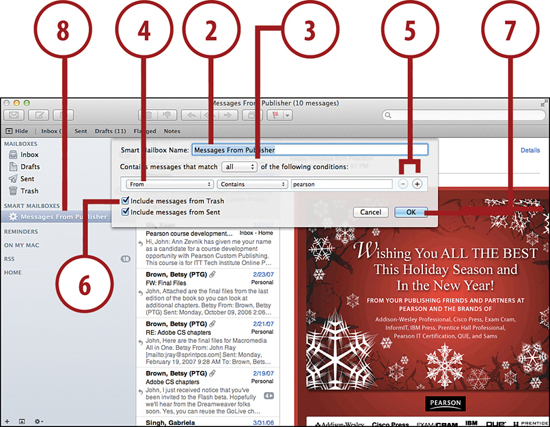
3. Choose whether the mailbox should match any or all conditions.
4. Configure your search criteria. Use the first pop-up menu to choose a message attribute (such as Subject), the second to choose a comparison, and the field (where applicable) to provide the value that you are comparing against.
5. Use the + and – buttons to add or remove additional criteria.
6. To include messages from the Trash mailbox or Sent mailbox, click the appropriate Include Messages checkboxes.
7. Click OK when you’re finished configuring the Smart Mailbox.
8. The new mailbox is created and displayed in the SMART MAILBOXES section within the Mailbox list.
Searching for Messages
Mail makes it easy to quickly search all of your email for particular content, and to turn that search into a Smart Mailbox for future reference. To search your mail, follow these steps:
1. Type the text you are looking for into the search field in the upper-right corner.
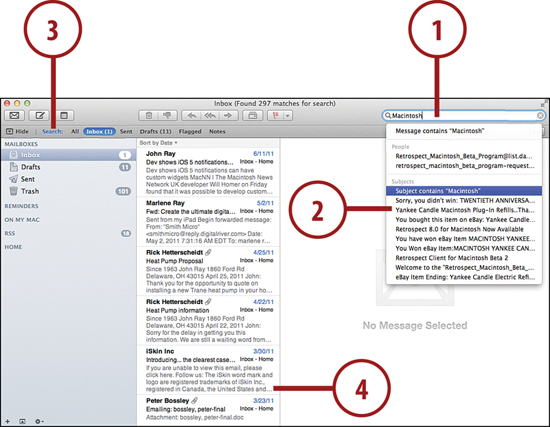
2. Potential search options appear in a dropdown list for matched people, mailboxes, subjects, and message content. Choose what best matches what you want to find.
3. Click the mailbox where the search should be performed.
4. The results appear in the message list.
5. Click Save to save the search as a Smart Mailbox. (See steps 2-8 of the “Automatic Email Organization with Smart Mailboxes” task.)
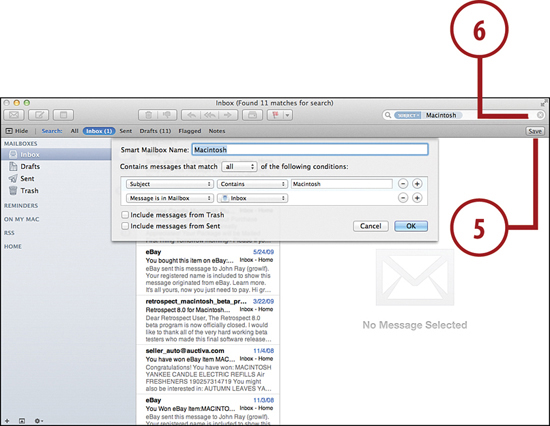
6. Alternatively, click the X button in the search field to clear the search results.
Writing Email Rules
If you’d prefer to have messages filed to actual mailboxes rather than Smart Mailboxes, you can write email rules. Email rules can file messages, highlight messages in the message list, and even forward them to another account. To write a rule, follow these steps:
1. Choose Mail, Preferences from the menu bar.
2. Click the Rules icon in the Preferences toolbar.
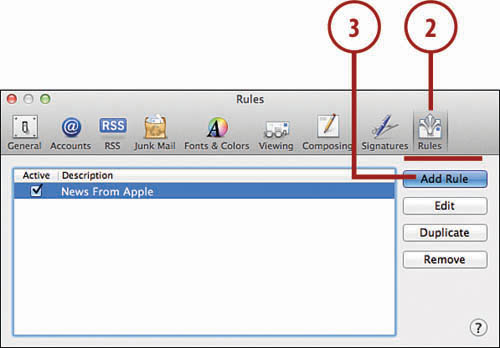
3. Click Add Rule.
4. Enter a description for the rule so that you can identify it later.
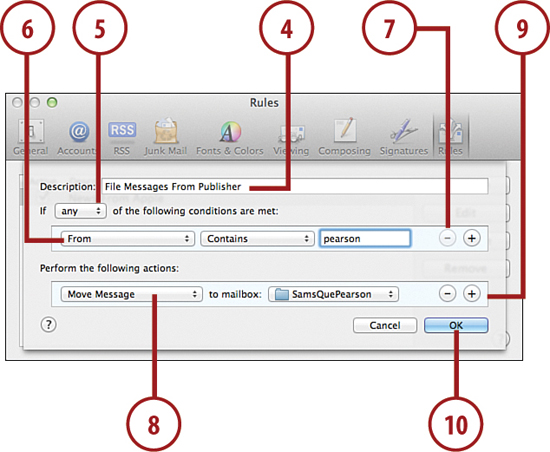
5. Use the Any pop-up menu to choose where any or all rules must evaluate as “true” in order for the rule’s actions to be carried out.
6. Configure the conditions under which the rule executes. The first pop-up menu chooses what is evaluated, the second the comparison to be made, and field is the value that should be used in the comparison.
7. Use + or – to add or remove additional conditions.
8. Configure the actions that are performed when the conditions are met.
9. Use + or – to add or remove actions.
10. Click OK to save the rule. Close the Mail Preferences.
Using RSS Feeds in Mail
Mail isn’t just an email reader; it’s also an RSS reader that can display news feeds from your favorite websites. These are visible under the RSS section in the mailbox list. When an RSS feed is selected, its contents are displayed in the message list area. Choosing one of the feed items shows a summary in the message content area—just like when you’re reading email.
Adding RSS Feeds to Mail
You can add new feeds to Mail and read summaries of your favorite news sites directly in Mail:
1. Click the + button at the bottom of the Mailbox list.
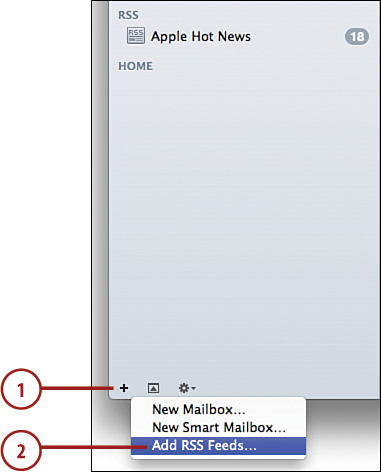
2. Choose Add RSS Feeds.
3. Click Browse Feeds in Safari Bookmarks to add previously bookmarked feeds.
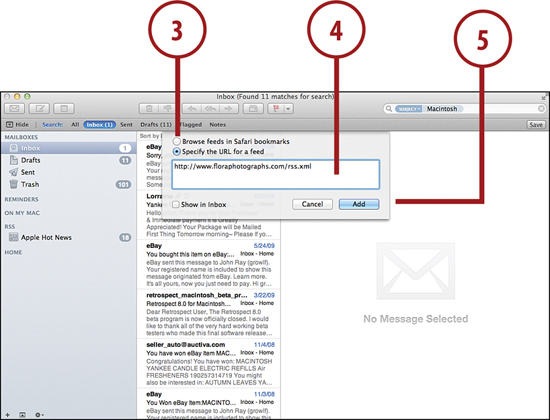
4. Add a feed directly using its URL by clicking the Specify URL for a Feed button. Enter the URL in the field that appears.
5. Click Add to finish.
Changing RSS Preferences
If you want to change how frequently your news feeds are refreshed in Mail, you need to access the RSS preferences.
1. Choose Mail, Preferences from the menu.
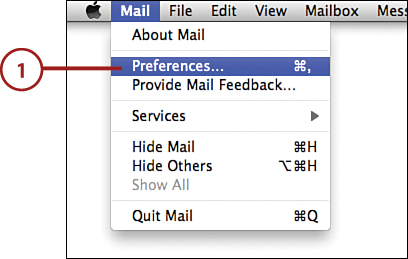
2. Click the RSS icon in the Preferences toolbar.
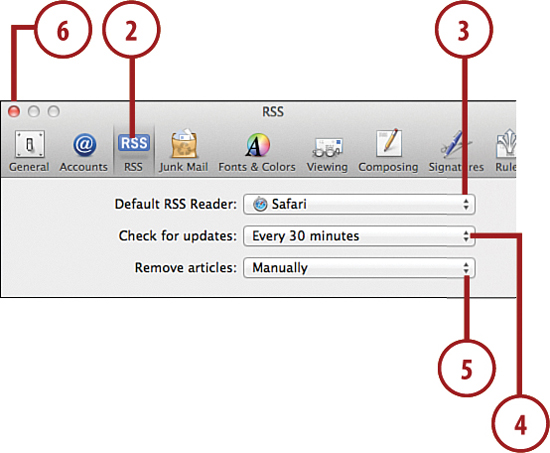
3. Use the Default RSS Reader to verify that Mail is set as your preferred RSS reader.
4. Choose a frequency with which to check for updates.
5. Configure how often Mail removes items from the RSS feeds it receives.
6. Close the Preferences to save your settings.
Instant Messaging with iChat
When email isn’t conversational enough, instant messaging can take over. Your MacBook comes with a first-rate instant messaging application called iChat (found in the Applications folder). iChat can be used for text messaging, audio conferencing, video conferencing, and even screen sharing. If you have an iCloud, GoogleTalk, Jabber, or AIM (AOL Instant Messenger) account, you’re ready to go.
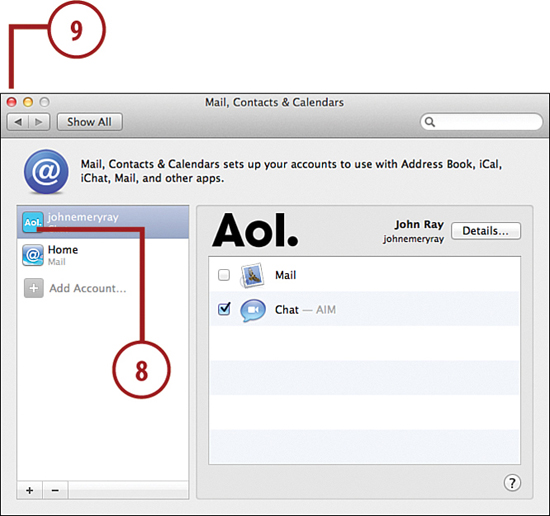
Adding an Account to iChat
As with Mail, before you can use iChat, you need to set up an account. You need to know your account type, username, and password before continuing.
1. Open the Mail, Contacts, and Calendars System Preference Panel.
2. Make sure the Add Account item is highlighted on the left.
3. Choose the online service that provides your IM account by clicking its name on the right. If your service only provides IM and not mail or calendaring, click Other to directly configure an iChat account.
4. If you chose Other, select Add an iChat account.
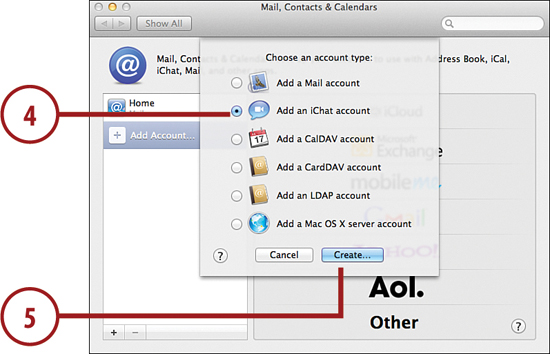
5. Click Create.
6. Fill in the requested information in the setup wizard that appears.

7. Click Create.
8. The account is displayed in the panel.
9. Close the System Preferences window by clicking the red button in the upper-left corner.
Logging Into (and Out of) Your Account
When iChat has an account configured, you’re ready to start iChat and begin chatting immediately. The first time you start iChat, your buddy list window appears and you are logged in. In fact, you are automatically logged in each time iChat starts. To manually log out of or into iChat, you simply need to set your status.
1. Start iChat from your Applications folder.
2. Click the status message below your name at the top of the iChat window. If you have multiple accounts set up, each one is represented by a line with separate status settings for that account.
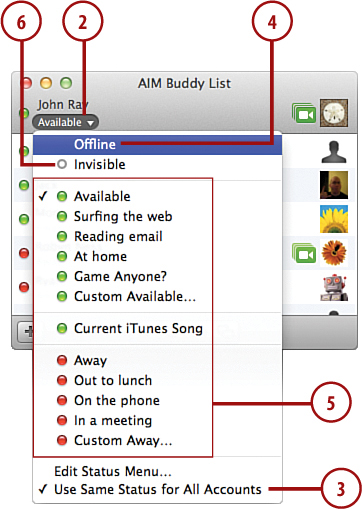
3. To keep your status in sync between accounts, make sure Use Same Status for All Accounts is checked.
4. Choose Offline to Log out.
5. Choose any other status to log back into your IM account.
6. Choose Invisible to log in but hide your availability from other people.
Configuring Your iChat Identity
Setting up an account in iChat gets you online, but you should customize your identity to better represent your online presence. With iChat, it’s simple to set custom status messages and pictures to reflect your current mood.
Setting the iChat Picture
Because your MacBook has a camera built-in, you can swap your iChat picture whenever you’d like. Just smile and click, and instantly your buddies are seeing a new image.
1. Click the picture in the upper-right corner of the iChat buddy list.

2. Choose from a previous picture, or click Edit Picture to choose a new picture.
3. Click the Camera icon to take a new picture.
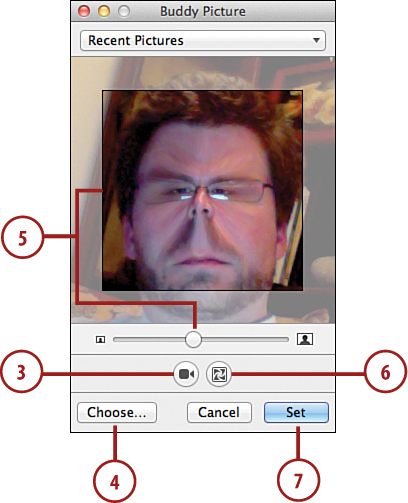
4. Alternatively, click Choose to choose a picture from your computer.
5. Set cropping and size for the picture by dragging it within the Buddy Picture window and adjusting the zoom slider.
6. Apply effects, if desired, using the Effects button.
7. Click Set to start using the new picture.
Configuring Custom Status Messages
Your status message can convey your state of mind, ask a question, or present some other information to your buddies. To configure a new status message, follow these steps:
1. Click the status popup menu.
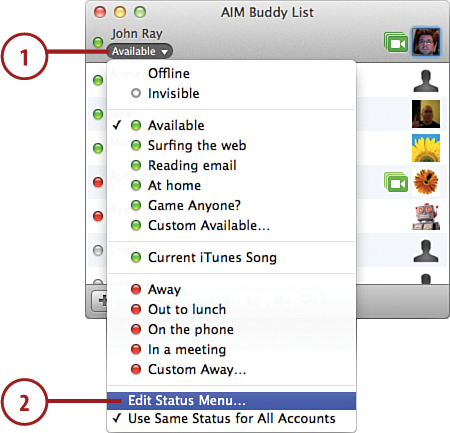
2. Choose Edit Status Menu.
3. Click + or – under the Available or Away lists to add or remove status messages.

4. Click OK to save your status message settings.
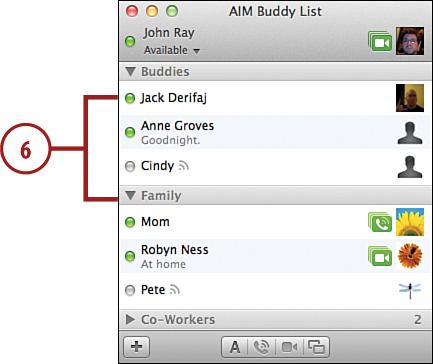
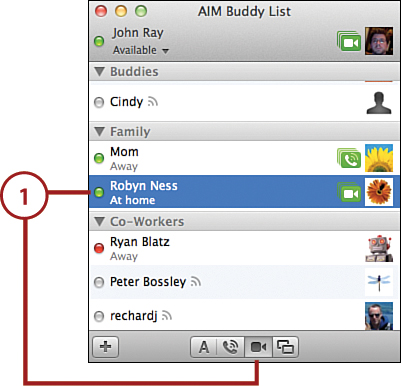
Managing Your Buddy List
Almost everything you do in iChat starts with your “buddy list.” The iChat buddy list contains all the people that you want to chat with (and possibly some you don’t). With each buddy is a display of his status (Away, Available, Idle, and so on) and an icon to indicate his chat capability.

The buddy list displays the people you can communicate with.
Adding Buddies
In order to initiate a chat with someone, you must first add them to your buddy list.
1. Click the + button at the bottom of the buddy list. Choose Add Buddy.

2. If you have an address card for the person you want to add, click the disclosure arrow in the lower-right corner of the window to display your address book and then find and click the person’s name.
3. Enter the screen name of your buddy in the Account Name field.
4. Enter a first and last name for your addition, and a group if any are available. Think of groups as a “folder” for your buddy.
5. Click Add.
Adding Groups
As your buddy list grows, you might want to consider organizing them into groups, such as friends, family, coworkers, and so on. Adding new groups is similar to adding new buddies.
1. Make sure View, Use Groups is selected in the iChat menu bar.

2. Click the + button at the bottom of the buddy list.
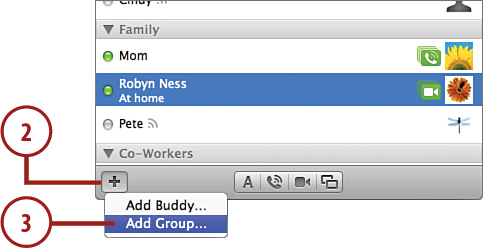
3. Choose Add Group.
4. Enter a name for the new group.
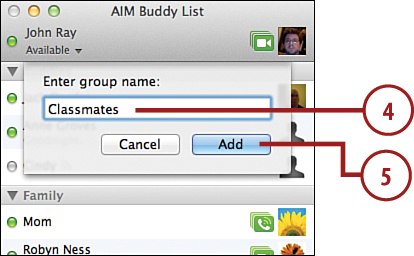
5. Click Add.
6. Drag buddies within the buddy list into the group where you want them to appear.
Communicating with Your Buddies
As mentioned previously, iChat supports a number of different communications methods including text, audio, and video. iChat theater even makes it possible to share visual media from your MacBook across a chat session. You might, for example, review an upcoming presentation with colleagues to fine-tune the content, or present a slideshow of a vacation to friends and family.
Responding to an Incoming Chat Request
After you’ve configured iChat and given out your screen name to your buddies, chances are you’ll start getting a few messages. To respond to an incoming chat request, follow these steps:
1. iChat displays the first message (or a request for an audio or video chat) in a white chat bubble.
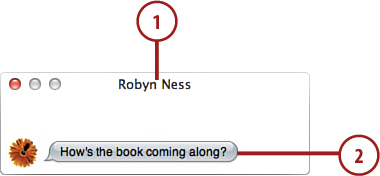
2. Click the bubble to show the chat window.
3. Click Accept to begin chatting, or Decline to ignore the request.
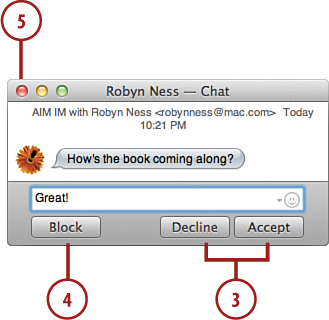
4. If you don’t know the individual or don’t want to hear from them, click Block.
5. When you’re finished chatting, close the chat window.
Starting a Text Chat
To initiate a text chat with one or more buddies, follow these steps:
1. Select one or more individuals in your buddy list. Shift-click to select multiple people.
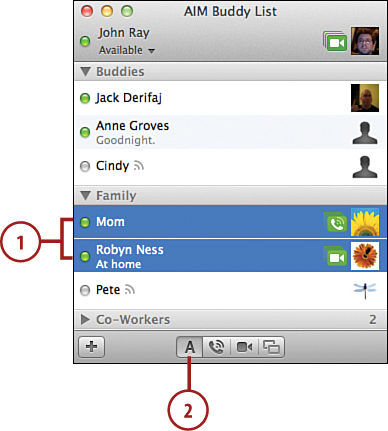
2. Click the A button at the bottom of the iChat window.
3. A chat window that shows all the participants displays.
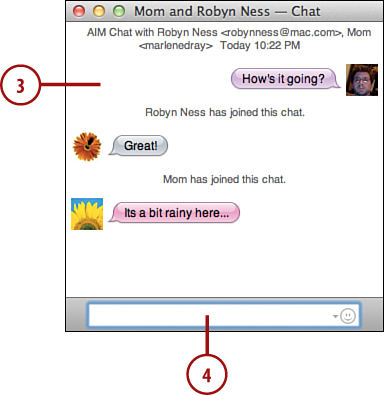
4. Type an invitation message and wait for responses!
Starting an Audio or Video Chat
A/V chats require significantly more bandwidth than text chats. iChat automatically senses the capabilities of your machine and Internet connection and that of your buddies and does not allow chats unless it thinks they will be successful. You can chat with up to 3 other people via video and 10 via audio, depending on your connection and assuming they have microphone or camera-enabled systems.
1. Select the individuals that you want to include in an audio or video chat. The icons by each buddy’s name indicate the chat capabilities.
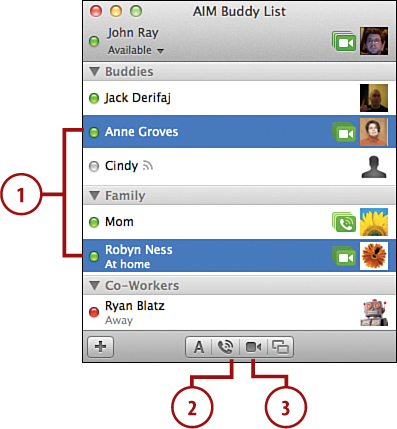
2. Click the telephone icon to initiate an audio chat.
3. Click the video icon to start a video chat.
4. A chat window appears displaying the participants as they join.

5. Click the + button to add additional members to the chat.
6. Toggle mute on the chat by clicking the microphone.
7. When conducting a video chat, click Effects to apply real-time video effects to your onscreen image.
8. Click the double arrows during a video chat to expand the video to full screen.
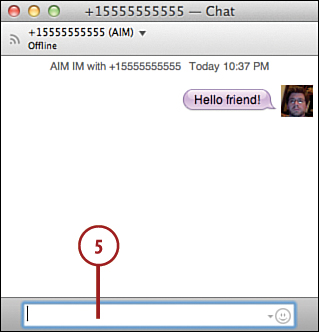
Sending SMS Messages via iChat
iChat can be used to communicate with a buddy via SMS (text messaging to a mobile phone) just as if the buddy was logged into iChat. To start a text messaging session, you need to know the mobile phone number or have it stored in Address Book.
1. Choose File, New SMS from the iChat menu bar.
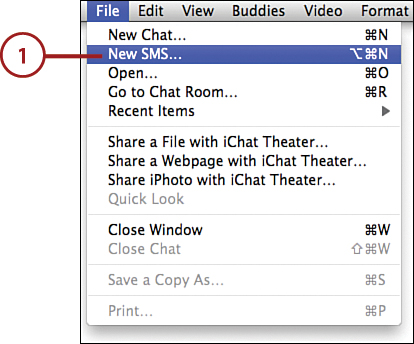
2. Enter the phone number you want to send a message to.
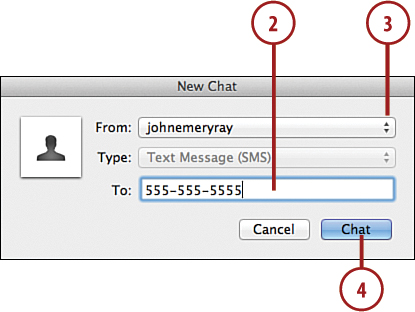
3. Choose the instant messaging account that should get the response.
4. Click Chat.
5. Begin typing in the new chat window. Your messages are automatically sent to the recipient’s mobile phone.
Sharing Files, Photos, and Your Screen
In addition to being a great communications tool, iChat can serve as a collaboration platform or even a way to interact on the same desktop. If you’ve ever found yourself in the position of having to talk through a document at long distance or troubleshoot technical problems remotely, you’ll appreciate the additional functionality built into iChat.
Presenting Files, Photos, and Webpages in iChat Theater
Using iChat Theater, you can share the content that you’ve created on your MacBook—photos, videos, and even webpages. These items can be shared with any buddy whose connection supports video chats.
1. Initiate a video chat with the individuals with whom you want to share a file.
2. Click the + button in the video chat window and then choose Share a File with iChat Theater to share an individual file, or Share iPhoto with iChat Theater to share an iPhoto album.
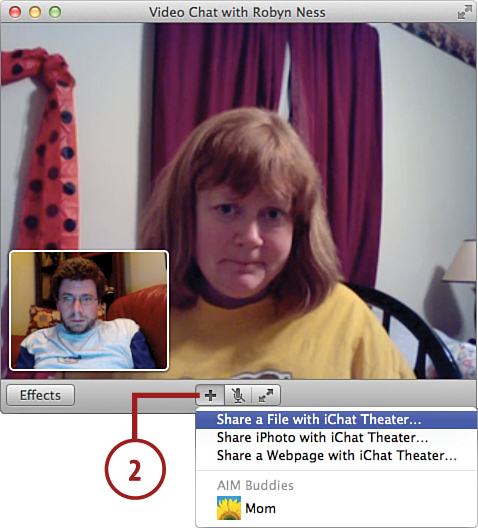
3. Choose the file, album, or webpage you want to share.
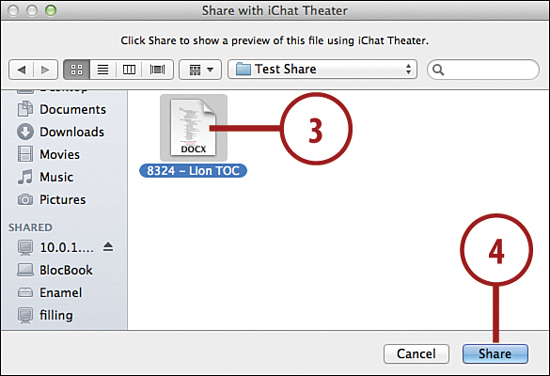
4. Click the Share button.
5. After the sharing session begins, use the onscreen controls to move through the presentation. Text and PDF files display page controls, video files include typical video controls, and so on.

6. Click the X button in the upper-right corner of the shared file’s display to stop sharing and return to the video chat.
Transferring Files over iChat
iChat provides a very convenient mechanism for sending files to your buddies. You can send individual files, or even entire folders, just by dragging them into iChat.
1. Find the file or folder that you want to share.

2. To transfer to an online buddy who you aren’t currently chatting with, drag the file to their name in your buddy list.
3. To transfer a file within an active chat session, drag the file to the chat window. Files such as images are displayed inline in the chat and can be previewed without opening the file.
Starting a Screen Sharing Session
A unique Mac-only feature of iChat is the ability to share someone else’s screen. Using this tool, you can control the other person’s computer as if you were sitting directly in front of it.
1. Choose the buddy that you want to share screens with.
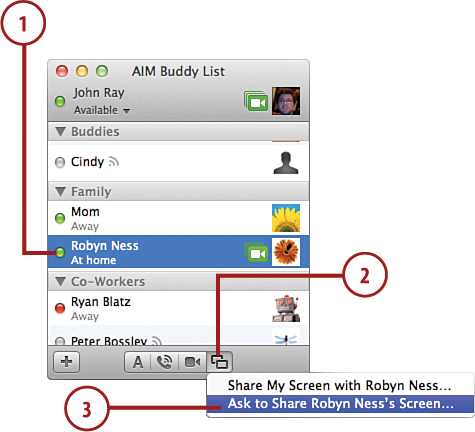
2. Click the Screen Sharing button.
3. Choose whether you want to request access to your buddy’s screen or if you want to share your screen.
4. After the request is accepted, you (or your buddy) have access to the remote screen. You can interact with the desktop as if you were sitting in front of the computer.
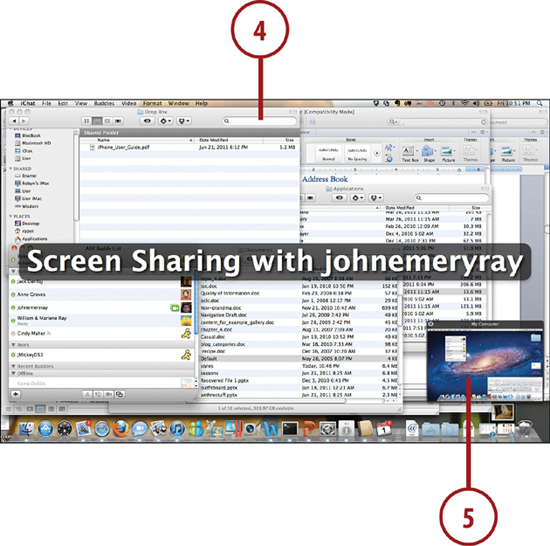
5. Click the miniaturized version of the screen to switch between viewing the local screen and the remote screen.
Video Calls with FaceTime
The question I get when I ask someone to sign up for FaceTime is “Isn’t iChat enough?” And I’ve wondered myself why Apple has introduced a new video chatting tool without simply integrating it into iChat. While I suspect that ultimately an integrated communications tool will appear, for now, consider FaceTime to be similar to a phone. Unlike iChat, which needs to be running, FaceTime will start automatically if someone places a FaceTime call, and it will simultaneously ring on as many Macs, iPhones, and iPads as you’d like.
FaceTime also requires zero configuration beyond providing an email address that your friends can “call.”
Setting Up FaceTime
The first time FaceTime starts, you need to provide it with an Apple ID that will be used for registration. After the initial ID is provided, you can associate as many email addresses as you’d like with a given install. Follow these steps to add FaceTime addresses:
1. Open FaceTime from the dock or from the Applications folder.
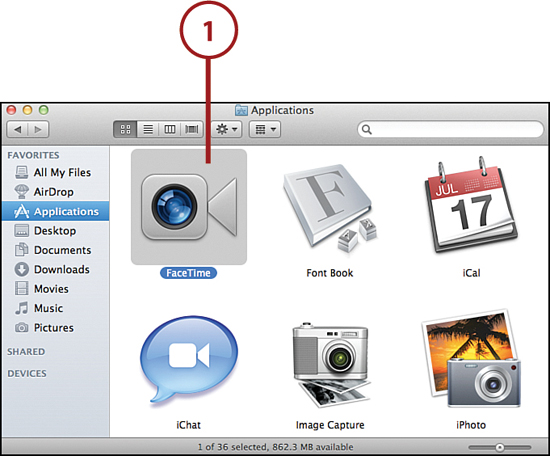
2. Enter your Apple ID and password.
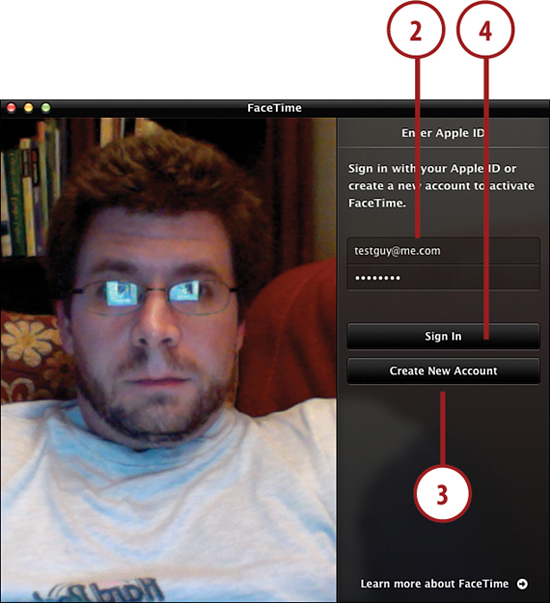
3. If you do not have an ID, click Create New Account to walk through an ID creation wizard.
4. Click Sign In.
5. Provide the primary email address you want to use for FaceTime.
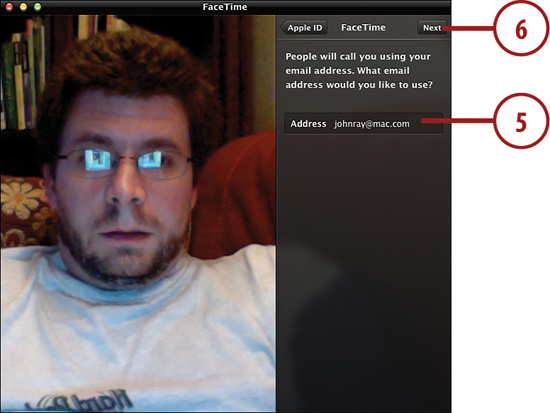
6. Click Next.
7. FaceTime logs in, and you’re ready for calls.

Placing FaceTime Calls
To place a call with FaceTime, you need to have the address or phone number of a FaceTime-compatible contact in your address book. In other words, make sure your family and friends have an iOS device or a Mac and have configured FaceTime. You also need to be sure you’ve stored their contact information in your address book. (See Chapter 5 for more information.)
Placing Calls from the Contacts List
Once you’ve got yourself a few equipped friends, follow these steps to call them over FaceTime:
1. Click the Contacts button at the bottom of the FaceTime window.
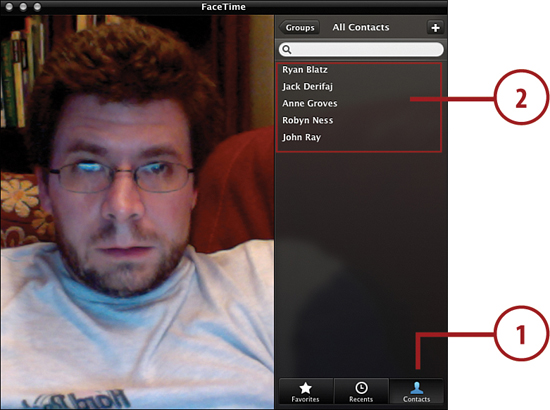
2. Browse through your contacts. When you find the person you want to call, click their name.
3. The contact information for your friend is displayed.
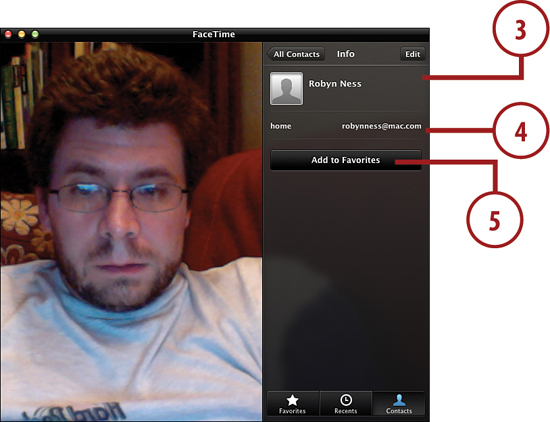
4. Click the phone number or email address you want to call.
5. If you want to call the person frequently, click the Add to Favorites button to add a shortcut for future use.
6. If the call is connected, you’ll be able to see and talk to the other person. Otherwise, skip to step 9.
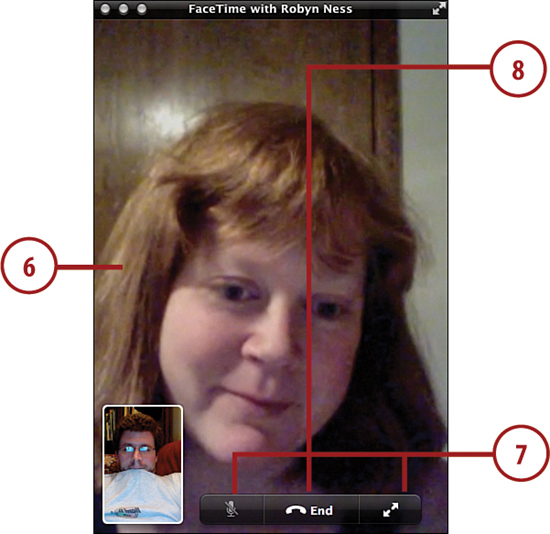
7. Use the button at the bottom-left corner of the window to mute the call, or the bottom-right to go fullscreen.
8. Click End to hang up when you are finished talking.
9. If the call does not connect, you’ll be given the options of cancelling the call or calling back (redial).

See Your Surroundings
By default, the FaceTime camera takes a portrait image. If you’d like to see more of your surroundings, you can rotate to a landscape mode by choosing Video, Use Landscape (![]() +R) from the menubar.
+R) from the menubar.
Placing Calls from the Favorites List
To place a call to someone you’ve marked as a favorite, complete these steps:
1. Click the Favorites button at the bottom-right corner of the FaceTime window.

2. Click a name in the Favorites list to place a call.
3. Click the arrow at the end of a favorite to open that individual’s contact information.
Receiving a FaceTime call
If you’ve ever received a call on an iPhone, you’ll be right at home receiving FaceTime calls on your MacBook:
1. When there is an incoming call, FaceTime automatically starts with no user intervention.
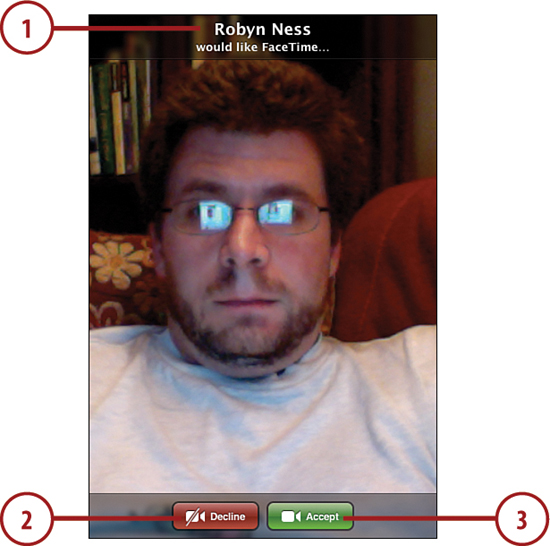
2. Click Decline to ignore the call.
3. Click Accept to begin talking.
Accessing Your Call List
FaceTime keeps a list of all incoming and outgoing calls, even if you aren’t around your computer when a call comes, so you can check to see who it was later.
1. Click the Recents button at the bottom-right corner of the FaceTime window.
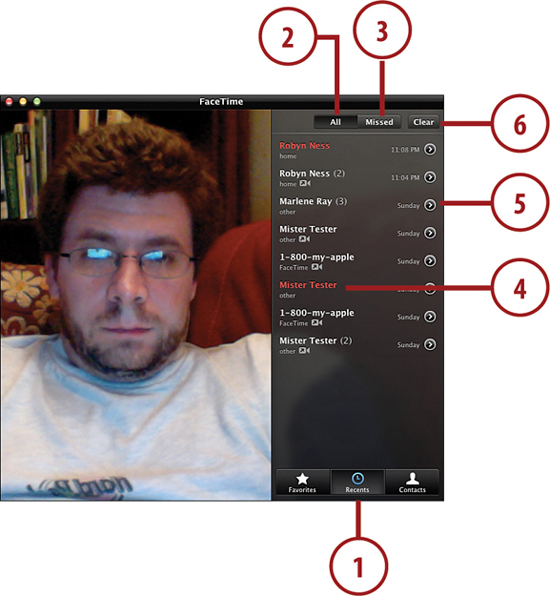
2. Click All to show all incoming and outgoing calls. Missed calls are displayed in red.
3. Click Missed to filter the list to missed incoming calls.
4. Click an entry in one of the lists to place a call.
5. Touch the arrow at the right side of an entry to view that person’s address book information.
6. Click Clear to remove the call history.
Disabling FaceTime
FaceTime is great, but, like a phone, sometimes you want to just ignore it. If you’re having one of those days, you can disable FaceTime on your MacBook so that it won’t ring if someone tries to call.
1. Choose Turn FaceTime Off (![]() +K) from the FaceTime menu.
+K) from the FaceTime menu.
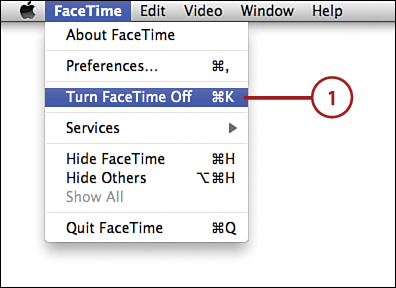
2. FaceTime is now disabled on your MacBook.
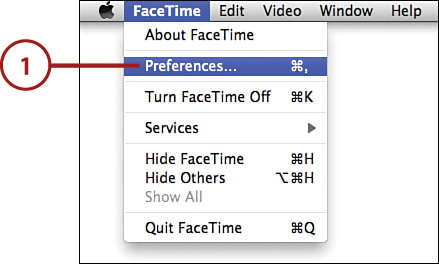
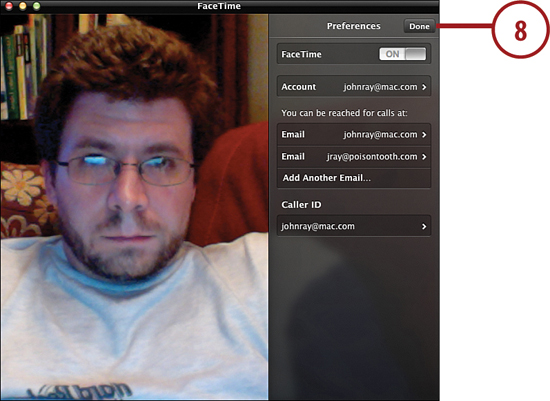
Updating Account Information and FaceTime Addresses
If you’ve registered several FaceTime accounts and would like them all to ring on your MacBook, you’ll need to edit the preferences to list all the email addresses you have. To do this, follow these steps:
1. Open the FaceTime Preferences by choosing FaceTime, Preferences from the menu.
2. Click the Account line if you’d like to change the Apple ID associated with your account.
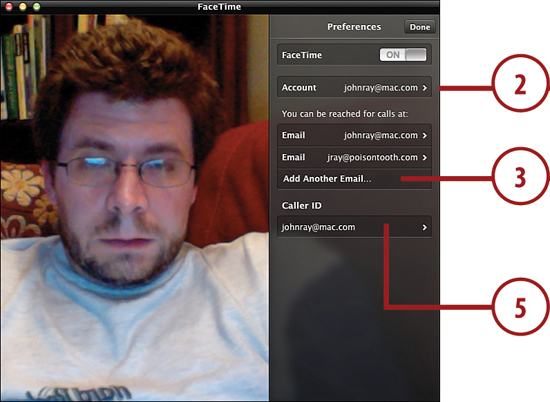
3. Click Add Another Email Account to add an alternative email account. If that address has not been registered with Apple, you’ll need to look for an email with a clickable link for verifying your address.
4. Repeat step 3 for as many addresses as you want to use with your FaceTime installation.
5. Click the Caller ID line to display all addresses associated with your FaceTime.
6. Click a line to set that address as your caller ID.
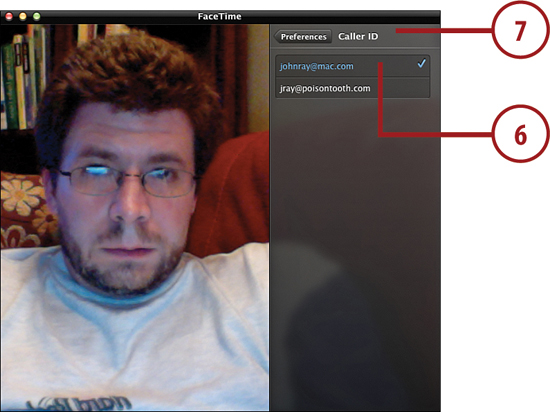
7. Click the Preferences Back button to return to the main preferences.
8. Click Done to finalize your preferences.
Web Browsing in Safari
While similar in many ways to other web browsers, Safari (found in the Applications, Safari folder) offers a few unique features that set it apart.
Safari has seen dramatic improvements over the past few years. With support for Webkit (the engine that forms the foundation for Safari) found in Google Chrome and on the iPhone, HP WebOS, and Android platforms, Safari is quickly becoming a web browsing standard, rather than an exception.
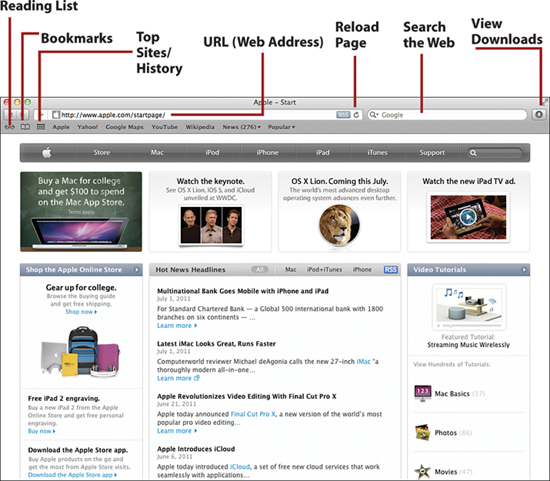
Managing Your Bookmarks, Top Sites, and Reading List
In Safari, there are four primary areas where you can store sites for easy access: the bookmark menu, which appears under the bookmarks menu item; the bookmarks bar, displayed under the URL; the top sites screen, which shows the sites you (or Safari) have identified as being frequently visited; and, new in Lion, the Reading List. The Reading List (denoted by an icon of eyeglasses) holds pages and links that you want to visit at a later time, but aren’t planning to keep as a permanent bookmark.
Adding a Bookmark
To add a bookmark to Safari, you need to know what site you want to bookmark, and where the bookmark should be stored:
1. Visit the site that you want to bookmark by typing its address into the URL field.
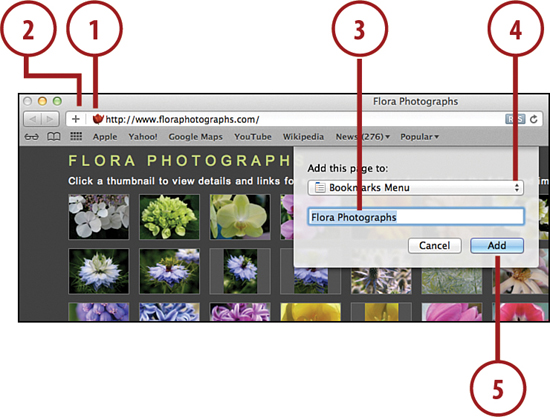
2. Click the + button.
3. Enter a name for the bookmark so you can identify it later.
4. Choose where to file the bookmark (Top Sites, Bookmark Menu, Bookmark Bar, Reading List, or a folder within one of these areas).
5. Click Add.
Previewing Bookmarks
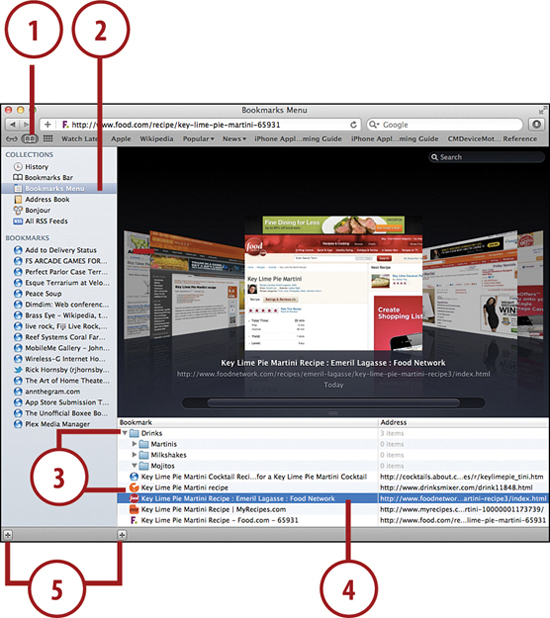
Amassing a huge collection of bookmarks can make it difficult to find what you’re looking for. With Safari you can quickly preview the websites in your bookmarks or history.
1. Click the Show Bookmarks button.
2. Choose a collection of bookmarks from the left-hand pane.
3. Select a folder of bookmarks (if any) from the bookmark list.
4. Drag the handle to resize the preview Cover-flow pane so that you can get a clear preview of the pages.
5. Use the scrollbar below the preview area to flip through the sites in the folder.
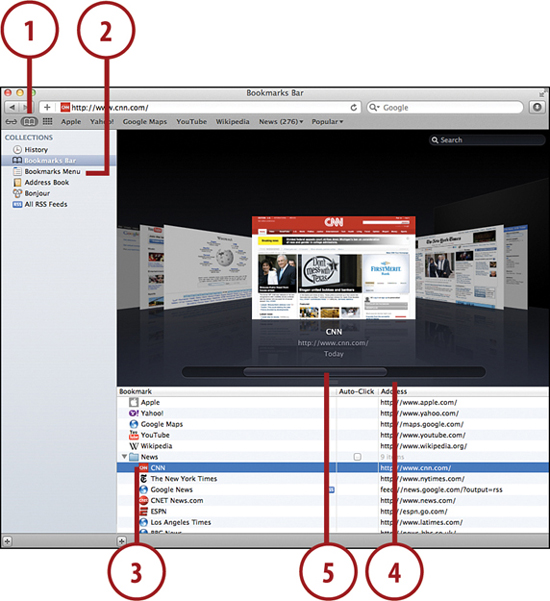
Organizing Bookmarks
After you’ve added a few bookmarks to the bookmark menu or bookmark bar, you can re-categorize them using these steps:
1. Click the Show Bookmark button.
2. Click the collection with which you want to work.
3. Navigate the folders and individual bookmarks as you would navigate a Finder window.
4. Click and drag bookmarks between folders or collections to organize them.
5. Click the + buttons to add new bookmark collections or folders for additional filing options.
Organizing Top Sites
As you browse, Safari identifies your “top sites.” The Top Sites button switches to display previews and marks sites that have updates with a star. Clicking a site opens it in Safari.
To manage the ordering and display of the top sites in Safari, follow these steps:
1. Click the Top Sites button.
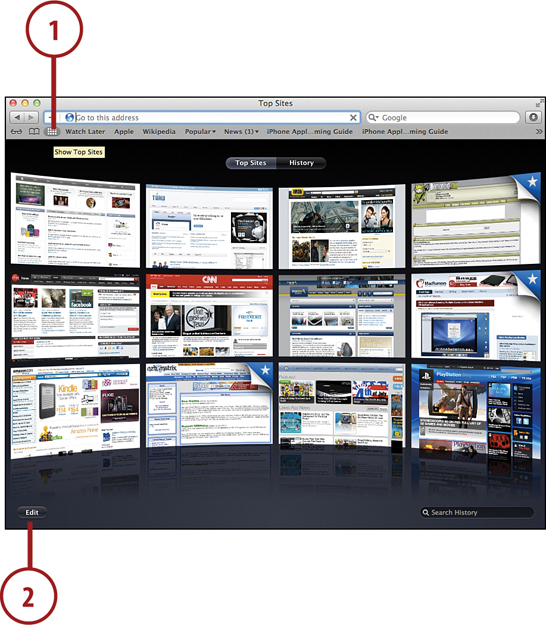
2. Click Edit.
3. Click the X button by a site to remove it, or the “pin” button to make sure the site stays on the screen.
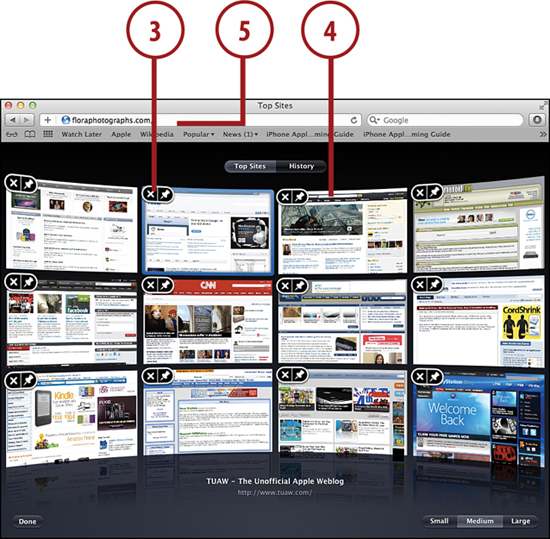
4. Rearrange the sites by clicking and dragging their preview images.
5. Add new sites by dragging their URLs into the top sites window.
Adding to Your Reading List
The Reading List is a simple feature that holds links and pages until you have a chance to go back and read them. If you have an iCloud account shared between your iOS devices and your Mac, you’ll even see the same synced reading list between all of them.
To manage your reading list in Safari, first browse to a webpage that you want to view later, and then do the following:
1. Open the Reading List by Clicking the Reading List Icon.
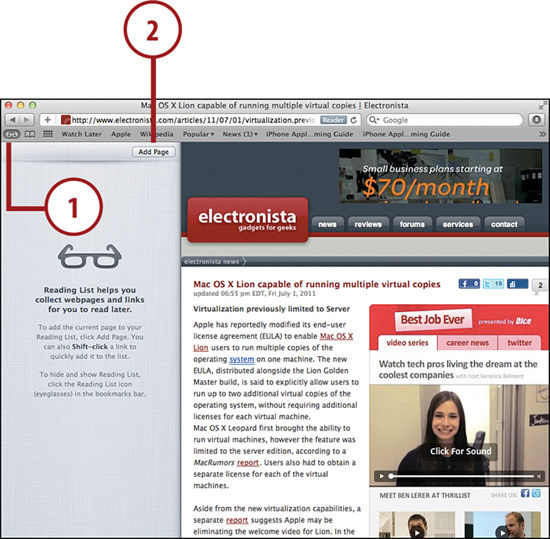
2. Click Add Page at the top of the Reading List Pane.
3. The page and summary text appear in the list.

4. Click the Reading List icon again to hide the list.
Paneless Reading List Additions
In addition to the steps described here, you can also Shift-click links to add them to the Reading List, or press Shift-![]() -D to add your current page to the list. If you’re more of a click and drag person, you can drag individual links to the Reading List pane or to the Reading List icon to add them to the list as well.
-D to add your current page to the list. If you’re more of a click and drag person, you can drag individual links to the Reading List pane or to the Reading List icon to add them to the list as well.
Managing Your Reading List
After you add things to your list, you want to read them, right? To manage your list, just follow these steps:
1. Open the Reading List by clicking the Reading List icon.
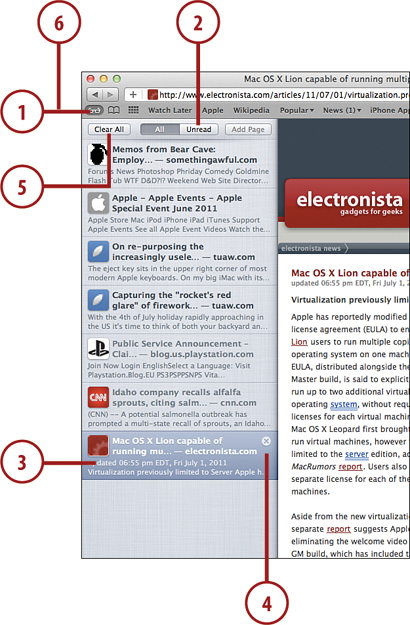
2. Click All or Unread to limit your view of the list to all pages, or just pages you haven’t finished reading.
3. Click a Reading List entry to load the page in Safari.
4. Click the X icon in the upper-right corner of an entry to remove it from the list.
5. Click Clear All to remove all items from the list.
6. Click the Reading List icon again to hide the list when you’re finished.
Advanced Browsing Features
Although “web browsing” as a pastime is only a little more than a decade old, it’s a skill that it almost seems that we were born with. Little by little, browser developers have been refining the process to add additional features. Safari is no different.
Using Tabbed Browsing
Originally, web browsers created a new window for each page you visited. In Safari, all these windows can be combined under a single window with tabs representing individual websites within that window. To use tabbed browsing in Safari, follow these steps:
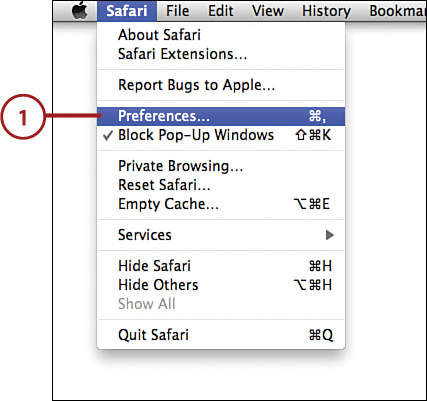
1. Choose Safari, Preferences from the menu bar.
2. Click the Tabs Toolbar icon.
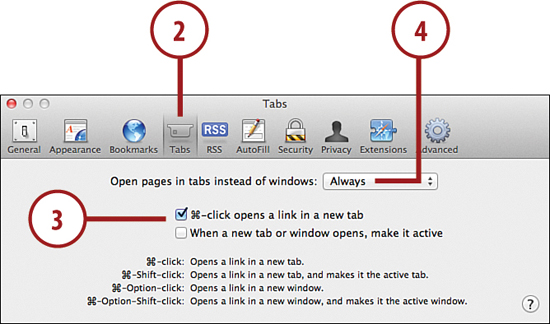
3. Check the ![]() -Click Opens a Link in a New Tab option.
-Click Opens a Link in a New Tab option.
4. If you’d like all new windows to open in a new tab, choose Always from the Open Pages in Tabs Instead of Windows dropdown menu.
5. While you’re browsing, hold down ![]() as you click links. The links create a new tab in the Safari browser window. Use the tabs to quickly switch between web pages.
as you click links. The links create a new tab in the Safari browser window. Use the tabs to quickly switch between web pages.

Viewing PDFs Online
In Lion, Apple has included a helpful PDF viewer that makes reviewing PDF documents a breeze. When you click a PDF link, the viewer opens. To control the viewer, follow these steps:
1. Position the cursor near the bottom center of the browser window to show the PDF controls.
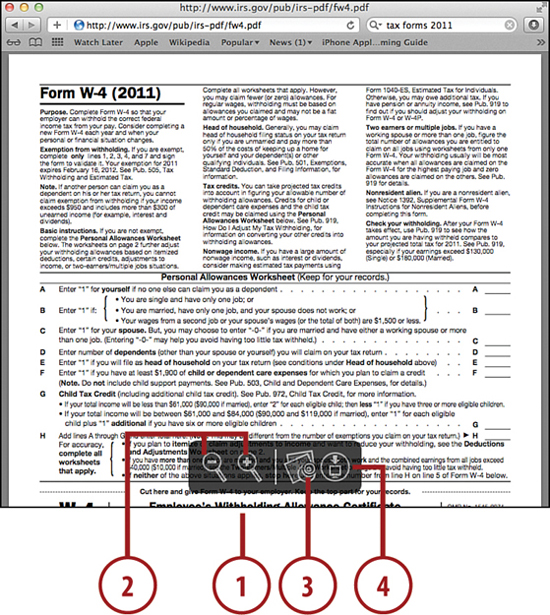
2. Click + or – to zoom in and out.
3. Click the Preview icon to open the PDF in the Lion Preview application.
4. Click the Download button to save the PDF to your downloads folder.
Enabling Private Browsing
If you share a computer with other people, and there’s a chance that they might stumble upon something in your web history that you’d prefer they didn’t (holiday gift orders, for example), you can enable private browsing.
When private browsing is enabled, no website content is saved to your MacBook—it’s as if you were never there:
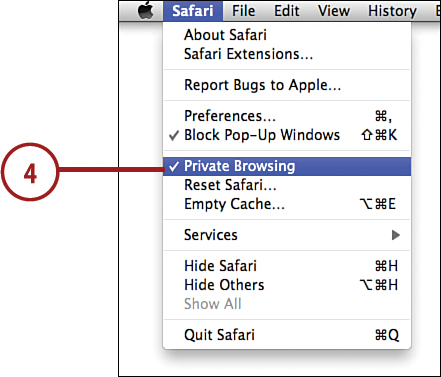
1. Choose Safari, Private Browsing from the menu bar.

2. Click OK when prompted to verify whether private browsing should be enabled.
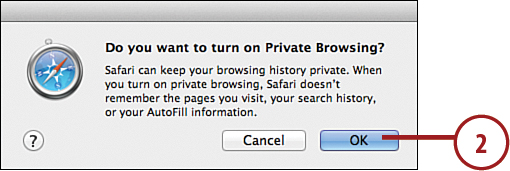
3. You can now use Safari as you would normally, but your session is private.
4. Choose Safari, Private Browsing again to disable private browsing.
Protecting Yourself Online
Safari offers several tools to help protect you from fraudulent activity online. To ensure that you have the most secure browsing experience possible, complete the following configuration:
1. Choose Safari, Preferences from the menu.

2. Click the Security toolbar icon.
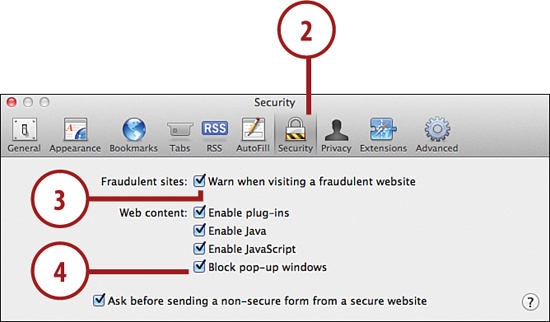
3. Check the checkbox beside Warn When Visiting a Fraudulent Website.
4. Check the checkbox beside Block Pop-up Windows.
5. Click the Privacy toolbar icon.
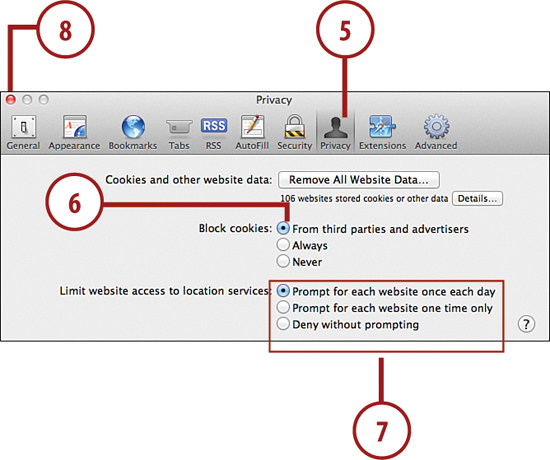
6. Be sure that the Block cookies option is set to From Third Parties and Advertisers.
7. Choose whether Safari should deny all access to your location information, or to prompt you if a website requests it. Note that some online services can provide valuable customized information using your location.
8. Close the Safari Preferences.
As a general rule, you should never download files online unless you trust the source. By default, Safari opens files that it has identified as safe. If you would prefer to prevent Safari from opening any file it downloads, you can find this option under the General Safari Preferences.
Adding Web Content to the Dashboard
Many of us visit a webpage just to see a tiny piece of content, such as the latest weather report or breaking news. With Safari and Lion’s Dashboard, you can create your own widget, called a web clipping, that is accessible directly from your MacBook’s dashboard. This gives you instant access to information you like without needing to open Safari. The content even updates automatically as long as you are connected to the Internet.
1. Visit the web page with the content you want to add to the dashboard.
2. Choose File, Open in Dashboard.
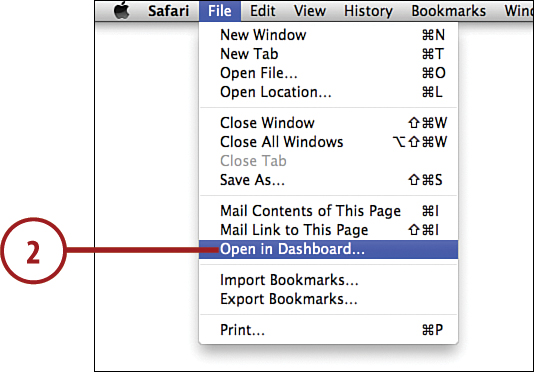
3. Position the box on the page so that the content you want to capture is highlighted as best possible and then click your mouse.

4. Fine-tune the selected area by dragging it within the Safari window and using the circular handles on the sides to resize it.
5. Click Add when you are satisfied with the results.
6. The Dashboard opens and the new web clipping widget is displayed.

Extending Safari’s Capabilities with Extensions
Safari supports developer-created extensions that can add additional functionality to your browsing experience—such as the ability to quickly access Twitter, eBay, and other services without leaving your current webpage. Safari extensions are supported by the individual developers, so after you install one, you’re on your own!
Installing an Extension
Installing extensions doesn’t require any more than clicking a link on a website.
To find and install Safari extensions, follow these steps:
1. Choose Safari Extensions from the Safari menu.
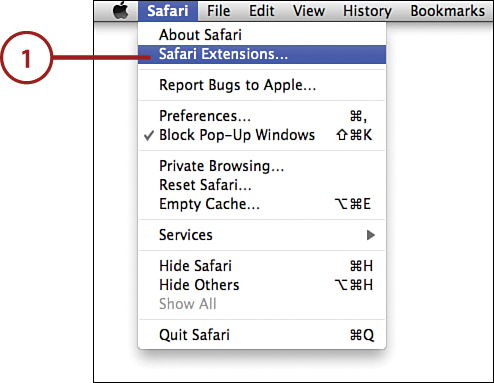
2. An Apple website opens listing all registered extensions.
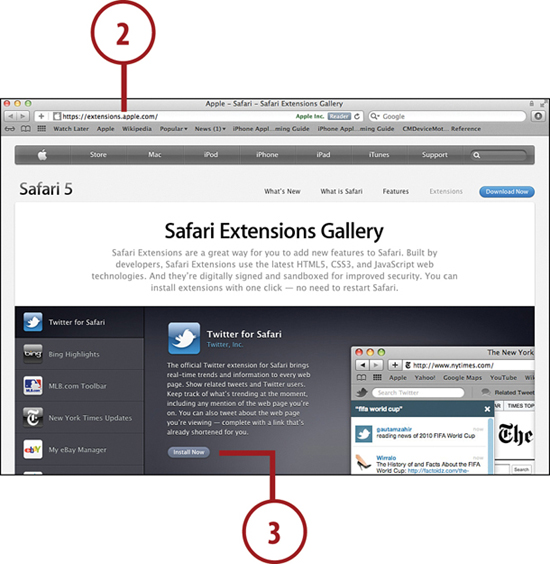
3. Use the website to browse to an extension you are interested in, and then click the Install Now button beside the extension.
4. After a few seconds, the extension is installed and activated. Depending on how it works, you may see a new button or area added to the Safari toolbar.
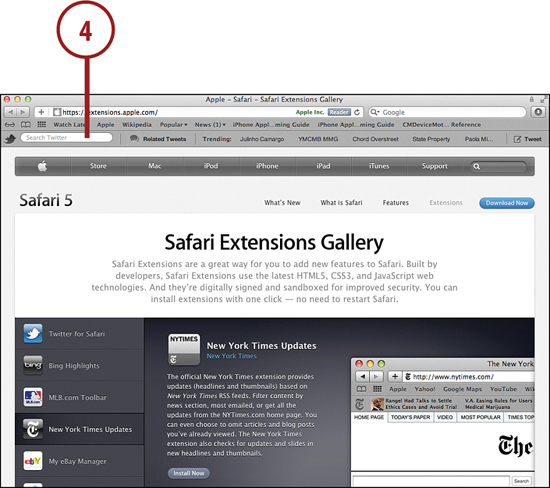
5. Follow the author’s instructions to use the extension.
Managing Extensions
To manage the extensions that you’ve installed—including configuring them, if configuration is necessary—use the Safari preferences. Follow these steps to access your extension settings:
1. Open the Safari preferences by choosing Safari, Preferences from the menu.

2. Click the Extensions button in the top of the Preferences window.
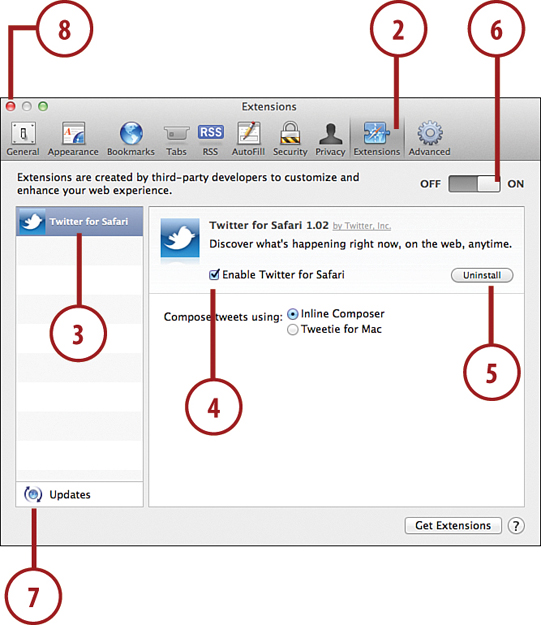
3. Click an individual extension to view its configuration options.
4. Use the Enable checkbox to enable or disable individual extensions.
5. Click Uninstall to remove the extension entirely.
6. Use the On/Off switch to disable all extensions.
7. Click the Updates button to look for and install updates to any installed extensions.
8. Close the Preferences when finished.