6. Working with Date, Time, and S Planner
In this chapter, you find out how to set the time, use the Clock application, and use the S Planner calendaring application. Topics include the following:
→ Synchronizing to the correct time
→ Working with the Clock application
→ Setting alarms
→ Waking up with the latest weather, news, and your schedule
→ Working with S Planner
Your Galaxy Note 4 has a Clock application you can use as a bedside alarm, stopwatch, timer, and world clock. The S Planner application synchronizes with your Google or Microsoft Exchange calendars and enables you to create events and meetings while on the road and to always know where your next meeting is.
Setting the Date and Time
Before you start working with the Clock and S Planner applications, make sure your Galaxy Note 4 has the correct date and time.
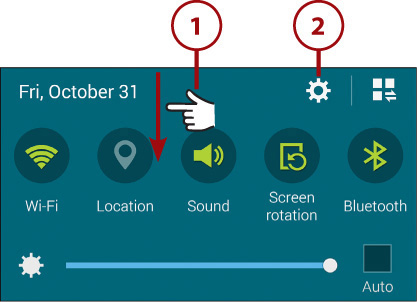
1. Pull down the Notifications panel.
2. Tap the Settings icon to display the Settings screen.
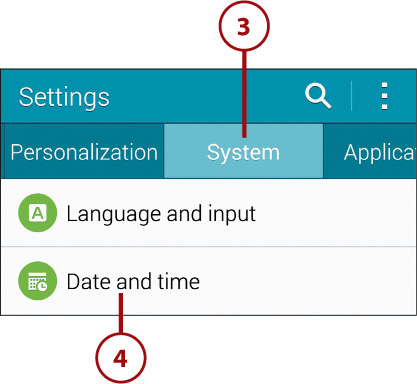
3. Tap the System tab to display the System screen.
4. Tap Date and Time to display the Date and Time screen.
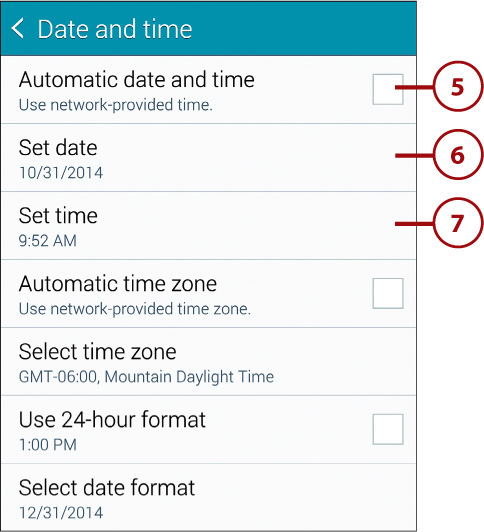
5. Tap the Automatic Date and Time check box to enable or disable synchronizing time and date with the wireless carrier. It is best to leave this enabled because it automatically sets date and time based on where you are traveling.
Does Network Time Sync Always Work?
In some countries, on some carriers, time synchronization does not work. This means that when you get off the plane and turn Airplane mode off (see the Prologue for information on Airplane mode), after a reasonable amount of time your time, date, and time zone will still be incorrect. In these instances, it is best to disable Automatic Date and Time and manually set the time, date, and time zone yourself. You can then try it on automatic in the next country you visit or when you are back in your home country.
6. Tap Set Date to set the date if you choose to disable network synchronization.
7. Tap Set Time to set the time if you choose to disable network synchronization.
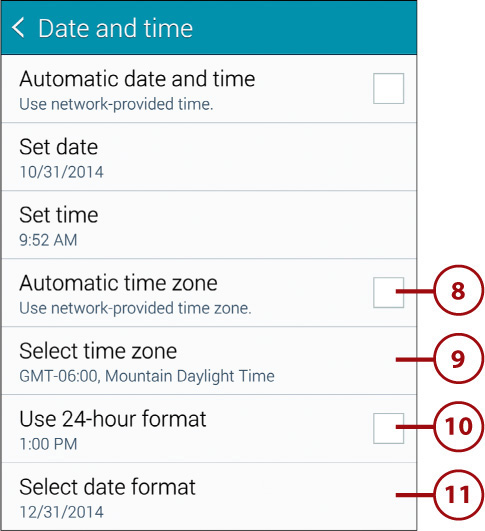
8. Tap the Automatic Time Zone check box to enable or disable synchronizing the time zone with the wireless carrier. It is best to leave this enabled because it automatically sets the time zone based on where you are traveling.
9. Tap Select Time Zone to set the time zone manually if you choose to disable network synchronization.
10. Tap the Use 24-Hour Format check box to enable or disable the use of 24-hour time format. This format makes your Galaxy Note 4 represent time without a.m. or p.m. For example, 1:00 p.m. becomes 13:00 in 24-hour format.
11. Tap Select Date Format to change the way in which the date is represented. For example, people in the United States normally write the date with the month first (for example, 12/31/2015). You can make your Galaxy Note 4 display the date with the day first (for example, 31/12/2015) or with the year first (for example, 2015/12/31).
Clock Application
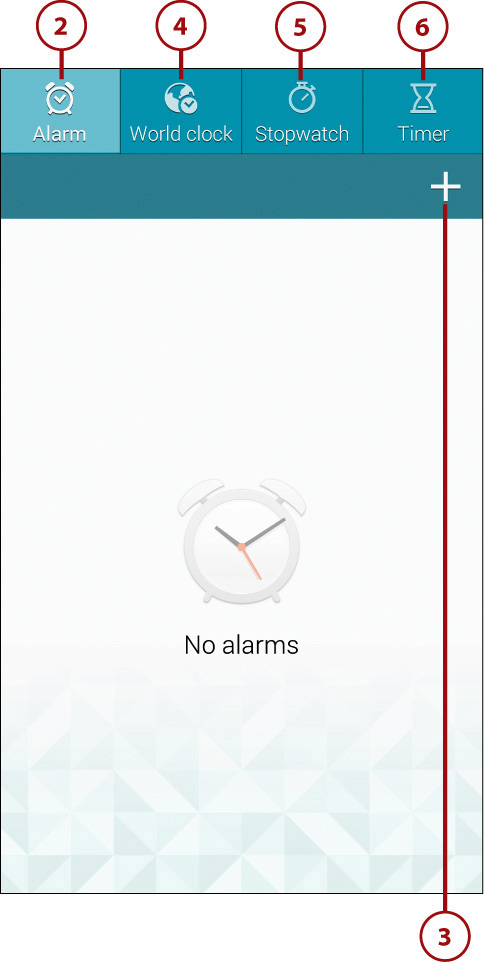
The Clock application is preinstalled on your Galaxy Note 4 and provides alarms, a world clock, a stopwatch, and a timer.
2. Tap the Alarm tab to view and edit your alarms.
3. Tap the + icon to create an alarm.
4. Tap the World Clock tab to see the World Clock and manage the clocks on that screen.
5. Tap the Stopwatch tab to use the Stopwatch.
6. Tap the Timer tab to use the Timer.
Manage Alarms
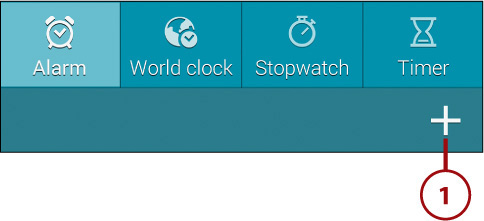
The Clock application enables you to set multiple alarms. These can be one-time alarms or recurring alarms. Even if you exit the Clock application, the alarms you set still trigger.
1. Tap the + icon to create a new alarm.
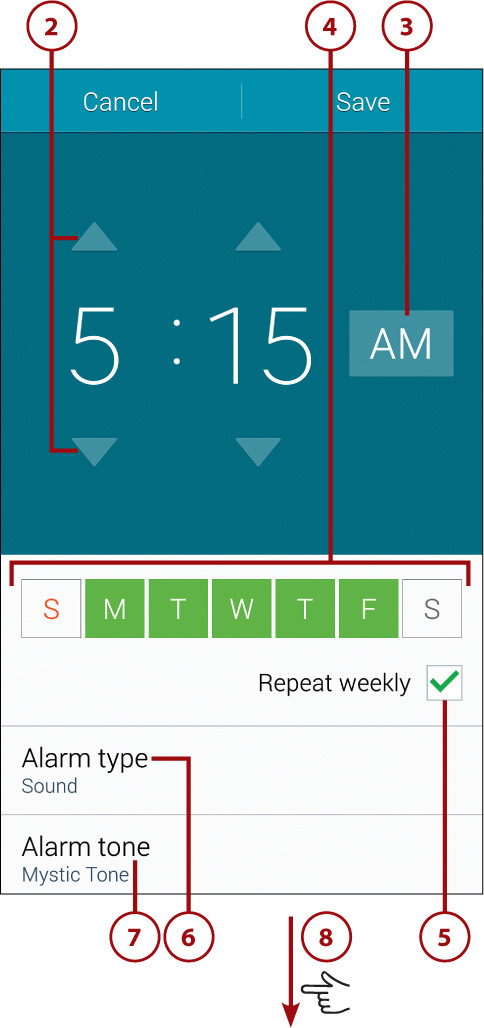
2. Tap the up/down arrows to set the hours and minutes.
3. Tap the AM/PM button to toggle between a.m. and p.m.
4. Tap the days of the week when you want the alarm to trigger. In this example, the alarm will sound on all days of the workweek but not on Saturday and Sunday.
5. Check the Repeat Weekly box if you want the alarm to repeat every week.
6. Tap Alarm Type to change the type of alarm. Your choices are Sound, Vibration, and Vibration and Sound.
7. Tap Alarm Tone to change the alarm tone or melody that plays.
8. Scroll down to see the remaining settings.
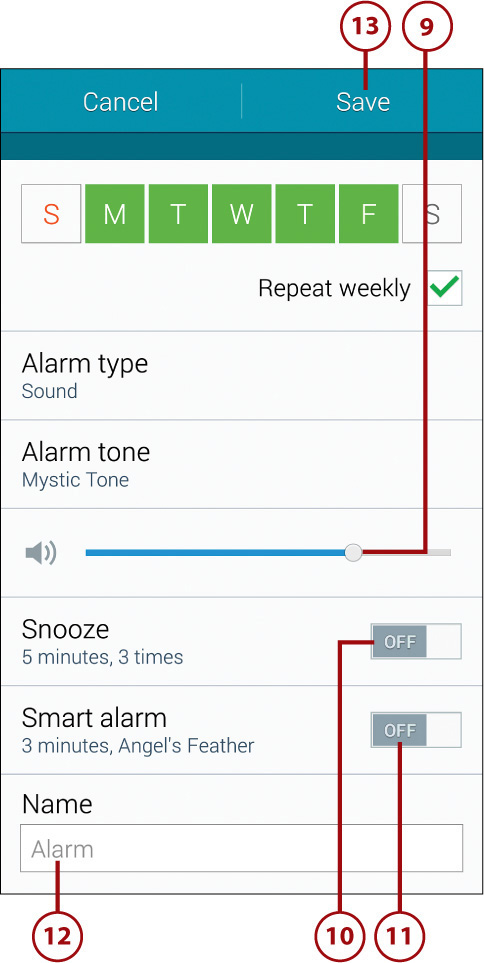
9. Drag the Volume slider to adjust the volume of the alarm.
10. Move the Snooze switch to enable or disable the Snooze feature. Touch the Snooze button to display the Snooze screen, where you can set how long the snooze lasts and how many times it repeats.
11. Move the Smart Alarm switch to enable or disable Smart Alarm. Smart Alarm plays a tune ahead of the alarm time to slowly start waking you up. Tap the Smart Alarm button to display the Smart Alarm screen, where you can set the build-up time and choose the alarm tone.
12. Tap the Name box and type the name for the alarm, such as Work Alarm or Weekend.
13. Tap Save to save your new alarm.
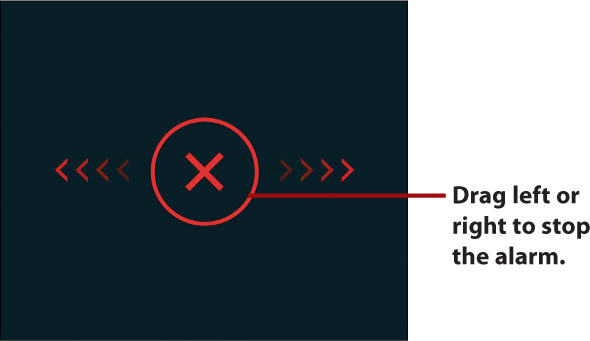
Stopping an Alarm
When the alarm goes off, tap the red circled × and drag it to either side to turn off the alarm.
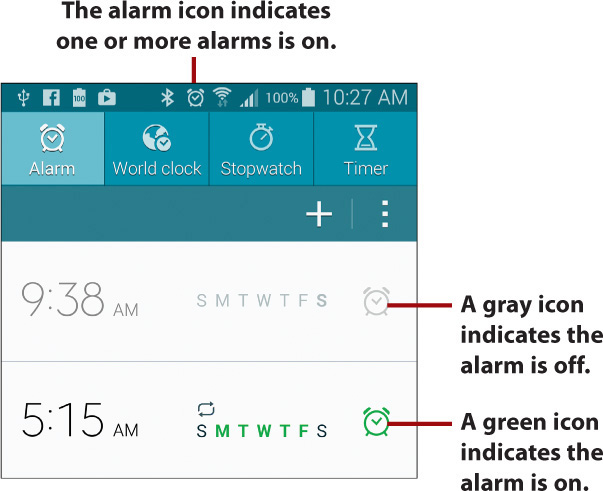
Turning an Alarm On or Off
After setting up an alarm, you can turn it off so that it doesn’t ring. Tap the alarm on the Alarm screen, making its alarm-clock icon (and the days for which it is set) change from green to gray.
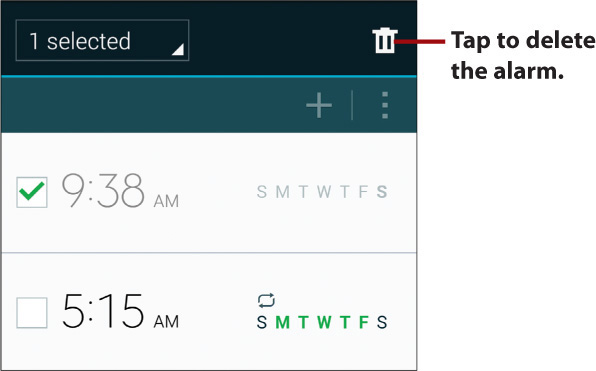
Editing or Deleting an Alarm
To edit an alarm, go to the Alarm screen in the Clock app and tap the alarm you want to edit. On the alarm’s screen, change the alarm as needed, and then tap Save.
To delete an alarm, tap and hold the alarm until the selection controls appear. Clock automatically checks the box for the alarm you tapped, but you can also check the boxes of any other alarms you want to delete. Then tap Delete (the trash icon) to delete the alarm or alarms.
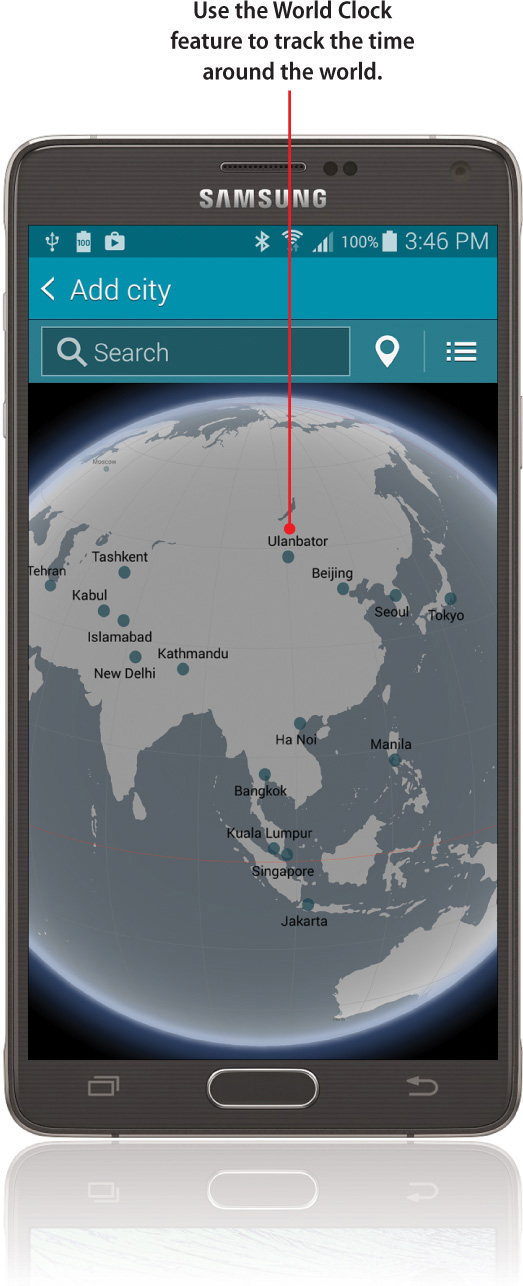
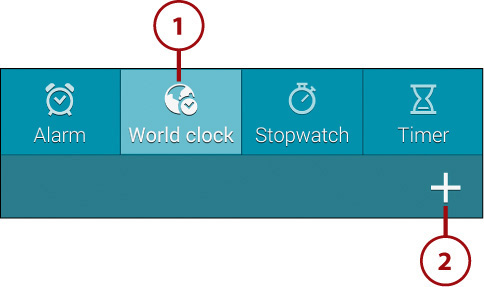
Use the World Clock
The World Clock enables you to keep track of time in multiple cities around the world.
1. Tap World Clock to display the World Clock screen.
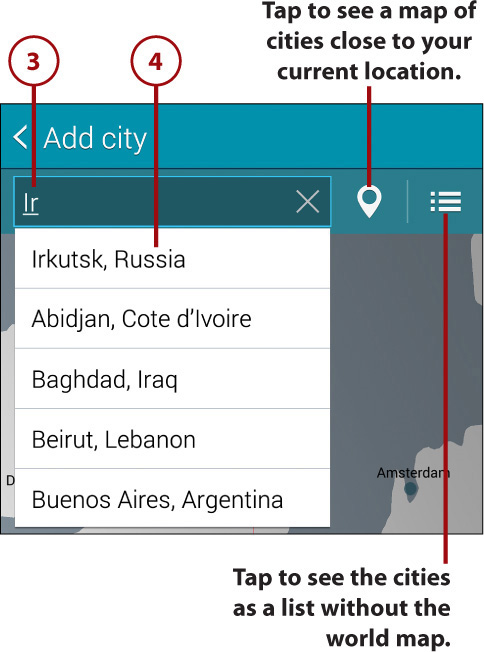
2. Tap Add City (+) to add a new city. The Add City screen appears.
3. Type in a partial city name to find the city you want to add.
4. Tap a city to add it to the World Clock screen.
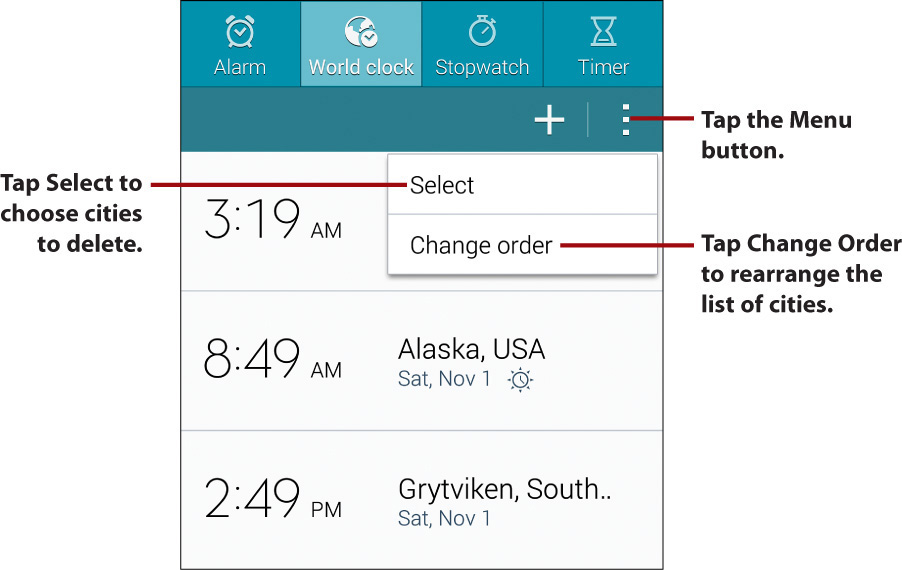
Managing Cities
To delete a city from your World Clock screen, or to rearrange the cities you’ve saved, tap the Menu button. Tap Select to select which cities to delete. Tap Change Order to display the Change Order screen; from that screen you can rearrange the cities by dragging them by the dotted handles on the left.
Using the S Planner Calendaring Application
The S Planner calendaring application enables you to synchronize all your Google Calendars under your primary Google account to your Galaxy Note 4. You can accept appointments and create and modify appointments right on your phone. Any changes are automatically synchronized wirelessly back to your Google Calendar.
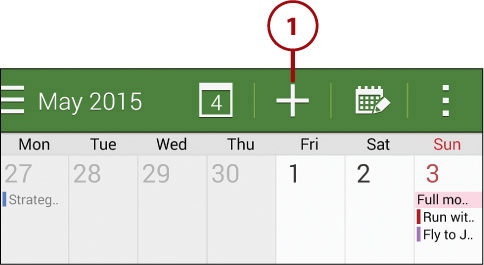
Navigate the S Planner Main Screen
The main screen of the S Planner app shows a one-day, one-week, or one-month view of your appointments. S Planner also shows events from multiple calendars at the same time.
1. Tap the S Planner icon on the Apps screen.
2. Swipe left to go forward in time.
3. Swipe right to go backward in time.
4. Tap the Today icon (the square bearing the date) at the top of the screen to show today’s date.
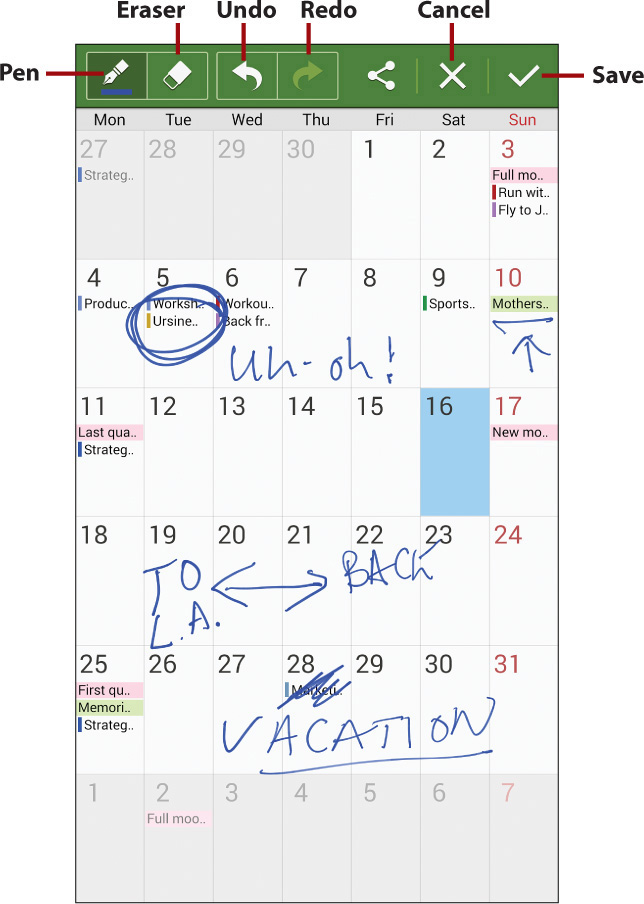
5. Tap the Writing mode icon (the calendar icon) to switch to Writing mode, where you can draw over the calendar with the S Pen. (Read more about this feature in the “Drawing All Over Your Calendar” sidebar.)
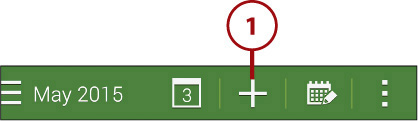
6. Tap + to create a new event.
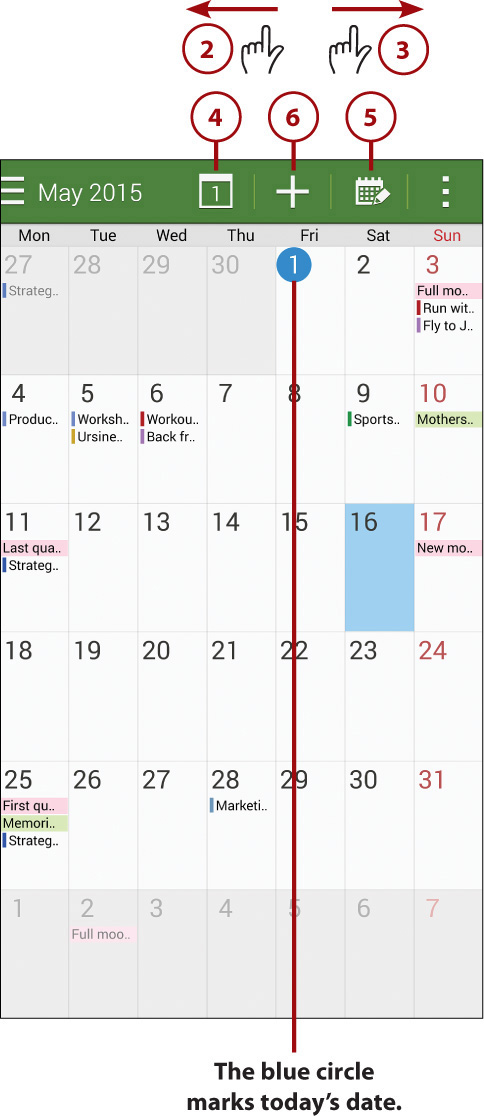
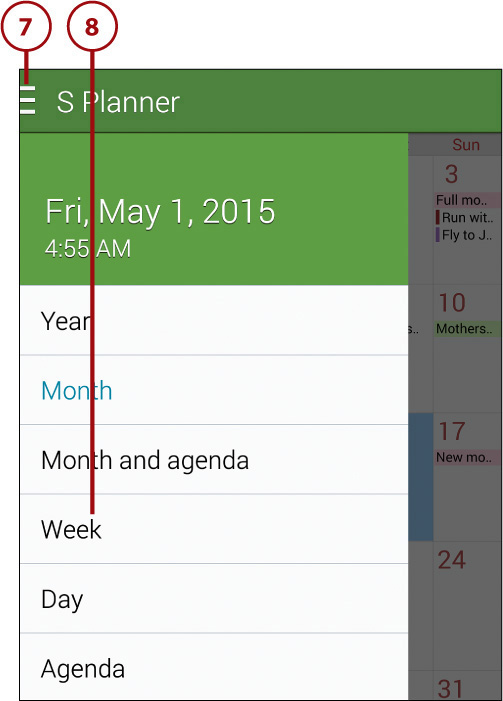
7. Tap the button in the upper-left corner to display the navigation panel.
8. Tap the view you want to see: Year, Month, Month and Agenda, Week, Day, or Agenda.
>>>Go Further: Drawing All Over Your Calendar
Event Colors
S Planner can display one calendar or many calendars at the same time. If you choose to display multiple calendars, events from each calendar are color coded so you can tell which events are from which calendar. In Google Calendar, you can also assign your choice of color to any event; S Planner preserves these colors.
Choose Which Calendars and Task Lists to View
If you have set up multiple accounts, which might each have multiple calendars or task lists, you can choose which calendars S Planner shows at the same time.
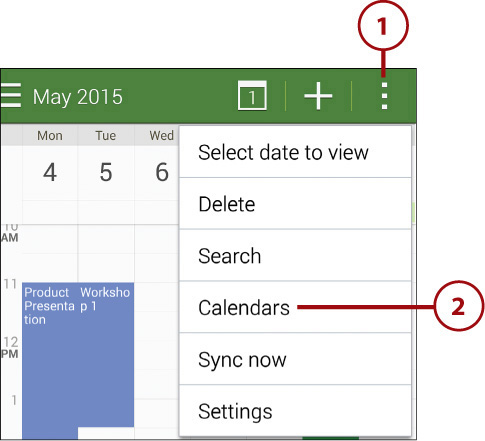
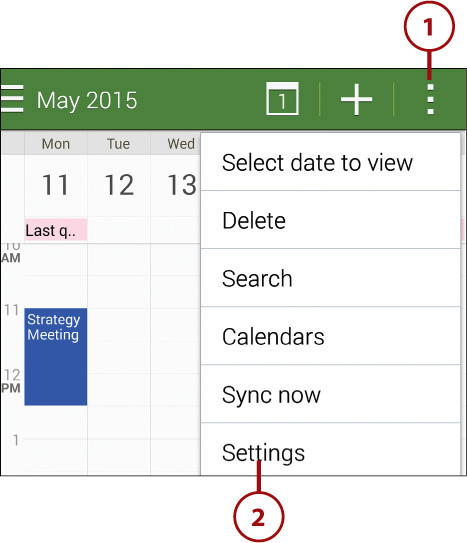
1. Tap the Menu button to open the menu.
2. Tap Calendars to display the Calendars screen.
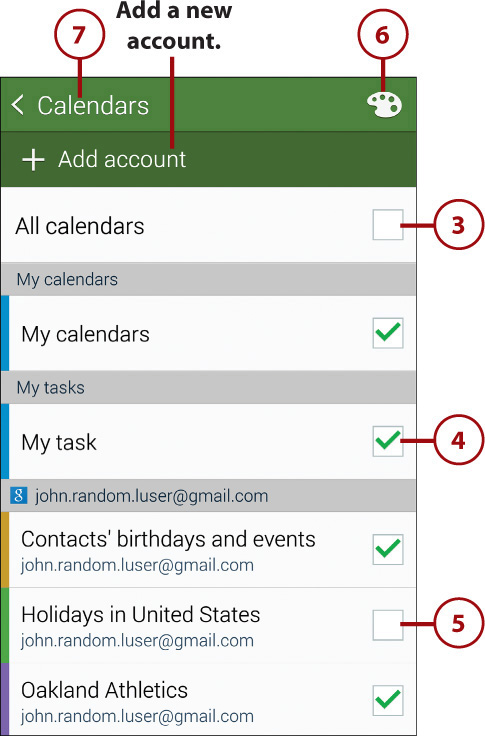
3. You can check the All Calendars box to quickly display all calendars and task lists from all accounts.
4. Check a box to display the calendar or task list.
5. Uncheck a box to hide a calendar or task list.
6. Tap the Calendar Color icon to display the Calendar Color screen, where you can choose colors for the calendars.
7. Tap Calendars or the Back button to return to the main S Planner screen.
2. Tap Settings to display the Settings screen.
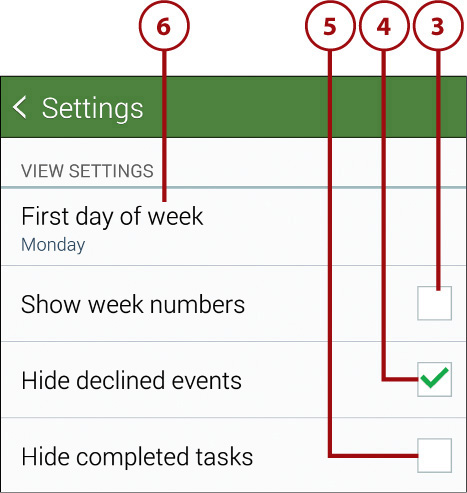
3. Check the Show Week Numbers box if you want to display week numbers. For example, March 26th is in week 13.
4. Check the Hide Declined Events box if you want to hide events you have declined.
5. Check the Hide Completed Tasks box if you want to hide tasks you have completed. Hiding what you’ve done may make it easier to see what you still have left to do.
6. Tap First Day of Week to display the First Day of Week dialog.
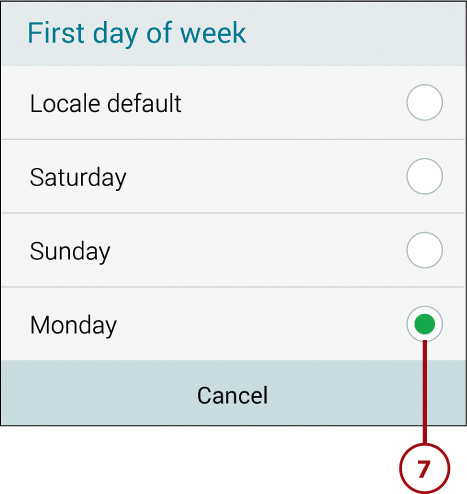
7. Tap the Locale Default radio button, the Saturday radio button, the Sunday radio button, or the Monday radio button, as needed. Locale Default means the locale determined by the time zone you are in controls what the first day of the week is.
8. Check the 7-Day Weather Forecast box if you want to display the weather on your calendar.
9. Check the Lock Time Zone box when you want to force S Planner to use your home time zone or another time zone you choose when displaying the calendar and event times. You would do this when you travel but you want to keep your calendar on your home time zone (or another time zone you select) instead of letting S Planner change it to whichever time zone you find yourself in.
10. Tap Select Time Zone to set your home time zone if you enabled Lock Time Zone in step 9.
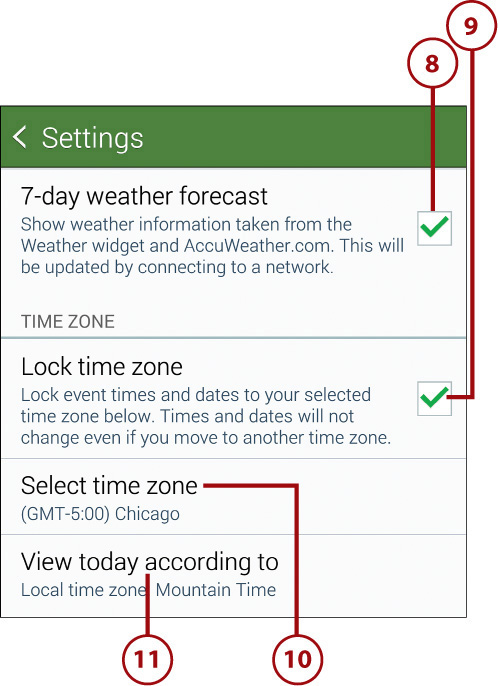
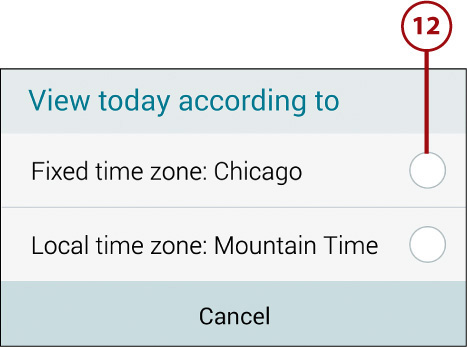
11. Tap the View Today According To button to display the View Today According To screen.
12. Tap the Fixed Time Zone radio button or the Local Time Zone radio button, as needed.
13. Tap Set Snooze Duration to display the Set Snooze Duration screen and then tap the radio button for the duration you want, such as 10 Minutes.
14. Tap Select Alert Type to display the Select Alert Type screen. You can then select the Pop-Up Notifications radio button, the Status Bar Notifications radio button, or the Off radio button, as needed.
15. Tap Notification Sound to choose the sound to play for calendar alerts.
16. Check the Vibration box if you want your Galaxy Note 4 to vibrate for alerts.
17. Tap Quick Responses to edit the four built-in Quick Responses or create custom Quick Responses. You find out how to use Quick Reponses later in this chapter.
18. Check the Online Recipient Search box if you want S Planner to search online for recipients of the address you type for shared events.
19. Tap Settings or the Back button to save your settings and return to the main S Planner screen.

Add a New Event
While you’re on the road, you can add a new appointment or event—and even invite people to it. Events you add synchronize to your Google and corporate calendars in real time.
1. Tap + to add a new event.
A Quicker Way to Add an Event
You can quickly add a new event by tapping and holding on the day on which you want to create the event and the time of day you want to create it.
2. Tap your account name to display the Calendar screen and then tap the calendar you want to add the event to.
3. Tap the color swatch to choose the color to assign to the event. You can use colors to make important events more conspicuous.
4. Tap Title to enter a title for your event.
5. Check the All Day box to mark the event as an all-day event.
6. Tap the Start button to display the Start tab of the Start and End screen, where you set the start date and time of the event.
7. Tap the End button to display the End tab of the Start and End screen, where you set the end date and time of the event.
8. Tap Time Zone to choose the time zone for the event.
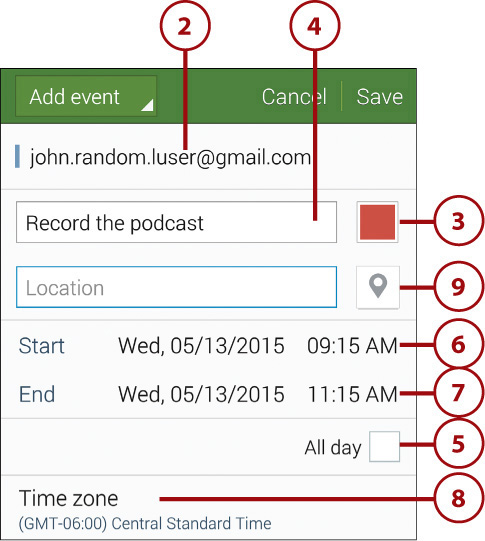
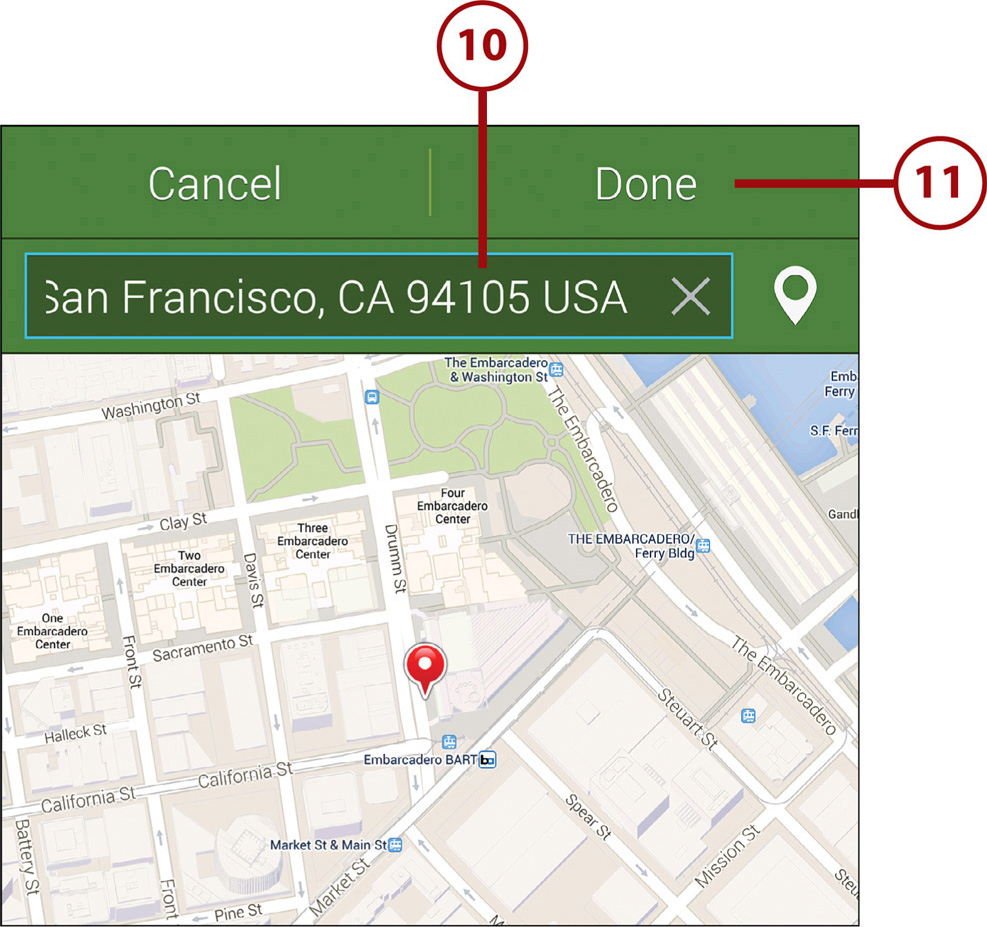
9. Tap Location to display the Location screen.
10. Type the location for the event.
11. Tap Done to return to the Add Event screen.
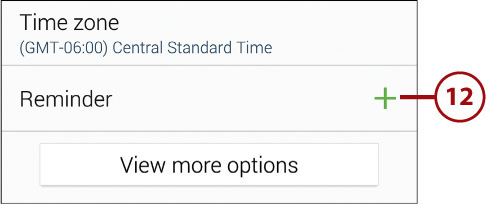
12. Tap the + to the right of Reminder to display the controls for configuring reminders.
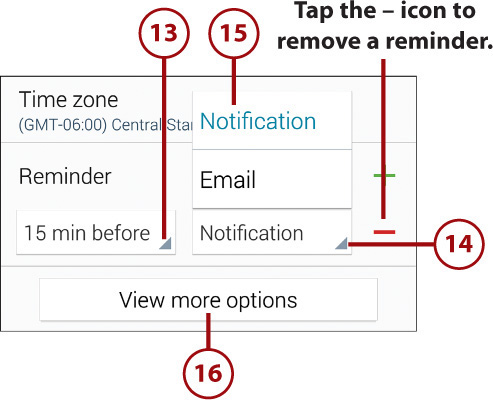
13. Tap the left pop-up menu and then tap the time period, such as 15 Min Before.
14. Tap the right pop-up menu.
15. Tap the reminder type: Email or Notification.
16. Tap View More Options to display the hidden options.
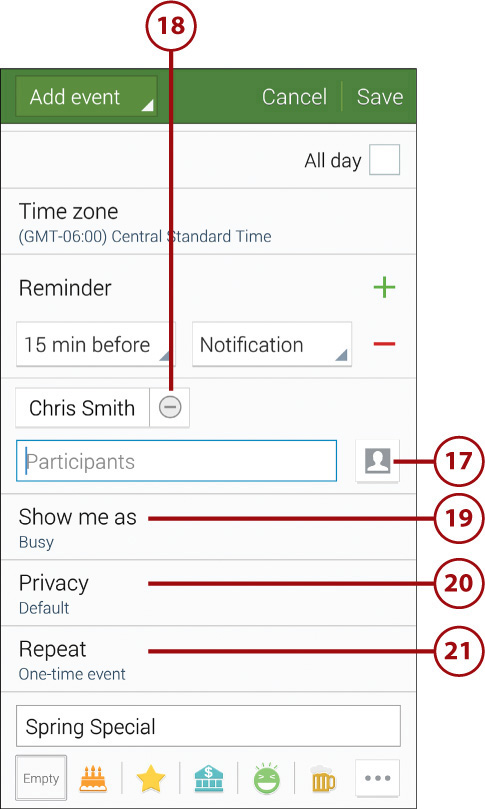
17. Tap the Contacts icon to add invitees from your Contacts list. You can also add invitees by typing their names or email addresses in the text box.
18. Tap the appropriate – icon to remove an invitee.
19. Tap Show Me As to display the Show Me As screen, where you can choose Busy or Available to show your availability during this event.
20. Tap Privacy to choose the privacy of the event. You can choose Default, Public, or Private. Default uses the calendar’s setting to determine who can see the details of the event. If the event is being created on your corporate calendar, setting the event to Private means that people can see you are busy, but they cannot see the event details.
21. Tap Repeat to set this as a recurring event. You can make it repeat daily, weekly, or monthly on the same date each month, but you can also set a meeting to repeat, for example, monthly but only every last Thursday regardless of the date.
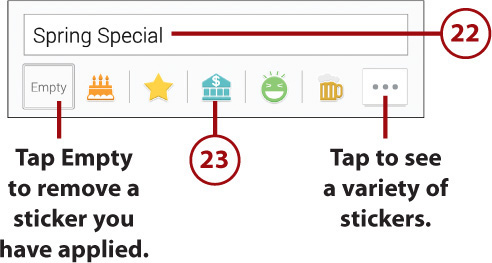
22. Tap Description and type a description for the event.
23. At the bottom of the screen, you can tap a sticker to apply it to the event. The stickers have images that might help you visually categorize events.
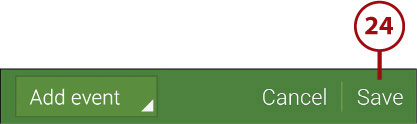
24. Tap Save to save the event. Any attendees you have added are automatically sent an event invitation.
Editing and Deleting an Event
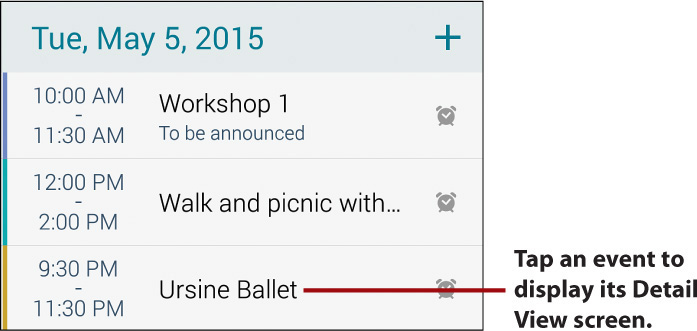
To edit an event, you must first open it for editing. How you do this depends on the view you’re using, but the general approach is to tap the event or the day, depending on what you can see. If a dialog opens showing you a summary of the event or the day, tap the event’s button to display the Detail View screen. When you tap an event in Agenda view or Month and Agenda view, S Planner takes you straight to the Detail View screen with no extra step.
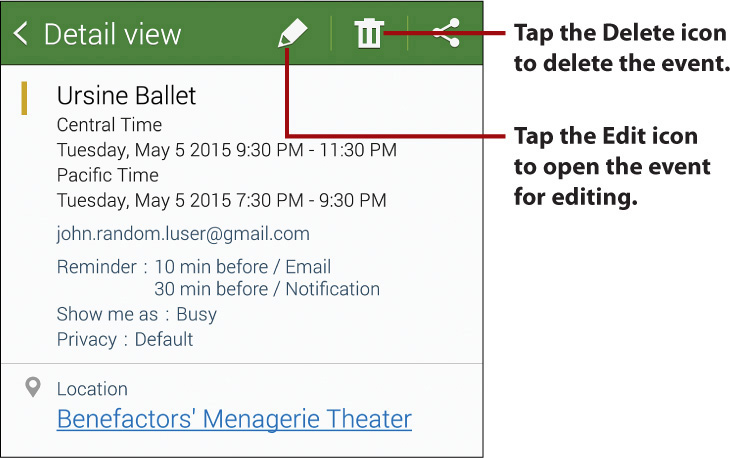
On the Detail View screen, tap the Edit icon to open the event for editing, or tap the Delete icon to delete the event. When you successfully delete an event to which someone has invited you, S Planner sends an event-decline notice to the event organizer. Therefore, you don’t have to first decline the meeting before deleting it because this is all taken care of automatically.
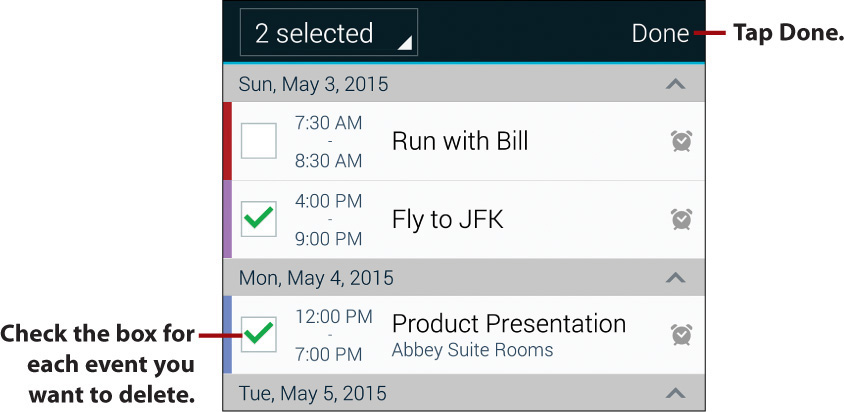
To delete multiple events, tap the Menu button and then tap Delete to display the Delete screen. Check the box for each event you want to delete and then tap Done.
Respond to a Google Event Invitation
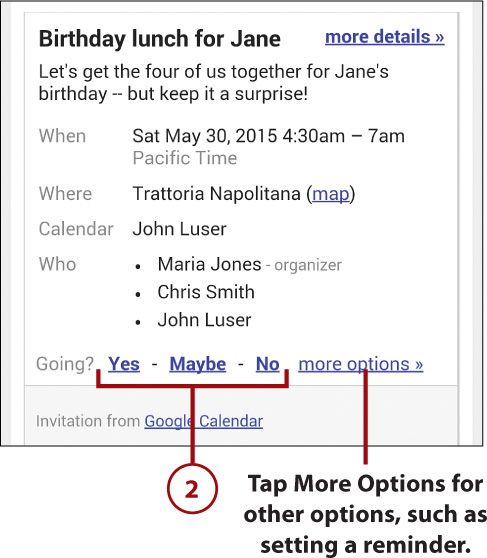
When you are invited to an event, you can choose your response right in the invitation email itself.
1. Tap to open the event invitation email.
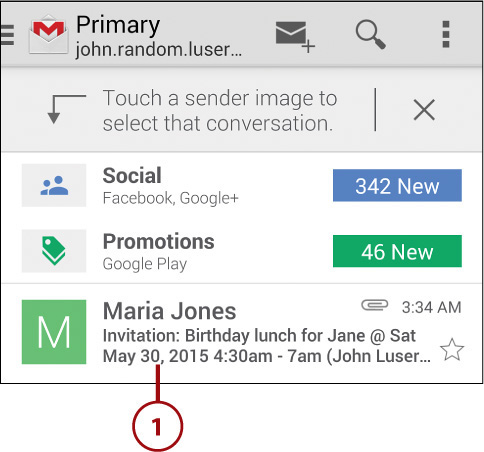
2. Tap Yes, Maybe, or No to indicate whether you will attend.
Respond to a Corporate Event Invitation
When you receive an invitation to an event, choose your response in the invitation email itself.
1. Tap to open the event invitation email.
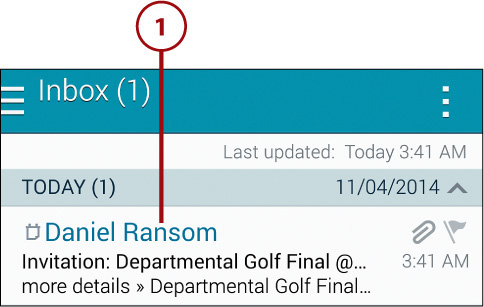
2. Tap Select Option to display the Select Option dialog.
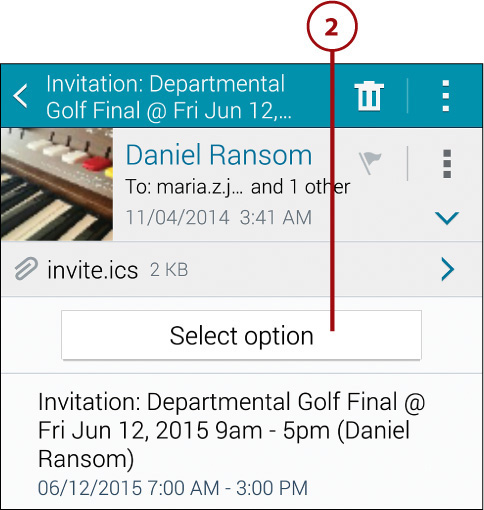
3. Tap Accept, Tentative, or Decline to give a straightforward response.
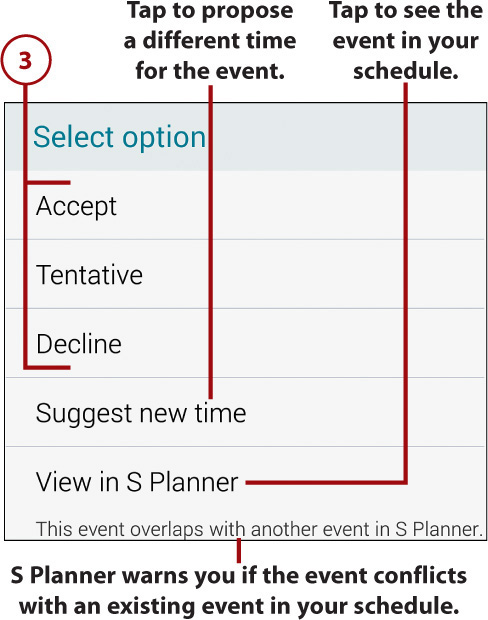
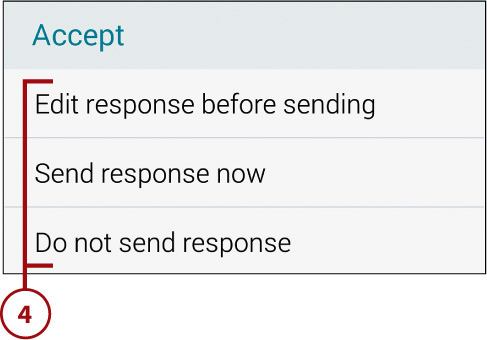
4. If a screen opens, tap the appropriate button. For example, in the Accept screen, you can tap Edit Response Before Sending to include custom text, tap Send Response Now to send an unvarnished acceptance, or tap Do Not Send Response to accept the invitation (and add it to your schedule as accepted) but not send a response to the organizer.
Should You Send a Response to an Invitation?
Usually, it is not only good manners but also helpful to send a response to an invitation. For most events, the organizer will need to know how many people are attending and who they are, so the organizer will find even a Maybe response more useful than no response. For huge public events, however, you may choose not to send a response.
Use Quick Responses
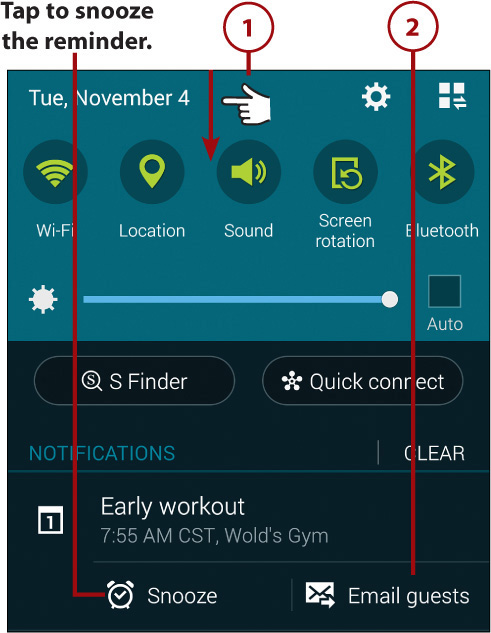
When your Galaxy Note 4 notifies you of an upcoming event, you can choose either Snooze or Email Guests. When you choose to email guests, you can choose a Quick Response to send them.
1. Pull down the Notification bar.
2. Tap Email Guests to open the Select a Quick Response dialog.
3. Choose one of your Quick Responses or write a custom message.
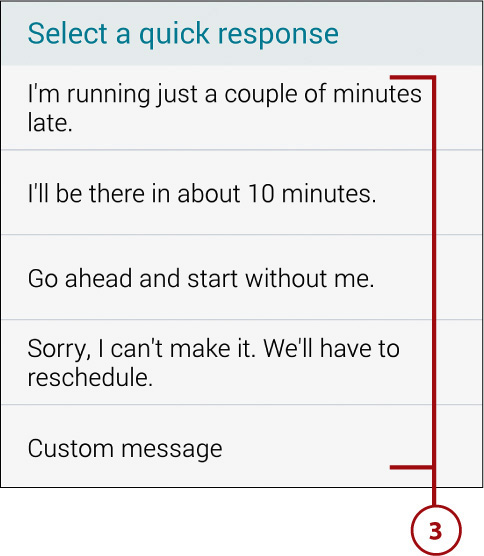
4. Tap the email app you want to use to send the Quick Response.

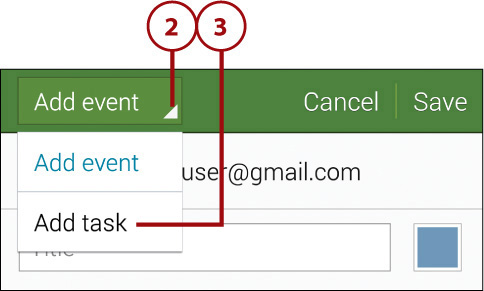
1. Tap New (+) to start adding a new item.
2. Tap the pop-up menu in the upper-left corner of the screen.
3. Tap Add Task to create a task.
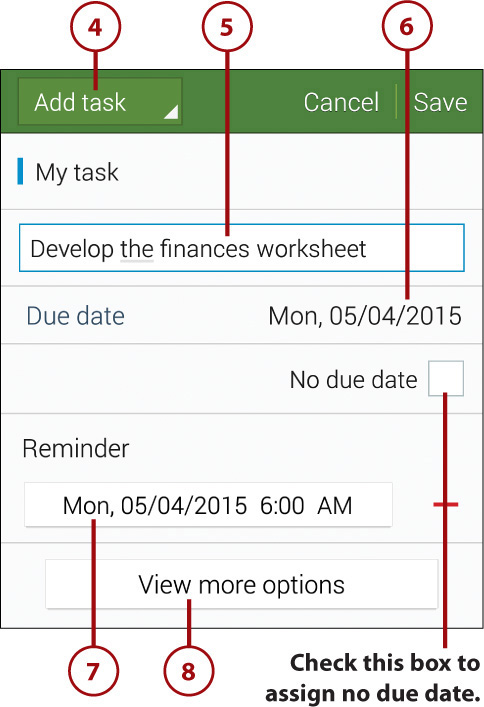
4. Tap the task list that appears and use the Task screen to switch to a different task list if necessary.
5. Tap Title and type the title for the task.
6. Tap Due Date and then specify when the task is due. If the task needs no due date, check the No Due Date box instead.
7. Tap Reminder to choose when you want to be reminded of the task.
8. If you want to add a description or set a priority, tap View More Options to display the extra controls.
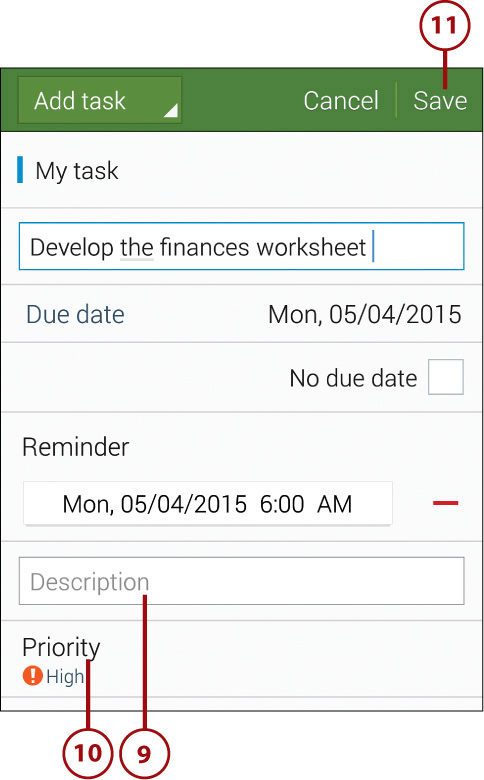
9. Tap Description and then type a description for the task.
10. Tap Priority to choose the task’s priority.
11. Tap Save to save the task.
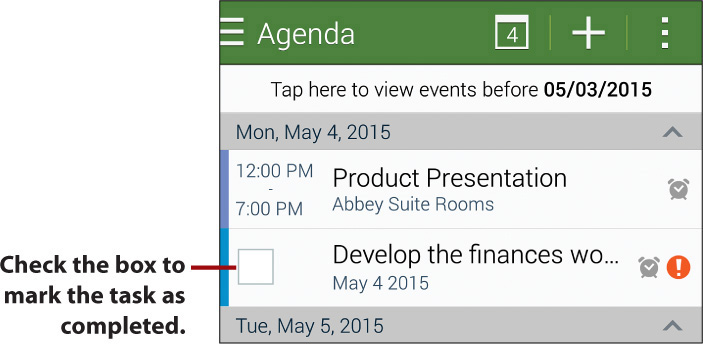
Marking a Task as Completed
To mark a task as completed, switch to Agenda view or Month and Agenda view. Check the box to the left of the task to mark it as completed.