
11. Bringing Out Your Inner Artist with Photos and Paint 3D
In this chapter, you learn how to work with photos, music, video, and games by learning about these tasks:
Remember the days—in the not-too-long ago past—when you took film to the drug store and then waited three days for your pictures to be developed?
Technology has made capturing, viewing, and sharing photos an instant thing, and because of that, and social media sites such as Facebook and Instagram, photographs have become a major language of connection among people all over the world. We are drawn to photos, whether they are beautiful, tragic, or interesting, and we capture and share the photos that help us communicate what’s important to us.
Whether we’re using our phones, tablets, or—um, cameras—taking photos is now a regular part of what we do. And the prevalence of photo-taking means that we have mountains of digital photographs to manage and organize. How will we find the one specific one we’re looking for?
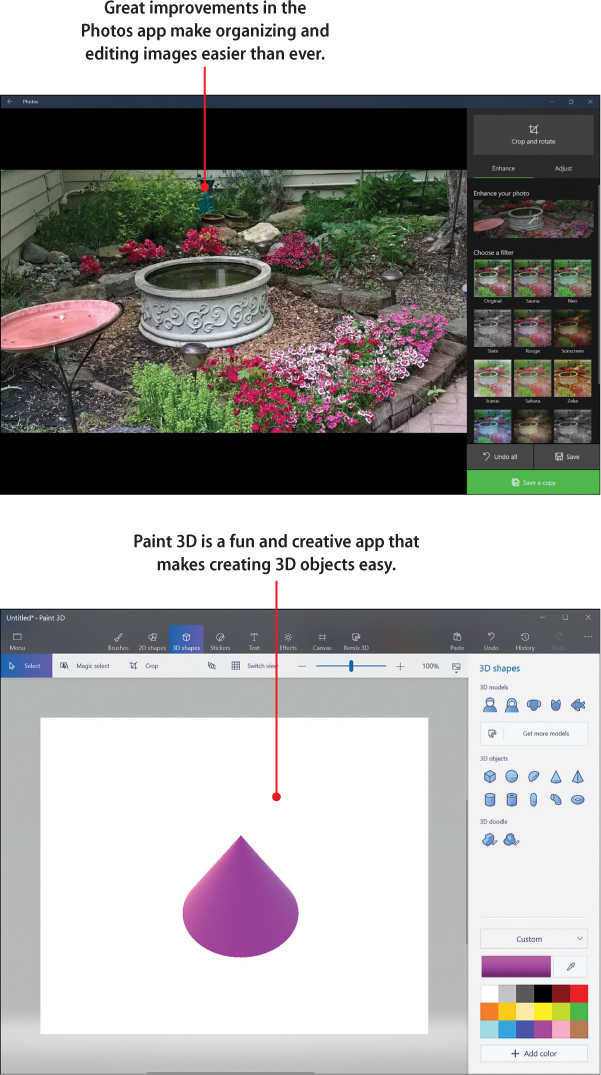
Windows 10 Fall Creators Update includes an enhanced Photos app that makes both organizing and fine-tuning photos simple. You can even create custom videos from the photos you’ve taken. What’s more, the new Paint 3D app enables you to play in a multidimensional space, designing new and creative landscapes for your artistic ideas.
Viewing and Organizing Your Photos
If you’ve been following along and trying the various versions of Windows 10 as they become available, you have no doubt noticed that the Photos app has more than a few makeovers. In past incarnations of Photos, developers have expanded the various editing tools available. Now in the version of Photos included with Windows 10 Fall Creators Update, Microsoft has made some interesting changes that make organizing your photos easier than ever while preserving the solid editing tools. The newest version of the app also includes some new creative tools.
Starting the Photos App
It’s no surprise that the Photos app is in Windows 10 in the Start menu. When you launch the app, it opens and displays the folders in which your various photos are currently stored.
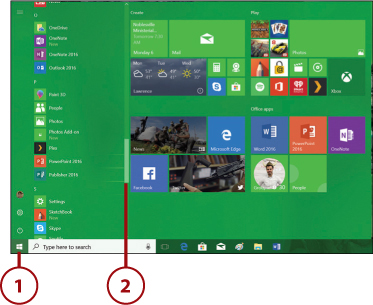
Click the Start button to display the Start menu.
Click the Photos app tile.
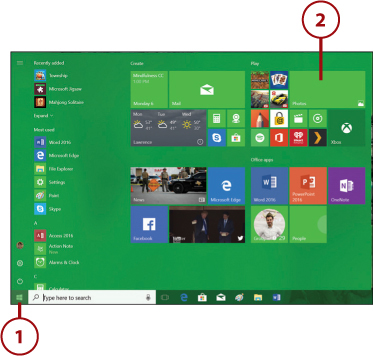
Scroll down to look through your most recent photos in the displayed collection.
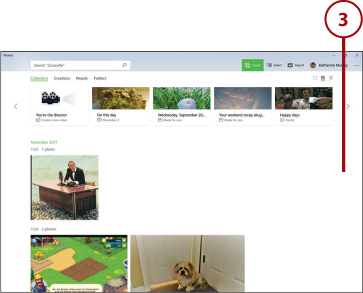
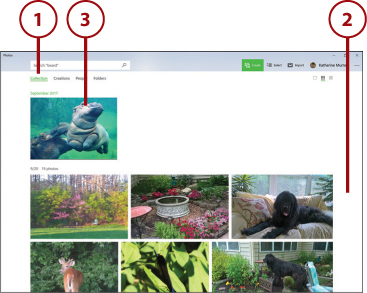
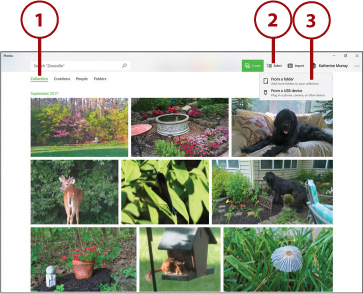
A Look Around the Photos App Window
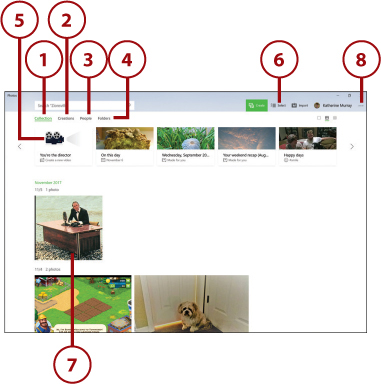
The Photos app has a clean new look, and the photos are organized center stage. Across the top, the app organizes your recent photos into albums for you, so you can easily navigate through all the photo collections the app gathers from your PC, phone, tablet, and OneDrive account. Here are the tools you’ll use regularly in the main window of the Photos app.
View your photos from all your devices, organized by date.
See the video albums the Photos app has put together for you (arranged by date, time, location, or subject).
View your photos grouped by the person central to the picture.
Navigate to a specific folder containing images you want to view.
Click to create a custom video of the photos you’ve taken.
Click to select individual photos or groups of photos.
Click a photo to display it and gain access to editing tools.
Select settings and preferences for the Photos app.
Viewing Your Photos
You can choose how you want to view and scroll through your photos by using the Collections, Creations, People, or Folders view.
In the Photos app, click the view you want to use.
Scroll through the various choices in that view.
Click the photo you want to view.
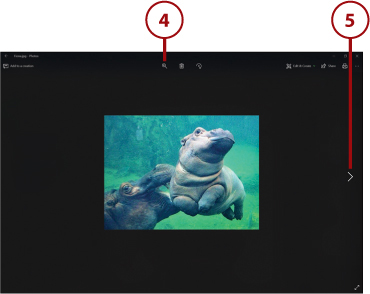
Magnify or reduce the image size by clicking the Zoom tools at the top of the photo window.
Browse through photos by clicking the Next or Previous buttons on the sides of the image.
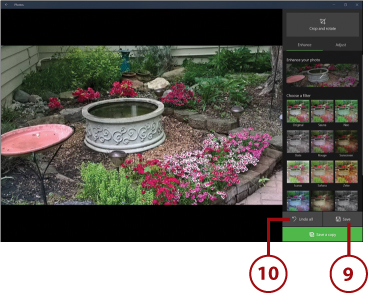
Editing and Enhancing Photos
When you’re displaying an image in the Photos app, you can easily make corrections, apply filters, remove red eye, and more.
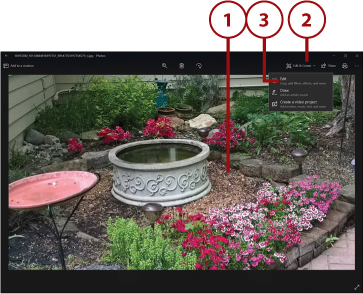
Display the photo you want to edit in the Photos app.
Click Edit & Create in the tools row above and to the right of the photo.
Choose Edit. A palette of editing tools appears to the right of the photo.
The Enhance tab provides you with a number of filters you can apply to the image. Click one to apply it.
To have Photos auto-adjust the color, brightness, and contrast, click Enhance Your Photo.
Click to crop or rotate the photo.
Click to adjust individual levels of Light, Color, and Clarity in the image.
If you want to create a copy of the original picture that saves your edits, tap or click Save a Copy.
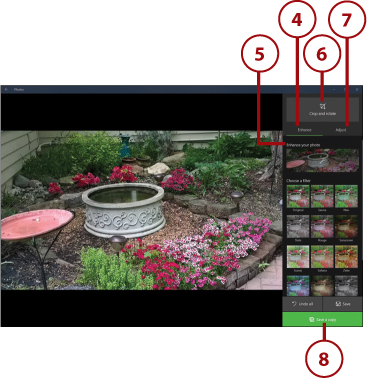
If you want to update the original version of the picture with your changes, click Save.
If you want to reverse your most recent edits, click or tap Undo All.
Importing Photos
These days we take so many photos that we need an easy way to view, edit, and share them. If you have set up your phone to work with OneDrive so you upload images you capture automatically, they’re available in your Photos app without your doing anything at all (provided you use the same Microsoft account for both your OneDrive account and your Windows 10 computer or device).
If you save photos on a thumb drive or a DVD, you need to be able to tell the Photos app where to find those images so they can be imported.
Open the Photos app and click the Collection tab.
Click Import to open the submenu.
Click whether you want to import photos from a USB device or another folder. If you choose a USB device, Windows 10 looks for the device connected to your computer; if one isn’t found, Windows 10 prompts you to insert it. If you choose a folder, the Open dialog box opens so you can choose the folder you want to use.
Navigate to the folder with the images you want to import, and click it.
Click Add This Folder to Pictures to tell Photos to include this folder in searches and collections.

Working with Creations
Creations are a new feature of Windows 10 Fall Creators Update. The Photos app chooses a selection of your photos (usually organized by date or person) and creates a video of images, complete with music and zoom effects. The result is quite stunning.
You can also create your own creations on the fly. The Photos app gives you the choice of creating a custom album with photos and videos you choose or editing your own video (compiled from photos you’ve taken).
Adding Your Own Creations
Creativity is a big theme in Windows 10 Fall Creators Update, and the Photos app gives you a number of tools and the latitude to create projects based on the photos you capture. Here’s how to create your own Photos creation.
Open the Photos app.
Click or tap Create to see a list of choices.
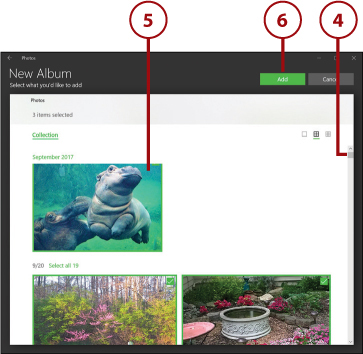
Click or tap Album. The New Album window appears.
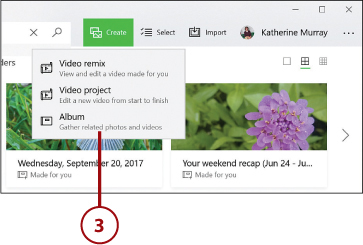
Scroll through the list of photos.
Click the photos you want to add to the album.
Click or tap Add. The new album is displayed so you can watch or edit your new creation.
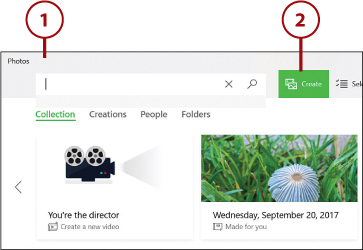
Viewing and Editing Creations
The Photos app in Windows 10 Fall Creators Update also does some creating of its own. You’ll notice that the app has taken some of your photos and put them to music, animating them in a kind of video project. You can view and edit these creations to add your own creative touches.
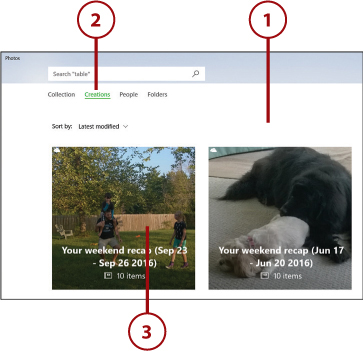
Display the Photos app.
Click Creations.
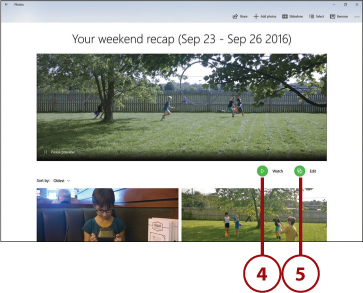
Click or tap the creation you want to view. The page for that project opens. The banner on the page shows a preview of the video.
Click Play to watch the video, complete with music.
Click or tap to edit the video, adding your own photos.
Paint 3D: Adding Artistic Dimension
Perhaps you’ve heard that 3D modeling is all the rage. From 3D printers (how is it possible that you can print a chair?) to multidimensional graphic design, looking at something in 3D gives us a more realistic sense of the object we’re interacting with. Windows 10 Fall Creators Update includes several 3D modeling tools: Paint 3D, Windows Mixed Reality, and HoloLens support.
Windows Mixed Reality is a new platform in Windows 10 that enables users to see a blend of real and virtual realities. You’ll get to try this out later in the chapter.
HoloLens technology is beyond the beginning level of this book (plus out of the reach of many of our technology budgets) because it requires a special VR headset. No worries, though—we can still have some fun with Paint 3D, which is included free as part of your version of Windows 10.
The Paint 3D app was originally planned as a replacement for Windows Paint, but thanks to customer feedback (and loyalty to Windows Paint), both apps now coexist in Windows 10. With Paint 3D, you can
Create 3D landscapes and objects
Make 2D drawings and turn them into 3D
Add special effects and stickers
Add ready-made 3D objects to your creations
Tweak lighting, brightness, and more
Getting Started with Paint 3D
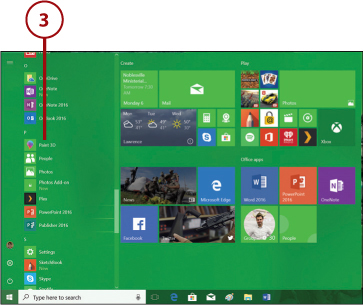
The Paint 3D app is in your Windows Start menu. Begin by tapping or clicking the Start button, and then scroll through the list to find the app.
Click or tap the Start button to display the Start menu.
Drag the scrollbar to display apps that begin with the letter P.
Click or tap the Paint 3D app. The app opens in your work area.
Exploring the Paint 3D Window
The first time you start Paint 3D, you are greeted with a Welcome screen that offers getting started tips, ideas, and videos. You can click one of the items to see more, or click the Show Welcome Screen check box to remove the check mark so the next time Paint 3D starts, the Paint 3D screen is displayed. For now, press Esc if necessary to clear the Welcome screen.
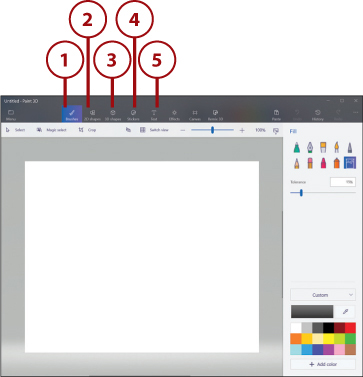
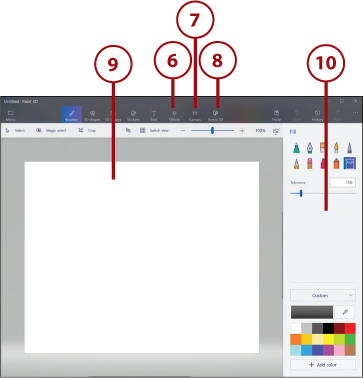
You use the following tools in Paint 3D to create 2D, 3D, and mixed reality creations:
Choose the brush style, color, and thickness.
Create 2D shapes, lines, and curves.
Choose from a palette of ready-made 3D shapes, models, and doodles, and apply colors and textures.
Add stickers to your creation.
Insert text into your 2D or 3D design.
Apply lighting effects to the object you’ve created.
Change the size and settings of your canvas.
Connect to the Remix 3D community to share ideas, get new 3D objects, and more.
Draw or write on the canvas.
Choose the tools and settings you want to use. This panel displays choices related to the tools you select.
Creating with Paint 3D
There are many fun things you can do with Paint 3D, and the best way to learn is to jump in and start experimenting. Paint 3D includes many ready-made objects that you can manipulate and make part of your own drawings.
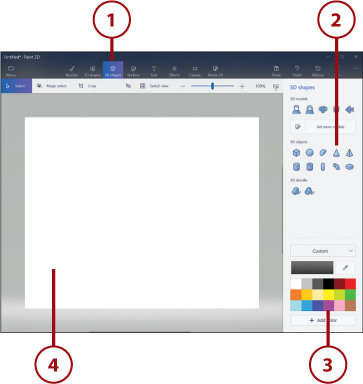
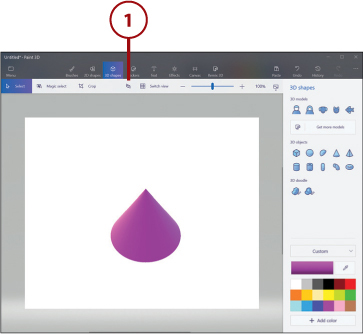
Using your finger or pen, click or tap the 3D tool.
Choose a shape from the right panel.
Choose a color from the color palette.
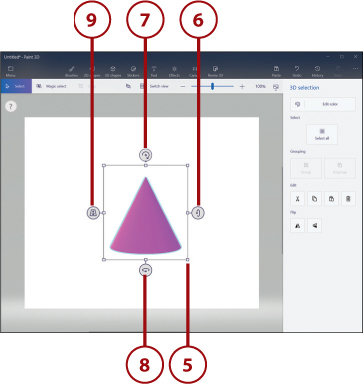
Drag to draw the shape on the canvas. Four tools appear around the perimeter of the shape.
Click a corner and resize the image by dragging.
Reposition the tilt of the object, forward or back.
Rotate the object right or left.
Pivot the object to get a different view.
Turn the object and adjust its placement in the three-dimensional space.
Adding Mixed Reality
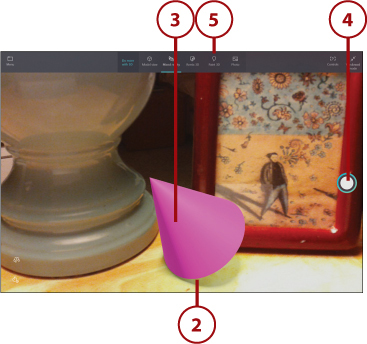
Once you’ve created an object, you can test it out against your own reality, creating a kind of mixed experience that is fun and a little mind-bending. If your computer is equipped with a camera, Paint 3D accesses it to get a picture of the live background and displays your newly created object on it. You can move the object on the background and take a snapshot of the creation if you like.
Once you’ve created your object, click the View Model in Mixed Reality button. The object appears within the real surroundings picked up by your camera.
Click to position the object.
Rotate the object as you’d like to get the right effect.
Tap or click to take a snapshot of the object in the real background.
Click or tap Paint 3D to return to the workspace.
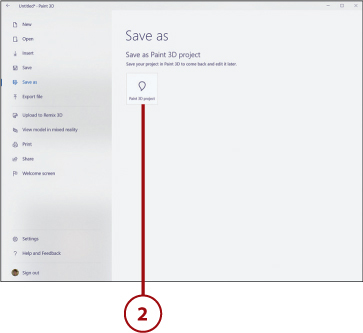
Saving Your Objects in Paint 3D
You can save the objects you’ve created by using the tools in the Paint 3D menu. You can also upload a 3D object to the Remix 3D community to share with others, invite feedback, and more.
When you’ve finished working with your object, click or tap Expand Menu.
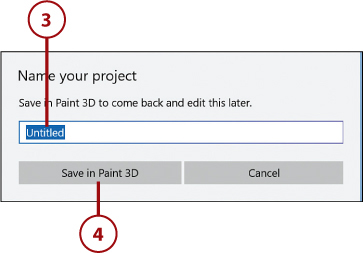
Click Save as Paint 3D Project. The Name Your Project box appears.
Type a name for the project.
Click or tap Save in Paint 3D.
Display the Remix 3D library by clicking the Remix 3D tool at the right end of the tools row. A panel appears on the right side of your work area, offering a palette of ideas you can use as inspiration for your own projects. If you like, you can visit the Remix 3D community by clicking the Remix 3D menu button in the upper-left corner of the panel (it resembled three horizontal lines) and choosing Visit Remix3D.com.