
6. Personalizing Windows
In this chapter, you find out how to customize the look and feel of Windows to your own personal satisfaction.
![]() Personalizing the Windows Desktop
Personalizing the Windows Desktop
When you first turn on your new computer system, you see the Windows lock screen, and then the Windows desktop, complete with the Start menu. You can accept the default look for each of these items, or you can customize them to your own personal tastes. It’s one way to make Windows look like your version of Windows, different from anybody else’s.
Personalizing the Windows Desktop
You can personalize several elements on the Windows desktop itself. You can change the color scheme, the desktop background, and even “pin” your favorite programs to the taskbar or the Start menu.
Personalize the Start Menu
The Windows 10 Start menu can be customized to display tiles for your favorite programs. These tiles can be moved or resized, as you like.
![]() Click the Start button to open the Start menu.
Click the Start button to open the Start menu.
![]() To resize the Start menu, mouse over the top or right edge; then click and drag the window to the desired size.
To resize the Start menu, mouse over the top or right edge; then click and drag the window to the desired size.
![]() To “pin” a program to the right side of the Start menu, right-click the name of the app and then select Pin to Start. (You can also use your mouse to click and drag the app to where you want it on the right side of the Start menu.)
To “pin” a program to the right side of the Start menu, right-click the name of the app and then select Pin to Start. (You can also use your mouse to click and drag the app to where you want it on the right side of the Start menu.)

Pinning
“Pinning” an app creates a permanent shortcut to that app. You can pin programs to either the Start menu or the taskbar.
![]() To rearrange tiles on the Start menu, click and hold a tile and then drag it to a new position.
To rearrange tiles on the Start menu, click and hold a tile and then drag it to a new position.
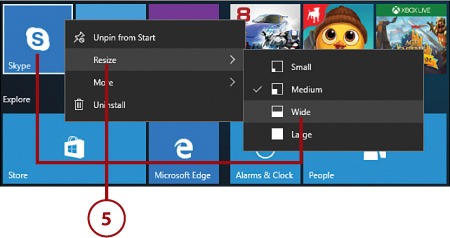
![]() To resize a tile, right-click the tile, select Resize, and then select the desired size. Tiles come in four possible sizes: Small, Medium, Wide, and Large.
To resize a tile, right-click the tile, select Resize, and then select the desired size. Tiles come in four possible sizes: Small, Medium, Wide, and Large.
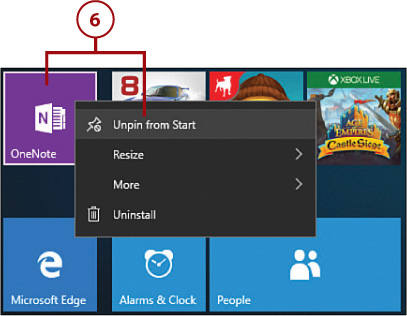
![]() To remove a tile from the Start menu, right-click the tile and select Unpin from Start.
To remove a tile from the Start menu, right-click the tile and select Unpin from Start.
Live Tiles
Tiles for some apps display “live” information—that is, current data in real time. For example, the Weather tile displays current weather conditions; the News tile displays current news headlines.
Change the Desktop Background
The Windows desktop displays across your entire computer screen. One of the most popular ways to personalize the desktop is to use a favorite picture or color as the desktop background.
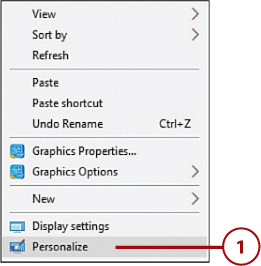
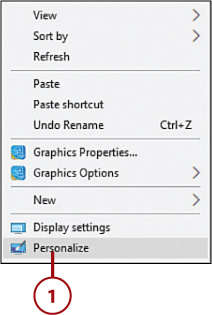
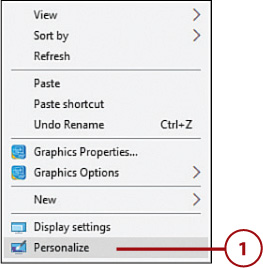
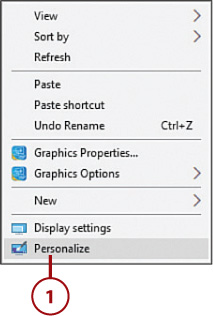
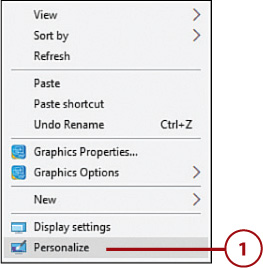
![]() Right-click in any open area of the desktop and select Personalize from the pop-up menu. The Personalization window displays.
Right-click in any open area of the desktop and select Personalize from the pop-up menu. The Personalization window displays.
![]() Click to select the Background tab.
Click to select the Background tab.
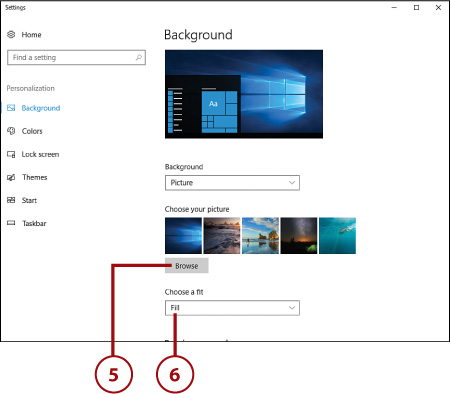
![]() To use a picture as your desktop background, click the Background control and select Picture.
To use a picture as your desktop background, click the Background control and select Picture.
![]() Click to select one of the thumbnail images displayed. Or…
Click to select one of the thumbnail images displayed. Or…

![]() Click Browse to select another picture stored on your computer.
Click Browse to select another picture stored on your computer.
![]() If the selected image is a different size from your Windows desktop, click the Choose a Fit list and select a display option—Fill (zooms into the picture to fill the screen), Fit (fits the image to fill the screen horizontally, but might leave black bars above and below the image), Stretch (distorts the picture to fill the screen), Tile (displays multiple instances of a smaller image), Center (displays a smaller image in the center of the screen, with black space around it), or Span (spans a single image across multiple monitors, if you have multiple monitors on your system).
If the selected image is a different size from your Windows desktop, click the Choose a Fit list and select a display option—Fill (zooms into the picture to fill the screen), Fit (fits the image to fill the screen horizontally, but might leave black bars above and below the image), Stretch (distorts the picture to fill the screen), Tile (displays multiple instances of a smaller image), Center (displays a smaller image in the center of the screen, with black space around it), or Span (spans a single image across multiple monitors, if you have multiple monitors on your system).
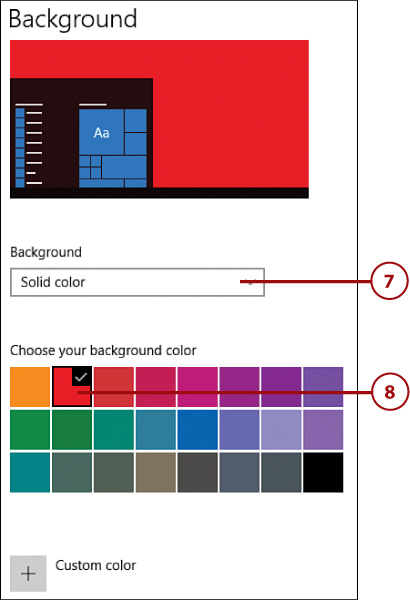
![]() To set a color for your desktop background, click the Background list and select Solid Color.
To set a color for your desktop background, click the Background list and select Solid Color.
![]() Click to select the color you want. (Or click Custom Color to choose from a broader palette.)
Click to select the color you want. (Or click Custom Color to choose from a broader palette.)
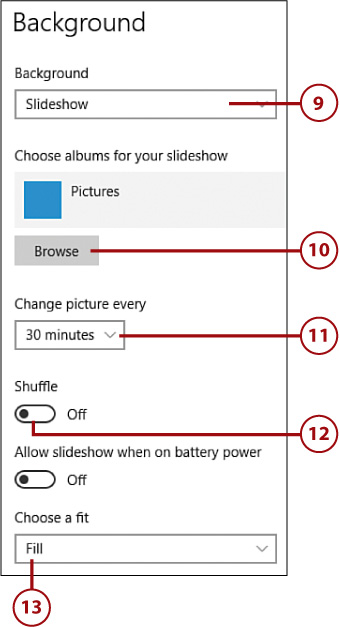
![]() To have your desktop background rotate through a variety of pictures, click the Background list and select Slideshow.
To have your desktop background rotate through a variety of pictures, click the Background list and select Slideshow.
![]() By default, the slideshow chooses pictures from your Pictures folder. To select a different folder, click Browse.
By default, the slideshow chooses pictures from your Pictures folder. To select a different folder, click Browse.
![]() To change how long each photo is displayed, click the Change Picture Every list and make a new selection.
To change how long each photo is displayed, click the Change Picture Every list and make a new selection.
![]() To display pictures randomly, click “on” the Shuffle switch.
To display pictures randomly, click “on” the Shuffle switch.
![]() Click the Choose a Fit list and select a display option.
Click the Choose a Fit list and select a display option.
Change the Accent Color
You can select any color for the title bar and frame that surrounds open windows on the desktop. You can also set the color for the Windows taskbar, Start menu, and Action Center.
![]() Right-click in any open area of the desktop and select Personalize from the pop-up menu. The Personalization window displays.
Right-click in any open area of the desktop and select Personalize from the pop-up menu. The Personalization window displays.
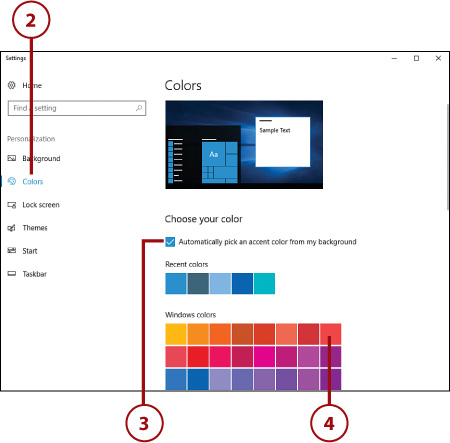
![]() Click to select the Colors tab.
Click to select the Colors tab.
![]() To have Windows automatically choose the accent color based on the color of the desktop image, click to check the Automatically Pick an Accent Color from My Background option.
To have Windows automatically choose the accent color based on the color of the desktop image, click to check the Automatically Pick an Accent Color from My Background option.
![]() To select a different accent color, uncheck the Automatically Pick an Accent Color from My Background option, and then click to select the color you want.
To select a different accent color, uncheck the Automatically Pick an Accent Color from My Background option, and then click to select the color you want.
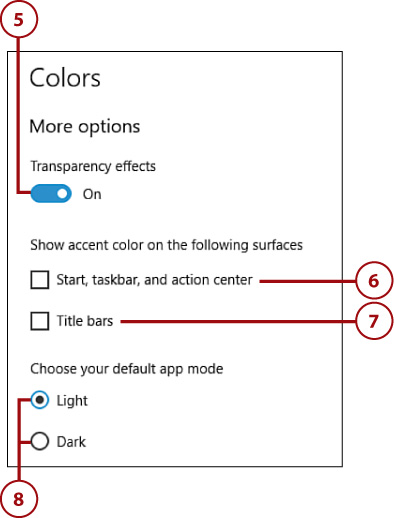
![]() To make the Windows desktop elements transparent, scroll down the window and click “on” the Transparency Effects switch.
To make the Windows desktop elements transparent, scroll down the window and click “on” the Transparency Effects switch.
![]() To show the accent color on the Start menu, taskbar, and Action Center, click to select the Start, Taskbar, and Action Center option. Uncheck this option to display a black Start menu, taskbar, and Action Center.
To show the accent color on the Start menu, taskbar, and Action Center, click to select the Start, Taskbar, and Action Center option. Uncheck this option to display a black Start menu, taskbar, and Action Center.
![]() To show the accent color on windows title bars, click to select the Title Bars option.
To show the accent color on windows title bars, click to select the Title Bars option.
![]() To switch to Windows 10’s “Dark” mode (displays a black background in many windows), go to the Choose Your Default App Mode section and select the Dark option.
To switch to Windows 10’s “Dark” mode (displays a black background in many windows), go to the Choose Your Default App Mode section and select the Dark option.
Change the Desktop Theme
Although you can configure each element of the Windows desktop separately, it’s often easier to choose a predesigned theme that changes all the elements in a visually pleasing configuration. A theme combines background images, color schemes, system sounds, and mouse cursor appearance to present a unified look and feel. Some themes even change the color scheme to match the current background picture.
![]() Right-click any open area of the desktop to display the options menu and then click Personalize to display the Personalization window.
Right-click any open area of the desktop to display the options menu and then click Personalize to display the Personalization window.
![]() Click to select the Themes tab.
Click to select the Themes tab.
![]() To save the currently selected background, color, sound, and mouse scheme as a new theme, click Save Theme. When prompted, give this new theme a name.
To save the currently selected background, color, sound, and mouse scheme as a new theme, click Save Theme. When prompted, give this new theme a name.
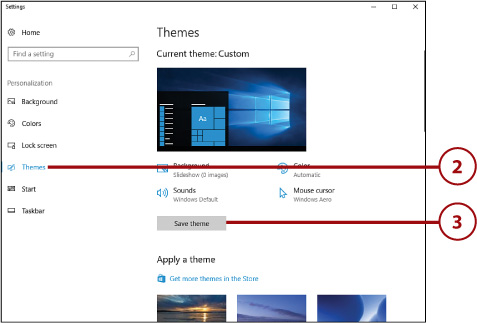
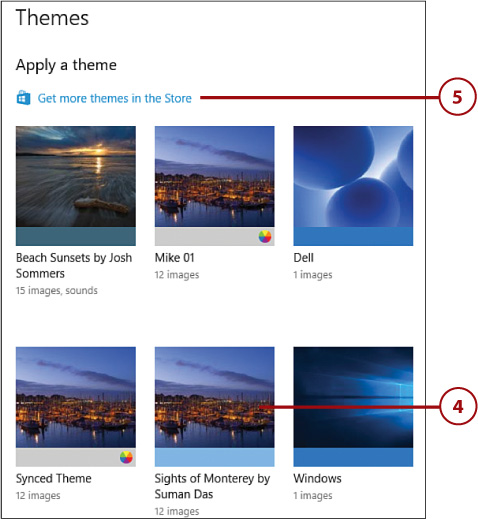
![]() Scroll down to the Apply a Theme section to view all themes installed on your PC. Click any theme to change to that theme.
Scroll down to the Apply a Theme section to view all themes installed on your PC. Click any theme to change to that theme.
![]() Additional themes, most free of charge, are available from the Microsoft Store online. Click Get More Themes in the Store to view what’s available.
Additional themes, most free of charge, are available from the Microsoft Store online. Click Get More Themes in the Store to view what’s available.
Personalizing the Lock Screen
You can also personalize the lock screen, which you see when you first start or begin to log in to Windows. You can change the background picture of the lock screen, turn the lock screen into a photo slideshow, and add informational apps to the screen.
Change the Lock Screen Background
You can choose from several stock images for the background of your lock screen, or you can upload your own photo to use as the background.
Lock Screen
The lock screen appears when you first power on your PC and any time you log off from your personal account or switch users. It also appears when you awaken your computer from Sleep mode.
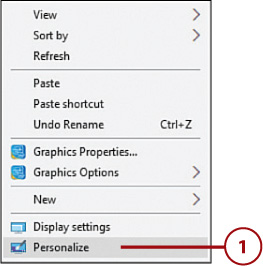
![]() Right-click in any open area of the desktop and select Personalize from the pop-up menu. The Personalization window displays.
Right-click in any open area of the desktop and select Personalize from the pop-up menu. The Personalization window displays.
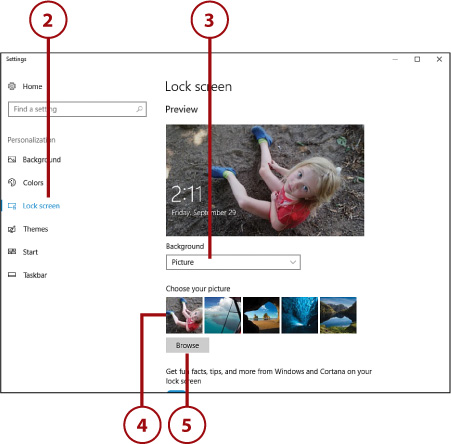
![]() Click to select the Lock Screen tab.
Click to select the Lock Screen tab.
![]() Click the Background list and select Picture. (Or stick with the default Windows Spotlight to have Windows choose new background pictures for you every few days.)
Click the Background list and select Picture. (Or stick with the default Windows Spotlight to have Windows choose new background pictures for you every few days.)
![]() Click the thumbnail for the picture you want to use.
Click the thumbnail for the picture you want to use.
![]() Alternatively, click the Browse button to use your own picture as the background.
Alternatively, click the Browse button to use your own picture as the background.
Display a Slideshow on the Lock Screen
Windows lets you turn your computer into a kind of digital picture frame, by displaying a slideshow of your photos on the lock screen while your PC isn’t being used.
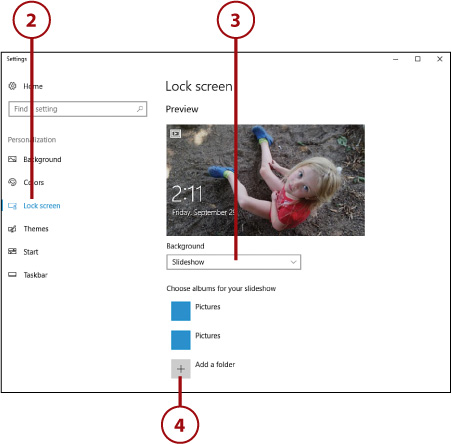
![]() Right-click in any open area of the desktop and select Personalize from the pop-up menu. The Personalization window displays.
Right-click in any open area of the desktop and select Personalize from the pop-up menu. The Personalization window displays.
![]() Click to select the Lock Screen tab.
Click to select the Lock Screen tab.
![]() Click the Background list and select Slideshow.
Click the Background list and select Slideshow.
![]() By default, Windows displays pictures from your Pictures folder. Click Add a Folder to select a different picture folder you want to display in your slideshow.
By default, Windows displays pictures from your Pictures folder. Click Add a Folder to select a different picture folder you want to display in your slideshow.
Add Apps to the Lock Screen
The lock screen can display a number of apps that run in the background and display useful or interesting information, even while your computer is locked. By default, you see the date/time, power status, and connection status, but it’s easy to add other apps and information (such as weather conditions and unread email messages) to the lock screen.
![]() Right-click in any open area of the desktop and select Personalize from the pop-up menu. The Personalization window displays.
Right-click in any open area of the desktop and select Personalize from the pop-up menu. The Personalization window displays.
![]() Click to select the Lock Screen tab.
Click to select the Lock Screen tab.
![]() Go to the Choose Apps to Show Quick Status section and click one of the + buttons to display the Choose an App panel.
Go to the Choose Apps to Show Quick Status section and click one of the + buttons to display the Choose an App panel.
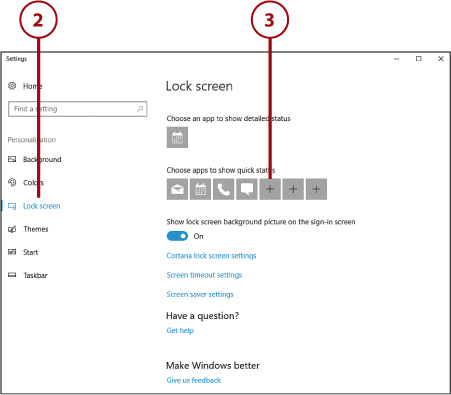
![]() Click the app you want to add.
Click the app you want to add.
Change Your Account Picture
Windows displays a small thumbnail image next to your account name when you log in to Windows from the lock screen; this same image displays next to your name on the Windows Start menu. When you first configured Windows, you were prompted to select a default image to use as this profile picture. You can, at any time, change this picture to something more to your liking.
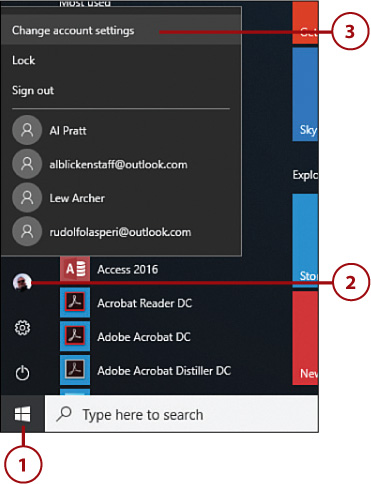
![]() Click the Start button to display the Start menu.
Click the Start button to display the Start menu.
![]() Click your name or picture on the left side of the Start menu to display the options menu.
Click your name or picture on the left side of the Start menu to display the options menu.
![]() Click Change Account Settings to display the Settings tool with the Your Info tab selected.
Click Change Account Settings to display the Settings tool with the Your Info tab selected.
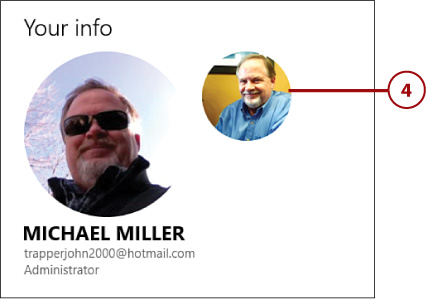
![]() If you’ve previously selected a profile picture, click one of the images displayed at the top of the page.
If you’ve previously selected a profile picture, click one of the images displayed at the top of the page.
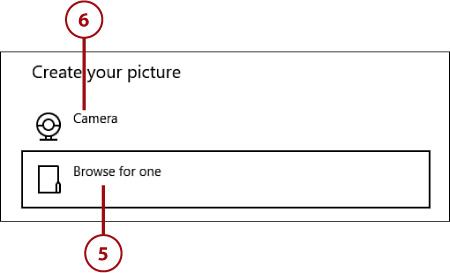
![]() To use another picture stored on your computer (or online at OneDrive), scroll to the Create Your Picture section, click Browse for One, and then select the picture you want.
To use another picture stored on your computer (or online at OneDrive), scroll to the Create Your Picture section, click Browse for One, and then select the picture you want.
![]() Alternatively, you can take a picture with your computer’s webcam to use for your account picture. Click Camera then follow the onscreen directions from there.
Alternatively, you can take a picture with your computer’s webcam to use for your account picture. Click Camera then follow the onscreen directions from there.
Configuring Other Windows Settings
You can configure many other Windows system settings. In most cases, the default settings work fine and you don’t need to change a thing. However, you can change these settings, if you want to or need to.
Configure Settings from the Settings Tool
You configure most Windows settings from the Settings tool, which consists of a series of tabs, accessible from the left side of the window, that present different types of settings.
![]() Click the Start button to display the Start menu, then click Settings.
Click the Start button to display the Start menu, then click Settings.
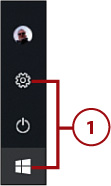
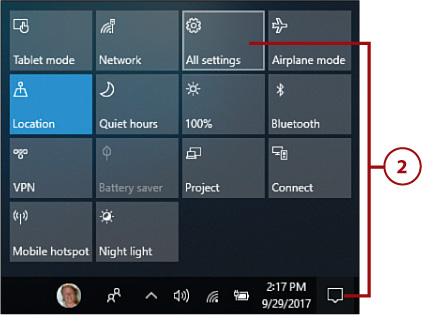
![]() Alternatively, click the Notifications icon on the taskbar then click All Settings.
Alternatively, click the Notifications icon on the taskbar then click All Settings.
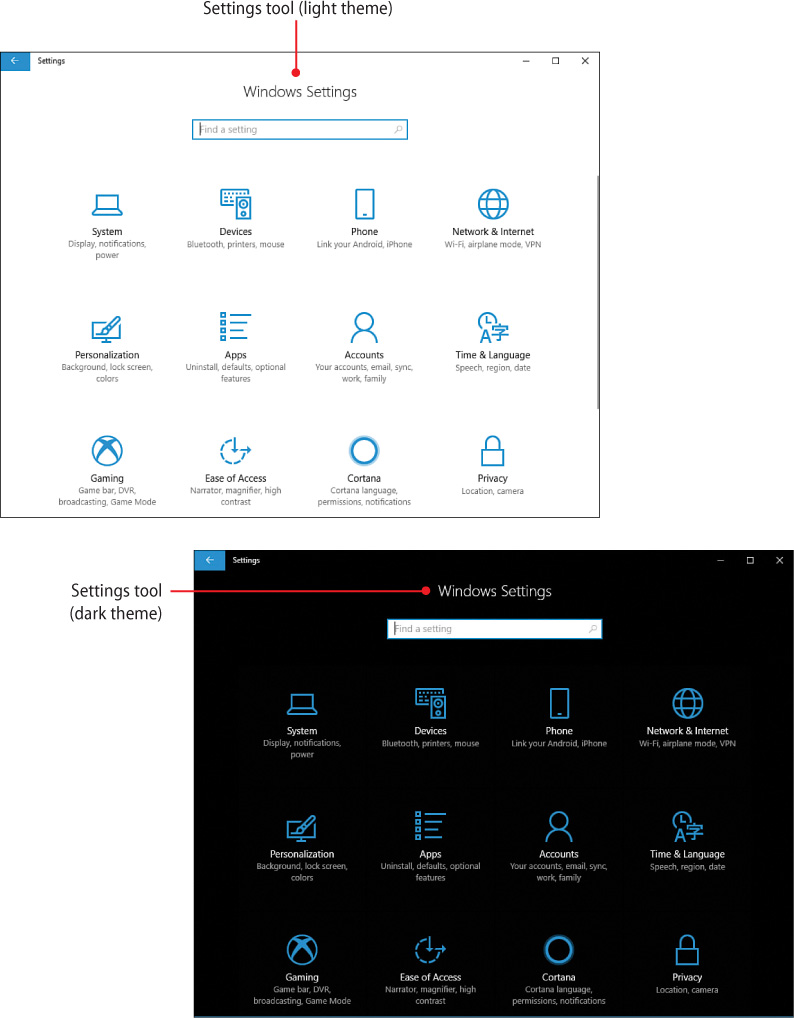
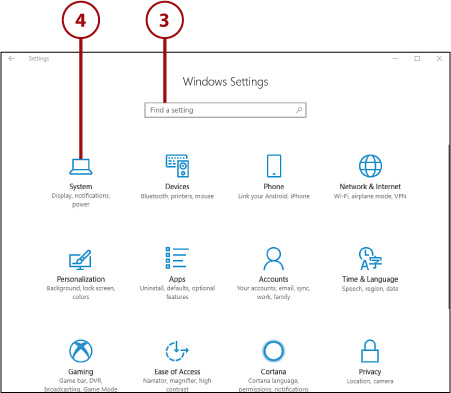
![]() Windows now opens the Settings tool. To search for a specific setting, type your query into the Find a Setting box and click the Search (magnifying glass) icon. Or…
Windows now opens the Settings tool. To search for a specific setting, type your query into the Find a Setting box and click the Search (magnifying glass) icon. Or…
![]() Click a category icon to display settings of that type.
Click a category icon to display settings of that type.
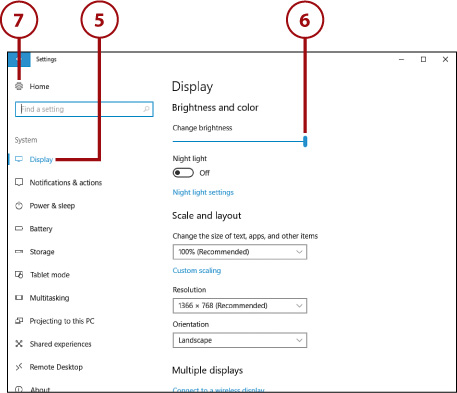
![]() Click the tab on the left to select the type of settings you want to configure.
Click the tab on the left to select the type of settings you want to configure.
![]() Configure the necessary options from the right side of the window.
Configure the necessary options from the right side of the window.
![]() Click Home to return to the Settings tool’s Home screen.
Click Home to return to the Settings tool’s Home screen.
Working with User Accounts
Chances are you’re not the only person using your computer; it’s likely that you’ll be sharing your PC with your spouse or partner and maybe even your children and grandchildren. Fortunately, you can configure Windows so that different people using your computer sign on with their own custom settings—and access to their own personal files.
The best way for multiple people to use a single computer is to assign each person his or her own password-protected user account. For a given person to use the PC and access her own programs and files, she has to sign in to the computer with her personal password. If a person doesn’t have an account or the proper password, she can’t use the computer.
Windows lets you create two different types of user accounts—online and local. The default is the online account, which comes with some unique benefits.
An online account is linked to a new or existing Microsoft account. When you use a Microsoft account on your computer, Windows displays information from other Microsoft sites you use. For example, Windows displays the latest weather conditions in the Weather app, the latest news headlines in the News app, and the latest stock quotes in the Stock app—all based on settings you make when you configure your Microsoft account. Local accounts cannot access this personalized data.
For these reasons, I recommend you create (or use an existing) Microsoft Account for any new user you add to your computer.
Create a New User Account
You create one user account when you first launch Windows on your new PC. At any time, you can create additional user accounts for other people using your computer.
By default, Windows will use an existing Microsoft account to create your new Windows user account. So if you have an Outlook.com, OneDrive, Skype, Xbox Live, or other Microsoft account, you can use that account to sign in to Windows on your computer.
![]() Open the Settings tool and click Accounts to display the Accounts page.
Open the Settings tool and click Accounts to display the Accounts page.
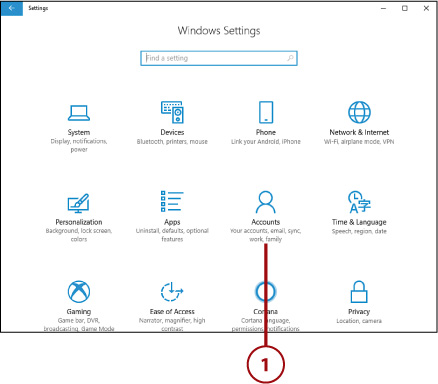
![]() Click to select the Family & Other People tab.
Click to select the Family & Other People tab.
![]() Click Add a Family Member to display the Microsoft Account window.
Click Add a Family Member to display the Microsoft Account window.
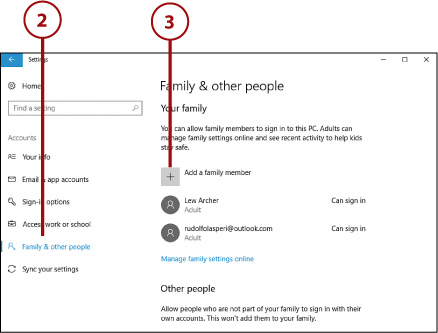
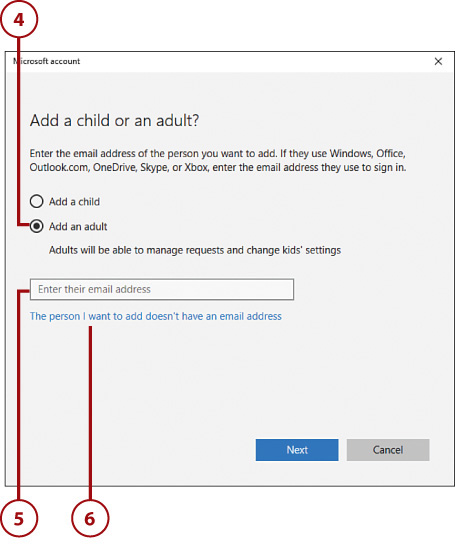
![]() Select either Add a Child or Add an Adult.
Select either Add a Child or Add an Adult.
![]() If the person already has an email address, enter it and click Next.
If the person already has an email address, enter it and click Next.
![]() If this person doesn’t have an email address, click The Person I Want to Add Doesn’t Have an Email Address.
If this person doesn’t have an email address, click The Person I Want to Add Doesn’t Have an Email Address.
![]() If you’re creating a new email address, enter the desired email username into the New Email box. (You might have to try several names to get one that isn’t already taken.)
If you’re creating a new email address, enter the desired email username into the New Email box. (You might have to try several names to get one that isn’t already taken.)
![]() Enter the desired password into the Password box.
Enter the desired password into the Password box.
![]() Enter this person’s birthdate.
Enter this person’s birthdate.
![]() Click Next and follow the remaining instructions to create the new account.
Click Next and follow the remaining instructions to create the new account.

Switch Users
If other people are using your computer, they’ll want to sign in with their own accounts. Fortunately, it’s relatively easy to sign in and out of different accounts, and to switch users.
You can change users on your PC without restarting it.
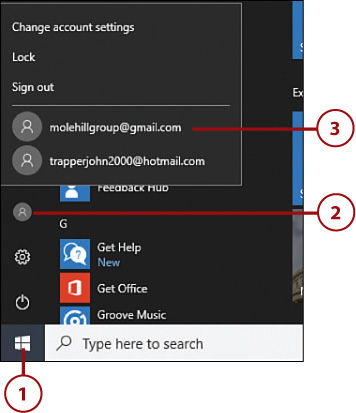
![]() Click the Start button to display the Start menu.
Click the Start button to display the Start menu.
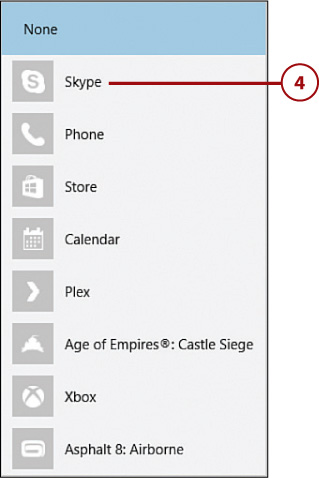
![]() Click your name or picture at the left side of the Start menu to display a list of other users.
Click your name or picture at the left side of the Start menu to display a list of other users.
![]() Click the desired user’s name.
Click the desired user’s name.
![]() When prompted, enter the new user’s password, and then press Enter.
When prompted, enter the new user’s password, and then press Enter.

Sign In with Multiple Users
If you have more than one user assigned to Windows, the sign-in process is slightly different when you start up your computer.
![]() Power up your computer.
Power up your computer.
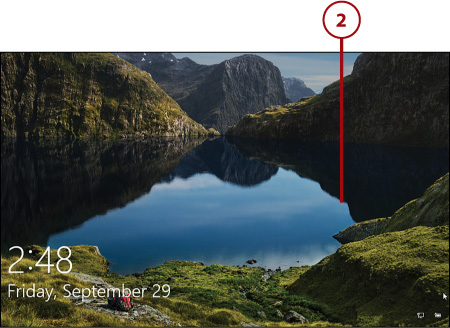
![]() When the Windows lock screen appears, press any key on your keyboard or click the mouse to display the sign-in screen. All users of this computer are listed here.
When the Windows lock screen appears, press any key on your keyboard or click the mouse to display the sign-in screen. All users of this computer are listed here.
![]() Click your username to display your personal sign-in screen.
Click your username to display your personal sign-in screen.
![]() Enter your password as normal; then press the Enter key to display your personal desktop.
Enter your password as normal; then press the Enter key to display your personal desktop.
