
7. Tuning into the Music Channel

In this chapter, you learn how to play music through your Xbox 360 console.
• Finding and playing audio content
• Exploring your music library
• Playing and ripping audio CDs
• Listening to music from a portable device
Although most people consider their Xbox 360 to be a visual powerhouse—and it certainly is—it is also capable of some amazing audio feats, which include playing and storing music. When it comes to playing music, the Xbox 360’s versatility can’t be beat. You can listen to music by connecting a portable media player, inserting a CD, or playing music stored on your console’s hard drive (that is, your music library). You can also purchase an unlimited streaming music subscription through Zune or turn your Xbox 360 into your own personal radio station through Last.fm or iHeartRadio. In this chapter, you learn how to tap the full potential of your console’s musical capabilities.
Taking Control of Music Playback
Although the term controller may be synonymous with gaming, your Xbox 360 controller is also your ticket into the music arena. Although not the most intuitive way to control music playback on your Xbox 360, it’s hard to beat the controller’s all-in-one convenience.
Now examine the general onscreen controls for using your Xbox 360 controller to play music. As expected, the Left Stick or D-pad moves between the various options, and the Start button or A button selects a highlighted option.

• Play or Pause—Play or pause the current song.
• Previous Track—If there’s a previous song, go back one song; otherwise, restart the current song.
• Stop—Stop the current song.
• Next Track—Go to the next song if one is available.
• Shuffle Off or On—Play your selections in random order. Default is off.
• Volume—Adjust the music playback volume.
Playing Music in the Background from the Xbox Guide
A unique feature that the Xbox 360 has over other consoles is its capability to play your own music in the background while browsing the Dashboard or playing most games, the latter of which replaces that game’s own background music with yours. The only way to begin music playback while a game runs is by calling up the Xbox Guide. Follow these steps to play your own music while playing a game:
1. After starting a game, press the Xbox Guide button on your controller.
2. Go to the Media blade, scroll to Select Music, and press A on your controller to select it. NOTE: This option is disabled when any in-game cutscene or movie is playing.

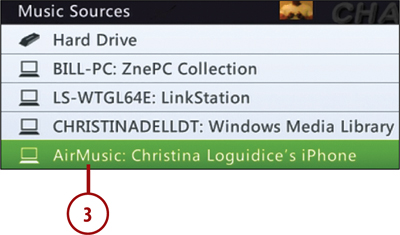
3. Select the location of the music you want to hear from Music Sources and then select the music you want to play.
4. Press the Xbox Guide button again to return to your game. Your music now plays in place of the game soundtrack if the game supports custom music. You can adjust the in-game volume mix of sound effects, music, and voice from the game’s options or settings menu.
Unfortunately, no music apps, namely Zune, Pass, Last.fm, or iHeartRadio, enable background play (cue the stereotypical sound of a needle being ripped from a record album). When you exit any service, the music stops!
Want to Stream Music From Your iOS Device?
You can download the AirMusic app by Plutinosoft from the Apple Store for approximately $2.99. The app enables you to stream your iPhone, iPad, or iPod Touch Music Library directly over Wi-Fi to your Xbox 360 or any other compatible DLNA device; DLNA stands for Digital Living Network Alliance, an organization spearheaded by Sony that ensures end-to-end interoperability among digital devices that enable storing, playing, and sharing of digital content. More information on AirMusic can be found at http://itunes.apple.com/us/app/airmusic/id409782234?mt=8.
Restoring In-Game Background Music
To restore the in-game background music or soundtrack, follow these steps:
1. Press the Xbox Guide button and go to the Media blade. Scroll to the currently playing song and press A to select it.

2. At the Music Sources screen, press X on your controller to restore Game Audio. Press the Xbox Guide button again to return to your game. The game’s soundtrack now plays like usual.

Enjoying Music with Zune
Unless you subscribe to Zune Pass, there’s not much you can do with the music side of Zune on your Xbox 360 other than purchase music videos or browse through music titles and listen to 30-second previews. With Zune Pass, you can stream the full versions of millions of songs on your Xbox 360 console. Your subscription also includes unlimited streaming and paid downloads to your PC and Windows Phone (and the discontinued Zune HD media player).
You can sign up for a Zune Pass within Zune on Xbox LIVE (see the “Getting a Zune Pass” section), on your computer with the Zune software (refer to “Media Sharing with Zune” in Chapter 4, “Getting to Know Your Xbox,” for more information), or on www.zune.net. A 14-day trial is available, and 1-month and 12-month subscriptions.
Getting a Zune Pass
Before you can access Zune, you need to download it from the Music channel or the Apps channel. After it finishes downloading, you’ll be brought directly to the Zune Music Marketplace. If you just want to browse the service, proceed to “Navigating Zune.” Otherwise, follow these steps if you want to get a Zune Pass account:
1. Go to the Music channel and select the Zune Music Marketplace block.

2. From the Zune Music Marketplace screen, select the Zune Pass block.

3. At the Pick Your Pass screen, select one of the Zune Pass purchase options and confirm your purchase on the screen that follows. At the Congratulations! screen, press A to complete the process.

Navigating Zune
After you enter Zune from the Music channel, you have access to the following blades:
• Picks for Me—Consists of Artist Picks, Album Picks, and Song Picks. As you play music, Zune recommends artists, albums, and songs you may like based on your music playing history.

• Spotlight—This is the default category. From here, you can access blocks highlighting various featured content, such as new music videos, top songs, seasonal music, and popular picks.
• My Collection—Here you can find all of your previously downloaded music and personalize your Zune music listening experience through features such as Smart DJ, Smart VJ, My Queue, and My Downloads.
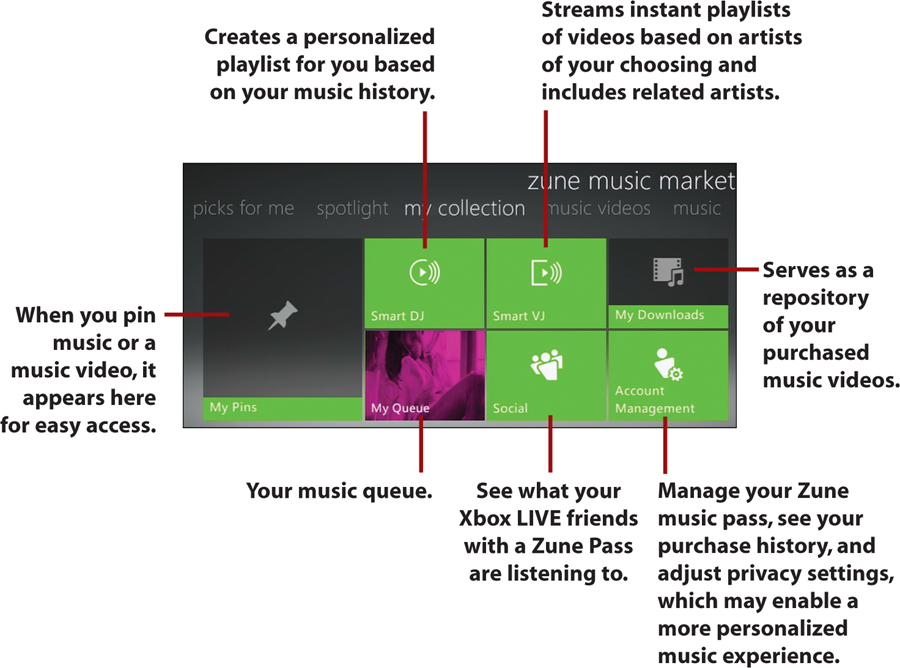
• Music Videos—Here you can find music videos in various ways, including browsing the New Releases, Featured, and Most Popular blocks. You can also conduct a search by Genre, which yields 17 categories (Rock, R&B/Soul, Electronic/Dance, Reggae/Dance, Country, Jazz, Comedy/Spoken Word, Soundtracks, More, Hip Hop, Pop, Latin, World, Classical, Blues/Folk, Christian/Gospel, and Kids), and by A to Z, which as you likely surmise lets you sort alphabetically. If you like a particular artist or his or her music video, selecting the Smart VJ Artists block presents you with music videos of comparable artists.
• Music—Here you can locate music by searching the New Releases, Top Artists, Top Songs, and Featured Music blocks. You can also access and browse a series of playlists via the Playlists blocks, or search for music by Genre (the same 17 categories are featured as in the Genre block under the Music Videos section).
The Left Stick or D-pad moves between the various selections; the Left and Right Bumpers work as left and right quick scroll buttons for long lists; and the Left and Right Triggers bring you to the previous and next song in your queue, respectively. You make selections by pressing the A button on your controller. Pressing B takes you to the previous screen, whereas pressing Y from any of the main menus (Picks for Me, Spotlight, My Collection, Music Videos, and Music) launches a search bar with a keyboard from which you can conduct a Music Search; when this search bar launches, the X button serves to move the cursor back and the Y button functions as a space bar. In submenus, you can press X to add a selected album, artist, or song to your queue. This may all sound incredibly confusing, but your available options are always clearly indicated at the bottom of the screen, so there is no need for concern.
Managing Your Zune Account
Managing your Zune account on your Xbox 360 is easy. Simply go to the My Collection blade and select Account Management. When selected, the following three options display:

• Zune Music Pass—Buy, change, and view details of your Zune Pass subscription.
• Purchase History—View the titles and dates of your purchases and rentals.
• Privacy Settings—Change your privacy settings.
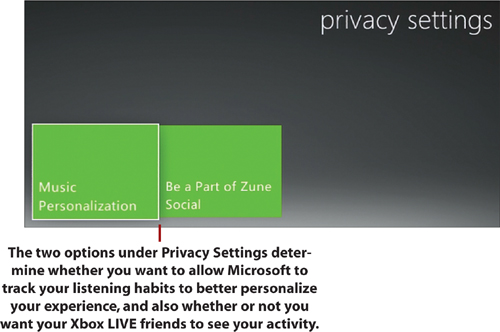
Selecting Music Personalization sends Microsoft your music playing and rating data, which is used to tailor your listening experience to your interests.
Selecting Be a Part of Zune Social enables others to see your recent music plays, favorites, most played artists, and other musical preferences via the Social blade. You can choose between Everyone, which shares with the entire Zune online community; Friends Only, which shares only with those on your friends list; or Blocked, which shares nothing.
Playing Music
Once your music plays, you can take control of it by selecting the cover thumbnail at the bottom of the screen, which launches a control and options panel. If in screensaver mode, press the B button on your controller to go back to the menu, where you can access the thumbnail. The control and options panel consists of the following options:
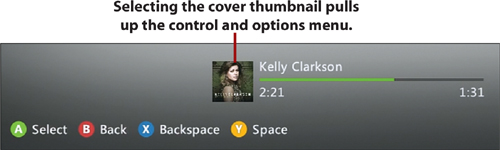

• Play or Pause—Plays or pauses the current song.
• Previous—Plays the previous song on the album or in your playlist.
• Next—Plays the next song on the album or in your playlist.
• Now Playing—Shows a larger thumbnail of the album cover. Pressing A lets you pause the song and also launches an Edit block. The Edit block shows everything that is in your queue and enables you to Turn Shuffle On (it is off by default) and Clear Queue.

• Pin Track—Selecting this block pins the music to your My Pins block for easy access in the future.
• Artist Details—Pulls up the following options: Play Top Songs; Smart VJ; Pin Artist, enabling you to pin the artist to My Pins; Smart DJ; and Play Music Videos.
The screensaver mode kicks in a few seconds after a song starts to play if there is no activity. The screensavers show artist photos as an animated slide show, along with the song number, title, and artist keywords. If you press A, you are brought to your queue, where you can access the edit block and move between items in your queue.

Personalizing Radio with Last.fm
If you don’t want to go with a Zune Pass subscription and you’re an Xbox LIVE Gold member, you can get an experience similar to Zune Pass through Last.fm for free, albeit peppered with ads and with a bit less control over exactly what you listen to.
Think of Last.fm as a multiplatform streaming radio station that plays more of the type of music you like and less of what you don’t like. Of course, Last.fm does offer a subscription option, which, as of this writing, is set at $3.00 per month, which includes uninterrupted and ad-free browsing and streaming. However, even without a subscription, the ad-supported version of the site still offers a wealth of options.
Tuning in to Last.fm
Last.fm can initially be found in the Apps Marketplace on the Apps channel. To get Last.fm, follow these steps:
1. Go to the Apps Marketplace, scroll to Music, and select Last.fm.

2. After Last.fm finishes downloading, select Create a FREE Last.fm Account in Seconds.

3. At the Last.fm Terms of Use screen, select Accept. Enter your information into the Create a Last.fm account fields and then select Continue.
4. Decide whether you want to automatically log in, show artist photos while a particular song plays, and allow “scrobbling.” Scrobbling is the Last.fm term for creating a detailed profile of your musical tastes by recording the details of the songs you listen to and is at the heart of the service. Like the other two options, it’s best to keep scrobbling checked.

Navigating Last.fm
When you enter Last.fm, you have access to the following blades, many of which are just different ways to play the same type of personalized music:
• Your Recent Stations—Includes up to 13 blades of your most recently played stations. The blade with your username represents an overall mix.

• Your Library Radio—Displays station blades of scrobbled artists, mixed in with a few recommendations. The first blade represents an overall mix.
• Your Mix Radio—Displays station blades of scrobbled artists, mixed in with a few recommendations from the latest music. The first blade represents an overall mix.
• Your Recommended Radio—Displays station blades of new recommendations based on your preferences. The first blade represents an overall mix.

• Popular Stations—Displays 50 of the most popular station blades from the overall Last.fm community.
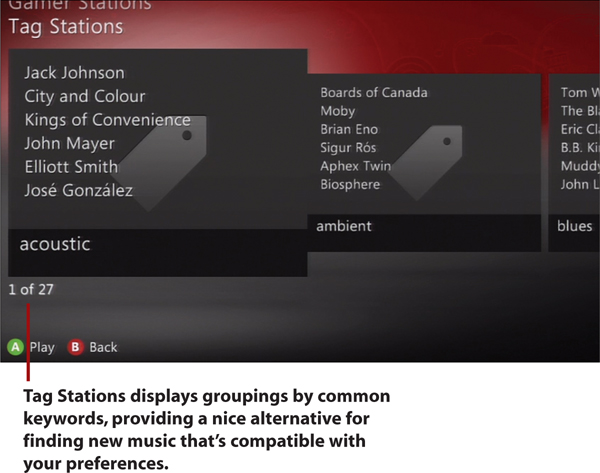
• Tag Stations—Displays station blades grouped by keyword, such as acoustic, ambient, blues, and emo.
• Gamer Stations—Displays station blades targeted to videogame players.
• Start a New Station—Start a new station either via artist name or keyword tag through the standard virtual keyboard interface.
• Your Last.fm Profile—Switch between Last.fm User Accounts and Modify Your Xbox 360 Last.fm Settings. The latter represents the same three check boxes from step 4 under “Tuning in to Last.fm.”
The Left Stick or D-pad moves between the various selections; the Left and Right Bumpers work as left and right quick scroll buttons for long lists; and the Left and Right Triggers work as up and down quick scroll buttons. Selections are made by pressing the A button on your controller. Pressing B takes you to the previous screen. When given the option, pressing Y displays artist information, which provides the artist’s play stats, photos, biography, similar artists, and related tags.
Playing Music
After selecting the perfect station, it’s time to take control and play. Though other buttons work, simply press A to bring up the following control panel:
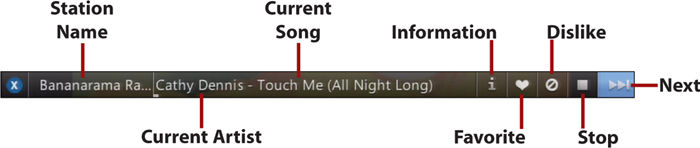
• Information—Selecting this option displays artist information, which provides the artist’s play stats, photos, biography, similar artists, and related tags.
• Favorite—Selecting this favorites the song and helps to guide future recommendations.
• Dislike—Mark as disliked and play the next song, guiding future recommendations. In the free version of Last.fm, you have a limited number of skips per session.
• Stop—Stop the current song, and return to the Last.fm main menu.
• Next—Skip to the next song. You have a limited number of skips per session in the free version of Last.fm.
In addition to working the control panel, the controller provides other functionality. Pressing the Back, B, or X buttons returns you to the Last.fm main menu, but continues playing your music, minimizing the control panel to the bottom of the screen, as shown in the example.

To shift focus between the control panel and the Last.fm main menu, press X. When the control panel is highlighted, highlight and select the artist name and song title, and press A to return to the playback view.
Getting iHeartRadio
The iHeart Radio app is your ticket to a customizable digital listening experience that includes access to more than 800 of the most popular live broadcast and digital-only radio stations from 150 cities across the United States. In addition, you have access to a host of user-created custom stations.
iHeartRadio is one of a new breed of an ever-growing list of audio apps, each of which has its own set of subscription requirements and needs to be downloaded. In the case of iHeartRadio, an Xbox LIVE Gold membership and a minimum of 75 MB of storage space is required. Like the other music apps, after download, each app appears under Music Apps in the Music channel and under My Apps in the Apps channel. Although each app’s interface and theme has unique elements, they all function roughly the same, as described in the iHeartRadio subsections that follow.
Downloading the iHeartRadio App
To download the iHeartRadio app, navigate to the Apps Marketplace and do the following:
1. At the Apps Marketplace, scroll to music and select iHeartRadio. After the iHeartRadio finishes downloading, you are free to explore its interface, though activation is required to access most features.

Activating iHeartRadio
The first time you access features that require an iHeartRadio user account, including My Stations, Recent Stations, Listen History, or the social features of the app, you are prompted to activate iHeartRadio. Navigate to the Music channel and follow these steps to associate the iHeartRadio app with your iHeartRadio account:
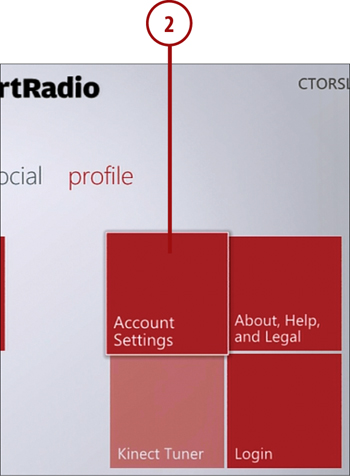
1. From the My Music Apps page, select iHeartRadio.

2. Select Profile from the main menu and then the Account Settings block.
3. Select Log In and, at the terms of services screen that follows, select Accept.

4. Record the activation code that displays on your console and visit http://www.iheart.com/activate to activate your account. You can elect to activate with your email address or Facebook account, with the latter offering a more quick process.
5. Sign in with (or create) your iHeartRadio account. Enter the activation code, and select Activate. Your Xbox 360 console is now activated as an iHeartRadio device.
Examining iHeartRadio Content and Features
After you activate iHeartRadio, you can enjoy its many offerings and features. The following options are available to you:
• Search—Selecting Search gives you access to the Find Station and Create Station options. Selecting Find Station launches an onscreen search bar that can be used to locate live stations by name or zip code. If you select Create Station, the same search bar launches, but serves as a tool to locate songs and artists.

• Stations—This option is the default when you enter iHeartRadio and is where much of the action occurs. Here you can access the following blocks: My Stations, which is where the stations you save can be easily accessed in the future (it acts like the My Pins block in Last.fm); Browse Live, which enables you to Browse by City, Browse by State, Browse by Genre, and Browse by Station Name to locate a station of interest; Near Me, which locates and lists stations near you; and Create Custom, which enables you to Create Station From Artist, Create Station From Song, and access the More Hottest Stations by Genre block.

• Featured—This section serves to highlight various stations and/or artists. You can also access the More Hottest Stations by Genre here.
• Social—Here you can discover what your friends, who are also iHeartRadio subscribers, are listening to. If you do not have any friends subscribed to iHeartRadio, you encounter a suggestion here to invite your Facebook friends to join iHeartRadio.
• Profile—This option shows your iHeartRadio history, including information on Recent Stations, Listen History, and Likes. In addition, you can adjust your Account Settings; access more information on iHeart Radio via the About, Help and Legal block, the latter of which contains About Us, Terms of Use, Support, Help/FAQ, Privacy Statement, and Music Intelligence Provided by the Echo Nest blocks; and access the Kinect Tuner if your system is Kinect-enabled.

Working with Stations
Once you select the perfect station, artist, or song there are several actions you can take:

Depending on if you are listening to a radio station, song, or particular artist, additional options become available when you select the block showcasing what you are listening to. Some options include:
• Pause—As you may expect, this pauses the music.
• Remove Station—This option removes the station from your My Stations block and causes playback of the title to be stopped.
• Like and Dislike—Lets iHeartRadio know what to play and what not to play.
• Lyrics—Provides you with the Lyrics to the song that is playing; however, this option may not be available for all songs.
• Skip—Brings you to the next song.
Your controller operates much the same as in other music apps and available controls are always clearly indicated at the bottom of the screen you are on. In brief, the basic controls are as follows:
• A Button—Use this to select items.
• B Button—Brings you to the previous screen or enables you to Exit iHeartRadio.
• Y Button—Enables you to conduct a search for Live Stations or Artist and Song Stations. When the search bar is launched, it can be used to close the search bar.
• X Button—Brings you to the Home screen if you are not in the main menu. When the search bar is launched, it serves as a Backspace button.
• Back Button—Functions like the B Button.
• Start Button—Functions like the A Button.
• Left Stick and D-pad—Moves items left and right.
• Left and Right Bumper—Serves as a quick scroll button, moving items left and right.
• Left and Right Trigger—No functionality.
Checking Out Your Music Library
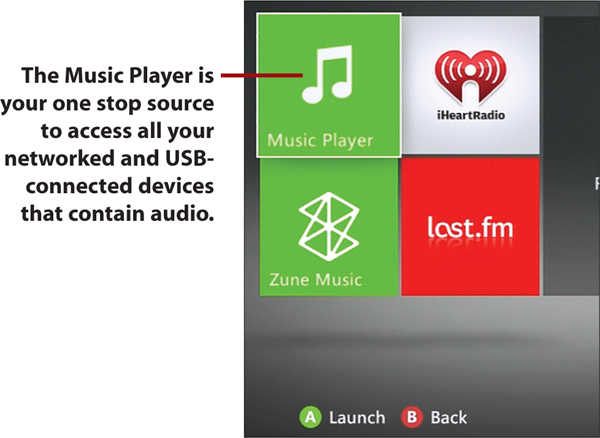
Your music library includes every connected media source on your network, including your home PC, any portable device connected directly to one of your Xbox 360’s USB ports, and any music CD in your disc tray. To access your Music library, select the Music Player from the My Music Apps block on the Music channel, or the Media blade from the Xbox Guide. When there, simply select your source and start playing using the standard controls.
Playing a CD
Just like with DVDs, your Xbox 360 is equipped to play music CDs by default. Simply insert the CD into the disc drive, and it should automatically start playing, unless you have auto-play disabled (refer to “Playing a Game Disc” in Chapter 4 for more on auto-play).
If auto-play is disabled, go to the Settings channel, select the System block, then select Console Settings, and then scroll to Auto-Play to ensure it is enabled; if it disabled, select Auto-Play and then select Enable from the next screen. You can also select Play CD from the profile blade of the Xbox Guide. Your CD should now start playing and you should see a screen like this one on your console.

Standard playback controls apply, with one cool exception: visualization. Visualization is, as the name suggest, a music visualizer that presents a series of different special effects that automatically react to the audio input. You can switch between visualizations by pressing the Left Bumper or Right Bumper on your controller. However, the music visualizer built into the Xbox 360 does even more and can actually be controlled by you and up to three other friends. The first step is to make the Visualization full screen by pressing Y on the first controller.

Trippy! Now that your Visualization is full screen, you can use the D-pad on the controller to cycle through more than 100 different effects by moving it up, down, left, and right. When you start changing effects, the auto change mode disengages and you’ll be in full control, only changing the effect when you want it changed. You can use nearly every button, stick, and even the D-pad on the controller to do something interesting, except for the Left and Right Triggers, which remain dedicated to going to the previous or next song in the playlist, respectively, and B and Back buttons, which exits out of the full screen visualization and returns you to the Now Playing screen.
As mentioned, this does not have to be a solitary undertaking, so try to get your friends and family involved. Controller one controls the camera and effects, controller two controls speed and light, controller three controls the amount of objects on screen, and controller four controls the spinning of tunnels.
Ripping a Music CD
One of the most reliable methods for playing background music on your Xbox 360 is by first storing and then streaming the music locally on a hard drive. Unfortunately, the only music you can store on your hard drive is that which you rip from a CD. On the plus side, the process is straightforward:
1. From the Now Playing screen, select Rip CD.

2. By default, all songs on the CD will be selected for ripping. You can deselect all songs by pressing Y on your controller or manually deselecting each song. When satisfied with your selections, highlight Rip CD, and press A on your controller.

3. Your Xbox 360 begins ripping the selected songs. If you ripped the CD while offline or the Xbox was unable to identify the songs, you can edit the song information by highlighting the title and pressing A on your controller.

4. When finished ripping, select Done. Your music is now on your hard drive and selectable from your Music Player.