13. Connecting Peripherals to Your Mac
In this chapter, you find out how to connect devices to your Mac and immediately expand your system’s capabilities, including:
![]() Adding a keyboard and mouse
Adding a keyboard and mouse
![]() Pairing Bluetooth devices
Pairing Bluetooth devices
![]() Connecting and configuring external displays
Connecting and configuring external displays
![]() Sending video and audio to an Apple TV or AirPlay device
Sending video and audio to an Apple TV or AirPlay device
![]() Adding and using printers
Adding and using printers
![]() Accessing and using popular scanners
Accessing and using popular scanners
The Mac comes with everything you need to get started using the system, but that doesn’t mean that you can’t expand it. Your Mac can interface with many different devices—frequently without requiring any additional software to be installed.
This chapter looks at several different types of peripherals that work with your Mac out of the box.
Connecting USB Input Devices
The Mac can connect to a variety of devices using the standard USB (Universal Serial Bus) ports. This section walks you through connecting a generic keyboard and mouse. Keep in mind, though, that there are hundreds of different input devices.
You should always refer to the documentation that came with your device. If the manual doesn’t mention the Macintosh (such as for a Windows-specific keyboard), try plugging in the device to see what happens!
The USB standard includes a variety of different profiles that define how a device can be used (input, audio output/input, and so on). These standards are supported on both Macintosh and Windows platforms. If a device doesn’t specifically say it supports the Mac, that doesn’t mean that it won’t work anyway.
The latest MacBooks support USB-C, an emerging standard for USB connections. If you’re the lucky owner of a new Mac with USB-C, you might need Apple’s USB-C adaptor to connect to the more common USB standard peripherals.
Configure a USB Keyboard
Your Mac comes with a perfectly usable keyboard, but if you have a favorite wired keyboard, you can plug it in and start using it almost immediately. To use a standard USB keyboard with your Mac, follow these steps:
1. Plug the keyboard into a free port on your Mac (not shown).
2. If the keyboard is an Apple or Mac-specific keyboard, it is recognized and immediately usable (not shown).
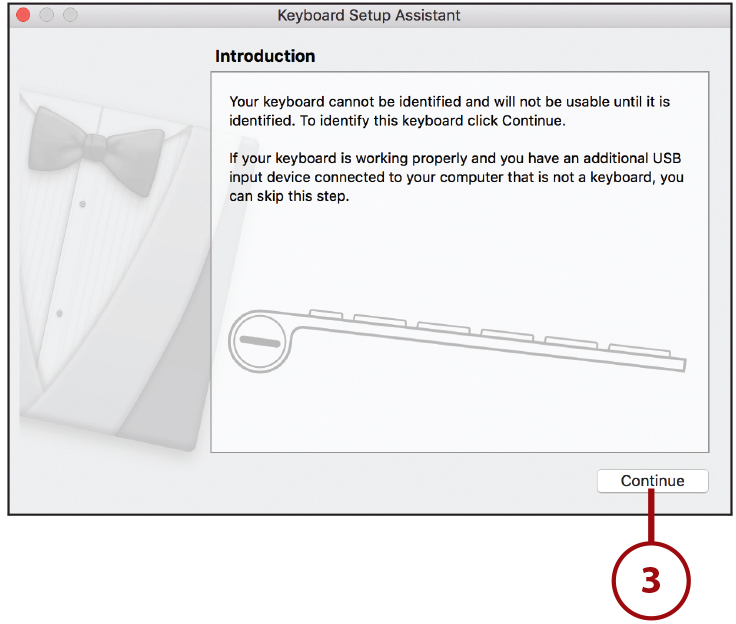
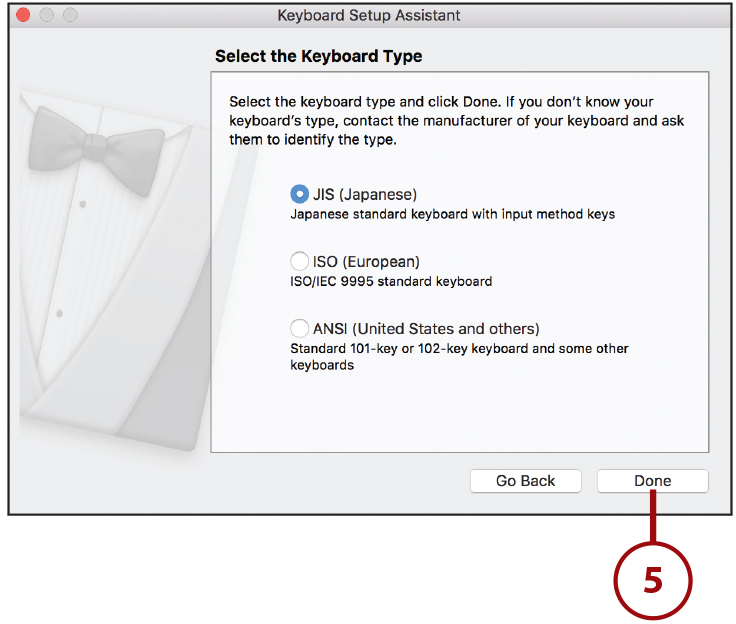
3. If you are using a generic USB keyboard, the Keyboard Setup Assistant launches, and you’re asked to identify the keyboard. Click Continue.
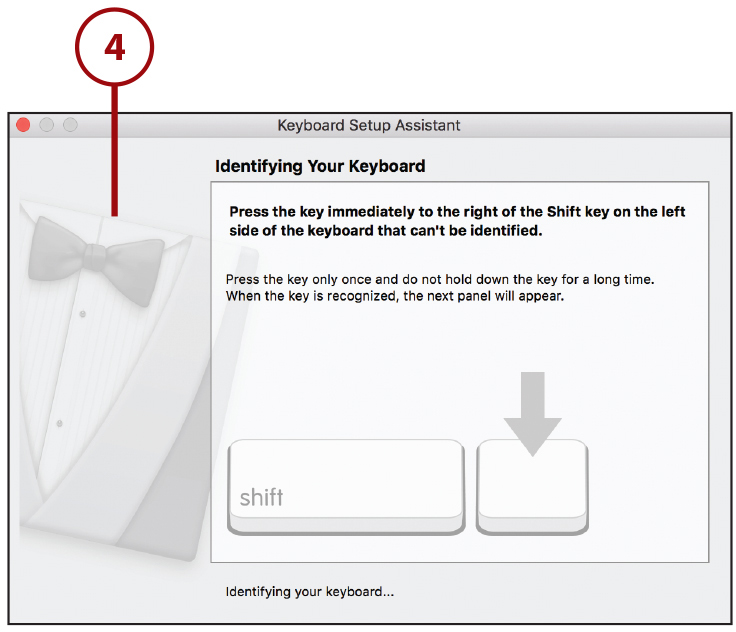
4. Walk through the steps presented by the setup assistant, pressing the keyboard keys when requested. If the assistant can’t identify the keyboard, you are asked to manually identify it.
5. Click Done at the conclusion of the setup assistant. The keyboard setup is complete, and the keyboard is ready to be used.
Manually Configuring the Keyboard Type
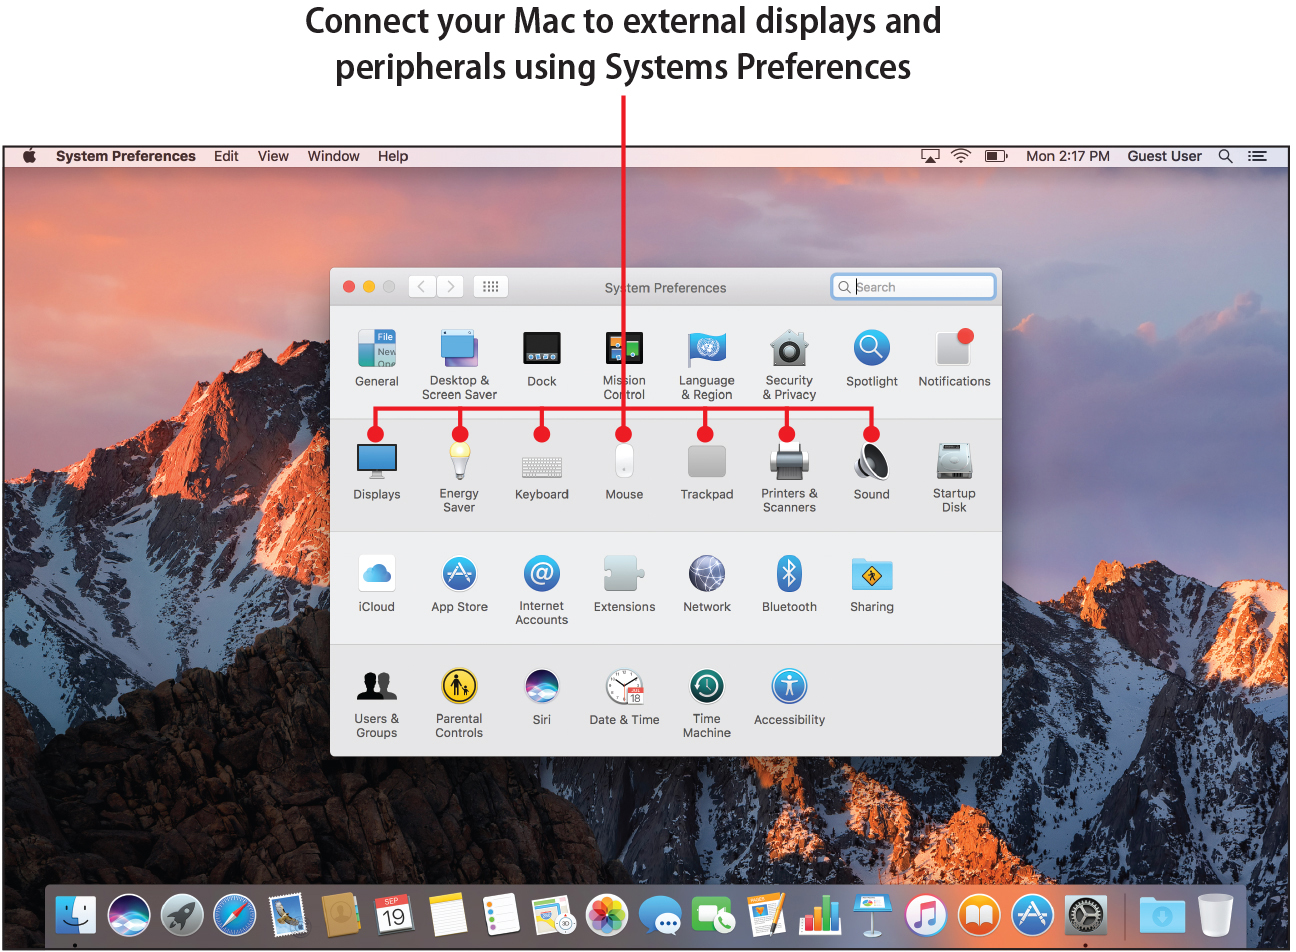
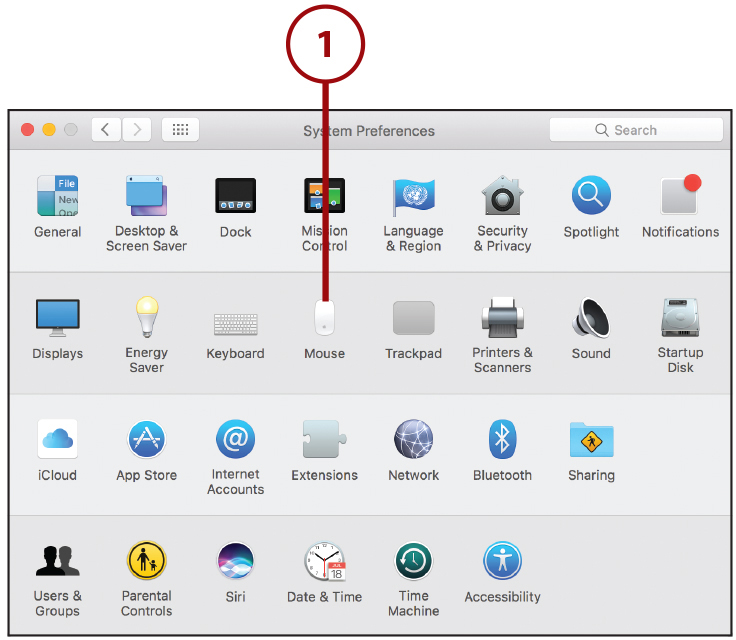
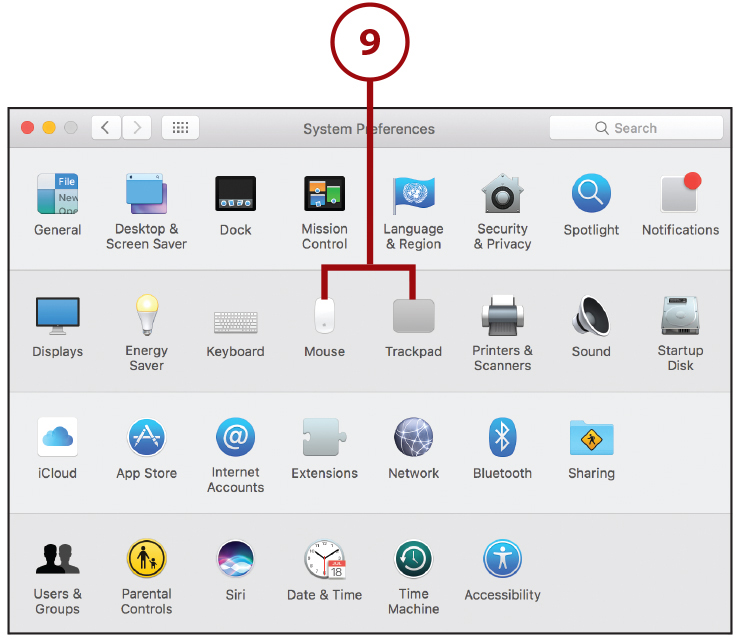
If the setup assistant does not start automatically when you plug in a USB keyboard, you can start it by opening the System Preferences window and clicking the Keyboard icon. In the Keyboard panel, click Change Keyboard Type.
Configure a USB Mouse
The Apple mouse is nice, but some of us like options! Want to use a shiny USB mouse with a zillion buttons? No problem. Like keyboards, USB mice plug right in and start working in a matter of seconds.
1. Open the System Preferences and click the Mouse icon.
2. Plug a USB mouse into your Mac (not shown).
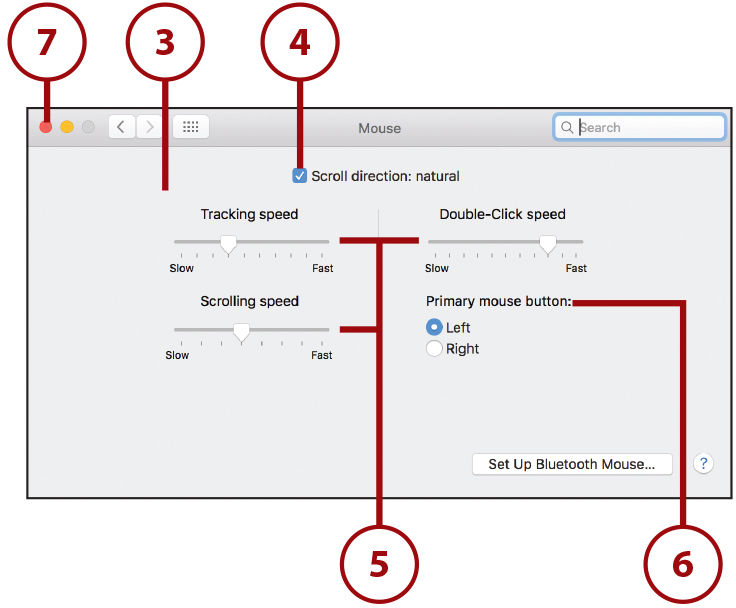
3. After a few seconds the Mouse panel updates to show the available options for your device.
4. Uncheck Scroll Direction: Natural if you prefer a scroll wheel that behaves in a traditional manner (down to go up, and vice versa).
5. Adjust the Tracking Speed, Scrolling Speed (if the mouse includes a scroll wheel), and Double-Click Speed by dragging the sliders left or right.
6. Choose which button acts as the primary button.
7. Close the preferences when you’ve finished your configuration.
Using Bluetooth Devices
The Mac’s built-in Bluetooth enables it to wirelessly connect to a variety of peripheral devices, including keyboards, mice, headsets, and so on. As with USB peripherals, your first step toward installing a device is to read the manufacturer’s instructions and install any drivers that came with it.
After installing the software that came with the peripheral, you use the Apple Bluetooth System Preferences panel to choose and pair your device.
>>>Go Further: What is Pairing?
When you’re working with Bluetooth peripherals, you’ll notice many references to pairing. Pairing is the process of making two devices (your Mac and the peripheral) aware of one another so they can communicate.
In order to pair with your computer, your device needs to be in pairing mode, which should be described in the device’s manual.
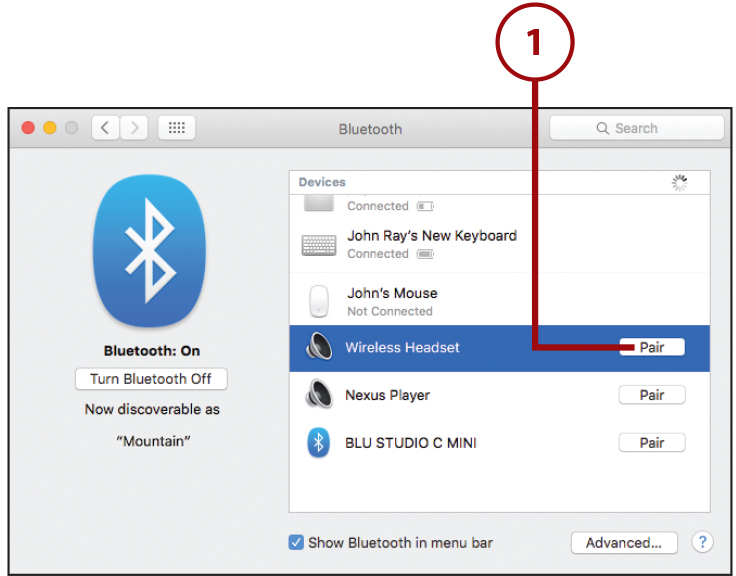
Pair a Bluetooth Mouse or Trackpad
To pair a Bluetooth device with your Mac, you follow the same basic steps, regardless of the type of peripheral. This task’s screenshots show an Apple Magic Trackpad being paired with the Mac.
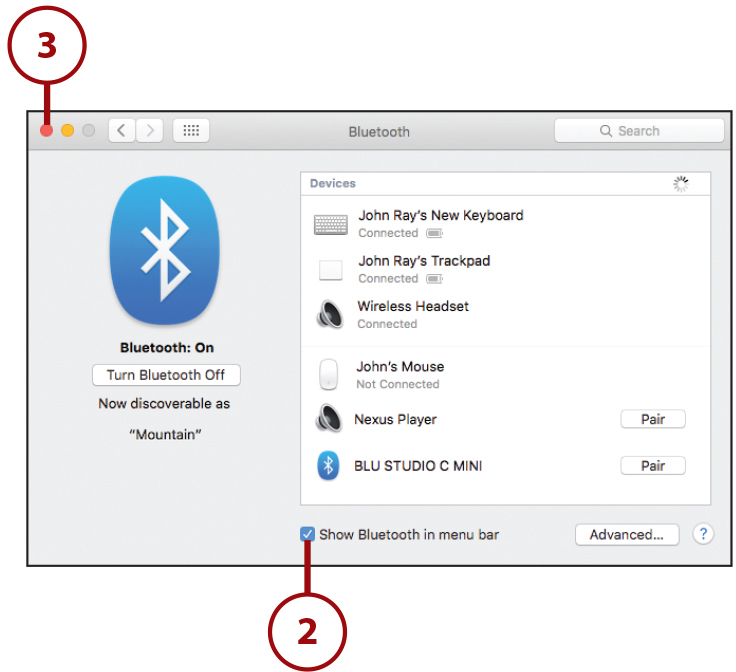
1. Open the Bluetooth System Preferences panel.
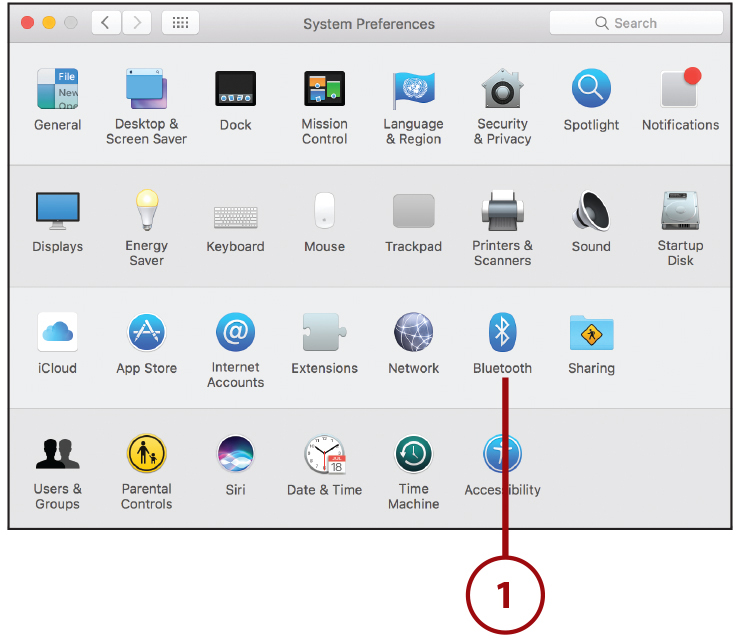
2. Make sure that your Mac’s Bluetooth system is On.
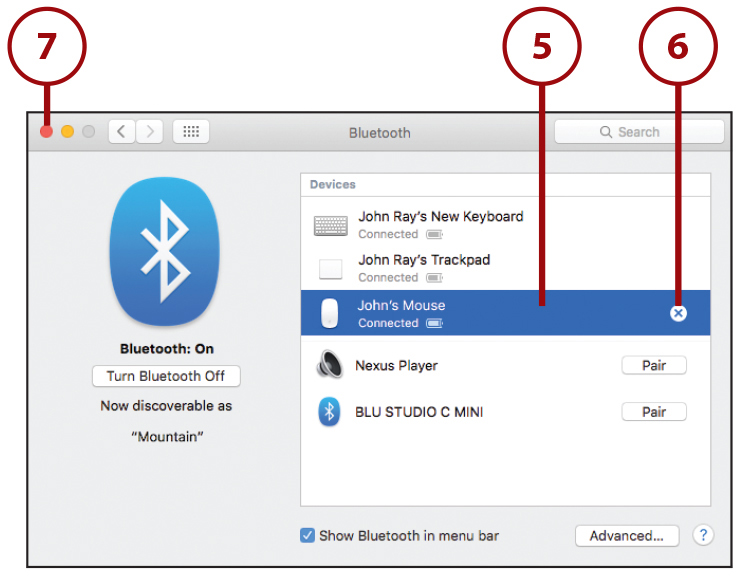
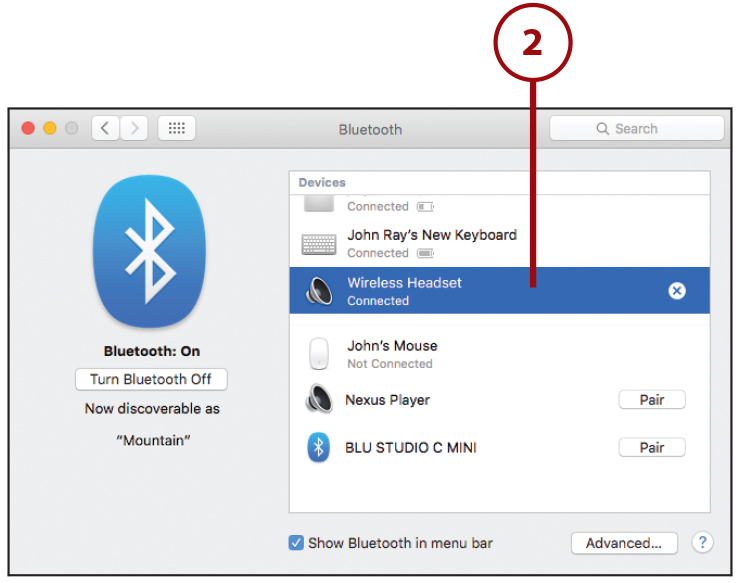
3. Devices paired and connected with your Mac are shown at the top of the list on the left, and new devices and those that are either not paired or are paired but not connected are shown at the bottom.
4. Click Pair to pair a new mouse or trackpad with your Mac.
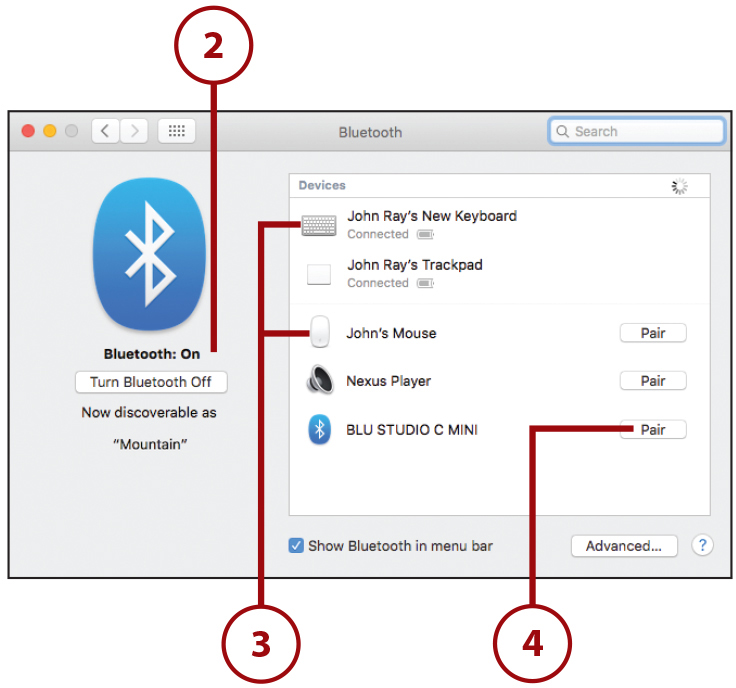
5. After a few seconds, the device is paired and available.
6. Click the X beside a device in the list to remove the pairing.
7. Close the preferences when finished.
Setting Up Bluetooth Devices from Almost Anywhere
You might notice a Set Up Bluetooth (Keyboard, Mouse, Trackpad) option within the Keyboard, Mouse, and Trackpad System Preferences panels. You can use these as shortcuts to immediately start searching for a Bluetooth device of that type. The Bluetooth System Preferences panel, however, is the central point for pairing all devices.
8. Your new device is listed in the Bluetooth System Preferences panel (not shown).
9. Use the corresponding (Mouse/Trackpad) Preferences panel to configure your device.
Pair a Bluetooth Keyboard
Some Bluetooth devices, such as keyboards, require an additional step while pairing: the entry of a passkey on the device with which you are pairing. To pair a keyboard with your system, follow these steps:
1. Follow steps 1–5 of the “Pair a Bluetooth Mouse or Trackpad” task, selecting the keyboard device from the list of detected devices, and then click Pair.
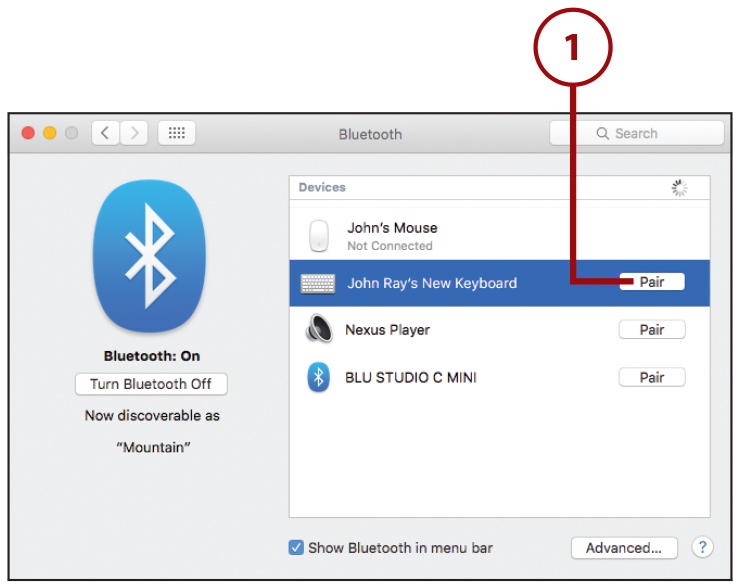
2. The setup process prompts you to enter a passkey on your device. Type the characters exactly as displayed on screen, including pressing Return, if shown.
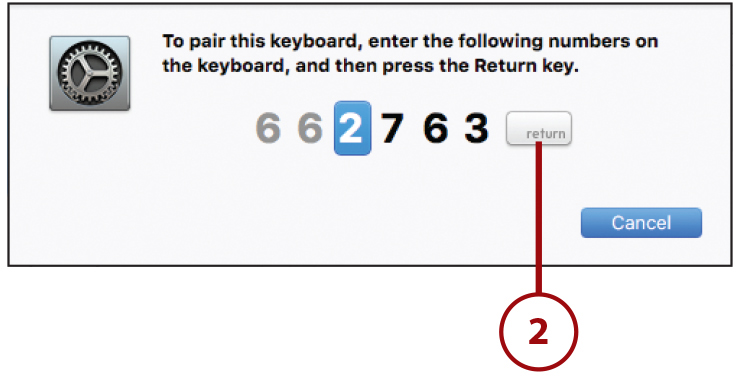
3. If the passkey was successfully entered, the device is configured and paired.

4. Open the Keyboard Preferences panel and configure the device as described in Chapter 11’s section, “Updating Keyboard and Dictation Settings.”
It’s Not All Good: Dealing with Troublesome Passkeys
If for some reason you enter the passkey and get an error, look for a Passcode Options button in the lower-left corner of the window during setup. Clicking this button might allow you to bypass the passkey or choose one that is easier to enter on your device.
Connect a Bluetooth Headset
Wireless headphones and headsets can help untether us from our computers when conferencing or listening to music. Your Mac with Sierra supports high-quality audio over Bluetooth connections, and setup is a cinch:
1. Follow steps 1–5 of the “Pair a Bluetooth Mouse or Trackpad” task, selecting the headset device from the list of detected devices, and then click Pair.
2. The headset is added to your system. You might need to cycle the power on and off the headset before it will work, however.
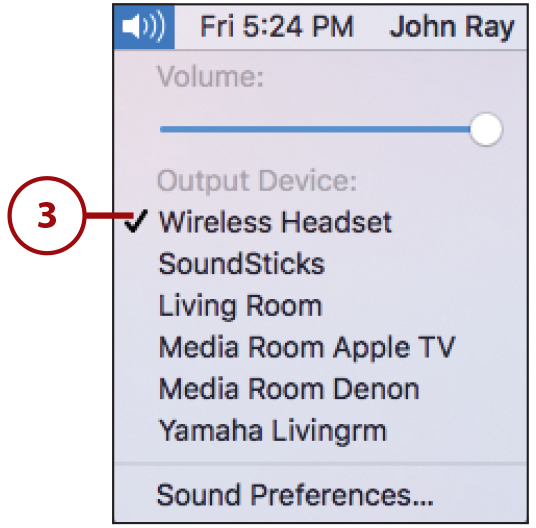
3. To set the headset for audio input or output, use the Volume menu bar icon or the Sound System Preferences panel, as described in Chapter 11’s section, “Setting Sound Input and Output.”
Add and Use the Bluetooth Status Menu
Apple Bluetooth devices report their status directly to your computer, giving you a heads up on battery issues (only for Apple devices) and other status problems. To use the Bluetooth status menu, follow these steps:
1. Open the System Preferences window and click the Bluetooth icon.

2. Click the Show Bluetooth in Menu Bar check box.
3. Close the preferences.
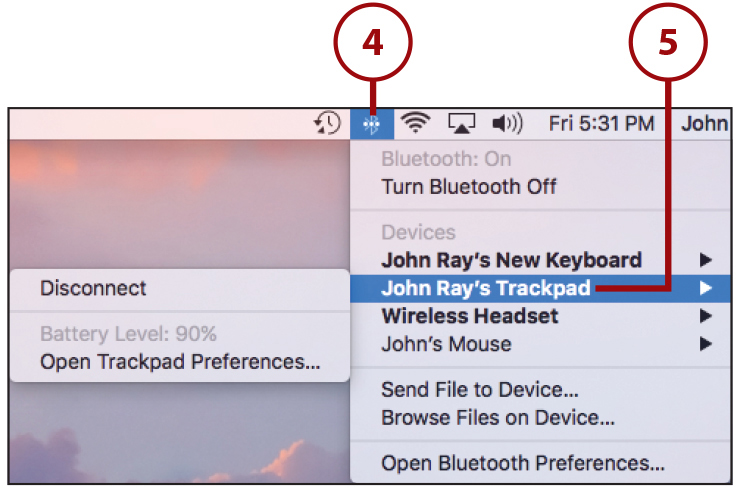
4. The Bluetooth menu is added to your display.
5. Each paired device has an entry in the menu for quick control of its features and display of battery levels.
Using External Displays and Projectors
Even the smallest Macintosh screens are larger than the biggest monitors we had a decade ago, yet somehow we manage to fill them. As I’m sure you’ve encountered, there are times when using an external monitor or a projector is helpful. As long as you have the right cables, running an external monitor is plug-and-play—no rebooting required.
What Kind of External Displays Can I Run?
All modern Macs have USB-C, Thunderbolt, or HDMI video output, which can be adapted to many different standards using a plug-in dongle from Apple. Earlier models used a miniDisplayport or miniDVI port, which, similarly, could be output to VGA or DVI monitors with the appropriate adapter.
Extend Your Desktop to Another Monitor
To use a second monitor to extend your desktop, follow these steps:
1. Plug the monitor into your Mac using the appropriate adapter cable (not shown).
2. The monitor is initialized and displays your desktop at the highest resolution (not shown).
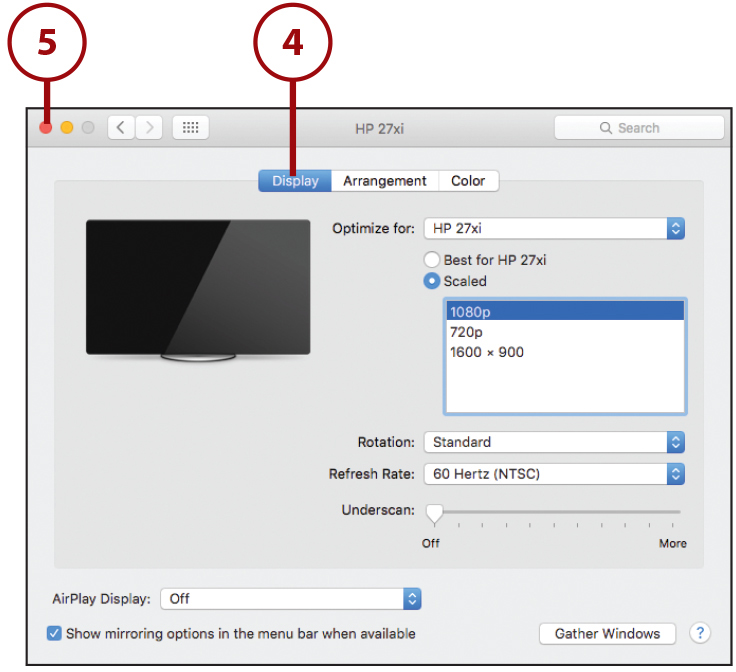
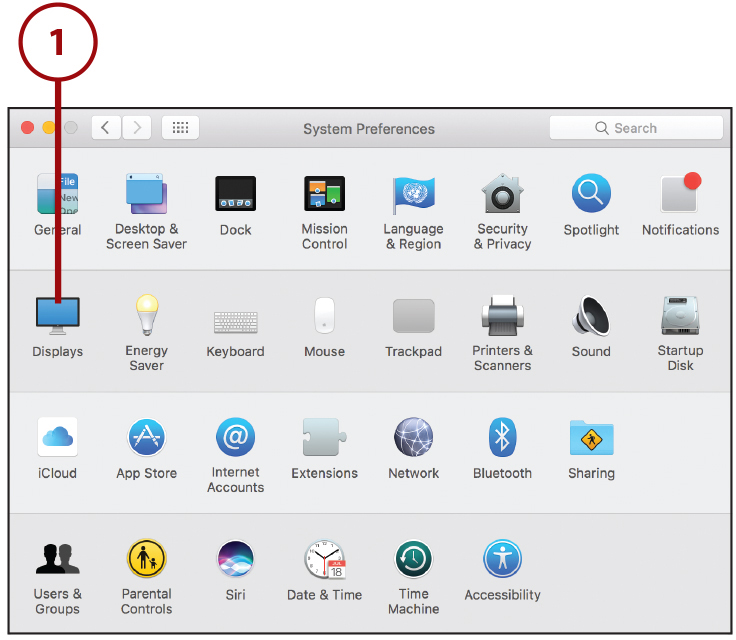
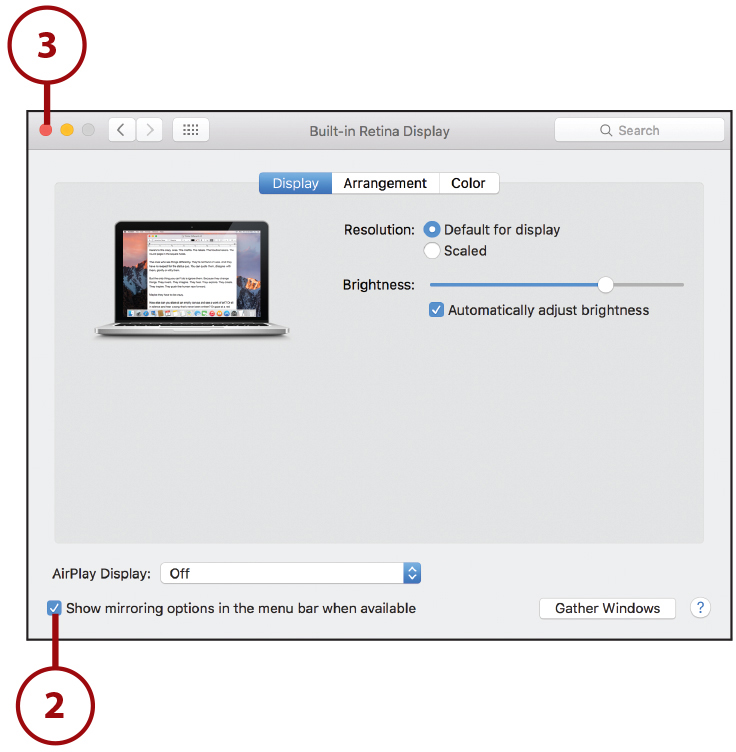
3. Open the Displays System Preferences panel.
4. A unique window is shown on each connected monitor, enabling you to customize its characteristics.
5. Close the preferences.
Set Monitor Arrangements
After a second monitor has been connected to your system, you can choose how it is arranged in relationship to your Mac display and whether it displays the menu bar.
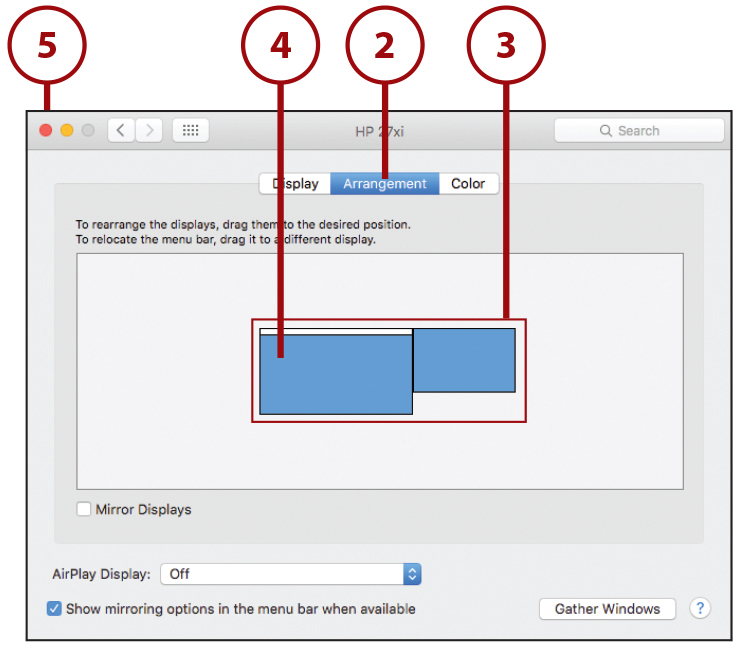
1. Open the Displays System Preferences panel.

2. Click the Arrangement button at the top of the window.
3. Drag the visual representation of the monitors so that it best represents your physical setup (that is, external monitor on the left, right, above, and so on).
4. If you want, change your primary display by dragging the small white line representing the menu bar from one display to the other.
5. Close the preferences.
>>>Go Further: Managing Multiple Monitors
When the Displays System Preferences panel is opened with two or more monitors connected, a unique copy of the preferences panel is shown on each monitor, representing that monitor’s settings.
Within each window, you can adjust the color and resolution of your external display using the same approach described in Chapter 11’s section, “Adjusting Your Display.” You can also use the Gather Windows button to pull all open application windows onto that display.
Add the Display Mirroring Menu to Your Menu Bar
If you frequently want to mirror your display (rather than extend your desktop), or display content on an Apple TV, you can either use the Displays System Preferences panel or add a global “mirroring” menu to the menu bar.
1. Open the Displays System Preferences panel.
2. Click the Show Mirroring Options in the Menu Bar When Available check box.
3. Close the preferences.
4. The menu item appears when external displays (or Apple TVs) are available to use.
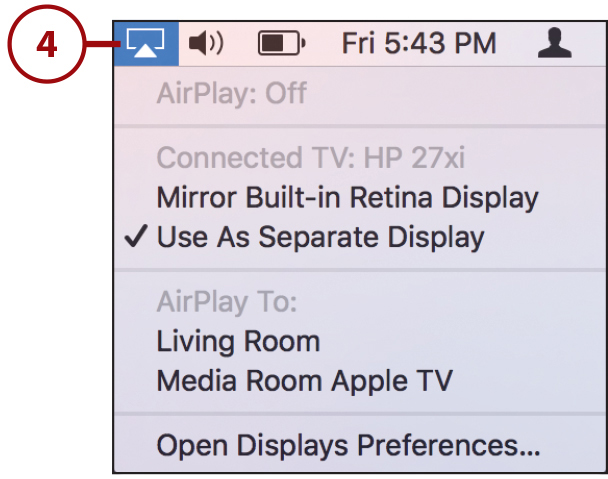
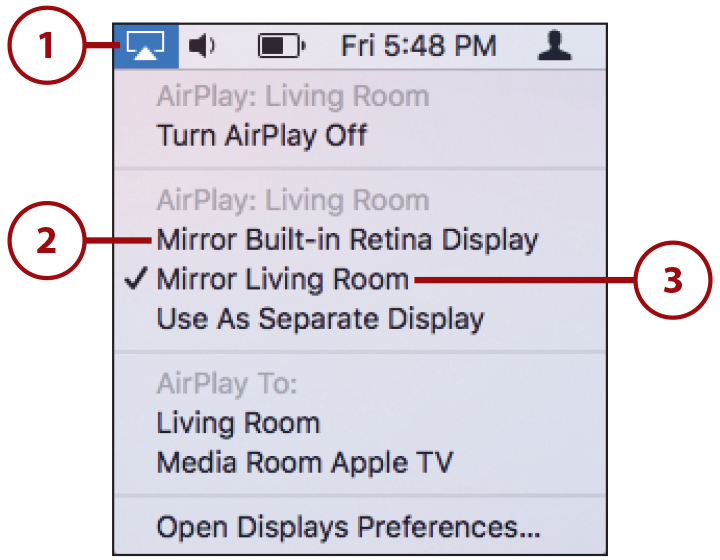
Use Mirrored Displays
When you plug another display into your Mac, it is initialized and activated as an extension to your desktop at the highest resolution it supports. If you’d prefer to mirror the content between your displays (or in other words, have both screens display the same thing), do the following:
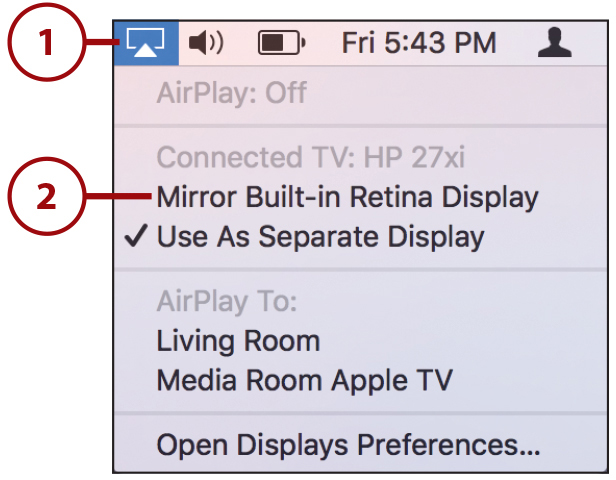
1. Click the Display Mirroring menu item in your menu bar.
2. Choose Mirror Built-in Retina Display. Your screen might go blank or flash for a moment.
3. Once mirroring has started, you can choose which display size is mirrored (the built-in display or the connected monitor).
4. Choose Use as Separate Display to switch back to using two separate displays.
Adapting Resolutions
If the external display is set as your primary monitor or cannot be adjusted to match your internal LCD, your Mac might instead change the resolution on its display to match the external monitor. This change reverts when you turn off mirrored video. To change the display resolution from the default, use the Displays System Preferences panel, as pictured in the previous section.
Connecting to an Apple TV (or Other Device) with AirPlay
Taking display connections to the next level, Sierra makes it simple to wirelessly share your display with an Apple TV (2nd or 3rd generation). Couple an Apple TV with a monitor, TV, or a projector, and you have a wireless presentation system for classrooms, businesses, or just at-home fun.
AirPlay works in one of four modes: mirroring, desktop extension, video/image sharing, and audio playback. Before reading any further, make sure you’ve added the Display Mirroring menu to your display (if it isn’t there already) using the steps in the earlier task, “Add the Display Mirroring Menu to Your Menu Bar.”
Although the Apple TV is the only AirPlay device that currently supports video, there are many speaker systems, amplifiers, and other devices (including Apple’s own AirPort Express) that can receive audio over AirPlay.
It’s Not All Good: Old Mac? You Might Be Out of Luck!
Sierra is only capable of mirroring and extending your display if you have recent Mac hardware. If you don’t see the mirroring menu (and you have an Apple TV), your Mac is likely too old to use Sierra AirPlay features. That said, I strongly encourage you to check out AirParrot—a commercial piece of software that offers all the AirPlay features of Sierra (and more) on any Mac (http://airparrot.com).
Mirror Your Display to an Apple TV
To display your Mac monitor on an Apple TV, both devices must be turned on and connected to the same network. When things are powered up, follow these steps to mirror your display:
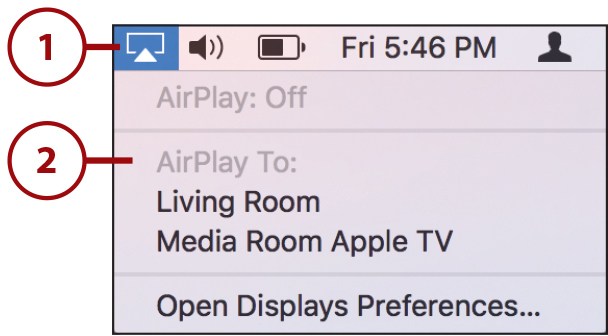
1. Click the Display Mirroring menu in the menu bar.
2. All available Apple TV devices are shown. Choose the one you want to mirror to.
3. After a few seconds, your Mac desktop is visible on the display connected to the Apple TV via AirPlay (not shown).
4. To disconnect from AirPlay, choose Turn AirPlay Off from the mirroring menu.

Mirror, Mirror on the Preferences Panel
You can also choose an AppleTV to mirror to directly from the Displays System Preferences panel. If an AppleTV is detected, an AirPlay pop-up menu is added to the preferences.
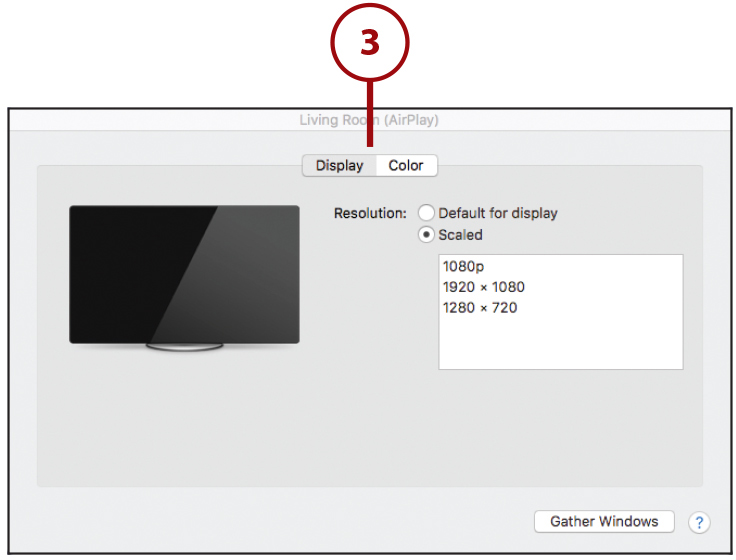
Set the AirPlay Apple TV Resolution
For the best mirroring performance, your Mac display should match the resolution of the display connected to the Apple TV—otherwise, your desktop will be enlarged and might look blurry. To adjust the resolution of the mirrored display, use these options:
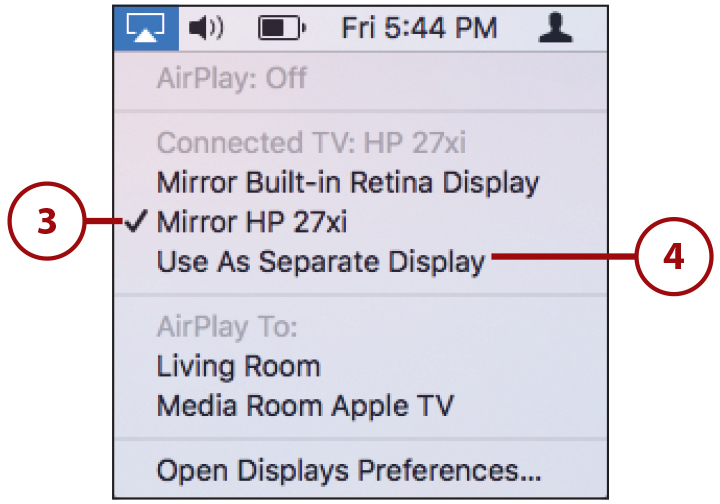
1. Click the Display Mirroring menu in the menu bar.
2. Choose Mirror Built-in Retina Display to scale the Apple TV image to match your Mac’s display.
3. Choose Mirror <AirPlay Device> to change your Mac resolution to match the resolution of the display connected to your Apple TV (this is the preferred approach).
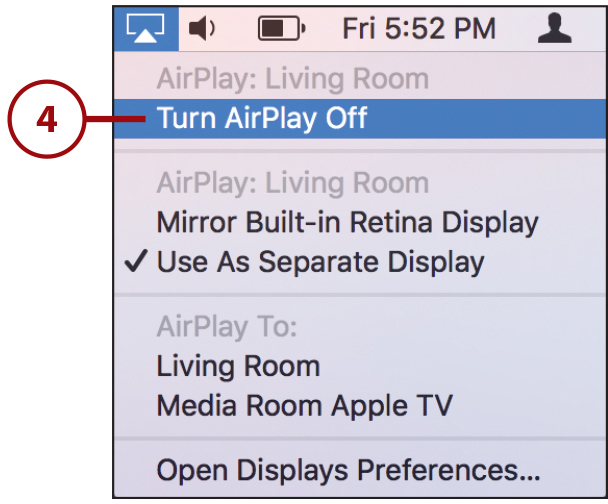
Extend Your Desktop to an Apple TV
In addition to mirroring, Sierra actually enables your Mac to use an Apple TV as an entirely new monitor—extending your desktop as if you had plugged a new display directly into your computer!
1. Connect to the Apple TV as described in “Mirror Your Display to an Apple TV.”
2. Choose Use as Separate Display from the Display Mirroring menu.
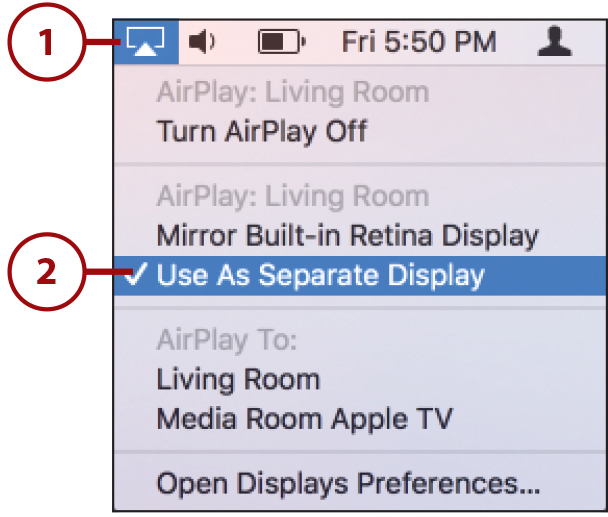
3. The Apple TV is added as an external display and can be configured like any other display using the Displays Preferences panel.
4. To disconnect from AirPlay, choose Turn AirPlay Off from the mirroring menu.
Share Multimedia to an Apple TV
In addition to acting as a monitor for your Mac, your Apple TV can also play video, audio, and other multimedia content (such as slideshows), if supported by your software. While viewing video, audio, or other multimedia content, look for an AirPlay icon, and then complete the following:
1. Click the icon to display and choose from any available Apple TV (iTunes is shown here).
2. After choosing an Apple TV, the content that was playing on your Mac is automatically transferred to the Apple TV.
3. Choose Computer to return the display to your local Mac.
It’s Not All Good: AirPlay icon nowhere to be seen?
If you have an AirPlay device but don’t see an AirPlay icon where you should (or your AirPlay device isn’t shown under the menu), here are a few steps that may help solve the problem:
1. Make sure that AirPlay is enabled. Devices like the Apple TV require that you enable AirPlay before it can be used.
2. Both your Mac and the AirPlay device should be connected to WiFi. AirPlay will work over a wired network, but discovery can be much slower.
3. Verify that your Mac and AirPlay are connected to the same wireless network. AirPlay relies on broadcast traffic that may not pass between different networks.
4. Reboot. Restart the AirPlay device. If it still doesn’t show up, reboot your Mac.
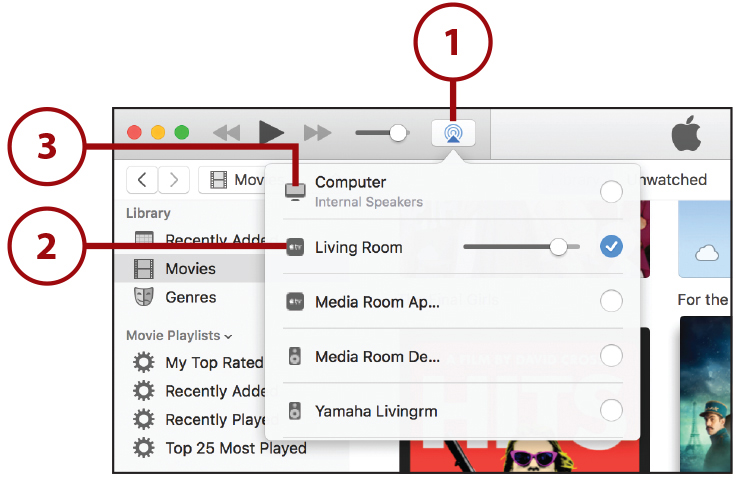
Send System Audio to an Apple TV
Any application that outputs audio to your default system audio device can be sent transparently, via AirPlay, to an Apple TV. To send your system audio to an Apple TV connected to a sound system, follow these steps:
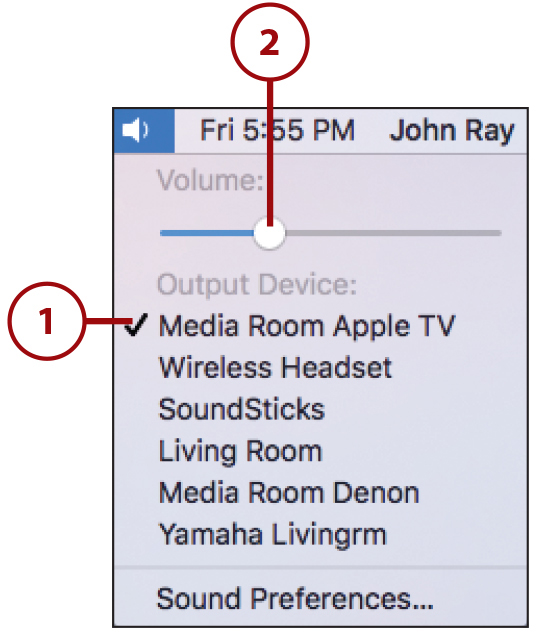
1. Use the Volume menu bar icon to select your AirPlay device. Alternatively, use the Sound System Preferences panel, as described in Chapter 11’s section, “Setting Sound Input and Output.”
2. Use the Volume slider to adjust the volume of the output device. You can work with the device just as you would with your normal Mac speakers.
Connecting and Using a Printer
Out of the box, Sierra supports a range of popular printers that require nothing more than being plugged in. Occasionally, however, you might need to install a driver before you can successfully print.
Drivers
Drivers are just pieces of software that help your Mac communicate in the same language as physical hardware, such as printers.
As with any peripheral that you want to use, be sure to read and follow the manufacturer’s instructions before proceeding.
Your Mac can connect to printers either over a network or via a USB direct connection. Regardless of the approach, configuration is straightforward.
Set Up a USB Printer
To connect to a printer via a USB connection, set up the printer as directed by the manufacturer and then follow these steps:
1. Connect the USB plug from the printer to your Mac and turn on the printer. If the printer is auto-detected, it might prompt you to download software (not shown).
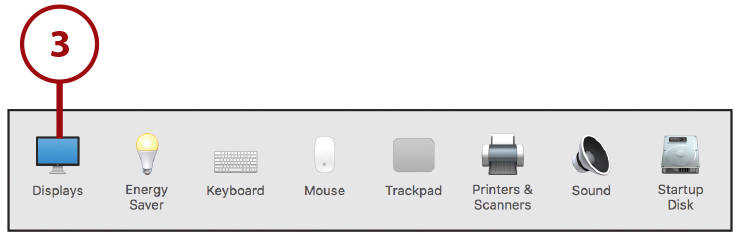
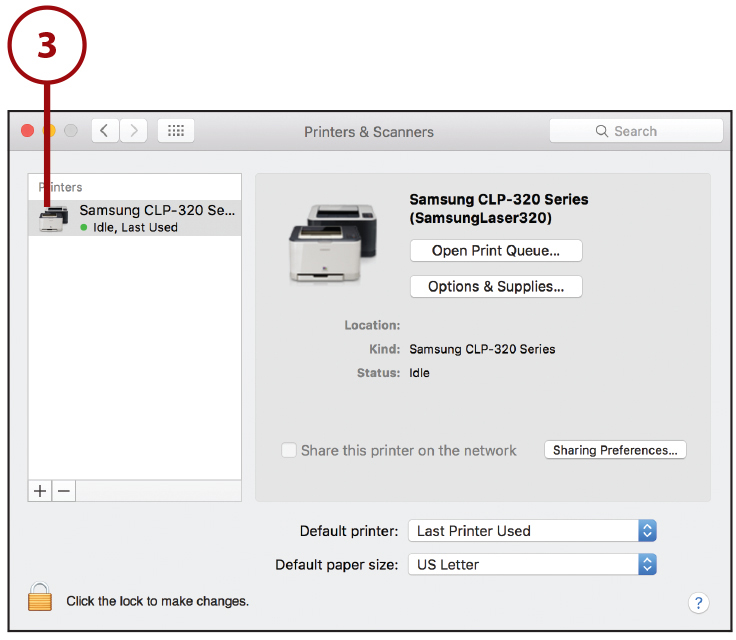
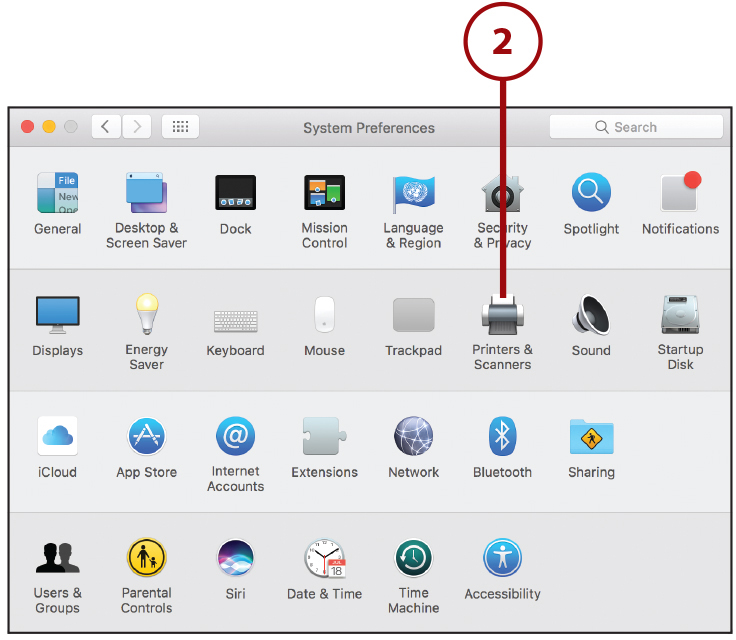
2. Open the System Preferences window and click the Printers & Scanners icon.

3. In many cases, the printer is detected and configured automatically and is immediately available for use. If this is the case, it is displayed in the Printers list, and you may close the Printers & Scanners System Preferences panel.
4. If the printer is not detected, click the + button below the empty Printers list.
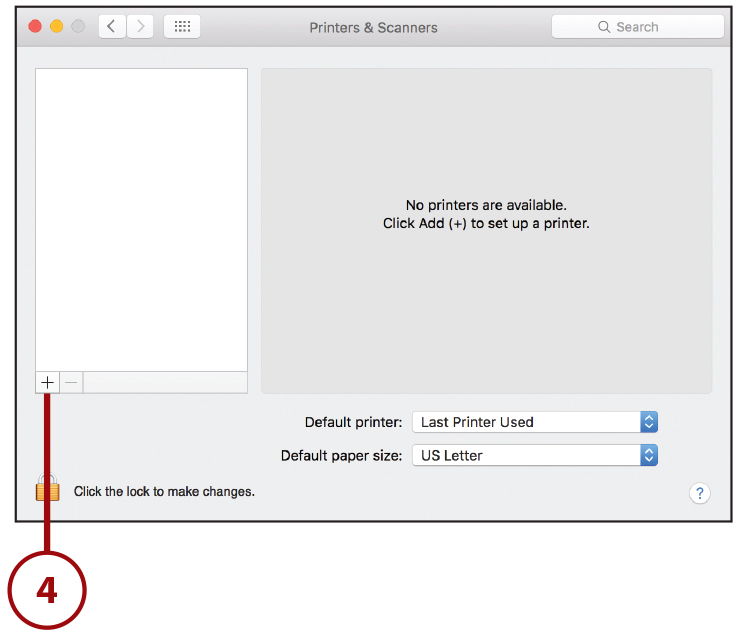
5. A window is shown displaying all of the available printers detected by your Mac. Choose the printer from the list.
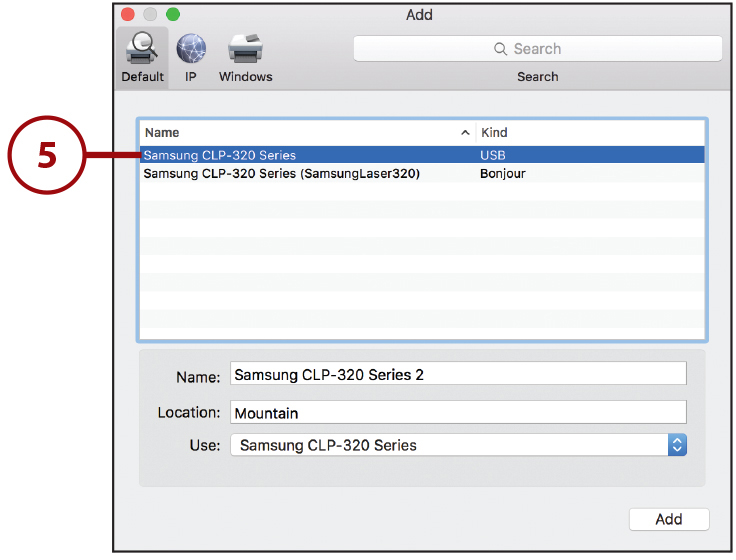
6. Your Mac searches for the software necessary to use the printer and displays the chosen printer name in the Use drop-down menu.
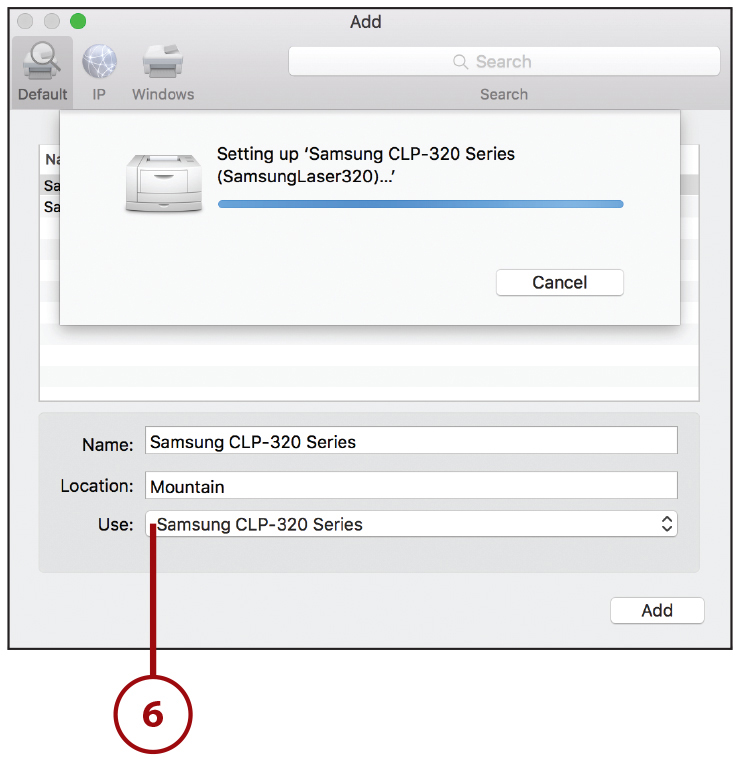
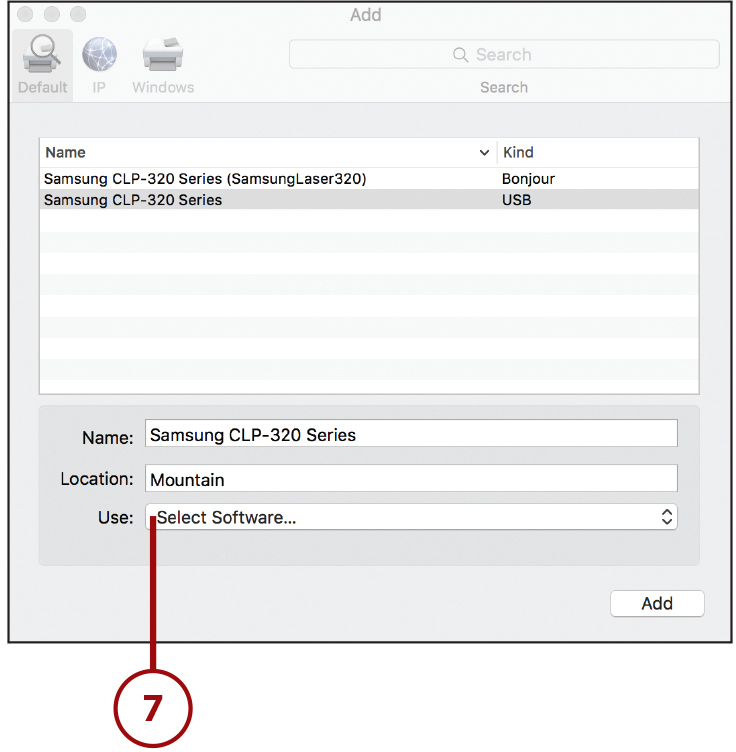
7. If the correct printer name is shown in the menu, jump to step 11. If the correct printer name is not displayed in the Use drop-down menu, choose Select Software from the menu.
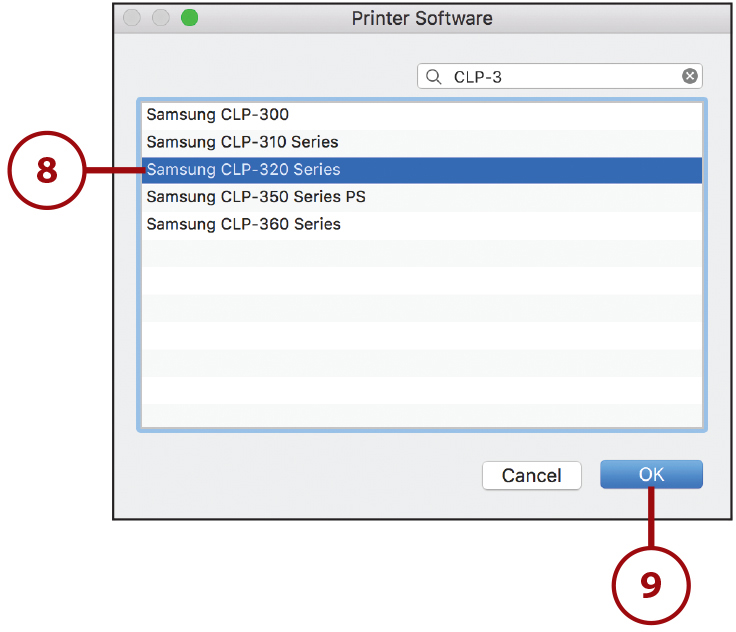
8. A window appears that shows all the printers supported in Sierra. Click your printer within the list.
9. Click OK.
10. Click Add to finish adding the printer. If there are options (such as a duplexer) that your Mac can’t detect, Sierra might prompt you to configure printer-specific features.
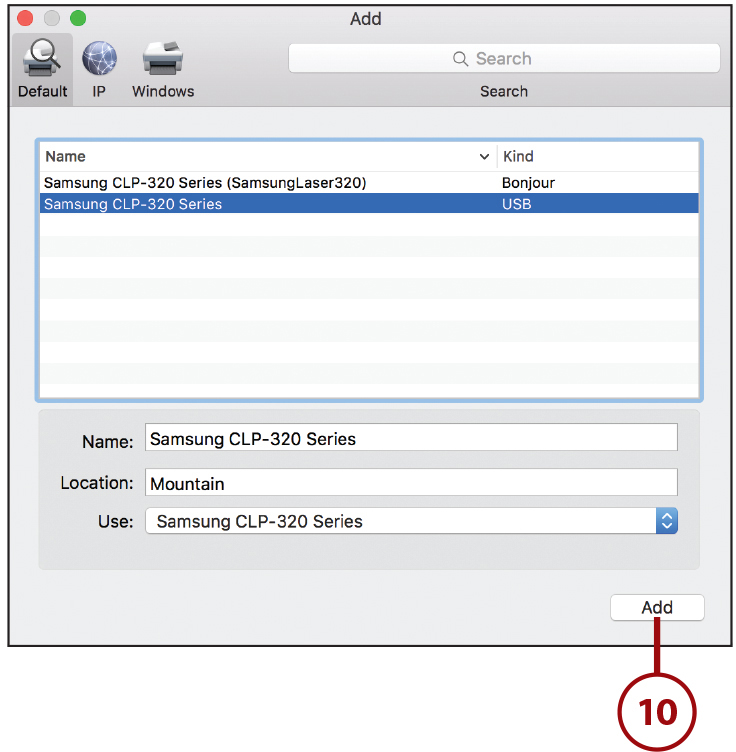
11. Close the preferences and begin using your printer.

>>>Go Further: Setting Up a Network or Airport Printer
To add a network printer, follow the steps described in Chapter 6’s section, “Access a Network Printer.”
AirPort-connected printers, even though they might not technically be network printers, are configured identically to network printers. AirPort makes them available over Bonjour, a configuration-free networking technology developed by Apple.
Print to a Printer
The options available when printing can vary depending on the application that you’re printing from, but once you’re used to the process, you’ll be able to find your way around any software’s printing options.
To output to one of your configured printers, complete the following steps in the application of your choice:
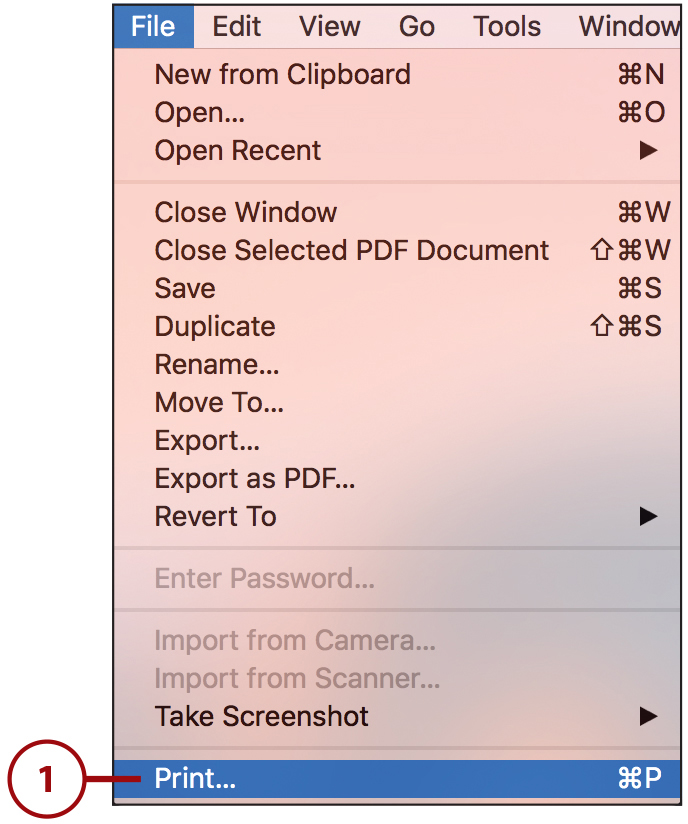
1. Choose File, Print from your application’s menu bar.
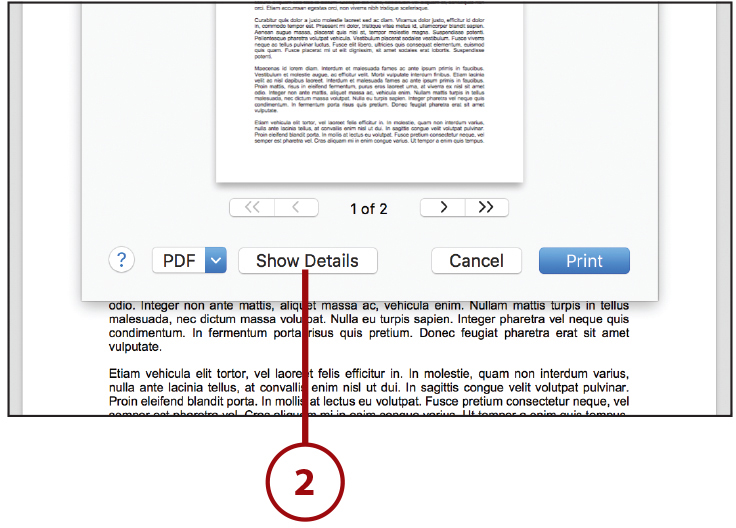
2. Click the Show Details button to display all the available options, if needed.
Where Is the Page Setup Option?
Apple has been working to streamline the printing process. In many applications, the Page Setup functionality has been combined with the standard Print function.
3. Select the printer to which you want to print.
4. Set the number of copies and page range options.
5. Set the paper size and orientation, if desired.
6. Use the printing options pop-up menu to choose specific printing options for your printer or options related to the application you’re using.
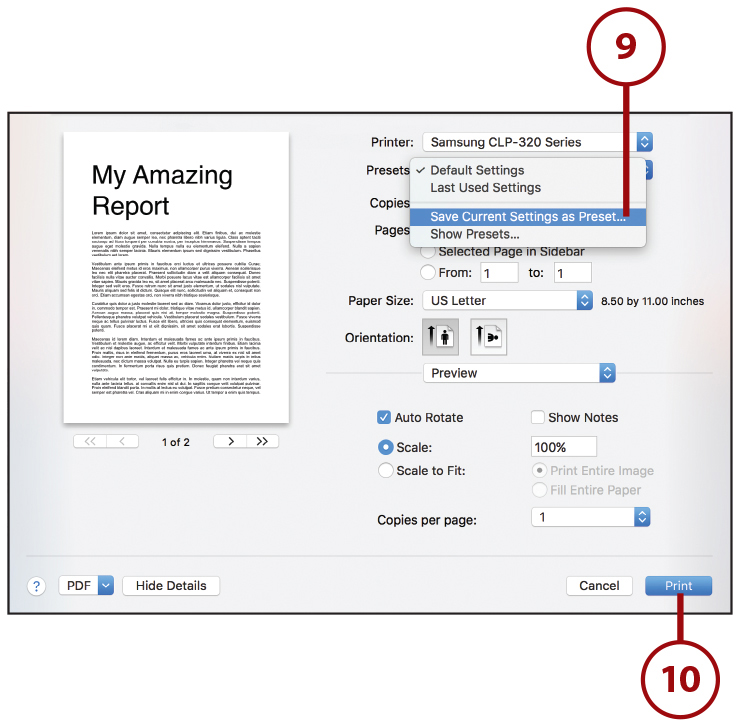
7. Review the results of your settings in the preview area on the left side of the window.
8. Use the controls below the preview to step through the pages in the document.
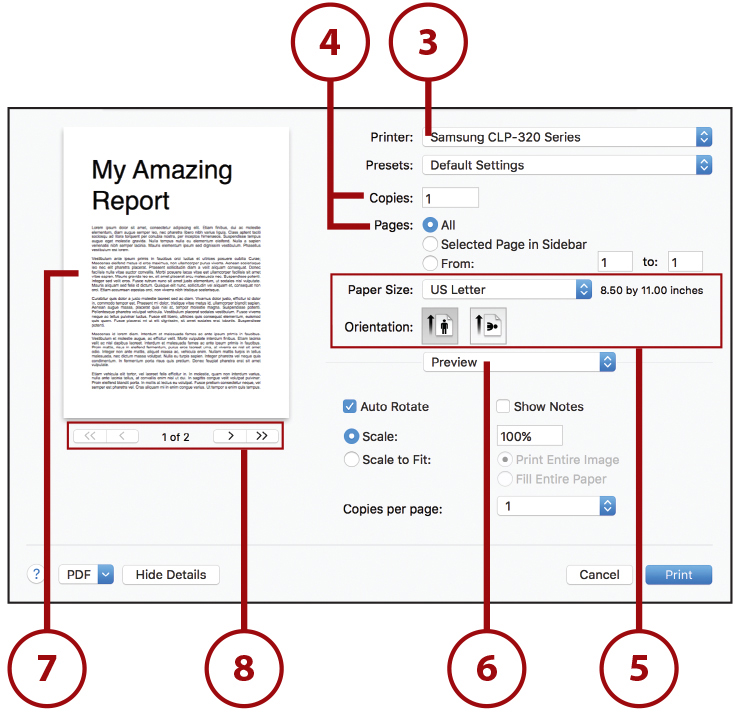
9. Use the Presets menu to save your settings if you want to recall them in the future.
10. Click Print to output to the printer.
Printing to PDF
In addition to printing to a printer, you can print a document to a PDF, or open it directly as a PDF in Preview. To print to a PDF, click PDF and choose Save as PDF in the Print dialog box. To open the document as a PDF in Preview, choose Open PDF in Preview.
Connecting and Using a Scanner
Although it’s not a heavily advertised feature of Sierra, the operating system can detect and drive a range of scanners without any additional drivers or software. This means that you can connect a scanner to your Mac and almost immediately begin scanning images.
Add a Scanner
To connect a USB scanner to your Mac, complete any initial setup instructions provided in the hardware manual and then follow these steps:
1. Plug the scanner into your Mac and turn it on (not shown).
2. Open the System Preferences and click the Printers & Scanners icon.
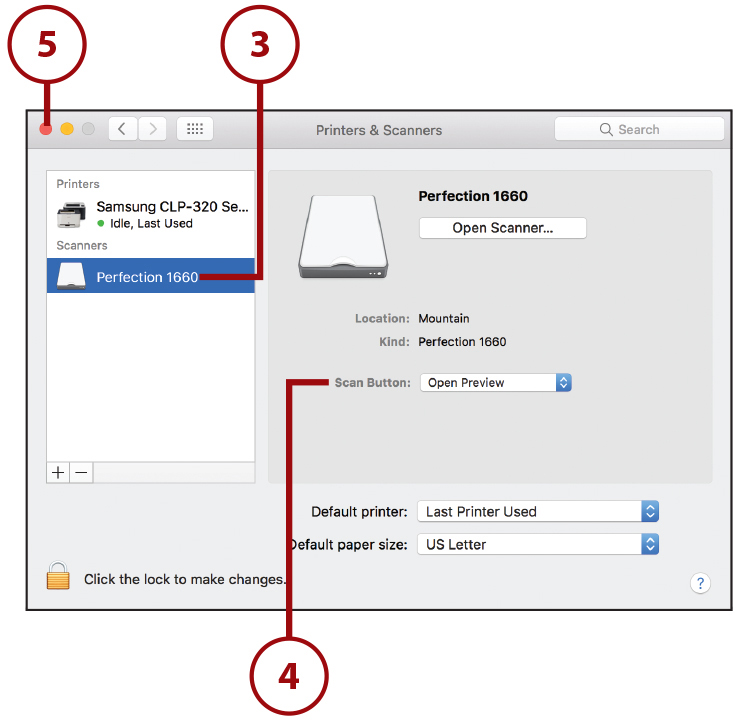
3. The scanner, if supported, appears in the Scanners listing on the left side of the panel. If it doesn’t appear immediately, click the Add button (+) and follow the same steps as for adding a printer.
4. Choose the application you want to start when the Scan button is pressed on the scanner. I recommend Preview because it is a convenient application for working with images.
5. Close the preferences.
Sierra supports many network scanners, such as the popular Canon Pixma All-In-One line. For these devices, make sure you install any software the manufacturer provided and then follow the instructions for scanning with a wired scanner. macOS should automatically recognize the scanner, as long as you are connected to the same network.
Scan in Preview
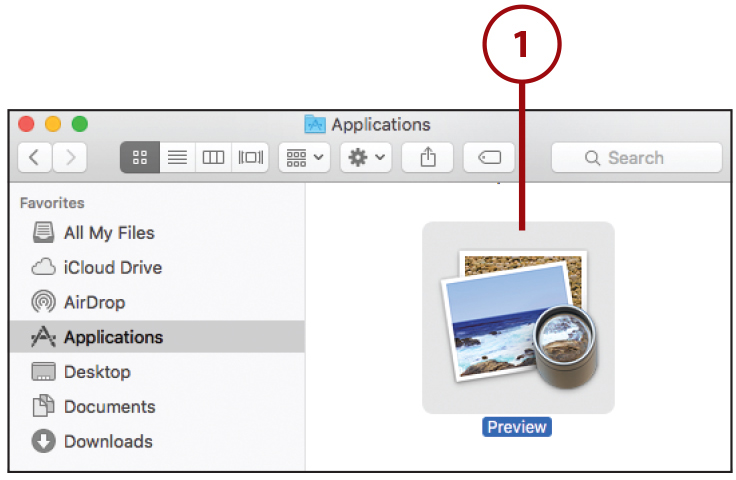
Preview (accessed by clicking Preview in the Applications folder) serves as the image hub on your Mac. It views images and PDFs, and allows annotations, cropping, image rotation, and more. With Sierra, it can also act as your scanning software. To scan an image directly into Preview, do the following:
1. Open Preview, or press the Scan button on the scanner if Preview is set as the default scanning application.
2. Choose Import from Scanner from the File menu.

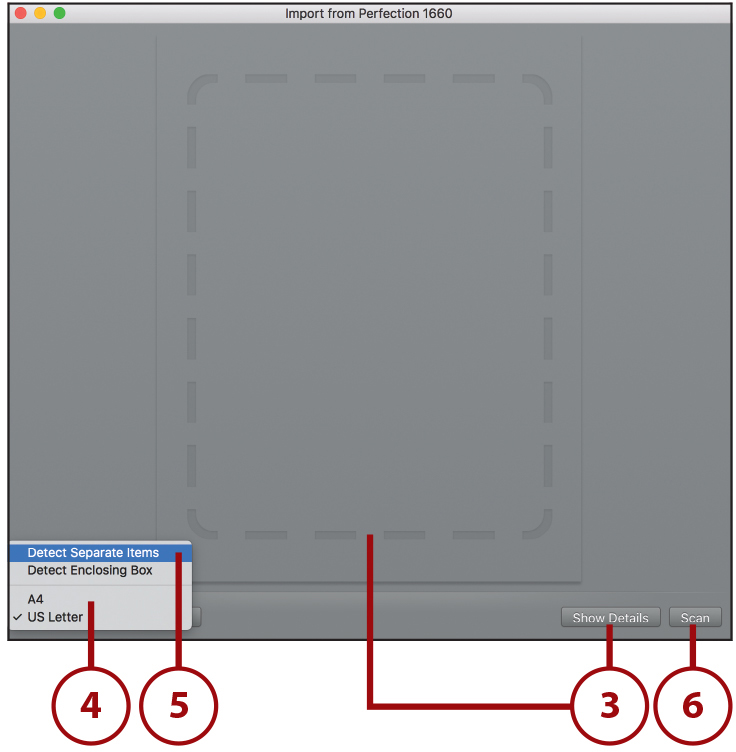
3. The basic scanning window appears. If you want to choose your scanning area or set the resolution, click Show Details and skip to step 8.
4. Use the pop-up menu in the lower-left corner to choose the size of the document you’re scanning.
5. Choose Detect Separate Items from the pop-up menu to automatically scan individual photos, pictures, and so on into separate images within a single scan.
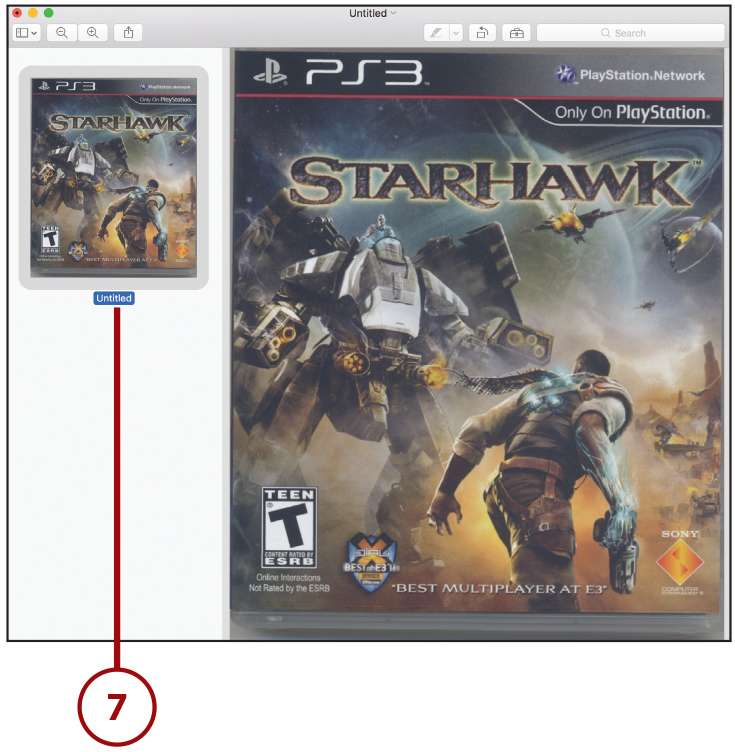
6. Click Scan. Preview performs a detailed scan, and then opens the result in a new window, where you can save it if desired.
Scanning Options
Originally, the Image Capture utility (found in the Applications folder) handled scanning in macOS. This capability has expanded to Preview, but Image Capture is still available if you’d like to give it a try.
7. Repeat step 6 as needed for all of your images.
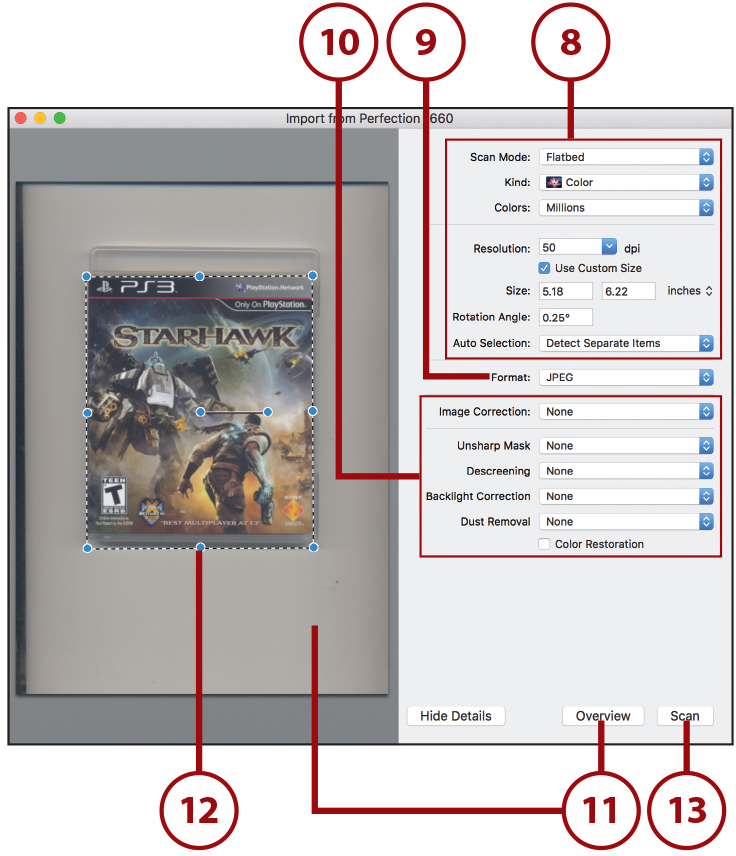
8. In detailed scanning mode, full controls for the scanner are shown on the right side of the window. Choose the scan’s resolution, size, orientation, and color depth.
9. Configure the format (file type) for scanned images.
10. Adjust any image filters and clean-up features you want to apply to the scan.
11. Click Overview to perform a low-resolution scan of your document and display it in the preview area on the left.
12. Adjust the bounding rectangle to fit your document. If you’ve chosen to detect separate items, you see multiple bounding rectangles.
13. Click Scan to begin scanning.
14. The result opens in a new window, where you can save it if desired.