
Chapter 16. Introduction to NGINX Controller
16.0 Introduction
NGINX Controller is an application-centric control plane for your application environments. Controller provides an interface that allows you to view and configure an entire fleet of NGINX Plus servers, no matter their physical location. Controller allows teams to focus less on the raw NGINX Plus configuration, and more on the application they’re using NGINX Plus to deliver.
In this chapter, you’ll read an overview of the NGINX Controller setup, connect an NGINX Plus server instance, and learn about using the NGINX Controller API. NGINX Controller is an enterprise product that requires a license. You can request a free trial from the NGINX Controller Product Page.
16.1 Setup Overview
Solution
Use the Official NGINX Controller Installation Guide for an up-to-date installation process. The following are a few tips, observations, and callouts for items to look out for throughout the setup guide.
NGINX Controller 3.x installs as a Kubernetes stack. It is important to review all of the technical specifications before beginning. An external PostgreSQL database is required. The Controller installer is provided as a tarball. Once unpacked, an install.sh script will need to be run as a non-root user.
Due to the way some OS images are distributed, there may be variance in the package repositories, which can cause some difficulty with the installation. Ubuntu 18.04 seems to be the most consistent in my testing, and is my recommendation for trials and exploration. Remember that NGINX Support is available to assist you in getting NGINX Controller up and running quickly.
There are a number of tools the installer needs installed before it’s able to run correctly. Most of the tools are standard on many operating systems, however the jq tool is not. You will need to ensure all the required tools are installed on your system prior to running any of the installer scripts.
A helper.sh script is provided in the installation package that can aid with installation, or altering the base configuration once installed. For instance, the argument supportpkg will build a package of debug and log information for you to send to NGINX Support to enable them to have a quick overview of your situation. The prereqs argument will install required packages and set up Kubernetes. To view logs from NGINX Controller, you can use ./helper.sh logs.
When the installer command is run, it will check the system for requirements and install any that it may additionally need. The installer will prompt for database information. Currently PostgreSQL is supported and must be on a remote server. The user information provided must be capable of creating databases. This information can be passed as command-line arguments to the installer.
A time series database volume will need to be supplied. You can use the local disk, an NSF volume, or an AWS EBS volume. If you choose to use an AWS EBS volume, the system will need appropriate AWS IAM permissions to attach the volume to the instance.
An end-user license agreement is presented and must be accepted to move forward. After reading, press q to exit the agreement, then y to accept.
A SMTP server is needed to invite users via email as well as for email notifications. In the event that an SMTP server is not yet available, these settings can be configured later by using the helper.sh script. Provide some generic value to these prompts, set the host to localhost, port to 25, decline authentication, and TLS. NGINX Controller will not be able to send email until SMTP is configured.
The FQDN is used when generating agent configuration, and should be set to a domain that can be relied upon. The organization name prompt is a friendly name used for labeling—a team or company name will suffice. When providing values for the administrator user, note that the email is used for system login.
SSL/TLS certificate paths can be provided through command parameters of the installer, or as environment variables. If these are not found, the installer will prompt to generate self-signed certificates.
Once the installation completes, the installer will provide a link to Controller. Follow the link and login with the administrator credentials.
Discussion
NGINX Controller provides a single control plane for management of your applications. The interface is sectioned into different views, Platform, Infrastructure, Services, and Analytics. By doing so, the view is clean and concise for the specific task at hand.
The platform view is used for managing Controller and user access. The infrastructure view provides details about the machines running the NGINX Controller agents. The next section will describe adding an NGINX Plus server to Controller by installing an agent.
In the services view, the application-centric attributes of NGINX Controller come to light. Controller organizes your applications, environments, gateways, and APIs, to enable you to reorganize and deploy rapidly.
16.2 Connecting NGINX Plus with Controller
Solution
If you have not yet installed NGINX Plus, use Recipe 1.3 to get a NGINX Plus node online.
The best way to find documentation for your Controller installation is to visit https://{Controller-FQDN}/docs/infrastructure/agent. At this document location, you can find information about the technical specifications needed to run the NGINX Controller Agent, as well as how to install and manage.
Installing the Controller Agent to an existing NGINX Plus server is straightforward. You will need to retrieve an installer script from the Controller API on port 8443, and run it with an API key. The Controller UI provides simple copy and paste instructions for your environment. After the install is finished, you must start the Controller Agent by using the service manager for your system.
Once the Controller Agent service is running, you will see an instance running in the Controller Infrastructure view.
Discussion
In this section, you added an NGINX Plus server to the NGINX Controller as an instance. An inventory of the NGINX Plus systems is now shown in the Infrastructure view as well as with a list request to the API. When you have one or more running instances in NGINX Controller, you can monitor valuable server and NGINX Plus metrics with the Graphs tab within the Infrastructure view. In the Platform view, under the agents tab, there’s a setting to enable NGINX config analyzer. When turned on, the Infrastructure view enables an analysis tab. The analysis tab provides information relevant to the NGINX Plus installation and its current configuration.
Now that you have a fresh NGINX Plus node with the Controller Agent installed, you may want to take a bootable image of this machine, or build configuration management to support these installations, so that you can replicate the machine. With an instance configured, you’re able to start setting up services, which consist of applications, their environments, and how they’re served.
16.3 Driving NGINX Controller with the API
Solution
Ensure you have network connectivity to Controller on the API port, which is by default 8443.
NGINX Controller is 100% driven entirely through its API. The interface simply uses that API to provide point-and-click access, and dashboards. Use the API Overview in the documentation on your Controller installation by visiting https://{Controller-FQDN}/docs/api/overview/. This will teach you the basis of the objects, permissions, and how to authenticate. From there, the API Reference can be found at https://{Controller-FQDN}/docs/api/api-reference/.
One way to jump-start your automation through using the API is to view already configured entities in the NGINX Controller interface, edit the entity, and view the API Spec. This API Spec will show you the method, path, and payload needed to create that object. With some variable substitution, you’re off to a good start on automating your Controller environment.
Discussion
For some engineers, the API will be the main interaction they have with NGINX Controller; for others, it will be the web interface. Either is valid and extremely powerful. The addition of showing the API call on the web interface lessens the frustration of digging through API reference and quickens your task automation. An Ansible collection for NGINX Controller exists to aid in Controller automation.
16.4 Enable WAF Through Controller App Security
Solution
If you have not already, follow the NGINX Plus App Protect Installation guide for your platform to install the App Protect module on your NGINX Plus node.
Navigate to the configuration of an existing App Component in NGINX Controller. Within the Security section, locate the WAF header or settings. Enable the WAF and save.
The WAF is now processing requests for the App through the default WAF policy. The default policy is set to alarm on all signatures, but will block for signatures that are considered highly accurate. Accuracy is determined by an algorithm that determines the probability of false positives. This means you can immediately start blocking harmful requests while gathering data about security events that are reported by the policy. Both flagged and blocked requests will show up in the NGINX Controller UI, appropriately labeled. NGINX Controller ADC will display WAF statistics and violation events for WAF violations triggered.
Ensure the application is handling some traffic. Test a request that would typically be blocked or flagged by a WAF. The following is an extremely basic SQL Injection request:
curl https://{appComponentEndpoint}/?query=9999999%20UNION%20SELECT%201%2C2
After a request is made that would be considered a security event, NGINX Controller ADC will report security analytics data. Locate these metrics in the Security Analytics section for this App and App Component. In Figure 16-1 you can see how NGINX Controller displays metric information about requests flagged by the WAF.
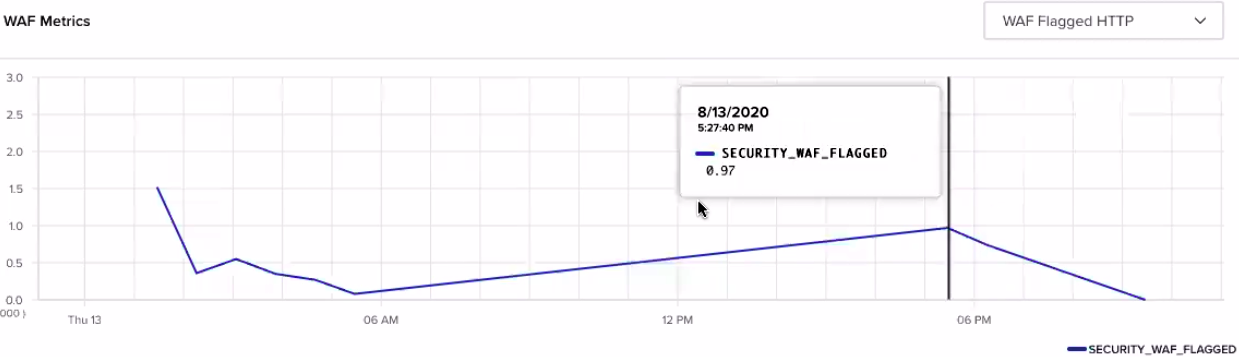
Figure 16-1. An NGINX App Security WAF has flagged some requests
Once some flagged requests start to show up, you can also view the event on the Security Events page. This is where you’ll find detailed information about each request flagged or blocked by NGINX App Security WAF.
Before enabling more strict policies, you should verify that your normal valid application traffic is not getting flagged. If normal behavior is flagged, inspect the reasoning for the individual security event. If normal application traffic is being flagged, you may have vulnerabilities in your application that need to be addressed. In Figure 16-2 all traffic observed by the WAF is displayed to show a pattern between regular traffic and request that violated by WAF rules.

Figure 16-2. An example of statistics reported by Controller ADC with a WAF enabled
Discussion
Controller App Security provides a simplistic WAF experience to secure your applications. With the information provided by the monitoring, you can watch for trends over time for security attacks, investigate further by looking at the detail of the event, and decide what action must be taken.
Web Application Firewalls are extremely important in today’s web security architecture. Applications are constantly being bombarded with attempts to compromise services with common vulnerabilities. By blocking these requests before they reach your application services, you’re not only securing the web application, but reserving resources for legitimate client requests.
A WAF is not only for external clients; you should consider using a WAF on internal traffic as well, so that one compromised service does not affect another.