
NOW THAT YOU’VE TAKEN the guided tour of your NOOK Tablet, it’s time to get started. So in this chapter, you’ll charge your tablet, connect to a network, register with Barnes & Noble, and then be on your merry way.
First things first—before doing anything else, charge your NOOK Tablet. It’ll likely already have some kind of charge, but that’s not good enough; you want it to be charged completely so your reading (and watching and playing) won’t be interrupted.
Get out your USB cable and power adapter (USB Port, Connector, and Charger). Plug the larger end of the USB cable into the power adapter, and then plug the power adapter into a wall outlet. Then connect the mini USB connector on the cable to the small USB port at the bottom of your NOOK Tablet. Your NOOK will start charging immediately. The little NOOK icon on the USB cable near the mini connector will turn orange, showing that your NOOK is charging. When it’s fully charged, it turns green. It takes about 3 hours to fully charge a NOOK Tablet, but if your NOOK Tablet already has a charge, it may take less time.

Note
As you’ll see in Chapter 11, you can use the USB cable to connect your NOOK Tablet to your computer and then transfer files between them. Unlike some smartphones and Android tablets, though, your NOOK Tablet doesn’t charge when it’s connected to a computer.
By the way, you don’t need to wait for your NOOK Tablet to charge while you’re going through setup. You can set it up while it’s charging. So plug it in and keep this book open while you get it set up to go.
When you turn on your NOOK Tablet for the first time, you’ll be welcomed by a video. It’s worth watching if you have the patience, since it covers the basics of using the tablet. But if you’re not in a video kinda mood, don’t worry, because this book covers everything in the video and more.
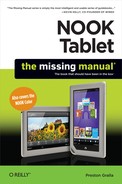
At the end of the video, you wind up on the Terms and Conditions page (if you skip the video, you go straight there). It’s got the usual legal rigmarole you can expect from such things. Unless you’re a lawyer with the time and inclination to read it, you’ll likely just tap the green Agree button. On the next screen, select your time zone, and then tap Next.


Now the fun begins. Your NOOK Tablet looks around in search of a WiFi network. It lists any that it finds. If you’re at home, you see your home WiFi network listed; if you’re at a B&N, that network is what you see. If any public WiFi hotspots are nearby, you’ll see them in the list as well.
Tip
If you have a home network and haven’t turned on its security, do it. Do it right now. Having an unsecured home network is like leaving your front door open and posting an invitation saying, “Come right in! What’s mine is yours, so take what you’d like.” Check your router’s documentation for turning on security.
Tap the network to which you want to connect—your home network, or whatever network you’re near—and on the screen that appears, enter your password and tap Connect. If you’re worried that someone will steal your password, turn on the “Hide password” box first.


Tip
Having trouble making your WiFi connection? Go to www.nook.com/tablet/wifi to seek help for your particular problem (scroll down to the Connectivity heading). If you can make the connection, but then run into problems, check out this chapter’s troubleshooting section in Using and Troubleshooting WiFi.
After a moment or two, you’ll see a connection icon next to the network you tapped, and the indication beneath it, “Connected to the internet.” Tap “Continue with Setup” to move on.
Note
Your NOOK has a number assigned to it called a MAC address, a unique identifier, like an ID, that identifies your NOOK Tablet to the Internet. No two devices have the same MAC address, so what you see is unique in the world. It’s not likely that you’ll need to know your MAC address, but if you ever need it, like if you’re asking for tech support, you can easily find it out. After you’ve registered the NOOK, press the NOOK button and select Settings→Device Info→“About Your NOOK” and you’ll find it listed at the bottom of your screen.
Before you can go any further, you have to register your NOOK Tablet and log in with a Barnes & Noble account. If you’ve ever ordered anything from www.barnesandnoble.com (or, to save your fingers, www.bn.com) or if you have a Barnes & Noble Member card, you already have an account. Enter your email address and password for the account (hint: the address that Barnes & Noble is sending you email to). If you don’t already have an account, create one now by tapping the notification at the bottom of your screen.

Tip
If you’d like, you can set up a Barnes & Noble account on the Web using your PC or Mac at BN.com.
When you register, you also have to provide a credit card and a billing address for your Barnes & Noble account. That’s so you can pay for all the goodies you’re about to buy.
After a moment or two, the screen tells you that your registration was successful and whisks you off to a Get Started page. From there you can check out tutorials for learning more about your NOOK Tablet; start shopping for books, movies, and music; or simply explore your tablet. To start exploring, press the NOOK button, and you’ll come to the main screen. (As for what to do next, turn to Chapter 3.)

You’ll probably use your NOOK Tablet in more than one place—your home, a public WiFi hotspot in a café or airport, or at a Barnes & Noble location, to name just a few. In those cases, you need to connect to a WiFi network other than the initial one you used when you set up your tablet.

It’s simple. Just follow these steps:
With your NOOK Tablet turned on, press the NOOK button. The Quick Nav bar appears.
Tap the Settings icon and select Wireless. From the screen that appears, make sure that the button at the top right is On, rather than Off.
Tap the WiFi hotspot you want to connect to.
Type the password, if the hotspot requires one, and then tap Connect.
That’s all it takes; you’re connected.
The vast majority of the time, you should have no problems making a WiFi connection. But wireless technology can be finicky sometimes, and when that happens, you might need some help. The technology is confusing enough that you may feel the need to consult a local witch doctor or magician to help, but this book is really all you need. Don’t go looking for your wizard hat yet.
One problem you may come across when making a connection to your home network is that your network name doesn’t show up on the NOOK Tablet’s WiFi list. If that’s the case, the likely hitch is that your home network is set up to be a hidden network; that is, it doesn’t broadcast its presence to the world.
Tip
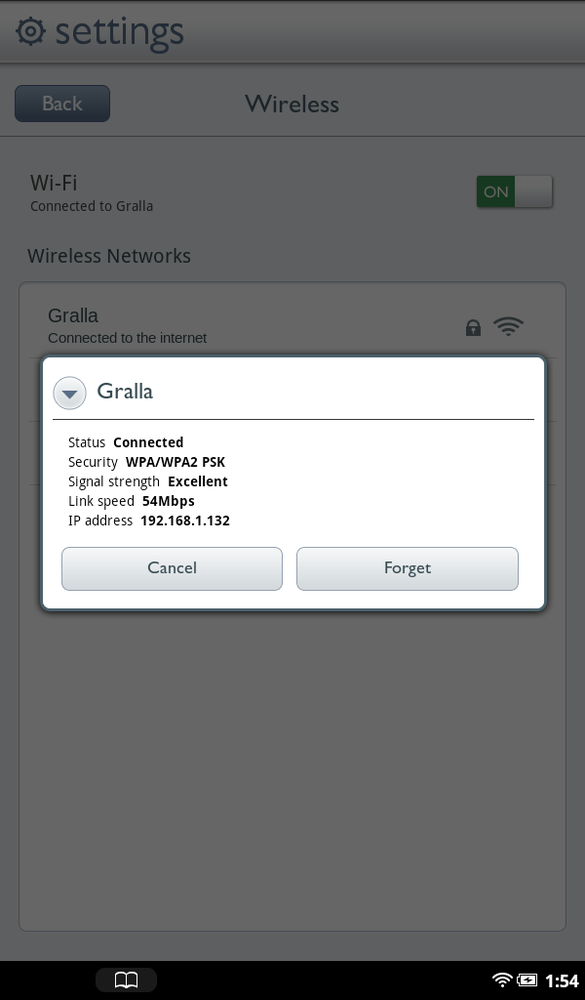
Are you the techie type who has a burning desire to know all there is to know about the WiFi network to which you’re connected? It’s easy to do. On the Wireless connection screen, tap the network’s name. A screen appears with details that will warm the cockles of any geek’s heart, including the signal strength, exact speed of connection, type of security being used, and even the IP address your NOOK Tablet is currently using.
One way to solve the problem is to unhide your network; check your router’s documentation for details. But there’s another way to solve it as well. When you get to the Wireless connection screen, as outlined in the previous section, tap Other Network. On the screen that appears, type the network name (called a service set identifier or SSID) and tap Save. (You’ll of course first need to know the name of the hidden network to do this.) From then on, that network will show up on your network list. If the network requires security, tap the down arrow in the Security box, and choose the type of security the network uses. (If you’re at a hotspot, ask for the security type and password; if you’re at home, check your router or its manual for details.) After you select the security method, type a password, tap Save, and you’re all set.


You may come across other WiFi problems that need solving as well. Here’s a quick rundown on how to fix some of them:
If a WiFi network shows up but you can’t connect to it, try turning off your NOOK Tablet, and then turning it back on. That often solves the problem.
If you keep having problems connecting to a WiFi network, on the Wireless connection screen, tap the network name, and then tap Forget from the screen that appears. Back on the Wireless connection screen, try connecting to it again.
If all else fails, call the NOOK technical support line at 1-800-THE-BOOK. You’ll be able to get help from a technical wizard who can help troubleshoot whatever ails your NOOK Tablet.
You can use your NOOK Tablet at any WiFi hot spot, but it really shows off its stuff when you use it at a Barnes & Noble store. When you go into the store, your NOOK Tablet automatically connects to its WiFi hotspot (if you’ve got the tablet and WiFi turned on, of course).
Now the fun begins. Tap Shop. You’ll come to a special page at the top of which is a “More in Store” section that offers you free extra content you won’t find anywhere else, such as articles by authors of popular books, review roundups, and more.
Better yet, you can spend an hour reading any eBook for free—that’s right, any book that B&N sells as an eBook, you can read for up to an hour, and you won’t have to pay a penny—a great way to find out whether you like a book before you commit to buying it.
If you have any questions about the NOOK Tablet, or need help of any kind, you’ll find out that you have a friend as well, because stores offer free in-person technical support and advice.