
14
Moving to the Cloud

In August of 2006, Amazon Web Services (AWS) brought public cloud infrastructure to the mainstream when it introduced its virtual computer, Elastic Compute Cloud (EC2). EC2 removed barriers to providing services over the internet; you no longer needed to purchase servers and software licenses, sign support contracts, rent office space, or hire IT professionals to maintain your infrastructure. Instead, you paid AWS as needed for the use of EC2 instances, allowing you to scale your business while AWS handled the maintenance, redundancy, and standards compliance details for you. In the following years, both Google and Microsoft released public cloud offerings to compete with AWS. Now all three cloud providers offer comprehensive services that cover everything from analytics to storage.
The goal of this chapter is to give you an apples-to-apples comparison of Amazon Web Services, Google Cloud, and Microsoft Azure. You’ll create and deploy an application to illustrate the differences in each provider’s tooling, authentication, and deployment experience. Your application will follow the platform-as-a-service (PaaS) model, in which you create the application and deploy it on the cloud provider’s platform. Specifically, you’ll create a function and deploy it to AWS Lambda, Google Cloud Functions, and Microsoft Azure Functions. We’ll stick to the command line as much as possible to keep the comparisons relative and introduce you to each provider’s tooling.
All three service providers offer a trial period, so you shouldn’t incur any costs. If you’ve exhausted your trial, please keep potential costs in mind as you work through the following sections.
You’ll create a simple function that retrieves the URL of the latest XKCD comic, or optionally the previous comic. This will demonstrate how to retrieve data from within the function to fulfill the client’s request and persist function state between executions.
By the end of this chapter, you should feel comfortable writing an application, deploying it, and testing it to leverage the PaaS offerings of AWS, Google Cloud, and Microsoft Azure. You should have a better idea of which provider’s workflow best fits your use case if you choose to make the jump to the cloud.
Laying Some Groundwork
The XKCD website offers a Real Simple Syndication (RSS) feed at https://xkcd.com/rss.xml. As its file extension indicates, the feed uses XML. You can use Go’s encoding/xml package to parse the feed.
Before you deploy a function to the cloud that can retrieve the URL of the latest XKCD comic, you need to write some code that will allow you to make sense of the RSS feed. Listing 14-1 creates two types for parsing the feed.
package feed

import (
    "context"
    "encoding/xml"
    "fmt"
    "io/ioutil"
    "net/http"
)

type Item struct {
    Title     string `xml:"title"`
    URL       string `xml:"link"`
    Published string 1`xml:"pubDate"`
}

type RSS struct {
    Channel struct {
        Items []Item `xml:"item"`
    } `xml:"channel"`
    entityTag 2string
}
Listing 14-1: Structure that represents the XKCD RSS feed (feed/rss.go)
The RSS struct represents the RSS feed, and the Item struct represents each item (comic) in the feed. Like Go’s encoding/json package you used in earlier chapters, its encoding/xml package can use struct tags to map XML tags to their corresponding struct fields. For example, the Published field’s tag 1 instructs the encoding/xml package to assign it the item’s pubDate value.
It’s important to be a good internet neighbor and keep track of the feed’s entity tag 2. Web servers often derive entity tags for content that may not change from one request to another. Clients can track these entity tags and present them with future requests. If the server determines that the requested content has the same entity tag, it can forgo returning the entire payload and return a 304 Not Modified status code so the client knows to use its cached copy instead. You’ll use this value in Listing 14-2 to conditionally update the RSS struct when the feed changes.
--snip--
func (r RSS) Items() []Item {
    items := 1make([]Item, len(r.Channel.Items))
    copy(items, r.Channel.Items)

    return items
}

func (r *RSS) ParseURL(ctx context.Context, u string) error {
    req, err := http.NewRequestWithContext(ctx, http.MethodGet, u, nil)
    if err != nil {
        return err
    }

    if r.entityTag != "" {
      2 req.Header.Add("ETag", r.entityTag)
    }

    resp, err := http.DefaultClient.Do(req)
    if err != nil {
        return err
    }

    switch resp.StatusCode {
    case 2http.StatusNotModified: // no-op
    case 3http.StatusOK:
        b, err := ioutil.ReadAll(resp.Body)
        if err != nil {
            return err
        }
        _ = resp.Body.Close()

        err = xml.Unmarshal(b, r)
        if err != nil {
            return err
        }

        r.entityTag = 4resp.Header.Get("ETag")
    default:
        return fmt.Errorf("unexpected status code: %v", resp.StatusCode)
    }

    return nil
}
Listing 14-2: Methods to parse the XKCD RSS feed and return a slice of items (feed/rss.go)
There are three things to note here. First, the RSS struct and its methods are not safe for concurrent use. This isn’t a concern for your use case, but it’s best that you’re aware of this fact. Second, the Items method returns a slice of the items in the RSS struct, which is empty until your code calls the ParseURL method to populate the RSS struct. Third, the Items method makes a copy of the Items slice 1 and returns the copy to prevent possible corruption of the original Items slice. This is also a bit of overkill for your use case, but it’s best to be aware that you’re returning a reference type that the receiver can modify. If the receiver modifies the copy, it won’t affect your original.
Parsing the RSS feed is straightforward and should look familiar. The ParseURL method retrieves the RSS feed by using a GET call. If the feed is new, the method reads the XML from the response body and invokes the xml.Unmarshal function to populate the RSS struct with the XML in the server.
Notice you conditionally set the request’s ETag header 2 so the XKCD server can determine whether it needs to send the feed contents or you currently have the latest version. If the server responds with a 304 Not Modified status code, the RSS struct remains unchanged. If you receive a 200 OK 3, you received a new version of the feed and unmarshal the response body’s XML into the RSS struct. If successful, you update the entity tag 4.
With this logic in place, the RSS struct should update itself only if its entity tag is empty, as it would be on initialization of the struct, or if a new feed is available.
The last task is to create a go.mod file by using the following commands:
$ cd feed
feed$ go mod init github.com/awoodbeck/gnp/ch14/feed
go: creating new go.mod: module github.com/awoodbeck/gnp/ch14/feed
feed$ cd -
These commands initialize a new module named github.com/awoodbeck/gnp/ch14/feed, which will be used by code later in this chapter.
AWS Lambda
AWS Lambda is a serverless platform that offers first-class support for Go. You can create Go applications, deploy them, and let Lambda handle the implementation details. It will scale your code to meet demand. Before you can get started with Lambda, please make sure you create a trial account at https://aws.amazon.com/.
Installing the AWS Command Line Interface
AWS offers version 2 of its command line interface (CLI) tools for Windows, macOS, and Linux. You can find detailed instructions for installing them at https://docs.aws.amazon.com/cli/latest/userguide/cli-chap-install.html.
Use the following commands to install the AWS CLI tools on Linux:
$ curl "https://awscli.amazonaws.com/awscli-exe-linux-x86_64.zip"
-o "awscliv2.zip"
  % Total    % Received % Xferd  Average Speed   Time    Time     Time  Current
                                 Dload  Upload   Total   Spent    Left  Speed
100 32.3M  100 32.3M    0     0  31.1M      0  0:00:01  0:00:01 --:--:-- 31.1M
$ unzip -q awscliv2.zip
$ sudo ./aws/install
[sudo] password for user:
You can now run: /usr/local/bin/aws --version
$ aws --version
aws-cli/2.0.56 Python/3.7.3 Linux/5.4.0-7642-generic exe/x86_64.pop.20
Download the AWS CLI version 2 archive. Use curl to download the ZIP file from the command line. Then unzip the archive and use sudo to run the ./aws/install executable. Once it’s complete, run aws --version to verify that the AWS binary is in your path and that you’re running version 2.
Configuring the CLI
Now that you have the AWS CLI installed, you need to configure it with credentials so it can interact with AWS on your account’s behalf. This section walks you through that process. If you get confused, review the AWS CLI configuration quick-start guide at https://docs.aws.amazon.com/cli/latest/userguide/cli-configure-quickstart.html.
First, access the AWS Console at https://console.aws.amazon.com. Log into the AWS Console to access the drop-down menu shown in Figure 14-1.
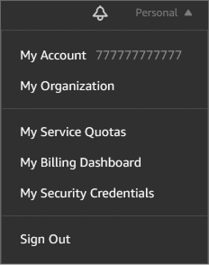
Figure 14-1: Accessing your AWS account security credentials
Click your account name in the upper-right corner of the AWS Console (Personal in Figure 14-1). Then, select My Security Credentials from the drop-down menu. This link should take you to the Your Security Credentials page, shown in Figure 14-2.
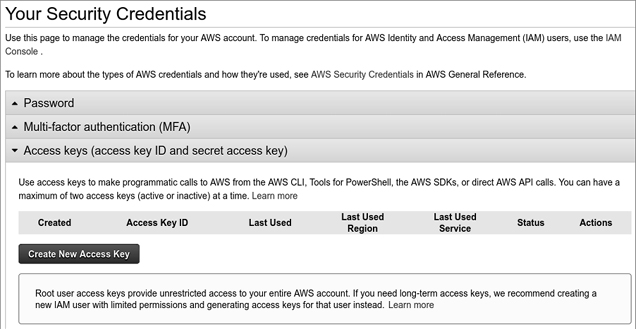
Figure 14-2: Creating a new access key
Select the Access keys section heading to expand the section. Then click the Create New Access Key button to create credentials to use on the command line. This will display the credentials (Figure 14-3).
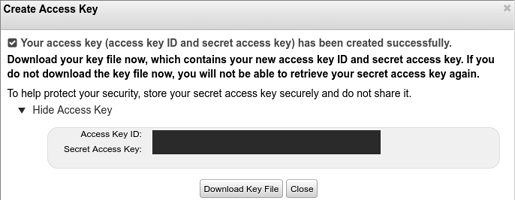
Figure 14-3: Retrieving the new access Key ID and secret access key
You’ll need both the access Key ID and secret access key values to authenticate your commands on the command line with AWS. Make sure you download the key file and keep it in a secure place in case you need to retrieve it in the future. For now, you’ll use them to configure your AWS command line interface:
$ aws configure
AWS Access Key ID [None]: AIDA1111111111EXAMPLE
AWS Secret Access Key [None]: YxMCBWETtZjZhW6VpLwPDY5KqH8hsDG45EXAMPLE
Default region name [None]: us-east-2
Default output format [None]: yaml
On the command line, invoke the aws configure command. You’ll be prompted to enter the access key ID and secret access key from Figure 14-3.
You can also specify a default region and the default output format. The region is the geographic endpoint for your services. In this example, I’m telling AWS I want my services to use the us-east-2 endpoint by default, which is in Ohio. You can find a general list of regional endpoints at https://docs.aws.amazon.com/general/latest/gr/rande.html.
Creating a Role
Your code requires a specific identity to run in AWS. This identity is called a role. You can have multiple roles under your AWS account and assign various permissions to each role. You can then assign roles to AWS services, which gives services permissions to access your resources without you having to assign credentials (such as your access key ID and secret access key) to each service. In this chapter, you’ll use a role to give AWS Lambda permission to access the Lambda function you’ll write.
For now, you’ll create just one role and give AWS Lambda permission to assume that role so it can invoke your code. Listing 14-3 details a simple trust policy document that assigns the proper access. The trust policy document outlines a set of permissions, which you’ll assign to a new role.
{
  "Version": 1"2012-10-17",
  "Statement": [
    {
      "Effect": 2"Allow",
      "Principal": {
        "Service": 3"lambda.amazonaws.com"
      },
      "Action": 4"sts:AssumeRole"
    }
  ]
}
Listing 14-3: Defining a trust policy for your new role (aws/trust-policy.json)
This trust policy tells AWS that you want to allow 2 the Lambda service 3 to assume the role 4. The trust policy version 1 is the current version of the trust policy language, not an arbitrary date.
Next, create the role to which you’ll assign this trust policy:
$ aws iam create-role --role-name "lambda-xkcd"
--assume-role-policy-document file://aws/trust-policy.json
Role:
1 Arn: arn:aws:iam::123456789012:role/lambda-xkcd
2 AssumeRolePolicyDocument:
    Statement:
    - Action: sts:AssumeRole
      Effect: Allow
      Principal:
        Service: lambda.amazonaws.com
    Version: '2012-10-17'
  CreateDate: '2006-01-02T15:04:05+00:00'
  Path: /
  RoleId: AROA1111111111EXAMPLE
  RoleName: lambda-xkcd
Create a new role with the AWS Identity and Access Management (IAM) service using the role name lambda-xkcd and the aws/trust-policy.json document you created in Listing 14-3. If successful, this creates a new role using your trust policy 2. IAM assigns the role an Amazon Resource Name (ARN). The ARN 1 is a unique identifier for this role that you’ll use when invoking your code.
Defining an AWS Lambda Function
AWS Lambda’s Go library gives you some flexibility when it comes to your Lambda function’s signature. Your function must conform to one of these formats:
func()

func() error

func(TypeIn) error

func() (TypeOut, error)

func(context.Context) error

func(context.Context, TypeIn) error

func(context.Context) (TypeOut, error)

func(context.Context, TypeIn) (TypeOut, error)
TypeIn and TypeOut correspond to encoding/json-compatible types, in that JSON input sent to your Lambda function will be unmarshaled into TypeIn. Likewise, the TypeOut your function returns will be marshaled to JSON before reaching its destination. You’ll use the last function signature in this section.
The function you’ll write should give you a taste for what you can do with serverless environments. It will accept input from the client, retrieve resources over the internet, maintain its state between function calls, and respond to the client. If you’ve read Chapter 9, you know that you could write an http.Handler that performs these actions, but AWS Lambda requires a slightly different approach. You won’t work with an http.Request or an http.ResponseWriter. Instead, you’ll use types you create or import from other modules. AWS Lambda handles the decoding and encoding of the data to and from your function for you.
Let’s get started writing your first bit of serverless code (Listing 14-4).
package main

import (
    "context"

    "github.com/awoodbeck/gnp/ch14/feed"
    "github.com/aws/aws-lambda-go/lambda"
)

var (
    rssFeed 1feed.RSS
    feedURL = 2"https://xkcd.com/rss.xml"
)

type EventRequest struct {
    Previous bool `json:"previous"`
}

type EventResponse struct {
    Title     string `json:"title"`
    URL       string `json:"url"`
    Published string `json:"published"`
}
Listing 14-4: Creating persistent variables and request and response types (aws/xkcd.go)
You can specify variables at the package level that will persist between function calls while the function persists in memory. In this example, you define a feed object 1 and the URL of the RSS feed 2. Creating and populating a new feed.RSS object involves a bit of overhead. You can avoid that overhead on subsequent function calls if you store the object in a variable at the package level so it lives beyond each function call. This also allows you to take advantage of the entity tag support in feed.RSS.
The EventRequest and EventResponse types define the format of a client request and the function’s response. AWS Lambda unmarshals the JSON from the client’s HTTP request body into the EventRequest object and marshals the function’s EventResponse to JSON to the HTTP response body before returning it to the client.
Listing 14-5 defines the main function and begins to define the AWS Lambda-compatible function.
--snip--
func main() {
  1 lambda.Start(LatestXKCD)
}

func LatestXKCD(ctx context.Context, req EventRequest) (
    EventResponse, error) {
    resp := 2EventResponse{Title: "xkcd.com", URL: "https://xkcd.com/"}

    if err := 3rssFeed.ParseURL(ctx, feedURL); err != nil {
        return resp, err
    }
Listing 14-5: Main function and first part of the Lambda function named LatestXKCD (aws/xkcd.go)
Hook your function into Lambda by passing it to the lambda.Start method 1. You’re welcome to instantiate dependencies in an init function, or before this statement, if your function requires it.
The LatestXKCD function accepts a context and an EventRequest and returns an EventResponse and an error interface. It defines a response object 2 with default Title and URL values. The function returns the response as is in the event of an error or an empty feed.
Parsing the feed URL 3 from Listing 14-4 populates the rssFeed object with the latest feed details. Listing 14-6 uses these details to formulate the response.
--snip--
    switch items := rssFeed.Items(); {
    case 1req.Previous && len(items) > 1:
        resp.Title = items[1].Title
        resp.URL = items[1].URL
        resp.Published = items[1].Published
    case len(items) > 0:
        resp.Title = items[0].Title
        resp.URL = items[0].URL
        resp.Published = items[0].Published
    }

    return resp, nil
}
Listing 14-6: Populating the response with the feed results (aws/xkcd.go)
If the client requests the previous XKCD comic 1 and there are at least two feed items, the function populates the response with details of the previous XKCD comic. Otherwise, the function populates the response with the most recent XKCD comic details, provided there’s at least one feed item. If neither of those cases is true, the client receives the response with its default values from Listing 14-5.
Compiling, Packaging, and Deploying Your Function
AWS Lambda expects you to compile your code and zip the resulting binary before deploying the archive, using the AWS CLI tools. To do this, use the following commands in Linux, macOS, or WSL:
$ GOOS=linux go build aws/xkcd.go
$ zip xkcd.zip xkcd
  adding: xkcd (deflated 50%)
$ aws lambda create-function --function-name "xkcd" --runtime "go1.x"
--handler "xkcd" --role "arn:aws:iam::123456789012:role/lambda-xkcd"
--zip-file "fileb://xkcd.zip"
CodeSha256: M36I7oiS8+S9AryIthcizsjdLDKXMaJKvZvsZzZDNH0=
CodeSize: 6597490
Description: ''
FunctionArn: arn:aws:lambda:us-east-2:123456789012:function:xkcd
FunctionName: 1xkcd
Handler: 2xkcd
LastModified: 2006-01-02T15:04:05.000+0000
LastUpdateStatus: Successful
MemorySize: 128
RevisionId: b094a881-9c49-4b86-86d5-eb4335507eb0
Role: arn:aws:iam::123456789012:role/lambda-xkcd
Runtime: go1.x
State: Active
Timeout: 3
TracingConfig:
  Mode: PassThrough
Version: $LATEST
Compile aws/xkcd.go and add the resulting xkcd binary to a ZIP file. Then, use the AWS CLI to create a new function named xkcd, a handler named xkcd, the go1.x runtime, the role ARN you created earlier, and the ZIP file containing the xkcd binary. Notice the fileb://xkcd.zip URL in the command line. This tells the AWS CLI that it can find a binary file (fileb) in the current directory named xkcd.zip.
If successful, the AWS CLI outputs the details of the new Lambda function: the function name 1 in AWS, which you’ll use on the command line to manage your function, and the filename of the binary in the zip file 2.
Compilation of the binary and packing it is a bit different on Windows. I recommend you do this in PowerShell since you can compress the cross-compiled binary on the command line without the need to install a specific archiver.
PS C:UsersUserdevgnpch14> setx GOOS linux

SUCCESS: Specified value was saved.
PS C:UsersUserdevgnpch14> Goingo.exe build -o xkcd .awsxkcd.go
go: downloading github.com/aws/aws-lambda-go v1.19.1
--snip--
PS C:UsersUserdevgnpch14> Compress-Archive xkcd xkcd.zip
At this point, use the AWS CLI tools to deploy the ZIP file as in the previous listing.
If you need to update your function code, recompile the binary and archive it again. Then use the following command to update the existing Lambda function:
$ aws lambda update-function-code --function-name "xkcd"
--zip-file "fileb://xkcd.zip"
Since you’re updating an existing function, the only values you need to provide are the names of the function and ZIP file. AWS takes care of the rest.
As an exercise, update the code to allow the client to request a forced refresh of the XKCD RSS feed. Then, update the function with those changes and move on to the next section to test those changes.
Testing Your AWS Lambda Function
The AWS CLI tools make it easy to test your Lambda function. You can use them to send a JSON payload and capture the JSON response. Invoke the function by providing the function name and the path to a file in the AWS CLI. The AWS CLI will populate this with the response body:
$ aws lambda invoke --function-name "xkcd" response.json
ExecutedVersion: $LATEST
StatusCode: 200
If the invocation is successful, you can verify that your function provided the XKCD comic name and URL by reviewing the response.json contents:
$ cat response.json
{"title":"Election Screen Time","url":"https://xkcd.com/2371/",
"published":"Mon, 12 Oct 2020 04:00:00 -0000"}
You can also invoke the function with a custom request body by adding a few additional command line arguments. You can pass a payload string if you specify its format as raw-in-base64-out. This tells the AWS CLI to take the string you provide and Base64-encode it before assigning it to the request body and passing it along to the function:
$ aws lambda invoke --cli-binary-format "raw-in-base64-out"
--payload '{"previous":true}' --function-name "xkcd" response.json
ExecutedVersion: $LATEST
StatusCode: 200
$ cat response.json
{"title":"Chemist Eggs","url":"https://xkcd.com/2373/",
"published":"Fri, 16 Oct 2020 04:00:00 -0000"}
Google Cloud Functions
Like AWS Lambda, Google Cloud Functions allows you to deploy code in a serverless environment, offloading the implementation details to Google. Not surprisingly, Go enjoys first-class support in Cloud Functions.
You’ll need a Google Cloud account before proceeding with this section. Visit https://cloud.google.com to get started with a trial account.
Installing the Google Cloud Software Development Kit
The Google Cloud Software Development Kit (SDK) requires Python 2.7.9 or 3.5+. You’ll need to make sure a suitable version of Python is installed on your operating system before proceeding. You can follow Google’s comprehensive installation guide at https://cloud.google.com/sdk/docs/install/, where you’ll find specific installation instructions for Windows, macOS, and various flavors of Linux.
Here are the generic Linux installation steps:
$ curl -O https://dl.google.com/dl/cloudsdk/channels/rapid/downloads/
google-cloud-sdk-319.0.1-linux-x86_64.tar.gz
  % Total    % Received % Xferd  Average Speed   Time    Time     Time  Current
                                 Dload  Upload   Total   Spent    Left  Speed
100 81.9M  100 81.9M    0     0  34.1M      0  0:00:02  0:00:02 --:--:-- 34.1M
$ tar xf google-cloud-sdk-319.0.1-linux-x86_64.tar.gz
$ ./google-cloud-sdk/install.sh
Welcome to the Google Cloud SDK!
--snip--
Download the current Google Cloud SDK tarball (the version changes frequently!) and extract it. Then, run the ./google-cloud-sdk/install.sh script. The installation process asks you questions that pertain to your environment. I snipped them from the output for brevity.
Initializing the Google Cloud SDK
You need to authorize the Google Cloud SDK before you’re able to use it to deploy your code. Google makes this process simple compared to AWS. There’s no need to create credentials and then copy and paste them to the command line. Instead, Google Cloud uses your web browser for authentication and authorization.
The gcloud init command is equivalent to the aws configure command, in that it will walk you through the configuration of your Google Cloud command line environment:
$ ./google-cloud-sdk/bin/gcloud init
Welcome! This command will take you through the configuration of gcloud.
--snip--
Pick cloud project to use:
1 [1] Create a new project
Please enter numeric choice or text value (must exactly match list
item):  1

Enter a Project ID. Note that a Project ID CANNOT be changed later.
Project IDs must be 6-30 characters (lowercase ASCII, digits, or
hyphens) in length and start with a lowercase letter. goxkcd
--snip--
$ gcloud projects list
PROJECT_ID                      NAME                   PROJECT_NUMBER
goxkcd                          goxkcd                 123456789012
The first step in the process will open a page in your web browser to authenticate your Google Cloud SDK with your Google Cloud account. Your command line output may look a little different from the output here if your Google Cloud account has existing projects. For the purposes of this chapter, elect to create a new project 1 and give it a project ID—goxkcd in this example. Your project ID must be unique across Google Cloud. Once you’ve completed this step, you’re ready to interact with Google Cloud from the command line, just as you did with AWS.
Enable Billing and Cloud Functions
You need to make sure billing is enabled for your project before it can use Cloud Functions. Visit https://cloud.google.com/billing/docs/how-to/modify-project/ to learn how to modify the billing details of an existing project. Once enabled, you can then enable your project’s Cloud Functions access. At this point, you can start writing code.
Defining a Cloud Function
Cloud Functions uses Go’s module support instead of requiring you to write a stand-alone application as you did for AWS Lambda. This simplifies your code a bit since you don’t need to import any libraries specific to Cloud Functions or define a main function as the entry point of execution.
Listing 14-7 provides the initial code for a Cloud Functions–compatible module.
package gcp

import (
    "encoding/json"
    "log"
    "net/http"

    "github.com/awoodbeck/gnp/ch14/feed"
)

var (
    rssFeed feed.RSS
    feedURL = "https://xkcd.com/rss.xml"
)

type EventRequest struct {
    Previous bool `json:"previous"`
}

type EventResponse struct {
    Title          string `json:"title"`
    URL            string `json:"url"`
    Published      string `json:"published"`
}
Listing 14-7: Creating persistent variables and request and response types (gcp/xkcd.go)
The types are identical to the code we wrote for AWS Lambda. Unlike AWS Lambda, Cloud Functions won’t unmarshal the request body into an EventRequest for you. Therefore, you’ll have to handle the unmarshaling and marshaling of the request and response payloads on your own.
Whereas AWS Lambda accepted a range of function signatures, Cloud Functions uses the familiar net/http handler function signature: func(http.ResponseWriter, *http.Request), as shown in Listing 14-8.
--snip--
func LatestXKCD(w http.ResponseWriter, r *http.Request) {
    var req EventRequest
    resp := EventResponse{Title: "xkcd.com", URL: "https://xkcd.com/"}

    defer 1func() {
        w.Header().Set("Content-Type", "application/json")
        out, _ := json.Marshal(&resp)
        _, _ = w.Write(out)
    }()

    if err := 2json.NewDecoder(r.Body).Decode(&req); err != nil {
        log.Printf("decoding request: %v", err)
        return
    }

    if err := rssFeed.ParseURL(3r.Context(), feedURL); err != nil {
        log.Printf("parsing feed: %v:", err)
        return
    }
Listing 14-8: Handling the request and response and optionally updating the RSS feed (gcp/xkcd.go)
Like the AWS code, this LatestXKCD function refreshes the RSS feed by using the ParseURL method. But unlike the equivalent AWS code, you need to JSON-unmarshal the request body 2 and marshal the response to JSON 1 before sending it to the client. Even though LatestXKCD doesn’t receive a context in its function parameters, you can use the request’s context 3 to cancel the parser if the socket connection with the client terminates before the parser returns.
Listing 14-9 implements the remainder of the LatestXKCD function.
--snip--
    switch items := rssFeed.Items(); {
    case req.Previous && len(items) > 1:
        resp.Title = items[1].Title
        resp.URL = items[1].URL
        resp.Published = items[1].Published
    case len(items) > 0:
        resp.Title = items[0].Title
        resp.URL = items[0].URL
        resp.Published = items[0].Published
    }
}
Listing 14-9: Populating the response with the feed results (gcp/xkcd.go)
Like Listing 14-6, this code populates the response fields with the appropriate feed item. The deferred function in Listing 14-8 handles writing the response to the http.ResponseWriter, so there’s nothing further to do here.
Deploying Your Cloud Function
You need to address one bit of module accounting before you deploy your code; you need to create a go.mod file so Google can find dependencies, because unlike with AWS Lambda, you don’t compile and package the binary yourself. Instead, the code is ultimately compiled on Cloud Functions.
Use the following commands to create the go.mod file:
$ cd gcp
gcp$ go mod init github.com/awoodbeck/gnp/ch14/gcp
go: creating new go.mod: module github.com/awoodbeck/gnp/ch14/gcp
gcp$ go mod tidy
--snip--
gcp$ cd -
These commands initialize a new module named github.com/awoodbeck/gnp/ch14/gcp and tidy the module requirements in the go.mod file.
Your module is ready for deployment. Use the gcloud functions deploy command, which accepts your code’s function name, the source location, and the Go runtime version:
$ gcloud functions deploy LatestXKCD --source ./gcp/ --runtime go113
--trigger-http --allow-unauthenticated
Deploying function (may take a while - up to 2 minutes)...
For Cloud Build Stackdriver Logs, visit:
https://console.cloud.google.com/logs/viewer--snip--
Deploying function (may take a while - up to 2 minutes)...done.
availableMemoryMb: 256
buildId: 5d7fee9b-7468-4b04-badc-81015aa62e59
entryPoint: 1LatestXKCD
httpsTrigger:
  url: 2https://us-central1-goxkcd.cloudfunctions.net/LatestXKCD
ingressSettings: 3ALLOW_ALL
labels:
  deployment-tool: cli-gcloud
name: projects/goxkcd/locations/us-central1/functions/LatestXKCD
runtime: 4go113
serviceAccountEmail: [email protected]
sourceUploadUrl: https://storage.googleapis.com/--snip--
status: ACTIVE
timeout: 60s
updateTime: '2006-01-02T15:04:05.000Z'
versionId: '1'
The addition of the --trigger-http and --allow-unauthenticated flags tells Google you want to trigger a call to your function by an incoming HTTP request and that no authentication is required for the HTTP endpoint.
Once created, the SDK output shows the function name 1, the HTTP endpoint 2 for your function, the permissions for the endpoint 3, and the Go runtime version 4.
Although the Cloud Functions deployment workflow is simpler than the AWS Lambda workflow, there’s a limitation: you’re restricted to the Go runtime version that Cloud Functions supports, which may not be the latest version. Therefore, you need to make sure the code you write doesn’t use newer features added since Go 1.13. You don’t have a similar limitation when deploying to AWS Lambda, since you locally compile the binary before deployment.
Testing Your Google Cloud Function
The Google Cloud SDK doesn’t include a way to invoke your function from the command line, as you did using the AWS CLI. But your function’s HTTP endpoint is publicly accessible, so you can directly send HTTP requests to it.
Use curl to send HTTP requests to your function’s HTTP endpoint:
$ curl -X POST -H "Content-Type: application/json" --data '{}'
https://us-central1-goxkcd.cloudfunctions.net/LatestXKCD
{"title":"Chemist Eggs","url":"https://xkcd.com/2373/",
"published":"Fri, 16 Oct 2020 04:00:00 -0000"}
$ curl -X POST -H "Content-Type: application/json"
--data '{"previous":true}'
https://us-central1-goxkcd.cloudfunctions.net/LatestXKCD
{"title":"Chemist Eggs","url":"https://xkcd.com/2373/",
"published":"Fri, 16 Oct 2020 04:00:00 -0000"}
Here, you send POST requests with the Content-Type header indicating that the request body contains JSON. The first request sends an empty object, so you correctly receive the current XKCD comic title and URL. The second request asks for the previous comic, which the function correctly returns in its response.
Keep in mind that, unlike with AWS, the only security your function’s HTTP endpoint has with the use of the --allow-unauthenticated flag is obscurity, as anyone can send requests to your Google Clouds function. Since you aren’t returning sensitive information, the main risk you face is the potential cost you may incur if you neglect to delete or secure your function after you’re done with it.
Once you’re satisfied that the function works as expected, go ahead and delete it. I’ll sleep better at night if you do. You can remove the function from the command line like this:
$ gcloud functions delete LatestXKCDYou’ll be prompted to confirm the deletion.
Azure Functions
Unlike AWS Lambda and Google Cloud Functions, Microsoft Azure Functions doesn’t offer first-class support for Go. But all is not lost. We can define a custom handler that exposes an HTTP server. Azure Functions will proxy requests and responses between clients and your custom handler’s HTTP server. You can read more details about the Azure Functions custom handlers at https://docs.microsoft.com/en-us/azure/azure-functions/functions-custom-handlers#http-only-function. In addition, your code runs in a Windows environment as opposed to Linux, which is an important distinction when compiling your code for deployment on Azure Functions.
You’ll need a Microsoft Azure account before proceeding. Visit https://azure.microsoft.com to create one.
Installing the Azure Command Line Interface
The Azure CLI has installation packages for Windows, macOS, and several popular Linux distributions. You can find details for your operating system at https://docs.microsoft.com/en-us/cli/azure/install-azure-cli/.
The following commands install the Azure CLI on a Debian-compatible Linux system:
$ curl -sL https://aka.ms/InstallAzureCLIDeb | sudo bash
[sudo] password for user:
export DEBIAN_FRONTEND=noninteractive
apt-get update
--snip--
$ az version
{
  "azure-cli": "2.15.0",
  "azure-cli-core": "2.15.0",
  "azure-cli-telemetry": "1.0.6",
  "extensions": {}
}
The first command downloads the InstallAzureCLIDeb shell script and pipes it to sudo bash. After authenticating, the script installs an Apt repository, updates Apt, and installs the azure-cli package.
Once installed, the az version command displays the current Azure CLI component versions.
Configuring the Azure CLI
Whereas the AWS CLI required you to provide its credentials during configuration, and the Google Cloud SDK opened a web page to authorize itself during configuration, the Azure CLI separates configuration and authentication into separate steps. First, issue the az configure command and follow the instructions for configuring the Azure CLI. Then, run the az login command to authenticate your Azure CLI using your web browser:
$ az configure
Welcome to the Azure CLI! This command will guide you through logging in and
setting some default values.

Your settings can be found at /home/user/.azure/config
Your current configuration is as follows:
--snip--
$ az login
1 You have logged in. Now let us find all the subscriptions to which you have
access...
[
  {
    "cloudName": "AzureCloud",
--snip--
  }
]
The Azure CLI supports several configuration options not covered in the az configure process. You can use the Azure CLI to set these values instead of directly editing the $HOME/.azure/config file. For example, you can disable telemetry by setting the core.collect_telemetry variable to off:
$ az config set core.collect_telemetry=off
Command group 'config' is experimental and not covered by customer support. Please use with discretion.
Installing Azure Functions Core Tools
Unlike the other cloud services covered in this chapter, the Azure CLI tools do not directly support Azure Functions. You need to install another set of tools specific to Azure Functions.
The “Install the Azure Functions Core Tools” section of https://docs.microsoft.com/en-us/azure/azure-functions/functions-run-local/ details the process of installing version 3 of the tools on Windows, macOS, and Linux.
Creating a Custom Handler
You can use the Azure Functions core tools to initialize a new custom handler. Simply run the func init command, setting the --worker-runtime flag to custom:
$ cd azure
$ func init --worker-runtime custom
Writing .gitignore
Writing host.json
Writing local.settings.json
Writing /home/user/dev/gnp/ch14/azure/.vscode/extensions.json
The core tools then create a few project files, the most relevant to us being the host.json file.
You need to complete a few more tasks before you start writing code. First, create a subdirectory named after your desired function name in Azure Functions:
$ mkdir LatestXKCDFunctionThis example names the Azure Function LatestXKCDFunction by creating a subdirectory with the same name. This name will be part of your function’s endpoint URL.
Second, create a file named function.json in the subdirectory with the contents in Listing 14-10.
{
  "bindings": [
    {
      "type": 1"httpTrigger",
      "direction": 2"in",
      "name": "req",
    3 "methods": [ "post" ]
    },
    {
      "type": 4"http",
      "direction": 5"out",
      "name": "res"
    }
  ]
}
Listing 14-10: Binds incoming HTTP trigger and outgoing HTTP (azure/LatestXKCDFunction/function.json)
The Azure Functions Core Tools will use this function.json file to configure Azure Functions to use your custom handler. This JSON instructs Azure Functions to bind an incoming HTTP trigger to your custom handler and expect HTTP output from it. Here, you’re telling Azure Functions that incoming 2POST requests 3 shall trigger 1 your custom handler, and your custom handler returns 4 HTTP responses 5.
Lastly, the generated host.json file needs some tweaking (Listing 14-11).
{
  "version": "2.0",
  "logging": {
    "applicationInsights": {
      "samplingSettings": {
        "isEnabled": true,
        "excludedTypes": "Request"
      }
    }
  },
  "extensionBundle": {
    "id": "Microsoft.Azure.Functions.ExtensionBundle",
    "version": "[1.*, 2.0.0)"
  },
  "customHandler": {
  1 "enableForwardingHttpRequest": true,
    "description": {
      "defaultExecutablePath": 2"xkcd.exe",
      "workingDirectory": "",
      "arguments": []
    }
  }
}
Listing 14-11: Tweaking the host.json file (azure/host.json)
Make sure to enable the forwarding of HTTP requests from Azure Functions to your custom handler 1. This instructs Azure Functions to act as a proxy between clients and your custom handler. Also, set the default executable path to the name of your Go binary 2. Since your code will run on Windows, make sure to include the .exe file extension.
Defining a Custom Handler
Your custom handler needs to instantiate its own HTTP server, but you can leverage code you’ve already written for Google Cloud Functions. Listing 14-12 is the entire custom handler implementation.
package main

import (
    "log"
    "net/http"
    "os"
    "time"

    "github.com/awoodbeck/gnp/ch14/gcp"
)

func main() {
    port, exists := 1os.LookupEnv("FUNCTIONS_CUSTOMHANDLER_PORT")
    if !exists {
        log.Fatal("FUNCTIONS_CUSTOMHANDLER_PORT environment variable not set")
    }

    srv := &http.Server{
        Addr:              ":" + port,
        Handler:           http.HandlerFunc(2gcp.LatestXKCD),
        IdleTimeout:       time.Minute,
        ReadHeaderTimeout: 30 * time.Second,
    }

    log.Printf("Listening on %q ...
", srv.Addr)
    log.Fatal(srv.ListenAndServe())
}
Listing 14-12: Using the Google Cloud Functions code to handle requests (azure/xkcd.go)
Azure Functions expects your HTTP server to listen to the port number it assigns to the FUNCTIONS_CUSTOMHANDLER_PORT environment variable 1. Since the LatestXKCD function you wrote for Cloud Functions can be cast as an http.HandlerFunc, you can save a bunch of keystrokes by importing its module and using the function as your HTTP server’s handler 2.
Locally Testing the Custom Handler
The Azure Functions Core Tools allow you to locally test your code before deployment. Let’s walk through the process of building and running the Azure Functions code on your computer. First, change into the directory with your Azure Functions code:
$ cd azureNext, build your code, making sure that the resulting binary name matches the one you defined in your host file—xkcd.exe, in this example:
azure$ go build -o xkcd.exe xkcd.goSince your code will run locally, you do not need to explicitly compile your binary for Windows.
Finally, run func start, which will read the host.json file and execute the xkcd.exe binary:
azure$ func start
Azure Functions Core Tools (3.0.2931 Commit hash:
d552c6741a37422684f0efab41d541ebad2b2bd2)
Function Runtime Version: 3.0.14492.0
[2020-10-18T16:07:21.857] Worker process started and initialized.
[2020-10-18T16:07:21.915] 2020/10/18 12:07:21 Listening on 1":44687" ...
[2020-10-18T16:07:21.915] 2020/10/18 12:07:21 decoding request: EOF
Hosting environment: Production
Content root path: /home/user/dev/gnp/ch14/azure
Now listening on: 2http://0.0.0.0:7071
Application started. Press Ctrl+C to shut down.

Functions:

    LatestXKCDFunction: [POST] 3http://localhost:7071/api/LatestXKCDFunction

For detailed output, run func with –verbose flag.
Here, the Azure Functions code set the FUNCTIONS_CUSTOMHANDLER_PORT environment variable to 44687 1 before executing the xkcd.exe binary. Azure Functions also exposes an HTTP endpoint on port 7071 2. Any requests sent to the LatestXKCDFunction endpoint 3 are forwarded onto the xkcd.exe HTTP server, and responses are forwarded to the client.
Now that the LatestXKCDFunction endpoint is active, you can send HTTP requests to it as you did with your Google Cloud Functions code:
$ curl -X POST -H "Content-Type: application/json" --data '{}'
http://localhost:7071/api/LatestXKCDFunction
{"title":"Chemist Eggs","url":"https://xkcd.com/2373/",
"published":"Fri, 16 Oct 2020 04:00:00 -0000"}
$ curl -X POST -H "Content-Type: application/json" –data
'{"previous":true}' http://localhost:7071/api/LatestXKCDFunction
{"title":"Dialect Quiz","url":"https://xkcd.com/2372/",
"published":"Wed, 14 Oct 2020 04:00:00 -0000"}
As with Google Cloud, sending a POST request with empty JSON in the request body causes the custom handler to return the current XKCD comic title and URL. Requesting the previous comic accurately returns the previous comic’s title and URL.
Deploying the Custom Handler
Since you’re using a custom handler, the deployment process is slightly more complicated than that for Lambda or Cloud Functions. This section walks you through the steps on Linux. You can find the entire process detailed at https://docs.microsoft.com/en-us/azure/azure-functions/functions-create-first-azure-function-azure-cli/.
Start by issuing the az login command to make sure your Azure CLI’s authorization is current:
$ az login
You have logged in.
Next, create a resource group and specify the location you’d like to use. You can get a list of locations using az account list-locations. This example uses NetworkProgrammingWithGo for the resource group name and eastus for the location:
$ az group create --name NetworkProgrammingWithGo --location eastus
{
  "id": "/subscriptions/--snip--/resourceGroups/NetworkProgrammingWithGo",
  "location": "eastus",
  "managedBy": null,
  "name": "NetworkProgrammingWithGo",
  "properties": {
    "provisioningState": "Succeeded"
  },
  "tags": null,
  "type": "Microsoft.Resources/resourceGroups"
}
Then, create a unique storage account, specifying its name, location, the resource group name you just created, and the Standard_LRS SKU:
$ az storage account create --name npwgstorage --location eastus
--resource-group NetworkProgrammingWithGo --sku Standard_LRS
 - Finished ..
--snip--
Finally, create a function application with a unique name, making sure to specify you’re using Functions 3.0 and a custom runtime:
$ az functionapp create --resource-group NetworkProgrammingWithGo
--consumption-plan-location eastus --runtime custom
--functions-version 3 --storage-account npwgstorage --name latestxkcd
Application Insights "latestxkcd" was created for this Function App.
--snip--
At this point, you’re ready to compile your code and deploy it. Since your code will run on Windows, it’s necessary to build your binary for Windows. Then, publish your custom handler.
$ cd azure
azure$ GOOS=windows go build -o xkcd.exe xkcd.go
azure$ func azure functionapp publish latestxkcd --no-build
Getting site publishing info...
Creating archive for current directory…
Skipping build event for functions project (--no-build).
Uploading 6.12 MB [##########################################################]
Upload completed successfully.
Deployment completed successfully.
Syncing triggers...
Functions in latestxkcd:
    LatestXKCDFunction - [httpTrigger]
        Invoke url: 1https://latestxkcd.azurewebsites.net/api/latestxkcdfunction
Once the code is deployed, you can send POST requests to your custom handler’s URL 1. The actual URL is a bit longer than this one, and it includes URI parameters relevant to Azure Functions. I’ve snipped it for brevity.
Testing the Custom Handler
Assuming you’re using your custom handler’s full URL, it should return results like those seen here:
$ curl -X POST -H "Content-Type: application/json" --data '{}'
https://latestxkcd.azurewebsites.net/api/latestxkcdfunction?--snip--
{"title":"Chemist Eggs","url":"https://xkcd.com/2373/",
"published":"Fri, 16 Oct 2020 04:00:00 -0000"}
$ curl -X POST -H "Content-Type: application/json"
--data '{"previous":true}'
https://latestxkcd.azurewebsites.net/api/latestxkcdfunction?--snip--
{"title":"Chemist Eggs","url":"https://xkcd.com/2373/",
"published":"Fri, 16 Oct 2020 04:00:00 -0000"}
Use curl to query your Azure Functions custom handler. As expected, empty JSON results in the current XKCD comic’s title and URL, whereas a request for the previous comic properly returns the previous comic’s details.
What You’ve Learned
When you use cloud offerings, you can focus on application development and avoid the costs of acquiring a server infrastructure, software licensing, and the human resources required to maintain it all. This chapter explored Amazon Web Services, Google Cloud, and Microsoft Azure, all of which offer comprehensive solutions that allow you to scale your business and pay as you go. We used AWS Lambda, Google Cloud Functions, and Microsoft Azure Functions, which are all PaaS offerings that allow you to deploy an application while letting the platform handle the implementation details.
As you saw, developing and deploying an application on the three cloud environments follow the same general process. First, you install the platform’s command line tools. Next, you authorize the command line tools to act on behalf of your account. You then develop your application for the target platform and deploy it. Finally, you make sure your application works as expected.
Both AWS Lambda and Cloud Functions have first-class support for Go, making the development and deployment workflow easy. Although Azure Functions doesn’t explicitly support Go, you can write a custom handler to use with the service. But despite the small variations in the development, deployment, and testing workflows, all three cloud platforms can generate the same result. Which one you should use comes down to your use case and budget.