
A fundamental part of the Express framework is its use of views. A view is simply a file that holds template code. Express helps us to separate our code into operationally distinct concerns. We have server code in app.js, route-specific functionality in routes/index.js, and then we have our output generating logic in the views folder. A template language provides a basis for defining dynamic logic-driven content, and the template (or view) engine converts our logic into the final HTML which is served to the user. In this recipe, we'll use Express' default view engine, Jade, to process and present some data.
Note
In the There's more... section, we'll find out how to change the view engine.
A list of supported template engines can be found at https://www.github.com/visionmedia/express/wiki. Comparisons of various template engines can be found at http://paularmstrong.github.com/node-templates/.
For our data, we'll be using the profiles.js object we created back in the first recipe ofChapter 3, Working with Data Serialization. We'll need to copy it into the root of our nca folder.
Let's keep it simple and strip any routes we've added to app.js. We just want our top-level route.
Since Jade is set as the default view engine in app.configure, there's nothing else we need to do with app.js in this example.
In routes/index.js, we'll strip all routes except for index.
exports.index = function(req, res){
  res.render('index', { title: 'Express'})
};
The res.render method loads the Jade template in views/index.jade. We're going to use index.jade as a view for our profiles.js object data, so we need to make it available to our index view.
We do this by passing it through the options object of res.render:
var profiles = require('../profiles.js'),
exports.index = function(req, res){
  res.render('index', { title: 'Profiles', profiles: profiles})
};
Notice we also changed the title property to'Profiles'.
All we do now is edit views/index.jade. The generated index.jade contains the following:
h1= title
p Welcome to #{title}
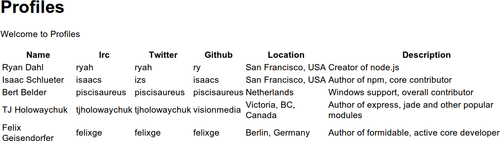
We're going to add a table to the page that outputs the details of each person in the profiles.js object:
table#profiles
  tr
    th Name
    th Irc
    th Twitter
    th Github
    th Location
    th Description
      each profile, id in profiles
        tr(id=id)
          each val in profile
            td #{val}
To test we start our app:
node app.js
And then navigate to http://localhost:3000 to see something like the following:
res.render pulls index.jade from the views folder, even though the first parameter is simply index. Express knows that a Jade file inside the views directory is intended because app.configure of app.js contains the following code:
  app.set('views', __dirname + '/views'),
  app.set('view engine', 'jade'),
The second parameter is an object, holding two properties: title and profiles. These object properties become local variables within the Jade view. We output the variables either by return value buffering with a preceding equals (=) sign, or by using Jade's interpolation, wrapping it like so: #{title}.
Jade is a lean templating language. It uses bracket-stripped markup tags and has an indentation-based syntax with an alternative block expansion option (where we use the colon instead of an indent to signify nesting). It also has a minimal syntax set for defining id and class attributes using the hash (#) and dot (.) respectively.
For instance, the following Jade:
table#profiles
  th Name
Would create the following HTML:
<table id=profiles><th>Name</th></table>
Tip
To learn more about the Jade language, check out its GitHub page: https://www.github.com/visionmedia/jade.
Jade also processes iteration logic. We used two each Jade iterators to pull the values from our profiles object as follows:
  each profile, id in profiles
    tr(id=id)
      each val in profile
        td #{val}
This code traverses the profiles object, loading each ID (ryan, isaac, bert, and so on) into a new id variable, and each object containing profile information into a profile object variable.
Underneath our first each, we indent tr(id=id). Unlike JavaScript, indentation in Jade is part of the logic, so getting it right is essential.
This tells Jade that for each profile we want to output a<tr> tag with the id attribute set to the ID of the profile. We don't use the hash (#) shorthand to set the id attribute in this case since we need Jade to evaluate our id variable. tr#id would generate<tr id=id> for each profile, whereas tr(id=id) generates<tr id=ryan> or isaac, or bert and so forth.
Underneath tr we indent again, indicating that whatever comes next should be nested within the<tr> tags. Again we use each to traverse the values of each sub-object, indenting beneath with a td that holds each value of the profile.
Let's take a look at some of the other templating capabilities and features Express has to offer.
Express supports a variety of alternative template engines, unsupported engines can be adapted to Express without excessive hassle.
The express executable will only generate Jade or EJS-based project scaffolding. To generate EJS we simply pass ejs to the -t flag:
express -t ejs nca
Instead of generating an Express project with EJS as the default view engine, let's convert our existing project (we'll start by copying it to nca_ejs).
First, we need to edit dependencies in package.json:
{
    "name": "application-name"
  , "version": "0.0.1"
  , "private": true
  , "dependencies": {
      "express": "2.5.8"
    , "ejs": "0.7.1"
  }
}
We've simply removed jade and put ejs in its place. Now we do:
npm install
So npm will put the EJS module into the node_modules folder.
Finally, we change our view engine in app.configure as follows:
app.configure(function(){
  app.set('views', __dirname + '/views'),
  app.set('view engine', 'ejs'),
  app.use(express.bodyParser());
  app.use(express.methodOverride());
  app.use(app.router);
});
This technique will work for any Express-supported template engine. There's no need to require the EJS module, Express takes care of that behind the scenes.
Since we've set up nca_ejs, we may as well go ahead and rewrite our index view in Embedded JavaScript.
In nca_ejs/views we add a new file, index.ejs, and put:
<h1> <%= title %></h1>
<p> Welcome to <%= title %></p>

<table>
<tr><th>Name</th><th>Irc</th><th>Twitter</th>
<th>Github</th><th>Location</th><th>Description</th></tr>

<% Object.keys(profiles).forEach(function (id) {%>
  <tr>
   <% Object.keys(profiles[id]).forEach(function (val) { %>
   <td><%= profiles[id][val]; %></td>
   <% }); %>

  </tr>
<% }); %>
</table>
<% and %> denote embedded JavaScript. If JavaScript happens to wrap any HTML code, the HTML is processed as if it's part of the JavaScript. For instance, in our forEach callbacks we have<tr> and<td>, these are included as output from each loop.
When the opening tag is accompanied by an equals sign (<%=), it evaluates any given JavaScript variable and pulls it into the generated output. For example, in our first<h1> we output the title variable.
Jade can also process plain JavaScript. Let's use that to our advantage to output our table headers in a more concise, dry fashion:
- var headers = ['Name', 'Irc', 'Twitter', 'Github', 'Location', 'Description'];
table#profiles
  tr
    each header in headers
      th= header
    each profile, id in profiles
      tr(id=id)
        each val in profile
          td #{val}
A dash (—) at the beginning of a line informs Jade that we're using plain JavaScript. Here we simply create a new array called headers and then use Jade's each iterator to output our headers, using the equals (=) sign to evaluate the header variable.
We could alternatively create our array in Jade as follows:
headers = ['Name', 'Irc', 'Twitter', 'Github', 'Location', 'Description'];
Jade then compiles this to the embedded JavaScript in the preceding example, including the var declarative.
Partials are described as mini-views or document-fragments. They are mainly intended for automatic templated iteration over an array (a collection), although they'll also work with objects.
For instance, instead of saying:
tr(id=id)
  each val in profile
    td #{val}
We can create a view file, which we'll call row.jade, in which we write:
td= row
Back in index.jade, we replace our each iterator with partial as follows:
    each profile, id in profiles
      tr(id=id)
        != partial('row', {collection: profile})
!= tells Jade to not only buffer what partial returns, but also to refrain from escaping the returned HTML. If we don't include the exclamation mark Jade replaces HTML characters with their special entity codes, (for example,< becomes<).
We pass'row' into partial which tells Jade to use the row.jade view as the partial. We pass an object with a collection property as the next parameter. If our profile was a simple array, we could simply pass the array and Jade would generate a td tag for each value in the array. However, the profile variables are objects, so passing it to collection causes Jade to traverse the values as if they were a simple array.
Each value in our collection (Ryan Dahl, ryah, Creator of Node.js, and so on), is referenced by the name of the view. So in our row.jade view, we use the row variable to grab each value. We can customize it by using the as property as follows:
!= partial('row', {collection: profile, as: 'line'})
Then in row.jade we would change row to line:
td= line
Tip
Express 2 to Express 3
In an effort to simplify viewing system internals and make it easier for template engines to integrate with Express, version 3 will no longer support partials. In Express 3, instead of a row.jade file, and using the call to partial, we could instead say:
    each profile, id in profiles
      tr(id=id)
       each row in profile
        td= row
One of the excellent things about partials is we can use them in our Express routes on the response (res) object. This is particularly remarkable because it allows us to seamlessly send fragments of HTML to AJAX or WebSocket requests, all while generating content from the same fragments (inside our views) for whole-page requests.
At the end of index.jade (the partials version), we'll insert a small proof of concept script:
script(src='http://ajax.googleapis.com/ajax/libs/jquery/1.7.1/jquery.min.js')
script
  setTimeout(function () {
    $.get('/', function (row) {
      $('#profiles tbody').append(row);
    });
  }, 1500);
This will wait for one and a half seconds and then make an AJAX request to our index route. So let's modify our index route in routes/index.js:
var profiles = require('../profiles.js'),

exports.index = function(req, res){
  if (req.xhr) {
    res.partial('row', {collection: profiles.ryan});
  }
  res.render('index', { title: 'Profiles', profiles: profiles});
};
If the request is an XmlHttpRequest (AJAX), we generate a new table row out of the ryan profile.
Now when we load http://localhost:3000, after a short delay Ryan's profile appears at the bottom of the table.
Tip
Express 2 to Express 3
Express 3 doesn't support partials, (neither in template logic nor in app code), so we would have to approach this a different way. For instance, we could send a JSON representation of the profiles and have the browser loop through it to populate the table.
As of this time of writing, there is no replacement middleware for partials, but there may well be in the near future.
Includes help us to separate and re-use pieces of template code. Let's put our profiles table into its own view. We'll call it profiles.jade.
To include profiles.jade from the index.jade file we simply do the following:
h1= title
p Welcome to #{title}

include profiles
Tip
Express 2 to Express 3
Layouts are also being axed from Express 3 in favor of block inheritance. So instead of any rendered views being implicitly wrapped up into the body variable and rendered within layout.jade, we now have to explicitly declare a block and then insert that block into our body.
Also included in a generated project is the layout.jade view. This is a special view that is intertwined with Express logic. Any rendered views are packaged into a body variable, which is then passed into layout.jade. So in our case, we tell res.render to assemble index.jade. Express converts index.jade to HTML, and then internally renders layout.jade, passing the generated HTML in a body variable. layout.jade allows us to head and foot our views. To disable this feature for the entire app, we use app.set('view options', {layout:false}). To prevent it from applying to a particular render, we simply pass layout:false to the options object of res.render.
Tip
Express 2 to Express 3
So in layout.jade, instead of body!=body we have the following:
body
block content
And at the top of index.jade we would inherit from layout.jade using extend and then define the content block, which would be loaded into the body of layout.jade:
extends layout
block content
  h1= title
  p Welcome to #{title}
//- the rest of our template...