
Chapter 5: Top 5 Developer-friendly Node.js API Frameworks
by Michael Wanyoike
In the past, we used to build monolithic applications that handled views, business logic and data management in one single codebase. This architecture created a number of problems that affected an application’s stability, performance and maintainability.
Nowadays, many web applications favor a more modular approach. This typically involves creating a public-facing API that exposes endpoints for interacting with an application’s data. In this guide, we’ll take a quick look what an API is, as well as five developer-friendly frameworks we can use to build them in Node.js.
What is an API?
In simple English, an API (short for Application Programming Interface) is a server application that responds to requests from client applications such as browsers and mobile apps. If you’ve had to fetch data from another source on the Internet (such as Twitter or GitHub), chances are you’ve used one already.
One big advantage of this approach is you build your back-end server API once, then you can connect it to different types of client interfaces—such as desktop, web, mobile or console apps. Having an API ensures data is consistent in all the front-facing apps that have been built for an organization.
An API provides important back-end functions such as:
- CRUD operations
- data validation and transformation
- authentication
- access control
- business logic
- transactional email
- task scheduling
- event handling
Building an API server in Node is quite simple. If you need to set one up quickly to test your front-end code, you can install JSON server to quickly prototype your back end. If you’ve started building your own API and you don’t have a front end yet, you can use the following tools to test your endpoints:
These tools allow you to perform both REST and GraphQL queries. We’ll get into them some more later on.
To build your own API, you’ll need a framework that will provide you with the necessary libraries and tools to create your back-end server. I’ve ordered the following list based on how user-friendly the framework is. The last one is the least technical to use.
1. Express
If you’re a Node.js beginner, this is the framework you should start with. You can install Express as a package dependency with the command npm install express. Alternatively, you can use the express-generator command-line tool to quickly spin up a starter Express project. We also have a tutorial on using this library.
Let’s look at what a simple REST API for managing users might look like in Express.
First, create a new project then install Express:
mkdir express-api
cd express-api
npm init -y
npm i express
Next, create an server.js file and add the following content:
let data = [
  { id: 1, firstName: 'Michael', lastName: 'Wanyoike' },
  { id: 2, firstName: 'James', lastName: 'Hibbard' },
];

const express = require('express');
const bodyParser = require('body-parser');
const app = express().use(bodyParser.json());

// GET all users
app.get('/users', (req, res) => { res.json(data); });

// GET a user
app.get('/users/:id', (req, res) => {
  const id = Number(req.params.id);
  const user = data.find(user => user.id === id);
  res.json(user ? user : { message: 'Not found' });
});

// ADD a user
app.post('/users', (req, res) => {
  const user = req.body;
  data.push(user);
  res.json(data);
});

// UPDATE a user
app.put('/users/:id', (req, res) => {
  const id = Number(req.params.id);
  const updatedUser = req.body;
  data = data.map(user => user.id === id ? updatedUser : user);
  res.json(data);
});

// DELETE a user
app.delete('/users/:id', (req, res) => {
  const id = Number(req.params.id);
  data = data.filter(user => user.id !== id);
  res.json(data);
});

app.listen(3000, () => { console.log('Server listening at port 3000'); });
Save this code, then start the server using node server.js. It’s now running on http://localhost:3000.
Interacting with the API Using Postman
We can test that our API does what it should using Postman, an API testing environment. Download the correct version for your system, then follow the instructions to get it installed.
We can start by sending a GET request to http://localhost:3000/users to list all of our users.
You should see the following response:
[
  {
    "id": 1,
    "firstName": "Michael",
    "lastName": "Wanyoike"
  },
  {
    "id": 2,
    "firstName": "James",
    "lastName": "Hibbard"
  }
]

After that, feel free to experiment. For example, if you want to create a user, send a POST request to http://localhost:3000/users, along with a JSON payload containing the user’s details. You can do this by clicking the Body tab, then selecting the raw radio button and JSON from the dropdown.
If you’d like a more in-depth tutorial on using Postman to interact with an API, I recommend Making API Requests with Postman or cURL.
Taking it Further
With Express, you can connect to any database by installing an adapter that will allow you to connect and execute queries. You can also write middleware functions to handle tasks such as routing, logging and error handling.
Unfortunately, it lacks built-in support for authentication and authorization. You’ll have to implement that yourself using third-party libraries such as Passport. Personally, I’m not a big fan of Express since it involves writing a lot of repetitive code when defining CRUD API routes for each database table.
Express Links
Before we move on, here are similar frameworks that are based on or influenced by Express:
2. Fastify

Fastify is a Node.js framework inspired by Hapi and Express. It’s designed to handle high numbers of requests as fast as possible. According to their synthetic benchmarks, Fastify is twice as fast as Express:
| Framework | Version | Router? | Requests/sec |
|---|---|---|---|
| hapi | 18.1.0 | ✓ | 29,998 |
| Express | 4.16.4 | ✓ | 38,510 |
| Restify | 8.0.0 | ✓ | 39,331 |
| Koa | 2.7.0 | ✗ | 50,933 |
| Fastify | 2.0.0 | ✓ | 76,835 |
| - | |||
http.Server |
10.15.2 | ✗ | 71,768 |
To get started, you can install it as a package dependency in your project. Simply execute the following commands:
mkdir fastify-app
cd fastify-app
npm init -y
npm install fastify
touch server.js
Copy the following code to server.js:
const fastify = require('fastify')({ logger: true })

fastify.route({
  method: 'GET',
  url: '/',
  schema: {
    // request needs to have a query string with a `name` parameter
    querystring: {
      name: { type: 'string' }
    },
    // the response needs to be an object with a `hello` property of type 'string'
    response: {
      200: {
        type: 'object',
        properties: {
          hello: { type: 'string' }
        }
      }
    }
  },
  // this function is executed for every request before the handler is executed
  preHandler: async (request, reply) => {
    // E.g. check authentication
  },
  handler: async (request, reply) => {
    return { hello: 'world' }
  }
})

const start = async () => {
  try {
    await fastify.listen(3000)
    fastify.log.info(`server listening on ${fastify.server.address().port}`)
  } catch (err) {
    fastify.log.error(err)
    process.exit(1)
  }
}
start()
To start and test the server, you can do as follows:
$ node server.js
{"level":30,"time":1579520918815,"pid":23484,"hostname":"linux-msi","msg":"Server listening at http://127.0.0.1:3000","v":1}
{"level":30,"time":1579520918815,"pid":23484,"hostname":"linux-msi","msg":"server listening on 3000","v":1}

# Run the following command in a separate terminal
$ curl http://localhost:3000
{"hello":"world"}
This is a slightly advanced example where we highlight Fastify’s feature of defining JSON schemas to validate requests and responses. Something else you may have noted is that Fastify code is able to handle JSON data out of the box. In addition to better performance, Fastify offers developers new features such as expressive coding style, hooks and decorators. Let’s break down what these features mean.
Expressive style
In Fastify, you write less code than you normally would in Express. For example, in Express you need to import an additional package to handle JSON requests and responses. In Fastify, you simply work with object literals and the JSON part is handled automatically by the framework.
Hooks
Hooks are special functions that are triggered by events. They allow you to interact with Fastify’s life cycle, which includes:
- onRequest
- preParsing
- preValidation
- preHandler
- preSerialization
- onError
- onSend
- onResponse
Hooks allow you to perform functions such as transforming data, performing validation or handling errors. You can read more about hooks in the Fastify documentation.
Decorators
Decorators is a feature that allows you to add functionality and new properties to a Fastify instance. You can read more about decorators in the Fastify documentation.
Fastify also has an extensive ecosystem of plugins. These plugins allow you to connect to a specific database system, perform authentication and access third-party services such as Google Cloud Storage. About half are official plugins while the rest have been created by the community.
Fastify Links
3. FeathersJS
If you detest writing repetitive code when building API routes, then Feathers could be the framework for you. Feathers is like Express on steroids. With simple commands, you can perform the following operations without writing a single line of code:
- generate an API project
- connect to any database
- create CRUD API endpoints
- set up authentication
- define tests
Both Express and Fastify are light-weight frameworks that allow you to work on simple projects. Feathers is a heavy-weight framework that allows you to easily build a database-driven API server using its command-line tools. Its code is organized into various types of files:
- Config: database configuration for production, development and testing.
- Models: schema for a specific database table/collection.
- Services: API function routes can be overridden here, or new ones can be added.
- Hooks: perform tasks based on an event life cyle method—such as
beforeCreate,afterCreatebeforeUpdate,afterUpdate. Useful for transforming data or restricting access to fields such as passwords.
Out of the box, Feathers supports real-time communication via Socket.io. This means you can build an interface using any front-end JavaScript framework that displays results in real time using Feathers as a back-end. It would be ideally suited to applications such as chats or trading platforms that require real-time capability.
Feathers also features a huge ecosystem of plugins allowing you to implement many extra features in your project. One of my favorite plugins is feathers-seeder, which fills your database with relevant data. This is a very useful feature when developing front-end code, ensuring that data is displayed correctly and can be paginated.
While it’s possible to install Feathers into a project as a dependency, it’s easier to use the command-line tool to build an API project for you. Here are a few instructions to get you started:
# Install Feathers CLI
npm install -g @feathersjs/cli

# Create a directory for your project
mkdir contacts-api && cd contacts-api

# Generate Feathers Project (you'll need to answer some basic questions)
feathers generate app

# Create Service (choose NeDB for local database, contacts for service, /contacts for API route)
feathers generate service

# Start the API server
npm start
If you follow the above commands, you’ll have created a database-driven API in just a few clicks. The server should be accessible on localhost:3030. However, you’ll need to use Postman or Insomnia to interact with the REST API you created like this:
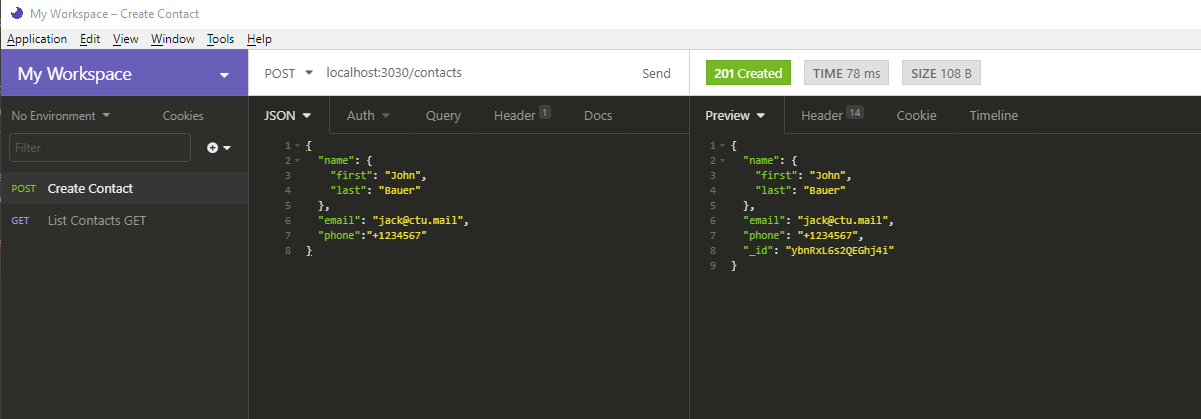
If you’d like to learn more, start with this guide to Feathers, which will teach you how to set up a secure, database-driven API. Next, check out this tutorial to learn how to connect a React front end with a Feathers back end.
Feathers Links
4. KeystoneJS

KeystoneJS takes the ease of building APIs to another level. Straight out of the box, you get first-class GraphQL support, an extensible architecture and admin user interface for populating your database. Unfortunately, it only supports Mongo and PostgreSQL database, so you’ll need to install either before you start a KeystoneJS project. Other than that limitation, Keystone comes with a lot of built-in and very useful features such as:
- authentication
- access Control
- email support
- hooks
- advanced Field Types
- and more …
KeystoneJS is built on top of Express and the Mongoose ODM. Creating a KeystoneJS project can be done using the following commands:
npm init keystone-app my-app

✔ What is your project name? … keystone-app
✔ Select a starter project › Todo
✔ Select an adapter › Mongoose
In the above example, we’ve created a simple database-driven API with a Todo endpoint. We’ve configured the project to use Mongo and you can start it up with the following commands:
# Make sure Mongo is running
sudo service mongod start

# Start your Keystone project
cd my-app
npm run dev

ℹ Command: keystone dev
✔ Validated project entry file ./index.js
✔ Keystone server listening on port 3000
✔ Initialised Keystone instance
✔ Connected to database
✔ Keystone instance is ready at http://localhost:3000 ?
? Keystone Admin UI:  http://localhost:3000/admin
? GraphQL Playground: http://localhost:3000/admin/graphiql
? GraphQL API:    http://localhost:3000/admin/api
Next, you can visit http://localhost:3000/admin, where you can use the UI to create new Todos. You can also go to the GraphQL API, http://localhost:3000/admin/api, and perform some queries. For example, to list all todos, you can use this query:
query {
  allTodos {
    id
    name
  }
}
When you press the play button, it should display the results:
{
  "data": {
    "allTodos": [
      {
        "id": "5e257020db53a03f48782463",
        "name": "Write Articles"
      },
      {
        "id": "5e257033db53a03f48782464",
        "name": "Eat lunch"
      }
    ]
  }
}
The main advantage of GraphQL over REST is that you can easily extract any data you need without defining a new API route. In a REST API, if you wanted to access records that were linked to other records via a relationship key, the back-end developer would need to create a new API endpoint that can handle the join operation. With GraphQL, such queries are defined on the front-end app. This frees up the back-end developer from having to add more API endpoints, which may become harder to maintain over time.
If you’re new to GraphQL, you should check out our tutorials. To quickly confirm that your todos have been saved into your Mongo database, just execute the following:
# Open mongo client shell
mongo

# List all databases
show databases

# Switch to database
use keystone-app

# Display todos
db.todos.find()

{ "_id" : ObjectId("5e257020db53a03f48782463"), "name" : "Write Articles", "__v" : 0 }
{ "_id" : ObjectId("5e257033db53a03f48782464"), "name" : "Eat lunch", "__v" : 0 }
Keystone Links
5. Strapi

Strapi is by far the most powerful framework in the Node.js ecosystem, and you can use it to build a REST API with the least effort of all frameworks listed. Strapi is based on Koa, a web framework designed by the team behind Express. Koa is described as a more modern, modular and light-weight version of the Express framework. Earlier benchmarks I showed indicate that Koa has significantly better performance than Express.
With Strapi, you’re presented with a well-designed web user interface that allows you to:
- connect to any database
- set up as many collections (tables) and complex relations as you like
- define field validation rules
- set up different types of authentication methods (email, GitHub, Facebook etc.)
- implement role-based access control
All this is done without hand coding anything. Strapi is mostly known as an open-source, headless CMS, and is built to favor non-technical users who are most likely going to be your project’s end users.
The primary advantage of Strapi is that end users can alter their API without involving developers. They also get an admin dashboard at an early stage in the project to upload and modify back-end data. This saves developers from creating the back-end user interface in the first place. If there’s a specific function that Strapi can’t provide, it can normally be easily implemented via plugins found in their marketplace. In addition, you may find that other front-end frameworks have support for Strapi through their own plugins. For example, you can use gatsby-source-plugin to connect Gatsby to a Strapi back end.
At the time of writing, Strapi is currently in beta. Depending on your internet speed and machine specs, the installation process can take upwards of ten minutes. My recommendation is to install and use Yarn, since it’s a bit faster. Hopefully, future versions will take a shorter time to set up. To start using Strapi right away, just execute the following commands:
# create a new strapi project based on quickstart template
yarn create strapi-app strapi-project --quickstart

# Start strapi server
yarn develop

yarn run v1.21.1

Project information

┌────────────────────┬──────────────────────────────────────────────────┐
│ Time               │ Mon Jan 20 2020 17:10:48 GMT+0300 (East Africa … │
│ Launched in        │ 7866 ms                                          │
│ Environment        │ development                                      │
│ Process PID        │ 25635                                            │
│ Version            │ 3.0.0-beta.18.4 (node v12.13.0)                  │
└────────────────────┴──────────────────────────────────────────────────┘

Actions available

Welcome back!
To manage your project ?, go to the administration panel at:
http://localhost:1337/admin

To access the server ⚡️, go to:
http://localhost:1337
Once the Strapi server has initialized, you can visit http://localhost:1337/admin to access the admin dashboard. First, you’ll need to create an admin account. Then you’ll be able to log in and start creating models. Once you save all the changes, Strapi should restart automatically in order to write code to its project folder. Next, click on your newly created Content Type to start inputting data. Finally, click on Roles & Permissions to set an appropriate access level for unauthenticated users. You can now use Postman or Insomnia to interact with your API, or consume it from a front-end app.
Strapi has been making great progress of late. The maintainers managed to raise $4 million in seed funding that’s being used to scale the team, ready the product for stable release and implement the most requested features proposed by its community. This means that it is safe for companies to invest time using the product to build their content management systems.
Strapi Links
Summary
And there you have it. These are my top five developer-friendly Node.js frameworks that you can use to build your API in 2020.
So which should you use? Well, if you’re a beginner, it’s best to start with Express or Fastify. If you’re already comfortable with Express, you should dive into Feathers, as it can help you avoid writing repetitive code by scaffolding your API project using command-line tools. If GraphQL is important to you, KeystoneJS will help you set up an API effortlessly (although all frameworks I’ve mentioned here are capable of providing a GraphQL interface via extensions). My favorite platform for building an API is Strapi, as it provides a friendly user interface to define your API structure and manage data. I also like the fact that user authentication and access control is built in, meaning I don’t have to code anything.
I hope this guide will help you make an informed choice on which framework to use for your next project.