
IN THIS CHAPTER:
Planning and then actually getting up in front of a group of people to give a presentation can be nerve wracking for even the most seasoned presenter. OpenOffice.org provides Impress, a presentation application that makes it easy for you to create a presentation that provides both insight and impact in relation to any subject matter.
In this chapter we take a look at how to create a presentation using Impress. We begin with a look at the options for creating a new presentation and then concentrate on the various aspects of creating presentation slides including the insertion of text and graphics.
OpenOffice.org Impress provides all the tools that you need to create both simple and complex presentations. You can create simple text slides and then add animation effects and slide transitions. You can even add multimedia content such as sound and other media objects to your slides to create full-blown multimedia presentations.
The Impress application window provides the same overall layout as the other OpenOffice.org applications such as Writer and Calc. You have the Function bar, Object bar, and Main toolbar, which give you access to most of the tools that you need to create your presentations. Impress also provides additional toolbars such as the Presentation toolbar, which makes it easy for you to quickly insert a new slide or change the slide design or layout.
The Impress application window provides the workspace and toolbars embraced by the other OpenOffice.org applications.
Impress also provides different options for the output of your presentations. Although most of us think of these types of presentations being shown primarily on a computer (or video projection system), Impress also makes it easy for you to design your presentations for other types of outputs such as overheads, papers, and actual 35mm slides.
Impress provides a fairly slide-centric approach to creating your presentation; in the default Drawing view you are able to concentrate on each slide as you add text and other objects to the slide. Then slide transitions and animation effects can be added on a slide-by-slide basis. However, you can also use different workspace views, such as the Outline view and the Slides view, which allow you to easily move content from slide to slide or rearrange the slides in the presentation, respectively.
Impress provides the AutoPilot Presentation Wizard, which walks you through the process of creating a new presentation. The wizard allows you to select a background for the slides in the presentation and quickly add a standard slide transition for the slides in the presentation.
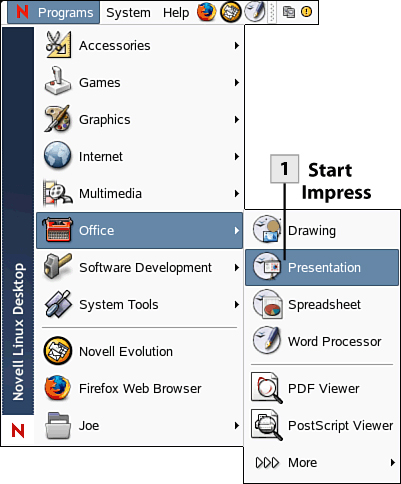
![]() Start Impress
Start Impress
Select the Programs, Office, Presentation. The AutoPilot Presentation Wizard opens.
Tip
If you don’t want the AutoPilot Presentation Wizard to appear each time you start Impress, select the Do Not Show This Dialog Again check box on the first wizard screen. When you open Impress in the future, you are taken directly to the Impress workspace and a new blank slide opens. You can then open existing presentations as needed. If you do want to use the AutoPilot to create a new presentation, select File, AutoPilot, Presentation.
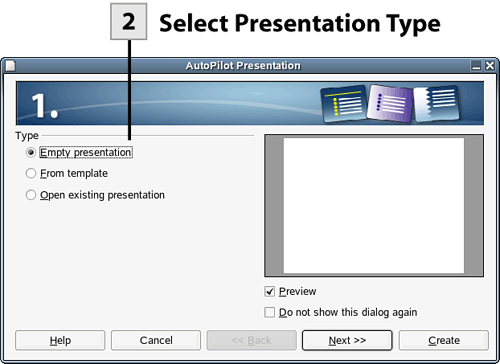

![]() Select Presentation Type
Select Presentation Type
On the first wizard screen select a new presentation type such as Empty Presentation or From Template. If you select From Template a list of templates appears. Select a template from the drop-down list. To continue, click Next.
Tip
If you want to open an existing presentation from the AutoPilot Wizard, select the Open Existing Presentation option.
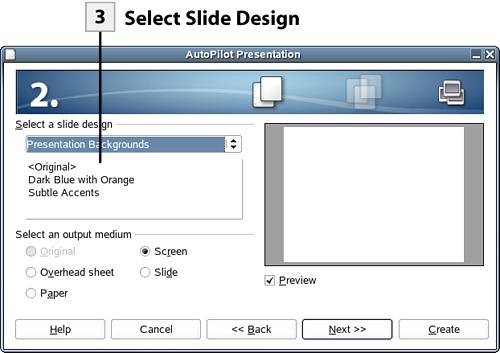
![]() Select Slide Design
Select Slide Design
On the next screen select a slide design from the Presentation Backgrounds drop-down list. To select an output medium (other than the default: Screen), select the appropriate option button such as Overhead Sheet or Paper. After making your selections, click Next to continue.
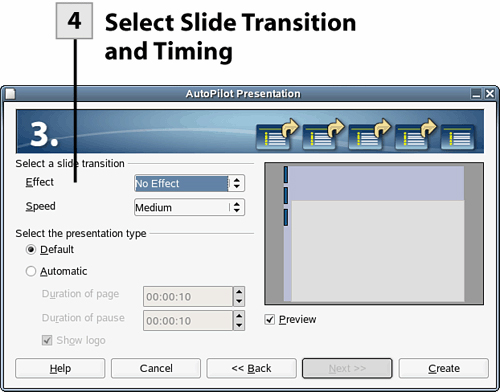
![]() Select Slide Transition and Timing
Select Slide Transition and Timing
On the next wizard screen you are provided the option of selecting a slide transition for the slides in the presentation. Select a transition type from the Effect drop-down list (such as Fly in from Left or Dissolve). To set the speed of the transition select the Speed drop-down list and select a speed (Medium is the default).
If you want to create a self-running automatic presentation, select the Automatic option button. You can then set the page and pause duration timings using the appropriate spinner box. After you have configured the settings on this wizard screen, select Create to continue.
Note
You do not have to select a transition type for your slides in the AutoPilot Presentation Wizard window. You can add transitions to your slides using the Slide Show menu (and then Slide Transition) as you create each of the slides.
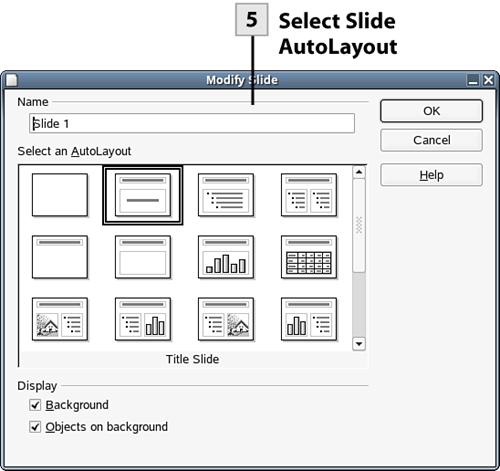
![]() Select Slide AutoLayout
Select Slide AutoLayout
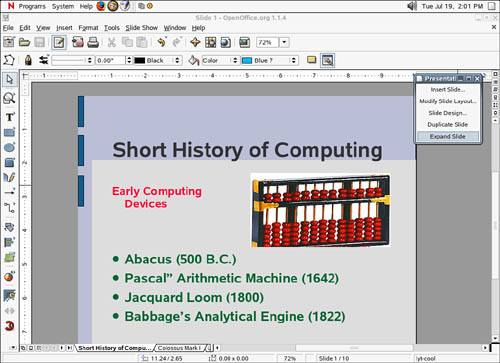
The Modify Slide dialog box opens. This allows you to set the AutoLayout for the first slide in the presentation. This layout is typically Title Slide layout. You can also enter a name for the slide. This is a descriptive name, which is saved with the slide’s properties. After selecting the slide layout and entering the optional slide name, click OK. The new slide appears in the Impress window in the Drawing view, which is used to add text and other objects to the slide (only one slide is shown in the Drawing view at a time).
Placeholder text is provided on the new slide. Select any of the placeholder text and enter your slide text as needed.
As you create your slide presentation, you will need to enter new slides. The quickest way to insert a new slide is using the Presentation toolbar. You can also insert a new slide using the Insert menu.
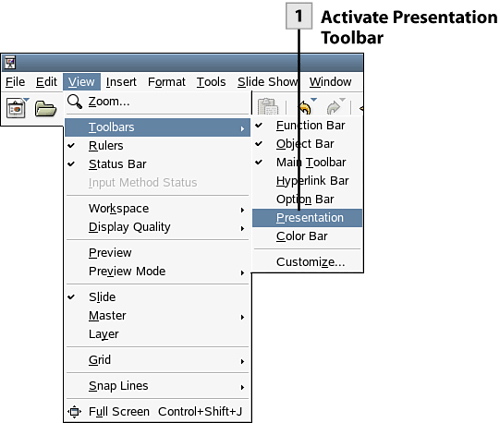
![]() Activate Presentation Toolbar
Activate Presentation Toolbar
If the Presentation toolbar is not open in the Impress workspace, select the View, Toolbars, Presentation. The Presentation toolbar appears.
Tip
You can dock the Presentation toolbar in the Impress workspace. For example, if you want to dock the Presentation toolbar on the right side of the workspace, hold down the Ctrl key and then drag the Presentation toolbar to the right border of the Impress window. When you dock the Presentation toolbar you are provided access to a series of buttons at the bottom of the toolbar that allow you to quickly switch the current view in the workspace.
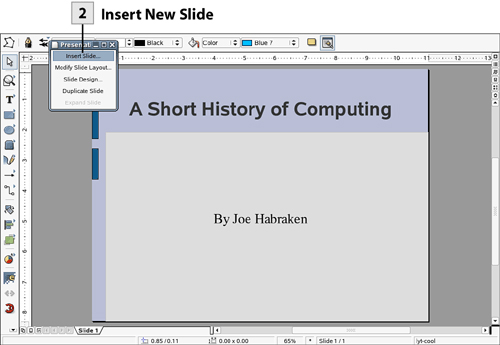
![]() Insert New Slide
Insert New Slide
On the Presentation toolbar, select Insert Slide. The Insert Slide dialog box appears.
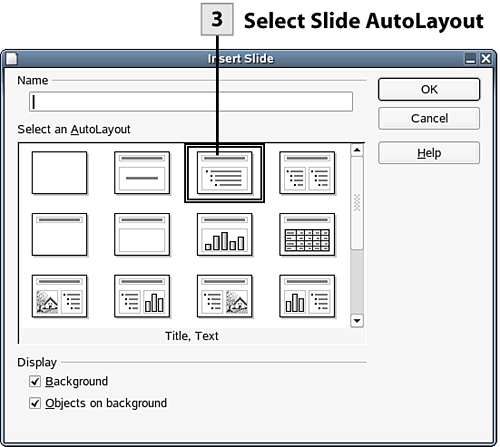
![]() Select Slide AutoLayout
Select Slide AutoLayout
In the Insert Slide dialog box type an optional name for the slide. Select a layout for the new slide from the AutoLayouts provided (the Title, Text layout is selected by default after you have created a title slide for the presentation). After making your selection, click OK. The new slide appears in the Impress workspace.
After you’ve created a slide, you can add text to it by selecting any of the placeholder text on the slide and then typing your text as needed. In some situations you may want to add text to a slide in a new text box. You can add text boxes, text boxes where the text fits the frame (making the font size dependant on the frame size), and you can also add callouts that allow you to provide information related to a certain part of an image, chart, or other inserted object.
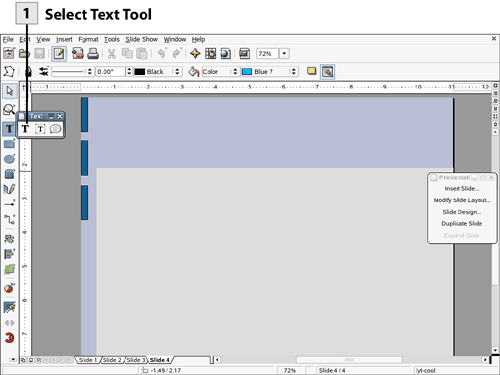
![]() Select Text Tool
Select Text Tool
Insert a new slide or use a current slide in a presentation. On the Main toolbar, select the Text button’s arrow and select one of the text tools such as Text or Fit Text to Frame (this changes the font to mimic the size of the drawn frame).
Tip
You can move from slide to slide in your presentation using the navigation buttons at the bottom of the workspace. To select a particular slide, click on the tab for that slide. The slide tabs show the name that you entered when you created the slide.
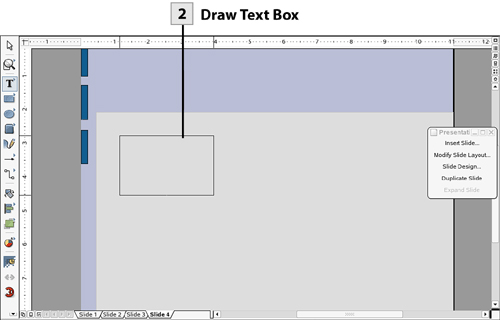
![]() Draw Text Box
Draw Text Box
Use the mouse to “draw” a text box on the current slide. When you release the mouse a cursor appears in the text box.
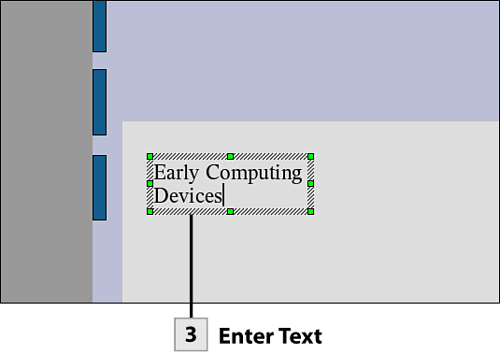
![]() Enter Text
Enter Text
Type the text that you want to place in the text box.
Tip
You can drag the text box by its border to any location on the slide. If you want to change the size or shape of the text box after you have entered text, use the sizing handles on the text box. After text is in the text box, you can select the text using the I-beam and then format the text using the font formatting and alignment tools on the Object bar.
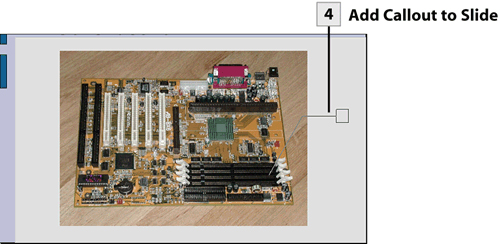
![]() Add Callout to Slide
Add Callout to Slide
Callouts allow you to draw attention to a particular place on a diagram or picture. Select the Text button’s arrow (as in step 1) and then select the Callouts tool. Drag the mouse from the item that you want to “point out” with the callout to a position where you want the callout’s text box to appear. Then release the mouse.
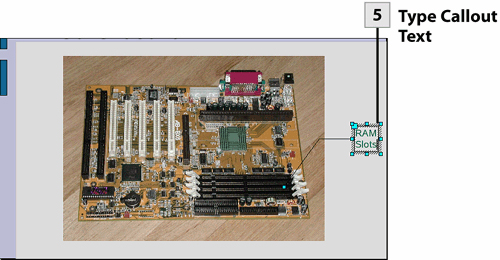
Type Callout Text
Type and format the text in the callout’s text box as needed. You can drag the callout to position it more precisely on the slide.
You can modify the layout for the current slide in the Drawing view. Because layout changes can affect text and objects already on the slide, you may want to finalize the layout for a slide before adding items to the slide.
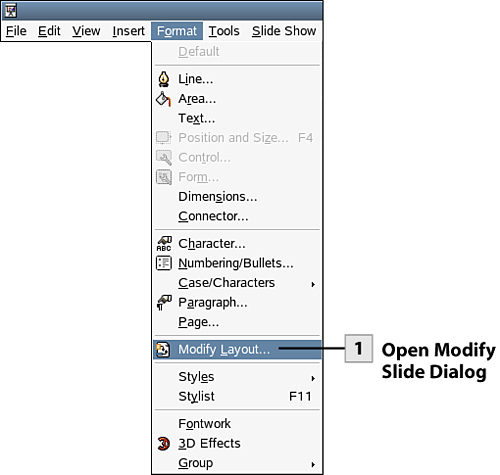
![]() Open Modify Slide Dialog
Open Modify Slide Dialog
Open the slide in the Drawing view. Select Format, Modify Layout. The Modify Slide dialog box opens.
Tip
You can also use the Presentation toolbar to duplicate the current slide. This allows you to change the layout for the slide and see how the change affects the text and objects already on the slide.
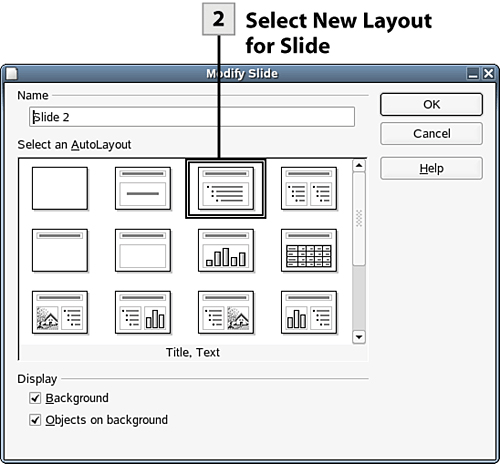
![]() Select New Layout for Slide
Select New Layout for Slide
Select a new layout for the slide in the Modify Slide dialog box. Then click OK to accept the selection.
You can change the slide design for a slide or slides in your presentation. This changes the background color and the design elements provided by the previous design. As with slide layouts, it makes sense to select the slide design before you enter a lot of text or other objects on the slides. This allows you to arrange objects on a slide so that they complement the design elements provided by the selected design. When you select a different design, you are actually selecting a template that is applied to the slides.
![]() Open Slide Design Dialog
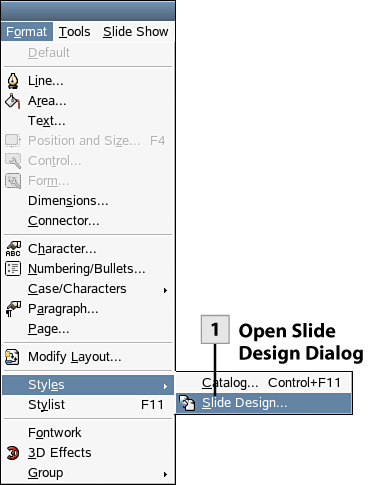
Open Slide Design Dialog
Open the slide in the Drawing view that you want to edit. Select Format, Styles, Slide Design. The Slide Design dialog box opens.
Tip
You can also open the Slide Design dialog box from the Presentation toolbar. Select Slide Design.
![]() Load Slide Designs
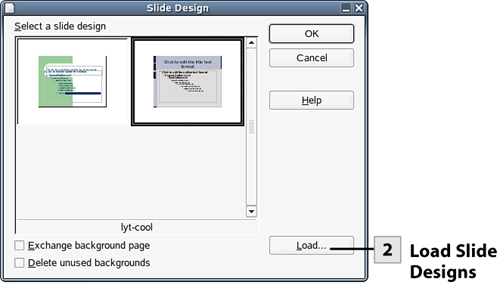
Load Slide Designs
Recently used designs are listed in the Slide Design dialog box. To load other available designs, select the Load button. The Load Slide Design dialog box opens.
![]() Choose Design for Loading
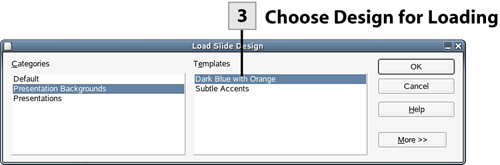
Choose Design for Loading
Select Presentation Backgrounds in the Categories box of the Load Slide Design dialog box. This lists the slide designs available. Select a design and then click OK. You are returned to the Slide Design dialog box.
Tip
You can download additional templates and slide designs from the OpenOffice.org website. The template page URL is http://documentation.openoffice.org/Samples_Templates/User/template/index.htm The template page provides links for downloading the templates and also provides information on the folder that you should place the templates in so that Impress can load them when you want to access them. This template page also provides templates for other OpenOffice.org applications such as Writer and Calc.
![]() Apply Design
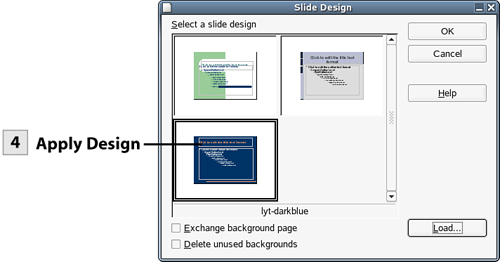
Apply Design
Select the newly loaded design in the Slide Design dialog box. Then click OK to apply the design to the current slide.
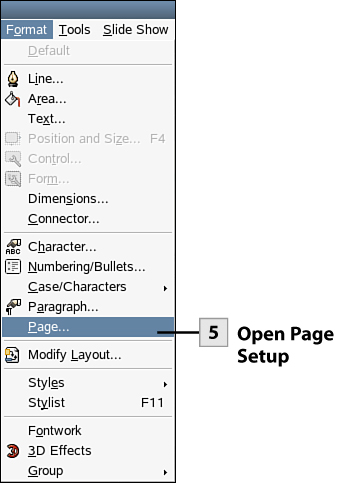
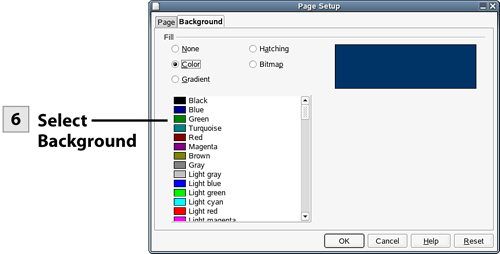
![]() Open Page Setup
Open Page Setup
You can change the background for the current slide; select Format, Page. The Page Setup dialog box opens. Select the Background tab if necessary.
Use the option buttons on the Background tab to select the type of background to apply to the slide: Color, Gradient, Hatching, or Bitmap. Then select the background for the slide from the currently selected background type. When you are ready to apply the new background, click OK.
Tip
You can change the background color and design elements for all the slides in a presentation. This allows you to add objects to all your slides such as a company logo or other repeating elements. You change the overall design of the slides in the presentation by editing the master slide. Select View, Master, Drawing from the menu. Be careful not to change the text box format provided on the master. You can, however, add or replace the design elements on the master. You can also change the background. Select Format, Page. Use the Page Setup dialog box to change the background for the master. You can then return to the slide view; select Format, Slide.
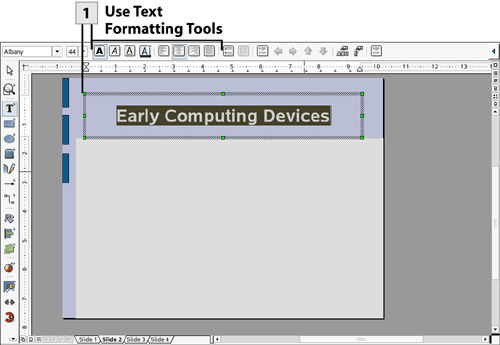
The Object bar provides tools specific to the currently selected object on your slide. For example, when you work with a text object (a text box) the Object bar provides font formatting and alignment tools. When you work on a drawn object (such as an ellipse drawn using the Mail toolbar Ellipse tool), the Object bar provides tools that can be used to format the line style, color, and background color for the drawn object.
![]() Use Text Formatting Tools
Use Text Formatting Tools
Select the text in a text box. The Object bar changes to the text formatting tools. Use the font formatting tools such as the Font box to select a new font and the Size box to select a new font size. You can also enable other formatting attributes such as Bold and Italic. To change the alignment for the selected text, select one of the alignment buttons such as Centered.
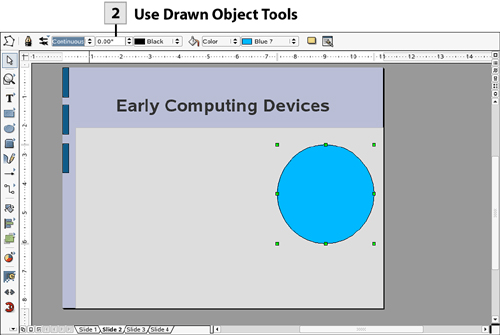
![]() Use Drawn Object Tools
Use Drawn Object Tools
Draw an object such as an ellipse using the Ellipse tool on the Main toolbar. With the drawn object selected use the Object bar tools such as the Line Style, Line Width, or Line Color tools to format the object. To change the fill color for the object, select the Area Style/Filling drop-down list and select a new color.
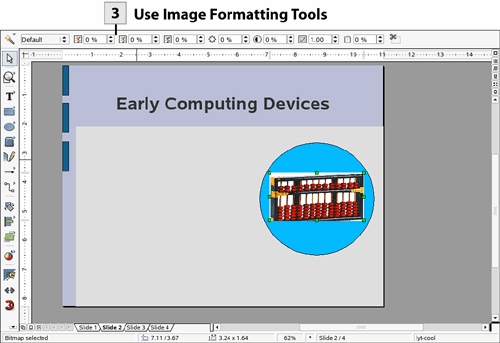
![]() Use Image Formatting Tools
Use Image Formatting Tools
Insert a graphic on a slide (select Insert, Graphics). When the graphic is selected, the Object bar provides tools for formatting the graphic. Use the Red, Blue, Green spinner boxes to change the basic color mix for the graphic. Use the Brightness and Contrast spinner boxes to lighten or darken the image as needed.
You can insert graphics and other objects to enhance the slides in your presentation. Graphics can be informative, such as a picture that provides information related to the slide content, or used just to add interest to your slides, such as a design element. You can also insert other objects (just about anything really), such as video and sound or application objects such as Calc spreadsheets and charts. Any application that you run on your system can actually be the host for an object placed on a slide.
![]() Open Insert Graphics Dialog
Open Insert Graphics Dialog
Select Insert, Graphics from the menu. This opens the Insert Graphics dialog box.
Tip
You can search for open source and free clipart and images on the Web. A good place to start is www.openclipart.org. You can browse for specific clipart on this site or download the entire library.
![]() Insert Graphic
Insert Graphic
In the Insert Graphics dialog box browse your folders as needed to locate the graphic. Then select the graphic file and then select Open. The graphic is placed on the slide. You can drag the graphic to a new location or size it as needed. Tools for modifying the graphic are available on the Object bar.
Tip
OpenOffice.org allows you to use graphics in a number of different graphic file formats including .bmp, .eps, .jpg, .jpg, and .png.
![]() Open Gallery
Open Gallery
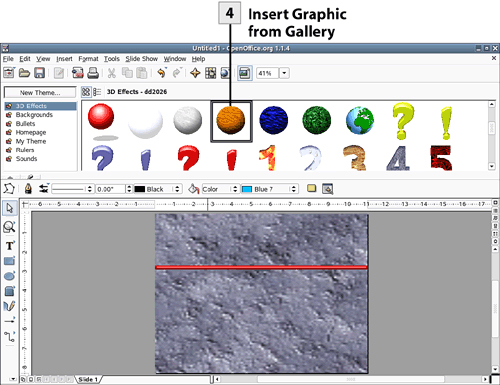
You can find a number of 3-D graphics, textures, and other graphic objects to add to your slides in the Gallery. Select the Gallery button on the Function bar. The Gallery opens at the top of the workspace.
![]() Drag Graphic from Gallery
Drag Graphic from Gallery
Select one of the Gallery categories such as 3D Effects, Bullets, or Rulers. Drag an object from the Gallery to the current slide. After the object is on the slide, you can move and size it as needed.
Tip
You can also drag sounds from the Gallery to your current slide. To see a more descriptive listing of the sounds in the Gallery’s Sound category, select the Detailed View button at the top of the Gallery pane.
Tip
To place repeating graphics or other objects such as a text box containing the date, slide show title, or your name, open the master slide (select View, Master, Drawing) and then place items on the master. You can insert fields such as the Date and Author (select Insert, Fields) at the top or bottom of the master slide and add a company logo or other graphic to the master. Remember that objects that you place on the master appear on all the slides in the presentation. Take advantage of the different design objects in the Gallery to build eye-catching master slides.
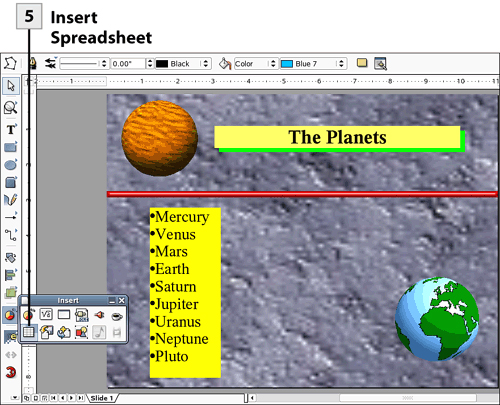
![]() Insert Spreadsheet
Insert Spreadsheet
You can place other objects on your slides including charts and spreadsheets. To insert a new spreadsheet on a slide, select the Insert button’s arrow on the Main toolbar and then select Spreadsheet from the object list. A new blank spreadsheet is placed as an object on the slide.
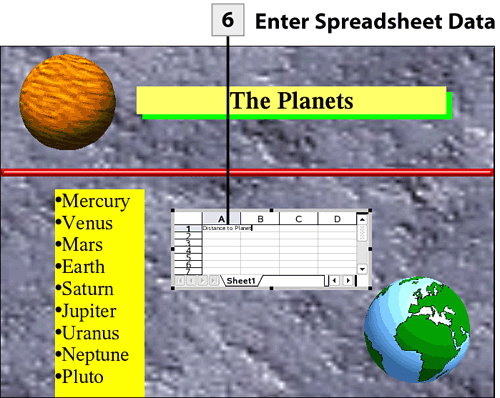
![]() Enter Spreadsheet Data
Enter Spreadsheet Data
When the spreadsheet object is selected the toolbars provide the tools that you would normally have access to in Calc. Enter data in the spreadsheet as needed. When you click outside the spreadsheet object, the toolbars provide the Impress tools normally available in the Impress workspace.
Slide transitions allow you to add some interest and glitz to your slide presentations. A transition uses a special effect (such as dissolve), and each slide in a presentation can be assigned a different transition type. You see the transitions as you advance from the current slide to the next slide during your slide show.
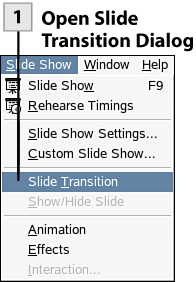
![]() Open Slide Transition Dialog
Open Slide Transition Dialog
To add a transition to the current slide, select the Slide Show, Slide Transition from the menu. The Slide Transition dialog box opens.
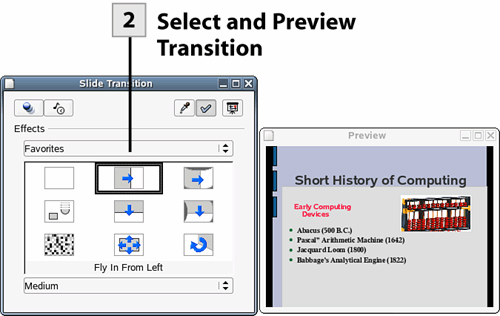
![]() Select and Preview Transition
Select and Preview Transition
Select the Preview button on the top right of the Slide Transition dialog box (this allows you to preview the transition). Then select a transition from the transition list. Select the Assign button (the check mark button); a preview of the transition appears in the Preview window when you assign the transition to the slide (using the Assign button).
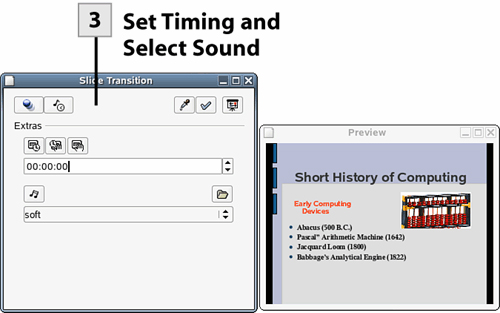
![]() Set Timing and Select Sound
Set Timing and Select Sound
Select the Extras button on the top left of the Slide Transition dialog box. This screen allows you to add automatic timings for the transition and add a sound effect to the transition.
Select the Automatic Transition button and then use the time spinner box to set the timing for the transition. To add a sound effect to the transition, select the Sound button and then select a sound from the list. When you select the Assign button, the timing and the sound are assigned to the transition and you receive a preview in the Preview window. After you have completed your transition settings, you can close the Slide Transition dialog box and the Preview box.
Another way to add special effects to your presentation slides is to take advantage of animation effects. These effects can be assigned to a particular object on a slide such as a text box or graphic.
There are “regular” effects that are used to control the entry of an object (or objects) onto the slide (such as a dissolve), and there are also text effects. A text effect can be used to animate the text in a text box such as a bulleted list. For example, assigning the Fly in from Left text effect to a text box causes each item in the list to fly in from the left (separately) when you click the mouse (a mouse click is required for each item in the list).
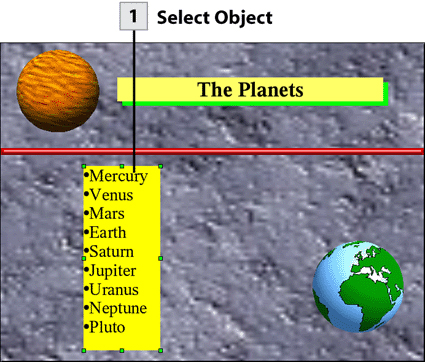
![]() Select Object
Select Object
Select an object on the current slide (or select multiple objects by using the mouse to drag a selection frame around those objects).
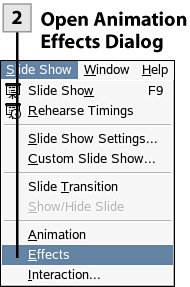
![]() Open Animation Effects Dialog
Open Animation Effects Dialog
Select Slide Show, Effects from the menu. The Animation Effects dialog box opens. Select the Preview button in the Animation Effects dialog box so that you can view a preview of any effects you apply to the selected object or objects.
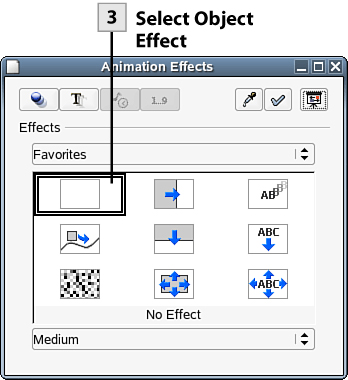
![]() Select Object Effect
Select Object Effect
If you want to apply an animation effect to an object (any object), select the effect category in the Effects drop-down list (such as Favorites, Cross-fading, and so on). Then select an effect in the effect box.
To change the speed of the effect, select the Speed drop-down list and select Slow, Medium, or Fast. To apply the effect and view a preview (in the Preview window), select the Assign button (check mark).
Tip
You can also select a sound to accompany your animation effects. After selecting an effect, select the Extras button. On the Extras screen select the Sound button and select a sound to accompany the effect. You can also select Fade Object to Color on the Extras screen and select a color to be used for the fade.
Tip
You can configure the order that objects appear on the slide when you have set effects for multiple objects. In the Animation Effects dialog box, select the Order button. The Order list appears for the slide, listing all the objects on the slide. Drag objects in the list to select the order entry for the various items. Remember to select Assign after making any changes to the animation effect settings.
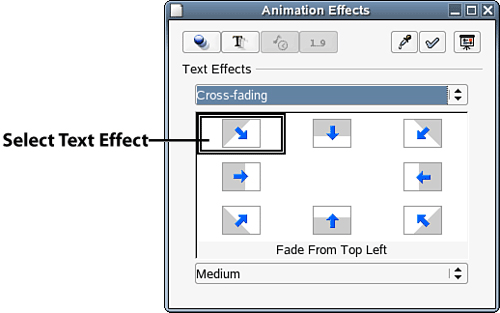
![]() Select Text Effect
Select Text Effect
If you want to apply a text effect rather than an object effect (as discussed in step 3), select the Text Effects button in the Animation Effects dialog box. Select the Text Effects drop-down list and select an effect from the list (such as Cross-fading, Fly In, and so on). Then select one of the effects shown in the Effect box.
After selecting the effect, select the Assign button to apply the effect to the text box. A preview of the effect will appear in the Preview window.
After you have finished applying your object or text effects, close the Animation Effects dialog box and then the Preview window.
After you create slides in the Draw view, you might want to take a “bigger picture” look at your presentation. Impress provides different workspace views including the Outline, Slides, and Notes views.
The Outline view allows you to see your presentation as an outline and makes it easy to move text (particularly bulleted lists) from one slide to another. You can use the Slides view to quickly view all the slides and change the slide order as needed. The Notes view allows you to view a notes area for each slide, which provides space for you to type notes related to each slide, allowing you to build your presentation script (what you will say) as you create the slides.
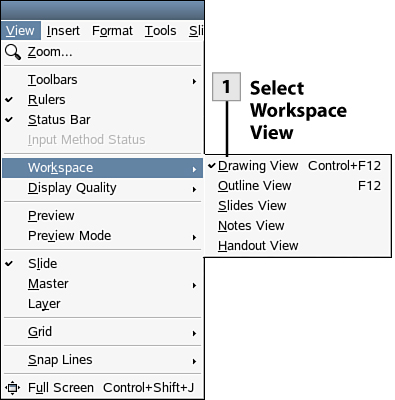
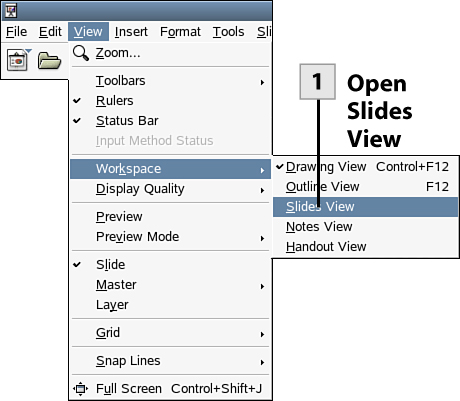
![]() Select Workspace View
Select Workspace View
To select a workspace view, select View, Workspace, and then select one of the views provided on the Workspace submenu such as Outline View.
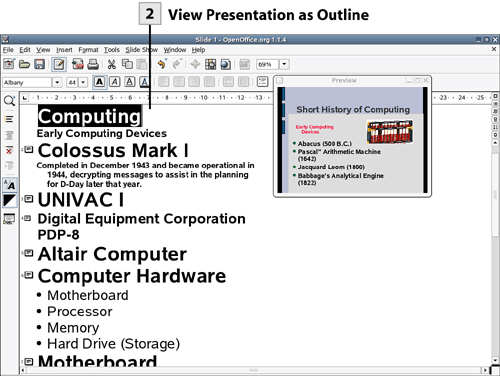
![]() View Presentation as Outline
View Presentation as Outline
Open the Outline view (select View, Workspace, Outline View). Use the Main toolbar outline buttons, such as First Level or All Levels, to shrink or expand the slide text shown, respectively. When you select First Level to shrink the slide content to the slide titles only, you can easily drag slides to a new location in the outline.
Tip
You can quickly view the presentation slide show from the current slide in the Outline view. Select the Slide Show button on the Main toolbar.
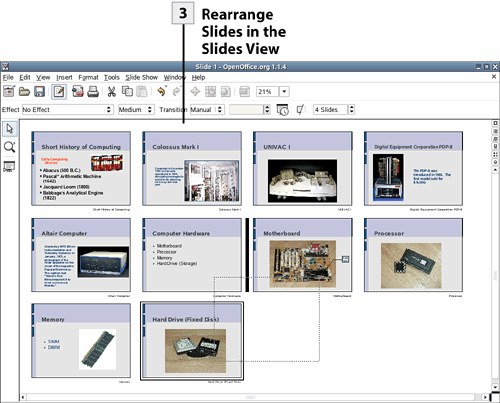
![]() Rearrange Slides in the Slides View
Rearrange Slides in the Slides View
Open the Slides view (select View, Workspace, Slides View). This view shows all the slides in the presentation as thumbnails. You can rearrange your slides in this view. Drag a slide to a new location as needed.
Tip
You can quickly assign a transition effect to a slide in the Slides view. Select the slide (or slides by dragging a selection frame around the slides) and then select the transition effect using the Effect drop-down list on the Object bar. If you want to see a preview of the effect, open the Preview window; select View, Preview.
Tip
When you are in the Slides view, you can quickly open any of the slides in the Drawing view by double-clicking on the slide.
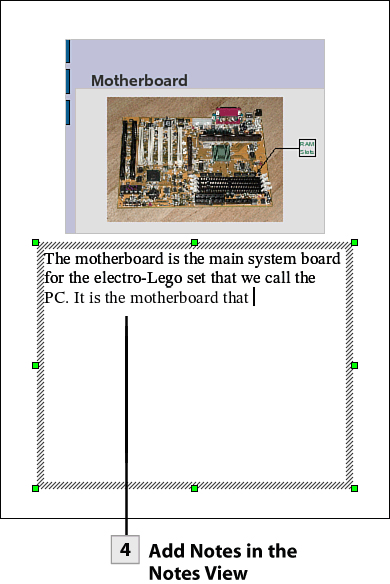
Open the Notes view (select View, Workspace, Notes View). The current slide is represented by a thumbnail, and a text box appears below the slide. Enter text as needed to the notes text box. This can be notes you will use when you give your presentation or reminders related to the presentation.
The Rehearse Slide Show Timings feature allows you to set up the timings for an automated presentation. You actually run the slide show, and a timer appears in the bottom-left corner of the screen. You can then deliver your “speech” and talk about the content of each slide as you would when giving the presentation. When you want to “set” the onscreen duration for a particular slide and move onto the next slide, you click on the timer on the slide show window.
These timing settings are saved with your presentation. The next time you run the automated presentation, the slides change based on the timings that you set during your “dry run” of the presentation. Because setting transition effects is another aspect of readying a slide show, the best place to select transitions and set and review the automatic slide timings is the Slides view.
![]() Open Slides View
Open Slides View
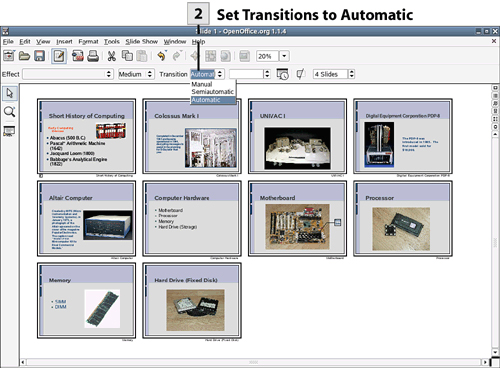
The fastest way to choose transitions for your slides and then run the Rehearse Timings feature is the Slides view; select View, Workspace, Slides View from the menu.
![]() Set Transitions to Automatic
Set Transitions to Automatic
Select all the slides in the presentation and then set the Transition drop-down list to Automatic.
Tip
If you want all the animation effects that you have added to your slides to play automatically but don’t want to have the slides advance until you click the mouse or press the spacebar, select Semiautomatic in the Transition drop-down list.
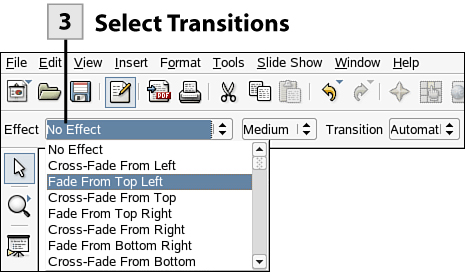
![]() Select Transitions
Select Transitions
Select a slide or slides and then select a transition from the Effect drop-down list. Repeat as needed to set a transition for each slide. You can also set the speed for the transition using the Speed drop-down list to select Slow, Medium, or Fast.
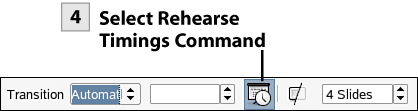
![]() Select Rehearse Timings Command
Select Rehearse Timings Command
After you have selected your transitions and set the transition mode to automatic, you can set the timing for each slide during the rehearsal. Select the Rehearse Timings button on the Object bar.
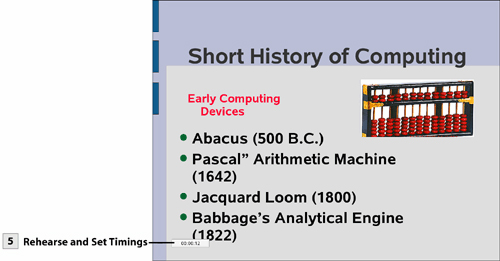
![]() Rehearse and Set Timings
Rehearse and Set Timings
The slide show begins, and the timer appears in the bottom left of the presentation screen. Rehearse your presentation; when you are ready to set the timing for the current slide and advance to the next slide, click on the Timer. Repeat as necessary to set all the timings for the presentation slides.
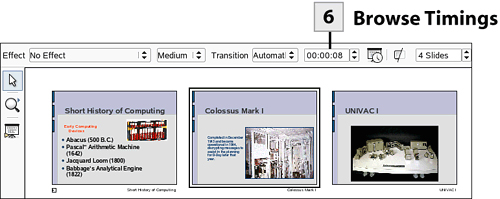
![]() Browse Timings
Browse Timings
After you complete your presentation, you are returned to the Slides view. Click on a slide to view the timer setting for that slide (it will correspond to the time you set during the rehearsal). You can edit the times (for your slides) by using the Time spinner box as needed.
You can configure a number of settings related to the slide show using the Slide Show dialog box. You can select where the slide show should begin (select the slide) and configure other settings such as the pause time for restarting an automatic presentation and settings related to the mouse pointer.
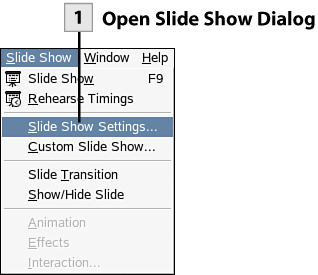
![]() Open Slide Show Dialog
Open Slide Show Dialog
From any of the workspace views (Drawing view, Slides view, and so on), select Slide Show, Slide Show Settings from the menu. The Slide Show dialog box opens.
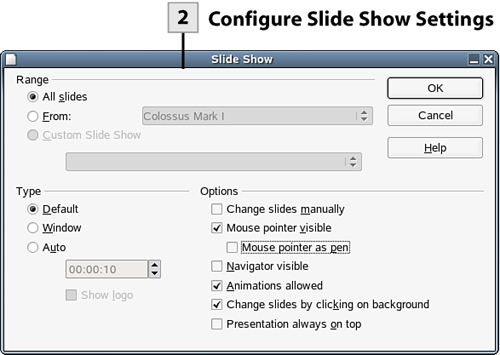
![]() Configure Slide Show Settings
Configure Slide Show Settings
To set a new start point for the slide show (other than slide 1), select the From option button. Then select the slide from the Slide drop-down list. To set the slide show to run in the application window rather than the entire computer screen, select the Window option button.
Tip
You can also select a custom slide show in the Slide Show Settings dialog box. A custom slide show is a slide show that you have configured using the current presentation slides. A custom slide show can present the slides in any order you want. To create a custom slide show (or shows) based on the slides in the current presentation, select Slide Show, Custom Slide Show, In the Custom Slide Show dialog box, select New to create a custom slide show. (You can select the slides and the order of the slides for the custom slide show.) You can create as many custom shows as you want based on the slides in the presentation.
If you want to set a pause duration (really the intermission time before restarting the presentation) for an automatically running presentation, select the Auto button and use the spinner box to set the pause duration (a Pause slide appears at the end of the slide show and stays on the screen until the slide show restarts).
Tip
If you want to run manually a slide show that has been configured as an automatic slide show, select the Change Slides Manually check box.
To use the mouse as a pen during the presentation (this allows you to draw on the screen), select the Mouse Pointer as Pen check box. After you have completed making your selections in the dialog box, click OK.
After you have created your slides, configured your transitions and timings, and added animation effects to the objects on your slides, you are ready to run the slide show. You can run the slide show from any of the workspace views. If you have configured the mouse pointer as a pen, you can highlight information on your slides as needed. You can also jump to a particular slide during the slide show using the Navigator.
Tip
If you want the Navigator to be visible during the entire slide show, select the Navigator Visible check box in the Slide Show dialog box. Otherwise, you can open the Navigator with the F5 function key.
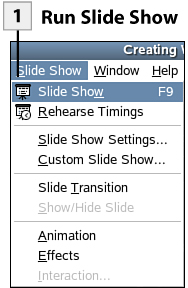
![]() Run Slide Show
Run Slide Show
Select Slide Show, Slide Show from the menu. The slide show begins to run on the computer.
Tip
You can also start the slide show by pressing F9 or by clicking the Slide Show button on the Main toolbar. The slide show starts from the currently displayed slide, so make sure that you are at the beginning of the presentation before starting the slide show.
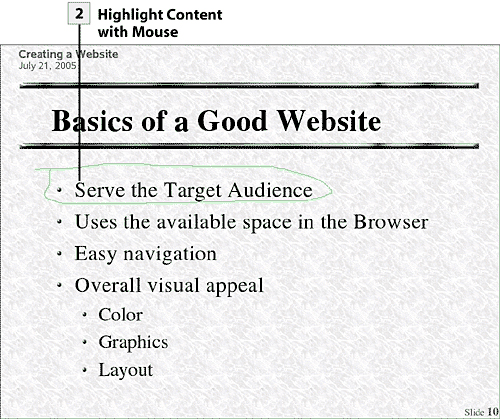
![]() Highlight Content with Mouse
Highlight Content with Mouse
If you configure the mouse as a pen (in the Slide Show dialog box), you can draw on the screen highlighting information for your audience. Hold down the left mouse button and draw as needed.
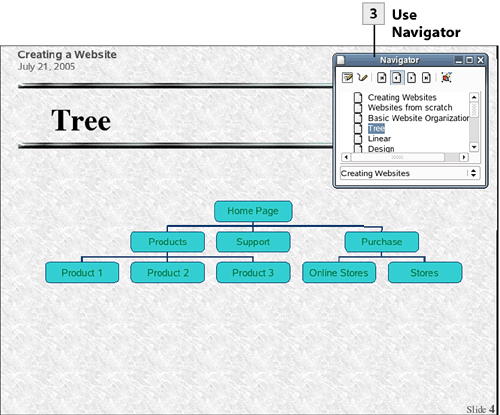
![]() Use Navigator
Use Navigator
Click the left mouse button to go forward one slide. Click the right mouse button to go back one slide. If you need to move to a particular slide because of a question from the audience, you can use the Navigator. Press the F5 function key. The Navigator appears. Use the Navigator to jump to a particular slide. After you have finished showing the slide show, you are returned to the Impress window.
You can print your slides for reference and also print your notes and create handouts for your audience. The various print settings for a presentation are available in the Print dialog box.
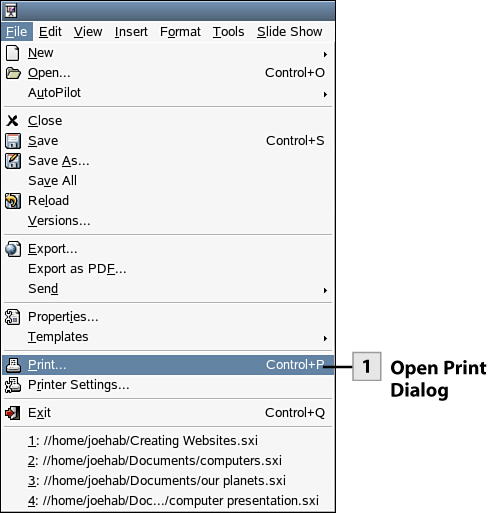
![]() Open Print Dialog
Open Print Dialog
Select File, Print. The Print dialog box opens. You can select the print range and the number of copies on this screen.
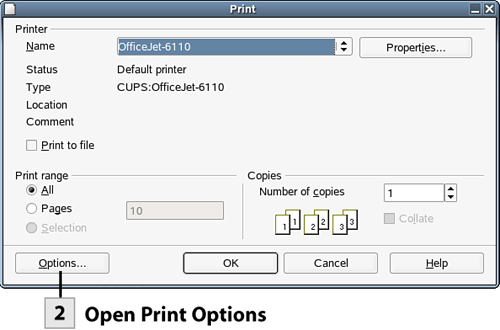
![]() Open Print Options
Open Print Options
To print handouts or notes, you need to access the print options. Select the Options button. The Printer Options dialog box opens.
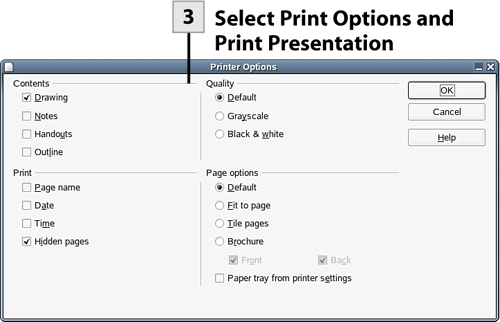
![]() Select Print Options and Print Presentation
Select Print Options and Print Presentation
Use the Contents check boxes to determine the type of printout that you want to create such as Notes, Handouts, or Outline. You can also select the output for the printout such as Grayscale or Black & White (select the appropriate option button). After you have completed your selection of print options, click OK. You are returned to the Print dialog box. Click OK again to send the print job to the currently selected printer.