
CHAPTER 2: The Stack ADT
© Ake13bk/Shutterstock
This chapter introduces the stack, an important data structure. A stack is a “last in, first out” structure. We begin the chapter with a discussion of using abstraction in program design. We review the related concepts of abstraction and information hiding and show how these techniques encourage us to view our data at three different “levels”: the application, abstract, and implementation levels. This approach is used with the stack structure. At the abstract level our stack is formally defined using a Java interface. We discuss many applications of stacks and look, in particular, at how stacks are used to determine whether a set of grouping symbols is well formed and to support the evaluation of mathematical expressions. Stacks are then implemented using two basic approaches: arrays and links (references). To support the link-based approach, we introduce the linked list structure. Finally, we also present an implementation using the Java library’s ArrayList class.
2.1 Abstraction
The universe is filled with complex systems. We learn about such systems through models. A model may be mathematical, like equations describing the motion of satellites around the Earth. A physical object such as a model airplane used in wind-tunnel tests is another form of model. Typically, only the relevant characteristics of the system being studied are modeled; irrelevant details are ignored. For example, in-flight movies are not included in the model airplanes used to study aerodynamics. When irrelevant details are omitted we have an abstract view of the system.
An abstraction is a model of a system that includes only the details essential to the perspective of the viewer of the system. What does abstraction have to do with software development? Writing software is difficult because both the systems we model and the processes we use to develop the software are complex. Abstractions are the fundamental way that we manage complexity. In every chapter of this text we make use of abstractions to simplify our work.
Information Hiding
Many software design methods are based on decomposing a problem’s solution into modules. A “module” is a cohesive system subunit that performs a share of the work. In Java, the primary module mechanism is the class. Decomposing a system using classes and objects generated from classes helps us handle complexity.
Classes/objects are abstraction tools. The complexity of their internal representation can be hidden from the rest of the system. As a consequence, the details involved in implementing a class are isolated from the details of the rest of the system. Why is hiding the details desirable? Shouldn’t the programmer know everything? No! Hiding the implementation details of each module within the module helps manage the complexity of a system because a programmer can safely concentrate on different parts of a system at different times. Information hiding is the practice of hiding details within a module with the goal of simplifying the view of the module for the rest of the system.
Of course, a program’s classes/objects are interrelated; that is, they work together to solve the problem. They provide services to one another through carefully defined interfaces. The interface in Java is usually provided by the public and/or protected methods of a class. Programmers of one class do not need to know the internal details of the classes with which it interacts, but they do need to know the interfaces. Consider a driving analogy: you can start a car without knowing how many cylinders are in the engine. You just have to understand the interface; that is, you only need to know how to turn the key.
Data Abstraction
Any data, such as a value of type int, processed by a computer is just a collection of bits that can be turned on or off. The computer manipulates data in this form. People, however, tend to think of data in terms of more abstract units such as numbers and lists, and thus we want our programs to refer to data in a way that makes sense to us. To hide the irrelevant details of the computer’s view of data from our own, we create another view. Data abstraction is the separation of a data type’s logical properties from its implementation.
Here we take a closer look at the very concrete—and very abstract—integer you have been using since you wrote your earliest programs. Just what is an integer? Integers are physically represented in different ways on different computers. However, knowing exactly how integers are represented on your computer is not a prerequisite for using integers in a high-level language. With a high-level language you use an abstraction of an integer. This is one of the reasons it is called a “high”-level language.
The Java language encapsulates integers for us. Data encapsulation is a programming language feature that enforces information hiding, allowing the internal representation of data and the details of the operations on the data to be encapsulated together within a single construct. The programmer using the data does not see the internal representation but deals with the data only in terms of its logical picture—its abstraction.
But if the data are encapsulated, how can the programmer get to them? Simple. The language provides operations that allow the programmer to create, access, and change the data. As an example, look at the operations Java provides for the encapsulated data type int. First, you can create variables of type int using declarations in your program.
int a, b, c;
Then you can assign values to these integer variables by using the assignment operator and perform arithmetic operations on them by using the +, -, *, /, and % operators.
a = 3; b = 5;
c = a + b;
The point of this discussion is that you have already been dealing with a logical data abstraction of integers. The advantages of doing so are clear: You can think of the data and the operations in a logical sense and can consider their use without having to worry about implementation details. The lower levels are still there—they are just hidden from you. The only information you really need to know about the int type is its range [–2,147,483,648 to 2,147,483,647] and the effects of the supported operations, for example, +, –, ×, /, and %. You do not need to understand two’s complement binary number representation nor how to arrange a circuit of logic gates in order to code the integer addition statement, even though such technologies are used to implement the operation.
We refer to the set of all possible values (the domain) of an encapsulated data “object,” plus the specifications of the operations that are provided to create and manipulate the data, as an abstract data type. An abstract data type (ADT) is a data type whose properties (domain and operations) are specified independently of any particular implementation.
In effect, all of Java’s built-in types, such as int, are ADTs. A Java programmer can declare variables of those types without understanding the actual representation. The programmer can initialize, modify, and access the information held by the variables via the provided operations.
In addition to the built-in ADTs, Java programmers can use the Java class mechanism to create their own ADTs. For example, the Date class defined in Chapter 1 can be viewed as an ADT. Yes, it is true that the programmers who created it needed to know about its actual representation; for example, they needed to know that a Date is composed of three int instance variables, and they needed to know the names of the instance variables. The application programmers who use the Date class, however, do not need this information. They simply need to know how to create a Date object and how to invoke its exported methods so as to use the object.
Data Levels
In this text we define, create, and use ADTs. We deal with ADTs from three different perspectives, or levels:
Application (or user or client or external) level As the application programmer, we use the ADT to solve a problem. When working on the application we only need to know what program statements to use to create instances of the ADT and invoke its operations. That is, our application is a client of the ADT. There can be many different clients that use the same ADT. We should note that a client of an ADT does not have to be an application—any code that uses the ADT is considered to be its client—it could even be code used in the implementation of another ADT.
Abstract (or logical) level This level provides an abstract view of the data values (the domain) and the set of operations to manipulate them. Here we deal with the what questions: What is the ADT? What does it model? What are its responsibilities? What is its interface? At this level, the ADT designer, sometimes in consultation with intended client programmers, provides a specification of the properties of the ADT. This specification is used by the application/client programmer to decide when and how to use the ADT. And it is used by the implementation programmer who needs to create code that fulfills the specification.
Implementation (or concrete or internal) level The implementation programmer designs and develops a specific representation of the structure to hold the data as well as the implementation (coding) of the operations. Here we deal with the how questions: How do we represent and manipulate the data? How do we fulfill the responsibilities of the ADT? There can be many different answers to these questions, resulting in multiple implementation approaches.
When you write a program, you often deal with data at each of these three levels. In this section, which features abstraction, the focus is the abstract level. In one sense, the ADT approach centers on the abstract level. The abstract level provides a model of the implementation level for use at the application level. Its description acts as a contract created by the designer of the ADT, relied upon by the application programmers who use the ADT, and fulfilled by the programmers who implement the ADT.
For the most part the abstract level provides independence between the application and implementation levels. Keep in mind, however, that there is one way that the implementation details can affect the applications that use the ADT—in terms of efficiency. The decisions we make about the way data are structured affect how efficiently we can implement the various operations on that data. The efficiency of operations can be important to the users of the data.
Preconditions and Postconditions
Suppose we want to design an ADT to provide a service. Access to the ADT is provided through its exported methods. To ensure that an ADT is usable at the application level, we must clarify how to use these methods. To be able to invoke a method, an application programmer must know its exact interface: its name, the types of its expected arguments, and its return type. But this information is not enough: The programmer also needs to know any assumptions that must be true for the method to work correctly and the effects of invoking the method.
Preconditions of a method are the conditions that must be true when invoking a method for the method to work correctly. For example, the increment method of the IncDate class, described in Chapter 1, could have preconditions related to legal date values and the start of the Gregorian calendar. Such preconditions should be listed at the beginning of the method declaration as a comment:
public void increment()
// Preconditions:    Values of day, month, and year represent a valid date.
//                   The value of year is not less than MINYEAR.
Establishing the preconditions for a method creates a contract between the programmer who implements the method and the programmers who use the method. The contract says that the method meets its specifications if the preconditions are satisfied. It is up to the programmers who use the method to ensure that the preconditions are true whenever the method is invoked. This approach is sometimes called “programming by contract.”
We must also specify which conditions are true when the method is finished. Postconditions (effects) of a method are the results expected at the exit of the method, assuming that the preconditions were met. Postconditions do not tell us how these results are accomplished; they merely tell us what the results should be. We use the convention of stating the main effects—that is, the postconditions—within the opening comment of a method, immediately after any preconditions that are listed. For example,
public void increment()
// Preconditions:    Values of day, month, and year represent a valid date.
//                   The value of year is not less than MINYEAR.
//
// Increments this IncDate to represent the next day.
Java Interfaces
Java provides a construct, the interface, that can be used to formally specify the abstract level of our ADTs.
The word “interface” means a common boundary shared by two interacting systems. We use the term in many ways in computer science. For example, the user interface of a program is the part of the program that interacts with the user, and the interface of a method is its name, the set of parameters it requires, and the return value it provides.
In Java, the word “interface” has a very specific meaning. In fact, interface is a Java keyword. It represents a specific type of program unit. A Java interface looks very similar to a Java class. It can include variable declarations and methods. However, all variables declared in an interface must be constants and all the methods must be abstract.1 An abstract method includes only a description of its parameters; no method bodies or implementations are allowed. In other words, only the interface of the method is included.
Unlike a class, a Java interface cannot be instantiated. What purpose can a Java interface serve if it can only hold abstract methods and cannot be instantiated? It provides a template for classes to fit. To make an interface useful, a separate class must “implement” it. That is, a class must be created that supplies the bodies for the method headings specified by the interface. In essence, Java interfaces are used to describe requirements for classes.
Here is an example of an interface with one constant (PI) and two abstract methods (perimeter and area):
package ch02.figures;
public interface FigureInterface
{
  final double PI = 3.14;

  double perimeter();
  // Returns perimeter of this figure.

  double area();
  // Returns area of this figure.
}
Although Java provides the keyword abstract that we can use when declaring an abstract method, we should not use it when defining the methods in an interface. Its use is redundant, because all nonstatic methods of an interface must be abstract. Similarly, we can omit the keyword public from the method signatures. It is best not to use these unnecessary modifiers when defining an interface, as future versions of Java may not support their use.
Interfaces are compiled just like classes and applications. Each of our interfaces is kept in a separate file. The name of the file must match the name of the interface. For example, the interface shown above must reside in a file called FigureInterface. java. The compiler checks the interface code for errors; if there are none, it generates a Java byte code file for the interface. In our example, that file would be called FigureInterface.class.
To use this interface a programmer could, for example, create a Circle class that implements the interface. When a class implements an interface, it receives access to all of the constants defined in the interface and it must provide an implementation—that is, a body—for all of the abstract methods declared in the interface. Thus, the Circle class, and any other class that implements the FigureInterface interface, would be required to repeat the declarations of the methods perimeter and area, and provide code for their bodies as shown here:
package ch02.figures;
public class Circle implements FigureInterface
{
  protected double radius;

  public Circle(double radius)
  {
    this.radius = radius;
  }

  public double perimeter()
  {
    return(2 * PI * radius);
  }

  public double area()
  {
    return(PI * radius * radius);
  }
}
Note that many different classes can all implement the same interface. For example, the following Rectangle class also implements FigureInterface.
package ch02.figures;
public class Rectangle implements FigureInterface
{
  protected double length, width;

  public Rectangle(double length, double width)
  {
    this.length = length;
    this.width = width;
  }

  public double perimeter()
  {
    return(2 * (length + width));
  }

  public double area()
  {
    return(length * width);
  }
}

Figure 2.1 UML for Figure ADT
You can imagine many other classes such as Square and Parallelogram, all of which implement the FigureInterface interface. A programmer who knows that these classes implement the interface can be guaranteed that each provides implementations for the perimeter and area methods.
The Unified Modeling Language (UML) class diagram in Figure 2.1 shows the relationship between the FigureInterface interface and the Circle and Rectangle classes. The dotted arrow with the open arrowhead indicates a class implementing an interface. Classes that implement an interface are not constrained only to implement the abstract methods of the interface as in this example; they can also add data fields and methods of their own.
Interfaces are a versatile and powerful programming construct. Among other things, they can be used to specify the abstract view of an ADT. Within the interface we define abstract methods that correspond to the exported methods of the ADT implementation. We use comments to describe the preconditions and postconditions of each abstract method. An implementation programmer, who intends to create a class that implements the ADT, knows that he or she must fulfill the contract spelled out by the interface. An application programmer, who wants to use the ADT, can use any class that implements the interface.
Using the Java interface construct in this way for our ADT specifications produces several benefits:
We can formally check the syntax of our specification. When the interface is compiled, the compiler uncovers any syntactical errors in the method interface definitions.
We can formally verify that the syntactical part of the interface “contract” is satisfied by the implementation. When the implementation is compiled, the compiler ensures that the method names, parameters, and return types match those defined in the interface.
We can provide a consistent interface to applications from among alternative implementations of the ADT. Some implementations may optimize the use of memory space; others may emphasize speed. An implementation may also provide extra functionality beyond that defined in the interface. Yet all of the implementations will have the specified interface in common.
Note that it is possible to declare a variable to be of an interface type. Given access to FigureInterface, Circle, and Rectangle, the following code is completely “legal.”
FigureInterface myFigure;
myFigure = new Circle(5);
myFigure = new Rectangle(2,4);
As long as a class implements the FigureInterface interface, we can instantiate an object of the class and assign it to myFigure. This is an example of polymorphism.
Interface-Based Polymorphism
In Section 1.2, “Organizing Classes,” we introduced the concept of polymorphism. You may want to review that material before continuing. In that section we discussed inheritance-based polymorphism. Here we discuss the other approach to polymorphism supported by Java, interface-based polymorphism.
Recall from the discussion in Chapter 1 that the word “polymorphism” has Greek roots and literally means “many forms” or “many shapes.” It is therefore lucky that we have our FigureInterface interface to use in this discussion. We will actually be defining object references that can refer to “many shapes”!
Polymorphic object variables are able to reference objects of different classes at different times during the execution of a program. They cannot reference just any class, but they can reference a set of related classes. In inheritance-based polymorphism, the relationship among the classes is defined by the inheritance tree. The related classes are descendants of a common class. With interface-based polymorphism the relationship is even simpler. The related classes implement the same interface.
Consider the following application. Can you predict what it will output?
//------------------------------------------------------------------
// RandomFigs.java           by Dale/Joyce/Weems           Chapter 2
//
// Demonstrates polymorphism.
//------------------------------------------------------------------
package ch02.apps;

import ch02.figures.*;
import java.util.Random;
import java.text.DecimalFormat;

public class RandomFigs
{
   public static void main(String[] args)
   {
      DecimalFormat df = new DecimalFormat("#.###");
      Random rand = new Random();
      final int COUNT = 5;
      double totalArea = 0;

      FigureInterface[] figures = new FigureInterface[COUNT];

      // generate figures
      for (int i = 0; i < COUNT; i++)
      {
         switch (rand.nextInt(2))
         {
             case 0:   figures[i] = new Circle(1.0);
                       System.out.print("circle area     3.14
");
                       break;

             case 1:   figures[i] = new Rectangle(1.0, 2.0);
                       System.out.print("rectangle area 2.00
");
                       break;
         }
      }

      // sum areas
      for (int i = 0; i < COUNT; i++)
         totalArea = totalArea + figures[i].area();
      System.out.println("
Total: " + df.format(totalArea));
   }
}
As you can see, we declare an array figures of FigureInterface objects. An object of any class that implements FigureInterface can be stored in this array. The first for loop inserts five figure objects into the array; however, because of the random nature of this code, we cannot tell which types of figures are inserted simply by reading the code. The binding of the array slots to the objects is performed dynamically at run time. So we can see what happens when running the program, the first loop also prints out a string description of each object inserted into the array. The second for loop walks through the array and adds up the areas of the inserted objects. Within that loop the decision of which area method, that of the Circle class or that of the Rectangle class, to execute must be made at run time. Each of the array slots is a polymorphic reference. Here are three sample program runs:
circle area     3.14   rectangle area  2.00   rectangle area  2.00
rectangle area  2.00   rectangle area  2.00   rectangle area  2.00
rectangle area  2.00   circle area     3.14   circle area     3.14
rectangle area  2.00   circle area     3.14   circle area     3.14
rectangle area  2.00   rectangle area  2.00   circle area     3.14
Total: 11.14           Total: 12.28           Total: 13.42
It is not difficult to imagine many uses for interface-based polymorphism. For example, an array of FigureInterface objects could form the basis of a Geometry tutorial or an array of CreatureInterface objects could be used in an adventure game. It is not necessary to use arrays to benefit from this type of polymorphism. Later in this chapter we define a StackInterface; we will create multiple classes that implement this interface. We could create a program that declares a variable of type StackInterface and then dynamically chooses which of the implementations to use when instantiating the variable, perhaps based on some user responses to queries or the state of the system. With such an approach our program would be dynamically adaptable to the current situation.
2.2 The Stack
Consider the items pictured in Figure 2.2. Although the objects are all different, each illustrates a common concept—the stack. At the abstract level, a stack is an ordered group of homogeneous elements. The removal of existing elements and the addition of new ones can take place only at the top of the stack. For instance, if your favorite blue shirt is underneath a faded, old, red one in a stack of shirts, you first take the red shirt from the top of the stack. Then you remove the blue shirt, which is now at the top of the stack. The red shirt may then be put back on the top of the stack. Or it could be thrown away!

Figure 2.2 Real-life stacks
A stack may be considered “ordered” because elements occur in sequence according to how long they have been in the stack. The elements that have been in the stack the longest are at the bottom; the most recent are at the top. At any time, given any two elements in a stack, one is higher than the other. (For instance, the red shirt was higher in the stack than the blue shirt.)
Because elements are added and removed only from the top of the stack, the last element to be added is the first to be removed. There is a handy mnemonic to help you remember this rule of stack behavior: A stack is a LIFO (last in, first out) structure. To summarize, a stack is an access-controlled structure in which elements are added or removed from only one end, a LIFO structure.
Operations on Stacks
The logical picture of the structure is only half the definition of an abstract data type. The other half is a set of operations that allows the user to access and manipulate the elements stored in the structure. What operations do we need to use a stack?
When we begin using a stack, it should be empty. Thus we assume that our stack has at least one class constructor that sets it to the empty state.
The operation that adds an element to the top of a stack is usually called push, and the operation that removes the top element from the stack is referred to as pop. Classically, the pop operation has both removed the top element of the stack and returned the top element to the client that invoked pop. More recently, programmers have been defining two separate operations to perform these actions because operations that combine observations and transformation can result in confusing programs.
We follow modern convention and define a pop operation that removes the top element from a stack and a top operation that returns the top element of a stack.2 Our push and pop operations are strictly transformers, and our top operation is strictly an observer. Figure 2.3 shows how a stack, envisioned as a stack of building blocks, is modified by several push and pop operations.
Using Stacks
Suppose you are relaxing at the kitchen table reading the newspaper and the phone rings. You make a mental note of where you stop reading as you stand to answer the phone. While chatting on the phone with your friend, the doorbell chimes. You say “just a minute, hold that thought” and put the phone down as you answer the door. As you are about to sign for the package that is being delivered, your dog Molly runs out the open door. What do you do? Obviously you retrieve Molly, then sign for the package, then finish the phone call, and finally return to reading your paper. Whether you realize it or not, you have been storing your postponed obligations on a mental stack! Each time you are interrupted you push the current obligation onto this stack and then, when you are free, you pop it from the stack and resume handling it.

Figure 2.3 The effects of push and pop operations
Stacks are very useful ADTs, especially in the field of computing system software. They are most often used in situations, like the example above, in which we must deal with postponed obligations. For example, programming language systems typically use a stack to keep track of operation calls. The main program calls operation A, that in turn calls operation B, that in turn calls operation C. When C finishes, control returns to B, the postponed obligation; when B finishes, control returns to A, the previous postponed obligation; and so on. The call and return sequence is essentially a LIFO sequence of postponed obligations.
You may have encountered a case where a Java exception has produced an error message that mentions “a system stack trace.” This trace shows the nested sequence of method calls that ultimately led to the exception being thrown. These calls were saved on the “system stack.”
Compilers use stacks to analyze language statements. A program often consists of nested components, for example, a for loop containing an if-then statement that contains a while loop. As a compiler is working through such nested constructs, it “saves” information about what it is currently working on in a stack; when it finishes its work on the innermost construct, it can “retrieve” its previous status (the postponed obligation) from the stack and pick up where it left off.
Similarly, an operating system will save information about the current executing process on a stack so that it can work on a higher-priority interrupting process. If that process is interrupted by an even higher-priority process, its information can also be pushed on the process stack. When the operating system finishes its work on the highest-priority process, it retrieves the information about the most recently stacked process and continues working on it, much like the scenario described above where you were interrupted while reading the paper.
Stacks are also useful in situations where decisions are made on a tentative basis, for example, when traversing a maze. Given the choice between passages A or B you choose passage A, but store the option of trying passage B on a stack, so that you can return to it if A does not work out. While wandering down passage A you are given a choice between passages C or D and choose C, storing D on the stack. When C turns out to be a dead end, you pop the most recent alternate passage off the stack, in this case passage D, and continue from there. With a complex maze many such decisions could be stored on the stack, allowing us to simulate investigating various paths through the maze by retracing our steps. This stack-based algorithm for exploring a maze is called a depth-first search and is often used to explore tree and graph data structures.
2.3 Collection Elements
A stack is an example of an access-controlled collection ADT. A collection is an object that holds other objects. Typically we are interested in inserting, removing, and obtaining the elements of a collection.
A stack collects together elements for future use, while maintaining a LIFO access ordering among the elements. Before continuing our coverage of stacks, we will examine the question of which types of elements can be stored in a collection. We will look at several variations that are possible when structuring collections of elements and describe the approaches used throughout this text. It is important to understand the various options, along with their strengths and weaknesses, so that you can make informed decisions about which approach to use based on your particular situation.
Generally Usable Collections
A straightforward approach to implementing several stacks to hold different types of objects would be to create a unique stack class for each type of object. If we want to have a stack of something—say, strings or integers or programmer-defined bank account objects—we would have to design and code an ADT for each targeted type. (See Figure 2.4a)
Although this approach would provide us with the needed stacks, it requires a lot of redundant coding, and it would be difficult to track and maintain so many different stack classes.

Figure 2.4 Options for collection elements
Collections of Class Object
One approach to creating generally usable collections is to have the collection ADT hold variables of class Object. Because all Java classes ultimately inherit from Object, such an ADT is able to hold a variable of any class. (See Figure 2.4b) This approach works well, especially when the elements of the collection do not have any special properties, for example, if the elements do not have to be sorted.
Although this approach is simple, it is not without problems. One drawback: whenever an element is removed from the collection, it can be referenced only as an Object. If you intend to use it as something else, you must cast it into the type that you intend to use. For example, suppose you place a string into a collection and then retrieve it. To use the retrieved object as a String object you must cast it, as emphasized here:
collection.push("E. E. Cummings");         // push string on a stack
String poet = (String) collection.top();   // cast top to String
System.out.println(poet.toLowerCase());    // use the string
Without the cast you will get a compile error because Java is a strongly typed language and will not allow you to assign a variable of type Object to a variable of type String. The cast operation tells the compiler that you, the programmer, are guaranteeing that the Object is, indeed, a String.
The Object approach works by converting every element into class Object as it is stored in the collection. Users of the collection must remember what kinds of objects have been stored in the collection, and then explicitly cast those objects back into their original classes when they are removed from the collection.
As shown by the third ObjectStack collection in Figure 2.4(b), this approach allows a program to mix the types of elements in a single collection. That collection holds an Integer, a String, and a BankAccount. In general, such mixing is not considered to be a good idea, and it should be used only in rare cases under careful control. Its use can easily lead to a program that retrieves one type of object—say, an Integer—and tries to cast it as another type of object—say, a String, which is an error.
Collections of a Class That Implements a Particular Interface
Sometimes we may want to ensure that all of the objects in a collection support a particular operation or set of operations. As an example, suppose the objects represent elements of a video game. Many different types of elements exist, such as monsters, heroes, and treasure. When an element is removed from the collection it is drawn on the screen, using a draw operation. In this case, we would like to ensure that only objects that support the draw operation can be placed in the collection.
Recall from Section 2.1, “Abstraction,” that a Java interface can include only abstract methods, that is, methods without bodies. Once an interface is defined we can create classes that implement the interface by supplying the missing method bodies. For our video game example we could create an interface with an abstract draw method. A good name for the interface might be Drawable, as classes that implement this interface provide objects that can be drawn. The various types of video game elements that can be drawn on the screen should all be defined as implementing the Drawable interface.
Now we can ensure that the elements in our example collection are all “legal” by designing it as a collection of Drawable objects—in other words, objects that implement the Drawable interface. In this way we ensure that only objects that support a draw operation are allowed in the collection. (See Figure 2.4c) This approach was discussed in more detail in the “Interface-Based Polymorphism” subsection of Section 2.1, “Abstraction,”.
Generic Collections
Beginning with version 5.0, the Java language supports generics. Generics allow us to define a set of operations that manipulate objects of a particular class, without specifying the class of the objects being manipulated until a later time. Generics represented one of the most significant changes to the language in version 5.0 of Java.
In a nutshell, generics are parameterized types. You are already familiar with the concept of a parameter. For example, in our Circle class the constructor has a double parameter named radius. When invoking that method we must pass it a double argument, such as “10.2”:
Circle myCircle = new Circle(10.2);
Generics allow us to pass type names such as Integer, String, or BankAccount as arguments. Notice the subtle difference: with generics we actually pass a type, for example, String, instead of a value of a particular type, for example, “Elvis.”
With this capability, we can define a collection class, such as Stack, as containing elements of a type T, where T is a placeholder for the name of a type. The name of the placeholder (convention tells us to use T) is indicated within braces; that is, <T>, in the header of the class.
public class Stack<T>
{
  protected  T[] elements ;     // array that holds objects of class T
  protected int topIndex = -1;  // index of the top element in the stack
...
In a subsequent application we can supply the actual type, such as String, Integer, or BankAccount, when the collection is instantiated (See Figure 2.4d).
Stack<String> answers;
Stack<Integer> numbers;
Stack<BankAccount> investments;
Pass BankAccount as the argument, get a BankAccount stack; pass String, get a String stack; and so on.
Generics provide the flexibility to design generally usable collections yet retain the benefit of Java’s strong type checking. They are an excellent solution, and we will use this approach throughout most of the remainder of this text.
2.4 The Stack Interface
In this section we use the Java interface construct to create a formal specification of our Stack ADT; that is, we formally specify the abstract view of our stacks. To specify any collection ADT we must determine which types of elements it will hold, which operations it will export, and how exceptional situations will be handled. Some of these decisions have already been documented.
Recall from Section 2.2, “The Stack,” that a stack is a LIFO structure, with three primary operations:
pushAdds an element to the top of the stack.popRemoves the top element from the stack.topReturns the top element of a stack.
In addition to these operations a constructor is needed that creates an empty stack.
As noted in Section 2.3, “Collection Elements,” our Stack ADT will be a generic stack. The type of information that a stack stores will be specified by the client code at the time the stack is instantiated. Following the common Java coding convention, we use <T> to represent the class of objects stored in our stack.
Now we look at exceptional situations. As you will see, this exploration can lead to the identification of additional operations.
Exceptional Situations
Are there any exceptional situations that require handling? The constructor simply initializes a new empty stack. This action, in itself, cannot cause an error—assuming that it is coded correctly.
The remaining operations all present potential problem situations. The descriptions of the pop and top operations both refer to manipulating the “top element of the stack.” But what if the stack is empty? Then there is no top element to manipulate. Suppose an application instantiates a stack and immediately invoked the top or pop operation? What should happen? There are three potential ways to address this “error” situation:
handle the error within the method itself
throw an exception
ignore it
How might the problem be handled within the methods themselves? Given that the pop method is strictly a transformer, it could simply do nothing when it is invoked on an empty stack. In effect, it could perform a vacuous transformation. For top, which must return an Object reference, the response might be to return null. For some applications this might be a reasonable approach, but in most cases it would merely complicate the application code. We will use a different approach.
What if we state a precondition that a stack must not be empty before calling top or pop? Then we do not have to worry about handling the situation within the ADT. Of course, we cannot expect every application that uses our stack to keep track of whether it is empty; that should be the responsibility of the Stack ADT itself. To address this requirement we define an observer called isEmpty that returns a boolean value of true if the stack is empty. Then the application can prevent misuse of the pop and top operations.
if (!myStack.isEmpty())
   myObject = myStack.top();
This approach appears promising but can place an unwanted burden on the application. If an application must perform a guarding test before every stack operation, its code might become inefficient and difficult to read. Therefore, it is also a good idea to provide an exception related to accessing an empty stack. Consider the situation where a large number of stack calls take place within a section of code. If we define an exception— for example, StackUnderflowException—to be thrown by both pop and top if they are called when the stack is empty, then such a section of code could be surrounded by a single try-catch statement, rather than use multiple calls to the isEmpty operation.
We decide to use this last approach. That is, we define a StackUnderflowException, to be thrown by both pop and top if they are called when the stack is empty. To provide flexibility to the application programmer, we also include the isEmpty operation in our ADT. Now the application programmer can decide either to prevent popping or accessing an empty stack by using the isEmpty operation as a guard or, as shown next, to “try” the operations on the stack and “catch and handle” the raised exception, if the stack is empty.
try
{
   myObject = myStack.top();
   myStack.pop();
   myOtherObject = myStack.top();
   myStack.pop();
}
catch (StackUnderflowException underflow)
{
   System.out.println("There was a problem in the ABC routine.");
   System.out.println("Please inform System Control.");
   System.out.println("Exception: " + underflow.getMessage());
   System.exit(1);
}
We define StackUnderflowException to extend the Java RuntimeException, as it represents a situation that a programmer can avoid by using the stack properly. The RuntimeException class is typically used in such situations. Recall that such exceptions are unchecked; in other words, they do not have to be explicitly caught by a program.
Here is the code for our StackUnderflowException class:
package ch02.stacks;
public class StackUnderflowException extends RuntimeException
{

  public StackUnderflowException()
  {
    super();
  }
  public StackUnderflowException(String message)
  {
    super(message);
  }
}
Because StackUnderflowException is an unchecked exception, if it is raised and not caught it is eventually thrown to the run-time environment, which displays an error message and halts. An example of such a message follows:
Exception in thread "main" ch02.stacks.StackUnderflowException: Top
attempted on an empty stack.
at ch02.stacks.ArrayStack.top(ArrayStack.java:78)
at MyTestStack.main(MyTestStack.java:25)
On the other hand, if the programmer explicitly catches the exception, as we showed in the try-catch example, the error message can be tailored more closely to the specific problem:
There was a problem in the ABC routine.
Please inform System Control.
Exception: top attempted on an empty stack.
A consideration of the push operation reveals another potential problem: What if we try to push something onto a stack and there is no room for it? In an abstract sense, a stack is never conceptually “full.” Sometimes, however, it is useful to specify an upper bound on the size of a stack. We might know that memory is in short supply or problem-related constraints may dictate a limit on the number of push operations that can occur without corresponding pop operations.
We can address this problem in a way analogous to the stack underflow problem. First, we provide an additional boolean observer operation called isFull, that returns true if the stack is full. The application programmer can use this operation to prevent misuse of the push operation. Second, we define StackOverflowException, that is thrown by the push operation if it is called when the stack is full. Here is the code for the StackOverflowException class:
package ch02.stacks;
public class StackOverflowException extends RuntimeException
{
  public StackOverflowException()
  {
    super();
  }
  public StackOverflowException(String message)

  {
    super(message);
  }
}
As with the underflow situation, the application programmer can decide either to prevent pushing information onto a full stack through use of the isFull operation or to “try” the operation on a stack and “catch and handle” any raised exception. The StackOverflowException is also an unchecked exception.
The Interface
We are now ready to formally specify our Stack ADT. As planned, we use the Java interface construct. Within the interface we include method signatures for the three basic stack operations push, pop, and top, plus the two observers isEmpty and isFull, as discussed above.
//---------------------------------------------------------------------------
// StackInterface.java             by Dale/Joyce/Weems              Chapter 2
//
// Interface for a class that implements a stack of T.
// A stack is a last in, first out structure.
//---------------------------------------------------------------------------
package ch02.stacks;

public interface StackInterface<T>
{
   void push(T element) throws StackOverflowException3;
   // Throws StackOverflowException if this stack is full,
   // otherwise places element at the top of this stack.

   void pop() throws StackUnderflowException;
   // Throws StackUnderflowException if this stack is empty,
   // otherwise removes top element from this stack.

   T top() throws StackUnderflowException;
   // Throws StackUnderflowException if this stack is empty,
   // otherwise returns top element of this stack.

   boolean isFull();
   // Returns true if this stack is full, otherwise returns false.

   boolean isEmpty();
   // Returns true if this stack is empty, otherwise returns false.
}
In Section 2.3, “Collection Elements,” we presented our intention to create generic collection ADTs. This means that in addition to implementing our ADTs as generic classes—that is, classes that accept a parameter type upon instantiation—we also will define generic interfaces for those classes. Note the use of <T> in the header of StackInterface. As with generic classes, <T> used in this way indicates that T is a placeholder for a type provided by the client code. T represents the class of objects held by the specified stack. Since the top method returns one of those objects, in the interface it is listed as returning T. This same approach is used for ADT interfaces throughout the remainder of the text.
Note that we document the effects of the operations, the postconditions, as comments. For this ADT there are no preconditions because we have elected to throw exceptions for all error situations.
Example Use
The simple ReverseStrings example below shows how to use a stack to store strings provided by a user and then to output the strings in the opposite order from which they were entered. The code uses the array-based implementation of a stack developed in Section 2.5, “Array-Based Stack Implementations,”. The parts of the code directly related to the creation and use of the stack are emphasized. We declare the stack to be of type StackInterface<String> and then instantiate it as an ArrayBoundedStack<String>. Within the for loop, three strings provided by the user are pushed onto the stack. The while loop repeatedly removes and prints the top string from the stack until the stack is empty. If we try to push any type of object other than a String onto the stack, we will receive a compile-time error message saying that the push method cannot be applied to that type of object.
//---------------------------------------------------------------------------
// ReverseStrings.java            by Dale/Joyce/Weems               Chapter 2
//
// Sample use of stack. Outputs strings in reverse order of entry.
//---------------------------------------------------------------------------
package ch02.apps;

import ch02.stacks.*;
import java.util.Scanner;

public class ReverseStrings
{

  public static void main(String[] args)
  {
    Scanner scan = new Scanner(System.in);

    StackInterface<String> stringStack;
    stringStack = new ArrayBoundedStack<String>(3);

    String line;

    for (int i = 1; i <= 3; i++)
    {
      System.out.print("Enter a line of text > ");
      line = scan.nextLine();
      stringStack.push(line);
    }

    System.out.println("
Reverse is:
");
    while (!stringStack.isEmpty())
    {
      line = stringStack.top();
      stringStack.pop();
      System.out.println(line);
    }
  }
}
Here is the output from a sample run:
Enter a line of text > the beginning of a story
Enter a line of text > is often different than
Enter a line of text > the end of a story

Reverse is:

the end of a story
is often different than
the beginning of a story
2.5 Array-Based Stack Implementations
This section presents an array-based implementation of the Stack ADT. Additionally, we look at an alternative implementation that uses the Java library’s ArrayList class. Note that Figure 2.16 in the Summary on page 146 shows the relationships among the primary classes and interfaces created to support our Stack ADT, including those developed in this section.
The ArrayBoundedStack Class
Here we develop a Java class that implements the StackInterface. We call this class ArrayBoundedStack, because it uses an array as the implementation structure and the resultant stack has a limited size. An array is a reasonable structure to hold the elements of a stack. We can put elements into sequential slots in the array, placing the first element pushed onto the stack into the first array position, the second element pushed into the second array position, and so on. The floating “high-water” mark is the top element in the stack. Given that stacks grow and shrink from only one end, we do not have to worry about inserting an element into the middle of the elements already stored in the array.
What instance variables does our implementation need? It needs the stack elements themselves and a variable indicating the top of the stack. We declare a protected array called elements to hold the stack elements and a protected integer variable called topIndex to indicate the index of the array that holds the top element. The topIndex is initialized to -1, as nothing is stored on the stack when it is first created (to depict how stacks grow and shrink from one end we draw our arrays vertically):

As elements are pushed and popped, we increment and decrement the value of topIndex. For example, starting with an empty stack and pushing “A,” “B,” and “C” results in:

We provide two constructors for use by clients of the ArrayBoundedStack class: One allows the client to specify the maximum expected size of the stack, and the other assumes a default maximum size of 100 elements. To facilitate the latter constructor, we define a constant DEFCAP (default capacity) set to 100.
The beginning of the ArrayBoundedStack.java file is shown here:
//---------------------------------------------------------------------------
// ArrayBoundedStack.java       by Dale/Joyce/Weems                 Chapter 2
//
// Implements StackInterface using an array to hold stack elements.
//
// Two constructors are provided: one that creates an array of a default size
// and one that allows the calling program to specify the size.
//---------------------------------------------------------------------------
package ch02.stacks;

public class ArrayBoundedStack<T> implements StackInterface<T>
{
  protected final int DEFCAP = 100;   // default capacity
  protected T[] elements;             // holds stack elements
  protected int topIndex = -1;        // index of top element in stack

  public ArrayBoundedStack()
  {
    elements = (T[]) new Object[DEFCAP];4
  }

  public ArrayBoundedStack(int maxSize)
  {
    elements = (T[]) new Object[maxSize];4
  }
Note that this class uses a generic parameter <T> as listed in the class header. The elements variable is declared to be of type T[], that is, an array of class T. This class implements a stack of T’s—the class of T is not yet determined. It will be specified by the client class that uses the bounded stack. Because the Java translator will not generate references to a generic type, our code must specify Object along with the new statement within our constructors. Thus, although we declare our array to be an array of class T, we must instantiate it to be an array of class Object. Then, to ensure that the desired type checking takes place, we cast array elements into class T, as shown here:
elements = (T[]) new Object[DEFCAP];
Even though this approach is somewhat awkward and typically generates a compiler warning, it is how we must create generic collections using arrays in Java. We could use the Java library’s generic-compliant ArrayList to rectify the problem, but we prefer to use the more basic array structure for pedagogic reasons. The compiler warning can safely be ignored.
Definitions of Stack Operations
For the array-based approach, the implementations of isFull and its counterpart, isEmpty, are both very simple. The stack is empty if the top index is equal to –1, and the stack is full if the top index is equal to one less than the size of the array.
public boolean isEmpty()
// Returns true if this stack is empty, otherwise returns false.
{
   return (topIndex == -1);
}

public boolean isFull()
// Returns true if this stack is full, otherwise returns false.
{
   return (topIndex == (elements.length - 1));
}
Now let us write the method to push an element of type T onto the top of the stack. If the stack is already full when push is invoked, there is nowhere to put the element. Recall that this condition is called stack overflow. Our formal specifications state that the push method should throw the StackOverflowException in this case. We include a pertinent error message when the exception is thrown. If the stack is not full, push must increment topIndex and store the new element into elements[topIndex]. The implementation of the method is straightforward:
public void push(T element)
// Throws StackOverflowException if this stack is full,
// otherwise places element at the top of this stack.
{
  if (isFull())
    throw new StackOverflowException("Push attempted on a full stack.");
  else
  {
    topIndex++;
    elements[topIndex] = element;
  }
}
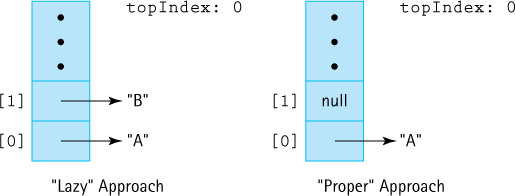
Figure 2.5 Lazy versus proper pop approaches for an array-based stack after push("A"), push("B"), and pop()
The pop method is essentially the reverse of push: Instead of putting an element onto the top of the stack, we remove the top element from the stack by decrementing topIndex. It is good practice to also “null out” the array location associated with the current top. Setting the array value to null removes the physical reference. Figure 2.5 shows the difference between the “lazy” approach to coding pop and the “proper” approach.
If the stack is empty when pop is invoked, there is no top element to remove and we have stack underflow. As with the push method, the specifications say to throw an exception.
public void pop()
// Throws StackUnderflowException if this stack is empty,
// otherwise removes top element from this stack.
{
  if (isEmpty())
    throw new StackUnderflowException("Pop attempted on empty stack.");
  else
  {
    elements[topIndex] = null;
    topIndex--;
  }
}
Finally, the top operation simply returns the top element of the stack, the element indexed by topIndex. Consistent with our generic approach, the top method shows type T as its return type. As with the pop operation, if the top operation is invoked on an empty stack, a stack underflow results.
public T top()
// Throws StackUnderflowException if this stack is empty,
// otherwise returns top element of this stack.
{
  T topOfStack = null;
  if (isEmpty())
    throw new StackUnderflowException("Top attempted on empty stack.");
  else

    topOfStack = elements[topIndex];
  return topOfStack;
}
That does it. We have just completed the creation of our first data structure ADT. Of course, we still need to test it; in fact, as the authors developed the code shown above they ran several tests along the way. We discuss testing of ADTs more thoroughly in the nearby feature section “Testing ADTs.”
Before continuing, we again want to emphasize the distinctions among the application, abstract, and implementation views of a stack. Suppose an application executes the following code (assume A and B represent strings):
StackInterface<String> myStack;
myStack = new ArrayBoundedStack<String>(3);
myStack.push(A);
myStack.push(B);
Figure 2.6 shows, left to right, the application, implementation, and abstract views that result from executing the above code. Note that the application has a reference variable myStack that points to an object of class ArrayBoundedStack. Within this ArrayBoundedStack object is hidden the reference variable elements that points to the array holding the strings and the int variable topIndex that indicates the array index where the top of the stack is stored.

Figure 2.6 Results of stack operations using ArrayBoundedStack
From the point of view of the application programmer the stack object is a black box—the details are hidden. In the figure we get a peek inside that black box. As the Stack ADT implementation programmers, we create the black box. It is important for you to see the difference between the variable myStack, which is an application variable and the variables element and topIndex, which are hidden inside the stack object.
One final note: the stack we implemented is bounded because it uses an array as its hidden data holder. We can also use arrays to implement unbounded stacks. One approach is to instantiate increasingly larger arrays, as needed during processing, copying the current array into the larger, newly instantiated array. We investigate this approach when implementing the Queue ADT in Chapter 4.
The ArrayListStack Class
There are often many ways to implement an ADT. This subsection presents an alternate implementation for the Stack ADT based on the ArrayList class. The ArrayList is a useful ADT provided by the Java Class Library.
The defining quality of objects of the ArrayList class are that they can grow and shrink in response to the program’s needs. As a consequence, when using the ArrayList approach we do not have to worry about our stacks being bounded. Our constructor no longer needs to declare a stack size. The isFull operation can simply return false, because the stack is never full. We do not have to handle stack overflows.
One could argue that if a program runs completely out of memory, then the stack could be considered full and should throw StackOverflowException. However, in that case the run-time environment throws an “out of memory” exception anyway; we do not have to worry about the situation going unnoticed. Furthermore, running out of system memory is a serious problem (and ideally a rare event) and cannot be handled in the same way as a Stack ADT overflow.
The fact that an ArrayList automatically grows as needed makes it a good choice for implementing an unbounded Stack. Additionally, it provides a size method that can be used to keep track of the top of our stack. The index of the top of the stack is always the size minus one.
Study the following code. Compare this implementation to the previous implementation. They are similar, yet different. One is based directly on arrays, whereas the other uses arrays indirectly through the ArrayList class. Note that with the approach shown below the internal representation of our Stack ADT is another ADT—the ArrayList (that in turn is built on top of an array). Just as it is possible to have many levels of procedural abstraction in programs, it is possible to have many levels of data abstraction.
One nice benefit of using the ArrayList approach is we no longer receive the annoying unchecked cast warning from the compiler. This is because an ArrayList object, unlike the basic array, is a first-class object in Java and fully supports the use of generics. Despite the obvious benefits of using ArrayList, we will continue to use arrays as one of our basic ADT implementation structures throughout most of the rest of this text. Learning to use the standard array is important for future professional software developers.
//---------------------------------------------------------------------------
// ArrayListStack.java          by Dale/Joyce/Weems                 Chapter 2
//
// Implements an unbounded stack using an ArrayList.
//---------------------------------------------------------------------------
package ch02.stacks;
import java.util.*;

public class ArrayListStack<T> implements StackInterface<T>
{
  protected ArrayList<T> elements;  // ArrayList that holds stack elements

  public ArrayListStack()
  {
    elements = new ArrayList<T>();
  }

  public void push(T element)
  // Places element at the top of this stack.
  {
    elements.add(element);
  }

  public void pop()
  // Throws StackUnderflowException if this stack is empty,
  // otherwise removes top element from this stack.

  {
     if (isEmpty())
      throw new StackUnderflowException("Pop attempted on empty stack.");
     else
      elements.remove(elements.size() - 1);
  }

  public T top()
  // Throws StackUnderflowException if this stack is empty,
  // otherwise returns top element of this stack.
  {
    T topOfStack = null;
    if (isEmpty())
      throw new StackUnderflowException("Top attempted on empty stack.");
    else
      topOfStack = elements.get(elements.size() - 1);
    return topOfStack;
  }

  public boolean isEmpty()
  // Returns true if this stack is empty, otherwise returns false.
  {
    return (elements.size() == 0);
  }

  public boolean isFull()
  // Returns false – an ArrayListStack is never full.
  {
    return false;
  }
}
2.6 Application: Balanced Expressions
Stacks are great for “remembering” things that have to be taken care of at a later time; in other words, handling postponed obligations. In this sample application we tackle a problem that perplexes many beginning programmers: matching parentheses, brackets, and braces in writing code. Matching grouping symbols is an important problem in the world of computing. For example, it is related to the legality of arithmetic equations, the syntactical correctness of computer programs, and the validity of XHTML tags used to define Web pages. This problem is a classic situation for using a stack, because we must “remember” an open symbol (e.g., (, [, or {) until it is “taken care of” later by matching a corresponding close symbol (e.g., ), ], or }, respectively). When the grouping symbols in an expression are properly matched, computer scientists say that the expression is well formed and that the grouping symbols are balanced.

Figure 2.7 Well-formed and ill-formed expressions
Given a set of grouping symbols, our problem is to determine whether the open and close versions of each symbol are matched correctly. Let us focus on the normal pairs: (), [], and {}. In theory we could define any pair of symbols (e.g., <> or /) as grouping symbols. Any number of other characters may appear in the input expression before, between, or after a grouping pair, and an expression may contain nested groupings. Each close symbol must match the last unmatched open symbol, and each open symbol must have a matching close symbol. Thus, expressions can be ill formed for two reasons: There is a mismatched close symbol (e.g., {]) or there is a missing close symbol (e.g., {{[]}). Figure 2.7 shows examples of both well-formed and ill-formed expressions.
The Balanced Class
To help solve our problem we create a class called Balanced, with a single exported method test that takes an expression as a string argument and checks whether the grouping symbols in the expression are balanced. As there are two ways that an expression can fail the balance test, there are three possible results. We use an integer to indicate the result of the test:
0 means the symbols are balanced, such as (([xx])xx)
1 means the expression has a mismatched close symbol, such as
(([xx}xx))2 means the expression is missing a close symbol, such as
(([xxx])xx
We include a single constructor for the Balanced class. To make the class more generally usable, we require the application to specify the open and close symbols. We thus define two string parameters for the constructor, openSet and closeSet, through which the application can pass the symbols. The symbols in the two sets match up by position. For our specific problem the two arguments could be “([{“and “)]}.”
It is important that each symbol in the combined open and close sets is unique and that the sets be the same size. We use programming by contract and state these criteria in a precondition of the constructor.
public Balanced(String openSet, String closeSet)
// Preconditions: No character is contained more than once in the
//                combined openSet and closeSet strings.
//                The size of openSet == the size of closeSet.
{
   this.openSet = openSet;
   this.closeSet = closeSet;
}
Now we turn our attention to the test method. It is passed a String argument through its expression parameter and must determine, based on the characters in openSet and closeSet, whether the symbols in expression are balanced. The method processes the characters in expression one at a time. For each character, it performs one of three tasks:
If the character is an open symbol, it is pushed on the stack.
If the character is a close symbol, it is checked against the last open symbol, obtained from the top of the stack. If they match, processing continues with the next character. If the close symbol does not match the top of the stack or if the stack is empty, then the expression is ill formed.
If the character is not a special symbol, it is skipped.
The stack is the appropriate data structure in which to save the open symbols because we always need to examine the most recent one. When all of the characters have been processed, the stack should be empty; otherwise, the expression is missing a close symbol.
Now we are ready to write the main algorithm for test. We assume an instance of our Stack ADT as defined by StackInterface. We also declare a boolean variable stillBalanced, initialized to true, to record whether the expression, as processed so far, is balanced.
The part of this algorithm that requires expansion before moving on to the coding stage is the “Process the current character” command. We previously described how to handle each type of character. Here are those steps in algorithmic form.
The code for the Balanced class is listed next. Because the focus of this chapter is stacks, we have emphasized the code related to the stack in the code listing. There are several interesting things to note about the test method of the class:
Within the
testmethod we declare our stack to be of typeStackInterface, but instantiate it as classArrayBoundedStack. It is good practice for a client program to declare an ADT at as abstract a level as possible. This approach makes it easier to change the choice of implementation later.The length of the expression limits the number of symbols that need to be pushed onto the stack. Therefore, we instantiate the stack with a size argument equal to the length of
expression.We use a shortcut for determining whether a close symbol matches an open symbol. According to our rules, the symbols match if they share the same relative position in their respective sets. This means that on encountering an open special symbol, rather than save the actual character on the stack, we can push its position in the
openSetstring onto the stack. Later in the processing, when encountering a close symbol, we can just compare its position with the position value on the stack. Thus, rather than push a character value onto the stack, we push an integer value.We instantiate our stacks to hold elements of type
Integer. But, as just mentioned, in thetestmethod we push elements of the primitive typeintonto our stack, thus taking advantage of Java’s Autoboxing feature. If a programmer uses a value of a primitive type as anObject, it is automatically converted (boxed) into an object of its corresponding wrapper class. So when the test method saysstack.push(openIndex);
the integer value of
openIndexis automatically converted to anIntegerobject before being stored on the stack. A corresponding feature called Unboxing reverses the effect of the Autoboxing. When the top of the stack is accessed with the statementopenIndex = stack.top();
the
Integerobject at the top of the stack is automatically converted to an integer value.In processing a closing symbol, we access the stack to see if its top holds the corresponding opening symbol. If the stack is empty, it indicates an unbalanced expression. There are two ways to check whether the stack is empty: use the
isEmptymethod or try to access the stack and catch aStackUnderflowException. We choose the latter approach. It seems to fit the spirit of the algorithm because we expect to find the open symbol and finding the stack empty is the “exceptional” case.In contrast, we use
isEmptyto check for an empty stack at the end of processing the expression. Here, we do not want to extract an element from the stack—we just need to know whether it is empty.
Here is the code for the entire class:
//---------------------------------------------------------------------------
// Balanced.java          by Dale/Joyce/Weems                       Chapter 2
//
// Checks for balanced expressions using standard rules.
//
// Matching pairs of open and close symbols are provided to the
// constructor through two string arguments.
//---------------------------------------------------------------------------
package ch02.balanced;

import ch02.stacks.*;

public class Balanced
{
  protected String openSet;
  protected String closeSet;

  public Balanced(String openSet, String closeSet)
  // Preconditions: No character is contained more than once in the
  //                combined openSet and closeSet strings.
  //                The size of openSet = the size of closeSet.
  {
    this.openSet = openSet;
    this.closeSet = closeSet;
  }

  public int test(String expression)
  // Returns 0 if expression is balanced.
  // Returns 1 if expression has unbalanced symbols.
  // Returns 2 if expression came to end prematurely.
  {
    char currChar;         // current character being studied
    int  currCharIndex;    // index of current character
    int  lastCharIndex;    // index of last character in expression

    int openIndex;         // index of current character in openSet
    int closeIndex;        // index of current character in closeSet

    boolean stillBalanced = true;  // true while expression balanced

    StackInterface<Integer> stack;    // holds unmatched open symbols
    stack = new ArrayBoundedStack<Integer>(expression.length());

    currCharIndex = 0;
    lastCharIndex = expression.length() - 1;

    while (stillBalanced && (currCharIndex <= lastCharIndex))
    // while expression still balanced and not at end of expression
    {
      currChar = expression.charAt(currCharIndex);
      openIndex = openSet.indexOf(currChar);

      if(openIndex != -1)   // if current character in openSet
      {
        // Push the index onto the stack.
        stack.push(openIndex);
      }
        else
        {
            closeIndex = closeSet.indexOf(currChar);
            if(closeIndex != -1)  // if current character in closeSet
            {
                try     // try to pop an index off the stack
                 {
                   openIndex = stack.top();
                   stack.pop();
                   if (openIndex != closeIndex)  // if not a match
                      stillBalanced = false;     // then not balanced
                 }

                 catch(StackUnderflowException e) // if stack was empty
                 {
                    stillBalanced = false;    // then not balanced
                 }
            }
        }
        currCharIndex++;     // set up processing of next character
      }

      if (!stillBalanced)
        return 1;   // unbalanced symbols
      else
      if (!stack.isEmpty())
        return 2;   // premature end of expression
      else
        return 0;   // expression is balanced
  }
}
The Application
Now that we have the Balanced class, it is not difficult to finish our application.
Our approach to program design in this text is to separate the user interface code from the rest of the program. We design classes, such as Balanced, that use our ADTs to solve some type of problem. We then design an application class that interacts with the user, taking advantage of the previously defined classes. Our extended examples present a command line interface (CLI) application program. However, behind the scenes, we sometimes also create graphical user interface (GUI) applications and provide the code for those programs with the program code files. The GUI-based application is often presented briefly, at the conclusion of the CLI application exposition, for those readers who are interested. Here we describe the CLI application in some detail. By separating the problem-solving aspect from the user interface aspect of our design we can easily reuse the problem-solving classes with different user interfaces.
Because the Balanced class is responsible for determining whether grouping symbols are balanced, all that remains is to implement the user input and output. Rather than processing just one expression, the user can enter a series of expressions, indicating they are finished by entering the expression “X.” We call our program BalancedCLI. Note that when the Balanced class is instantiated, the constructor is passed the strings “({[“ “)]}” so that it corresponds to our specific problem.
//---------------------------------------------------------------------------
// BalancedCLI.java               by Dale/Joyce/Weems               Chapter 2
//
// Checks for balanced grouping symbols.
// Input consists of a sequence of expressions, one per line.
// Special symbol types are (), [], and {}.
//---------------------------------------------------------------------------
package ch02.apps;

import java.util.Scanner;
import ch02.balanced.*;

public class BalancedCLI
{
  public static void main(String[] args)
  {
    Scanner scan = new Scanner(System.in);

    // Instantiate new Balanced class with grouping symbols.
    Balanced bal = new Balanced("([{", ")]}");

    int result; // 0 = balanced, 1 = unbalanced, 2 = premature end

    String expression = null;    // expression to be evaluated
    final String STOP = "X";     // indicates end of input

    while (!STOP.equals(expression))
    {
      // Get next expression to be processed.
      System.out.print("Expression (" + STOP + " to stop): ");
      expression = scan.nextLine();
      if (!STOP.equals(expression))
      {
         // Obtain and output result of balanced testing.
         result = bal.test(expression);
         if (result == 1)
            System.out.println("Unbalanced
");
         else
         if (result == 2)
            System.out.println("Premature end of expression
");
         else

            System.out.println("Balanced
");
      }
    }
  }
}
Here is the output from a sample run:
Expression (X to stop): (xx[yy]{ttt})
Balanced

Expression (X to stop): ((())
Premature end of expression

Expression (X to stop): (ttttttt]
Unbalanced

Expression (X to stop): (){}{}[({{[{({})}]}})]
Balanced

Expression (X to stop): X

Figure 2.8 Program architecture
The Software Architecture
Figure 2.8 is a UML diagram showing the relationships among our interfaces and classes used in the balanced expression applications. The intent is to show the general architecture, so we do not include details about attributes and operations.
2.7 Introduction to Linked Lists
Recall from Section 1.4, “Data Structures,” that the array and the linked list are the two primary building blocks for the more complex data structures. This section discusses linked lists in more detail, showing how to create linked lists using Java and introducing operations on linked lists. We use linked lists of strings in our examples.
This is a very important section. Understanding linked structures is crucial for computer scientists.
Arrays Versus Linked Lists

The figure depicts abstract views of an array of strings and a linked list of strings. An important difference between the two approaches is the internal representation of the data in memory and the way in the individual elements are accessed. With an array, we view all the elements as being grouped together, sitting in one block of memory. With a linked list, each element sits separately in its own block of memory. We call this small separate block of memory a “node.”
An array is a built-in structure in Java and most other programming languages. In contrast, although a few languages provide built-in linked lists (e.g., Lisp and Scheme), most do not. Java does support common types of linked lists through its class library. Even though the linked lists in the library are sufficient for many applications, software engineers need to understand how they work, both to appreciate their limitations and also to be able to build custom linked structures when the need arises.
As you know, an array allows us to access any element directly via its index. In comparison, the linked list structure seems very limited, as its nodes can only be accessed in a sequential manner, starting at the beginning of the list and following the links. So why should we bother to use a linked list in the first place? There are several potential reasons:
The size of an array is fixed. It is provided as an argument to the
newcommand when the array is instantiated. The size of a linked list varies. The nodes of a linked list can be allocated on an “as needed” basis. When no longer needed, the nodes can be returned to the memory manager.For some operations a linked list is a more efficient implementation approach than an array. For example, to place an element into the front of a collection of elements with an array you must shift all elements by one place toward the back of the array. This task requires many steps, especially if the array contains many elements. With a linked list you simply allocate a new node and link it to the front of the list. This task requires only three steps: create the new node and update two links. The following figure depicts the steps required to add an element to the front of an array and an equivalent linked list:

For some applications you never have to directly access a node that is deep within the list without first accessing the nodes that precede it on the list. In those cases, the fact that nodes of a linked list must be accessed sequentially does not adversely affect performance.
The basic approaches that support linked list management also allow us to create and use more complex structures such as the trees and graphs developed in later chapters.
The LLNode Class
To create a linked list we need to know how to do two things: allocate space for a node dynamically and allow a node to link to, or reference, another node. Java supplies an operation for dynamically allocating space, an operation we have been using for all of our objects—the new operation. Clearly, that part is easy. But how can we allow a node to reference another node? Essentially a node in a linked list is an object that holds some important information, such as a string or other object, plus a link to another node. That other node is the exact same type of object—it is also a node in the linked list.
When defining the node class, we must allow the objects created from it to reference node class objects. This type of class is a self-referential class. The definition of our node class includes two instance variables: one that holds the important information that the linked list is maintaining and one that is a reference to an object of its same class. To allow our linked lists to be generally usable we use generics. The generic placeholder <T> is used to represent the information held by a node of the linked list. This approach allows us to create linked lists of strings, bank accounts, student records, and virtually anything.
We call our self-referential class LLNode. Objects of this class are the linked list nodes. Because we use this class to support link-based implementations of several of our ADTs later in the text, we place it in the support package. Its declarations include self-referential code, which is emphasized here:
package support;
public class LLNode<T>
{
   protected T info;                 // information stored in list
   protected  LLNode<T> link;        // reference to a node
. . .
The LLNode class defines an instance variable info to hold a reference to the object of class T represented by the node and an instance variable link to reference another LLNode object. That next LLNode can hold a reference to an object of class T and a reference to another LLNode object, that in turn holds a reference to an object of class T and a reference to another LLNode object, and so on. The chain ends when the LLNode holds the value null in its link, indicating the end of the linked list. As an example, here is a linked list with three nodes, referenced by the LLNode<String> variable letters.5 Given that we know how the nodes of our linked list are implemented, we now present a more detailed view in our figures.

We define one constructor for the LLNode class:
public LLNode(T info)
{
  this.info = info;
  link = null;
}
The constructor accepts an object of class T as an argument and sets the info variable to that object. For example,
LLNode<String> sNode1 = new LLNode<String>("basketball");
results in the structure

Other constructors are possible, such as one that accepts an LLNode<T> reference as an argument and sets the link variable. We do not think they would add much to the usability of the class.
Note that our constructor essentially creates a linked list with a single element. How, then, can you represent an empty linked list? You do so by declaring a variable of class LLNode but not instantiating it with the new operation:
LLNode<String> theList;
In that case, the value held in the node variable is null:
theList: null
Completing the class are the definitions of the setters and getters. Their code is standard and straightforward. The setLink method is used to link nodes together into a list. For example, the following code
LLNode<String> sNode1 = new LLNode<String>("basketball");
LLNode<String> sNode2 = new LLNode<String>("baseball")";
sNode1.setLink(sNode2);
results in the structure

The complete LLNode class is shown next. It is used in Section 2.8, “A Link-Based Stack,” to create a link-based implementation of the Stack ADT. Before we see how that is accomplished, we introduce the standard operations on linked lists.
//--------------------------------------------------------------------------
// LLNode.java               by Dale/Joyce/Weems                   Chapter 2
//
// Implements<T> nodes for a Linked List.
//--------------------------------------------------------------------------
package support;

public class LLNode<T>
{
   protected T info;
   protected LLNode<T> link;

   public LLNode(T info)
   {
      this.info = info;
      link = null;
   }

  public void setInfo(T info){ this.info = info;}
  public T getInfo(){ return info; }
  public void setLink(LLNode<T> link){this.link = link;}
  public LLNode<T> getLink(){ return link;}
}
Operations on Linked Lists
Our node class LLNode provides a building block. It is up to us to use this building block to create and manipulate linked lists.
Three basic operations are performed on linked lists: A linked list can be traversed to obtain information from it, a node can be added to a linked list, and a node can be removed from a linked list. Look more carefully at each of these categories. To help simplify our presentation, we assume the existence of this linked list of LLNode<String> objects referenced by the variable letters:

Traversal
Information held in a linked list is retrieved by traversing the list. There are many potential reasons for traversing a list; for the purposes of this discussion let us assume that we want to display the information contained in the letters linked list one line at a time, starting at the beginning of the list and finishing at the end of the list.
To traverse the linked list we need some way to keep track of our current position in the list. With an array we use an index variable. That approach will not work with a linked list because it is not indexed. Instead we need to use a variable that can reference the current node of interest on the list. Let us call it currNode. The traversal algorithm is
We refine this algorithm, transforming it into Java code as we go. Our letters list is a linked list of LLNode<String> objects. Therefore, currNode must be an LLNode<String> variable. We initialize currNode to point to the beginning of the list.
Next we turn our attention to the body of the while loop. Displaying the information at currNode is achieved using the getInfo method. That part is easy:
System.out.println(currNode.getInfo());
But how do we “Change currNode to point to the next node on the list”? Consider the situation after currNode has been initialized to the beginning of the linked list:

We want to change currNode to point to the next node, the node where the info variable points to the string “C.” In the preceding figure notice what points to that node— the link variable of the node currently referenced by currNode. Therefore, we use the getLink method of the LLNode class to return that value and set the new value of currNode:
currNode = currNode.getLink();
Putting this all together we now have the following pseudocode.
The only thing left to do is determine when currNode is pointing off the end of the list. The value of currNode is repeatedly set to the value in the link variable of the next node. When we reach the end of the list, the value in this variable is null. So, as long as the value of currNode is not null, it is “not pointing off the end of the list.” Our final code segment is
LLNode<String> currNode = letters;
while (currNode != null)
{
   System.out.println(currNode.getInfo());
   currNode = currNode.getLink();
}
Figure 2.9 traces through this code, graphically depicting what occurs at each step using our example linked list.
Before leaving this example we should see how our code handles the case of the empty linked list. The empty linked list is an important boundary condition. Whenever you are dealing with linked lists, you should always double-check that your approach works for this oft-encountered special case.

Figure 2.9 Trace of traversal code on letters linked list
Recall that an empty linked list is one in which the value in the variable that represents the list is null:
letters: null
What does our traversal code do in this case? The currNode variable is initially set to the value held in the letters variable, which is null. Therefore, currNode starts out null, the while loop condition
(currNode != null)
is immediately false, and the while loop body is not entered. Essentially, nothing happens—exactly what we would like to happen when traversing an empty list! Our code passes this desk check. We should also remember to check this case with a test program.
Insertion
Three general cases of insertion into a linked list must be considered: insertion at the beginning of the list, insertion in the interior of the list, and insertion at the end of the list.

Let us consider the case in which we want to insert a node into the beginning of the list. Suppose we have the node newNode to insert into the beginning of the letters linked list:

Our first step is to set the link variable of the newNode node to point to the beginning of the list:

To finish the insertion, we set the letters variable to point to the newNode, making it the new beginning of the list:

The insertion code corresponding to these two steps is
newNode.setLink(letters);
letters = newNode;
Note that the order of these statements is critical. If we reversed the order of the statements, we would end up with this:

You must be very careful when manipulating references. Drawing figures to help you follow what is going on is usually a good idea.
As we did for the traverse operation, we should ask what happens if our insertion code is called when the linked list is empty. Figure 2.10 depicts this situation graphically. Does the method correctly link the new node to the beginning of the empty linked list? In other words, does it correctly create a list with a single node? First, the link of the new node is assigned the value of letters. What is this value when the list is empty? It is null, which is exactly what we want to put into the link of the only node of a linked list. Then letters is reset to point to the new node. The new node becomes the first, and only, node on the list. Thus this method works for an empty linked list as well as a linked list that contains elements. It is always gratifying (and an indication of good design) when our general case algorithm also handles the special cases correctly.
Implementation of the other two kinds of insertion operations requires similar careful manipulation of references.

Figure 2.10 Results of insertion code on an empty linked list
Remaining Operations
So far this section has developed Java code that performs a traversal of a linked list and an insertion into the beginning of a linked list. We provided these examples to give you an idea of how you can work with linked lists at the code level.
Our purpose in introducing linked lists was to enable us to use them later for implementing ADTs. We defer development of the remaining linked list operations, including deletions, until they are needed to support the implementation of a specific ADT. For now, we will simply say that, as with insertion, there are three general cases of deletion of nodes from a linked list: deletion at the beginning of the list, deletion in the interior of the list, and deletion at the end of the list.
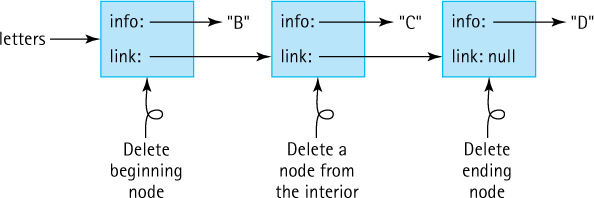
2.8 A Link-Based Stack
In the previous section we introduced linked lists and explained how they provide an alternative to arrays when implementing collections. It is important for you to learn both approaches. Recall that a “link” is the same thing as a “reference.” The Stack ADT implementation presented in this section is therefore referred to as a reference- or link-based implementation.
Figure 2.16, in the Summary on page 146, shows the relationships among the primary classes and interfaces created to support our Stack ADT, including those developed in this section.
The LinkedStack Class
We call our new stack class LinkedStack to differentiate it from our array-based stack implementations. LinkedStack implements the StackInterface. Determining names for our classes is important and not always easy. See the nearby boxed feature “Naming Constructs” for more discussion of this topic.
Only one instance variable is required in the LinkedStack class, one that holds a reference to the linked list of objects that represents the stack. Needing quick access to the top of the stack, we maintain a reference to the node representing the top, that is, the most recent element pushed onto the stack. That node will, in turn, hold a reference to the node representing the next most recent element. This pattern continues until a particular node holds a null reference in its link attribute, signifying the bottom of the stack. We call the original reference variable top, as it will always reference the top of the stack. It is a reference to an LLNode. When instantiating an object of class LinkedStack, we create an empty stack by setting top to null. The beginning of the class definition is shown here. Note the import statement that allows us to use the LLNode class.
//---------------------------------------------------------------------------
// LinkedStack.java  by Dale/Joyce/Weems      Chapter 2
//
// Implements StackInterface using a linked list to hold the stack elements.
//---------------------------------------------------------------------------

package ch02.stacks;

import support.LLNode;
public class LinkedStack<T> implements StackInterface<T>
{
   protected LLNode<T> top; // reference to the top of this stack

   public LinkedStack()
   {
      top = null;
   }
. . .
Next, we see how we implement our link-based stack operations.
The push Operation
Pushing an element onto the stack means creating a new node and linking it to the current chain of nodes. Figure 2.11 shows the result of the sequence of operations listed here. Like Figure 2.6 it shows the application, implementation, and abstract views of the stack. It graphically demonstrates the dynamic allocation of space for the references to the stack elements. Assume A, B, and C represent objects of class String.
StackInterface<String> myStack;
myStack = new LinkedStack<String>();
myStack.push(A);
myStack.push(B);
myStack.push(C);
When performing the push operation we must allocate space for each new node dynamically. Here is the general algorithm:
Figure 2.12 graphically displays the effect of each step of the algorithm, starting with a stack that already contains A and B and showing what happens when C is pushed onto it. This is the same algorithm studied in Section 2.7, “Introduction to Linked Lists,” for insertion into the beginning of a linked list. We have arranged the node boxes visually to emphasize the LIFO nature of a stack.
Let us look at the algorithm line by line, creating our code as we go. Follow our progress through both the algorithm and Figure 2.12 during this discussion. We begin by allocating space for a new stack node and setting its info attribute to the element:
LLNode<T> newNode = new LLNode<T>(element);

Figure 2.11 Results of stack operations using LLNode<String>
Thus, newNode is a reference to an object that contains two attributes: info of class T and link of the class LLNode. The constructor has set the info attribute to reference element (the argument C in our example), as required. Next we need to set the value of the link attribute:
newNode.setLink(top);
Now info references the element pushed onto the stack, and the link attribute of that element references the previous top of stack.
Finally, we need to reset the top of the stack to reference the new node:
top = newNode;

Figure 2.12 Results of push(C) operation
Putting it all together, the code for the push method is
public void push(T element)
// Places element at the top of this stack.
{
   LLNode<T> newNode = new LLNode<T>(element);
   newNode.setLink(top);
   top = newNode;
}
Note that the order of these tasks is critical. If we reset the top variable before setting the link of the new node, we would lose access to the stack nodes. This situation is generally true when dealing with a linked structure: You must be very careful to change the references in the correct order so that you do not lose access to any of the data. Do not hesitate to draw pictures such as those shown in our figures to help ensure you code the correct sequence of steps.

Figure 2.13 Results of push operation on an empty stack
You have seen how the algorithm works on a stack that contains elements. What happens if the stack is empty? Although we verified in Section 2.7, “Introduction to Linked Lists,” that our approach works in this case, we should trace through it again. Figure 2.13 shows graphically what occurs.
Space is allocated for the new node, and the node’s info attribute is set to reference element. Now we need to correctly set the various links. The link of the new node is assigned the value of top. What is this value when the stack is empty? It is null, which is exactly what we want to put into the link of the last (bottom) node of a linked stack. Then top is reset to point to the new node, making the new node the top of the stack. The result is exactly what is desired—the new node is the only node on the linked list, and it is the current top of the stack.
The pop Operation
The pop operation is equivalent to deleting the first node of a linked list. It is essentially the reverse of the push operation.

Figure 2.14 Results of pop operation
To accomplish it simply reset the stack’s top variable to reference the node that represents the next element. Resetting top to the next stack node effectively removes the top element from the stack. See Figure 2.14. This requires only a single line of code:
top = top.getLink();
The assignment copies the reference from the link attribute of the top stack node into the variable top. After this code is executed, top refers to the LLNode object just below the prior top of the stack. We can no longer reference the previous top object because we overwrote our only reference to it. As indicated in Figure 2.14, the former top of the stack becomes garbage; the system garbage collector will eventually reclaim the space. If the info attribute of this object is the only reference to the data object labeled C in the figure, it, too, is garbage and its space will be reclaimed.
Are there any special cases to consider? Given that an element is being removed from the stack, we should be concerned with empty stack situations. What happens if we try to pop an empty stack? In this case the top variable contains null and the assignment statement “top = top.getLink;” results in a run-time error: NullPointerException. Therefore, we protect the assignment statement using the Stack ADT’s isEmpty operation. The code for our pop method is shown next.
public void pop()
// Throws StackUnderflowException if this stack is empty,
// otherwise removes top element from this stack.
{
   if (isEmpty())
      throw new StackUnderflowException("Pop attempted on an empty stack.");
   else
      top = top.getLink();
}
We use the same StackUnderflowException we used in our array-based approaches.
There is one more special case: popping from a stack with only one element. We need to make sure that this operation results in an empty stack. Let us see if it does. When our stack is instantiated, top is set to null. When an element is pushed onto the stack, the link of the node that represents the element is set to the current top variable; therefore, when the first element is pushed onto our stack, the link of its node is set to null. Of course, the first element pushed onto the stack is the last element popped off. This means that the last element popped off the stack has an associated link value of null. Because the pop method sets top to the value of this link attribute, after the last value is popped, top again has the value null, just as it did when the stack was first instantiated. We conclude that the pop method works for a stack of one element. Figure 2.15 graphically depicts pushing a single element onto a stack and then popping it off.
The Other Stack Operations
Recall that the top operation simply returns a reference to the top element of the stack. At first glance this might seem very straightforward. Simply code
return top;
as top references the element on the top of the stack. However, remember that top references an LLNode object. Whatever program is using the Stack ADT is not concerned about LLNode objects. The client program is only interested in the object that is referenced by the info variable of the LLNode object.
Let us try again. To return the info of the top LLNode object we code
return top.getInfo();
That is better, but we still need to do a little more work. What about the special case when the stack is empty? In that situation we throw an exception instead of returning an object. The final code for the top method is shown next.
public T top()
// Throws StackUnderflowException if this stack is empty,
// otherwise returns top element of this stack.

Figure 2.15 Results of push, then pop on an empty stack
{
   if (isEmpty())
      throw new StackUnderflowException("Top attempted on an empty stack.");
   else
      return top.getInfo();
}
That was not bad, but the isEmpty method is even easier. If we initialize an empty stack by setting the top variable to null, then we can detect an empty stack by checking for the value null.
public boolean isEmpty()
// Returns true if this stack is empty, otherwise returns false.
{
   return (top == null);
}
Because a linked stack is never full (we can always allocate another node) the isFull method simply returns false:
public boolean isFull()
// Returns false – a linked stack is never full.
{
   return false;
}
The linked implementation of the Stack ADT can be tested using a similar test plan as was presented for the array-based version.
Comparing Stack Implementations
Here we compare our two classic implementations of the Stack ADT, ArrayBoundedStack and LinkedStack, in terms of storage requirements and efficiency of the algorithms. First we consider the storage requirements. An array that is instantiated to match the maximum stack size takes the same amount of memory, no matter how many array slots are actually used. The linked implementation, using dynamically allocated storage, requires space only for the number of elements actually on the stack at run time. Note, however, that the elements are larger because we must store the reference to the next element as well as the reference to the user’s data.
We now compare the relative execution “efficiency” of the two implementations. The implementations of isFull and isEmpty are clearly O(1); they always take a constant amount of work. What about push, pop, and top? Does the number of elements in the stack affect the amount of work required by these operations? No, it does not. In all three implementations, we directly access the top of the stack, so these operations also take a constant amount of work. They, too, have O(1) complexity.
Only the class constructor differs from one implementation to the other in terms of the order of growth efficiency. In the array-based implementation, when the array is instantiated, the system creates and initializes each of the array locations. As it is an array of objects, each array slot is initialized to null. The number of array slots is equal to the maximum number of possible stack elements. We call this number N and say that the array-based constructor is O(N). For the linked approach, the constructor simply sets the top variable to null, so it is only O(1).
Overall, the two stack implementations are roughly equivalent in terms of the amount of work they do. So, which is better? The answer, as usual, is “it depends.” The linked implementation does not have space limitations, and in applications where the number of stack elements can vary greatly, it wastes less space when the stack is small. Why would we ever want to use the array-based implementation? Because it is short, simple, and efficient. If pushing occurs frequently, the array-based implementation executes faster than the link-based implementation because it does not incur the run-time overhead of repeatedly invoking the new operation. When the maximum size is small and we know the maximum size with certainty, the array-based implementation is a good choice.
2.9 Application: Postfix Expression Evaluator
Postfix notation is a notation for writing arithmetic expressions in which the operators appear after their operands.6 For example, instead of writing
(2 + 14) × 23
we write
2 14 + 23 ×
With postfix notation, there are no precedence rules to learn, and parentheses are never needed. Because of this simplicity, some popular handheld calculators of the 1980s used postfix notation to avoid the complications of the multiple parentheses required in traditional algebraic notation. Postfix notation is also used by compilers for generating nonambiguous expressions.
Discussion
In elementary school you learned how to evaluate simple expressions that involve the basic binary operators: addition, subtraction, multiplication, and division. These are called binary operators because they each operate on two operands. It is easy to see how a child would solve the following problem:
2 + 5 = ?
As expressions become more complicated, the pencil-and-paper solutions require a little more work. Multiple tasks must be performed to solve the following problem:
(((13 – 1) / 2) × (3 + 5)) = ?
These expressions are written using a format known as infix notation, which is the same notation used for expressions in Java. The operator in an infix expression is written in between its operands. When an expression contains multiple operators such as
3 + 5 × 2
we need a set of rules to determine which operation to carry out first. You learned in your mathematics classes that multiplication is done before addition. You learned Java’s operator-precedence rules7 in your first Java programming course. We can use parentheses to override the normal ordering rules. Still, it is easy to make a mistake when writing or interpreting an infix expression containing multiple operations.
Evaluating Postfix Expressions
Postfix notation is another format for writing arithmetic expressions. In this notation, the operator is written after (post) the two operands. For example, to indicate addition of 3 and 5:
5 3 +
The rules for evaluating postfix expressions with multiple operators are much simpler than those for evaluating infix expressions; simply perform the operations from left to right. Consider the following postfix expression containing two operators.
6 2 / 5 +
We evaluate the expression by scanning from left to right. The first item, 6, is an operand, so we go on. The second item, 2, is also an operand, so again we continue. The third item is the division operator. We now apply this operator to the two previous operands. Which of the two saved operands is the divisor? The one seen most recently. We divide 6 by 2 and substitute 3 back into the expression, replacing 6 2 /. Our expression now looks like this:
3 5 +
We continue our scanning. The next item is an operand, 5, so we go on. The next (and last) item is the operator +. We apply this operator to the two previous operands, obtaining a result of 8.
Here are some more examples of postfix expressions containing multiple operators, equivalent expressions in infix notation, and the results of evaluating them. See if you get the same results when you evaluate the postfix expressions.
| Postfix Expression | Infix Equivalent | Result |
|---|---|---|
| 4 5 7 2 + – × | 4 × (5 – (7 + 2)) | –16 |
| 3 4 + 2 × 7 / | ((3 + 4) × 2)/7 | 2 |
| 5 7 + 6 2 – × | (5 + 7) × (6 – 2) | 48 |
| 4 2 3 5 1 – + × + × | ? × (4 + (2 × (3 + (5 – 1)))) | not enough operands |
| 4 2 + 3 5 1 – × + | (4 + 2) + (3 × (5 – 1)) | 18 |
| 5 3 7 9 + + | (3 + (7 + 9)) ... 5??? | too many operands |
Our task is to write a program that evaluates postfix expressions entered interactively by the user. In addition to computing and displaying the value of an expression, our program must display error messages when appropriate (“not enough operands,” “too many operands,” and “illegal symbol”).
Postfix Expression Evaluation Algorithm
As so often happens, our by-hand algorithm can serve as a guideline for our computer algorithm. From the previous discussion it is clear that there are two basic items in a postfix expression: operands (numbers) and operators. We access items (an operand or an operator) from left to right, one at a time. When the item is an operator, we apply it to the preceding two operands.
We must save previously scanned operands in a collection object of some kind. A stack is the ideal place to store the previous operands, because the top item is always the most recent operand and the next item on the stack is always the second most recent operand— just the two operands required when we find an operator. The following algorithm uses a stack to evaluate a postfix expression.
Each iteration of the while loop processes one operator or one operand from the expression. When an operand is found, there is nothing to do with it (we have not yet found the operator to apply to it), so it is saved on the stack until later. When an operator is found, we get the two topmost operands from the stack, perform the operation, and put the result back on the stack; the result may be an operand for a future operator.
Let us trace this algorithm. Before we enter the loop, the input remaining to be processed and the stack look like this:

After one iteration of the loop, we have processed the first operand and pushed it onto the stack.

After the second iteration of the loop, the stack contains two operands.

We encounter the + operator in the third iteration. We remove the two operands from the stack, perform the operation, and push the result onto the stack.

In the next two iterations of the loop, we push two operands onto the stack.

When we find the - operator, we remove the top two operands, subtract, and push the result onto the stack.

When we find the * operator, we remove the top two operands, multiply, and push the result onto the stack.

Now that we have processed all of the items on the input line, we exit the loop. We remove the result, 48, from the stack, and return it.

This discussion has glossed over a few “minor” details, such as how to recognize an operator, how to know when we are finished, and when to generate error messages. We discuss these issues as we continue to evolve the solution to our problem.
Error Processing
Our application will read a series of postfix expressions, some of which might be illegal. Instead of displaying an integer result when such an expression is entered, the application should display error messages as follows:
| Type of Illegal Expression | Error Message |
|---|---|
| An expression contains a symbol that is not an integer or not one of “+,” “-,” “ * ,” and “ / ” | Illegal symbol |
| An expression requires more than 50 stack items | Too many operands—stack overflow |
| There is more than one operand left on the stack after the expression is processed; for example, the expression 5 6 7 + has too many operands | Too many operands—operands left over |
| There are not enough operands on the stack when it is time to perform an operation; for example, 6 7 + + +; and, for example, 5 + 5 | Not enough operands—stack underflow |
Assumptions
The operations in expressions are valid at run time. This means there is no division by zero. Also, no numbers are generated that are outside of the range of the Java
inttype.A postfix expression has a maximum of 50 operands.
To facilitate error management we create an exception class called PostFixException similar to the exceptions created for the Stack ADT.
The PostFixEvaluator Class
The purpose of this class is to provide an evaluate method that accepts a postfix expression as a string and returns the value of the expression. We do not need any objects of the class, so we implement evaluate as a public static method. This means that it is invoked through the class itself, rather than through an object of the class.
The evaluate method must take a postfix expression as a string argument and return the value of the expression. The code for the class is listed below. It follows the basic postfix expression algorithm that was developed earlier, using an ArrayBoundedStack object to hold operands of class Integer until they are needed. Note that it instantiates a Scanner object to “read” the string argument and break it into tokens.
Let us consider error message generation. Because the evaluate method returns an int value, the result of evaluating the postfix expression, it cannot directly return an error message. Instead we turn to Java’s exception mechanism. Look through the code for the lines that throw PostFixException exceptions. You should be able to see that we cover all of the error conditions identified previously. As would be expected, the error messages directly related to the stack processing are all protected by if statements that check whether the stack is empty (not enough operands) or full (too many operands). The only other error trapping occurs if the string stored in operator does not match any of the legal operators, in which case an exception with the message “Illegal symbol” is thrown. This is a very appropriate use of exceptions.
//----------------------------------------------------------------------
// PostFixEvaluator.java       by Dale/Joyce/Weems             Chapter 2
//
// Provides a postfix expression evaluation.
//----------------------------------------------------------------------
package ch02.postfix;

import ch02.stacks.*;
import java.util.Scanner;

public class PostFixEvaluator
{
  public static int evaluate(String expression)
  {
    Scanner tokenizer = new Scanner(expression);
    StackInterface<Integer> stack = new ArrayBoundedStack<Integer>(50);

    int value;
    String operator;

    int operand1, operand2;
    int result = 0;
    Scanner tokenizer = new Scanner(expression);

    while (tokenizer.hasNext())
    {
      if (tokenizer.hasNextInt())
      {
        // Process operand.
        value = tokenizer.nextInt();
        if (stack.isFull())
          throw new PostFixException("Too many operands-stack overflow");
        stack.push(value);
      }
      else
      {
         // Process operator.
         operator = tokenizer.next();

        // Check for illegal symbol
        if (!(operator.equals("/") || operator.equals("*") ||
              operator.equals("+") || operator.equals("-")))
          throw new PostFixException("Illegal symbol: " + operator);

        // Obtain second operand from stack.
        if (stack.isEmpty())
          throw new PostFixException("Not enough operands-stack underflow" );
        operand2 = stack.top();
        stack.pop();

        // Obtain first operand from stack.
        if (stack.isEmpty())
          throw new PostFixException("Not enough operands-stack underflow" );
        operand1 = stack.top();
        stack.pop();

        // Perform operation.
        if (operator.equals("/" ))
          result = operand1 / operand2;
        else
        if(operator.equals("*" ))
          result = operand1 * operand2;
        else
        if(operator.equals("+" ))
          result = operand1 + operand2;

        else
        if(operator.equals("-"))
          result = operand1 - operand2;

        // Push result of operation onto stack.
        stack.push(result);
      }
    }

    // Obtain final result from stack.
    if (stack.isEmpty())
      throw new PostFixException("Not enough operands-stack underflow");
    result = stack.top();
    stack.pop();

    // Stack should now be empty.
    if (!stack.isEmpty())
      throw new PostFixException("Too many operands-operands left over");

    // Return the final.
    return result;
  }
}
The PFixCLI Class
This class is the main driver for our CLI-based application. Using the PostFixEvaluator and PostFixException classes, it is easy to design our program. We follow the same basic approach used for BalancedCLI earlier in the chapter—namely, repeatedly prompt the user for an expression, allowing him or her to enter “X” to indicate he or she is finished, and if the user is not finished, evaluate the expression and return the results. Note that the main program does not directly use a stack; it uses the PostFixEvaluator class, which in turn uses a stack.
//---------------------------------------------------------------------------
// PFixCLI.java              by Dale/Joyce/Weems                    Chapter 2
//
// Evaluates postfix expressions entered by the user.
// Uses a command line interface.
//---------------------------------------------------------------------------
package ch02.apps;

import java.util.Scanner;
import ch02.postfix.*;

public class PFixCLI
{
  public static void main(String[] args)
  {
    Scanner scan = new Scanner(System.in);
    String expression = null;    // expression to be evaluated
    final String STOP = "X";     // indicates end of input
    int result;                  // result of evaluation

    while (!STOP.equals(expression))
    {
      // Get next expression to be processed.
      System.out.print("
Postfix Expression (" + STOP + " to stop): ");
      expression = scan.nextLine();

      if (!STOP.equals(expression))
      {
         // Obtain and output result of expression evaluation.
         try
         {
           result = PostFixEvaluator.evaluate(expression);

           // Output result.
           System.out.println("Result = " + result);
         }
         catch (PostFixException error)
         {
           // Output error message.
           System.out.println("Error in expression - " + error.getMessage());
         }
      }
    }
  }
}
Here is a sample run of our console-based application:
Postfix expression (X to stop): 5 7 + 6 2 - *
Result = 48
Postfix expression (X to stop): 4 2 3 5 1 - + * + *
Error in expression Not enough operands-stack underflow
Postfix expression (X to stop): X
2.10 Stack Variations
In the primary exposition of our ADTs in this text we record design decisions and specify the operations to be supported by the ADT. We also develop or at least discuss various implementation approaches, in most cases highlighting one array-based approach and one reference/linked list–based approach.
There are alternate approaches to defining/implementing any data structure. Therefore, for each of the major data structures presented in this text, we include a section that investigates variations of the structure. The stack, being a relatively simple data structure, does not permit a great amount of variation as compared, for example, to the tree structure for which dozens of variations exist. Nevertheless, a look at stack variations is still instructive.
Revisiting Our Stack ADT
Let us briefly review the design decisions made when we defined our Stack ADT and consider alternate approaches:
Our stacks are generic, that is, the type of element held in our stack is specified by the application when the stack is instantiated. Alternately, we could define stacks to hold elements of class
Objector of a class that implements a specified interface. These approaches were discussed in detail in Section 2.3, “Collection Elements,”.Classically, stacks provide two operations:
void push (T element)—pusheselementonto the stackT pop ( )—removes and returns the top element of the stack
For our stacks we redefined
popand added a third operationtop, giving us:void push (T element)—pusheselementonto the stackvoid pop ( )—removes the top element of the stackT top( )—returns the top element of the stack
Obviously, we could have chosen to use the classic approach. In one sense the top method we define is superfluous, as we can create the same result by using the classic pop immediately followed by a push. We chose our approach to emphasize the design benefits of defining methods that only do one thing. Thus we avoid the dual action of the classic pop that both removes and returns an element. However, the classic approach is also valid, and you will find it in many texts and code libraries.
Our stacks throw exceptions in the case of underflow or overflow. An alternative approach is to state as a precondition for the stack methods that they will not be invoked in a situation where an underflow or overflow will be generated. In that case the implementation of the operations can just ignore the possibility. Yet another approach is to catch the issue within the method and prevent the overflow or underflow from occurring by nullifying the operation. With this latter approach we might redefine our three operations to return information about whether or not the operation completed successfully:
boolean push (T element)—pushes the element onto the stack; returnstrueif element successfully pushed,falseotherwiseboolean pop ( )—removes the top element of the stack; returnstrueif element successfully popped,falseotherwiseT top( )—if the stack is not empty, returns the top element of the stack; otherwise returnsnull
Rather than redefining our operations we could also just add new operations with unique names such as safePush or offer.
The Java Stack Class and the Collections Framework
The Java library provides classes that implement ADTs that are based on common data structures: stacks, queues, lists, maps, sets, and more. The library’s Stack8 is similar to the Stack ADT we develop in this chapter in that it provides a LIFO structure. However, in addition to our push, top, and isEmpty9 operations, it includes two other operations:
T pop( )—The classic “pop” operation removes and returns the top element from the stack.int search(Object o)—Returns the position of objectoon the stack.
Because the library Stack class extends the library Vector class, it also inherits many operations defined for Vector (such as capacity, clear, clone, contains, isEmpty, toArray, and toString) and its ancestor Object.
Here is how you might implement the reverse strings application (see Section 2.4, “The Stack Interface,”) using the Stack class from the Java library. The minimal differences between this application and the one using our Stack ADT are emphasized.
//---------------------------------------------------------------------------
// ReverseStrings2.java          by Dale/Joyce/Weems                Chapter 2
//
// Sample use of the library Stack.
// Outputs strings in reverse order of entry.
//---------------------------------------------------------------------------
package ch02.apps;

import java.util.Stack;
import java.util.Scanner;

public class ReverseStrings2
{
   public static void main(String[] args)
   {
      Scanner scan = new Scanner(System.in);

      Stack<String> stringStack = new Stack<String>();

      String line;

      for (int i = 1; i <= 3; i++)
      {
         System.out.print("Enter a line of text > ");
         line = scan.nextLine();
         stringStack.push(line);
      }

      System.out.println("
Reverse is:
" );
      while (!stringStack.empty())
      {
         line = stringStack.peek();
         stringStack.pop();
         System.out.println(line);
      }
   }
}
The library pop method both removes and returns the top element of the stack. Therefore, the body of the while loop in ReverseStrings2 could be coded as
line = stringStack.pop();
System.out.println(line);
or even as
System.out.println(stringStack.pop());
Which approach is best? It is really a matter of personal preference. We believe the approach used in ReverseStrings2 is the easiest to read and understand. However, one could also argue that the one-line approach shown immediately above is clear enough and properly uses the pop method.
The Collections Framework
As discussed in Section 2.2, “The Stack,” another term for a data structure is “collection.” The Java developers refer to the set of library classes, such as Stack, that support data structures as the Collections Framework. This framework includes both interfaces and classes. It also includes documentation that explains how the developers intend for us to use them. As of Java 5.0 all the structures in the Collections Framework support generics.
The Java library’s Collections Framework comprises an extensive set of tools. It does more than just provide implementations of data structures; it provides a unified architecture for working with collections. The Stack class has been part of the Java Library from the beginning. More recently the library includes a set of Deque classes that can and should be used in place of the legacy Stack class. We will discuss the Deque classes in the Variations section of Chapter 4.
In this text we do not cover the Java Collections Framework in great detail. This text is meant to teach you about the fundamental nature of data structures and to demonstrate how to define, implement, and use them. It is not an exploration of how to use Java’s specific library architecture of similar structures. Nevertheless, when we discuss a data structure that has a counterpart in the Java library, we will briefly describe the similarities and differences between our approach and the library’s approach, as we did here for stacks.
Before you become a professional Java programmer you should carefully study the Collections Framework and learn how to use it productively. This text prepares you to do this not just for Java, but for other languages and libraries as well. If you are interested in learning more about the Java Collections Framework, you can study the extensive documentation available at Oracle’s website.
Summary
Data can be viewed from multiple perspectives. Java encapsulates the implementations of its predefined types and allows us to encapsulate our own class implementations. In this chapter we specified a Stack ADT using the Java interface construct and created several implementations: one based on arrays, one based on the library’s ArrayList class, and one based on linked lists. The concept of a linked list, new to many readers, was introduced in its own section. The Stack ADT allowed us to create applications that checked whether the grouping symbols in a string are balanced and evaluated postfix arithmetic expressions.
When using data abstraction to work with data structures such as a stack, there are three levels or views from which to consider our structures. The abstract level describes what the ADT provides to us. This view includes the domain of what the ADT represents and what it can do, as specified by its interface. At the application level, we use the ADT to solve problems. Finally, the implementation level provides the specific details of how to represent our structure and the code that supports the operations. The abstract level acts as a contract between the application level “above” it and the implementation level “below” it.
What do we gain by separating these views of the data? First, we reduce complexity at the higher levels of the design, making the client program easier to understand. Second, we make the program more readily modifiable: The implementation can be changed without affecting the program that uses the data structure. Third, we develop software that is reusable: The implementation operations can be used by other programs, for completely different applications, as long as the correct interfaces are maintained.

Figure 2.16 The stack-related interfaces and classes developed in Chapter 2
Figure 2.16 is a UML-like diagram showing the stack-related interfaces and classes developed in this chapter, along with a few other supporting classes, and their relationships. Our diagrams vary somewhat from traditional UML class diagrams:
We show the name of the package in the upper-left corner of the class/interface rectangle.
We omit private and protected information.
If a class implements an interface we do not relist the methods defined within the interface within the class rectangle. We indicate that some methods have not been listed but placing “. . .” at the bottom of the method list.
In an effort to present clear, uncluttered diagrams we sometimes omit arrows indicating “uses,” if the information can be inferred. For example, the
Array-BoundedStackclass uses theStackUnderflowException. Since theArray-BoundedStackclass implementsStackInterface, and we already show thatStackInterfaceusesStackUnderflowException, we can safely omit the arrow connectingArrayBoundedStacktoStackUnderflowException.Library classes included in our diagrams are shaded. We only include such classes if they are directly related to the implementation of the ADT.
Exercises
2.1 Abstraction
-
Describe four ways you use abstraction in your everyday life.
-
Name three different perspectives from which we can view data. Using the example “a list of student academic records,” describe how we might view the data from each perspective.
-
Describe one way that the implementation details can affect the applications that use an ADT, despite the use of data abstraction.
-
What is an abstract method?
-
What happens if a Java interface specifies a particular method signature, and a class that implements the interface provides a different signature for that method? For example, suppose interface
SampleInterfaceis defined as:public interface SampleInterface { public int sampleMethod(); }and the class
SampleClassispublic class SampleClass implements SampleInterface { public boolean sampleMethod() { return true; } } -
True or False? Explain your answers.
You can define constructors for a Java interface.
Classes implement interfaces.
Classes extend interfaces.
A class that implements an interface can include methods that are not required by the interface.
A class that implements an interface can leave out methods that are required by an interface.
You can instantiate objects of an interface.
-
What is wrong with the following method, based on our conventions for handling error situations?
public void method10(int number)
// Precondition:   number is > 0.
// Throws NotPositiveException if number is not > 0,
// otherwise ...
-
A friend of yours is having trouble instantiating an object of type
FigureInterface. His code includes the statementFigureInterface myFig = new FigureInterface(27.5);
What do you tell your friend?
-
 Create Java classes that implement the
 FigureInterfaceinterface:Square—constructor accepts a single argument of typedoublewhich indicates the length of a side of the squareRightTriangle—constructor accepts two arguments of typedoublethat indicate the lengths of the two legsIsoscelesTriangle—constructor accepts two arguments of typedoublethat indicate the height and the baseParallelogram—constructor accepts three arguments of typedoublethat indicate the height, the base, and the angle between the nonbase side and the base
-
 Update the
 RandomFigsapplication so that it also uses the newFigureInterfaceclasses you implemented for the previous question. -
For this problem you must define a simple interface
NumTrackerInterfaceand two implementations of the interface,Tracker1andTracker2.Define a Java interface named
NumTrackerInterface. A class that implements this interface must keep track of both the sum and the count of numbers that are submitted to it through itsaddmethod, and provide getters for the sum, the count, and the average of those numbers. Theaddmethod should accept an argument of typeint, thegetSumandgetCountmethods should both return values of typeint, and thegetAveragemethod should return a value of typedouble. Suppose a class namedTracker1implements theNumTrackerInterface. A simple sample application that usesTracker1is shown here. Its output would be “3 29 9.67.”public class Sample { public static void main (String[] args) { NumTrackerInterface nt = new Tracker1(); nt.add(5); nt.add(15); nt.add(9); System.out.print(nt.getCount() + " "); System.out.print(nt.getSum() + " "); System.out.println(nt.getAverage()); } }Create a class called
Tracker1that implements theNumTrackerInterface. This class should use three instance variables,count,sum, andaverage, to hold information. The getters should simply return the information when requested. Create a test driver application that demonstrates that theTracker1class works correctly.Create a class called
Tracker2that implements theNumTrackerInterface. This class should use two instance variables,countandsum, to hold information. The average should be calculated only when needed with this approach. Create a test driver application that demonstrates that theTracker2class works correctly.Discuss the difference in the design philosophies exhibited by
Tracker1andTracker2.
2.2 The Stack
-
True or False?
A stack is a first in, first out structure.
The item that has been in a stack the longest is at the “bottom” of the stack.
If you push five items onto an empty stack and then pop the stack five times, the stack will be empty again.
If you push five items onto an empty stack and then perform the top operation five times, the stack will be empty again.
The push operation should be classified as a “transformer.”
The top operation should be classified as a “transformer.”
The pop operation should be classified as an “observer.”
The top operation always returns the most recently pushed item.
If we first push
itemAonto a stack and then pushitemB, then the top of the stack isitemB.On a stack a push operation followed by a pop operation has no effect on the status of the stack.
On a stack a pop operation followed by a push operation has no effect on the status of the stack.
-
Describe the differences between the classic stack pop operation and the pop operation as defined in this text.
-
In the following command sequences numbered blocks are pushed and popped from a stack. Suppose that every time a block is popped, its numerical value is printed. Show the sequence of values that are printed in each of the following sequences. Assume you begin with an empty stack:
push block5; push block7 ; pop; pop; push block2; push block1; pop; push block8;
push block5; push block4; push block3; push block2; pop; push block1; pop; pop; pop;
push block1; pop; push block1; pop; push block1; pop; push block1; pop;
-
Describe how you might use a stack in each of the following scenarios:
Help a forgetful friend discover where he left his umbrella during a night out “on the town.”
Track an auction where the current highest bidder is allowed to retract her bid.
2.3 Collection Elements
-
In Section 2.3, “Collection Elements,” we looked at four approaches to defining the types of elements we can hold in a collection ADT. Briefly describe each of the four approaches.
-
For this problem you must define a simple generic interface
PairInterface, and two implementations of the interface,BasicPairandArrayPair.Define a Java interface named
PairInterface. A class that implements this interface allows creation of an object that holds a “pair” of objects of a specified type—these are referred to as the “first” object and the “second” object of the pair. We assume that classes implementingPairInterfaceprovide constructors that accept as arguments the values of the pair of objects. ThePairInterfaceinterface should require both setters and getters for the first and second objects. The actual type of the objects in the pair is specified when thePairInterfaceobject is instantiated. Therefore, both thePairInterfaceinterface and the classes that implement it should be generic. Suppose a class namedBasicPairimplements thePairInterfaceinterface. A simple sample application that usesBasicPairis shown here. Its output would be "apple orange."public class Sample { public static void main (String[] args) { PairInterface myPair<String> = new BasicPair<String>("apple", "peach"); System.out.print(myPair.getFirst() + " "); myPair.setSecond("orange"); System.out.println(myPair.getSecond()); } }Create a class called
BasicPairthat implements thePairInterfaceinterface. This class should use two instance variables,firstandsecond, to represent the two objects of the pair. Create a test driver application that demonstrates that theBasicPairclass works correctly.Create a class called
ArrayPairthat implements thePairInterfaceinterface. This class should use an array10 of size 2 to represent the two objects of the pair. Create a test driver application that demonstrates that theArrayPairclass works correctly.
2.4 Formal Specification
-
The
StackInterfaceinterface represents a contract between the implementer of a Stack ADT and the programmer who uses the ADT. List the main points of the contract. -
Based on our Stack ADT specification, an application programmer has two ways to check for an empty stack. Describe them and discuss when one approach might be preferable to the other approach.
-
Show what is written by the following segments of code, given that
item1,item2, anditem3areintvariables, andsis an object that fits the abstract description of a stack as given in the section. Assume that you can store and retrieve variables of typeintons.item1 = 1; item2 = 0; item3 = 4; s.push(item2); s.push(item1); s.push(item1 + item3); item2 = s.top(); s.push (item3*item3); s.push(item2); s.push(3); item1 = s.top(); s.pop(); System.out.println(item1 + " " + item2 + " " + item3); while (!s.isEmpty()) { item1 = s.top(); s.pop(); System.out.println(item1); }item1 = 4; item3 = 0; item2 = item1 + 1; s.push(item2); s.push(item2 + 1); s.push(item1); item2 = s.top(); s.pop(); item1 = item2 + 1; s.push(item1); s.push(item3); while (!s.isEmpty()) { item3 = s.top(); s.pop(); System.out.println(item3); } System.out.println(item1 + " " + item2 + " " + item3);
-
Your friend Bill says, “The push and pop stack operations are inverses of each other. Therefore, performing a push followed by a pop is always equivalent to performing a pop followed by a push. You get the same result!” How would you respond to that? Do you agree?
-
In each plastic container of Pez candy, the colors are stored in random order. Your little brother Phil likes only the yellow ones, so he painstakingly takes out all the candies one by one, eats the yellow ones, and keeps the others in order, so that he can return them to the container in exactly the same order as before—minus the yellow candies, of course. Write the algorithm to simulate this process. (You may use any of the stack operations defined in the Stack ADT, but may not assume any knowledge of how the stack is implemented.)
-
Using the Stack ADT:
Download the text code files and set them up properly on your laptop/desktop. Run the
ReverseStringsapplication.Create a similar program that uses a stack. Your new program should ask the user to input a line of text and then it should print out the line of text in reverse. To do this your application should use a stack of
Character.
-
A Century Stack is a stack with a fixed size of 100. If a Century Stack is full, then the element that has been on the stack, the longest, is removed to make room for the new element. Create a
CenturyStackInterfacefile that captures this specification of a Century Stack.
2.5 Array-Based Stack Implementations
-
Show the implementation representation (the values of the instance variables
elementsandtopIndex) at each step of the following code sequence:StackInterface<String> s = new ArrayBoundedStack<String> (5); s.push("Elizabeth"); s.push("Anna Jane"); s.pop(); s.push("Joseph"); s.pop(); -
Show the implementation representation (the values of the instance variables
elementsandtopIndex) at each step of the following code sequence:StackInterface<String> s = new ArrayBoundedStack<String> (5); s.push("Adele"); s.push("Heidi"); s.push("Sylvia"); s.pop();s.pop();s.pop(); -
Describe the effects each of the changes would have on the
ArrayBoundedStackclass.Remove the
finalattribute from theDEFCAPinstance variable.Change the value assigned to
DEFCAPto 10.Change the value assigned to
DEFCAPto -10.In the first constructor change the statement to
elements = (T[]) new Object[100];
In
isEmpty, change “topIndex == -1” to “topIndex < 0”.Reverse the order of the two statements in the else clause of the
pushmethod.Reverse the order of the two statements in the else clause of the
popmethod.In the
throwstatement of thetopmethod change the argument string from “Top attempted on an empty stack” to “Pop attempted on an empty stack.”
-
Add the following methods to the
ArrayBoundedStackclass, and create a test driver for each to show that they work correctly. In order to practice your array related coding skills, code each of these methods by accessing the internal variables of theArrayBoundedStack, not by calling the previously defined public methods of the class.String toString()—creates and returns a string that correctly represents the current stack. Such a method could prove useful for testing and debugging the class and for testing and debugging applications that use the class. Assume each stacked element already provided its own reasonabletoStringmethod.int size()—returns a count of how many items are currently on the stack. Do not add any instance variables to theArrayBoundedStackclass in order to implement this method.void popSome(int count)—removes the topcountelements from the stack; throwsStackUnderflowExceptionif there are less thancountelements on the stack.boolean swapStart()—if there are less than two elements on the stack returnsfalse; otherwise it reverses the order of the top two elements on the stack and returnstrue.T poptop( )—the “classic” pop operation, if the stack is empty it throwsStackUnderflowException; otherwise it both removes and returns the top element of the stack.
-
Perform the tasks listed in Exercise 28, but update the
ArrayListStack. -
Using the
ArrayBoundedStackclass, create an applicationEditStringthat prompts the user for a string and then repeatedly prompts the user for changes to the string, until the user enters an X, indicating the end of changes. Legal change operations are:U—make all letters uppercase
L—make all letters lowercase
R—reverse the string
C ch1 ch2—change all occurrences of ch1 to ch2
Z—undo the most recent change
You may assume a “friendly user,” that is, the user will not enter anything illegal. When the user is finished the resultant string is printed. For example, if the user enters:
All dogs go to heaven
U
R
Z
C O A
C A t
X
Z
the output from the program will be “ALL DAGS GA TA HEAVEN”
-
During software development when is the appropriate time to begin testing?
-
Create a noninteractive test driver, similar to
Test034, that performs robust testing of the listed method of theArrayBoundedStackclass:isEmptytoppushpop
-
Perform the tasks listed in Exercise 32, but test the
ArrayListStack. Note: If you completed Exercise 32 then this should be a trivial exercise. -
Implement a Century Stack (see Exercise 24).
Using an array (can you devise a solution that maintains O(1) efficiency for the push operation?).
Using an
ArrayList.
2.6 Application: Balanced Expressions
-
Suppose each of the following well-formed expressions (using the standard parenthesis, brackets, and braces) is passed to the
testmethod of ourBalancedclass. Show the contents of the stack, from bottom to top, at the point in time when the stack holds the most elements, for each expression. Include ties.( x x ( xx ( ) ) xx) [ ]
( ) [ ] { } ( ) [ ] { }
(( )) [[[ ]]] {{{{ }}}}
( { [ [ { ( ) } [ { ( ) } ] ] ] } ( ) )
-
Suppose each of the following ill-formed expressions (using the standard parenthesis, brackets, and braces) is passed to the
testmethod of ourBalancedclass. Show the contents of the stack, from bottom to top, at the point in time when it is discovered the expression is ill-formed.( x x ( xx ( ) xx) [ ]
( ) [ ] { ( ) [ } ] { }
(( )) [[[ ]]] {{{{ }}}} )
( { [ [ { ( ) } [ { ( { ) } ] ] ] } ( ) )
-
Answer the following questions about the
Balancedclass:Is there any functional difference between the class being instantiated in the following two ways?
Balanced bal = new Balanced ("abc", "xyz");
Balanced bal = new Balanced ("cab", "zxy");
Is there any functional difference between the class being instantiated in the following two ways?
Balanced bal = new Balanced ("abc", "xyz");
Balanced bal = new Balanced ("abc", "zxy");
Is there any functional difference between the class being instantiated in the following two ways?
Balanced bal = new Balanced ("abc", "xyz");
Balanced bal = new Balanced ("xyz", "abc");
Which type is pushed onto the stack? A
char? Anint? AnInteger? Explain.Under which circumstances is the first operation performed on the stack (not counting the
newoperation) thetopoperation?What happens if the string
expression, that is passed to thetestmethod, is an empty string?
2.7 Introduction to Linked Lists
-
What is a self-referential class?
-
Draw figures representing our abstract view of the structures created by each of the following code sequences. Assume that each case is preceded by these three lines of code:
LLNode<String> node1 = new LLNode<String>("alpha");
LLNode<String> node2 = new LLNode<String>("beta");
LLNode<String> node3 = new LLNode<String>("gamma");
node1.setLink(node3); node2.setLink(node3);
node1.setLink(node2);      node2.setLink(node3);
node3.setLink(node1);
node1.setLink(node3); node2.setLink(node1.getLink());
-
We developed Java code for traversing a linked list. Here are several alternate, possibly flawed, approaches for using a traversal to print the contents of the linked list of strings accessed through
letters. Critique each of them:LLNode<String> currNode = letters; while (currNode != null) { System.out.println(currNode.getInfo()); currNode = currNode.getLink(); }LLNode<String> currNode = letters; while (currNode != null) { currNode = currNode.getLink(); System.out.println(currNode.getInfo()); }LLNode<String> currNode = letters; while (currNode != null) { System.out.println(currNode.getInfo()); if (currNode.getLink() != null) currNode = currNode.getLink(); else currNode = null; }
-
Assume
numberspoints to a linked list ofLLNode<Integer>. Write code that prints the following. Do not forget to consider the case where the list is empty. Recall thatLLNodeexports setters and getters for bothinfoandlink.The sum of the numbers on the list
The count of how many elements are on the list
The count of how many positive numbers are on the list
The enumerated contents of the list; for example, if the list contains 5, 7, and -9 the code will print
1.  5
2.  7
3. -9
The reverse enumerated contents of the list (hint: use a stack); for example, if the list contains 5, 7, and -9 the code will print
1. -9
2.  7
3.  5
-
Using the same style of algorithm presentation as found in this section, describe an algorithm for
Removing the first element from a linked list
Removing the second item from a linked list
Swapping the first two elements of a linked list (you can assume the list has at least two elements)
Adding an element with info attribute I as the second element of a linked list (you can assume the list has at least one element)
2.8 A Link-Based Stack
-
What are the main differences, in terms of memory allocation, between using an array-based stack and using a link-based stack?
-
Consider the code for the
pushmethod of theLinkedStackclass. What would be the effect of the following changes to that code?Switch the first and second lines.
Switch the second and third lines.
-
Show the implementation representation (draw the linked list starting with
topIndex) at each step of the following code sequence:StackInterface<String> s = new LinkedStack<String>(); s.push("Elizabeth"); s.push("Anna Jane"); s.pop(); s.push("Joseph"); s.pop(); -
Show the implementation representation (draw the linked list starting with
topIndex) at each step of the following code sequence:StackInterface<String> s = new LinkedStack<String>(); s.push("Adele"); s.push("Heidi"); s.push("Sylvia"); s.pop();s.pop();s.pop(); -
Repeat Exercise 28, but add the methods to the
LinkedStackclass. -
Use the
LinkedStackclass to support an application that tracks the status of an online auction. Bidding begins at 1 (dollars, pounds, euros, or whatever) and proceeds in increments of at least 1. If a bid arrives that is less than the current bid, it is discarded. If a bid arrives that is more than the current bid, but less than the maximum bid by the current high bidder, then the current bid for the current high bidder is increased to match it and the new bid is discarded. If a bid arrives that is more than the maximum bid for the current high bidder, then the new bidder becomes the current high bidder, at a bid of one more than the previous high bidder’s maximum. When the auction is over (the end of the input is reached), a history of the actual bids (the ones not discarded), from high bid to low bid, should be displayed. For example:New Bid Result High Bidder High Bid Maximum Bid 7 John New high bidder John 1 7 5 Hank High bid increased John 5 7 10 Jill New high bidder Jill 8 10 8 Thad No change Jill 8 10 15 Joey New high bidder Joey 11 15 The bid history for this auction would be
Joey 11 Jill 8 John 5 John 1 Input/output details can be determined by you or your instructor. In any case, as input proceeds the current status of the auction should be displayed. The final output should include the bid history as described above.
-
Implement a Century Stack (see Exercise 24) using a linked list.
2.9 Application: Postfix Expression Evaluator
-
Evaluate the following postfix expressions.
5 7 8 * +
5 7 8 + *
5 7 + 8 *
1 2 + 3 4 + 5 6 * 2 * * +
-
Evaluate the following postfix expressions. Some of them may be ill-formed expressions—in that case, identify the appropriate error message (e.g., too many operands, too few operands).
1 2 3 4 5 + + +
1 2 + + 5
1 2 * 5 6 *
/ 23 * 87
4567 234 / 45372 231 * + 34526 342 / + 0 *
-
Revise and test the postfix expression evaluator program as specified here.
Use the
ArrayListStackclass instead of theArrayBoundedStackclass— do not worry about stack overflow.Catch and handle the divide-by-zero situation that was assumed not to happen. For example, if the input expression is 5 3 3 - /, the result would be the message “illegal divide by zero.”
Support a new operation indicated by “^” that returns the larger of its operands. For example, 5 7 ^ = 7.
Keep track of statistics about the numbers pushed onto the stack during the evaluation of an expression. The program should output the largest and smallest numbers pushed, the total numbers pushed, and the average value of pushed numbers.
2.10 Stack Variations
-
In the discussion of our Stack ADT, as compared to the classic definition of a stack, we stated that our
topmethod is superfluous. AssumemyStackis a stack of strings that uses the classic definition of thepopmethod. Create a code section that is functionally equivalent to the following line of code, but that does not use thetopmethod:System.out.println(myStack.top());
-
As discussed in this section, instead of having our stack methods throw exceptions in the case of “erroneous” invocations, we could have the stack methods handle the situation themselves. We define the following three “safe” methods:
boolean safePush (T element)—pusheselementonto the stack; returnstrueif element successfully pushed,falseotherwiseboolean safePop ( )—removes the top element of the stack; returnstrueif element successfully popped,falseotherwiseT safeTop( )—if the stack is not empty returns the top element of the stack, otherwise returnsnull
Add these operations to the
ArrayBoundedStackclass. Create a test driver application to demonstrate that the added code works correctly.Add these operations to the
ArrayListStackclass. Create a test driver application to demonstrate that the added code works correctly.Add these operations to the
LinkedStackclass. Create a test driver application to demonstrate that the added code works correctly.
Exercises 55 to 58 require “outside” research.
-
Describe the major differences between the Java library’s
VectorandArrayListclasses. -
Explain how the iterators in the Java Collections Framework are used.
-
What is the defining feature of the Java library’s
Setclass? -
Which classes of the Java library implement the
Collectioninterface?