
CHAPTER 4: The Queue ADT
© Ake13bk/Shutterstock
In this chapter we consider the queue, the logical counterpart of the stack. Whereas the stack is a “last in, first out” (LIFO) structure, a queue is a “first in, first out” (FIFO) structure. Whichever element is in the queue the longest time is the next element to be removed. Like the stack, the queue has many important uses related to systems programming and also is an appropriate structure for many other applications.
We study the queue as an ADT, looking at it from the abstract, application, and implementation levels. At the abstract level, queues are defined using a Java interface. Several applications of queues are discussed, and in particular we look at how queues are used to determine whether a string is a palindrome and to investigate properties of real-world queues. Two basic approaches are used to implement queues: arrays and linked lists. In addition to using an array to implement a bounded queue, we see how to implement an unbounded queue using an array. In a bit of a departure from our normal sequential processing view of things, the final section of the chapter discusses how queues are used to hold tasks targeted for parallel execution, and how to use Java to safely exploit such parallelism if it can be used to improve performance.
4.1 The Queue
The stacks studied in Chapter 2 are structures in which elements are always added to and removed from the same end. But what if we need to represent a collection that operates in a different manner? Suppose we want to simulate cars passing through the stages of a car wash. The cars go in one end and come out the other end. A data structure in which elements enter at one end and are removed from the opposite end is called a queue. The queue data structure, like the car wash, has the property that the first element (car) to go in is the first element (car) to come out.
Several variations on this basic form of queue exist, so to distinguish it we sometimes refer to this version as a FIFO queue. Other versions of queues are presented in Section 4.7, “Queue Variations” and in Chapter 9, “The Priority Queue ADT.” For now we concentrate on the classic version of a queue—so when we say “queue” we mean a FIFO queue. As with the stack, we consider the queue as an ADT from three levels: abstract, implementation, and application.
A queue is an access-controlled group of elements in which new elements are added at one end (the “rear”) and elements are removed from the other end (the “front”). As another example of a queue, consider a line of students waiting to pay for their books at a university bookstore (see Figure 4.1). In theory, if not in practice, each new student gets in line at the rear. When the cashier is ready for a new customer, the student at the front of the line is served.
To add elements to a queue, we access the rear of the queue; to remove elements, we access the front. The middle elements are logically inaccessible. It is convenient to picture the queue as a linear structure with the front at the left end and the rear at the right end. However, we must stress that the “ends” of the queue are abstractions; their “leftness” and “rightness” may or may not correspond to any characteristics of the queue’s implementation. The essential property of the queue is its FIFO access.

Figure 4.1 A FIFO queue
Operations on Queues
The bookstore example suggests two operations that can be applied to a queue. First, new elements can be added to the rear of the queue, an operation called enqueue. Second, elements can be removed from the front of the queue, an operation called dequeue. Figure 4.2 shows how a series of these operations would affect a queue, envisioned as a series of blocks.
Unlike the stack operations push and pop, the addition and removal operations for a queue do not have standard names. The enqueue operation is sometimes called enq, enque, add, or insert; dequeue is also called deq, deque, remove, or serve.
Using Queues
Chapter 2 discussed how operating systems and compilers use stacks. Similarly, queues are often used for system programming purposes. For example, an operating system often maintains a queue of processes that are ready to execute or that are waiting for a particular event to occur.
As another example, computer systems must often provide a “holding area” for messages that are being transmitted between two processes, two programs, or even two systems. This holding area is usually called a “buffer” and is often implemented as a queue. For example, if a large number of mail messages arrive at a mail server at about the same time, the messages are held in a buffer until the mail server can get around to processing them. If it processes the messages in the order they arrived—in FIFO order—then the buffer is a queue.

Figure 4.2 The effects of enqueue and dequeue operations
Many other applications need to store requests before processing. Consider applications that provide services to customers—for example, selling airline or theater tickets. Such applications typically use a queue to manage the requests.
As shown by the bookstore example, our software queues have counterparts in real-world queues. We wait in queues to buy pizza, to enter movie theaters, to drive on a turnpike, and to ride on a roller coaster. Another important application of the queue data structure is to help us simulate and analyze such real-world queues, as we will see in the sample application in Section 4.8, “Application: Average Waiting Time.”
4.2 The Queue Interface
This section formally specifies our Queue ADT. Other than the fact that we support the operations enqueue and dequeue rather than push, pop, and top, we use the same basic approach as we did for our Stack ADT:
Our queues are generic—the type of object held by a particular queue is indicated by the client at the time the queue is instantiated.
The classes defined to support our queues are grouped together in the
ch04. queuespackage.We provide an observer operation
sizeso that an application can determine the size of a queue. The size of a queue might be important to an application because it can give an indication of how long an element will remain in the queue.We provide observer operations
isEmptyandisFullso that a client, when appropriate, can prevent itself from trying to remove an element from an empty queue or add an element to a full queue.We create
QueueUnderflowExceptionandQueueOverflowExceptionclasses.We create a
QueueInterfacethat defines the signatures of the queue methods. An implementation of a queue shouldimplementthis interface.
The code for the two exception classes is essentially the same as that used for the two stack exception classes in Chapter 2, so we do not show it here. As with stacks, the application programmer can decide to prevent problems by using the isFull and isEmpty observers before accessing a queue, or the application can “try” the access operations and “catch and handle” any raised exception.
Here is the QueueInterface. As you can see, it defines the signatures of the five queue methods—enqueue, dequeue, isEmpty, isFull, and size.
//---------------------------------------------------------------------------
// QueueInterface.java          by Dale/Joyce/Weems                 Chapter 4
//
// Interface for a class that implements a queue of T.
// A queue is a "first in, first out" structure.
//---------------------------------------------------------------------------
package ch04.queues;

public interface QueueInterface<T>
{
   void enqueue(T element) throws QueueOverflowException1;
   // Throws QueueOverflowException if this queue is full;
   // otherwise, adds element to the rear of this queue.

   T dequeue() throws QueueUnderflowException;
   // Throws QueueUnderflowException if this queue is empty;
   // otherwise, removes front element from this queue and returns it.

   boolean isFull();
   // Returns true if this queue is full;
   // otherwise, returns false.

   boolean isEmpty();
   // Returns true if this queue is empty;
   // otherwise, returns false.
   int size();
   // Returns the number of elements in this queue.
}
Example Use
As we did for stacks we provide a simple example use of a queue to end this section about the formal specification of the Queue ADT. The RepeatStrings example shows how to use a queue to store strings provided by a user and then to output the strings in the same order in which they were entered. The code uses the array-based implementation of a queue developed in the next section. The parts of the code directly related to the creation and use of the queue are emphasized. We declare the queue to be of type QueueInterface<String> and then instantiate it as an ArrayBoundedQueue<String>. Within the for loop, three strings provided by the user are enqueued. The while loop repeatedly dequeues and prints the front string from the queue until the queue is empty.
//----------------------------------------------------------------------
// RepeatStrings.java        by Dale/Joyce/Weems               Chapter 4
//
// Sample use of a queue. Outputs strings in same order of entry.
//----------------------------------------------------------------------
package ch04.apps;

import ch04.queues.*;
import java.util.Scanner;

public class RepeatStrings
{
  public static void main(String[] args)
  {
    Scanner scan = new Scanner(System.in);

    QueueInterface<String> stringQueue;
    stringQueue = new ArrayBoundedQueue<String>(3);

    String line;

    for (int i = 1; i <= 3; i++)

    {
       System.out.print("Enter a line of text > ");
       line = scan.nextLine();
       stringQueue.enqueue(line);
    }
     System.out.println("
Order is:
");
     while (!stringQueue.isEmpty())
    {
       line = stringQueue.dequeue();
       System.out.println(line);
    }
  }
}
Here is the output from a sample run:
Enter a line of text > the beginning of a story
Enter a line of text > is often different than
Enter a line of text > the end of a story

Order is:

the beginning of a story
is often different than
the end of a story
4.3 Array-Based Queue Implementations
This section presents two array-based implementations of the Queue ADT: one that implements a bounded queue and one that implements an unbounded queue. We continue to simplify some of our figures by using a capital letter to represent an element’s information.
Note that Figure 4.16, in the chapter’s summary, shows the relationships among all the classes and interfaces created to support our Queue ADT.
The ArrayBoundedQueue Class
First we develop a Java class that implements a fixed-size queue. Such a queue is often called a “bounded buffer” because it has a limited size (it is bounded), and it can be used to temporarily hold information until it is needed (it is a buffer). We call our class ArrayBoundedQueue, in recognition of the fact that it uses an array as the internal implementation. The term Bounded is part of the class name to distinguish this class from the array-based unbounded queue that is developed later in this section.
Our first task is to decide how to store the queue in the array: We need some way of determining the front and rear elements of the queue. Several possible alternatives are available.
Fixed-Front Design Approach
In our array-based implementation of the Stack ADT we began by inserting an element into the first array position, setting topIndex to 0, and then adjusting the location of topIndex with subsequent push and pop operations. The bottom of the stack, however, was always the first slot in the array. Can we use a similar solution for a queue, keeping the front of the queue fixed in the first array slot and letting the rear move as new elements are added?
Let us see what happens after a few enqueue and dequeue operations if we add the first element into the first array position, the second element into the second position, and so on. To simplify our figures in this chapter, we show the element sitting inside its corresponding array slot—keep in mind that, in actuality, the array slot holds a reference to the element. After four calls to enqueue with arguments A, B, C, and D, the queue would look like this:

Remember that the front of the queue is fixed at the first slot in the array, whereas the rear of the queue moves back with each enqueue. Now we dequeue the front element from the queue:

This operation removes the element in the first array slot and leaves a hole. To keep the front of the queue fixed at the top of the array, we need to move every element in the queue forward one slot:

With this design the enqueue operation is the same as the array-based stack’s push, simply add the element into the next available array slot. The dequeue operation is more complicated than the stack’s pop, because the remaining elements of the queue have to shift up toward the front of the array.
Let us evaluate this design. Its strengths are its simplicity and ease of coding; it is almost as simple as the stack implementation. Although the queue is accessed from both ends rather than one (as in the stack), we just have to keep track of the rear, because the front is fixed. Only the dequeue operation is more complicated. What is the weakness of the design? It is the complexity and inefficiency of the dequeue operation. All of the elements must move forward one array slot every time we dequeue, which increases the amount of work done.
How serious is this weakness? To make this judgment, we have to know something about how the queue will be used. If it will hold large numbers of elements, the processing required to move the elements with each dequeue makes this solution a poor one. Conversely, if the queue generally contains only a few elements, the data movement may not be too costly. Although this design can be made to work and has acceptable performance in some situations, in general it is not the most efficient choice. Let us develop a design that avoids the need to move all the queue elements for each dequeue operation.
Floating-Front Design Approach
The need to move the elements in the array was created by our decision to keep the front of the queue fixed in the first array slot and to let only the rear move. What if we allow both the front and the rear to move? As before, an enqueue operation adds an element at the rear of the queue and adjusts the location of the rear. But now a dequeue operation removes the element at the front and simply adjusts the location of the front. No movement of elements is required. However, we now have to keep track of the array indices of both the front and the rear of the queue.
Figure 4.3 shows how several enqueue and dequeue operations would affect a queue that uses this approach.
Letting the queue elements float in the array creates a new problem when the rear indicator gets to the end of the array. In our first design, this situation told us that the queue was full. Now, however, the rear of the queue could potentially reach the end of the array when the queue is not yet full (Figure 4.4a).
Because there may still be space available at the beginning of the array, the obvious solution is to let the queue elements “wrap around” the end of the array. In other words, the array can be treated as a circular structure in which the last slot is followed by the first slot (Figure 4.4b). To get the next position for the rear indicator, for instance, we can use an if statement. Assume capacity represents the size of the array:
if (rear == (capacity - 1))
   rear = 0;
else
   rear = rear + 1;
Another way to reset rear is to use the modulo (%) operator:
rear = (rear + 1) % capacity;
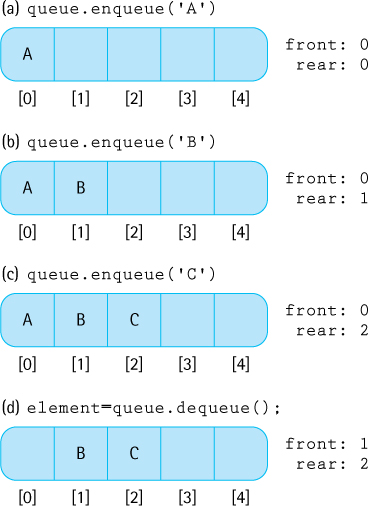
Figure 4.3 The effect of enqueue and dequeue

Figure 4.4 Wrapping the queue elements around the array
Comparing Design Approaches
The circular array (floating-front) solution is not as simple as the fixed-front design. What do we gain by adding this complexity to our design? By using a more efficient dequeue operation, we achieve better performance. The fixed-front version of dequeue is an O(N) operation. The floating-front design requires dequeue to perform just a few simple operations. The amount of work never exceeds some fixed constant, no matter how many elements are in the queue, so the algorithm’s complexity is O(1).
We will use the more efficient floating-front approach.
The Instance Variables and Constructors
What instance variables does our implementation need? We need the queue elements themselves; they are held in an array named elements. From our earlier analysis, we know that we must add two instance variables to the class: front and rear. And we know that to help wrap around the array it is useful to know its capacity—that is, the maximum number of elements the queue can hold. The capacity is supplied by the array’s length attribute.
We are now confident that we can handle the enqueue and dequeue operations, but what about the remaining operations? To facilitate the observer operations isEmpty, isFull, and size, we decide to use one more instance variable, numElements. The numElements variable holds the current number of elements in the queue. Here is the beginning of ArrayBoundedQueue:
//---------------------------------------------------------------------------
// ArrayBoundedQueue.java        by Dale/Joyce/Weems                Chapter 4
//
// Implements QueueInterface with an array to hold the queue elements.
// Two constructors are provided: one that creates a queue of a default
// capacity and one that allows the calling program to specify the capacity.
//---------------------------------------------------------------------------
package ch04.queues;
public class ArrayBoundedQueue<T> implements QueueInterface<T>
{
  protected final int DEFCAP = 100; // default capacity
  protected T[] elements;           // array that holds queue elements
  protected int numElements = 0;    // number of elements in the queue
  protected int front = 0;          // index of front of queue
  protected int rear;               // index of rear of queue
  public ArrayBoundedQueue()
  {
    elements = (T[]) new Object[DEFCAP]2;
    rear = DEFCAP - 1;
  }

  public ArrayBoundedQueue(int maxSize)
  {
    elements = (T[]) new Object[maxSize]3;
    rear = maxSize - 1;
  }
As you can see, our class includes the two standard constructors for a bounded structure: one for which the client program specifies a maximum size and one that defaults to a maximum size of DEFCAP elements (the default capacity is 100). Recall that because the Java translator will not generate references to a generic type, our code must specify Object along with the new statement within our constructors. Thus, we declare our arrays to be arrays of class T but instantiate them to be arrays of class Object. Then, to ensure that the desired type checking takes place, we cast array elements into class T. Even though this approach is somewhat awkward and typically generates a compiler warning, it is how we must create generic collections using arrays in Java.
The rear variable is initialized to the last array index. Due to the wraparound approach used, the first time something is enqueued this value is set to 0, indicating the array slot that should hold that first element. The front variable is initialized to 0, as that is the array index of the first element that is dequeued. Note that when the queue holds just one element, front and rear will have the same value.
Definitions of Queue Operations
Given the preceding discussion, the implementations of our queue operations are straightforward. Recall that for the bounded queue the enqueue method should throw an exception if the queue is full. If the queue is not full, the method should simply increment the rear variable, “wrapping it around” if necessary, place the element into the rear location, and increment the numElements variable.
public void enqueue(T element)
// Throws QueueOverflowException if this queue is full;
// otherwise, adds element to the rear of this queue.
{
  if (isFull())
    throw new QueueOverflowException("Enqueue attempted on a full queue.");
  else
  {
    rear = (rear + 1) % elements.length;
    elements[rear] = element;
    numElements = numElements + 1;
  }
}
The dequeue method is essentially the reverse of enqueue. It throws an exception if the queue is empty. Otherwise, it increments front, also wrapping if necessary, decrements numElements, and returns the element previously indicated by the front variable. This methods starts by copying the reference to the object it eventually returns. It does so because during its next step, it removes the reference to the object from the array.
public T dequeue()
// Throws QueueUnderflowException if this queue is empty;
// otherwise, removes front element from this queue and returns it.
{
  if (isEmpty())
    throw new QueueUnderflowException("Dequeue attempted on empty queue.");
  else
  {
    T toReturn = elements[front];
    elements[front] = null;
    front = (front + 1) % elements.length;
    numElements = numElements - 1;
    return toReturn;
  }
}
Note that dequeue, like the stack pop operation, sets the value of the array location associated with the removed element to null. This allows the Java garbage collection process to work with up-to-date information.
The observer methods are very simple, thanks to the fact that we keep track of the size of the queue in the numElements variable:
public boolean isEmpty()
// Returns true if this queue is empty; otherwise, returns false
{
  return (numElements == 0);
}

public boolean isFull()
// Returns true if this queue is full; otherwise, returns false.
{
  return (numElements == elements.length);
}

public int size()
// Returns the number of elements in this queue.
{
    return numElements;
}
That completes the development of our array-based bounded queue implementation.
The ArrayUnboundedQueue Class
Next we develop a Java class that uses an array and implements an unbounded queue. It may seem surprising to implement an unbounded structure using an array, given that once an array is created its capacity cannot be changed. The trick is to create a new, larger array, when needed, and copy the structure into the new array.
To create the ArrayUnboundedQueue class we can reuse some of the design and code from our previous work. There are several options:
We could extend the
ArrayBoundedQueueclass, overwriting any methods affected by the change—both theenqueueand theisFullmethods. This is a valid approach. As a general rule, however, we hesitate to extend concrete classes. Doing so creates a tight coupling between the two classes that can create issues later on, if the base class is modified.We could “wrap” a bounded queue inside of our unbounded queue implementation. In other words, instead of directly using an array to hold our unbounded queue, use a bounded queue to hold it. When needed, instantiate a new larger bounded queue, copying over the contents of the previous bounded queue using a sequence of dequeue/enqueue operations. This approach also works although it adds an extra level of abstraction.
We could reuse the basic parts of our bounded queue design, redesigning it as necessary to make the queue unbounded. In other words, literally make a copy of the
ArrayBoundedQueue.javafile, rename the file toArrayUnboundedQueue, and then make the required changes to this file. We opt for this third approach.
Starting with ArrayBoundedQueue, what changes are needed so that the queue never becomes full? Of course, we change the name of the class to ArrayUnboundedQueue. We also change the isFull() method so that it always returns false, since an unbounded queue is never full.
Those are the “easy” changes. Now we address the issue of making the structure unbounded. We must change the enqueue method to increase the capacity of the array if it has run out of space. Because enlarging the array is conceptually a separate operation from enqueuing, we implement it as a separate method named enlarge. So the enqueue method begins with the following statement:
if (numElements == elements.length)
enlarge();
Next we need to implement the enlarge method. By how much should we increase the size of the array? Again, several options are possible:
Set a constant increment value or multiplying factor within the class.
Allow the application to specify an increment value or multiplying factor when the queue is instantiated.
Use the original capacity as the increment value.
Because enlarge must copy the contents of the entire array, it is a O(N) operation— therefore we do not want to invoke it too often. This fact implies that we should increment the capacity by a large amount. But if we increment by too large an amount, we waste both time and space.
Let us use the original capacity as the increment value. Our enlarge method instantiates an array with a size equal to the current capacity plus the original capacity. Our constructor code stores the value of the original capacity using an instance variable origCap.
Within enlarge, when copying the contents from the old array into the new array, we must be careful to step through the elements of the queue, beginning at front, and properly wrapping around the end of the array on our way to rear. In the new array the elements are placed at the beginning of the array. After the copy operation, we update instance variables appropriately. Here are the declarations and affected methods of the ArrayUnboundedQueue class, with the code changes from the bounded version emphasized.
//---------------------------------------------------------------------------
// ArrayUnboundedQueue.java      by Dale/Joyce/Weems                Chapter 4
//
// Implements QueueInterface with an array to hold queue elements.
//
// Two constructors are provided; one that creates a queue of a default
// original capacity and one that allows the calling program to specify the
// original capacity.
//
// If an enqueue is attempted when there is no room available in the array, a
// new array is created, with capacity incremented by the original capacity.
//---------------------------------------------------------------------------
package ch04.queues;

public class ArrayUnboundedQueue<T> implements QueueInterface<T>
{
  protected final int DEFCAP = 100; // default capacity
  protected T[] elements;           // array that holds queue elements
  protected int origCap;            // original capacity
  protected int numElements = 0;    // number of elements in the queue
  protected int front = 0;          // index of front of queue
  protected int rear;               // index of rear of queue

  public ArrayUnboundedQueue()
  {
    elements = (T[]) new Object[DEFCAP]4;
    rear = DEFCAP - 1;
    origCap = DEFCAP;
  }

  public ArrayUnboundedQueue(int origCap)
  {
    elements = (T[]) new Object[origCap]5;
    rear = origCap - 1;
    this.origCap = origCap;
  }

  private void enlarge()
  // Increments the capacity of the queue by an amount
  // equal to the original capacity.
  {
    // create the larger array
    T[] larger = (T[]) new Object[elements.length + origCap];

    // copy the contents from the smaller array into the larger array
    int currSmaller = front;
    for (int currLarger = 0; currLarger < numElements; currLarger++)
    {
      larger[currLarger] = elements[currSmaller];
      currSmaller = (currSmaller + 1) % elements.length;
    }

    // update instance variables
    elements = larger;
    front = 0;
    rear = numElements - 1;
  }
  public void enqueue(T element)
  // Adds element to the rear of this queue.
  {
    if (numElements == elements.length)
      enlarge();

    rear = (rear + 1) % elements.length;
    elements[rear] = element;
    numElements = numElements + 1;
  }

// dequeue, isEmpty and size code not printed - they are unchanged

  public boolean isFull()
  // Returns false - an unbounded queue is never full.
  {
    return false;
  }
}
In our bounded queue implementation the enqueue method exhibits O(1) complexity. That is not the case for our unbounded queue, at least not in the worst case. Do you see why? If the number of enqueue invocations exceeds the number of dequeue invocations, eventually the elements array becomes full and the enqueue method will invoke the enlarge method. Because the enlarge method is O(N) we must say that the corresponding call to enqueue also required O(N) steps. Thus in the worst case, enqueue is O(N).
Note that there can be a long sequence of enqueue and dequeue operations executed before the enlarge method is invoked; in fact, there can be applications that use our unbounded queue that never cause the array to become full. At the very least there must be N + 1 calls to the enqueue method before the enlarge method is invoked on an array of size N. If we distribute the cost of the enlarge method across these N + 1 calls, then the average cost of the enqueue method is still O(1). Using this average cost approach we can consider the execution efficiency of the enqueue method to be O(1). The analysis employed in this paragraph is called amortized analysis—amortization is a financial term related to spreading a payment of a debt across several payments as opposed to paying in one lump sum.
Note that if you are working within an environment where consistent efficiency is important, for example, with some real-time systems, then average case efficiency might not be the appropriate measure to consider. In such environments you must be cautious in your choice of ADT implementation.
Section 2.5, “Array-Based Stack Implementations,” includes a description about implementing an unbounded stack using the Java library ArrayList class. ArrayList can also be used to implement an unbounded queue—in fact, it is a good choice for the implementation because it provides a structure that grows in size as needed and it supports the use of generic types without the generation of any compiler warnings. Exercise 14 asks you to explore this implementation approach.
4.4 An Interactive Test Driver
Section 2.5, “Array-Based Stack Implementations,” addressed testing our ADTs. It discussed the importance of developing a test driver application in parallel with the development of the ADT implementation class. It also discussed the importance of batch testing tools in a professional environment. Here we take a slightly different approach. We create an interactive test driver for our ArrayBoundedQueue class. Not only does this application act as an example use of the ArrayBoundedQueue class, it can also be used by students to experiment and learn about the Queue ADT and the relationships among its exported methods. The approach outlined in this section can be used to create similar test drivers for any of the ADT implementation classes presented in the text (or elsewhere in fact). Our interactive test driver will use elements of type String to be stored and retrieved from the ADT.
The General Approach
Every ADT that we implement supports a set of operations. For each ADT we therefore can create an interactive test driver program that allows us to test the operations in a variety of sequences. How can we write a single test driver that allows us to test numerous operation sequences? The solution is to create a test driver that repeatedly presents the user—that is, the tester—with a choice of operations representing the exported methods of the ADT. In this way the tester can test any sequence of operations he or she chooses. When the tester chooses an operation that requires one or more arguments, then the test driver prompts the tester to supply that information also.
Interactive test drivers can all follow the same basic algorithm. Here is a pseudo-code description:
The interactive test driver obtains the operation requests from the user one at a time, performs the operation by invoking the methods of the class being tested, and reports the results to an output stream. This approach provides us with maximum flexibility when we are testing our ADTs.
Notice that the first step prompts for, reads, and displays the test name. This step might seem unnecessary for an interactive program given that the name of the test is reported directly back to the user who enters it. However, the programmer performing the test may want to save a record of the interactive dialogue for later study or as archival test documentation, so establishing a name for the interactive dialogue can prove useful.
A Test Driver for the ArrayBoundedQueue Class
The application ITDArrayBoundedQueue is included in the ch04.queues package with the program files. The leading “ITD” stands for Interactive Test Driver.
Study the test driver program. You should be able to follow the control logic and recognize that it is a refinement of the pseudo-code presented above. You should also understand the purpose of each statement. Although the program is straightforward, a few points require further explanation. The program starts by using new to instantiate test, an ArrayBoundedQueue variable. It then proceeds to ask the user to select one of the two available constructors and, under the control of the first switch statement, instantiates test again. It does not appear that the first use of the new command, in the opening statement of the main method, is necessary. It seems to be redundant. However, some Java compilers require that statement. Without it they report an error such as “variable test might not have been initialized” because the later new commands are embedded within a decision structure (the switch statement) that includes a branch without a new command (the default branch). These compilers conclude that new may not be executed. Including the new command in the opening statement resolves the problem.
The test driver does some error checking to ensure that user inputs are valid, but it does not represent a completely robust program. For instance, it does not verify that the size provided for the second constructor is a positive number, and it does not prevent the user from inserting too many elements into an ArrayBoundedQueue. Although both of these situations are disallowed by the contract of ArrayBoundedQueue, based on the stated preconditions, they should not be prevented by our test driver program. The user of the test driver, who is testing the ArrayBoundedQueue, might wish to determine what happens when preconditions are not met and, therefore, needs the ability to violate the preconditions during a test run.
Using the Test Driver
Figure 4.5 shows the result of a sample run of the test driver. User input is shown in blue. The repeated display of the operation menu has been replaced with "..." in most places. As you can see, in this test the user chooses to use the first constructor to create the queue and then requests the following sequence of operations: isEmpty(), enqueue(“Test Line 1”), isEmpty(), enqueue(“Test Line 2”), isFull(), dequeue(), dequeue(), and dequeue(). Our ArrayBoundedQueue class passed the test! The reader is encouraged to try this test driver yourself.

Figure 4.5 Output from interactive test driver
4.5 Link-Based Queue Implementations
In this section we implement an unbounded queue using a linked list. We call our class LinkedQueue. As we did for the linked implementation of stacks presented in Chapter 2, we use the LLNode class from our support package to provide the nodes for the internal representation.
In the array-based implementation of a queue, we kept track of two indices that indicated the front and rear boundaries of the data in the queue. In a linked representation, we can use two references, front and rear, to mark the front and the rear of the queue, respectively. When the queue is empty, both of these references should equal null. Therefore, the constructor for the queue initializes them both accordingly. The beginning of our class definition is as follows:
//---------------------------------------------------------------------------
// LinkedQueue.java            by Dale/Joyce/Weems                  Chapter 4
//
// Implements QueueInterface using a linked list.
//---------------------------------------------------------------------------
package ch04.queues;
import support.LLNode;

public class LinkedQueue<T> implements QueueInterface<T>
{
  protected LLNode<T> front;     // reference to the front of this queue
  protected LLNode<T> rear;      // reference to the rear of this queue
  protected int numElements = 0; // number of elements in this queue

  public LinkedQueue()
  {
    front = null;  rear = null;
  }
Figure 4.6 graphically depicts our queue representation. We often depict queues by showing their instance variables (front and rear) in different areas of the figure. Recall that these variables are actually collected together in a single queue object. Also, recall that dynamically allocated nodes in linked structures exist “somewhere in the system memory” although we show the nodes arranged linearly for clarity. We will not include the numElements variable in our figures in this section.

Figure 4.6 A linked queue representation
The Enqueue Operation
In our linked implementation of the Stack ADT, we saw how to add and delete a node at the beginning of a linked list. We add new elements to a queue by inserting them at the rear of the structure—we have not yet seen that operation. We need an algorithm to implement the enqueue operation. The steps in the algorithm are numbered and steps 1, 2, and 3 correspond to the labeled parts of Figure 4.7.
Here we look at these four steps, one at a time:
The first step is familiar. We create a new node for the
elementby instantiating a newLLNodeobject and passing it theelementas an argument:LLNode<T> newNode = new LLNode<T>(element);
Next we add our new node at the rear of the queue. We set the link of the current last node to reference the new node, using the
LLNode setLinkmethod:rear.setLink(newNode);
But what happens if the queue is empty when we
enqueuethe element? When using references, you must always be sure to handle the special case ofnull; you cannot use it to access an object. If the queue is empty when we add the element, the value ofrearwould benulland the use ofrear.setLinkwould raise a run-time exception. In other words, we cannot “set the link of the current last node to reference the new node” because there is no “current last node.” In this case we must setfrontto point to the new node since it is the first node in the queue:if (rear == null) front = newNode; else rear.setLink(newNode);

Figure 4.7 The enqueue operation
The next task in the
enqueuealgorithm, updating therearreference, simply involves the assignment:rear = newNode;
Does this work if it is the first node in the queue—that is, if we are inserting into an empty queue? Yes, because we always have
rearpointing to the new node following a call toenqueue, regardless of how many elements are in the queue.Incrementing the number of elements is straightforward:
numElements++;
Putting this all together, we get the following code for the enqueue method:
public void enqueue(T element)
// Adds element to the rear of this queue.
{
LLNode<T> newNode = new LLNode<T>(element);
if (rear == null)
  front = newNode;
else
  rear.setLink(newNode);
rear = newNode;
numElements++;
}
The Dequeue Operation
The dequeue operation is similar to the stack’s pop operation because it removes an element from the beginning of the linked list. However, recall that pop only removed the top element from the stack, whereas dequeue both removes and returns the element. Also, as with the stack’s top operation, we do not want to return the entire LLNode, just the information the node contains.
In writing the enqueue algorithm, we noticed that inserting into an empty queue is a special case because we need to make front point to the new node. Similarly, in our dequeue algorithm we need to allow for the special case of deleting the only node in the queue, leaving it empty. If front is null after being reset, the queue is empty and we need to set rear to null. The first few steps of the algorithm for removing and returning the front element from a linked queue are illustrated in Figure 4.8.

Figure 4.8 The dequeue operation
Let us look at the implementation line by line.
We “remember” the information in the first node so that we can return it later. We declare a local
Tvariableelementand then assign the information (i.e., the reference to the information) from the front queue element to it:T element; element = front.getInfo();
We remove the front node from the queue. This step is easy: just set
frontto the link to the next element. This approach works even if the resultant queue is empty, because the link would benull:front = front.getLink();
If the queue becomes empty, also set the
rearof the queue tonull, as discussed earlier:if (front == null) rear = null;
Decrementing the number of elements is straightforward:
numElements--;
Now just return the information saved earlier:
return element;
Finally, we must remember to throw a QueueUnderflowException if the dequeue operation is attempted on an empty queue. Putting it all together, the code is as shown here;
public T dequeue()
// Throws QueueUnderflowException if this queue is empty;
// otherwise, removes front element from this queue and returns it.
{
  if (isEmpty())
    throw new QueueUnderflowException("Dequeue attempted on empty queue.");
  else
  {
     T element;
     element = front.getInfo();
     front = front.getLink();
     if (front == null)
       rear = null;
     numElements--;
     return element;
   }
}
The remaining operations isEmpty, isFull, and size are all very straightforward. The code for the entire class can be found within the ch04.queues package.
A Circular Linked Queue Design
Our LinkedQueue class contains two instance variables, one to reference each end of the queue. This design is based on the linear structure of the linked queue. Can we implement the class using only one instance variable? Given only a reference to the front of the queue, we could follow the links to get to the rear of the queue, but this approach makes accessing the rear (to enqueue an element) an O(N) operation. If instead we set the only reference to the rear of the queue, it is impossible to access the front because the links only go from front to rear, so this approach also will not work well.
However, we can efficiently access both ends of the queue from a single reference if the queue is circularly linked. That is, the link of the rear node would reference the front node of the queue (see Figure 4.9). A LinkedQueue could then have only one instance variable, referencing the rear of the queue, rather than two. This queue implementation differs from the abstract picture of a queue as a linear structure with two ends. Instead, it is a circular structure with no ends. What makes it a queue is its support of FIFO access.

Figure 4.9 A circular linked queue
To enqueue an element, we access the “rear” node directly through the reference rear. To dequeue an element, we must access the “front” node of the queue. We do not have a reference to this node, but we do have a reference to the node preceding it—rear. The reference to the “front” node of the queue is in rear.getLink(). For an empty queue, rear would be null. Designing and coding the Queue ADT operations using a circular linked implementation is left for you as an exercise.
Comparing Queue Implementations
We have now looked at several different implementations of the Queue ADT. How do they compare? We consider two different factors: the amount of memory required to store the structure and the amount of “work” the solution requires, as expressed in order of growth notation. Let us first compare the ArrayBoundedQueue and LinkedQueue implementations.
The internal array in an ArrayBoundedQueue consumes the same amount of memory, no matter how many slots are actually used; we need to reserve space for the maximum number of elements. The linked implementation using dynamically allocated storage space requires space only for the number of elements actually in the queue. Note, however, that the node elements are twice as large, because we must store the link (the reference to the next node) as well as the reference to the element.
Figure 4.10 illustrates each queue implementation approach, assuming a current queue size of 5 and a maximum queue size (for the array-based implementation) of 100. To simplify, we ignore the instance variables related to capacity and number of elements. Note that the array-based implementation requires space for two integers and 101 references (one for the array reference variable elements and one for each array slot) regardless of the size of the queue. The linked implementation requires space for only 12 references (one for front, one for rear, and two for each of the current queue elements). However, for the linked implementation the required space increases as the size of the queue increases, based on the following formula:
Number of required references = 2 + (2 * size of queue)
A simple analysis reveals that the breakeven point between the two approaches in terms of space used is when the actual queue size is approximately half the maximum queue size. For smaller queues the linked representation requires less space than the array-based representation, and beyond that size, the linked representation requires more space. In any case, unless the maximum queue size is significantly larger than the average queue size, the difference between the two implementations in terms of space is probably not important.
We can also compare the relative execution “efficiency” of the two implementations in terms of order of growth notation. In both implementations, the complexity of the observer methods (isFull, isEmpty, and size) is clearly O(1). These methods always take the same amount of work regardless of how many elements are on the queue. As was the case for stacks, the queue constructor requires O(N) steps for the array representation, but is O(1) for the linked representation.

Figure 4.10 Comparing queue implementations
What about enqueue and dequeue? Does the number of elements in the queue affect the amount of work done by these operations? No, it does not; in both implementations, we can directly access the front and the rear of the queue. The amount of work done by these operations is independent of the queue size, so these operations also have O(1) complexity. As with the array-based and linked implementations of stacks, both queue implementations are roughly equivalent in terms of the amount of work they do.
Now we briefly consider our ArrayUnboundedQueue approach. The analysis for the bounded approach applies to the unbounded approach. However, with the unbounded approach we could start with an array size that handles an average-size queue; only if the queue becomes larger is the array expanded. Thus we do not pay as big a penalty in terms of extra space. The drawback is the extra time, O(N), required to resize the array. For most applications this operation is not required very often, and as discussed earlier, we can consider the O(N) cost of this operation to be spread across many enqueue invocations.
4.6 Application: Palindromes
In this section we develop a short application that uses both a queue and a stack related to palindromes. This is a simple, fun application that serves to remind us that we can often use more than one ADT when solving problems.
A palindrome is a string that reads the same forward and backward. While we are not sure of their general usefulness, identifying them provides us with a good example for the use of both queues and stacks. Besides, palindromes can be entertaining. Consider these famous palindromes:
A tribute to Teddy Roosevelt, who orchestrated the creation of the Panama Canal: “A man, a plan, a canal—Panama!”
Allegedly muttered by Napoléon Bonaparte upon his exile to the island of Elba (although this is difficult to believe given that Napoléon mostly spoke French!): “Able was I ere, I saw Elba.”
Overheard in a busy Chinese restaurant: “Won ton? Not now!”
Possibly the world’s first palindrome: “Madam, I’m Adam.”
Followed immediately by one of the world’s shortest palindromes: “Eve.”
As you can see, the rules for what is a palindrome are somewhat lenient. Typically, we do not worry about punctuation, spaces, or matching the case of letters.
The Palindrome Class
As with previous applications, we separate the user interface from the part of the program that does the main processing. First we concentrate on that main processing—identifying a palindrome.
The class Palindrome exports a single static method test that takes a candidate string argument and returns a boolean value indicating whether the string is a palindrome. Because the method is static, we do not define a constructor for the class. Instead, we invoke the test method using the name of the class.
The test method, when invoked, creates a new stack of characters and a new queue of characters. It then repeatedly pushes each letter from the input line onto the stack, and also enqueues the same letter into the queue. It discards any nonletter characters because they are not considered part of a palindrome. To simplify the comparison later, we push and enqueue lowercase versions of the characters.
When all of the characters of the candidate string have been processed, the program repeatedly pops a letter from the stack and dequeues a letter from the queue. As long as these letters match each other the entire way through this process (until the structures are empty), we have a palindrome. Can you see why? Because the queue is a FIFO structure, the letters are returned from the queue in the same order they appear in the string. But the letters taken from the stack, a LIFO structure, are returned in the opposite order. Thus we are comparing the forward view of the string to the backward view of the string.
Here is the code for the Palindrome class.
//---------------------------------------------------------------------
// Palindrome.java           by Dale/Joyce/Weems               Chapter 4
//
// Provides a method to test whether a string is a palindrome.
// Non letters are skipped.
//---------------------------------------------------------------------
package ch04.palindromes;

import ch02.stacks.*;
import ch04.queues.*;

public class Palindrome
{
  public static boolean test(String candidate)
  // Returns true if candidate is a palindrome, false otherwise.
  {
    char ch;                   // current candidate character being processed
    int length;                // length of candidate string
    char fromStack;            // current character popped from stack
    char fromQueue;            // current character dequeued from queue
    boolean stillPalindrome;   // true if string might still be a palindrome

    StackInterface<Character> stack; // holds non blank string characters
    QueueInterface<Character> queue; // also holds non blank string characters

    // initialize variables and structures
    length = candidate.length();
    stack = new ArrayBoundedStack<Character>(length);
    queue = new ArrayBoundedQueue<Character>(length);

    // obtain and handle characters
    for (int i = 0; i < length; i++)
    {
      ch = candidate.charAt(i);
      if (Character.isLetter(ch))
      {
        ch = Character.toLowerCase(ch);
        stack.push(ch);
        queue.enqueue(ch);
       }
     }

     // determine if palindrome
     stillPalindrome = true;
     while (stillPalindrome && !stack.isEmpty())
     {
       fromStack = stack.top();
       stack.pop();
       fromQueue = queue.dequeue();
       if (fromStack != fromQueue)
         stillPalindrome = false;
     }
     // return result
     return stillPalindrome;
  }
}
Note that we use both the bounded stack and the bounded queue implementations. It is appropriate to use bounded structures because the structures need not be larger than the length of the candidate string. Also note that we make use of Java’s autoboxing and unboxing features, when adding and removing variables of the primitive type char to and from the structures. The system automatically wraps the char values in a Character object before addition, then unwraps the returned Character object back into a char value after it is removed.
The Applications
The Palindrome class does most of the work for us. All that is left to do now is to implement the user I/O. The PalindromeCLI program found in the ch04.apps package is similar to the command line interface programs presented in previous chapters. Its basic flow is to prompt the user for a string, use the Palindrome class’s test method to determine whether the string is a palindrome, output the result, and then ask the user to enter another string, until the user enters a special “stop” string, in this case the string “X”. Here is a sample run of the program:
String (X to stop): racecar
is a palindrome.

String (X to stop): aaaaaaaaabaaaaaaaa
is NOT a palindrome.

String (X to stop): fred
is NOT a palindrome.

String (X to stop): Are we not drawn onward, we few? Drawn onward
to new era!
is a palindrome.

String (X to stop): X
The program PalindromeGUI, also found in ch04.apps, implements a graphical user interface (GUI)-based interface providing the same functionality as PalindromeCLI.
There are other—probably better—ways of determining whether a string is a palindrome. In fact, in Exercise 35 of Chapter 3 we asked you to consider some other approaches. We included this example application for several reasons: it is interesting but not too complicated, it is fun, it clearly demonstrates the association between a stack and a queue, and it reminds us that we can use more than one ADT when solving a problem. Figure 4.11 is an abbreviated Unified Modeling Language (UML) diagram showing the relationships among the stack and queue interfaces and classes used in the palindrome applications.

Figure 4.11 Palindrome program architecture
4.7 Queue Variations
As we did with stacks, we look at some variations of the queue. It is important to understand that there are many approaches to defining and implementing data structures. We first consider some alternate ways to define the classic queue operations. Next we look at additional operations that could be included in a Queue ADT, some that allow us to “peek” into the queue and others that expand the access rules, essentially creating a more versatile structure that can be used as both a queue or a stack. Finally, we review the Java Standard Library queue support.
Before continuing we should mention an important ADT closely related to the queue. The Priority Queue ADT is often considered along with queues. A priority queue enqueues elements in any order but when an element is dequeued, it returns the highest priority element. So unlike with the traditional queue, the order in which elements enter the queue has no relationship to the order in which they are removed. The Priority Queue is an important ADT; we return to it in Chapter 9.
Exceptional Situations
Our queues throw exceptions in the case of underflow or overflow. Another approach is to test for the exceptional situation within the method implementation, prevent the over/underflow from occurring by nullifying the operation, and return a value that indicates failure. With this latter approach we might redefine enqueue and dequeue as follows:
boolean enqueue(T element)addselementto the rear of this queue; returnstrueif element is successfully added,falseotherwiseT dequeue()returnsnullif this queue is empty, otherwise removes front element from this queue and returns it
In the case of enqueue, the most common reason for failure to complete the operation would be an attempt to add an element to a full, bounded queue. We also could define alternate versions of queues that have rules about what will or will not be accepted for entry—for example a queue that disallows duplicate elements or a queue that only accepts elements with certain features (only students who ate their vegetables may queue up for ice cream). In the case of dequeue the primary reason for failure is that the queue is empty.
Rather than redefining our operations we could just add new operations exhibiting the functionality described above, with unique names such as safeEnqueue and safeDequeue to differentiate them from the regular queue operations.
The GlassQueue
An application that uses our Stack ADT, as defined in Chapter 2, has the option of either obtaining the top element of the stack (the top method) or removing the top element from the stack (the pop method). This means that an application can “look at” the top element of the stack without removing it from the stack. An application might use this feature to determine whether or not to pop a stack under some circumstances, or perhaps to choose which of several stacks to pop at a particular time.
The ability to look into a data structure without removing an element is often called “peeking.” As discussed in Chapter 2, including this operation with stacks makes looking at the top element of the stack easy, but it is a superfluous operation. The same result can be obtained by using the classic pop operation, followed by examining the returned element, followed by a push operation that returns the element to the top of the stack. For queues, however, this is not the case. One cannot just simply dequeue an element, examine it, and then enqueue it back to its original position in the queue. Trying to do so would result in moving the element from the front of the queue to the rear of the queue. For this reason, adding the ability to peek into a queue can be very useful.
We define a new type of queue that includes the ability to peek into both the front and the rear of the queue. We call this queue a Glass Queue, because the queue’s contents are somewhat transparent, as if the queue was made from glass. Our Glass Queue must support all of the operations of a “regular” queue plus the new operations peekFront and peekRear. First we define a GlassQueueInterface class.
Java supports inheritance of interfaces—one interface can extend another interface. In fact, the language supports multiple inheritance of interfaces—a single interface can extend any number of other interfaces. The fact that a Glass Queue requires all of the operations of our current Queue ADT makes this a perfect place to use inheritance. We define our GlassQueueInterface as a new interface that extends QueueInterface but also requires peekFront and peekRear methods. Here is the code for the new interface (note the emphasized extends clause):
//---------------------------------------------------------------------------
// GlassQueueInterface.java        by Dale/Joyce/Weems              Chapter 4
//
// Interface for a class that implements a queue of T and includes operations
// for peeking at the front and rear elements of the queue.
//---------------------------------------------------------------------------
package ch04.queues;

public interface GlassQueueInterface<T> extends QueueInterface<T>
{
  public T peekFront();
  // If the queue is empty, returns null.
  // Otherwise, returns the element at the front of this queue.

  public T peekRear();
  // If the queue is empty, returns null.
  // Otherwise, returns the element at the rear of this queue.
}
As you can see, the interface is a simple extension of the QueueInterface. Similarly, an implementation of a LinkedGlassQueue class, that implements our new GlassQueue-Interface, is a straightforward extension of the LinkedQueue class:
//--------------------------------------------------------------------------
// LinkedGlassQueue.java         by Dale/Joyce/Weems               Chapter 4
//
// Extends LinkedQueue with operations to access the front and rear queue
// elements without removing them.
//---------------------------------------------------------------------------
package ch04.queues;
public class LinkedGlassQueue<T> extends LinkedQueue<T>
                                 implements GlassQueueInterface<T>
{
  public LinkedGlassQueue()
  {
    super();
  }

  public T peekFront()
  // If the queue is empty, returns null.
  // Otherwise returns the element at the front of this queue.
  {
    if (isEmpty())
       return null;
    else
       return front.getInfo();
  }

  public T peekRear()
  // If the queue is empty, returns null.
  // Otherwise returns the element at the rear of this queue.
  {
    if (isEmpty())
       return null;
    else
       return rear.getInfo();
  }
}
We will use the LinkedGlassQueue class to help us solve the problem presented in Section 4.8, “Application: Average Waiting Time.”
The Double-Ended Queue
Stacks are a linear structure permitting addition and removal of elements from one end, called the top. Queues are a linear structure permitting addition to one end, called the rear, and removal from the other end, called the front. Why can we not define a structure that allows both addition and removal from both ends? Well—there is no reason why not. In fact, we can and many people have! Such a structure is classically called a Double-Ended Queue. “Double-Ended Queue” is sometimes shortened to “Dequeue” but because that term is identical to one of the standard queue operations, the more common term used for this ADT is Deque, pronounced “Deck.”

When defining a Deque ADT we must differentiate between two addition methods (front and rear) and two removal methods (front and rear). A few changes and additions to our QueueInterface class results in the following DequeInterface class:
//---------------------------------------------------------------------------
// DequeInterface.java          by Dale/Joyce/Weems                 Chapter 4
//
// Interface for a class that implements a deque of T.
// A deque is a linear structure allowing addition/removal at both ends.
//---------------------------------------------------------------------------
package ch04.queues;

public interface DequeInterface<T>
{
  void enqueueFront(T element) throws QueueOverflowException;
  // Throws QueueOverflowException if this queue is full;
  // otherwise, adds element to the front of this queue.

  void enqueueRear(T element) throws QueueOverflowException;
  // Throws QueueOverflowException if this queue is full;
  // otherwise, adds element to the rear of this queue.

  T dequeueFront() throws QueueUnderflowException;
  // Throws QueueUnderflowException if this queue is empty;
  // otherwise, removes front element from this queue and returns it.

  T dequeueRear() throws QueueUnderflowException;
  // Throws QueueUnderflowException if this queue is empty;
  // otherwise, removes rear element from this queue and returns it.

  boolean isFull();
  // Returns true if this queue is full; otherwise, returns false.

  boolean isEmpty();
  // Returns true if this queue is empty; otherwise, returns false.

  int size();
  // Returns the number of elements in this queue.
}
Instead of defining an entirely new interface for the Deque ADT we could define the DequeInterface class as an extension of the QueueInterface class, as we did for our Glass Queue. With that approach we only need to include the two methods enqueueFront and dequeueRear in the interface, as all the other method declarations would be inherited. In fact, lots of structural variations of interfaces and implementation classes involving generalizations and/or specializations are possible, considering the relationships among the Stack, Queue, and Deque ADTs. Here we decided to take the simplest approach—we defined an entirely new interface.
Implementations of array-based and link-based deques are left as exercises.
Doubly Linked Lists
If you attempt to create a Deque using a linked list you will discover that it is difficult to implement the dequeueRear operation. In order to remove the last node in a linked list you need access to the previous node, and the only way to gain that access in a standard linked list is to walk through the entire list. In cases like this, where we need to access the node that precedes a given node, a doubly linked list is useful. In a doubly linked list, the nodes are linked in both directions. Each node of a doubly linked list contains three parts:
info: the element stored in the nodelink: the reference to the following nodeback: the reference to the preceding node
A deque that uses a linear doubly linked list might look like this:

The back reference of the first node and the link reference of the last node contain null. Nodes for such a list could be provided by the following DLLNode class, which is similar to our previously defined LLNode class.
//---------------------------------------------------------------------------
// DLLNode.java             by Dale/Joyce/Weems                     Chapter 4
//
// Implements nodes holding info of class <T> for a doubly linked list.
//---------------------------------------------------------------------------
package support;

public class DLLNode<T>
{
  private T info;
  private DLLNode<T> forward, back;

  public DLLNode(T info)
  {
    this.info = info; forward = null; back = null;
  }

  public void setInfo(T info){this.info = info;}
  public T getInfo(){return info;}

  public void setForward(DLLNode<T> forward){this.forward = forward;}
  public void setBack(DLLNode<T> back){this.back = back;}

  public DLLNode getForward(){return forward;}
  public DLLNode getBack(){return back;}
}
Note that yet another alternate approach, called a Circular Doubly Linked List, exists where the back reference of the first node points to the last node and the link reference of the last node points to the first node—see Exercise 33.
The dequeueRear Operation
When we make changes (additions/deletions) to a doubly linked list we must be careful to properly manage all of the references and to handle the special cases. Let us look at an example. Imagine implementing a Deque ADT with a doubly linked list that uses the DLLNode class. Let us discuss the dequeueRear method. Consider our sample deque:

As with the dequeue operation of our “regular” Queue ADT we throw an exception if the queue is empty, and otherwise remove and return an element from the queue and decrement the count of the number of elements. If removing the only element from the queue we also need to update the front reference. Here we concentrate on the pointer manipulation. In our example, we want to make the node containing C become the rear node. Therefore we need to set the forward link of the node containing C to null, and set the rear reference of the queue to point to the node containing C. How do we access the node containing C? Due to the doubly linked nature of our implementation this is easy— it is rear.getBack(). After setting the forward link of the C node to null (using the setLink method) we have the following:

Now we set the value of the rear reference to indicate the next-to-last node, the node containing C. Assuming no other references are pointing at the node containing D, it becomes garbage, and that space will eventually be reclaimed by the system.

Putting this all together along with the code for handling the special cases (empty and one element queues) and returning the element we arrive at the following implementation of a dequeueRear method:
public T dequeueRear()
// Throws QueueUnderflowException if this deque is empty;
// otherwise, removes rear element from this queue and returns it.

{
  if (isEmpty())
     throw new QueueUnderflowException("dequeue rear attempted on empty
queue.");
  else
  {
     T element;
     element = rear.getInfo();
     if (rear.getBack() == null)
     {
       front = null; rear = null;
     }
     else
     {
       rear.getBack().setLink(null);
       rear = rear.getBack();
     }
     numElements--;
     return element;
  }
}
This dequeueRear implementation is O(1). The same operation for our “standard” linked queue would require O(N) steps since the next to last node is not readily available. The increased efficiency is not without some cost. The nodes of a doubly linked list require more space than those of a singly linked list.
The Java Library Collection Framework Queue/Deque
A Queue interface was added to the Java Library Collection Framework with Java 5.0 in 2004. As expected, the library’s approach to queues is similar to our approach in that elements are always removed from the “front” of the queue. However, their approach also exhibits several important differences:
It does not require elements to be added only at the “rear” of the queue. For example, added elements might be ordered based on a priority value. In other words, it allows Priority Queue ADT (Chapter 9) implementations.
It provides two operations for enqueuing:
add, that throws an exception if invoked on a full queue, andoffer, that returns a boolean value offalseif invoked on a full queue.It provides two operations for dequeuing:
remove, that throws an exception, andpoll, that returnsfalse, when invoked on an empty queue.Inspection operations, for obtaining the front element without removing it, are included.
As with the library Stack, the library Queue was supplanted by the Deque with the release of Java 6.0 in 2006. The library Deque interface is similar to the DequeInterface previously discussed—it requires operations allowing for additions, deletions, and inspections at both ends of the queue. By carefully restricting method use, a class that implements the interface could be used by an application as a stack (only allow enqueuing and dequeuing at the front) or as a queue (only allow enqueuing to the rear and dequeuing from the front) or even as some sort of stack-queue combination. There are four library classes that implement the Deque interface: ArrayDeque, ConcurrentLinkedDeque, Linked-BlockingDeque, and LinkedList.
Here is how you might implement the repeat strings application (see Section 4.2, “The Queue Interface”) using the ArrayDeque class from the Java library. The minimal differences between this application and the one using our Queue ADT are emphasized.
//----------------------------------------------------------------------
// RepeatStrings2.java        by Dale/Joyce/Weems              Chapter 4
//
// Sample use of the library ArrayDeque.
// Outputs strings in same order of entry.
//----------------------------------------------------------------------
package ch04.apps;

import java.util.ArrayDeque;
import java.util.Scanner;

public class RepeatStrings2
{
  public static void main(String[] args)
  {
    Scanner scan = new Scanner(System.in);

    ArrayDeque<String> stringQueue;
    stringQueue = new ArrayDeque<String>(3);

    String line;

    for (int i = 1; i <= 3; i++)
    {
      System.out.print("Enter a line of text > ");

      line = scan.nextLine();
      stringQueue.addLast(line);
    }

    System.out.println("
Order is:
");
    while (!stringQueue.isEmpty())
    {
      line = stringQueue.removeFirst();
      System.out.println(line);
    }
  }
}
If you are interested in learning more about the Java Collections Framework, you can study the extensive documentation available on Oracle’s website.
4.8 Application: Average Waiting Time
Queues are useful data structures within computer systems: for example, there are process queues, print job queues, and service queues. Queues are also commonly seen in the real world: tollbooth queues, ticket-counter queues, and fast-food queues.
The primary function of such queues is to provide a place for a “customer” to wait before receiving a “service.” Processes are waiting for a processor, print jobs are waiting for a printer, and hungry people are waiting for their hamburgers. Sometimes management is interested in how much time customers spend waiting in queues. For example, a computer system manager wants quick system response time, and a fast-food restaurant manager wants to keep his or her customers happy. These goals are achieved by minimizing the time spent in the queues.
One way to minimize queue waiting time is to add more servers, and therefore more queues, to the system.6 Print jobs spend less time in the print queue if there are 10 printers to churn out jobs than they do if there is only one printer. Likewise, a fast-food restaurant with six teller lines can handle more customers, more quickly, than a restaurant with only two lines. However, additional servers are not free—there is usually some cost associated with them. Management must balance the benefits of adding extra servers against the costs when deciding how many servers to provide.
In this section we create a program that simulates a system of queues. The goal is to help management analyze queuing systems. Computer simulations are a powerful and widely used technique for analysis of complicated real-world problems. Our program simulates a series of customers arriving for service, entering a queue, waiting, being served, and finally leaving the queue. It tracks the time the customers spend waiting in queues and outputs the average waiting time.
Problem Discussion and Example
How do we calculate the waiting time of a customer? To simplify things, we assume that time is measured in integer units, and that our simulation starts at time 0. Suppose a customer arrives at time X and leaves at time Y. Is the waiting time for that customer equal to Y – X? No, part of that time the customer was being served. The time Y – X is called the turnaround time; it is the total time the customer spends in the system, including the service time. Waiting time is turnaround time minus service time.
To calculate waiting time we need to know the arrival time, finish time, and service time. The arrival time and service time depend on the individual customers—when they show up and how much service they need. The finish time depends on the number of queues, the number of other customers in the queues, and the service needs of those other customers.
Each simulation should take customers in the order they arrive and place them into queues. We assume that a customer always chooses the smallest queue available. In case of a tie, the customer chooses the smaller-numbered queue. The program has to model only two situations: a customer arriving for service and a customer leaving after being served. When a customer leaves, the program must remember the customer’s waiting time so that it can calculate the overall average waiting time.
As an example, consider a case with the following four customers:
| Customer | Arrival Time | Service Time |
| 1 | 3 | 10 |
| 2 | 4 | 3 |
| 3 | 5 | 10 |
| 4 | 25 | 7 |
Suppose we have two queues. The first customer arrives at time 3 and enters queue 0. We can see that the expected finish time is 13, because the service time is 10. The second customer arrives before the first is finished and enters queue 1. The finish time is 7. This scenario is represented by the following chart:

The third customer arrives at time 5, before either of the preceding customers is finished. Because both queues have the same number of customers, customer 3 enters the smaller numbered queue, queue 0, and has an expected finish time of 23. Do you see why? Customer 1 finishes at time 13 so it is not until then that the service for customer 3 begins— because their service time is 10, their finish time will be 13 + 10 = 23. Note that for this simulation customers may not “jump” queues—once they enter a queue they stay in it.
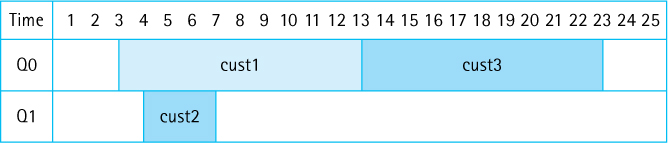
If you continue this simulation by hand, you should get the following results, for an average waiting time of 8 ÷ 4 = 2.0 time units.
| Customer | Arrival Time | Service Time | Finish Time | Wait Time |
| 1 | 3 | 10 | 13 | 0 |
| 2 | 4 | 3 | 7 | 0 |
| 3 | 5 | 10 | 23 | 8 |
| 4 | 25 | 7 | 32 | 0 |
The Customer Class
As we just saw, customers have four associated values: arrival time, service time, finish time, and wait time. We create a Customer class to model these values. Objects of this class will be enqueued to and dequeued from our queue objects, simulating customers entering and leaving real-world queues.
What are the responsibilities of objects of the Customer class? The arrival and service times of the customer can be provided as arguments to the constructor when a Customer object is instantiated. A Customer must provide observer methods for those attributes, and it should also provide methods to both set and observe the finish time. Given that the object eventually knows its arrival, service, and finish times, it can be responsible for calculating and returning its own waiting time.
Because we may want to use customers in other applications later in the text, we place the Customer class in the support package. The class is very straightforward:
//----------------------------------------------------------------------
// Customer.java          by Dale/Joyce/Weems                  Chapter 4
//
// Supports customer objects having arrival, service, and finish time
// attributes. Responsible for computing and returning wait time.
//
// Clients should not request wait time unless finish time has been set.
//----------------------------------------------------------------------
package support;

public class Customer
{
  protected int arrivalTime;
  protected int serviceTime;
  protected int finishTime;

  public Customer(int arrivalTime, int serviceTime)
  {
    this.arrivalTime = arrivalTime;
    this.serviceTime = serviceTime;
  }

  public int getArrivalTime(){return arrivalTime;}
  public int getServiceTime(){return serviceTime;}
  public void setFinishTime(int time){finishTime = time;}
  public int getFinishTime(){return finishTime;}

  public int getWaitTime()
  {
    return (finishTime - arrivalTime - serviceTime);
  }
}
For our simulation where do the customers come from? To create a sequence of customer objects we need to know their arrival times and service requirements. These values can be obtained in several ways. One approach is to read the values from a file. This strategy is great for testing because it allows the programmer to completely control the input values. However, it is awkward if you want to simulate a large number of customers.
Another approach is to generate the values randomly. We take this approach. It is easy to generate the random service times: The user simply enters the minimum and maximum expected service times, and using Java’s Random class our program generates service times between those two values.
We follow a slightly different algorithm with arrival times. Service time measures an amount of time, but arrival time specifies when the customer arrives. For example, customer 1 arrives at 10:00 a.m., customer 2 at 10:05, customer 3 at 10:07, and so on. In our simulation, we simply start the clock at 0 and keep the arrival time as an integer. We cannot directly create a sequence of increasing times by using the random number generator. Instead, we randomly generate the times between customer arrivals (the interarrival times), and keep a running total of those values.
For example, we might generate a sequence of interarrival times of 5, 7, 4, 10, and 7. Given that our simulation starts at time 0, the arrival times are then 5, 12, 16, 26, and 33. To constrain the range of interarrival times, we can let the user specify a minimum value and a maximum value. Note that we are assuming that both the interarrival and service time values are distributed uniformly between their minimums and maximums. Simulations can, of course, also be based on other distributions.
For each customer our program generates an arrival time and a service time. Through the simulation it then determines the finish time and, based on those values, calculates the waiting time. We create a CustomerGenerator class. An object of this class is passed the minimum and maximum interarrival and service times of the customers upon instantiation. Its primary responsibility is to generate and return the “next” customer when requested.
The customer generator class uses the Java library’s Random class. Recall that a call to rand.nextInt(N) returns a random integer between 0 and N – 1. Note that a Customer Generator object keeps track of the current time, so it can calculate the next arrival time. We also place this class in the support package.
//---------------------------------------------------------------------------
// CustomerGenerator.java        by Dale/Joyce/Weems                Chapter 4
//
// Generates a sequence of random Customer objects based on the
// constructor arguments for min and max interarrival and service times.
// Assumes a flat distribution of both interarrival and service times.
// Assumes time starts at 0.
//---------------------------------------------------------------------------
package support;

import java.util.Random;

public class CustomerGenerator
{
  protected int minIAT;    // minimum interarrival time
  protected int maxIAT;    // maximum interarrival time
  protected int minST;     // minimum service time
  protected int maxST;     // maximum service time

  protected int currTime = 0;   // current time

  Random rand = new Random();   // to generate random numbers

  public CustomerGenerator (int minIAT, int maxIAT, int minST, int maxST)
  // Preconditions: all arguments >= 0
  //                minIAT <= maxIAT
  //                minST  <= maxST
  {
    this.minIAT = minIAT;    this.maxIAT = maxIAT;
    this.minST  = minST;     this.maxST  = maxST;
  }

  public void reset()
  {
    currTime = 0;
  }

  public Customer nextCustomer()
  // Creates and returns the next random customer.
  {
    int IAT;  // next interarrival time
    int ST;   // next service time

    IAT = minIAT + rand.nextInt(maxIAT - minIAT + 1);
    ST  = minST  + rand.nextInt(maxST - minST + 1);

    currTime = currTime + IAT;  // updates current time to the arrival
                                // time of next customer

    Customer next = new Customer(currTime, ST);
    return next;
  }
}
The Simulation
Our application will generate a sequence of customers and simulate them entering queues, waiting, and being serviced. It will output the average waiting time of a customer. What should be the input to our application? What does the user want to vary under their control?
We allow the user of the application to indicate customer information in the form of the minimum and maximum interarrival and service times, and the total number of customers. The application also obtains the number of simulated queues from the user. We index the queues starting at 0; if there are N queues, they are indexed 0 to N - 1. To ease the input burden, our program will allow the user to enter the sets of minimum and maximum time parameters once, and then run repeated simulations where he or she indicates the number of queues and customers.
As with our previous applications, we separate the user interaction from the classes that perform the “work” of the program. Therefore, we next create a Simulation class. We place it in a package called ch04.simulation. A Simulation object can be created based on the parameters obtained from the user, perform the simulation, and return the average waiting time. Because the user must be able to run multiple simulations using the same customer parameters (the time-related parameters), we decide to pass these parameters to the Simulation object once, at instantiation—that is, through the constructor of the Simulation object. The constructor, in turn, creates a CustomerGenerator object to use during the subsequent simulation runs. Next, the application can “ask” the Simulation object to run simulations, always using the same CustomerGenerator but with differing numbers of queues and customers.
Let us now consider the actual simulation process. As already determined, our program uses an array of queues to hold the customers. It must be able to take the next-generated Customer from the CustomerGenerator and add it into the correct queue. But how can it determine the correct queue? It must pick the smallest queue; therefore, it will use the queue’s size method to determine which queue to use.
Do we need any special operations for our queues? After the program determines which queue to use, it must enqueue the customer into that queue. Recall that we can determine the finish time of a customer as soon as we know which queue the customer is entering. If the queue is empty, then that customer’s finish time is equal to the arrival time plus the service time. If the queue is not empty, then the new customer’s finish time is equal to the finish time of the customer at the rear of the queue plus the new customer’s own service time. Thus the program can set the finish time of a customer before enqueuing the customer. Note that if the queue is nonempty, the program must be able to peek at the customer at the rear of the queue before it can set the finish time for the current customer. For this reason, we add peeking at the rear of a queue to our list of desired operations.
To perform the simulation the program must also be able to determine when the “next” customer is ready to leave a queue, and then remove and return that customer. How does it determine when a customer is ready to leave a queue? Because customers in a queue know their finish times, the program just needs to compare the finish times of the customers at the front of each queue and determine which is the earliest. Therefore, the program must be able to peek at the customer at the front of a queue. That is one more operation to add to our list.
So, in addition to the standard queue operations we need to be able to peek at both the front and the rear elements in our queues. The GlassQueue class developed in Section 4.7, “Queue Variations,” provides these capabilities.
The simulate method of the Simulation class works through the simulation until finished. Each time through the while loop one of two things is simulated: a new customer is added into the queues or a customer is removed from a queue. To decide which of these two actions to simulate, the method determines and compares the next arrival time and the next departure time. The constant MAXTIME is used to simplify the code; an arrival/departure time value of MAXTIME indicates that there are no arrivals/departures.
//---------------------------------------------------------------------
// Simulation.java           by Dale/Joyce/Weems              Chapter 4
//
// Models a sequence of customers being serviced
// by a number of queues.
//---------------------------------------------------------------------
package ch04.simultion;

import support.*;        // Customer, CustomerGenerator
import ch04.queues.*;    // LinkedGlassQueue

public class Simulation
{
  final int MAXTIME = Integer.MAX_VALUE;

  CustomerGenerator custGen;    // a customer generator
  float avgWaitTime = 0.0f;     // average wait time for most recent
                                // simulation

  public Simulation(int minIAT, int maxIAT, int minST, int maxST)
  {
    custGen = new CustomerGenerator(minIAT, maxIAT, minST, maxST);
  }

  public float getAvgWaitTime()
  {
    return avgWaitTime;
  }

  public void simulate(int numQueues, int numCustomers)
  // Preconditions: numQueues > 0
  //                numCustomers > 0
  //                No time generated during simulation is > MAXTIME
  //
  // Simulates numCustomers customers entering and leaving
  // a queuing system with numQueues queues
  {
    // the queues

    LinkedGlassQueue<Customer>[] queues = new LinkedGlassQueue[numQueues]7;

    Customer nextCust;      // next customer from generator
    Customer cust;          // holds customer for temporary use

    int totWaitTime = 0;    // total wait time
    int custInCount = 0;    // count of customers started so far
    int custOutCount = 0;   // count of customers finished so far

    int nextArrTime;        // next arrival time
    int nextDepTime;        // next departure time
    int nextQueue;          // index of queue for next departure

    int shortest;           // index of shortest queue
    int shortestSize;       // size of shortest queue
    Customer rearCust;      // customer at rear of shortest queue
    int finishTime;         // calculated finish time for customer being
                            //   enqueued

    // instantiate the queues
    for (int i = 0; i < numQueues; i++)
      queues[i] = new LinkedGlassQueue<Customer>();

    // set customer generator and get first customer
    custGen.reset();
    nextCust = custGen.nextCustomer();

    while (custOutCount < numCustomers)  // while still more customers
    {
      // get next arrival time
      if (custInCount != numCustomers)
        nextArrTime = nextCust.getArrivalTime();
      else
        nextArrTime = MAXTIME;

      // get next departure time and set nextQueue
      nextDepTime = MAXTIME;
      nextQueue = -1;
      for (int i = 0; i < numQueues; i++)
        if (queues[i].size() != 0)
        {
          cust = queues[i].peekFront();

          if (cust.getFinishTime() < nextDepTime)
          {
            nextDepTime = cust.getFinishTime();
            nextQueue = i;
          }
        }

      if (nextArrTime < nextDepTime)
      // handle customer arriving
      {
        // determine shortest queue
        shortest = 0;
        shortestSize = queues[0].size();
        for (int i = 1; i < numQueues; i++)
        {
          if (queues[i].size() < shortestSize)
          {
            shortest = i;
            shortestSize = queues[i].size();
          }
        }

        // determine the finish time
        if (shortestSize == 0)
          finishTime = nextCust.getArrivalTime() + nextCust.getServiceTime();
        else
        {
          rearCust = queues[shortest].peekRear();
          finishTime = rearCust.getFinishTime() + nextCust.getServiceTime();
        }

        // set finish time and enqueue customer
        nextCust.setFinishTime(finishTime);
        queues[shortest].enqueue(nextCust);

        custInCount = custInCount + 1;

        // if needed, get next customer to enqueue
        if (custInCount < numCustomers)
          nextCust = custGen.nextCustomer();
      }
      else
      // handle customer leaving

      {
          cust = queues[nextQueue].dequeue();
          totWaitTime = totWaitTime + cust.getWaitTime();
          custOutCount = custOutCount + 1;
      }
    }  // end while

    avgWaitTime = totWaitTime/(float)numCustomers;
  }
}
The Application
This application is similar in structure to those presented previously in the text. The primary responsibility of the application is interacting with the user. We make the simplifying assumption that the user is well behaved—in other words, the user provides valid input data. For example, the minimum service time the user enters is not larger than the maximum service time.
We provide two versions of the application in the ch04.apps package. SimulationCLI uses the command line interface. Here is an output from a sample run:
Enter minimum interarrival time: 0
Enter maximum interarrival time: 10
Enter minimum service time: 5
Enter maximum service time: 20

Enter number of queues: 2
Enter number of customers: 2000
Average waiting time is 1185.632

Evaluate another simulation instance? (Y=Yes):  y
Enter number of queues: 3
Enter number of customers: 2000
Average waiting time is 5.7245

Evaluate another simulation instance? (Y=Yes):  n
Program completed.
As you can see, our program provides us with a powerful analysis tool. Under the conditions of interarrival times between 0 and 10 and service times between 5 and 20, with only two queues the waiting time “blows up.” But by simply adding one more queue, the expected waiting time becomes very reasonable.
A screenshot of a run of our second version of the application, SimulationGUI, is shown in Figure 4.12. A benefit of the GUI approach is that the user can easily change just one input value and rerun the simulation to see the effect of that change. A drawback of the approach is that the previous result is no longer readily visible, as it is with the command line approach.
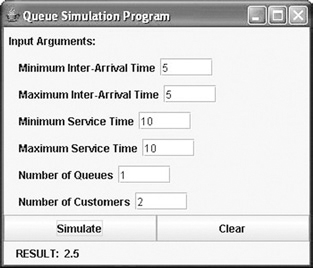
Figure 4.12 Screenshot of the SimulationGUI program in action
Testing Considerations
How do we know our program works? Besides being careful with the design and coding, we must test it. We should test each of the classes separately as we create them. To do so, we need to create test driver programs that allow us to evaluate the classes under different conditions.
We can test the overall system by carefully selecting the values we enter for input. For example, if we enter the minimum and maximum interarrival times both as 5, then we know that a customer should arrive every 5 time units. By controlling the arrival times and service requirements, along with the number of available queues, we can see whether our system provides reasonable answers. Finally, we could tweak the CustomerGenerator code slightly, so that it outputs the arrival and service times of each of the customers it generates. Using this information, we can hand-check the results of a simulation to confirm that it is correct.
An abbreviated UML diagram showing our classes and interfaces related to the Simulation applications is shown in Figure 4.13.
4.9 Concurrency, Interference, and Synchronization
The complexities of today require many people to engage in multitasking—performing more than one task at a time. For example, right now you may be texting on your phone while watching TV and eating lunch, all at the same time you are doing your data structures homework! Computers also multitask. A computer system can be printing a document, running a virus checker, and interacting with a user all at the same time.

Figure 4.13 Queue waiting time simulation program architecture
Many computer programs require multitasking capabilities. For example, a game program might have separate code sequences to react to changes in user input, to detect collisions between the objects in the game, and to update a scoreboard reflecting the game status. For such a game to be playable each of the code sequences must be active simultaneously and they must interact with each other. Programs that perform this way are called concurrent programs. Concurrent programs consist of several interacting code sequences executing simultaneously, possibly through an interleaving of their statements by a single processor, possibly through execution on distinct processors.
On a single processor system concurrency is achieved through the interleaving of the instructions of the various code sequences. The computer jumps back and forth among code sequences, executing a “few” instructions from one sequence, and then a “few” from another sequence, and so on. On systems with dual processors, quad processors, or higher levels of physical support for parallelism, the concurrency can be “real.” The computer’s operating system hides the presence or absence of physical concurrency support from the program designer so that as programmers we need not be concerned with the details of that support.
In many ways queues are the data structure most directly associated with concurrency. Imagine a system where some processes, called producers, create tasks that need attention, while other processes, called consumers, are able to handle the tasks. How do we coordinate between the producers and consumers? The Queue ADT is an obvious choice to act as a buffer between the producers and the consumers. Producers repeatedly generate tasks and place them in the queue—consumers repeatedly remove a task from the queue and handle it. The queue itself is a shared data structure and as such access to it must be carefully coordinated. We must be careful that producers do not improperly interleave access to the shared queue while scheduling tasks. We must coordinate removal of tasks from the queue by consumers, to ensure that a specific task is not consumed multiple times. Coordinating a shared resource like this is at the heart of the study of concurrent programming.
A formal study of program concurrency is typically provided in operating system, database, or algorithm courses within a computing curriculum and is beyond the scope of this book. However, in this section we introduce the topic by:
Defining terminology related to concurrency.
Showing how to indicate that parts of a Java program should be executed concurrently.
Explaining how concurrent code sequences might interfere with each other.
Demonstrating how to synchronize the execution of the code sequences so that such interference does not occur.
The Counter Class
To support our investigation of the topics of this section we use the following simple Counter class. It provides an integral attribute that is originally zero and that can be incremented through calls to an increment method. All auxiliary classes created for this section of the text are placed into the ch04.threads package.
//------------------------------------------------------------------
// Counter.java            by Dale/Joyce/Weems             Chapter 4
//
// Tracks the current value of a counter.
//------------------------------------------------------------------
package ch04.threads;
public class Counter
{
   private int count;

   public Counter()
   {
      count = 0;
   }

   public void increment()
  {

     count++;
  }

  public int getCount(){return count;}
}
The sample program Demo01 instantiates a Counter object c, increments it three times, and then prints its value. The sample output is as expected, showing a count of 3. All of the application programs created for this section of the text are placed into the ch04. concurrency folder.
package ch04.concurrency;
import ch04.threads.*;

public class Demo01
{
   public static void main(String[] args)
   {
      Counter c = new Counter();
      c.increment();
      c.increment();
      c.increment();
      System.out.println("Count is: " + c.getCount());
   }
}
The output of the program is: Count is: 3
Java Threads
The Java concurrency mechanism we present is the thread. Every Java program that executes has a thread, the “main” thread of the program. The main thread has the ability to generate additional threads. The various threads of the program run concurrently. The program terminates when all of its threads terminate.
The java.lang package, which is automatically imported into all programs, provides a Thread class. We create thread objects by first defining a class that implements the Java library’s Runnable interface. Such classes must provide a public run method. As an example, see the following Increase class that accepts a Counter object and an integer amount through its constructor, and provides a run method that increments the Counter object the number of times indicated by the value of amount.
package ch04.threads;
public class Increase implements Runnable
{
   private Counter c;  private int amount;

   public Increase (Counter c, int amount)
   {
      this.c = c;      this.amount = amount;
   }

   public void run()
   {
      for (int i = 1; i <= amount; i++)
         c.increment();
   }
}
We can now instantiate a Thread object by passing its constructor an Increase object (or any Runnable object). The instantiated Thread object can be used to execute the Increase object’s run method in a separate thread from the main program thread. To do this we call the thread object’s start method. Consider the Demo02 example:
package ch04.concurrency;
import ch04.threads.*;
public class Demo02
{
  public static void main(String[] args) throws InterruptedException8
  {
    Counter  c = new Counter();
    Runnable r = new Increase(c, 10000);
    Thread    t = new Thread(r);
    t.start();
    System.out.println("Expected: 10000");
    System.out.println("Count is: " + c.getCount());
  }
}
The Demo02 program instantiates a Counter object c, uses c plus the integer literal 10,000 to instantiate a Runnable object r, and uses r to instantiate a Thread object t. The thread object runs, in a separate thread, after the call to its start method. The program displays the value of the counter object before terminating. What value will it display? Considering that the Increase object will increment the counter 10,000 times we expect the output of the program to be the following:
Expected: 10000
Count is: 10000

Figure 4.14 Execution of the Demo02 program
But the increment of the counter and the display of its value occur in different threads, as shown in Figure 4.14. There is no guarantee that the incrementing of the counter by the second thread will finish before its value is displayed by the main thread. In fact, it is very likely that a value other than 10,000 will be output. When run on the author’s computer, the Demo02 program displays output such as:
Expected: 10000
Count is: 3074
We can indicate that we want one thread to wait for the completion of another thread by using the join command. The following program produces the “correct” output, reporting a count of 10,000, since it indicates that the main thread should wait for completion of the t thread before displaying the value of the counter object. The line of code that accomplishes this is emphasized.
package ch04.concurrency;
import ch04.threads.*;

public class Demo03
{
   public static void main(String[] args) throws InterruptedException


   {
      Counter  c = new Counter();
      Runnable r = new Increase(c, 10000);
      Thread   t = new Thread(r);

      t.start();
      t.join();

      System.out.println("Expected: 10000");
      System.out.println("Count is: " + c.getCount());
   }
}
The join command indicates that the main thread should wait until completion of the thread t before continuing. Therefore, the counter is incremented completely before its value is output.
Interference
When two or more threads of a program make changes to the same data at the same time they can interfere with each other and create unintended, undesired results. Consider the Demo04 program that has a total of three threads: the main thread and two others, t1 and t2.
package ch04.concurrency;
import ch04.threads.*;

public class Demo04
{
  public static void main(String[] args) throws InterruptedException
  {
    Counter    c = new Counter();
    Runnable  r1 = new Increase(c, 5000);
    Runnable  r2 = new Increase(c, 5000);
    Thread    t1 = new Thread(r1);
    Thread    t2 = new Thread(r2);

    t1.start();
    t2.start();
    t1.join();
    t2.join();

    System.out.println("Count is: " + c.getCount());
  }
}
As you can see, the Demo04 program runs two separate threads, each of which increments the shared counter object 5,000 times. The program uses the join method to ensure that all auxiliary threads are finished before it accesses and displays the final values of the counter. Again we ask—what values will this program display? Clearly we would expect the result to be
Count is: 10000
However, we would be wrong. This example demonstrates the dangers of working with concurrency. Programmers who use concurrency must be very careful how they wield its power. Three separate runs of the Demo04 program on the author’s computer produce the following three outputs:
Count is: 9861
Count is: 9478
Count is: 9203
The reason for these unexpected results is that the two incrementing threads interfere with each other. Consider that to increment a counter requires three steps in Java byte code: obtain the current value of the counter, add one to that value, and store the result. If two threads executing simultaneously interleave the execution of these steps, then the resultant value of the counter will be one less than the expected value. For example, consider the following sequence of steps, where the counter begins with the value 12 and both threads increment the counter. Although we would expect the resultant value to be 14, due to the “interference” the final value is only 13:
Thread t1                       Thread t2
Step 1: obtains value 12
              ↓                  Step 2: obtains value 12
Step 3: increments value to 13                ↓
Step 4: stores the value 13                   ↓
                                Step 5: increments value to 13
                                Step 6: stores the value 13
Examining the output from the Demo04 program we conclude that such interference occurs multiple times during the execution of the code. When concurrent threads make changes to shared variables, such as in the Demo04 program, they must synchronize their access of the shared information.
Synchronization
In Java we can force synchronization at either the statement level or the method level. We use method-level synchronization. In the Demo04 example, the method that requires synchronization is the increment method of the Counter class. To demonstrate the use of a synchronized method we create a separate counter class SyncCounter. Indicating that a method is synchronized simply requires the use of the synchronized keyword as a modifier in the method declaration line, as emphasized in the following code.
//---------------------------------------------------------------------------
// SyncCounter.java               by Dale/Joyce/Weems               Chapter 4
//
// Tracks the current value of a counter.
// Provides synchronized access to the increment method.
//---------------------------------------------------------------------------
package ch04.threads;

public class SyncCounter
{
  private int count;
  public SyncCounter()
  {
    count = 0;
  }

  public synchronized void increment()
  {
    count++;
  }

  public int getCount(){return count;}
}
Thread access to the increment method of the SyncCounter class will be executed in a safe fashion. If one thread is in the middle of executing code within the method, no other thread will be given access to the method. No interleaving of Java byte code statements for this method will occur. This prevents the interference that led to the unexpected results in the Demo04 program.
Whenever the Demo05 program below is executed it correctly reports the expected value for the counter of 10,000. The IncreaseSync class used in the program is identical to the Increase class except that it accepts a SyncCounter instead of Counter as its first parameter.
package ch04.concurrency;
import ch04.threads.*;

public class Demo05
{
  public static void main(String[] args) throws InterruptedException

  {
    SyncCounter sc = new SyncCounter();
    Runnable r1 = new IncreaseSync(sc, 5000);
    Runnable r2 = new IncreaseSync(sc, 5000);
    Thread t1 = new Thread(r1);
    Thread t2  =  new Thread(r2);

    t1.start(); t2.start();
    t1.join(); t2.join();

    System.out.println("Count is: " + sc.getCount());
  }
}
A Synchronized Queue
Data collections are sometimes at the heart of concurrent programs. The Queue ADT in particular is often used concurrently, for example, to store tasks generated by “producer” threads of a system that need to be handled later by separate “consumer” threads of the system, in essence acting as a repository for unfinished work. When a collection is used by multiple threads, access to it must be synchronized. Otherwise some elements may be mistakenly skipped and others may be erroneously accessed more than once, as threads interfere with each other while manipulating the data structure that underlies the collection.
In this subsection we investigate using a queue as described in the previous paragraph. We use a simple example so that we can concentrate on the synchronization issues. First we look at an unsynchronized version of the program and discuss its potential problems, then we see how to resolve the raised issues. Here is the first version of the program:
package ch04.concurrency;
import ch04.threads.*;
import ch04.queues.*;

public class Demo06
{
  public static void main(String[] args) throws InterruptedException
  {
    int LIMIT = 100;
    SyncCounter c = new SyncCounter();
    QueueInterface<Integer> q;
    q = new ArrayBoundedQueue<Integer>(LIMIT);

    for (int i = 1; i <= LIMIT; i++)
      q.enqueue(i);

    Runnable r1 = new IncreaseUseArray(c, q);
    Runnable r2 = new IncreaseUseArray (c, q);
    Thread   t1 = new Thread(r1);
    Thread   t2 = new Thread(r2);

    t1.start(); t2.start();
    t1.join(); t2.join();

    System.out.println("Count is: " + c);
  }
}
The Demo06 program above creates a queue of integers and inserts the integers from 1 to 100 into the queue. It then generates and runs two threads: t1 and t2. These threads each contain a copy of an IncreaseUseArray object (see the code that follows). Therefore, each of the threads checks the queue to see whether it is empty, and if not, the thread removes the next number from the queue and increments the shared counter object that number of times. So perhaps the t1 thread increments the counter once while the t2 counter is incrementing the counter twice; and then the t2 thread may increment the counter three times while the t1 counter is incrementing the counter four times, and so on. Remember that access to the counter is synchronized. After both threads complete, the value of the counter is output.
package ch04.threads;
import ch04.queues.*;

public class IncreaseUseArray implements Runnable
{
   private SyncCounter c;
   private QueueInterface<Integer> q;

   public IncreaseUseArray (SyncCounter c, QueueInterface<Integer> q)
   {
      this.c = c; this.q = q;
   }
   public void run()
   {
      int hold;
      while (!q.isEmpty())
      {
         hold = q.dequeue();

Figure 4.15 Threads t1 and t2 increment c—expected result is 5050
         for (int i = 1; i <= hold; i++)
            c.increment();
      }
   }
}
Let us review. The Demo06 program inserts the numbers from 1 to 100 into the queue q. As shown in Figure 4.15, the t1 and t2 threads repeatedly remove numbers from that queue and increment the counter c accordingly. The value of the counter is then output. What is that value? It should be 5050, which is equal to the sum of the integers between 1 and 100, correct? When executed on the author’s computer the result is 5050. Good. So the program works as expected. Not so fast—when dealing with concurrent programs it is possible for interference errors to occur intermittently. Such errors depend on the timing of thread interleaving, and so although the program may work as expected on one run, on another run we may get unexpected results.
We ran this program 10 times, and 10 times the result was 5050. But the 11th test run produced a result of 4980. And the 16th test run produced a null pointer exception. Although access to the counter is synchronized, access to the queue itself is not. That is the source of these unexpected results. Interference during access to the dequeue method, perhaps multiple times, would explain both of these unexpected results. Readers are encouraged to try this experiment for themselves to see what happens on their systems.
To create a reliable version of this program we need to create a synchronized queue class. Fortunately, this is not difficult. We simply add the synchronized keyword to the qualifiers of each of the exported methods of our queue implementation as emphasized in the SyncArrayBoundedQueue class below. Adding the synchronized keyword to multiple methods guarantees that if one thread is active in any of those methods, then no other thread will be allowed into the same method or any of the other methods. Using this class in place of the ArrayBoundedQueue class in the Demo06 program creates a reliable example (see Demo7). We ran this new program 100 times and received the expected result of 5050 every time.
//---------------------------------------------------------------------------
// SyncArrayBoundedQueue.java        by Dale/Joyce/Weems            Chapter 4
//
// Implements QueueInterface with an array to hold the queue elements.
// Operations are synchronized to allow concurrent access.
//---------------------------------------------------------------------------
package ch04.queues;

public class SyncArrayBoundedQueue<T> implements QueueInterface<T>
{
protected final int DEFCAP = 100; // default capacity
protected T[] elements;           // array that holds queue elements
protected int numElements = 0;    // number of elements in the queue
protected int front = 0;          // index of front of queue
protected int rear;               // index of rear of queue

public SyncArrayBoundedQueue()
{
    elements = (T[]) new Object[DEFCAP];
    rear = DEFCAP - 1;
  }

  public SyncArrayBoundedQueue(int maxSize)
  {
    elements = (T[]) new Object[maxSize];
    rear = maxSize - 1;
  }

  public synchronized void enqueue(T element)
  // Throws QueueOverflowException if this queue is full;
  // otherwise, adds element to the rear of this queue.
  {
  if (isFull())
      throw new QueueOverflowException("Enqueue attempted on full queue.");
  else
  {
      rear = (rear + 1) % elements.length;
      elements[rear] = element;
      numElements = numElements + 1;
  }
}

  public synchronized T dequeue()
  // Throws QueueUnderflowException if this queue is empty;
  // otherwise, removes front element from this queue and returns it.
  {
  if (isEmpty())
    throw new QueueUnderflowException("Dequeue attempted on empty queue");
  else
  {
    T toReturn = elements[front];
    elements[front] = null;
    front = (front + 1) % elements.length;
    numElements = numElements - 1;
    return toReturn;
    }
  }

  public synchronized boolean isEmpty()
  // Returns true if this queue is empty; otherwise, returns false.
   {
     return (numElements == 0);
   }

  public synchronized boolean isFull()
  // Returns true if this queue is full; otherwise, returns false.
   {
     return (numElements == elements.length);
   }

  public synchronized int size()
  // Returns the number of elements in this queue.
   {
     return numElements;
   }
}
We have avoided the interference problems by making all of the queue access and increment methods synchronized. As a result, every attempt to access the queue waits if the other thread is currently accessing it. Once a thread has the increment value from the queue, it attempts to access the shared counter, but because it too is synchronized, the thread will wait until the other thread is done incrementing the counter. As a result, there are very few concurrent operations taking place. While one thread is incrementing, the other thread can access the queue, and vice versa. If our goal is to make use of two physical processors in the computer to finish the task twice as quickly, the actual speed improvement will be disappointing.
Programmers of concurrent systems often encounter situations such as this. To ensure correctness, they must include so much synchronization that most of the work done by the threads takes place sequentially rather than concurrently. To get greater concurrency, it may be necessary to rethink the solution to the problem.
For example, if each of our threads had its own private counter, they could each get values from the synchronized queue and perform their increments concurrently on their own counters. On completion, each thread would return its counter value, and the main thread would add the two values to get the final result. The threads would only wait on occasions where they interfere in accessing the queue and would no longer need to wait when accessing a counter. Executing this solution on two processors could yield nearly a doubling of performance.
We say “could” because there are other factors involved in achieving good performance with concurrent processing. For example, creating each new thread requires the run-time system to do some work. If the work to be done by each thread is less than the work required to create the thread, then it actually takes longer to create the threads and do the work concurrently than to do the work in the usual sequential way. As you can see, concurrency brings many additional considerations to programming.
In every new generation of computer chip, manufacturers add more cores (processors), with each core capable of running multiple threads simultaneously. Taking advantage of these capabilities requires programs to divide their work among multiple threads. Concurrent programming is thus an important future trend in computing.
Concurrency and the Java Library Collection Classes
In Section 4.7, “Queue Variations,” a subsection discussed the Java Library Collection Framework Queue and explained that the library includes a Queue interface and a Deque interface. Nine classes in the library implement the Queue interface, and four implement the Deque interface. As we emphasized in the current section, queues are often used in concurrent programs. Lending credence to this statement is the fact that most of the queue interface implementations in the Java library support concurrent use in one way or another:
The
ArrayBlockingQueue,LinkedBlockingQueue,DelayQueue,Synchronous-Queue, andPriorityBlockingQueueall share the feature that a thread attempting to put an element into a full queue object will block until such time that the queue object has space available, and that a thread attempting to retrieve an element from an empty queue object will block until an element is available.The
ConcurrentLinkedQueueis thread safe. This means that like theSyncArrayBoundedQueuewe developed in this section, operations on objects of theConcurrentLinked-Queueare synchronized to allow concurrent access.
Originally most of the collection classes in the Collections Framework were thread safe, just like the ConcurrentLinkedQueue class. These include the Vector, Stack, Dictionary, and HashTable classes. However, due to the protection processing required there is an execution time cost associated with maintaining thread safeness. Furthermore, many users of the collection classes do not need nor want to use concurrent threads, so the built-in cost of thread safeness was considered unnecessary overhead. Therefore, with the release of Java 2, similar nonthread-safe classes were included in the library for all of the original collection classes. For example, the ArrayList class is a nonthread-safe alternative for the Vector class and HashSet or HashMap are alternatives to HashTable.
The original set of collection classes, the thread-safe collection classes, are now known as the “historical” collection classes. Most programmers prefer not to use them; instead, programmers use the collection classes introduced with Java 2 or later. There are facilities in the library for transforming these newer classes into thread-safe classes. For example, you could create a synchronized Set collection using the unsynchronized HashSet class with the statement
Set s = Collection.synchronizedSet(new HashSet());
Summary
A queue is a “first in, first out” (FIFO) structure. We defined a queue at the abstract level as an ADT, creating a queue interface that requires both enqueue and dequeue operations plus several observer operations. Two array-based implementations were developed—one bounded and one unbounded. We also created a link-based implementation and discussed several other implementations that would use links. Figure 4.16 displays a diagram of the major queue-related interfaces and classes developed in this chapter. The diagram follows the same conventions we listed on page 146 for the Stack ADT diagram.
Queues are often used to hold information until it needs to be used or jobs until they can be served. The palindrome identifier application highlighted this nature of queues, using a queue to hold a sequence of characters until they could be compared to the characters from a stack.
We developed a second application, a tool to analyze queue behavior. Our program allowed us to control the arrival rate and service needs of queue elements, and discover the average amount of time an element spent waiting on a queue. By varying the number of queues, we could determine the suitability of adding new servers to a queuing system. This application used a variation of our standard queue, a “glass” queue that allowed an application to look inside the queue abstraction. In addition to the glass queue variation we discussed several other variations and took a quick look at the support for queues in the Java library.
Finally, we also discussed the use of queues for managing tasks that can be executed concurrently and looked at some of Java’s mechanisms for indicating concurrency and for synchronizing concurrent threads.

Figure 4.16 The queue-related interfaces and classes developed in Chapter 4
Exercises
4.1 The Queue
-
True or False? Explain your answers.
A queue is a “first in, first out” structure.
The element that has been in a queue the longest is at the “rear” of the queue.
If you
enqueuefive elements into an empty queue and thendequeuefive elements, the queue will be empty again.If you
enqueuefive elements into an empty queue and then perform theisEmptyoperation five times, the queue will be empty again.The
enqueueoperation should be classified as a “transformer.”The
isEmptyoperation should be classified as a “transformer.”The
dequeueoperation should be classified as an “observer.”If we first
enqueue elementAinto an empty queue and thenenqueue elementB, thefrontof the queue iselementA.
-
Indicate whether a queue would be a suitable data structure to use in each of the following applications.
An ailing company wants to evaluate employee records so that it can lay off some workers on the basis of service time (the most recently hired employees are laid off first).
A program is to keep track of patients as they check into a clinic, assigning them to doctors on a “first come, first serve” basis.
A program to solve a maze is to backtrack to an earlier position (the last place where a choice was made) when a dead-end position is reached.
An operating system is to process requests for computer resources by allocating the resources in the order in which they are requested.
A grocery chain wants to run a simulation to see how average customer wait time would be affected by changing the number of checkout lines in its stores.
Customers are to take numbers at a bakery and be served in order when their number comes up.
Gamblers take numbers in the lottery and win if their numbers are picked.
4.2 The Queue Interface
-
Based on our Queue ADT specification, a programmer has two ways to check for an empty queue. Describe them and discuss when one approach might be preferable to the other approach.
-
Show what is written by the following segments of code, given that
element1,element2, andelement3areintvariables, andqis an object that fits the abstract description of a queue as given in Section 4.2, “The Queue Interface.” Assume you can store and retrieve values of typeintinq.element1 = 1; element2 = 0; element3 = 4; q.enqueue(element2); q.enqueue(element1); q.enqueue(element1 + element3); element2 = q.dequeue(); q.enqueue(element3*element3); q.enqueue(element2); q.enqueue(3); element1 = q.dequeue(); System.out.println(element1 + " " + element2 + " " + element3); while (!q.isEmpty()) { element1 = q.dequeue(); System.out.println(element1); }element1 = 4; element3 = 0; element2 = element1 + 1; q.enqueue(element2); q.enqueue(element2 + 1); q.enqueue(element1); element2 = q.dequeue(); element1 = element2 + 1; q.enqueue(element1); q.enqueue(element3); while (!q.isEmpty()) { element1 = q.dequeue(); System.out.println(element1); } System.out.println(element1 + " " + element2 + " " + element3);
-
Your friend Bill says, “The enqueue and dequeue queue operations are inverses of each other. Therefore, performing an enqueue followed by a dequeue is always equivalent to performing a dequeue followed by an enqueue. You get the same result!” How would you respond to that? Do you agree?
-
 Using the Queue ADT: For this exercise you should use the methods listed in the
 QueueInterfaceinterface and standard Java control operations. Assume all of the queues are able to hold elements of typeintand have sufficient capacity to fulfill the problem specifications.Assume
startQcontains elements of typeintand bothevenQandoddQare empty. Devise a section of code that moves all of the integers fromstartQto the other two queues such that when finished,startQis empty,evenQcontains the even integers, andoddQcontains the odd integers.Assume
queueAandqueueBcontain integers andqueueCis empty. Devise a section of code that will alternately move an integer fromqueueAtoqueueCand then fromqueueBtoqueueCuntil either or both of the source queues are empty—if anything is left in a source queue then those integers are also copied toqueueC. For example, if you start withqueueAcontaining 1 2 3 4 andqueueBcontaining 5 6 then when the code finishes executing the two source queues are empty andqueueCcontains 1 5 2 6 3 4.
4.3 Array-Based Queue Implementations
-
Discuss the relative efficiency of the
enqueueanddequeueoperations for an array-based queue implemented with a fixed-front approach as opposed to a floating-front approach. -
Draw the internal representation of the queue
qfor each step of the following code sequence:ArrayBoundedQueue<String> q = new ArrayBoundedQueue<String>(5); q.enqueue("X"); q.enqueue("M"); q.dequeue(); q.enqueue("T");Your drawings should be similar to the array-based implementation part of Figure 4.10.
-
 Using the Queue ADT: Write a segment of code (application level) to perform each of the following operations. Assume
 myQueueis an object of the classArrayBounded Queueand is a queue of strings, containing at least three elements. You may call any of the public methods. You may also use additionalArrayBoundedQueueobjects.Set the string variable
secondElementto the second element from the beginning ofmyQueue, leavingmyQueuewithout its original two front elements.Set the string variable
lastequal to the rear element inmyQueue, leavingmyQueueempty.Set the string variable
lastequal to the rear element inmyQueue, leavingmyQueueunchanged.Print out the contents of
myQueue, leavingmyQueueunchanged.
-
Using the Queue ADT: Write a program that repeatedly prompts the user to enter strings, using the string “x done” to indicate when finished. The user is assumed to only enter strings of the form “f name” or “m name.” Output the names that had “m” indicated in the same order they were entered, preceded by the string “males:” and then do the same for the names that had “f” indicated, preceded by the string “females:”. Use two
ArrayBoundedQueueobjects in your program.Sample Run
Input a gender and name (x done to quit) > m Fred
Input a gender and name (x done to quit) > f Wilma
Input a gender and name (x done to quit) > m Barney
Input a gender and name (x done to quit) > m BamBam
Input a gender and name (x done to quit) > f Betty
Input a gender and name (x done to quit) > x done
males: Fred Barney BamBam females: Wilma Betty
-
Describe the effects each of the following changes would have on the
ArrayBounded Queueclass:Remove the
finalattribute from theDEFCAPinstance variable.Change the value assigned to
DEFCAPto 10.Change the value assigned to
DEFCAPto -10.In the first constructor, change the first statement to
elements = (T[]) newObject[100];
In the first constructor, change the last statement to
rear = DEFCAP;
In the first constructor, change the last statement to
rear = -1;
Reverse the order of the first two statements in the else clause of the
enqueuemethod.Reverse the order of the last two statements in the else clause of the
enqueuemethod.Reverse the order of the first two statements in the else clause of the
dequeuemethod.In
isEmpty, change “==” to “=”.
-
Add the following methods to the
ArrayBoundedQueueclass, and create a test driver for each to show that they work correctly. In order to practice your array coding skills, code each of these methods by accessing the internal variables of theArrayBoundedQueue, not by calling the previously defined public methods of the class.String toString()creates and returns a string that correctly represents the current queue. Such a method could prove useful for testing and debugging the class and for testing and debugging applications that use the class. Assume each queued element already provides its own reasonabletoStringmethod.int space()returns an integer indicating how many empty spaces remain in the queue.void remove(int count)removes the frontcountelements from the queue, and throwsQueueUnderflowExceptionif there are less thancountelements in the queue.boolean swapStart()returnsfalseif there are less than two elements in the queue; otherwise it reverses the order of the front two elements in the queue and returnstrue.boolean swapEnds()returnsfalseif there are less than two elements in the queue; otherwise it swaps the first and last elements of the queue and returnstrue.
-
Consider our array-based unbounded queue implementation.
What would be the effect of starting with a capacity of 1?
What would be the effect of starting with a capacity of 0?
-
Create an
ArrayListUnboundedQueueclass that implements theQueueInterface, using anArrayListinstead of an array as the internal representation. Also create a test driver application that demonstrates that the class works correctly. -
A “deque” is like a queue, but it also allows you to add to the front of the queue and to remove from the rear of the queue. Create an array-based
DeQueclass and a test driver that demonstrates that it works correctly.
4.4 An Interactive Test Driver
-
Devise a test plan that uses the
ITDArrayBoundedQueueapplication to demonstrate that each of the followingArrayBoundedQueuemethods works correctly. Submit a description of your plan, an argument as to why it is a robust plan, and the output from using the interactive test driver to carry out the test.boolean isEmpty()int size()void enqueue(T element)
-
As in Exercise 12a, add a
toStringmethod to theArrayBoundedQueueclass. Next enhance theITDArrayBoundedQueueclass to include a menu option that invokes the newtoStringmethod and displays the returned string. Finally, demonstrate that everything works correctly by using theITDArrayBoundedQueue. -
Following the approach used to create the
ITDArrayBoundedQueueclass, devise similar test drivers for each of the following classes. Demonstrate that your program works correctly.The
ArrayUnboundedQueueclassThe
ArrayBoundedStackclass (see packagech02.stacks)The
LinkedStackclass (see packagech02.stacks)
4.5 Link-Based Queue Implementations
-
Draw the internal representation of the queue
qfor each step of the following code sequence:LinkedQueue<String> q; q = new LinkedQueue<String>(); q.enqueue("X"); q.enqueue("M"); q.dequeue(); q.enqueue("T");Your drawings should be similar to the linked implementation part of Figure 4.10.
-
Describe the effects each of the following changes would have on the
LinkedQueueclass:In the constructor, change “
rear = null” to “rear = front.”In the
enqueuemethod, move the statement “rear = newNode” to just before the if statement.In the
enqueuemethod, change thebooleanexpression “rear == null” to “front == null.”In the
dequeuemethod, switch the second and third statements in the else clause.
-
Consider Figure 4.6. Suppose we switched the relative positions of the front and rear references. How would that affect our queue implementation? How would you implement the
dequeuemethod if this new approach was used? -
Add the following methods to the
LinkedQueueclass, and create a test driver for each to show that they work correctly. In order to practice your linked list coding skills, code each of these methods by accessing the internal variables of theLinkedQueue, not by calling the previously defined public methods of the class.String toString()creates and returns a string that correctly represents the current queue. Such a method could prove useful for testing and debugging the class and for testing and debugging applications that use the class. Assume each queued element already provides its own reasonabletoStringmethod.void remove(int count)removes the frontcountelements from the queue; throwsQueueUnderflowExceptionif less thancountelements are in the queue.boolean swapStart()returnsfalseif less than two elements are in the queue, otherwise reverses the order of the front two elements in the queue and returnstrue.boolean swapEnds()returnsfalseif there are less than two elements in the queue, otherwise swaps the first and last elements of the queue and returnstrue.
-
With the linked implementation of a queue, what are the ramifications of an application enqueuing the same object twice before dequeuing it?
-
A “deque” is like a queue, but it also allows you to add to the front of the queue and to remove from the rear of the queue. Create a link-based
DeQueclass and a test driver that demonstrates that it works correctly. -
Implement the Queue ADT using a circular linked list as shown in Figure 4.9.
-
Assume the maximum queue size is 200.
How many references are needed for:
Our bounded array-based queue holding 20 elements?
Our bounded array-based queue holding 100 elements?
Our bounded array-based queue holding 200 elements?
Our reference-based queue holding 20 elements?
Our reference-based queue holding 100 elements?
Our reference-based queue holding 200 elements?
For what size queue do the array-based and reference-based approaches use approximately the same number of references?
4.6 Application: Palindromes
-
Consider the
testmethod of thePalindromeclass. What is the effect of:Switching the order of the
pushandenqueuestatements in the for loop?Removing the
stack.pop()statement?The
candidateargument string beingnull?The
candidateargument string having no letters?
-
How would you change the
testmethod of thePalindromeclass so that it considers all characters, not just letters? Identify the statements you would change, and how you would change them. -
This question deals with palindromic dates—that is, dates that read the same forward and backward.
The year 2002 was a palindromic year. When is the next palindromic year?
If dates are written MMDDYYYY, then May 2, 2050, is a palindromic date. What is the earliest palindromic date of the 21st century?
Create a program that identifies all palindromic dates in a given year. First a user enters a year. Then the program reports the palindromic dates. Finally, the program asks the user if he or she wishes to try again. Note that you need a class similar to the
Palindromeclass, but one that permits testing “digit” characters.
4.7 Queue Variations
-
As discussed in this section, instead of having our queue methods throw exceptions in the case of “erroneous” invocations, we could have the queue methods handle the situation themselves. We define the following two “safe” methods:
boolean safeEnqueue (T element)addselementto the rear of the queue; returnstrueif element successfully added,falseotherwiseT safeDequeue ( )returnsnullif this queue is empty; otherwise removes front element from this queue and returns itAdd these operations to the
ArrayBoundedQueueclass. Create a test driver application to demonstrate that the added code works correctly.Add these operations to the
LinkedQueueclass. Create a test driver application to demonstrate that the added code works correctly.
-
Show what is written by the following segment of code, given that
element1,element2, andelement3areintvariables, andglassQis an object that fits the abstract description of a glass queue as given in Section 4.7, “Queue Variations.” Assume that you can store and retrieve values of typeintinglassQ.element1 = 1; element2 = 0; element3 = 4; glassQ.enqueue(element2); glassQ.enqueue(element1); glassQ.enqueue(element3); System.out.println(glassQ.peekFront()); System.out.println(glassQ.peekRear()); element2 = glassQ.dequeue(); glassQ.enqueue(element3*element3); element1 = glassQ.peekRear(); glassQ.enqueue(element1); System.out.println(element1 + " " + element2 + " " + element3); while (!glassQ.isEmpty()) { element1 = glassQ.dequeue(); System.out.println(element1); } -
Following the approach used to create the
ITDArrayBoundedQueueclass, devise a similar test driver for theLinkedGlassQueueclass. Demonstrate that your program works correctly. -
Using the circular doubly linked list below, give the expression corresponding to each of the following descriptions.

For example, the expression for the
infovalue of node 1, referenced from reference A, would beA.getInfo().The
infovalue of node 1, referenced from reference CThe
infovalue of node 2, referenced from reference BThe
linkvalue of node 2, referenced from reference AThe
linkvalue of node 4, referenced from reference CNode 1, referenced from reference B
The
backvalue of node 4, referenced from reference CThe
backvalue of node 1, referenced from reference A
-
This exercise shares some content with Exercises 15 and 24. Create a class that implements the
DequeInterfaceand a test driver that demonstrates it works correctly:Create an array-based bounded implementation.
Create a linked list–based implementation.
Create a doubly linked list–based implementation. Use the
DLLNodeclass for the nodes.
Questions 35–38 require “outside” research.
-
List the Java library classes that implement the Java library
Queueinterface. -
In the Java library, the
BlockingQueueinterface extends theQueueinterface. Briefly describe the main differences between a “blocking” queue and a “normal” queue. -
The informal description provided of the Java library
Queuesuggests that addition of anullobject into a queue be disallowed. Why? -
Describe the differences among the four Java library classes that implement the Library
Dequeinterface.
4.8 Application: Average Waiting Time
-
Complete the following table:
Customer Arrival Time Service Time Finish Time Wait Time 1 0 10 2 8 3 3 8 10 4 9 40 5 20 15 6 32 18 Assuming one queue, what is the average waiting time?
Assuming two queues, what is the average waiting time?
Assuming three queues, what is the average waiting time?
-
In the Average Waiting Time program, which class (
Customer,CustomerGenerator,GlassQueue,Simulation, orSimulationCLI) is responsible for:Providing the size of a queue?
Deciding which queue a customer enters?
Obtaining the number of queues from the user?
Calculating the arrival time of a customer?
Calculating the finish time of a customer?
Calculating the waiting time for a customer?
Calculating the average waiting time?
-
Use the Average Waiting Time program to determine a reasonable number of queues to use if there are 1,000 customers and:
The interarrival time is 5 and the service time is 5.
The interarrival time is 1 and the service time is 5.
The interarrival time ranges from 0 to 20, and the service time ranges from 20 to 100.
The interarrival time ranges from 0 to 2, and the service time ranges from 20 to 100.
-
Revise the Average Waiting Time program to do the following:
Also output the largest number of customers who were on a queue at the same time.
Also output the percentage of the time at least one server was “idle.”
Choose the queue for a customer to enter based on shortest finish time, rather than shortest size. The user should have the ability to choose which approach to use for any simulation run.
4.9 Concurrency, Interference, and Synchronization
-
Seats to events such as concerts are often sold online, at ticket kiosks, and at walk-up ticket booths, simultaneously. Discuss potential interference problems in such situations and options for controlling the interference.
-
What is the output of each of the following code sequences? List all possible results and explain your answers.
Counter c = new Counter();
c.increment(); c.increment();
System.out.println(c);
Counter c = new Counter();
Runnable r = new Increase(c, 3);
Thread t = new Thread(r);
t.start();
System.out.println(c);
Counter c = new Counter();
Runnable r = new Increase(c, 3);
Thread t = new Thread(r);
c.increment(); t.start();
System.out.println(c);
Counter c = new Counter();
Runnable r = new Increase(c, 3);
Thread t = new Thread(r);
t.start(); c.increment();
System.out.println(c);
Counter c = new Counter();
Runnable r = new Increase(c, 3);
Thread t = new Thread(r);
t.start(); t.join();
c.increment();
System.out.println(c);
Counter c = new Counter();
Runnable r = new Increase(c, 3);
Thread t = new Thread(r);
t.start(); c.increment();
t.join();
System.out.println(c);
SyncCounter sc = new SyncCounter();
Runnable r = new IncreaseSync(sc, 3);
Thread t = new Thread(r);
t.start(); sc.increment();
t.join();
System.out.println(sc);
-
Create a
PrintCharclass that implementsRunnable. The constructor should accept a character and an integer as parameters. Therunmethod should print the character the number of times indicated by the integer. Create an application that instantiates twoPrintCharobjects, one passed “A” and 200 and one passed “B” and 200. It then instantiates and starts two thread objects, one for each of the twoPrintCharobjects. Experiment with the resulting system, using different numerical parameters for thePrintCharobjects. Create a report about the results of your experimentation. -
Create an application that instantiates a 20 × 20 two-dimensional array of integers, populates it with random integers drawn from the range 1 to 100, and then outputs the index of the row with the highest sum among all the rows. To support your solution, create a class from which you can instantiate
Runnableobjects, each of which will sum one row of the two-dimensional array and then place the sum of that row into the appropriate slot of a one-dimensional, 20-element array. To summarize, your application will:Generate the two-dimensional array of random integers.
Start 20 concurrent threads, each of which places the sum of one row of the two-dimensional array into the corresponding slot of a one-dimensional array.
Output the index of the row with the maximum value.