CHAPTER
24
Enhancing RMAN with Veritas NetBackup for Oracle
Veritas NetBackup Server software and Database Agent software work in collaboration with RMAN to manage enterprise backup, recovery, and storage administration. The products run on many operating systems, support popular databases, and integrate easily with an assortment of storage devices. NetBackup’s tantalizing features, coupled with the vendor’s close partnership with Oracle, make it a desirable choice. The information and downloads in this chapter are available on Symantec’s website, as Veritas is now part of Symantec.
Key Features
NetBackup for Oracle has many features and benefits that augment the functionality of RMAN. A summary of the key features is listed in Table 24-1.
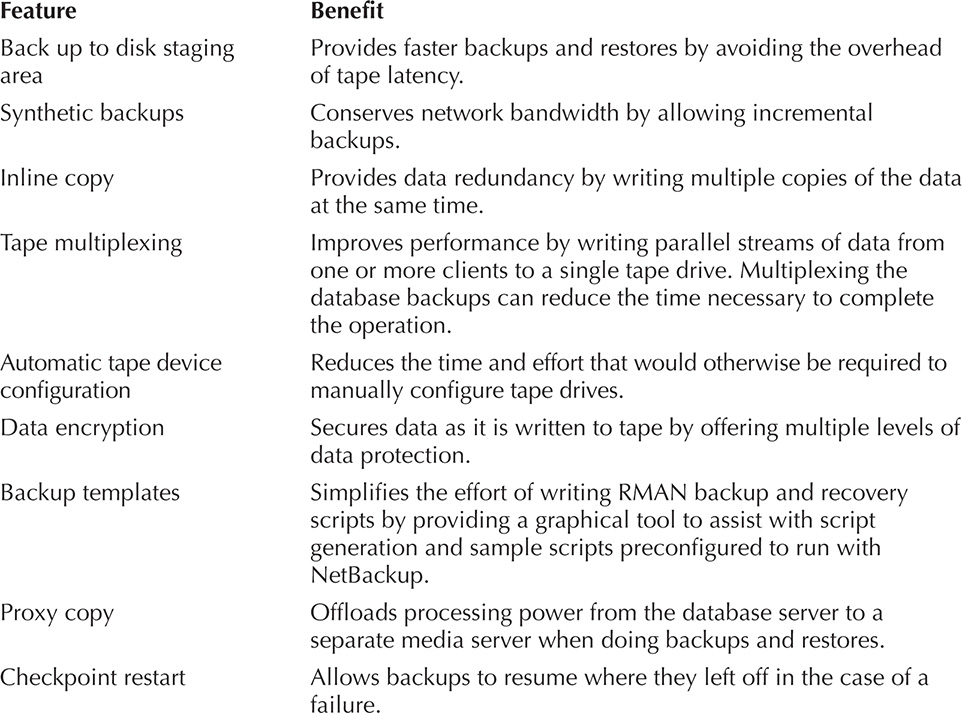
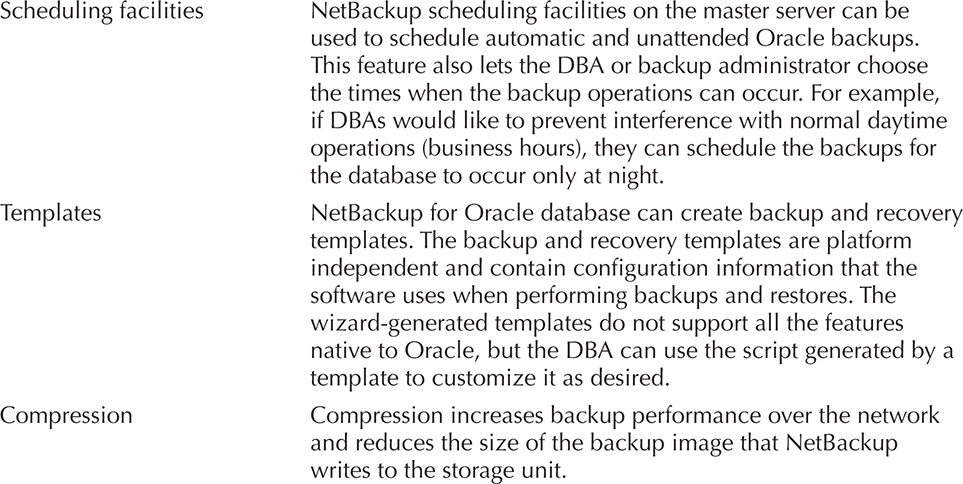
TABLE 24-1. Key Features of NetBackup for Oracle
Some specialty add-ons worth looking into are NetBackup Advanced Client, NetBackup Vault, and NetBackup Bare Metal Restore.
Necessary Components
The following elements enable successful communication exchanges between RMAN, the NetBackup servers, and the storage devices:
![]() NetBackup Server software
NetBackup Server software
![]() NetBackup for Oracle agent software—includes a required interface library file (libobk.*)
NetBackup for Oracle agent software—includes a required interface library file (libobk.*)
![]() Oracle Database software—includes the RMAN utility and the Oracle Call Interface (OCI)
Oracle Database software—includes the RMAN utility and the Oracle Call Interface (OCI)
![]() NetBackup licenses—needed for all software, options, and agents being used
NetBackup licenses—needed for all software, options, and agents being used
Storage/Media Device Configuration
Setting up tape drives, host bus adapters, SCSI IDs, and tape robots (see NetBackup Media Manager Device Configuration Guide) is usually left up to Unix or storage administrators. We will not discuss those vendor-specific steps here, but will instead provide a few commands to verify proper configuration of tape media devices.

NOTE
Hardware devices should be set up and tested for proper working order prior to installing the NetBackup for Oracle agent software.
Use the following command to query the master server from the client server to verify communications:
![]()
Next, query the master server from the client server to verify the version:
![]()
View which storage server will be servicing the client server by issuing the following:
![]()
Finally, verify that the NetBackup communication daemons are listening for requests:
![]()
NetBackup Installation
Multiple tiers make up a networked backup environment. Every layer needs some amount of software configuration to enable component interoperability. The installations are straightforward and should take less than 20 minutes each. Besides doing local installations, you can run remote installs, installs from the Administration Console, and software propagation to the clients from a central master server.
NOTE
NetBackup software should not be installed on a network file system–mounted directory. Doing so could cause interference with its file-locking mechanisms.
NetBackup Server software gets installed on the following servers:
![]() Master server
Master server
![]() Media server (optional)
Media server (optional)
![]() Client (database) server
Client (database) server
The NetBackup for Oracle agent software gets installed on the client (database) server.
The following list defines the server types just mentioned:
![]() Master server Orchestrates the NetBackup environment. It is placed in a layer referred to as Tier 1 (top server tier). Tiers are labels for each of the different architectural layers or groupings of architectural components. The role of the master server is to schedule backups, track job progress, manage tape devices, and store backup metadata in a repository. Since the master server plays such a critical role, it is a good idea to cluster this server for high availability (and greater peace of mind).
Master server Orchestrates the NetBackup environment. It is placed in a layer referred to as Tier 1 (top server tier). Tiers are labels for each of the different architectural layers or groupings of architectural components. The role of the master server is to schedule backups, track job progress, manage tape devices, and store backup metadata in a repository. Since the master server plays such a critical role, it is a good idea to cluster this server for high availability (and greater peace of mind).
![]() Media servers Occupy Tier 2 (middle tier) and are used to back up a group of files locally while other files are being backed up across the network. Media servers are introduced into the environment to boost performance, but they are not required.
Media servers Occupy Tier 2 (middle tier) and are used to back up a group of files locally while other files are being backed up across the network. Media servers are introduced into the environment to boost performance, but they are not required.
![]() Client servers Reside in Tier 3 (client tier) and are usually the database servers that house the databases to be backed up.
Client servers Reside in Tier 3 (client tier) and are usually the database servers that house the databases to be backed up.
Pre-Installation Tasks for NetBackup for Oracle Agent
Before you install NetBackup for Oracle, you need to complete the following tasks:
1. Verify that the system administrator has installed and properly configured the NetBackup software on the master server, media servers (optional), and the client database servers.
2. Ensure that the proper license keys for all NetBackup servers, clients, agents, and options have been purchased and are registered on the master server. You can do this from either the Administration Console or the command line. From the Administration Console, launch the following and then choose Help | License Keys:
![]()
From the command line, run
![]()
3. Obtain the NetBackup for Oracle agent software CD, or ask a Unix system administrator to push the software to the client database machine from the master server.
NOTE
On the database server, both the NetBackup Server software and NetBackup for Oracle agent software need to be the same version. The software on the master server needs to be the same or a higher version as that on the database server.
NetBackup for Oracle Agent Installation Steps
To install the NetBackup for Oracle agent, follow these steps:
1. Insert and mount the installation CD.
2. Log in as root to the client (database) server.
3. Change to the directory where the CD is mounted.
4. Run the ./install script.
5. Choose NetBackup Database Agent.
6. You are asked whether you want to do a local installation. Enter y.
7. Choose NetBackup for Oracle.
8. Enter q (Done Selecting Agents).
9. Enter y to verify your selection.
10. Installation proceeds as follows:
A. A script called /<install_path>/netbackup/dbext/install_dbext is generated.
B. The file /<install_path>/netbackup/bp.conf is updated with server names.
C. Entries are added to /etc/services.
D. Entries are added to the NIS services map if NIS is running on the server.
E. Entries are added to the server /etc/initd.conf file for bpcd, vopied, and bpjava-msvc.
F. Startup and shutdown scripts are copied to the /etc/init.d directory.
G. Installation output is written to /<install_path>/netbackup/ext.
NOTE
In most cases, look for NetBackup to be installed in the /usr/openv/netbackup directory.
How to Link Oracle to NetBackup Media Manager
After installing the NetBackup for Oracle agent, you need to link Oracle Database software with the NetBackup Media Management Library. The link allows RMAN to write files to the media devices or to pull files from them. The NetBackup Media Management Library or API often is found in /<install_path>/netbackup/bin, whereas the Oracle library is located in $ORACLE_HOME/lib. Both files are named libobk*.
Linking can be done either automatically or manually, as described next.
Automatic Link Method
NetBackup for Oracle includes a script to automate the library link process. Since all steps are automated, using the script is preferred over a manual method. The oracle_link script performs the following actions:
![]() Retrieves the database version
Retrieves the database version
![]() Retrieves the operating system version
Retrieves the operating system version
![]() Warns if the database is not shut down
Warns if the database is not shut down
![]() Checks environment variable settings
Checks environment variable settings
![]() Applies the appropriate library based on its assessment
Applies the appropriate library based on its assessment
The steps to automatically link Oracle 9i Database, Oracle Database 10g, Oracle Database 11g, and Oracle Database 12c with NetBackup for Oracle follow:
1. Log into the Unix server as the Oracle Database owner account, usually oracle.
2. Set the variables $ORACLE_SID and $ORACLE_HOME.
3. Shut down each Oracle database instance:
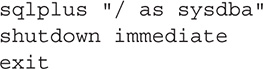
4. Run the <install_path>/netbackup/bin/oracle_link script.
5. View the output that is written to /tmp/make_trace.pid for errors.
Manual Link Method
If you prefer more control over the link process, you may opt for the manual method. The following are the steps to manually link Oracle 9i Database and Oracle Database 10g with NetBackup for Oracle:
1. Log into the Unix server as the oracle account.
2. Set the variables $ORACLE_SID and $ORACLE_HOME.
3. Shut down each Oracle database instance:
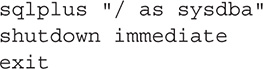
4. Perform the applicable linking steps in Table 24-2.
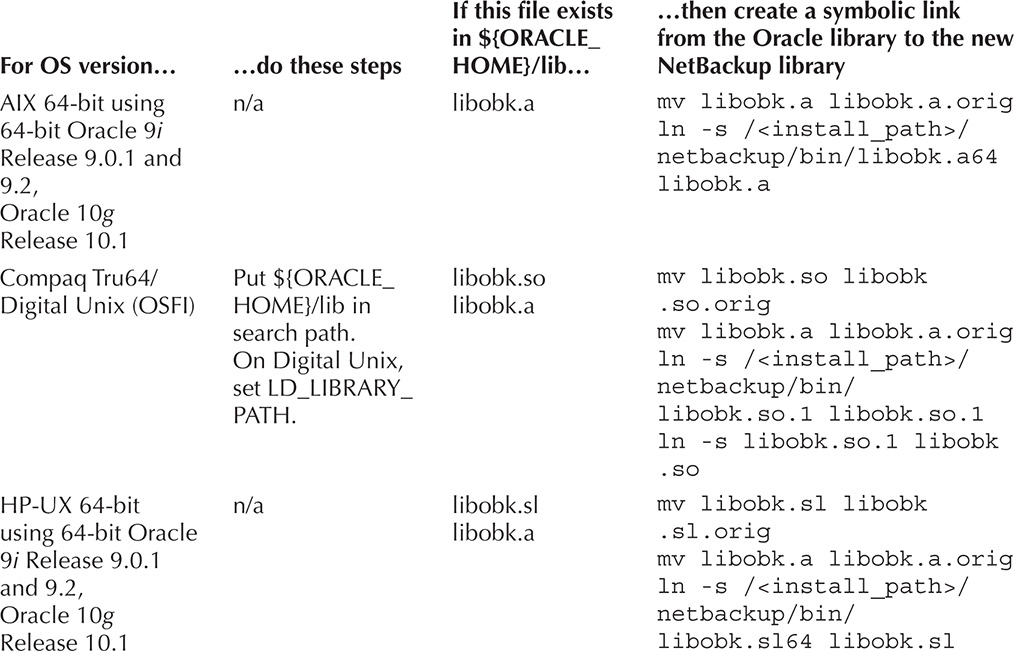
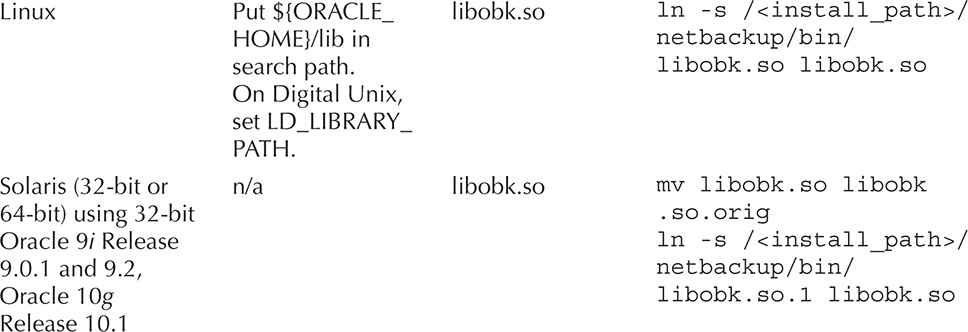
TABLE 24-2. Manual Link Process
Architecture
Now that the hardware is configured, the server and agent programs are installed, the daemons are running, and the libraries are linked, we’ve built a solid foundation (see Figure 24-1) upon which to run RMAN.
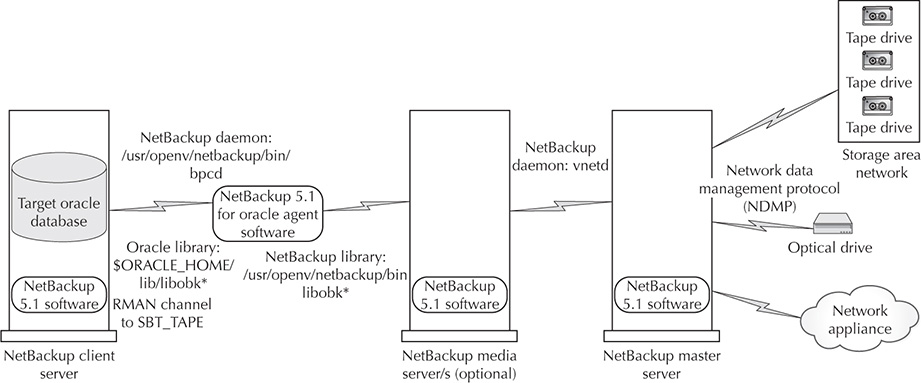
FIGURE 24-1. NetBackup architecture
Configuring NetBackup Policies
You need to give NetBackup instructions on how and when to execute the backups. These instructions are organized into special groupings called policies. Here are some points to be aware of when configuring policies:
![]() An RMAN job must be associated with at least one policy in order for it to execute.
An RMAN job must be associated with at least one policy in order for it to execute.
![]() A default policy is provided with the agent software.
A default policy is provided with the agent software.
![]() Multiple policies can be created for a single database server.
Multiple policies can be created for a single database server.
The NetBackup Administration Console provides a nice and easy interface for configuring the following policy information:
![]() Attributes
Attributes
![]() Schedule
Schedule
![]() Clients on which the policy is implemented
Clients on which the policy is implemented
![]() Backup selection
Backup selection
Adding New Policies
Here’s how to add a new policy:
1. Start the NetBackup program on the storage server where the policy will be created.
2. Click the Policies tab. Expand NetBackup Management | Policies, as shown in Figure 24-2.
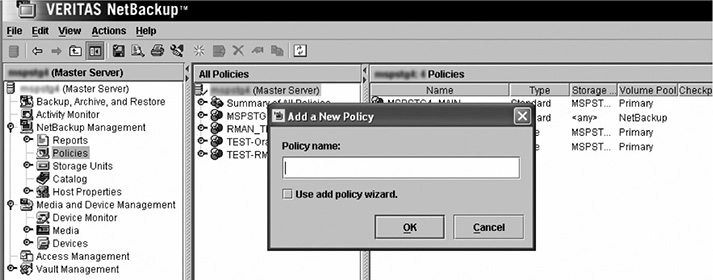
FIGURE 24-2. Adding new policies
3. In the All Policies pane, right-click Master Server and then choose New.
4. Type a unique name in the Add a New Policy dialog box, shown in Figure 24-2. Once you add the name of the new policy in the dialog box, the Change Policy dialog box will appear.
As part of the policy definition, choose the policy attributes, shown on the Attributes tab in Figure 24-3, as follows:
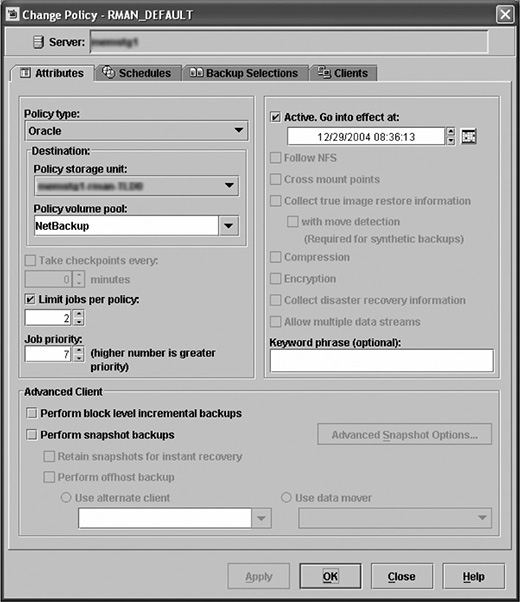
FIGURE 24-3. NetBackup policy configuration
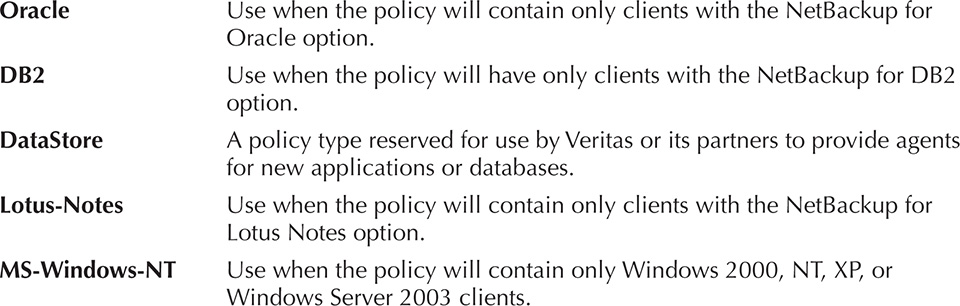
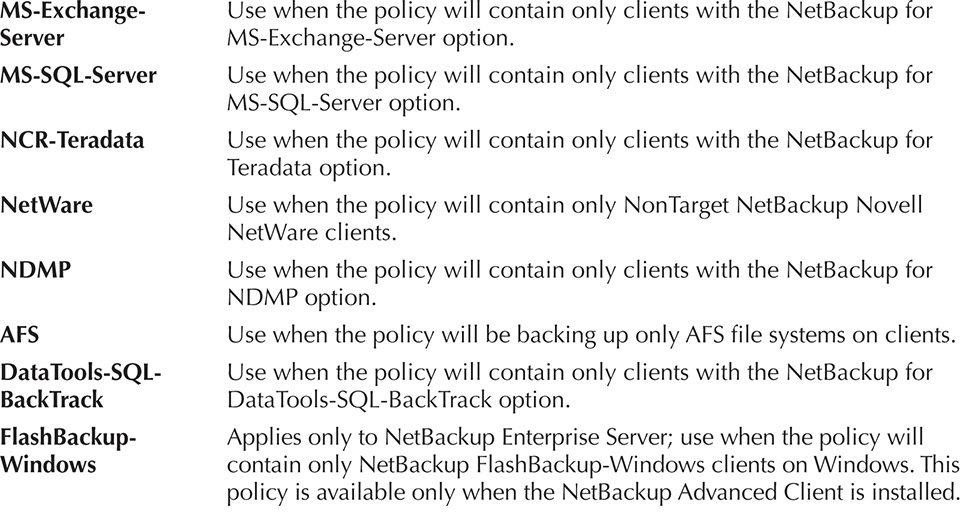
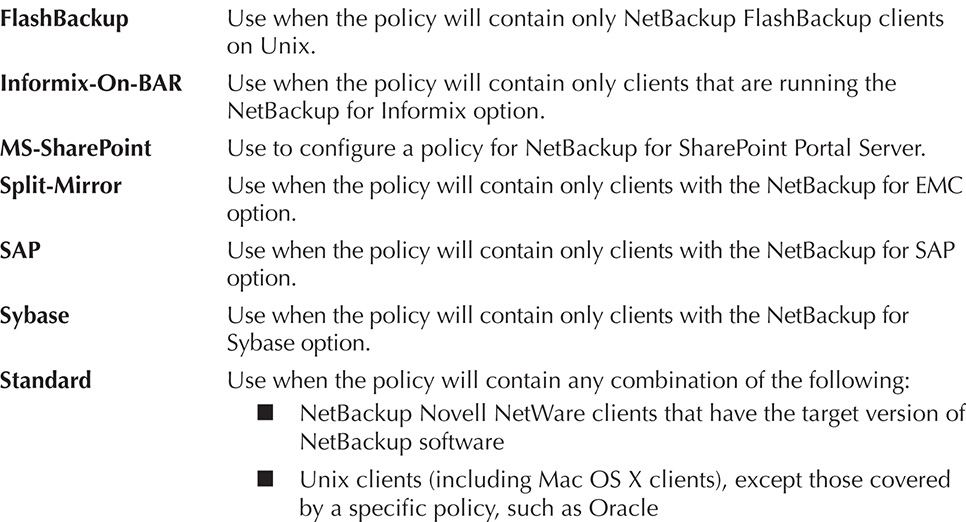
![]() Policy Type This drop-down list contains many options; for Oracle RMAN backups, you can choose the Oracle policy type. The following are the various policy options with the intended use of each option:
Policy Type This drop-down list contains many options; for Oracle RMAN backups, you can choose the Oracle policy type. The following are the various policy options with the intended use of each option:
![]() Destination Choose settings for Policy Storage Unit and Policy Volume Pool.
Destination Choose settings for Policy Storage Unit and Policy Volume Pool.
![]() Limit Jobs Per Policy Check this box to restrict the number of jobs that can be run in parallel.
Limit Jobs Per Policy Check this box to restrict the number of jobs that can be run in parallel.
![]() Active. Go into Effect At Check this box and specify a date and time to turn on, at a later date and time, a policy that you create in advance.
Active. Go into Effect At Check this box and specify a date and time to turn on, at a later date and time, a policy that you create in advance.
Defining Schedules
If you are using the NetBackup scheduler, you must define when the jobs should run. A single policy can contain more than one job schedule and can be shared by multiple database servers (clients).
The Oracle policy type has options for Application Backup Schedule and Automatic Backup Schedule, as described next. One or more automatic backup schedules will be required depending on the job frequency.
Configure an Application Backup Schedule
Whenever the policy type is “Oracle,” NetBackup creates an Application Backup schedule. This schedule defines the overall timeframe when any backup job can occur. Unscheduled Oracle backups will default to using this schedule. Special processes, needed for the execution of RMAN jobs, are initiated as part of the Application Backup schedule.
To configure an Application Backup schedule, follow these steps:
1. In the Change Policy dialog box, click the Schedules tab.
2. Double-click Default Application Backup Schedule.
3. Click the Attributes tab, shown in Figure 24-4, and make sure that the Retention option is set.

FIGURE 24-4. Application Backup schedule
4. Click the Start Window tab. The Start Window defines the time limits during which a backup job can begin. It is a more granular subschedule within the overall Application Backup schedule. A backup job must start within the time limits of the Start Window, but will continue to run until it finishes.
Set the backup window for the Application Backup schedule to 24 hours a day, seven days a week, in order to perform any unscheduled or scheduled backup at any time and for any duration.
Configure an Automatic Backup Schedule
To configure an Automatic Backup schedule, follow these steps:
1. In the Change Policy dialog box, click the Schedules tab.
2. Click the New button to open the Add Schedule window.
3. On the Attributes tab (refer to Figure 24-5), enter a unique name for the schedule.
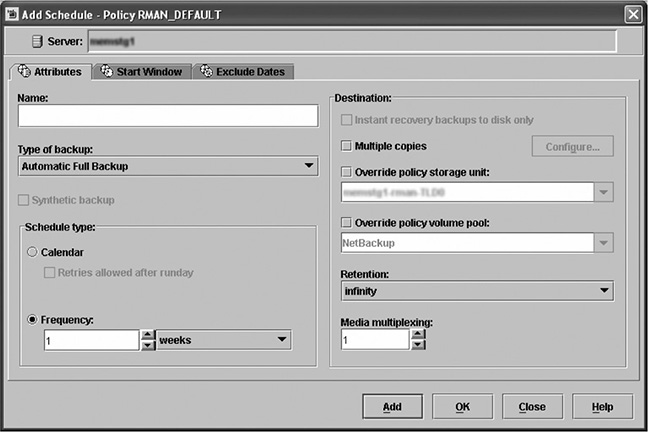
FIGURE 24-5. Automatic Backup schedule
4. Select from four different backup types in the Type of Backup drop-down list:
![]() Application Backup Runs when an Oracle backup is started manually. Each Oracle policy must be configured with one Application Backup schedule.
Application Backup Runs when an Oracle backup is started manually. Each Oracle policy must be configured with one Application Backup schedule.
![]() Automatic Full Backup Backs up all the database blocks that have been allocated or that are in use by Oracle.
Automatic Full Backup Backs up all the database blocks that have been allocated or that are in use by Oracle.
![]() Automatic Differential Incremental Backup Backs up database blocks that have changed since the most recent full or incremental backup at level n or lower.
Automatic Differential Incremental Backup Backs up database blocks that have changed since the most recent full or incremental backup at level n or lower.
![]() Automatic Cumulative Incremental Backup Backs up database blocks that have changed since the most recent full or incremental backup at level n – 1 or lower.
Automatic Cumulative Incremental Backup Backs up database blocks that have changed since the most recent full or incremental backup at level n – 1 or lower.
5. Select from two different schedule types:
![]() Calendar Specifies exact dates, recurring days of the week, or recurring days of the month.
Calendar Specifies exact dates, recurring days of the week, or recurring days of the month.
![]() Frequency Specifies the period that will elapse until the next backup operation can begin on this schedule. Options are hourly, daily, and weekly.
Frequency Specifies the period that will elapse until the next backup operation can begin on this schedule. Options are hourly, daily, and weekly.
6. Select an appropriate retention period from the Retention drop-down list, which controls how long NetBackup retains the records for scheduled backups.
To add other schedules, repeat Steps 1 through 6.
Defining a Backup Selection
When running backup jobs, NetBackup will call any custom scripts or templates that are placed in the backup selection list. These files will be executed in the order they are listed. In NetBackup, two options can be used to define commands for Oracle RMAN backup or recovery:
![]() Templates Stored in a known location on the central master server so that they do not need to be put on each database server. The filename is entered without a path.
Templates Stored in a known location on the central master server so that they do not need to be put on each database server. The filename is entered without a path.
![]() Scripts Located on each database server listed and must be entered with a full pathname.
Scripts Located on each database server listed and must be entered with a full pathname.
To add scripts or templates to the backup selections list, follow these steps:
1. From the Administration Console, double-click the policy name in the Policies list.
2. In the Change Policy dialog box, click the Backup Selections tab.
3. Click New.
4. In the Add Backup Selection dialog box, shown in Figure 24-6, enter the shell script or template name. Use the Add button to add the script or template to the selection list.
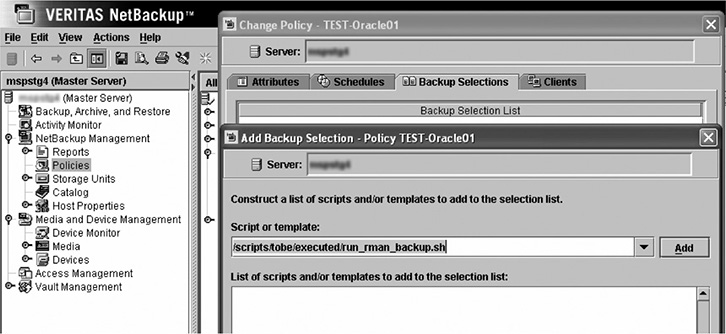
FIGURE 24-6. Backup selection
5. Click OK.
Defining Policy Clients
To add a database server (client) to a policy, follow these steps:
1. From the Administration Console, double-click the policy name in the Policies list.
2. In the Change Policy dialog box, click the Clients tab.
3. Click New to open the Add Client dialog box, shown in Figure 24-7.
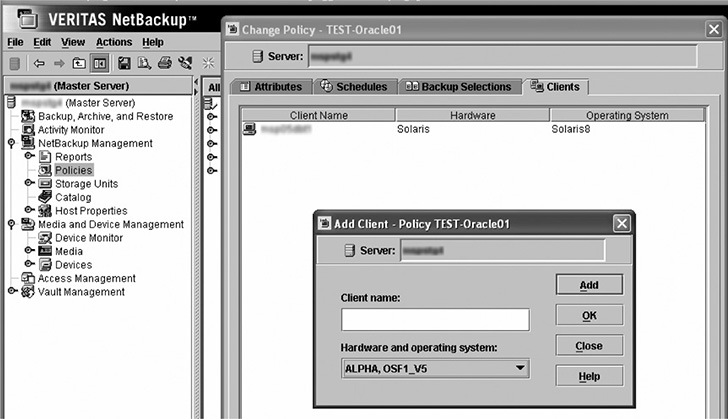
FIGURE 24-7. Define policy clients
4. In the Client Name box, type the name of the client you are adding.
5. Choose the hardware and operating system type from the drop-down list.
6. Click OK or click Add to set up another client.
Managing Expired Backup Images
The NetBackup Media Manager and RMAN both have the ability to manage backup retention periods. This can be a problem if their retention settings don’t match. Automatic expiration of backup images from both repositories is not supported. A workaround is to use the Retention setting in the Application Backup schedule and then to synchronize the NetBackup and RMAN repositories.
Delete Expired Backups Using NetBackup Repository
NetBackup controls the expiration of the Oracle backup images from its repository by using the Retention setting in an Application Backup schedule. The setting specifies the length of time before the backup image expires and is deleted. When you use NetBackup retention to delete backup images, you must do regular Oracle repository maintenance to remove references to expired backup files.
Delete Expired Backups Using RMAN
RMAN has a manual command to remove all database and archive log backups that have reached their retention limits. You can use this command to delete database backups from both the RMAN catalog and the NetBackup repository. When a request is issued to delete a backup file from the RMAN repository, RMAN sends the request to NetBackup to delete the corresponding images from its repository, regardless of the retention level. The code for deleting expired backups is shown next:

The crosscheck command should be used only in cases where files marked with the status “Available” that no longer exist can be expired and marked deleted. RMAN should control the retention using the following command. If you configure the channel with the tape parameters, there is no need to allocate channels. This feature is available in Oracle 9i Database and newer versions.
![]()
RMAN Sample Scripts
Something particularly clever about the NetBackup for Oracle agent installation is that it includes RMAN backup and recovery sample scripts that are pre-instrumented (that is, they already include code snippets or templates) with code for using NetBackup. Look for the sample scripts in /<install_path>/netbackup/ext/db_ext/oracle/samples/rman.
These sample scripts will be included:
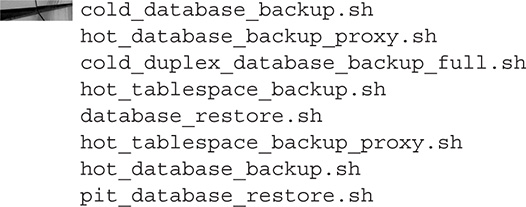
New scripts can be generated from the Administration Console. For anyone who has suffered through the time-consuming effort of trying to locate elusive punctuation errors, these scripts come as a pleasant surprise.
The following is an RMAN code snippet for calling NetBackup:
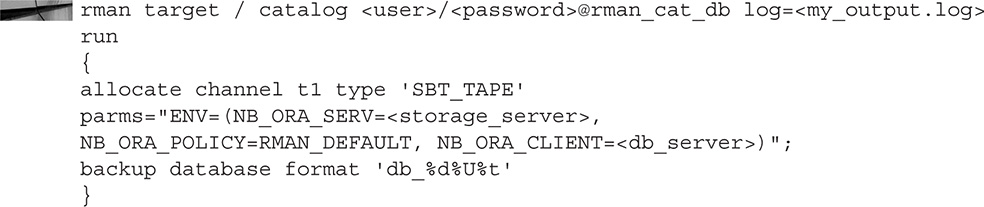
The NetBackup Administrator’s Guide recommends adding %t at the end of the format string, since NetBackup uses a timestamp as part of its search criteria for catalog images. You can also do this by using configure.
The following is an RMAN code snippet for calling NetBackup that uses configure commands:

Troubleshooting
Inevitably, something will break in the environment. Knowing how to prioritize problems in advance helps to resolve them more smoothly. This section highlights steps to help troubleshoot issues.
The following are general troubleshooting steps to take:
1. Verify Oracle agent installation by making sure that the proper libraries exist in /<install_path>/netbackup/bin. Refer to Table 24-2 earlier in the chapter to determine which library (for example, libobk.a) corresponds to your operating system.
2. Check the database server (client) to ensure that the bphdb executable exists. This is used by both the NetBackup scheduler and the GUI to start backups.
3. Check that the following executables exist:
![]() /<install_path>/netbackup/bin/bpdbsbora
/<install_path>/netbackup/bin/bpdbsbora
![]() /<install_path>/netbackup/bin/bpubsora
/<install_path>/netbackup/bin/bpubsora
![]() /<install_path>/lib/libdbsbrman.so
/<install_path>/lib/libdbsbrman.so
![]() /<install_path>/lib/libnbberman.so
/<install_path>/lib/libnbberman.so
4. Check that the following /<install_path>/netbackup/logs directories exist with 777 permissions:
![]() On the database server (client): bpdbsbora, dbclient, bphdb, and bpcd
On the database server (client): bpdbsbora, dbclient, bphdb, and bpcd
![]() On the master server: bprd and bpdbm
On the master server: bprd and bpdbm
![]() On the media server: bpbrm and bptm
On the media server: bpbrm and bptm
Use NetBackup Logs
NetBackup generates logs for backup and restore operations. These logs can be used to investigate media manager problems, but RMAN errors will be written to the RMAN logs. There are two types of NetBackup logs:
![]() Progress logs Located in /<install_path>/netbackup/logs/user_ops/username/logs, these logs are generated for any backup or restore operations. These files can sometimes be large and cumbersome. They contain sizable amounts of data. The key here is knowing how to extract the data you need. There are basically two error types: numbers 16 and 32, where 16 is an error failure and 32 is a critical failure. The best way to find them is to search the log files for <16> and <32>.
Progress logs Located in /<install_path>/netbackup/logs/user_ops/username/logs, these logs are generated for any backup or restore operations. These files can sometimes be large and cumbersome. They contain sizable amounts of data. The key here is knowing how to extract the data you need. There are basically two error types: numbers 16 and 32, where 16 is an error failure and 32 is a critical failure. The best way to find them is to search the log files for <16> and <32>.
![]() Debug logs Each debug log corresponds to a NetBackup process and executable. When debugging is turned on, the logs are written to /<install_path>/netbackup/logs. These logs can grow quickly in size, so use debugging only when necessary.
Debug logs Each debug log corresponds to a NetBackup process and executable. When debugging is turned on, the logs are written to /<install_path>/netbackup/logs. These logs can grow quickly in size, so use debugging only when necessary.
To enable logging on the database server (client), modify the /<install_path>/netbackup/bp.conf file with this line:
![]()
# is a value of 1 to 5 to indicate the level of logging. Keep in mind that a higher value generates a lot of information and could cause the directory to run out of space.
NOTE
Make sure that the debug file permissions are set to 777. Verify that libobk is linked properly if log files are not being created.
Determine Which Library Is in Use
You can find out which NetBackup library is interfacing with Oracle, as follows:
![]()
Security Best Practices
Since the NetBackup software runs in a networked environment, it is susceptible to vulnerabilities such as denial of service attacks. To prevent these situations from happening, the following best practices are recommended by Veritas, which is now Symantec:
![]() Allow administrative access to privileged users only.
Allow administrative access to privileged users only.
![]() Allow remote access only from trusted servers.
Allow remote access only from trusted servers.
![]() Apply the latest patches.
Apply the latest patches.
![]() Install NetBackup behind a firewall.
Install NetBackup behind a firewall.
![]() Ensure virus protection is running on the servers.
Ensure virus protection is running on the servers.
![]() Monitor network traffic for malicious activity.
Monitor network traffic for malicious activity.
![]() Block external access to the default ports used by NetBackup.
Block external access to the default ports used by NetBackup.
![]() NetBackup server and clients should face toward the internal network.
NetBackup server and clients should face toward the internal network.
Cost Justification
It’s not always easy to justify the costs of purchasing expensive software and licenses for an information technology department, which is traditionally considered to be a non-revenue-generating part of an organization. This section provides some ideas for demonstrating to management the value of purchasing Veritas NetBackup for Oracle.
The NetBackup for Oracle software extends the capabilities of RMAN. Since the software allows RMAN to speak directly to storage servers, it automates processes that would otherwise be done by people. It shortens backup and recovery time by eliminating some steps altogether and by cutting out process variation. Essentially, this translates into better overall application performance (since backups take less time), reduced business outages during recovery events, more error-free recoveries, and greater productivity of database and storage administrators.
The NetBackup software could easily pay for itself during just one significant business outage where productivity and revenue are negatively impacted.
Summary
We have explored how NetBackup software is used to facilitate a networked backup and recovery environment. We outlined the ways in which it extends existing RMAN functionality. We described how to configure each layer for direct component communication, which eliminates the need for manual intervention. We discovered that using NetBackup to enhance RMAN results in faster backup and recovery, reduced process variation, and shorter business outages during recovery events. NetBackup for Oracle software has been thoughtfully developed for those of us who are excited about easily deployed and feature-rich backup and recovery solutions.