

CHAPTER
26
RMAN and Tivoli Storage Manager
If you already use Tivoli Storage Manager (TSM) for backing up files in your enterprise, taking the next step and using TSM to back up your Oracle database makes a lot of sense: you not only can leverage an existing data protection asset, but also get a seamless connection from Oracle’s RMAN utility to TSM. With only a few minor modifications to your RMAN scripts and a straightforward one-time TSM client installation, you won’t even know that the tape or disk drive you’re using for backup is on a different server. In your DBA role, you may never even have to run a TSM console command.
In this chapter we’ll cover a number of topics related to TSM, the TSM client in general, and the add-on module known as Tivoli Data Protection for Oracle (TDPO). First, we’ll give you a brief overview of the TSM architecture and how an Oracle client connects to it. Your in-depth involvement with TSM begins when you must test and configure TDPO on the server where you will perform the RMAN backup commands.
Throughout this chapter, we’ll briefly cover a couple of TSM and Oracle client utilities that you will use to perform initial and routine configuration and monitoring tasks. We’ll next perform a couple of backups using RMAN and see the effect of these backups in the storage pool assigned to your TSM Oracle client. At the end of the chapter, we will cover a couple common problems you might encounter in backing up Oracle databases with TSM and TDPO and how to resolve them.
Overview of Tivoli Storage Manager
TSM is a multitiered architecture: when you use it to back up an Oracle database, you may have as many as four tiers. In contrast, you could host all tiers on a single server, but this is not recommended in a distributed environment where you want to keep your backup server separate from the server whose data you want to back up.
Figure 26-1 is a diagram of a typical TSM environment. In the next few sections we’ll drill down into a few of the components shown in Figure 26-1 and explain some TSM concepts along the way.
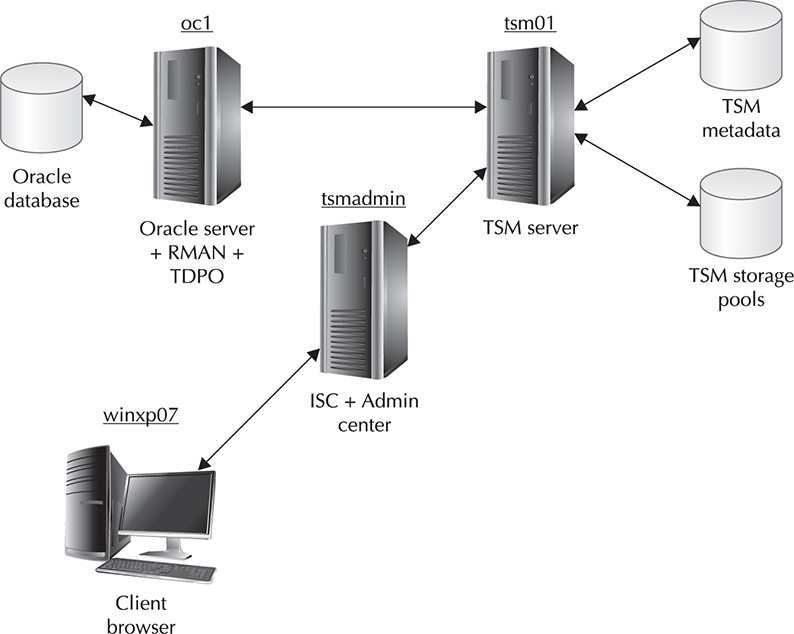
FIGURE 26-1. TSM architecture
Table 26-1 outlines the nodes shown in Figure 26-1. These nodes are used in the examples throughout this chapter to show you how you can distribute the TSM components across your network.

TABLE 26-1. TSM Node Names and Roles
TSM Server System Objects
The multilevel structure of system objects in a TSM server makes it easy to optimally configure your backups for each of the various data sources in your environment. For the same reason, this flexible hierarchy also makes it easy to assign a specific configuration to unrelated data sources! Figure 26-2 shows the relationship between TSM system objects as well as the types and number of objects that a client uses on any given TSM server.
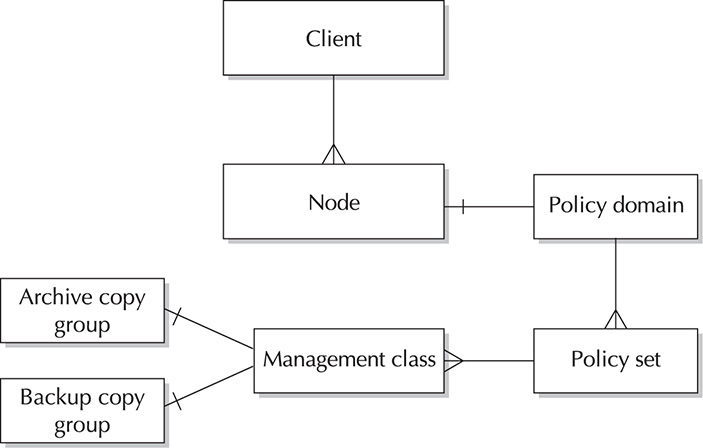
FIGURE 26-2. Client/TSM relationship and TSM system objects
At the highest level is the policy domain: a policy domain consists of one or more policy sets, and each policy set consists of one or more management classes. Each management class can have one archive copy group and one backup copy group. We’ll tell you more about each of these objects in the following sections.
Policy Domain
A policy domain is a group of clients with similar requirements for backing up and archiving data. You might use a policy domain for everyone in a particular department, a particular building or floor, or all users of a specific file server.
A default TSM installation includes one default policy domain called standard. For the examples later in this chapter, we will use the standard policy domain. You assign backup clients to a policy domain.
Policy Set
A policy set is a group of management classes. Each policy domain can contain one or more policy sets, but only one policy set in a policy domain can be active at any given time. You use policy sets to easily switch between available management classes.
Management Class
A management class is a collection of zero, one, or two copy groups. You designate one management class within a policy set as the default management class. You typically use management classes to partition client data based on its criticality to the business, how frequently it changes, or whether the data must be retained indefinitely. A management class can have at most one backup copy group and at most one archive copy group.
Backup Copy Groups and Archive Copy Groups
A copy group specifies the common attributes that control these characteristics of a backup or archive file:
![]() Generation How many copies of each file are retained
Generation How many copies of each file are retained
![]() Destination Which storage pool will contain the backup
Destination Which storage pool will contain the backup
![]() Expiration When a file will be deleted because the expiration date or retention period has passed
Expiration When a file will be deleted because the expiration date or retention period has passed
A backup copy group contains attributes that control whether a file that has changed since the last backup is backed up again, how many days must elapse before a file is backed up again, and how a file is processed if it is in use during a backup. In contrast, an archive copy group contains attributes that control whether a file is archived if it is in use, where the server stores archived copies of the files, and how long the server keeps archived copies of the files. TDPO only uses backup copy groups for Oracle backups.
TSM Client
You install the client piece of TSM, which includes the TSM API, on any server that needs to use a TSM server for backup or recovery. Also included in an installation on an Oracle server is the RMAN library interface to TSM: Tivoli Data Protection for Oracle (TDPO).
Using TDPO, RMAN can back up these database objects to TSM:
![]() Databases
Databases
![]() Tablespaces
Tablespaces
![]() Datafiles
Datafiles
![]() Archived log files
Archived log files
![]() Control files
Control files
![]() Spfiles
Spfiles
Plus, you can perform a full database restoration while the database is offline; you can perform tablespace or datafile restores while the database is either online or offline.
The server oc1 is a client node in an Oracle Real Application Clusters (RAC) database in Figure 26-1 and is a client of TSM on server tsm01.
RMAN Workshop: Configuring TDPO for Oracle
For this Workshop you will need an operational TSM server and client environment and Oracle database home installed. The latest and greatest version available is the IBM Tivoli Storage Manager for Databases: Data Protection for Oracle Version 7.1.
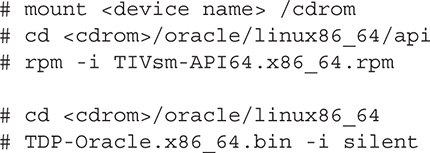
Step 1. To install TDPO on your Oracle server, you need to install the following RPM packages:
![]() Data Protection for Oracle Linux x86_64 base code, license, utilities: TDP-Oracle.x86_64.bin This contains the libraries and link definitions that Oracle RMAN will use to connect to TSM.
Data Protection for Oracle Linux x86_64 base code, license, utilities: TDP-Oracle.x86_64.bin This contains the libraries and link definitions that Oracle RMAN will use to connect to TSM.
![]() Tivoli Storage Manager API Linux x86_64: TIVsm-API64.i386.rpm This installs the application program interface (API) libraries to support TDPO or any other application that will programmatically access TSM.
Tivoli Storage Manager API Linux x86_64: TIVsm-API64.i386.rpm This installs the application program interface (API) libraries to support TDPO or any other application that will programmatically access TSM.
Step 2. The next step is to register the client oc1 on the TSM server using the TSM console:
![]()
Note that we’re setting maxnummp=2, which specifies the maximum number of parallel sessions that the client can use when backing up to tape. Even though we’re using disk drives for backup in these examples, it’s a good idea to define the parallelism you need on those occasions when you do back up to tape. Note that orabakpw is the password for this node.
Registering a client node also creates an administrative account that you can use to connect to the TSM server; however, creating individual server accounts for each administrator gives you more control over privileges assigned to each administrator, as well as more precise auditing information when an administrator changes the TSM server’s configuration.
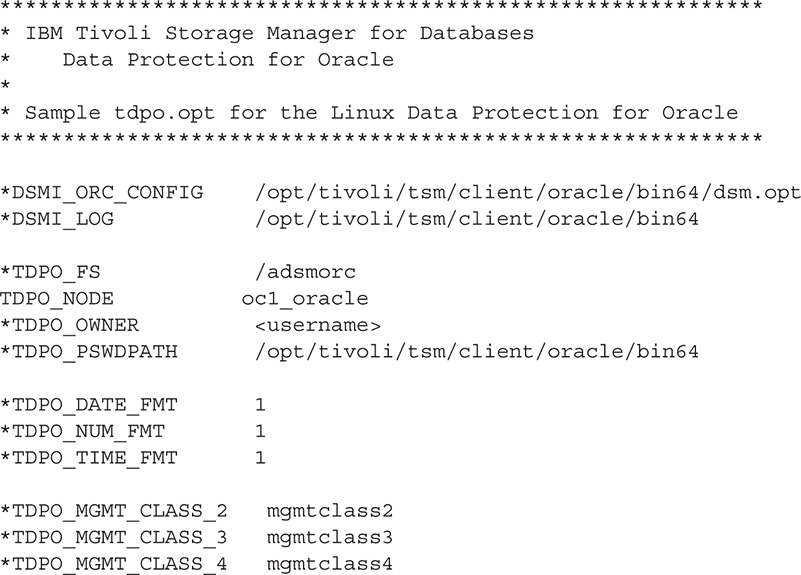
Step 3. Define TDPO options. On the Oracle client node oc1, change to the directory /opt/tivoli/tsm/client/oracle/bin64 and then copy tdpo.opt.smp (the sample file) to tdpo.opt. The file tdpo.opt, as you might expect, defines the TDPO-specific options, such as how TDPO will connect to the TSM server. Uncomment the line beginning with TDPO_NODE and replace <hostname> with the name of the TSM client node. In this example, we will use oc1_oracle. In addition, uncomment the lines beginning with DSMI_ORC_CONFIG and DSMI_LOG if you installed TDPO in a directory different from the default location. Your tdpo.opt file should now look like this:
Step 4. Create dsm.sys. The file dsm.sys defines how to connect to each TSM server, specifying the port number, TCP/IP address, and so forth. Copy the file /opt/tivoli/tsm/client/api/bin64/dsm.sys.smp to /opt/tivoli/tsm/client/oracle/bin64/dsm.sys and change the values as follows:
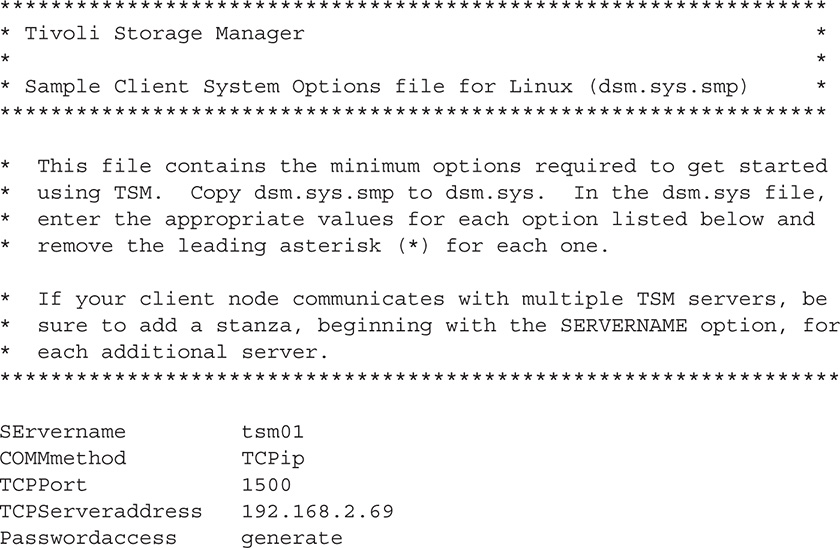
The IP address 192.168.2.69 is the address of the server tsm01. To avoid manually entering a password for every backup, you will use the tdpoconf utility later in this chapter to create a password file that TDPO will use to authenticate with the TSM server.
Step 5. Create dsm.opt. The file dsm.opt defines the TSM server name you will use for backups on this node. In the directory /opt/tivoli/tsm/client/oracle/bin64, create a file with one line, as follows:
![]()
Step 6. To enable the RMAN catalog’s archiving and expiration settings to control backup retention on the TSM server, update the configuration for node oc1_oracle on the TSM node by using this console command:
![]()
Step 7. Configure TSM copy group options. Since RMAN creates different backup filenames for each backup file it creates, all backup objects saved to the TSM backup storage pool have unique filenames, and therefore they will never expire. As a result, you must set the copy group attribute verdeleted to 0 so that TDPO can remove unwanted backup objects from the TSM backup storage pool when an RMAN command or policy sets the backup object to an inactive or expired state. The parameter verdeleted specifies the maximum number of backup versions to retain for files that have been deleted from the client; therefore, setting this value to 0 ensures that the expired backup files on the TSM server are deleted the next time expiration processing occurs.
In this example, you are using the default copy group for your TDPO backups, so you set the option verdeleted as follows using TSM console:
![]()
Step 8. Generate the tdpo password file. To ensure that you do not have to interactively specify a password for every RMAN backup to the TSM server, use the tdpoconf utility as follows:
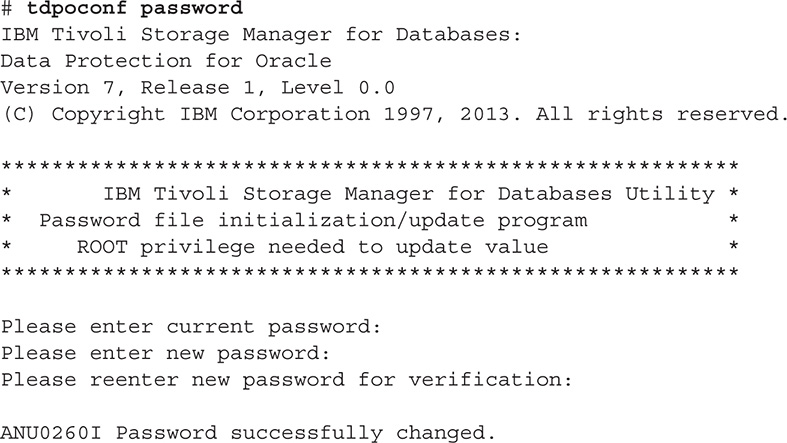
The tdpoconf utility creates or updates an encrypted password file called /opt/tivoli/tsm/client/oracle/bin64/TDPO.oc1_oracle.
Step 9. You need to create a symbolic link to the TSM library functions in Oracle’s default library directory, as follows:
![]()
The RPM utility has no way of knowing where your Oracle executables and libraries are stored, so you must define this link manually. If you have multiple Oracle homes, you need to create the link in each home that you want to be able to use TDPO in.
Libobk is the generic name for the library file. Each backup vendor that wants to interface with RMAN will provide a library file that is linked to the libobk file.
Step 10. Test TDPO connectivity. To ensure that you can establish a connection to the TSM server, use the sbttest utility. You can find sbttest in the directory $ORACLE_HOME/bin. Here, tdpo_check is the backup_file_name created by this program:

Performing an RMAN Backup Using TDPO
Now that the TDPO setup is complete, you’re ready to perform your first RMAN backup. You’ll use the allocate channel command in an RMAN session to define the backup location; even though your channel type is always sbt_tape, the actual backup device on the TSM server could be a disk, a writable DVD, or a physical tape drive; RMAN doesn’t know and you don’t care what physical device will contain the backup, as long as you can recover the database when disaster strikes!
In this first example, you back up just the USERS tablespace to TSM:
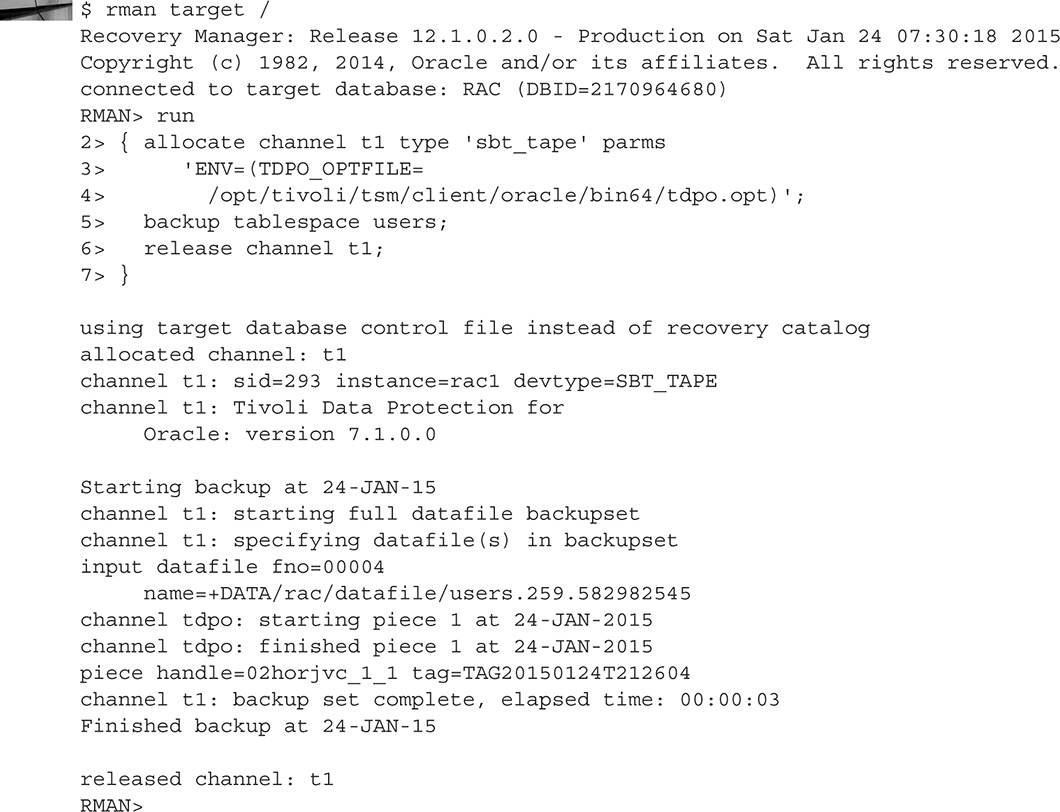
The only bit of extra work you need to do to back up to TSM is to specify the location of the TDPO options file in the RMAN env parameter. In this second example, you back up the entire database:

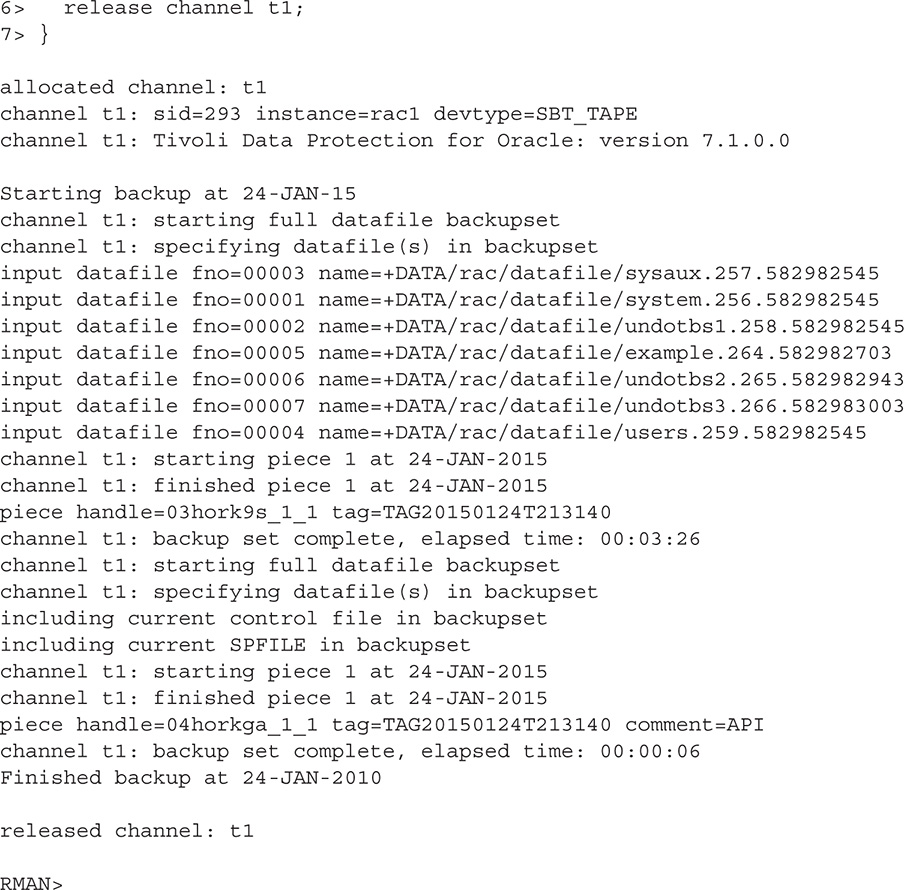
Note that you do not have to specify where the backup goes or what disk device to use. TSM automatically puts the backup files into one or more of the storage pool’s volumes.
By querying the RMAN catalog, you can see both of the backups you just created:
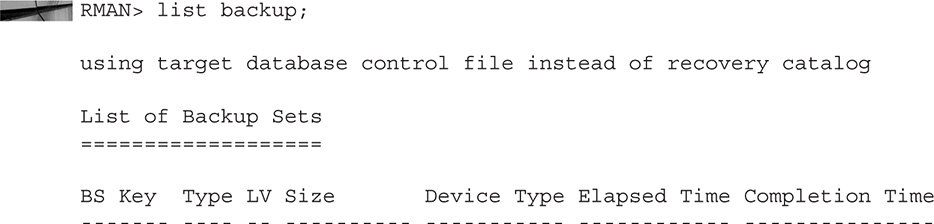
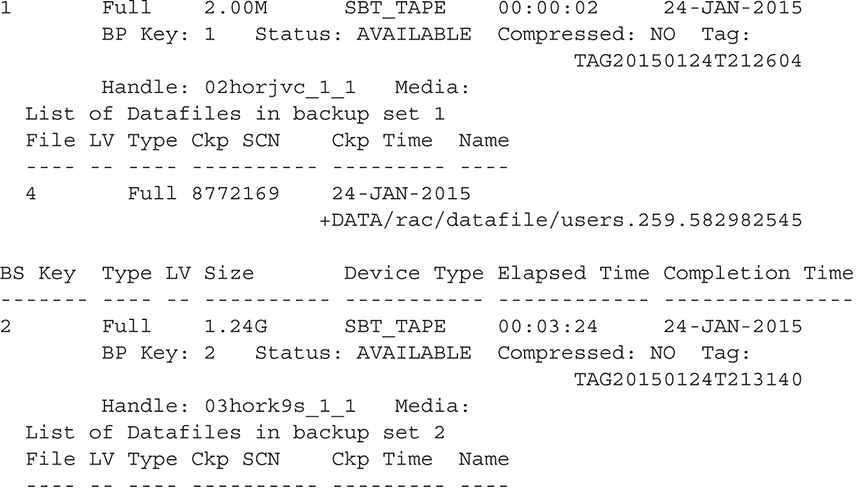

And finally, you can see how much disk space the backups are using in the storage pool by looking at the properties of the storage pool volumes, as shown in Figure 26-3. You access this page by clicking the ORACLEPOOL storage pool link in Figure 26-4 and then clicking the Volumes link in Figure 26-5.
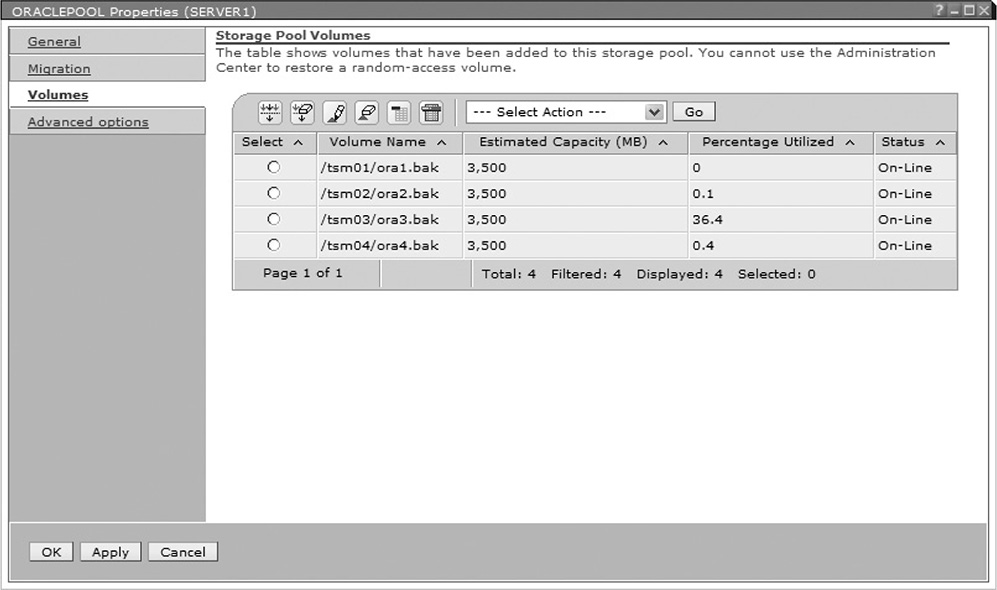
FIGURE 26-3. Querying storage pool volumes
FIGURE 26-4. Displaying storage pools and capacity

FIGURE 26-5. Client displaying storage pool volumes
Default Channels
Although every DBA should know how to manually allocate channels, it can involve a lot of error-prone typing, and if you have many databases, you may not know which tdpo file to use. By setting one parameter, you can back up a database with a simple backup database command with no manual channel allocation. Running a show all command from the RMAN> prompt will show the various RMAN options that are configured. To back up to TSM with automatic channel allocation, we are interested in only two options: CONFIGURE DEFAULT DEVICE TYPE TO 'SBT_TAPE' and CONFIGURE CHANNEL DEVICE TYPE 'SBT_TAPE' PARMS.
By running the following commands from the RMAN prompt, we can set default channels:

After the configuration commands have been run, backups are even easier:
![]()
Deleting Database Backups
One of the main advantages of using RMAN is a common interface in deleting backups. It doesn’t matter if the backups are on disk or tape; the same commands are used to delete expired backups. Even though the commands to delete backups are the same when using TSM and TDPO, there are times when additional cleanup may be needed. When you delete backups, you will notice they are deleted very quickly regardless of their size. When RMAN tells TSM to delete backup files, TSM does not immediately delete the files because the tape may not be available at the moment, or all the tape drives could be busy. Therefore, TSM marks the files to be deleted and returns a success code to RMAN. The TSM administrator will run a purge process that actually deletes the files. If you are using a catalog with the tdposync tool provided by TSM, it is possible to compare what the RMAN catalog shows as deleted and what TSM has actually deleted.
To launch tdposync from the default location using the sample tdpo file, run the following:
![]()
You must have the tdpo file that was used to take the backups for the comparison to work. After launching, tdposync will ask for a username, password, and a connection string to the RMAN catalog. If more than one RMAN catalog holds backup records, add the following parameter:
![]()
If any discrepancies are found after the comparison, tdposync will provide a list and ask for confirmation before deleting the files from TSM.
Troubleshooting Common Backup Scenarios
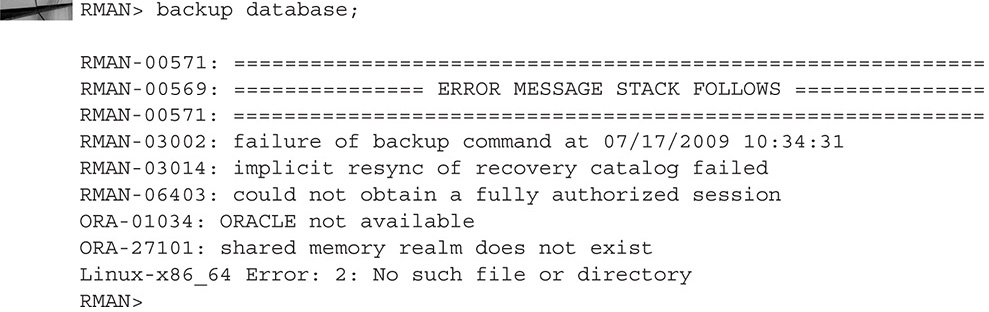
Backing up an Oracle database using TSM involves four parts: RMAN, Oracle, O/S, and TSM—each of which can fail and report errors. When you use the RMAN console at first, it can be difficult to know which of the four parts is reporting the error because errors from all sources are returned to the RMAN console. In the next example, O/S, Oracle, and RMAN errors are returned after a simple backup database was issued:
It is usually best to take a bottom-up approach when reading the error messages:
6. RMAN-03002: failure of backup command
5. RMAN-03014: implicit resync of recovery catalog failed
4. RMAN-06403: could not obtain a fully authorized session
3. ORA-01034: ORACLE not available
2. ORA-27101: shared memory realm does not exist
1. Linux-x86_64 Error: 2: No such file or directory
Line 1 is an O/S error that was returned to Oracle. In this case, it doesn’t prove too helpful in resolving the problem. Lines 2 and 3 provide the answer and should be recognizable to Oracle DBAs. “ORA-27101: shared memory realm does not exist” means the database instance was not running, and therefore RMAN could not connect to the database.
The first example could happen whether or not you are using TSM. The next scenario will introduce an error only if you are using TSM. We begin with an RMAN run block that allocates a channel, backs up the archive logs, deletes them, and then releases the channel.
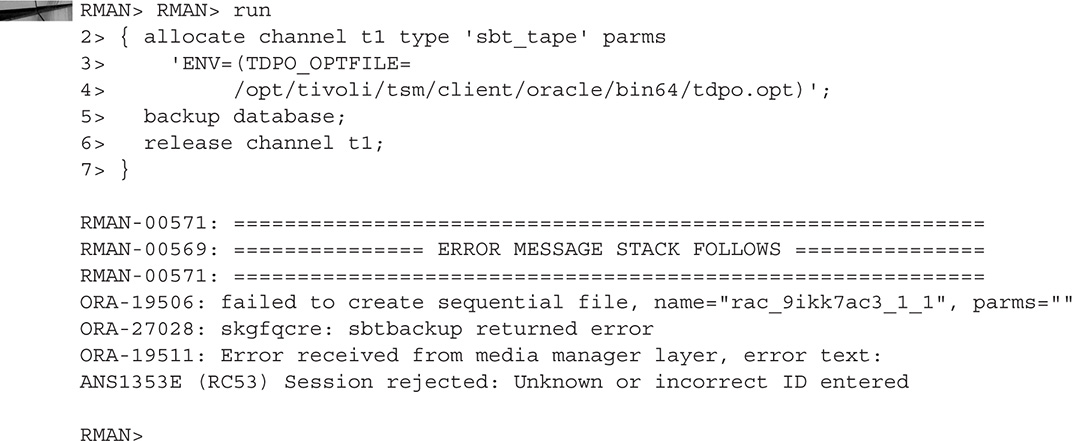
Again, starting with the bottom-up approach, we read the error messages starting with 1:
4. ORA-19506: failed to create sequential file, name="a400_9ikk7ac3_1_1", parms=""
3. ORA-27028: skgfqcre: sbtbackup returned error
2. ORA-19511: Error received from media manager layer, error text:
1. ANS1353E (RC53) Session rejected: Unknown or incorrect ID entered
ANS and ANU are errors returned by the TDPO library. Line 3 indicates RMAN received an error from the media management layer (TDPO library). Lines 2 and 1 are again RMAN saying that it failed to create the backup file of the archive logs. ANU and ANS errors can be time consuming to troubleshoot because many configuration and parameter files and settings have to be checked, as well as many different TSM errors that can be returned. From the error message returned in Step 1, “Session rejected,” we can assume a connection was made from RMAN to TSM and TSM rejected the session. Many different causes may result in a session being rejected; in this case, it is a lack of a password file for the tdpo node. As mentioned earlier in the chapter, to back up or restore an RMAN backup, a tdpo node name and password are supplied to TSM. To quickly troubleshoot this error, check the tdpo options file for the tdpo name that RMAN is using, and then also check to ensure RMAN can access the password file for the tdpo name. Also look in the dsm.sys file for the parameter ERRORLOGNAME. This will tell you the path to the file where TDPO will save error information and may provide more details. Your storage administrator may also be able to see if the session rejection message in the TSM logs fails and may be able to provide additional details.
Additional Troubleshooting
To turn on or off debug involves a simple debug on; or debug off; command. Once debug is on, we need to inform RMAN what additional debug information is to be collected. On the allocate channel command, trace=1 is used to create trace files in the user_dump_destination directory. Also on the allocate channel command, the debug=2 instructs RMAN to send additional information to the sbtio.log file.
Summary
Once you perform the initial installation and setup of TSM and TDPO in a few easy steps, it’s a case mostly of “set it and forget it,” allowing you, the DBA, to focus more on the RMAN scripts themselves than on managing where and how TSM stores the backups. When problems do arise, by properly reading out an error, you will quickly be able to diagnose backup failures and whether the problem lies with the database or with TSM.
TSM and TDPO not only make it easy to back up your Oracle database using the familiar RMAN interface, but they also reduce your enterprise’s storage management administrative costs because you can use a single storage manager—Tivoli Storage Manager—for all of your backup, recovery, and archival needs.