
Chapter 8
Unleashing the Calendar’s Power
In This Chapter
![]() Using the Date Navigator
Using the Date Navigator
![]() Finding a date (the number kind)
Finding a date (the number kind)
![]() Making and breaking dates
Making and breaking dates
![]() Viewing your calendar
Viewing your calendar
![]() Printing your appointments
Printing your appointments
![]() Reminding yourself to celebrate
Reminding yourself to celebrate
Do working people work all day? No. Most working people spend the day going to meetings. It’s enough to send anyone to Overmeeters Anonymous. The Outlook Calendar can’t halt the relentless tedium of meetings, but it can speed up the scheduling process and help you budget your time for more meetings!
Getting Around the Outlook Calendar
No doubt you’ve been looking at calendars your whole life, so the Outlook Calendar will be pretty simple for you to understand. It looks like a calendar: plain old rows of dates, Monday through Friday plus weekends, and so on. You don’t have to think like a computer to understand your schedule.
If you want to see more information about something in your calendar, most of the time, you just click the calendar with your mouse. If that doesn’t give you enough information, click twice. If that doesn’t give you everything you’re looking for, read on; I fill you in on the fine points.
The Date Navigator is actually the name of this feature, but don’t confuse it with Casanova’s chauffeur. The Date Navigator (shown in the upper left of Figure 8-1) is a trick you can use in Outlook to change the part of the calendar you’re seeing or the time period you want to see.
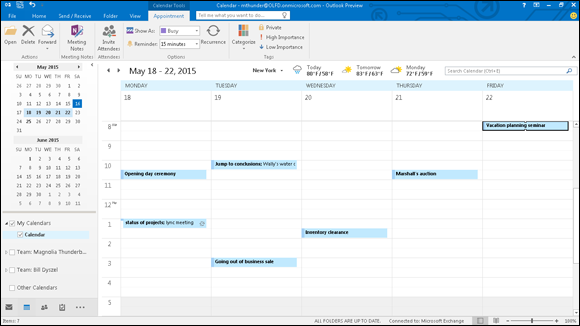
Figure 8-1: The Outlook Date Navigator.
 Believe it or not, that unassuming calendar scrap is probably the quickest way to change how you look at the calendar and make your way around in it. Just click the date you want to see – and it opens in all its glory. It couldn’t be simpler.
To navigate your calendar, follow these steps:
Click Calendar in the Navigation pane (or press Ctrl+2).
Your calendar appears in the Information Viewer, while the top part of the Navigation pane displays the Date Navigator. If you have the To-Do bar open, the Date Navigator also appears there.
Click the Day, Work Week, Week, or Month button on the Ribbon.
The button you click is highlighted.
- To see the details of a single date, click that day wherever it’s visible. You see the appointments and events scheduled for the day you clicked.
- To advance the Date Navigator one month at a time, click one of the triangles on either side of the name of the month.
- As time goes by (so to speak), you’ll gravitate to the Calendar view that suits you best. I like the Week view because it includes Saturday and Sunday so I can see my weekend plans. You can leave Outlook running most of the time to keep the information you need handy.
Time travel isn’t just science fiction. You can zip around the Outlook Calendar faster than you can say “Star Trek.” Talk about futuristic — the calendar can schedule appointments for you well into the year 4500! Think about it: Between now and then, there are more than 130,000 Saturday nights! That’s the good news. There are also more than 130,000 Monday mornings. Of course, in our lifetimes, you and I have to deal with only about 5,000 Saturday nights at most, so we have to make good use of them. Better start planning.
When you need to find an open date fast, follow these steps:
Press Ctrl+G.
A dialog box opens with a date highlighted, as shown in Figure 8-2.
To go to another date, type the date you want in the Date box as you normally would, such as January 15, 2016 or 1/15/16.
A really neat way to change dates is to type something like 45 days ago or 93 days from now. Try it. Outlook understands simple English when it comes to dates. Don’t get fancy though; Outlook doesn’t understand Four score and seven years ago. (But who does?)

Figure 8-2: The Go To Date dialog box.
If you want to go to today’s date, just click the Today button on the Home tab on the Ribbon at the top of the screen. No matter which date you land on, you can plunge right in and start scheduling. You can double-click the time and date of when you want an appointment to occur and then enter the particulars or you can double-check the details of an appointment on that date by double-clicking the date and making changes to the appointment if necessary. You can also do something silly like find out what day of the week your birthday falls on 1,000 years from now. (Mine’s on Saturday. Don’t forget.)
Meetings Galore: Scheduling Appointments
Many people live and die by their datebooks. The paper type of datebook still exists. (How quaint.) I’ll admit, I find them the easiest kind of datebook to put stuff in, although after it’s in, the stuff can be a pain to find. Such electronic gizmos as iPhones, Androids, and BlackBerrys can also serve as datebooks, but sometimes, it’s hard to put appointments into them because they’re small and mouseless. Fortunately, many digital gadgets synchronize to Outlook, so you can have the best of both worlds!
Outlook makes it surprisingly easy to add appointments — and even easier to find items you’ve entered. It also warns you when you’ve scheduled two dates simultaneously. (Very embarrassing!)
Press Ctrl+Shift+A from any Outlook section to create an appointment. The catch is that you won’t see the appointment on the calendar until you switch to the Calendar view.
The quick-and-dirty way to enter an appointment
Some appointments don’t need much explanation. If you’re having lunch with Mom on Friday, there’s no reason to make a big production out of entering the appointment:
Make sure the calendar is open in a view that shows the hours of the day in a column.
For example, the Work Week view does.
- Click the starting time of your appointment.
Type a description.
Lunch with Mom works.
Press Enter.
Your appointment is now part of your official schedule — faster than you can say “Waiter!”
The complete way to enter an appointment
Appointments you set up at work often require you to include a little more information than you’d need for your lunch date with Mom. You might want to add:
- Details about the location of a meeting
- Notes about the meeting agenda
- A category (so you can show the boss how much time you spend with your clients)
When you want to give an appointment the full treatment, use the complete method:
Click Calendar in the Navigator pane.
Your calendar appears.
Click the New Appointment button on the Home tab on the Ribbon.
The Appointment form opens, as shown in Figure 8-3.
Or press Ctrl+N to open the screen that lets you create a new item in your calendar.
Click in the Subject box and type something there to help you remember what the appointment’s about.
For example, type Dentist appointment or Deposit lottery winnings or whatever. This text shows up on your calendar.
Click in the Location box and enter the location.
This step is optional, but it can be helpful information to add to your appointment.
Notice the little triangle (scroll-bar button) at the right side of the box? If you click the triangle, you see a list of the last few locations where you scheduled appointments so you can use the same places repeatedly without having to retype them. Now that so many people hold meetings on Skype or through conference calls, this is a good spot to record those kinds of details. You can enter the dial-in number and conference code in the location line or note that it’s a Skype meeting.Add any other information you need to remember about your appointment.
The large, empty box on the Appointment form is a great place to save driving directions, meeting agendas, or anything else that might be helpful to remember when the appointment time arrives.
Click the Save & Close button.
The appointment you created appears in your calendar, as shown in Figure 8-4. You may have to change your Calendar view by clicking the Date Navigator on the date the appointment occurs so you can see your new appointment.
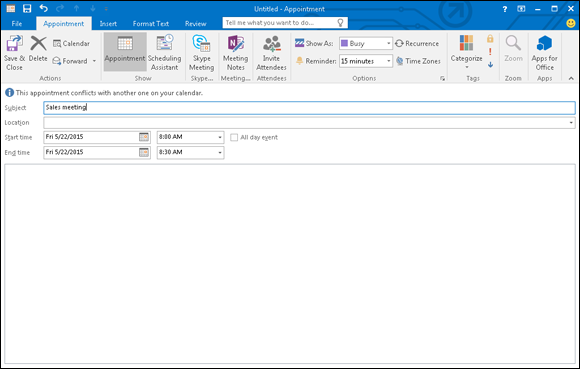
Figure 8-3: The Appointment form.
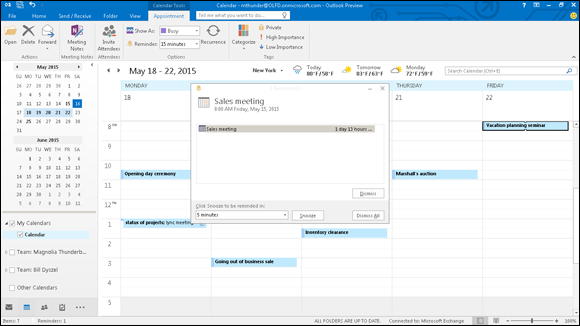
Figure 8-4: When you finish creating an appointment, you’ll find it in your calendar.
 If you want to see reminders for all your important appointments, you must keep Outlook running so the reminders pop up. You can keep Outlook running in the background if you start a second program, such as Microsoft Word. When the reminder time arrives, you see a dialog box similar to the one shown in Figure 8-5.
Figure 8-5: A dialog box pops up to remind you about your appointment.
Not this time: Changing dates
You can be as fickle as you want with Outlook. In fact, to change the time of a scheduled item, just drag the appointment from where it is to where you want it to be, as shown in Figure 8-6. Or back again … maybe … if you feel like it… .
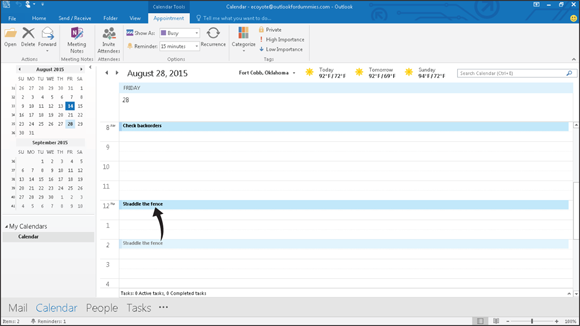
Figure 8-6: If your appointment is a drag, drop it in a new time slot.
To change an appointment, follow these steps:
Click the appointment in the Calendar view.
A dark border appears around the edge of the appointment.
- Make sure you’re in Work Week view, Week view, or Month view.
Drag the appointment to the time or date you want it to be.
If you want to copy an appointment for another time, hold down Ctrl while you use the mouse to drag the appointment to another time or date. For example, if you’re scheduling a summer intern orientation from 9 a.m. to 11 a.m. and again from 1 p.m. to 3 p.m., you can create the 9 a.m. appointment and then copy it to 1 p.m. by holding Ctrl and dragging the appointment. Then, you have two appointments with the same subject, location, and date — but with different start times.If you copy an appointment to a different date by dragging the appointment to a date on the Date Navigator, you keep the hour of the appointment but change the date.
You can change an appointment to a date you can’t see on the calendar by following these steps:
Double-click the appointment.
The Appointment window opens.
Click the Calendar icon in the leftmost Start Time box to see the selected month’s calendar.
A drop-down calendar appears, as shown in Figure 8-7.
Pick the month by clicking one of the triangles beside the month’s name.
Clicking the left triangle moves you one month earlier; clicking the right triangle moves you one month later.
- Click the day of the month you want.
Click in the rightmost Start Time text box and enter the appointment’s new time — if needed.
You can also use the scroll-down button to the right of the time to select a new start time.
Make any other changes you need in the appointment.
Click the information you want to change and type the revised information over it.
- Click the Save & Close button.
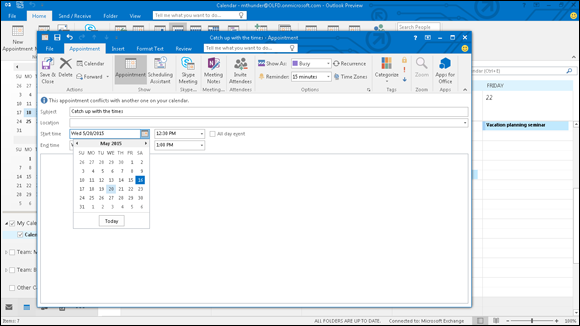
Figure 8-7: The drop-down calendar on the Appointment form.
Imagine that your dentist calls to tell you that you won’t need a root canal after all but that you’ll still need a routine checkup. To change the length of an appointment, follow these steps:
Click the appointment in Day, Work Week, or Week view.
This process doesn’t work in Month view because you can’t see the time without opening the appointment.
Move the mouse pointer over the handles at the top or the bottom of the appointment.
When the pointer is in the right place, it turns into a two-headed arrow.
- Drag the bottom line down to make the appointment time longer; drag the bottom line up to make the appointment shorter.
You also can shorten an appointment to less than 30 minutes. Follow these steps:
- Double-click the appointment.
- Click the End Time box.
- Type the ending time.
- Click the Save & Close button.
You can enter times in Outlook without adding colons and often without using a.m. or p.m. Outlook translates 443 as 4:43 p.m. If you plan lots of appointments at 4:43 a.m., just type 443A. (Just don’t call me at that hour, okay?) You can also enter time in the 24-hour format — 1643 would be 4:43 p.m. — but Outlook likes normal time better, so the time will display as 4:43.
Not ever: Breaking dates
Well, sometimes things just don’t work out. Sorry about that. Even if it’s hard for you to forget, with the click of a mouse, Outlook deletes dates you otherwise fondly remember. Okay, two clicks of a mouse. C’est la vie, c’est l’amour, c’est la guerre. (Look for my next book: Tawdry French Clichés For Dummies.)
To delete an appointment (after you’ve called to break it), follow these steps:
- Right-click on the appointment.
- Choose Delete. As far as Outlook is concerned, your appointment is cancelled.
By pressing Ctrl+D, you can delete an appointment with just one brusque keystroke. How cold. Just make sure you’ve selected the correct appointment first!
We’ve got to keep seeing each other: Recurring dates
Some appointments are like a meal at a Chinese restaurant: As soon as you’re done with one, you’re ready for another. With Outlook, you can easily create an appointment that comes back like last night’s spicy Szechwan noodles.
To create a recurring (that is, regularly scheduled) appointment, follow these steps:
Click the appointment you want to repeat.
The appointment is highlighted.
Click the Recurrence button on the Ribbon, as shown in Figure 8-8.
The Appointment Recurrence dialog box opens, as shown in Figure 8-9. If you simply click the OK button to accept the preset choices in the Appointment Recurrence dialog box, your appointment will repeat at the same time each week forever. However, you might not be prepared to schedule meetings from now until doomsday. By the way, doomsday isn’t a federal holiday; you’ll still have to work (unless you take a personal doomsday). Thus, you might want to fill in the rest of the Appointment Recurrence dialog box just to be sure.
Click in the Start text box and enter the starting time.
Outlook assumes your appointment is 30 minutes long unless you tell it otherwise by also entering an ending time. Click in the End box and enter an ending time if you feel the need.
- In the Recurrence Pattern section, click the Daily, Weekly, Monthly, or Yearly option button to select how often the appointment recurs.
- In the next part of the Recurrence pattern section, choose how many times the appointment occurs.
- In the Range of recurrence section, enter the first occurrence in the Start box.
Choose when the appointments will stop.
You can select from these options:
- No end date (infinity)
- End after (a certain number of occurrences)
- End by (a certain date)
Click the OK button.
The Appointment Recurrence dialog box closes and the Appointment form appears; refer to Figure 8-3.
- Click in the Subject box and enter the subject.
- Click in the Location box and enter the location.
- Click the Save & Close button.
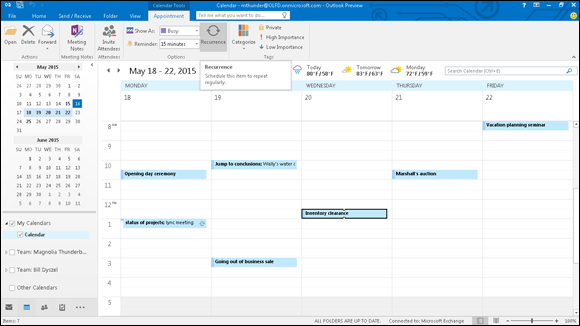
Figure 8-8: Create recurring appointments from the Actions menu.

Figure 8-9: The Appointment Recurrence dialog box.
Your appointment appears in your Outlook calendar with a symbol in the lower-right corner to show that it’s a recurring appointment, as shown in Figure 8-10. The symbol looks like two little arrows chasing each other’s tails — a little bit like people who go to too many recurring meetings. Coincidence? I don’t think so.
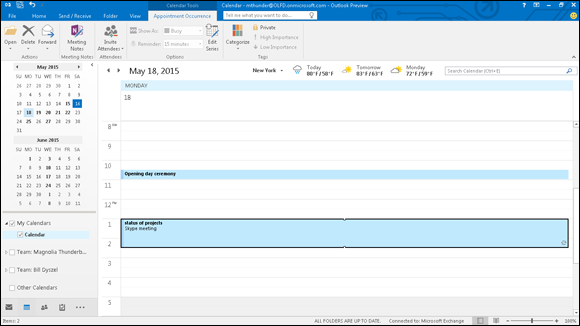
Figure 8-10: Repeating appointments display the recurrence symbol in the lower-right corner.
Even a recurring appointment gets changed once in a while. Edit a recurring appointment this way:
Double-click the appointment you want to edit.
The Open Recurring Item dialog box opens.
- Choose whether you want to change just the occurrence you clicked or the whole series.
Click the OK button.
The appointment appears, displaying the recurrence pattern below the location, as shown in Figure 8-11.
Edit the details for the appointment.
To change the pattern, click the Recurrence button, change the recurrence, and click the OK button.
- Click the Save & Close button.
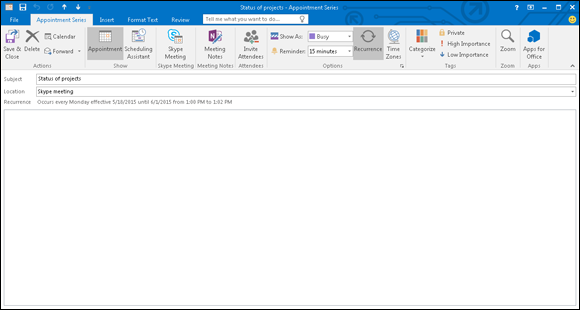
Figure 8-11: A recurring appointment includes a description about how and when the appointment recurs.
I find it helpful to enter regular appointments, such as classes or reoccurring recreational events, even if I’m sure I won’t forget them. Entering all my activities into Outlook prevents me from scheduling conflicting appointments.
Getting a Good View of Your Calendar
Outlook enables you to slice and dice the information in every section nearly any way you can imagine — all by using different views. You could easily fill a cookbook with the different views you can create, but I’m going to stick to the standard ways of looking at a calendar that most people are used to. If you want to cook up a calendar arrangement that nobody’s ever thought of before, Outlook will probably let you. If you accidentally create a Calendar view you don’t like — “Only Mondays? Yikes. What was I thinking?” — that’s okay; you can delete it.
The basic Calendar views are Daily view, Work Week view, Week view, and Month view; see Figure 8-12. Other views (such as Schedule view) are helpful when you’re trying to figure out when you did something or when you’ll do something.

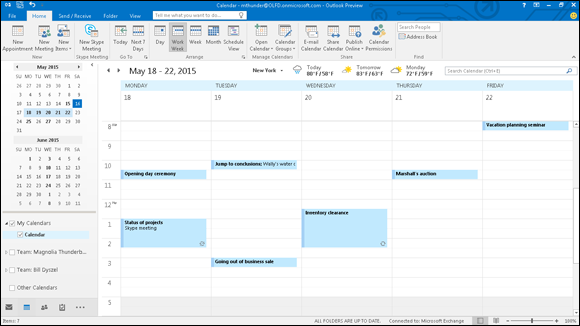
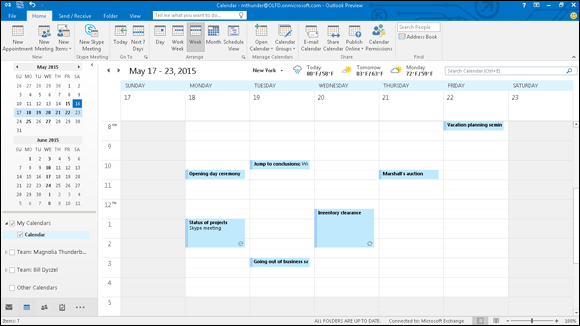
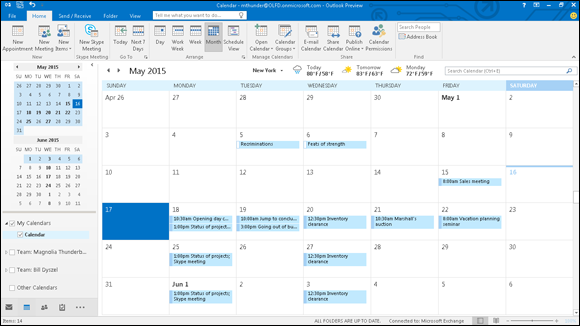
Figure 8-12: The various views for the Calendar.
Outlook displays buttons on the Ribbon for all its Calendar views. You can change Calendar views by clicking the name of the view you want to see. If the view you select doesn’t suit you, don’t worry — just click a different view. In the Schedule view (shown in Figure 8-13), you can view an arrangement of your calendar set in skinnier vertical columns. It’s also a useful way to view your calendar in a more linear sequence for planning purposes.
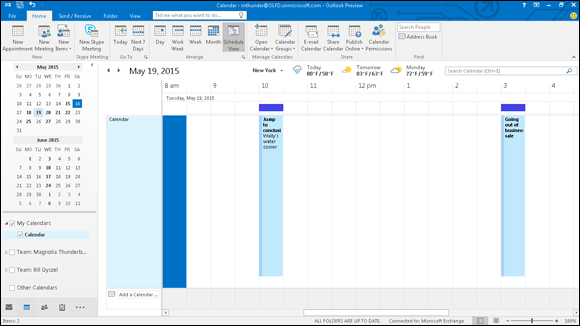
Figure 8-13: The Schedule view.
Printing Your Appointments
Plain old paper is still everybody’s favorite medium for reading. No matter how slick your computer organizer is, you may still need old-fashioned ink on paper to make it really useful. To be brutally honest, Outlook’s calendar-printing feature has always been pretty weak. If you can’t figure out how to print your calendar the way you want, it’s probably not your fault.
You use the same basic steps to print from any module in Outlook. Here’s how to print your appointments:
Click a date within the range of dates you want to print.
If you want to print a single day, click just one day. If you want to print a range of dates, click the first date and then hold down Shift and click the last date in the range. The whole range is highlighted to show which dates you’ve selected.
Click the File tab and choose Print (or press Ctrl+P).
The Print dialog box opens, as shown in Figure 8-14.
In the Print Settings section, make a style choice.
Daily, Weekly, Monthly, Trifold, and Calendar Details are the basic choices. You can also define your own print styles in Outlook, so you may eventually have quite a collection of choices showing up in this box. Outlook also shows you a preview of the page you’re about to print, which eliminates surprises.
Click the Print button.
Your dates are sent to the printer.
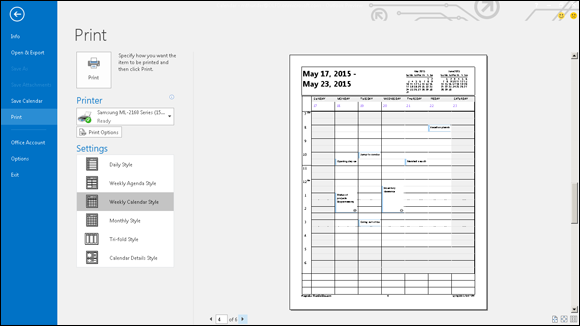
Figure 8-14: The Print dialog box.
Adding Holidays
What days are most important to working people? The days when they don’t have to work! Outlook can automatically add calendar entries for every major holiday so you don’t forget to take the day off. (As if you’d forget!) In fact, Outlook can automatically add holidays from more than 70 different countries and several major religions. Thus, if you have a yen (so to speak) to celebrate Japanese Greenery Day, an urge to observe Estonian Independence Day, or suddenly want to send a gift for Ataturk’s birthday, your Outlook calendar can remind you to observe those monumental events.
To add holidays to your calendar, follow these steps:
- Click the File tab.
Choose Options.
The Outlook Options dialog box opens.
- Click Calendar.
Click the Add Holidays button (under Calendar Options).
You see a list of nations and religions.
Click the holidays you want to add.
Think about it: If you promised you’d only eat chocolate on holidays, you can make just about every day of the year a holiday by adding enough international celebrations to your calendar. It’s just a thought (yum!).
- Click OK to save your changes.
Handling Multiple Calendars
People who led double lives were once considered thrilling and dangerous. Now they’re underachievers. You only have two lives? Well, get busy, pal — get three more. Outlook can manage as many calendars as you have lives. Even if you’re a mild-mannered person who just likes peace and quiet, you might want to keep your personal calendar and your business calendar separate by creating two calendars in Outlook.
Creating multiple calendars
To create an additional Outlook Calendar, follow these steps:
- Click the Calendar button in the Navigator pane.
- Click Open Calendar in the Manage Calendars group on the Home tab on the Ribbon.
- Choose Create New Blank Calendar.
- Give your new calendar a name.
Click OK.
The name you’ve assigned to your new calendar appears in the Folder pane — to the right of a blank check box. If you select the check box, your new calendar will appear in the Information Viewer screen side by side with your original calendar — using the same Day, Week, or Month view, as shown in Figure 8-15. If you deselect the check box to remove the check mark, the calendar you deselected disappears.
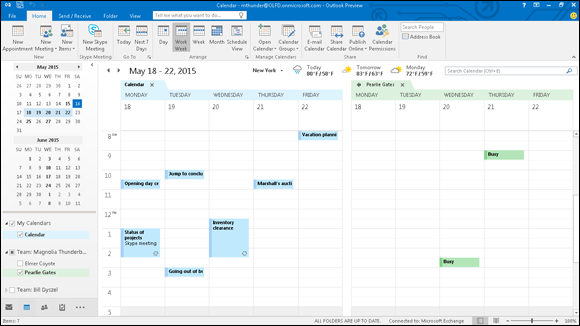
Figure 8-15: Two calendars side by side.
Managing multiple calendars
You can’t be in two places at once. Even if you could, you wouldn’t want your boss to know that; otherwise, you’d end up having to be everywhere at once for the same pay. That’s why you’ll like the fact you can superimpose Outlook Calendars to avoid schedule conflicts. When you open two calendars side by side, one of the two calendars displays an arrow on the tab of the calendar’s name at the top of the screen. By clicking that arrow, you can superimpose the two calendars to see whether any appointments conflict, as shown in Figure 8-16.
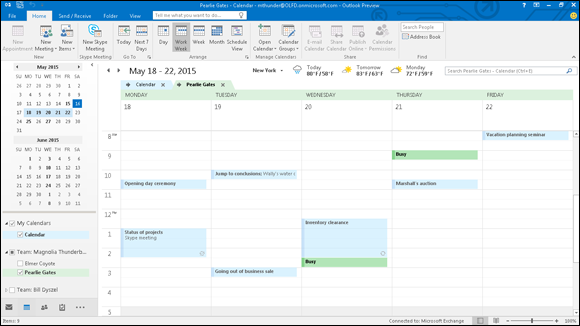
Figure 8-16: Superimpose two calendars to prevent shattering the space-time continuum as well as to keep your appointments straight.