The previous chapter showed you how to use INNER JOIN and LEFT JOIN to retrieve information stored in multiple tables. You also learned how to link existing tables by adding an extra column to the child table and updating each record individually to insert a foreign key. However, most of the time you’ll want to insert data simultaneously in both tables. That presents a challenge, because INSERT commands can operate on only one table at a time. You need to handle the insert operations in the correct sequence, starting with the parent table, so that you can get the new record’s primary key and insert it in the child table at the same time as other details. Similar considerations also need to be taken into account when updating and deleting records. The code involved isn’t difficult, but you need to keep the sequence of events clearly in mind as you build the scripts.
This chapter guides you through the process of inserting new articles in the blog table, optionally selecting a related image or uploading a new one, and assigning the article to one or more categories, all in a single operation. Then you’ll build the scripts to update and delete articles without destroying the referential integrity of related tables.
You’ll also learn about processing multiple queries as a batch using a transaction, rolling the database back to its original state if any part of the batch fails, as well as about foreign-key constraints, which control what happens if you try to delete records that still have a foreign-key relationship in another table. Not all databases support transactions and foreign-key constraints, so it’s important to check whether your remote server does. This chapter also explains what measures you can take to preserve the integrity of your data if your server doesn’t support foreign-key constraints.
Inserting, updating, and deleting records in related tables
Finding the primary key of a record immediately after it has been created
Processing multiple queries as a single batch and rolling back if any part fails
Converting a table’s storage engine
Establishing foreign-key constraints between InnoDB tables
Maintaining Referential Integrity

You need to manage foreign-key relations to avoid orphaned records
If you delete the article, but fail to delete the entries for article_id 2 in the cross-reference table, a query that looks for all articles in the Kyoto or People categories tries to match a nonexistent record in the blog table. Similarly, if you decide to delete one of the categories without also deleting matching records in the cross-reference table, a query that looks for the categories associated with an article tries to match a nonexistent category.
Before long, your database is littered with orphaned records. Fortunately, maintaining referential integrity is not difficult. SQL does it through the establishment of rules known as foreign-key constraints that tell the database what to do when you update or delete a record that has dependent records in another table.
Support for transactions and Foreign-key constraints
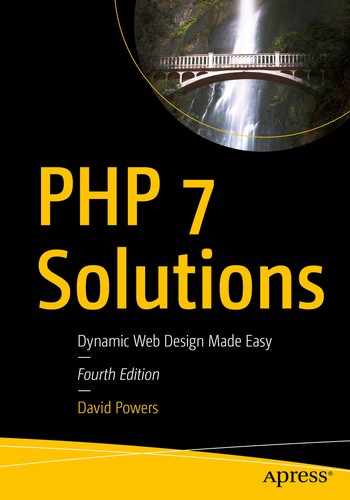
Transactions and foreign-key constraints are supported by InnoDB, the default storage engine in MySQL 5.5 and later. The equivalent storage engine in MariaDB is Percona XtraDB, but it identifies itself as InnoDB and has the same features. Even if your remote server is running the latest version of MySQL or MariaDB, there’s no guarantee that InnoDB is supported, because your hosting company may have disabled it.
If your server is running an older version of MySQL, the default storage engine is MyISAM, which doesn’t support transactions or foreign-key constraints. However, you might still have access to InnoDB, because it has been an integral part of MySQL since version 4.0. Converting MyISAM tables to InnoDB is very simple and takes only a few seconds.
If you don’t have access to InnoDB, you need to maintain referential integrity by building the necessary rules into your PHP scripts. This chapter shows both approaches.
Note
MyISAM tables have the advantage of being very fast. They require less disk space and are ideal for storing large amounts of data that isn’t changed very often. However, the MyISAM engine is no longer being actively developed, so it’s not recommended to use it for new projects.
PHP Solution 18-1: Checking whether InnoDB is supported
- 1.If your hosting company provides phpMyAdmin to administer your database(s), launch phpMyAdmin on your remote server and click the Engines tab at the top of the screen, if it’s available. This displays a list of storage engines similar to Figure 18-2.
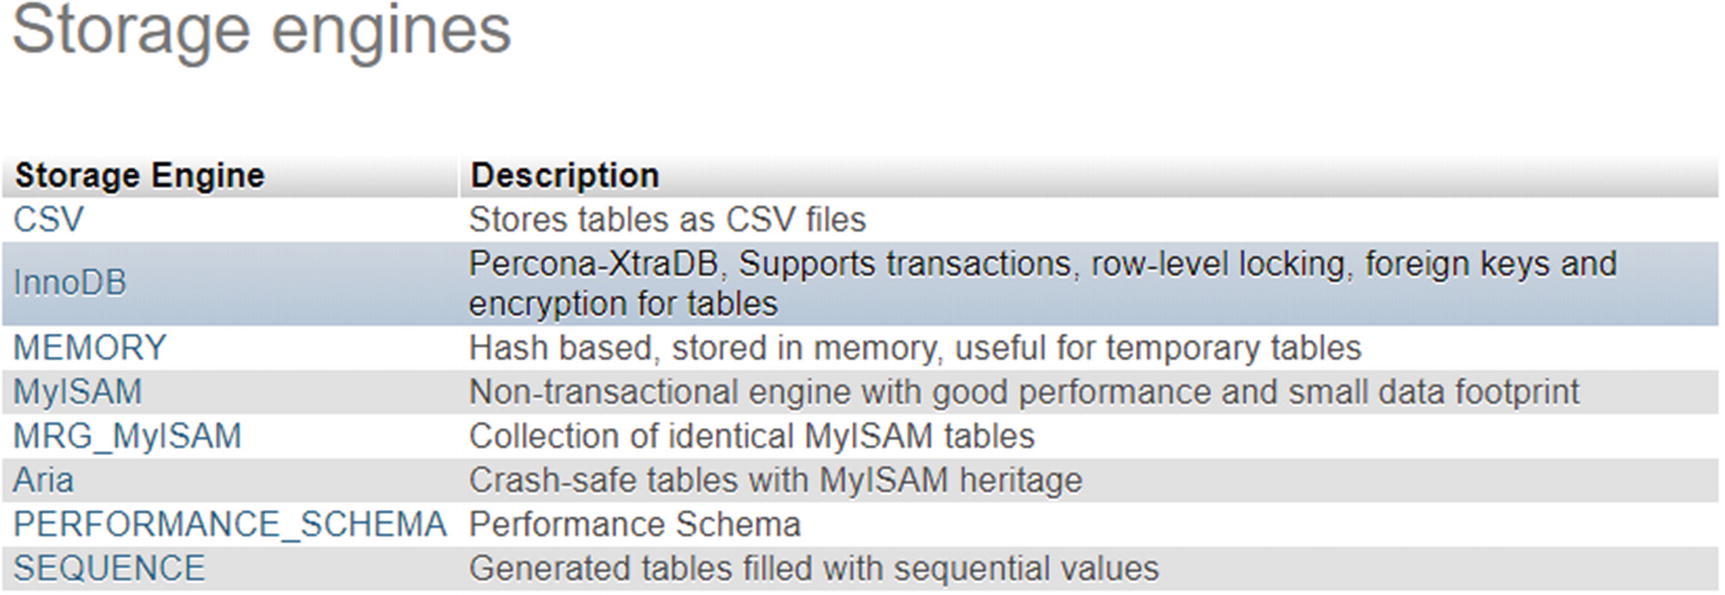 Figure 18-2.
Checking storage engine support through phpMyAdmin
Note
Notice that the description for InnoDB in Figure 18-2 refers to Percona XtraDB. The screenshot was taken on a MariaDB server. You are likely to see a different selection of storage engines on a MySQL server, but both MySQL and MariaDB should normally offer at least InnoDB and MyISAM. The Aria storage engine is MariaDB’s improved version of MyISAM. It’s not covered in this book because it’s not available on MySQL, nor does it support transactions or foreign-key constraints.
- 2.
The list displays all storage engines, including those that are not supported. Unsupported or disabled storage engines are grayed out. If you’re not sure of the status of InnoDB, click its name in the list.
- 3.If InnoDB is not supported, you’ll see a message telling you so. If, on the other hand, you see a list of variables similar to Figure 18-3, you’re in luck—InnoDB is supported.
 Figure 18-3.
Confirmation that InnoDB is supported
- 4.If there’s no Engines tab in phpMyAdmin, select any table in your database and click the Operations tab at the top right of the screen. In the Table options section, click the down arrow to the right of the Storage Engine field to display the available options (see Figure 18-4). If InnoDB is listed, it’s supported.
 Figure 18-4.
The available storage engines are listed in the Table options
- 5.
If neither of the preceding methods gives you the answer, open storage_engines.php in the ch18 folder. Edit the first three lines to insert the hostname, username, and password for the database on your remote server.
- 6.Upload storage_engines.php to your web site and load the page into a browser. You should see a list of storage engines and level of support, as shown in Figure 18-5. In some cases, NO will be replaced by DISABLED.
 Figure 18-5.
The SQL query in storage_engines.php reports which ones are supported
As Figure 18-5 shows, a typical installation supports several storage engines. What may come as a surprise is that you can use different storage engines within the same database. In fact, it’s recommended that you do. Even if your remote server supports InnoDB, it’s usually more efficient to use MyISAM or Aria for tables that don’t require transactions or have a foreign-key relationship. Use InnoDB for tables that require transactions or have foreign-key relationships.
I’ll explain how to convert tables to InnoDB later in this chapter. Before that, let’s look at how to establish and use foreign-key relationships regardless of the storage engine being used.
Inserting records into multiple tables
An INSERT query can insert data into only one table. Consequently, when working with multiple tables, you need to plan your insert scripts carefully to ensure that all the information is stored and that the correct foreign-key relationships are established.
The decision chain for inserting a new blog article with an image and categories
When the page first loads, the form hasn’t been submitted, so the page simply displays the insert form. Both the existing images and categories are listed in the insert form by querying the database in the same way as was done for the images in the update form in PHP Solutions 17-2 and 17-3.
- 1.
If an image has been uploaded, the upload is processed, the details of the image are stored in the images table, and the script gets the primary key of the new record.
- 2.
If no image has been uploaded, but an existing image has been selected, the script gets its foreign key from the value submitted through the $_POST array.
- 3.
In either case, the new blog article is inserted in the blog table along with the image’s primary key as a foreign key. However, if an image has neither been uploaded nor selected from the existing ones, the article is inserted in the blog table without a foreign key.
- 4.
Finally, the script checks whether any categories have been selected. If they have, the script gets the new article’s primary key and combines it with the primary keys of the selected categories in the article2cat table.
If there’s a problem at any stage, the script needs to abandon the rest of the process and redisplay the user’s input. The script is quite long, so I’ll break it up into several sections. The first stage is to create the article2cat cross-reference table.
Creating a cross-reference table

In a cross-reference table, both columns together form a composite primary key
Setting up the categories and cross-reference tables
Settings for the categories table
Name | Type | Length/Values | Attributes | Null | Index | A_I |
|---|---|---|---|---|---|---|
cat_id | INT | UNSIGNED | Deselected | PRIMARY | Selected | |
category | VARCHAR | 20 | Deselected |
Settings for the article2cat cross-reference table
Name | Type | Length/Values | Attributes | Null | Index | A_I |
|---|---|---|---|---|---|---|
article_id | INT | UNSIGNED | Deselected | PRIMARY | ||
cat_id | INT | UNSIGNED | Deselected | PRIMARY |
The important point about the definition for a cross-reference table is that both columns are set as primary key, and that the A_I (AUTO_INCREMENT) check box is not selected for either column.
Caution
To create a composite primary key, you must declare both columns to be primary keys at the same time. If, by mistake, you declare only one as the primary key, the database prevents you from adding the second one later. You must delete the primary-key index from the single column and then reapply it to both. It’s the combination of the two columns that is treated as the primary key.
Getting the filename of an uploaded image
The script makes use of the Upload class from Chapter 6, but the class needs slight tweaking because the filenames of uploaded files are incorporated into the $messages property.
PHP Solution 18-2: Improving the Upload class
- 1.
Open Upload.php in the PhpSolutions/File folder. Alternatively, copy Upload.php from the ch18/PhpSolutions/File folder and save it in PhpSolutions/File in the phpsols-4e site root.
- 2.
Add the following line to the list of properties at the top of the file:
protected $filenames = [];This initializes a protected property called $filenames as an empty array.
- 3.Amend the moveFile() method to add the amended filename to the $filenames property if the file is successfully uploaded. The new code is highlighted in bold.protected function moveFile($file) {$filename = $this->newName ?? $file['name'];$success = move_uploaded_file($file['tmp_name'], $this->destination . $filename);if ($success) {// add the amended filename to the array of uploaded files$this->filenames[] = $filename;$result = $file['name'] . ' was uploaded successfully';if (!is_null($this->newName)) {$result .= ', and was renamed ' . $this->newName;}$this->messages[] = $result;} else {$this->messages[] = 'Could not upload ' . $file['name'];}}
The name is added to the $filenames array only if the file is successfully moved to the destination folder.
- 4.Add a public method to return the values stored in the $filenames property. The code looks like this:public function getFilenames() {return $this->filenames;}
It doesn’t matter where you put this code in the class definition, but it’s common practice to keep all public methods together.
- 5.
Save Upload.php. If you need to check your code, compare it with Upload_01.php in the ch18/PhpSolutions/File folder.
Adapting the insert form to deal with multiple tables
The insert form for blog articles that you created in Chapter 15 already contains the code needed to insert most of the details in the blog table. Rather than start again from scratch, it makes sense to adapt the existing page. As it stands, the page contains only a text input field for the title and a text area for the article.
You need to add a multiple-choice <select> list for categories and a drop-down <select> menu for existing images.
To prevent a user from selecting an existing image at the same time as uploading a new one, a check box and JavaScript control the display of the relevant input fields. Selecting the check box disables the drop-down menu for existing images and displays the input fields for a new image and caption. Deselecting the check box hides and disables the file and caption fields and re-enables the drop-down menu. If JavaScript is disabled, the options for uploading a new image and captions are hidden.
Note
To save space, most of the remaining PHP solutions in this chapter give detailed instructions only for MySQLi. The structure and PHP logic for the PDO version are the same. The only differences lie in the commands used to submit the SQL queries and to display the results. Fully commented PDO files are in the ch18 folder.
PHP Solution 18-3: Adding the category and image Input Fields
- 1.
In the admin folder, find and open the version of blog_insert_mysqli.php that you created in Chapter 15. Alternatively, copy blog_insert_mysqli_01.php from the ch18 folder to the admin folder and remove _01 from the filename.
- 2.The <select> elements for the categories and existing images need to query the database when the page first loads, so you need to move the connection script and database connection outside the conditional statement that checks if the form has been submitted. Locate the lines highlighted in bold:if (isset($_POST['insert'])) {require_once '../includes/connection.php';// initialize flag$OK = false;// create database connection$conn = dbConnect('write');Move them outside the conditional statement and include utility_funcs.php, like this:require_once '../includes/connection.php';require_once '../includes/utility_funcs.php';// create database connection$conn = dbConnect('write');if (isset($_POST['insert'])) {// initialize flag$OK = false;
- 3.
The form in the body of the page needs to be capable of uploading a file, so you need to add the enctype attribute to the opening <form> tag, like this:
<form method="post" action="blog_insert_mysqli.php" enctype="multipart/form-data"> - 4.If an error occurs when trying to upload a file—for example, if it’s too big or is not an image file—the insert operation will be halted. Amend the existing text input field and text area to redisplay the values, using the same technique as shown in Chapter 6. The text input field looks like this:<input name="title" type="text" id="title" value="<?php if (isset($error)) {echo safe($_POST['title']);} ?>">The text area looks like this:<textarea name="article" id="article"><?php if (isset($error)) {echo safe($_POST['article']);} ?></textarea>
Make sure there’s no gap between the opening and closing PHP tags and the HTML. Otherwise, you’ll add unwanted whitespace inside the text input field and text area.
- 5.The new form elements go between the text area and the Submit button. First, add the code for the multiple-choice <select> list for categories. The code looks like this:<p><label for="category">Categories:</label><select name="category[]" size="5" multiple id="category"><?php// get categories$getCats = 'SELECT cat_id, category FROM categories ORDER BY category';$categories = $conn->query($getCats);while ($row = $categories->fetch_assoc()) {?><option value="<?= $row['cat_id'] ?>" <?phpif (isset($_POST['category']) && in_array($row['cat_id'],$_POST['category'])) { echo 'selected';} ?>><?= safe($row['category']) ?></option><?php } ?></select></p>
To allow the selection of multiple values, the multiple attribute has been added to the <select> tag, and the size attribute has been set to 5. The values need to be submitted as an array, so a pair of square brackets has been appended to the name attribute.
The SQL queries the categories table, and a while loop populates the <option> tags with the primary keys and category names. The conditional statement in the while loop adds selected to the <option> tag to redisplay selected values if the insert operation fails.
- 6.Save blog_insert_mysqli.php and load the page into a browser. The form should now look like Figure 18-8.
 Figure 18-8.
The multiple-choice <select> list pulls the values from the categories table
- 7.
View the page’s source code to verify that the primary key of each category is correctly embedded in the value attribute of each <option> tag. You can compare your code with blog_insert_mysqli_02.php in the ch18 folder.
- 8.Next, create the <select> drop-down menu to display the images already registered in the database. Add this code immediately after the code you inserted in step 5:<p><label for="image_id">Uploaded image:</label><select name="image_id" id="image_id"><option value="">Select image</option><?php// get the list of images$getImages = 'SELECT image_id, filenameFROM images ORDER BY filename';$images = $conn->query($getImages);while ($row = $images->fetch_assoc()) {?><option value="<?= $row['image_id'] ?>"<?phpif (isset($_POST['image_id']) && $row['image_id'] ==$_POST['image_id']) {echo 'selected';}?>><?= safe($row['filename']) ?></option><?php } ?></select></p>
This creates another SELECT query to get the primary key and filename of each image stored in the images table. The code should be very familiar by now, so it needs no explanation.
- 9.The check box, file input field, and text input field for the caption go between the code in the previous step and the Submit button. The code looks like this:<p id="allowUpload"><input type="checkbox" name="upload_new" id="upload_new"><label for="upload_new">Upload new image</label></p><p class="optional"><label for="image">Select image:</label><input type="file" name="image" id="image"></p><p class="optional"><label for="caption">Caption:</label><input name="caption" type="text" id="caption"></p>
The paragraph that contains the check box has been given the ID allowUpload, and the two other paragraphs have been assigned a class called optional. The style rules in admin.css set the display property of these three paragraphs to none.
- 10.
Save blog_insert_mysqli.php and load the page in a browser. The images <select> drop-down menu is displayed below the categories list, but the three form elements you inserted in step 9 are hidden. This is what will be displayed if JavaScript is disabled in the browser. Users will have the option to select categories and an existing image but not to upload a new image.
If necessary, check your code against blog_insert_mysqli_03.php in the ch18 folder.
- 11.Copy toggle_fields.js from the ch18 folder to the admin folder. The file contains the following JavaScript:var cbox = document.getElementById('allowUpload');cbox.style.display = 'block';var uploadImage = document.getElementById('upload_new');uploadImage.onclick = function () {var image_id = document.getElementById('image_id');var image = document.getElementById('image');var caption = document.getElementById('caption');var sel = uploadImage.checked;image_id.disabled = sel;image.parentNode.style.display = sel ? 'block' : 'none';caption.parentNode.style.display = sel ? 'block' : 'none';image.disabled = !sel;caption.disabled = !sel;}
This uses the IDs of the elements inserted in step 8 to control their display. If JavaScript is enabled, the check box is automatically displayed when the page loads, but the file input field and text input field for the caption remain hidden. If the check box is checked, the drop-down menu of existing images is disabled, and the hidden elements are displayed. If the check box is subsequently unchecked, the drop-down menu is re-enabled, and the file input field and caption field are hidden again.
- 12.Link toggle_fields.js to blog_insert_mysqli.php with a <script> tag just before the closing </body> tag, like this:</form><script src="toggle_fields.js"></script></body>
Adding the JavaScript at the bottom of the page speeds up downloading and display. The code in toggle_fields.js won’t work correctly if you add it to the <head>.
- 13.Save blog_insert_mysqli.php and load the page in a browser. In a JavaScript-enabled browser, the check box should be displayed between the <select> drop-down menu and the Submit button. Select the check box to disable the drop-down menu and display the hidden fields, as shown in Figure 18-9.
 Figure 18-9.
The check box controls the display of the file and caption input fields
- 14.
Deselect the check box. The file and caption input fields are hidden, and the drop-down menu is re-enabled. You can check your code, if necessary, with blog_insert_mysqli_04.php and toggle_fields.js in the ch18 folder.
I used JavaScript rather than PHP to control the display of the file and caption input fields because PHP is a server-side language. After the PHP engine has sent the output to the browser, it has no further interaction with the page unless you send another request to the web server. JavaScript, on the other hand, works in the browser, so it’s able to manipulate the content of the page locally. JavaScript can also be used in conjunction with PHP to send requests to the web server in the background, and it can use the result to refresh part of the page without reloading it—a technique known as Ajax, which is beyond the scope of this book.
The updated insert form now has input fields for categories and images, but the processing script still handles only the text input field for the title and the text area for the blog entry.
PHP Solution 18-4: Inserting data into Multiple Tables
This PHP solution adapts the existing script in blog_insert_mysqli.php to upload a new image (if required) and then insert data into the images, blog, and article2cat tables following the decision chain outlined in Figure 18-6. It assumes you have set up the article2cat cross-reference table and have completed PHP Solutions 18-2 and 18-3.
Don’t attempt to rush through this section. The code is quite long, but it brings together many of the techniques you have learned previously.
Note
If you’re using PDO, a separate section after this PHP solution describes the main differences in the code.
- 1.
The Upload class that you updated in PHP Solution 18-2 uses a namespace, so you need to import it at the top level of the script. Add this line immediately after the opening PHP tag at the top of blog_insert_mysqli.php:
use PhpSolutionsFileUpload; - 2.Immediately after the prepared statement has been initialized, insert the following conditional statement to process the image if one has been uploaded or selected.// initialize prepared statement$stmt = $conn->stmt_init();// if a file has been uploaded, process itif(isset($_POST['upload_new']) && $_FILES['image']['error'] == 0) {$imageOK = false;require_once '../PhpSolutions/File/Upload.php';$loader = new Upload('../images/');$loader->upload('image');$names = $loader->getFilenames();// $names will be an empty array if the upload failedif ($names) {$sql = 'INSERT INTO images (filename, caption) VALUES (?, ?)';if ($stmt->prepare($sql)) {$stmt->bind_param('ss', $names[0], $_POST['caption']);$stmt->execute();$imageOK = $stmt->affected_rows;}}// get the image's primary key or find out what went wrongif ($imageOK) {$image_id = $stmt->insert_id;} else {$imageError = implode(' ', $loader->getMessages());}} elseif (!empty($_POST['image_id'])) {// get the primary key of a previously uploaded image$image_id = $_POST['image_id'];}// create SQL$sql = 'INSERT INTO blog (title, article) VALUES(?, ?)';
This begins by checking if $_POST['upload_new'] has been set. As explained in Chapter 6, a check box is included in the $_POST array only if it has been selected. So, if the check box hasn’t been selected, the condition fails, and the elseif clause at the bottom is tested instead. The elseif clause checks for the existence of $_POST['image_id']. If it exists and is not empty, it means that an existing image has been selected from the drop-down menu, and the value is stored in $image_id.
If both tests fail, an image has neither been uploaded nor selected from the drop-down menu. The script later takes this into account when preparing the INSERT query for the blog table, allowing you to create a blog entry without an image.
However, if $_POST['upload_new'] exists, the check box has been selected, and an image has probably been uploaded. To make sure, the conditional statement also checks the value of $_FILES['image']['error']. As you learned in Chapter 9, the error code 0 indicates a successful upload. Any other error code means the upload failed or that no file was selected.
Assuming a file has been successfully uploaded from the form, the conditional statement includes the Upload class definition and creates an object called $loader, setting the destination folder to images. It then calls the upload() method, passing it the name of the file input field, to process the file and store it in the images folder. To avoid complicating the code, I’m using the default maximum size and MIME types.
The changes you made to the Upload class in PHP Solution 18-2 add the name of an uploaded file to the $filenames property only if the file was moved successfully to the destination folder. The getFilenames() method retrieves the contents of the $filenames property and assigns the result to $names.
If the file was moved successfully, its filename is stored as the first element of the $names array. So if $names contains a value, you can safely proceed with the INSERT query, which binds the values of $names[0] and $_POST['caption'] as strings to the prepared statement.
After the statement has been executed, the affected_rows property resets the value of $imageOK. If the INSERT query succeeded, $imageOK is 1, which is treated as true.
If the image details were inserted in the images table, the prepared statement’s insert_id property retrieves the primary key of the new record and stores it in $image_id. The insert_id property must be accessed before running any other SQL queries because it contains the primary key of the most recent query.
However, if $imageOK is still false, the else block calls the upload object’s getMessages() method and assigns the result to $imageError. The getMessages() method returns an array, so the implode() function is used to join the array elements as a single string. The most likely cause of failure is a file that’s too big or that’s of the wrong MIME type.
- 3.
As long as the image upload didn’t fail, the next stage in the process is to insert the blog entry into the blog table. The form of the INSERT query depends on whether an image is associated with the blog entry. If it is, $image_id exists and needs to be inserted in the blog table as a foreign key. Otherwise, the original query can be used.
Amend the original query like this:// insert blog details only if there hasn't been an image upload errorif (!isset($imageError)) {// if $image_id has been set, insert it as a foreign keyif (isset($image_id)) {$sql = 'INSERT INTO blog (image_id, title, article) VALUES(?, ?, ?)';if ($stmt->prepare($sql)) {$stmt->bind_param('iss', $image_id, $_POST['title'], $_POST['article']);$stmt->execute();}} else {// create SQL$sql = 'INSERT INTO blog (title, article)VALUES(?, ?)';if ($stmt->prepare($sql)) {// bind parameters and execute statement$stmt->bind_param('ss', $_POST['title'], $_POST['article']);$stmt->execute();}}if ($stmt->affected_rows > 0) {$OK = true;}}This whole section of code is wrapped in a conditional statement that checks whether $imageError exists. If it does, there’s no point in inserting the new blog entry, so the entire code block is ignored.
However, if $imageError doesn’t exist, the nested conditional statement prepares different INSERT queries depending on whether $image_id exists and then executes whichever one has been prepared.
The conditional statement that checks the affected_rows property is moved out of the else block so that it applies to either INSERT query .
- 4.The next stage of the process inserts values into the article2cat cross-reference table. The code follows immediately after the code in the previous step and looks like the following:// if the blog entry was inserted successfully, check for categoriesif ($OK && isset($_POST['category'])) {// get the article's primary key$article_id = $stmt->insert_id;foreach ($_POST['category'] as $cat_id) {if (is_numeric($cat_id)) {$values[] = "($article_id, " . (int) $cat_id . ')';}}if ($values) {$sql = 'INSERT INTO article2cat (article_id, cat_id)VALUES ' . implode(',', $values);// execute the query and get error message if it failsif (!$conn->query($sql)) {$catError = $conn->error;}}}
The value of $OK is determined by the affected_rows property from the query that inserted the data in the blog table, and the multiple-choice <select> list is included in the $_POST array only if any categories are selected. So, this code block is run only if the data was successfully inserted in the blog table and at least one category was selected in the form. It begins by obtaining the primary key of the insert operation from the prepared statement’s insert_id property and assigning it to $article_id.
The form submits the category values as an array. The foreach loop checks each value in $_POST['category']. If the value is numeric, the following line is executed:
$values[] = "($article_id, " . (int) $cat_id . ')';This creates a string with the two primary keys, $article_id and $cat_id, separated by a comma and wrapped in a pair of parentheses. The (int) casting operator makes sure that $cat_id is an integer. The result is assigned to an array called $values. For example, if $article_id is 10 and $cat_id is 4, the resulting string assigned to the array is (10, 4).
If $values contains any elements, implode() converts it to a comma-separated string and appends it to the SQL query. For example, if categories 2, 4, and 5 are selected, the resulting query looks like this:INSERT INTO article2cat (article_id, cat_id)VALUES (10, 2),(10, 4),(10, 5)As explained in “Reviewing the Four Essential SQL Commands” in Chapter 15, this is how you insert multiple rows with a single INSERT query.
Because $article_id comes from a reliable source and the data type of $cat_id has been checked, it’s safe to use these variables directly in an SQL query without using a prepared statement. The query is executed with the query() method . If it fails, the connection object’s error property is stored in $catError .
- 5.The final section of code handles the redirect on success and error messages. The amended code looks like this:// redirect if successful or display errorif ($OK && !isset($imageError) && !isset($catError)) {header('Location: http://localhost/phpsols-4e/admin/blog_list_mysqli.php');exit;} else {$error = $stmt->error;if (isset($imageError)) {$error .= ' ' . $imageError;}if (isset($catError)) {$error .= ' ' . $catError;}}
The condition controlling the redirect now ensures that $imageError and $catError don’t exist. If either does, the value is concatenated to the original $error, which contains any error message from the prepared statement object.
- 6.
Save blog_insert_mysqli.php and test it in a browser. Try uploading an image that’s too big or a file of the wrong MIME type. The form should be redisplayed with an error message and the blog details preserved. Also try inserting blog entries both with and without images and/or categories. You now have a versatile insert form.
If you don’t have suitable images to upload, use the images in the phpsols images folder. The Upload class renames them to avoid overwriting the existing files.
You can check your code against blog_insert_mysqli_05.php in the ch18 folder.
Main differences in the PDO version
The final PDO version can be found in blog_insert_pdo_05.php in the ch18 folder. It follows the same basic structure and logic as the MySQLi version, but has some important differences in the way values are inserted in the database.
The code in step 2 follows the MySQLi version closely but uses named placeholders instead of anonymous ones. To get the number of affected rows, PDO uses the rowCount() method on the statement object. The primary key of the most recent insert operation is obtained using the lastInsertId() method on the connection object. Like the MySQLi insert_id property, you need to access it immediately after the INSERT query has been executed.
If an image has been uploaded, the conditional statement highlighted in bold binds the value of $image_id to the named :image_id placeholder. But if no image has been uploaded, bindValue() sets the value to NULL.
In step 4, the PDO version uses exec() instead of query() to insert the values into the article2cat table. The exec() method executes an SQL query and returns the number of rows affected, so it should be used with INSERT, UPDATE, and DELETE queries when a prepared statement is not required.
Updating and Deleting Records in Multiple Tables
The addition of the categories and article2cat tables means that the changes to blog_update_mysqli.php and blog_update_pdo.php in PHP Solutions 17-2 and 17-3 in the previous chapter no longer adequately cover the foreign-key relationships in the phpsols database. In addition to amending the update form, you also need to create scripts to delete records without destroying the database’s referential integrity.
Updating records in a cross-reference table
Each record in a cross-reference table contains only a composite primary key. Normally, primary keys should never be altered. Moreover, they must be unique. This poses a problem for updating the article2cat table. If you make no changes to the selected categories when updating a blog entry, the cross-reference table doesn’t need to be updated. However, if the categories are changed, you need to work out which cross-references to delete and which new ones to insert.
Rather than getting tied up in knots working out whether any changes have been made, a simple solution is to delete all existing cross-references and insert the selected categories again. If no changes have been made, you simply insert the same ones again.
PHP Solution 18-5: Adding categories to the update form
- 1.
Continue working with blog_update_mysqli.php from PHP Solution 17-2. Alternatively, copy blog_update_mysqli_04.php from the ch18 folder and save it in the admin folder as blog_update_mysqli.php.
- 2.When the page first loads, you need to run a second query to get the categories associated with the blog entry. Add the following highlighted code to the conditional statement that gets details of the selected record:$stmt->free_result();// get categories associated with the article$sql = 'SELECT cat_id FROM article2catWHERE article_id = ?';if ($stmt->prepare($sql)) {$stmt->bind_param('i', $_GET['article_id']);$OK = $stmt->execute();$stmt->bind_result($cat_id);// loop through the results to store them in an array$selected_categories = [];while ($stmt->fetch()) {$selected_categories[] = $cat_id;}}
The query selects cat_id from all records in the cross-reference table that match the primary key of the selected blog entry. The results are bound to $cat_id, and a while loop extracts the values into an array called $selected_categories.
- 3.In the body of the HTML page, add a multiple-choice <select> list between the text area and the <select> drop-down menu that displays the list of images. Use another SQL query to populate it, like this:<p><label for="category">Categories:</label><select name="category[]" size="5" multiple id="category"><?php// get categories$getCats = 'SELECT cat_id, category FROM categoriesORDER BY category';$categories = $conn->query($getCats);while ($row = $categories->fetch_assoc()) {?><option value="<?= $row['cat_id'] ?>" <?phpif (isset($selected_categories) &&in_array($row['cat_id'], $selected_categories)) {echo 'selected';} ?>><?= safe($row['category']) ?></option><?php } ?></select></p>
The while loop builds each <option> tag by inserting cat_id in the value attribute and displaying the category between the opening and closing tags. If cat_id is in the $selected_categories array, selected is inserted in the <option> tag. This selects the categories already associated with the blog entry.
- 4.
Save blog_update_mysqli.php and select one of the EDIT links in blog_list_mysqli.php to make sure the multiple-choice list is populated with the categories. If you inserted a new entry in PHP Solution 18-4, the categories you associated with the item should be selected, as shown in the following screenshot.

You can check your code, if necessary, against blog_update_mysqli_05.php in the ch18 folder. The PDO version is found in blog_update_pdo_05.php.
- 5.Next, you need to edit the section of code that updates the record when the form is submitted. The new code begins by removing all entries in the cross-reference table that match article_id and then inserts the values selected in the update form. Inline comments indicate where existing code has been omitted to save space.// if form has been submitted, update recordif (isset($_POST ['update'])) {// prepare update queryif (!empty($_POST['image_id'])) {// existing code omitted} else {// existing code omitted$done = $stmt->execute();}}// delete existing values in the cross-reference table$sql = 'DELETE FROM article2cat WHERE article_id = ?';if ($stmt->prepare($sql)) {$stmt->bind_param('i', $_POST['article_id']);$done = $stmt->execute();}// insert the new values in articles2catif (isset($_POST['category']) && is_numeric($_POST['article_id'])) {$article_id = (int) $_POST['article_id'];foreach ($_POST['category'] as $cat_id) {$values[] = "($article_id, " . (int) $cat_id . ')';}if ($values) {$sql = 'INSERT INTO article2cat (article_id, cat_id)VALUES ' . implode(',', $values);$done = $conn->query($sql);}}}
The code that inserts the values selected in the update form is identical to the code in step 4 of PHP Solution 18-4. The key point to note is that it uses an INSERT query, not UPDATE. The original values have been deleted, so you’re adding them anew.
- 6.
Save blog_update_mysqli.php and test it by updating existing records in the blog table. You can check your code, if necessary, against blog_update_mysqli_06.php in the ch18 folder. The PDO version is found in blog_update_pdo_06.php.
Treating Multiple Queries as a block in a transaction
The preceding PHP Solution takes a lot on trust. The update sequence involves three separate queries: updating the blog table, deleting references in the article2cat table, and inserting new ones. If any of them fails, $done will be set to false; but if a subsequent one is successful, it will be reset to true. You could easily end up with only a partial update, but be none the wiser unless it was the last part of the series of queries that fails.
One solution might be to run a series of conditional statements preventing any further execution if the preceding query fails. The problem is that you still end up with a partial update. When updating connected records in multiple tables, the whole sequence needs to be treated as a block. If one part fails, the whole sequence fails. The update sequence is processed only if all parts of it succeed. Treating multiple queries as a unified block is known in SQL as a transaction. Implementing a transaction is simple in both MySQLi and PDO.
Note
To use transactions in MySQL and MariaDB, you must use the InnoDB storage engine.
Using a transaction in MySQLi
Using a transaction in PDO
Caution
Function and method names in PHP are case-insensitive, so rollBack() and rollback() are equally acceptable for MySQLi and PDO. However, there’s a subtle difference between begin_transaction() (MySQLi) and beginTransaction() (PDO). The PDO method doesn’t have an underscore.
PHP Solution 18-6: Converting tables to the InnoDB Storage Engine
- 1.
Select the phpsols database in phpMyAdmin, and then select the article2cat table.
- 2.
Click the Operations tab at the top right of the screen.
- 3.In the Table options section, the Storage Engine field reports which engine the table is currently using. If it says MyISAM, select InnoDB from the drop-down menu, as shown in Figure 18-10.
 Figure 18-10.
Changing a table’s storage engine is very easy in phpMyAdmin
- 4.
Click Go. Changing the storage engine is as simple as that!
Note
Each table needs to be converted individually. You cannot change all tables in a database in a single operation.
PHP Solution 18-7: Wrapping the update Sequence in a Transaction (MySQLi)
- 1.
If necessary, convert the storage engine for the blog and article2cat tables to InnoDB as described in the previous PHP solution.
- 2.
Continue working with blog_update_mysqli.php and blog_list_mysqli.php from PHP Solution 18-5. Alternatively, copy blog_update_mysqli_06.php and blog_list_mysqli_04.php from the ch18 folder to the admin folder in the phpsols-4e site root, and remove the numbers from the filenames.
- 3.
Initialize an empty array at the top of blog_update_mysqli.php to store error messages:
$trans_error = []; - 4.Turn off autocommit mode and begin a transaction at the start of the conditional statement that runs the sequence of update queries like this:// if form has been submitted, update recordif (isset($_POST ['update'])) {// set autocommit to off$conn->autocommit(false);$conn->begin_transaction();// prepare update query
- 5.After the query that updates the blog table, add a conditional statement to add any error message to the $trans_error array if the query fails. To save space, some of the existing code has been omitted:if (!empty($_POST['image_id'])) {// existing code omitted$done = $stmt->execute();}} else {// existing code omitted$done = $stmt->execute();}}if (!$done) {$trans_error[] = $stmt->error;}
- 6.Add a similar conditional statement to capture any error message from the deletion of existing values in the cross-reference table.// delete existing values in the cross-reference table$sql = 'DELETE FROM article2cat WHERE article_id = ?';if ($stmt->prepare($sql)) {$stmt->bind_param('i', $_POST['article_id']);$done = $stmt->execute();if (!$done) {$trans_error[] = $stmt->error;}}
- 7.The code to capture any error message from inserting the updated values in the article2cat table needs to be slightly different because it uses the query() method rather than a prepared statement. Instead of the error property of the statement object, you need to access the error property of the database connection object like this:if ($values) {$sql = 'INSERT INTO article2cat (article_id, cat_id)VALUES ' . implode(',', $values);$done = $conn->query($sql);if (!$done) {$trans_error[] = $conn->error;}}
- 8.After the sequence of queries, use a conditional statement to roll back or commit the transaction like this (the code goes inside the conditional statement that runs the script when the Update button has been clicked):if ($trans_error) {$conn->rollback();$done = false;} else {$conn->commit();}
It’s necessary to set $done explicitly to false if $trans_error contains any error messages. This is because $done will be set to true by any query that would have succeeded outside of the transaction.
- 9.The conditional statement that redirects the page needs to be amended to handle the transaction. Add the new code highlighted in bold:// redirect page after updating or if $_GET['article_id']) not definedif (($done || $trans_error) || (!$_POST && !isset($_GET['article_id']))) {$url = 'http://localhost/phpsols-4e/admin/blog_list_mysqli.php';if ($done) {$url .= '?updated=true';} elseif ($trans_error) {$url .= '?trans_error=' . serialize($trans_error);}header("Location: $url");exit;}
The conditions are now grouped inside parentheses to make sure they’re interpreted correctly. The first pair checks whether $done or $trans_error equates to true. The final condition is made more specific by checking that the $_POST array is empty. This is necessary because !isset($_GET['article_id']) is always true after the Update button has been clicked.
If $trans_error contains any error messages, it equates to true, so a query string is appended to the redirect location. Because $trans_error is an array, it needs to be passed to the serialize() function before it can be concatenated onto the query string. This converts the array to a string that can be converted back to its original format.
- 10.The final change is in the PHP block above the table in blog_list_mysqli.php. Add the code in bold to display any error messages if the update fails:if (isset($_GET['updated'])) {echo '<p>Record updated</p>';} elseif (isset($_GET['trans_error'])) {$trans_error = unserialize($_GET['trans_error']);echo "<p>Can't update record because of the following error(s):</p>";echo '<ul>';foreach ($trans_error as $item) {echo '<li>' . safe($item) . '</li>';}echo '</ul>';}
The unserialize() function reverses the effect of serialize(), converting the error messages back into an array, which are then displayed in a foreach loop.
- 11.
Save blog_update_mysqli.php and blog_list_mysqli.php, and update an existing record. The script should work the same as before.
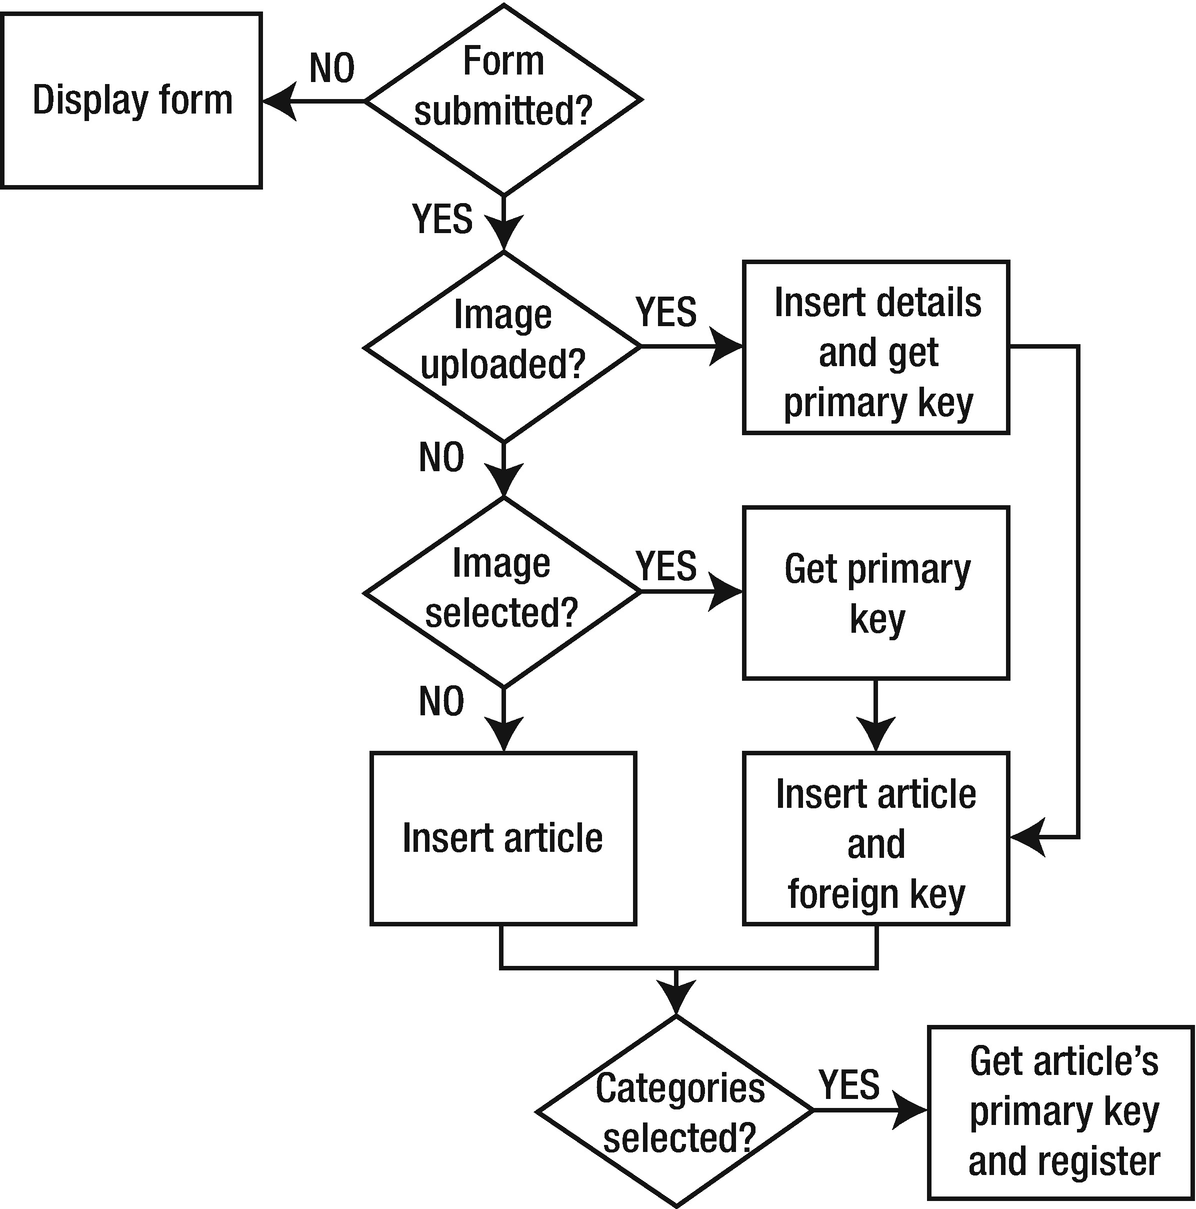
- 12.Introduce some deliberate errors into the SQL in blog_update_mysqli.php, and test it again. This time, you should see a series of error messages similar to Figure 18-11 when you return to blog_list_mysqli.php.
 Figure 18-11.
The update fails because of errors in the column names
- 13.
Click the EDIT link for the record you just tried to update and verify that none of the values has changed. You can check your code against blog_update_mysqli_07.php and blog_list_mysqli_05.php in the ch18 folder.
PHP Solution 18-8: Wrapping the update sequence in a transaction (PDO)
- 1.
If necessary, convert the storage engine for the blog and article2cat tables to InnoDB as described in PHP Solution 18-6.
- 2.
Continue working with blog_update_pdo.php and blog_list_pdo.php from PHP Solution 18-5. Alternatively, copy blog_update_pdo_06.php and blog_list_pdo_04.php from the ch18 folder to the admin folder in the phpsols-4e site root, and remove the numbers from the filenames.
- 3.
Initialize a variable at the top of the page to keep track of the transaction, and set its value to false:
$trans_error = false; - 4.Inside the conditional statement that runs the sequence of queries to update the blog and article2cat tables, set PDO to throw an exception when it encounters a problem like this:if (isset($_POST['update'])) {$conn->setAttribute(PDO::ATTR_ERRMODE, PDO::ERRMODE_EXCEPTION);// prepare update query$sql = 'UPDATE blog SET image_id = ?, title = ?, article = ?WHERE article_id = ?';
- 5.Wrap all the code that runs the update queries in a try/catch block , and begin a transaction at the beginning of the try block like this:$conn->setAttribute(PDO::ATTR_ERRMODE, PDO::ERRMODE_EXCEPTION);try {$conn->beginTransaction();// prepare update query// other database queries omitted} catch (Exception $e) {$conn->rollBack();$trans_error = $e->getMessage();}
- 6.In the existing code, the return value of executing each query is set to $done. This is no longer necessary because we’re using a transaction. We’ll use $done as the return value of committing the transaction successfully. Locate the following lines (they’re around lines 53, 57, and 69):$done = $stmt->execute();$done = $stmt->execute([$_POST['article_id']]);$done = $conn->exec($sql);Change them to this:$stmt->execute();$stmt->execute([$_POST['article_id']]);$conn->exec($sql);
- 7.Immediately before the catch block, add the code in bold to commit the transaction:$done = $conn->commit();} catch (Exception $e) {$conn->rollBack();$trans_error = $e->getMessage();}
- 8.The conditional statement that redirects the page needs to be amended to handle the transaction. Add the new code highlighted in bold:// redirect page after updating or if $_GET['article_id'] not definedif (($done || $trans_error) || (!$_POST && !isset($_GET['article_id']))) {$url = 'http://localhost/phpsols-4e/admin/blog_list_pdo.php';if ($done) {$url .= '?updated=true';} elseif ($trans_error) {$url .= "?trans_error=$trans_error";}header("Location: $url");exit;}
The conditions are now grouped inside parentheses to make sure they’re interpreted correctly. The first pair checks whether $done or $trans_error equates to true. The final condition is made more specific by checking that the $_POST array is empty. This is necessary because !isset($_GET['article_id']) is always true after the Update button has been clicked.
If $trans_error contains any error messages, it equates to true, so a query string is appended to the redirect location.
- 9.The final change is in the PHP block above the table in blog_list_pdo.php. Add the code in bold to display any error messages if the update fails:if (isset($_GET['updated'])) {echo '<p>Record updated</p>';} elseif (isset($_GET['trans_error'])) {echo "Can't update record because of the following error: ";echo safe($_GET['trans_error']) . '</p>';}
PDO throws an exception as soon as it encounters an error, so there will be only one error message, even if there are multiple errors.
- 10.
Save blog_update_pdo.php and blog_list_pdo.php, and update an existing record. The script should work the same as before.
- 11.
Introduce a deliberate error in one of the update queries in blog_update_pdo.php, and test it again. This time, you’ll see the error message when you’re returned to blog_list_pdo.php.
- 12.
Click the EDIT link for the record you just tried to update and verify that none of the values has changed. You can check your code against blog_update_pdo_07.php and blog_list_pdo_05.php in the ch18 folder.
Tip
Transactions are essential in situations where a series of queries should be processed only if certain criteria are met. For example, in a financial database, a transfer of money should go ahead only if sufficient funds are available.
Preserving Referential Integrity on Deletion
In PHP Solution 18-5, there was no need to worry about referential integrity when you deleted records in the cross-reference table because the values stored in each record are foreign keys. Each record simply refers to the primary keys stored in the blog and categories tables. Referring to Figure 18-1 at the beginning of this chapter, deleting from the cross-reference table the record that combines article_id 2 with cat_id 1 simply breaks the link between the article titled “Trainee Geishas Go Shopping” and the Kyoto category. Neither the article nor the category is affected. They both remain in their respective tables.
The situation is very different if you decide to delete either the article or the category. If you delete the “Trainee Geishas Go Shopping” article from the blog table, all references to article_id 2 must also be deleted from the cross-reference table. Similarly, if you delete the Kyoto category, all references to cat_id 1 must be removed from the cross-reference table. Alternatively, you must halt the deletion if an item’s primary key is stored elsewhere as a foreign key.
The best way to do this is through the establishment of foreign-key restraints. To do so, related tables must use the InnoDB storage engine. If you’re using MySQL or MariaDB 5.5 or later, InnoDB is the default. Also, all the .sql files that accompany this book select the InnoDB engine. However, if you have existing tables that were created using the MyISAM storage engine, you need to convert them before you can establish foreign-key constraints (see PHP Solution 18-6).
PHP Solution 18-9: Setting up Foreign-key constraints
- 1.
Select the article2cat table in phpMyAdmin and click the Structure tab.
- 2.Click Relation view (circled in Figure 18-12) above the structure table (in older versions of phpMyAdmin, it’s a link below the structure table.
 Figure 18-12.
Foreign-key constraints are defined in phpMyAdmin’s Relation view
- 3.
The screen that opens is where you define foreign-key constraints. Leave the Constraint name field blank. phpMyAdmin will automatically generate a name for the constraint.
- 4.Foreign-key constraints can be set up only on columns that are indexed. The article_id and cat_id columns in article2cat are the table’s composite primary key, so they’re both listed in the Column drop-down menu. Select article_id. Then select the following settings under Foreign key constraint (INNODB):
Database: phpsols
Table: blog
Column: article_id
This establishes a constraint between article_id in the parent table (blog) and article_id in the child table (article2cat).
- 5.Next, you need to decide how the constraint should behave. The ON DELETE drop-down menu has the following options:
CASCADE: When you delete a record in the parent table, all dependent records are deleted in the child table. For example, if you delete the record with the primary key article_id 2 in the blog table, all records with article_id 2 in the article2cat table are automatically deleted.
SET NULL: When you delete a record in the parent table, all dependent records in the child table have the foreign key set to NULL. The foreign-key column must accept NULL values.
NO ACTION: On some database systems, this allows foreign-key constraint checks to be delayed. MySQL performs checks immediately, so this has the same effect as RESTRICT.
RESTRICT: This prevents the deletion of a record in the parent table if dependent records still exist in the child table.
Note The same options are available for ON UPDATE. With the exception of RESTRICT, they are of limited interest because you should change the primary key of a record only in exceptional circumstances. ON UPDATE RESTRICT not only stops changes from being made to the primary key in the parent table; it also rejects any inserts or updates in the child table that would result in foreign-key values that don’t have a match in the parent table.
In the case of a cross-reference table, CASCADE is the logical choice. If you decide to delete a record in the parent table, you want all cross-references to that record to be removed at the same time. However, to demonstrate the default behavior of foreign-key constraints, select RESTRICT for both ON DELETE and ON UPDATE.
- 6.Click the Add constraint link to establish a foreign-key constraint for cat_id using the following settings:
Column: cat_id
Database: phpsols
Table: categories
Column: cat_id
- 7.Set ON DELETE and ON UPDATE to RESTRICT. The settings should look like Figure 18-13. Then click the Save button.
 Figure 18-13.
Setting foreign-key constraints for the cross-reference table
Note The layout of Relation view in older versions of phpMyAdmin is different, combining the Database, Table, and Column drop-down menus in a single drop-down.
- 8.
If you have not already done so, update at least one blog entry to associate it with a category.
- 9.In phpMyAdmin, select the categories table and click Delete next to a category that you know to be associated with a blog entry, as shown in Figure 18-14.
 Figure 18-14.
Try to delete a record in the categories table
- 10.Click OK when phpMyAdmin asks you to confirm the deletion. If you have set up the foreign-key constraints correctly, you’ll see an error message similar to that in Figure 18-15.
 Figure 18-15.
The foreign-key constraint prevents the deletion if dependent records exist
- 11.
If the error message appears in a modal dialog box, click the box to dismiss it.
- 12.
Select the article2cat table, and click the Structure tab. Then click “Relation view.”
Note In older versions of phpMyAdmin, ON DELETE and ON UPDATE may be blank. Leaving these options blank has the same effect as selecting RESTRICT, which is the default for both.
- 13.
Change both ON DELETE settings to CASCADE, and click Save.
- 14.
Select a record in the blog table that you know is associated with a category. Make a note of its article_id and then delete the record.
- 15.
Check the article2cat table. The records associated with the record you have just deleted have also been deleted.
To continue your exploration of foreign-key constraints, select the blog table, and establish a foreign-key relationship with image_id in the images table. If you delete a record from the images table, the image_id foreign key in the blog table needs to be set to NULL. This is done automatically if you set the value of ON DELETE to SET NULL. Test it by deleting a record from the images table and checking the associated record(s) in the blog table.
Note
If you need to convert an InnoDB table back to MyISAM, you must first remove any foreign-key constraints. Select “Relation view,” and click Drop at the top-left of each constraint. In older versions of phpMyAdmin, set the “Foreign key (INNODB)” fields to blank, and click Save. After removing the constraints, you can change the storage engine as described in PHP Solution 18-6. Select MyISAM instead of InnoDB.
Creating delete scripts with foreign-key constraints
Choosing the values for ON DELETE in InnoDB tables depends on the nature of the relationship between tables. In the case of the phpsols database, it’s not only safe but desirable to set the option to CASCADE for both columns in the article2cat cross-reference table. If a record is deleted in either the blog or categories parent tables, the related values need to be deleted in the cross-reference table.
The relationship between the images and blog tables is different. If you delete a record from the images table, you probably don’t want to delete related articles in the blog table. In that case, SET NULL is an appropriate choice. When a record is deleted from the images table, the foreign key in related articles is set to NULL, but the articles remain intact.
On the other hand, if images are vital to the understanding of articles, select RESTRICT. Any attempt to delete an image that still has related articles is automatically halted.
These considerations affect how you handle deletion scripts. When the foreign-key constraint is set to CASCADE or SET NULL, you don’t need to do anything special. You can use a simple DELETE query and leave the rest to the database.
Creating Delete Scripts without Foreign-key Constraints
Chapter Review
Once you have learned the basic SQL and the PHP commands necessary to communicate with a database, working with single tables is very easy. Linking tables through foreign keys, however, can be quite challenging. The power of a relational database comes from its sheer flexibility. The problem is that this infinite flexibility means there is no single “right” way of doing things.
Don’t let this put you off, though. Your instinct may be to stick with single tables, but down that route lies even greater complexity. The key to making it easy to work with databases is to limit your ambitions in the early stages. Build simple structures like the one in this chapter, experiment with them, and get to know how they work. Add tables and foreign-key links gradually. People with a lot of experience working with databases say they frequently spend more than half the development time just thinking about the table structure. After that, the coding is the easy bit!
In the final chapter, we move back to working with a single table, addressing the important subject of user authentication with a database and how to handle hashed and encrypted passwords.