
Chapter 12: Creating PHP 8 Applications Using Asynchronous Programming
In recent years, an exciting new technology has taken the PHP: Hypertext Preprocessor (PHP) community by storm: asynchronous programming, also known as PHP async. The asynchronous programming model addresses an issue present in any application code written using the traditional synchronous mode of programming: your application is forced to wait for certain tasks to complete before providing results. The central processing unit (CPU) (or CPUs) of the server upon which your application is running sits idle while mundane input/output (I/O) tasks are performed. PHP async allows your application to take full advantage of hardware resources by suspending blocking I/O tasks until later. The net effect is a massive increase in performance, as well as the ability to handle a geometrically larger number of user requests.
After reading through this chapter and carefully studying the examples, you will be able to develop PHP async applications. In addition, you will be able to take advantage of the async capabilities of selected PHP extensions and frameworks. By the time you are done working through this chapter, you will be in a position to improve the performance of your applications, from 5 times up to a staggering 40 times faster!
Topics covered in this chapter include the following:
- Understanding the PHP async programming model
- Using the Swoole extension
- Using selected PHP frameworks in async mode
- Learning about PHP 8.1 fibers
Technical requirements
The minimum hardware required to examine and run the code examples provided in this chapter is listed here:
- x86_64 based desktop PC or laptop
- 1 gigabyte (GB) free disk space
- 4 GB of random-access memory (RAM)
- 500 kilobits per second (Kbps) or faster internet connection
In addition, you will need to install the following software:
- Docker
- Docker Compose
Please refer to the Technical requirements section of Chapter 1, Introducing New PHP 8 OOP Features, for more information on the Docker and Docker Compose installation, as well as how to build the Docker container used to demonstrate the code explained in this book. In this book, we refer to the directory in which you restored the sample code for the book as /repo.
The source code for this chapter is located here: https://github.com/PacktPublishing/PHP-8-Programming-Tips-Tricks-and-Best-Practices.
We can now begin our discussion by having a look at PHP async.
Understanding the PHP async programming model
Before we get into the details of how to develop PHP applications using asynchronous libraries, it's important to step back and have a look at the PHP asynchronous programming model. Understanding the difference between this and the conventional synchronous programming model opens a new world of high performance for you to utilize when developing PHP applications. Let's first have a look at the synchronous programming model, after which we'll dive into async.
Developing synchronous programming code
In traditional PHP programming, code executes in a linear fashion. Once the code has been compiled into machine code, the CPU executes the code one line after another in a sequential manner until the code ends. This is certainly true of PHP procedural programming. Surprising to some, this is also true for object-oriented programming (OOP) as well! Regardless of whether or not you use objects as part of your code, the OOP code gets compiled into first-byte code and then machine code, and is processed in a synchronous manner in exactly the same manner as is procedural code.
Using OPcache and the Just-in-Time (JIT) compiler has no bearing on whether or not the code operates in a synchronous manner. The only thing that OPcache and the JIT compiler bring to the table is the ability to operate synchronous code faster than was otherwise possible.
Important note
Please do not get the impression that there is something wrong with writing code using the synchronous programming model! This approach is not only tried and true but also quite successful. Furthermore, synchronous code is supported by many ancillary tools such as PHPUnit, Xdebug, numerous frameworks, and many others.
There is a major drawback to the synchronous programming model, however. Using this model, the CPU has to constantly wait for certain tasks to complete before the program is allowed to move along. To a large extent, such tasks include access to an external resource, such as making a database query, writing to a log file, or sending an email. Such tasks are referred to as blocking operations (operations that block progress).
The following diagram gives you a visual representation of an application flow, which involves the blocking operations of writing to a log file and sending an email notification:

Figure 12.1 – Synchronous programming model
As you can see from Figure 12.1, when an application writes to a log file, the CPU puts a hold on program code execution until the operating system (OS) signals that the log file's write operation has finished. Later, the code might send out an email notification. Again, the CPU puts a hold on code execution until the email send operation has concluded. Although each waiting interval may be insignificant in and of itself, when you add together the waiting intervals for all such blocking operations—especially if lengthy loops are involved—performance starts to degrade.
One solution is to liberally implement a caching solution. Another solution, as you may have guessed, is to write your application using the asynchronous programming model. Let's have a look at that right now.
Understanding the asynchronous programming model
The idea behind asynchronous operations has been around for quite some time. One extremely well-known example is Apache Web Server, with its Multi-Processing Modules (MPMs). The MaxRequestWorkers directive allows you to specify how many simultaneous requests the web server can handle (see https://httpd.apache.org/docs/current/mod/mpm_common.html#maxrequestworkers for more information).
The asynchronous programming model usually involves setting up management nodes, referred to as workers. This allows program execution to continue without having to wait for any given task to complete. The gain in performance can be quite dramatic, especially in situations where a large number of blocking operations (for example, filesystem access or database queries) occur.
The following diagram visualizes how the tasks of writing to a log file and sending an email might be accomplished using the asynchronous programming model:
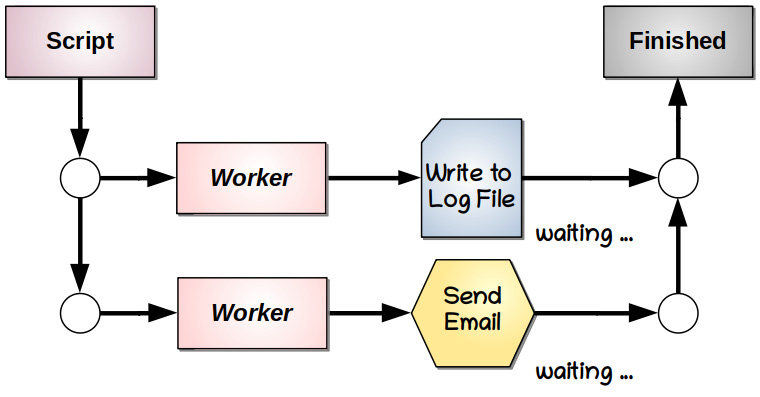
Figure 12.2 – Asynchronous programming model
The total waiting time is reduced by a factor of how many workers are assigned. The program flow shown in Figure 12.2 would involve half the waiting time as that shown in Figure 12.1. Overall performance improves as the number of workers assigned to handle blocking operations increases.
Important note
The asynchronous programming model is not to be confused with parallel programming. In parallel programming, tasks are literally executed simultaneously, often being assigned to different CPUs or CPU cores. Asynchronous programming, on the other hand, operates sequentially but allows the sequential code to continue while waiting for the results of a blocking operation (for example, a filesystem request or a database query).
Now that you have an idea of how the PHP async programming model works, let's have a look at coroutine support.
Working with async coroutine support
Coroutines are similar to threads but operate in user space, not kernel space, and thus do not need to involve the OS. If this support is available, the coroutine support component detects blocking operations (such as reading or writing to a file) and effectively suspends that operation until results are received. This frees up the CPU to proceed with other tasks until the results have been returned from the blocking process. This process operates at the machine-code level and is thus undetectable to us, other than the fact that our code runs faster.
Theoretically, using an extension or framework that provides coroutine support might boost performance, even if your code is written using the synchronous programming model. Please note that not all PHP async frameworks or extensions offer this support, which might, in turn, influence your choice of framework or extension to use for future development.
The Swoole extension (https://www.swoole.co.uk/) offers coroutine support. On the other hand, ReactPHP (https://reactphp.org/), one of the most popular PHP async frameworks, does not offer coroutine support unless used with the Swoole extension (discussed next) or with PHP fibers (discussed in the Learning about PHP 8.1 fibers section). One of the reasons why ReactPHP is so popular, however, is the very fact that the Swoole extension is not required. If you are operating in a hosting environment where you do not have control over the PHP installation, you can still use ReactPHP and achieve a substantial performance gain, without having to touch the PHP installation.
We now turn our attention to writing code for the async model.
Creating a PHP async application
Now comes the hard part! Unfortunately, an application written using the synchronous programming model does not take advantage of what the async model has to offer. Even if you are using a framework and/or extension that provides coroutine support, you do not realize maximum performance gain unless you refactor your code to follow the async programming model.
Most PHP async frameworks and extensions offer a number of ways for you to separate tasks. Here is a brief summary of the more commonly used approaches.
Event loops
In a certain sense, an event loop is a repetitive block of code that runs continuously until a specified event occurs. All of the PHP async extensions and frameworks offer this feature in one form or another. Listeners that take the form of a callback are added to an event loop. When an event is triggered, the listener's logic is invoked.
The Swoole event loop leverages Linux epoll_wait (https://linux.die.net/man/2/epoll_wait) functionality. Because hardware-based events report to Linux through pseudo file handles, the Swoole event loop allows the developer to base the starting and stopping of the event loop not only on attributes of actual files but also of any hardware process that produces a file descriptor (FD).
The ReactPHP framework offers the same functionality, but uses the PHP stream_select() function by default, in place of the OS epoll_wait functionality. This makes the ReactPHP event loop application programming interface (API) portable between servers, although reaction time will be slower. ReactPHP also offers the ability to define an event loop based on the ext-event, ext-ev, ext-uv, or ext-libevent PHP extensions. Leveraging these extensions gives ReactPHP access to the hardware, much as does Swoole.
Promises
A promise is a software construct that allows you to defer the processing of a task until later. The concept was first proposed as part of the CommonJS project (http://wiki.commonjs.org/wiki/Promises/A). It was designed as a bridge between the synchronous and asynchronous programming worlds.
In synchronous programming, a function (or class method) generally either succeeds or fails. In PHP, a failure is handled as either a deliberately thrown exception or a fatal error. In the asynchronous model, three states are identified as part of a promise: fulfilled, failed, and unfulfilled. Accordingly, when a promise instance is created, you need to supply three handlers that take action based upon the state they represent.
In the case of ReactPHP, when you create a ReactPromisePromise instance, you supply a resolver as the first constructor argument. The resolver itself requires three callbacks labeled $resolve, $reject, and $notify. These three correspond to the three possible states of a promise: fulfilled, failed, or unfulfilled.
Streams
Many async frameworks provide a wrapper for PHP streams. PHP streams are most often used to handle operations involving the filesystem. File access is a blocking operation that causes program execution to pause until the OS returns the results.
In order to avoid having file access block the progress of an async application, a streams component is used. ReactPHP, for example, provides classes under the ReactStream namespace that implement ReadableStreamInterface or WritableStreamInterface. These classes serve as a wrapper for ordinary PHP stream functions such as fopen(), fread(), and fwrite(), as well as file_get_contents() and file_put_contents(). The ReactPHP classes use memory to avoid blocking and defer the actual read or write until later, thus allowing asynchronous activities to continue.
Timers
Timers are separate tasks that can be set to run after a given interval. In this respect, timers resemble the JavaScript setTimeout() function. Tasks scheduled using timers can be set to run one time only, or continuously at specified intervals.
The timer implementation in most PHP async frameworks or extensions generally avoids using the PHP pcntl_alarm() function. The latter function allows a developer to send a SIGALRM signal to a process after a certain number of seconds. The pcntl_alarm() function only allows you to set one at a time, however, and the lowest time interval is measured in seconds. In contrast, PHP async frameworks and extensions allow you to set multiple timers accurately, to the millisecond. Another difference in PHP async timer implementation is that it is not dependent upon the declare(ticks=1) statement.
There are many potential uses for timers—for example, a timer could check a directory that contains Completely Automated Public Turing test to tell Computers and Humans Apart (CAPTCHA) images and can remove old ones. Another potential use would be to refresh the cache periodically.
Channels
Channels are a means of communicating between concurrent processes. The current implementation of channels is based upon an algebraic model proposed in 1978 by Sir Charles Antony Hoare. His proposal was refined over the years and evolved into the model described in his book Communicating Sequential Processes, published in 1985. Channels and the communicating sequential processes (CSP) model are a feature of many currently popular languages such as Go.
In contrast to other more complicated approaches, when using channels the CSP processes are anonymous, whereas the channel is explicitly named. Another aspect of the channel approach is that the sender is prevented from sending until the receiver is ready to receive. This simple principle alleviates having to implement an excessive amount of shared locking logic. In the Swoole extension, for example, channels are used to implement connection pools or as a means of scheduling concurrent tasks.
Now that you have a basic understanding of PHP async theory, it's time to put the theory into practice. We start by examining how to use the Swoole extension.
Using the Swoole extension
The PHP Swoole extension was first made available on the PHP extension C library website (https://pecl.php.net/) in December 2013. Since that time, it's gained considerable attention. With the introduction of the JIT compiler in PHP 8, there has been a considerable amount of renewed interest in the Swoole extension as it's fast and stable and is in a position to make PHP applications run even faster. The total number of downloads is close to 6 million, and the average number per month is around 50,000.
In this section, you will learn about the extension, how it's installed, and how it's used. Let's first get an overview of the extension.
Examining the Swoole extension
Because the extension is written in the C language, once it's compiled, installed, and enabled, a set of functions and classes are added to your current PHP installation. The extension leverages certain low-level features that are only available in OSes derived from UNIX, however. This means that if you are running a Windows server, the only way you can get a PHP async application that uses the Swoole extension running is by installing Windows Services for Linux (WSL) or by setting up your application to run in a Docker container on the Windows server.
Tip
If you want to experiment with PHP async on a Windows server, consider using ReactPHP (discussed in the Working with ReactPHP section), which does not have the OS dependencies required by the Swoole extension.
One of the big advantages of PHP async is that the initial block of code gets loaded immediately and stays in memory until the asynchronous server instance stops. This is the case when using the Swoole extension. In your code, you create an asynchronous server instance that effectively turns PHP into a continuously running daemon listening on the designated port. This is also a disadvantage, however, in that if you make changes to your program code, the changes are not recognized by the async server instance until you reload it.
One of the great features of the Swoole extension is its coroutine support. What this means, in real-life terms, is that we don't have to perform major surgery on applications written using the synchronous programming model. Swoole will automatically pick out blocking operations such as filesystem access and database queries and allow these operations to be placed on hold while the rest of the application proceeds. Because of this support, you can often simply run the synchronous application using Swoole, resulting in an immediate performance boost.
Another really great feature of the Swoole extension is SwooleTable. This feature lets you create, entirely in memory, the equivalent of a database table that can be shared between multiple processes. There are many possible uses for such a construct, and the potential performance gain is truly staggering.
The Swoole extension has the ability to listen for User Datagram Protocol (UDP) transmissions rather than Transmission Control Protocol (TDP) ones. This is an extremely interesting possibility as UDP is much faster than TCP. Swoole also includes a timer implementation accurate to the millisecond, as well as async clients for MySQL, PostgreSQL, Redis, and cURL. The Swoole extension also gives you the ability to set up inter-process communication (IPC) using Golang style channels. Let's now have a look at installing Swoole.
Installing the Swoole extension
The Swoole extension can be installed using the same techniques you would deploy to install any PHP extension written in the C language. One approach is to simply use your OS package manager. Examples include apt (or its less friendly cousin, apt-get) for Debian or Ubuntu Linux, and yum or dnf for Red Hat, CentOS, or Fedora. When using an OS package manager, the Swoole extension is made available in the form of precompiled binaries.
The recommended approach, however, is to use the pecl command. If this command is not available on your installation, the pecl command can be installed (logged in as a root user) as follows on an Ubuntu or Debian OS: apt install php-pear. For a Red Hat, CentOS, or Fedora installation, the following works: yum install php-pear.
When installing the Swoole extension using pecl, you can specify a number of options. These options are summarized here:
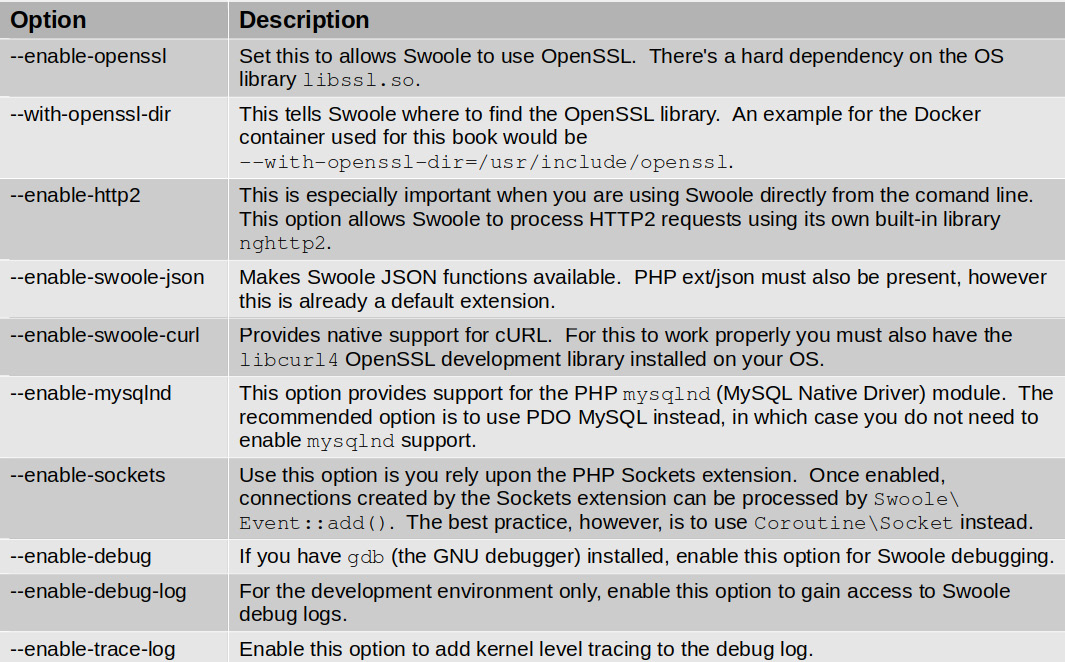
Table 12.1 – Swoole extension pecl installation options
For more information on these options and for an overview of the installation procedure, have a look here:
https://www.swoole.co.uk/docs/get-started/installation
Let's now take a look at a sample installation that includes Swoole support for sockets, JavaScript Object Notation (JSON), and cURL, as follows:
- The first thing we need to do is to update the pecl channel. This is a list of PHP extension source code repositories and functions, much like the sources list used by the apt or yum package managers. Here's the code to do this:
pecl channel-update pecl.php.net
- Next, we specify the installation command and use the -D flag to add options, as follows:
pecl install -D
'enable-sockets="yes"
enable-openssl="no"
enable-http2="no"
enable-mysqlnd="no"
enable-swoole-json="yes"
enable-swoole-curl="yes"'
swoole
- This starts the extension installation process. You now see the various C language code files and header files downloaded, after which your local C compiler is used to compile the extension. Here is a partial view of the compile process:
root@php8_tips_php8 [ / ]# pecl install swoole
downloading swoole-4.6.7.tgz ...
Starting to download swoole-4.6.7.tgz (1,649,407 bytes)
.....................................................................................................................................................................................................................................................................................................................................done: 1,649,407 bytes
364 source files, building
running: phpize
Configuring for:
PHP Api Version: 20200930
Zend Module Api No: 20200930
Zend Extension Api No: 420200930
building in /tmp/pear/temp/pear-build-defaultuserQakGt8/swoole-4.6.7
running: /tmp/pear/temp/swoole/configure --with-php-config=/usr/bin/php-config --enable-sockets=no --enable-openssl=no --enable-http2=no --enable-mysqlnd=yes --enable-swoole-json=yes --enable-swoole-curl=yes
...
Build process completed successfully
Installing '/usr/include/php/ext/swoole/config.h'
Installing '/usr/lib/php/extensions/no-debug-non-zts-20200930/swoole.so'
install ok: channel://pecl.php.net/swoole-4.6.7
configuration option "php_ini" is not set to php.ini location
You should add "extension=swoole.so" to php.ini
- If a C compiler is not found, you will be warned. Also, you might need to install the PHP development library for your OS. The warning messages give you further guidance if this is the case.
- Once completed, you then need to enable the extension. This is accomplished by adding extension=swoole to the php.ini file. If you are unsure of its location, use the php -i command and look for the location of the php.ini file. Here is a command you can issue from the command line that adds this directive:
echo "extension=swoole" >>/etc/php.ini
- You can then use the following command to confirm the availability of the Swoole extension:
php --ri swoole
This concludes the installation of the Swoole extension. If you are custom-compiling PHP, you can also add the --enable-swoole option when running configure prior to compilation. This causes the Swoole extension to be compiled and enabled along with your core PHP installation (and allows you to bypass the installation steps just outlined). We will now have a look at a brief Hello World example taken from the documentation to test the installation.
Testing the installation
The Swoole documentation provides a simple example you can use for a quick test to see if the installation was successful. The sample code is shown on the main Swoole documentation page (https://www.swoole.co.uk/docs/). We do not reproduce it here for copyright reasons. Here are the steps taken to run the Hello World test:
- First, we copied the Hello World example from https://www.swoole.co.uk/docs/ to /path/to/repo/ch12/php8_swoole_hello_world.php file.
Next, we modified the demo program and changed $server = new SwooleHTTPServer("127.0.0.1", 9501); to $server = new SwooleHTTPServer("0.0.0.0", 9501);.
This change allows the Swoole server to listen on port 9501 for any Internet Protocol (IP) address.
- We then modified the /repo/ch12/docker-compose.yml file to make port 9501 available outside the Docker container, as follows:
version: "3"
services:
...
php8-tips-php8:
...
ports:
- 8888:80
- 9501:9501
...
- To make this change effective, we had to bring the service down and back up again. From a command prompt/terminal window on your local computer, use these two commands:
/path/to/repo/init.sh down
/path/to/repo/init.sh up
- Please note that if you are running Windows, remove .sh.
- We then opened a shell into the PHP 8 Docker container and ran the Hello World program, as follows:
$ docker exec -it php8_tips_php8 /bin/bash
# cd /repo/ch12
# php php8_swoole_hello_world.php
- Finally, from outside the Docker container, we opened a browser to this IP address and port: http://172.16.0.88:9501.
The following screenshot shows the result from the Swoole Hello World program:

Figure 12.3 – The Swoole demo Hello World program output
Before getting into details on how the Swoole extension can be used to improve application performance, we need to examine a sample application that's a prime candidate for the PHP async model.
Examining a sample I/O-intensive application
For the sake of illustration, we have created a sample application written as a REpresentational State Transfer (REST) API, designed to run in PHP 8. The sample application presents a chat or instant messaging API with the following simple features:
- Use a HyperText Transfer Protocol (HTTP) POST method to post a message either to a specific user or to all users. After a successful posting, the API returns the message just posted.
- An HTTP GET method with a from=username parameter returns all messages to and from that username and messages to all users. If the all=1 parameter is set, it returns a list of all usernames.
- An HTTP DELETE method removes all messages from the messages table.
Only parts of the application code are shown in this section. If you are interested in the entire Chat application, the source code is located under /path/to/repo/src/Chat. The primary API endpoint is provided here: http://172.16.0.81/ch12/php8_chat_ajax.php.
The examples that follow are executed in a PHP 8.1 Docker container. Be sure to bring down the existing containers as follows, from a command prompt on your local computer on a Windows computer: C:path o epoinit down. For Linux or Mac, from a terminal window: /path/to/repo/init.sh down. To bring up the PHP 8.1 container from a Windows computer: C:path o epoch12init up. From a Linux or Mac terminal window: /path/to/repo/ch12/init.sh up.
The examples that follow are executed in a PHP 8.1 Docker container. Be sure to bring down the existing containers as follows from a command prompt on your local computer on a Windows computer: C:path o epoinit down
For Linux or Mac, from a terminal window:
/path/to/repo/init.sh down
To bring up the PHP 8.1 container from a Windows computer:
C:path o epoch12init up
From a Linux or Mac terminal window:
/path/to/repo/ch12/init.sh up
We now look at the source code for the core API program itself, as follows:
- First, we define a ChatMessagePipe class, identifying all of the external classes we need to use, like this:
// /repo/src/Chat/Messsage/Api.php;
namespace ChatMessage;
use ChatHandler {GetHandler, PostHandler,
NextHandler,GetAllNamesHandler,DeleteHandler};
use ChatMiddleware {Access,Validate,ValidatePost};
use ChatMessageRender;
use PsrHttpMessageServerRequestInterface;
class Pipe {
- We then define an exec() static method that invokes a set of PHP Standard Recommendation 15 (PSR-15)-compliant handlers. We also invoke the first stage of the pipe by calling the process method of the ChatMiddlewareAccess middleware class. The return value of NextHandler is ignored:
public static function exec(
ServerRequestInterface $request) {
$params = $request->getQueryParams();
$method = strtolower($request->getMethod());
$dontcare = (new Access())
->process($request, new NextHandler());
- Still in the same method, we use a match() construct to check for HTTP GET, POST, and DELETE method calls. If the method is POST, we use the ChatMiddlewareValidatePost validation middleware class to validate the POST arguments. If validation succeeds, the sanitized data is then passed to ChatHandlerPostHandler. If the HTTP method is DELETE, we directly call ChatHandlerDeleteHandler:
$response = match ($method) {
'post' => (new ValidatePost())
->process($request, new PostHandler()),
'delete' => (new DeleteHandler())
->handle($request),
- If the HTTP method is GET, we first check to see if the all parameter is set. If so, we invoke ChatHandlerGetAllNamesHandler. Otherwise, the default clause passes data through ChatMiddleWareValidate. If validation succeeds, the sanitized data is passed to ChatHandlerGetHandler:
'get' => (!empty($params['all'])
? (new GetAllNamesHandler())->handle($request)
: (new Validate())->process($request,
new GetHandler())),
default => (new Validate())
->process($request, new GetHandler())};
return Render::output($request, $response);
}
}
- The core API class can then be called using a short conventional program, as shown here. In this calling program, we build a PSR-7 compliant PsrHttpMessageServerRequestInterface instance using LaminasDiactorosServerRequestFactory. The request is then passed through the Pipe class and a response is produced:
// /repo/ch12/php8_chat_ajax.php
include __DIR__ . '/vendor/autoload.php';
use LaminasDiactorosServerRequestFactory;
use ChatMessagePipe;
$request = ServerRequestFactory::fromGlobals();
$response = Pipe::exec($request);
echo $response;
We also created a test program (/repo/ch12/php8_chat_test.php—not shown) that calls the API endpoint a set number of times (the default is 100). On each iteration, the test program posts a random message consisting of a random recipient username, a random date, and a sequential entry from the /repo/sample_data/geonames.db database. The test program takes two arguments. The first argument is a URL that represents the API. The second (optional) argument represents the number of iterations.
Here are example results running /ch12/php8_chat_test.php from a command shell into the PHP 8.1 Docker container:
root@php8_tips_php8_1 [ /repo/ch12 ]# php php8_chat_test.php
http://localhost/ch12/php8_chat_ajax.php 10000 bboyer : Dubai:AE:2956587 : 2021-01-01 00:00:00
1 fcompton : Sharjah:AE:1324473 : 2022-02-02 01:01:01
...
998 hrivas : Caloocan City:PH:1500000 : 2023-03-19 09:54:54
999 lpena : Budta:PH:1273715 : 2021-04-20 10:55:55
From User: dwallace
Elapsed Time: 3.3177478313446
From the output, take note of the elapsed time. In the next section, using Swoole, we are able to cut this time in half! Before using Swoole, however, it is only fair to incorporate the JIT compiler. We enable JIT using the following command:
# php /repo/ch10/php8_jit_reset.php on
In PHP 8.0.0, it's possible you might encounter a few errors and possibly a segmentation fault. In PHP 8.1, however, the API should work as expected with the JIT compiler enabled. However, it's highly doubtful the JIT compiler would improve performance, as the frequent API calls cause the application to wait. Any application with frequent blocking I/O operations is an excellent candidate for the asynchronous programming model. Before we proceed, however, we need to turn off JIT, using the same utility program as before, as follows:
# php /repo/ch10/php8_jit_reset.php off
Let's now have a look at how the Swoole extension might be used to improve the performance of this I/O-intensive application.
Using the Swoole extension to improve application performance
Given that Swoole provides coroutine support, all we really need to do in order to improve the Chat application performance is to rewrite the /repo/ch12/php8_chat_ajax.php calling program, turning it into an API that listens on port 9501 as a Swoole server instance. Here are the steps to rewrite the main API calling program:
- First, we enable autoloading and identify the external classes needed:
// /repo/ch12/php8_chat_swoole.php
include __DIR__ . '/vendor/autoload.php';
use ChatMessagePipe;
use ChatHttpSwooleToPsr7;
use SwooleHttpServer;
use SwooleHttpRequest;
use SwooleHttpResponse;
- Next, we start a PHP session and create a SwooleHTTPServer instance that listens for any IP address on port 9501:
session_start();
$server = new SwooleHTTPServer('0.0.0.0', 9501);
- We then invoke the on() method and associate it with the start event. In this case, we make a log entry to identify when the Swoole server started. Other server events are documented here: https://www.swoole.co.uk/docs/modules/swoole-http-server-doc:
$server->on("start", function (Server $server) {
error_log('Swoole http server is started at '
. 'http://0.0.0.0:9501');
});
- Finally, we define a main server event, $server->on('request', function () {}), which handles incoming requests. Here's the code to accomplish this:
$server->on("request", function (
Request $swoole_request, Response $swoole_response){
$request = SwooleToPsr7::
swooleRequestToServerRequest($swoole_request);
$swoole_response->header(
"Content-Type", "text/plain");
$response = Pipe::exec($request);
$swoole_response->end($response);
});
$server->start();
Unfortunately, a SwooleHttpRequest instance passed to the callback associated with the on() method is not PSR-7-compliant! Accordingly, we need to define a ChatHttpSwooleToPsr7 class and a swooleRequestToServerRequest() method that performs the conversion using a static call. We then set headers on the SwooleHttp|Response instance and return a value from the pipe to complete the circuit.
It's extremely important for you to note that the standard PHP superglobals, such as $_GET and $_POST, do not work as expected from a running Swoole server instance. The main point of entry is the initial program you use to start the Swoole server from the command line. The only incoming request parameter is the actual initial program filename. Any subsequent input must be captured through the SwooleHttpRequest instance that's passed to the on() function.
The documentation found at https://php.net/swoole does not show all of the methods available for the SwooleHTTPRequest and SwooleHTTPResponse classes. However, on the Swoole website itself, you can find the relevant documentation, which is also listed here:
- https://www.swoole.co.uk/docs/modules/swoole-http-request
- https://www.swoole.co.uk/docs/modules/swoole-http-response
It's also worth noting that the SwooleHTTPRequest object properties roughly correspond to the PHP superglobals, as shown here:
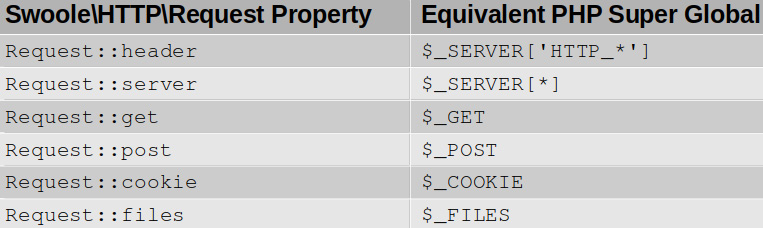
Table 12.2 – Swoole request mapping to PHP superglobals
Another consideration is that using Xdebug in Swoole coroutines can lead to segmentation faults and other issues, up to and including a core dump. A best practice is to enable Swoole debugging with the --enable-debug flag when first installing Swoole using pecl. To test the application, we proceed as follows:
- From a command shell into the PHP 8.1 Docker container, we run the Swoole version of our Chat API, as follows. The message immediately displayed is a result of $server->on("start", function() {}):
# cd /repo/ch12
# php php8_chat_swoole.php
Swoole http server is started at http://0.0.0.0:9501
- We then open another terminal window on our host computer and open another shell into the PHP 8.1 Docker container. From there, we are able to run the /repo/ch12/php8_chat_test.php test program, as follows:
# cd /repo/ch12
# php php8_chat_test.php http://localhost:9501 1000
- Note the two additional arguments. The first argument tells the test program to use the Swoole version of the API rather than the old version that uses the Apache Web Server. The last arguments tell the test program to run through 1,000 iterations.
Let's now have a look at the output, as follows:
root@php8_tips_php8_1 [ /repo/ch12 ]# php php8_chat_test.php
http://localhost:9501 1000
0 coconnel : Dubai:AE:2956587 : 2021-01-01 00:00:00
1 htyler : Sharjah:AE:1324473 : 2022-02-02 01:01:01
...
998 cvalenci : Caloocan City:PH:1500 : 2023-03-19 09:54:54
999 smccormi : Budta:PH:1273715 : 2021-04-20 10:55:55
From User: ajenkins
Elapsed Time: 1.8595671653748
The most notable feature of the output is the elapsed time. If you look back at the previous section, you'll note that the API running as a traditional PHP application using Apache took about 3.35 seconds to complete 1,000 iterations, whereas the same API, running under Swoole, completes in approximately 1.86 seconds: almost half the time!
Please note that this is without any additional optimization. Swoole has many other features we could use, including the ability to define in-memory tables, spawn tasks off additional worker threads, and use event loops to facilitate caching, among other possibilities. As you can see, Swoole immediately provides a performance boost and is well worth investigating as a possible way to gain even more performance out of your existing applications.
Now that you have an idea of how Swoole might be used to improve application performance, let's have a look at other potential PHP async solutions.
Using selected PHP frameworks in async mode
There are a number of other PHP frameworks that implement the asynchronous programming model. In this section, we cover ReactPHP, the most popular of the PHP async frameworks, as well as Amp, another popular PHP async framework. In addition, we show you how selected PHP frameworks can be used in async mode.
It's important to note that many of the PHP frameworks able to operate in asynchronous mode have a dependency on the Swoole extension. The one that does not have this dependency is ReactPHP, covered next.
Working with ReactPHP
ReactPHP (https://reactphp.org/) is an implementation of the Reactor software design pattern and was inspired by the non-blocking asynchronous Node.js framework (https://nodejs.org/en/), among others.
Although ReactPHP does not give you the automatic performance increase seen with the Swoole extension, it has a big advantage in that it does not rely upon features of UNIX or Linux, and can thus run on a Windows server. The other advantage of ReactPHP is that it has no specific dependency on PHP extensions, other than those already included as standard extensions.
The core of any ReactPHP application is the ReactEventLoopLoop class. As the name implies, a Loop instance starts up effectively as an infinite loop. Most PHP infinite loops spell disaster for your application! In this case, however, the loop is used with a server instance that continuously listens to requests on a given port.
Another key component of ReactPHP is ReactSocketServer. This class opens a socket on the given port, enabling a ReactPHP application to listen for HTTP requests directly without having to involve a web server.
Other features of ReactPHP include the ability to listen for UDP requests, a non-blocking cache, and the implementation of async promises. ReactPHP also features a Stream component that allows you to defer filesystem reads and writes, greatly speeding up performance because your application no longer has to wait for such file I/O requests to finish.
One final advantage to using ReactPHP is that it's fully compliant with PSR-7 (HTTP messaging). We'll now look at the example program that runs the Chat API described earlier, rewritten using ReactPHP. Here are the steps to rewrite the program:
- From Command Prompt into the Docker PHP 8 container, using Composer, we install the necessary ReactPHP components:
cd /repo/ch12
composer require --ignore-platform-reqs react/event-loop
composer require --ignore-platform-reqs react/http
composer require --ignore-platform-reqs react/socket
- We then rewrite /repo/ch12/php8_chat_swoole.php and rename it as /repo/ch12/php8_chat_react.php. The first thing we need to change are the use statements:
// /repo/ch12/php8_chat_react.php
include __DIR__ . '/vendor/autoload.php';
use ChatMessagePipe;
use ReactEventLoopFactory;
use ReactHttpServer;
use ReactHttpMessageResponse as ReactResponse;
use PsrHttpMessageServerRequestInterface;
- We then start a session and create a ReactEventLoopLoop instance, as follows:
session_start();
$loop = Factory::create();
- We now define a handler that accepts a PSR-7 ServerRequestInterface instance as an argument and returns a ReactHttpMessageResponse instance:
$server = new Server($loop,
function (ServerRequestInterface $request) {
return new ReactResponse(200,
['Content-Type' => 'text/plain'],
<8 SPACES>Pipe::exec($request)
);
});
- We then set up a ReactSockerServer instance to listen on port 9501 and execute a loop, like this:
$socket = new ReactSocketServer(9501, $loop);
$server->listen($socket);
echo "Server running at http://locahost:9501 ";
$loop->run();
We then open a separate command shell into the PHP 8.1 container and start the ReactPHP server as follows:
root@php8_tips_php8_1 [ /repo/ch12 ]# php php8_chat_react.php
From another command shell into the PHP 8.1 container, we can then run the test program as follows: root@php8_tips_php8_1 [ /repo/ch12 ]# php php8_chat_test.php
http://localhost:9501
The output (not shown) is similar to that shown when using the Swoole extension.
Next, we have a look at another popular PHP async framework: Amp.
Implementing PHP async using Amp
The Amp framework (https://amphp.org/), much like ReactPHP, provides implementations of timers, promises, and streams. Amp also provides coroutine support, as well as an asynchronous iterator component. The latter is extremely intriguing, as iteration is essential to most PHP applications. If you can move iteration into an asynchronous mode of processing, while potentially involving a lot of refactoring, it might provide an immense boost to your application's performance. Another interesting twist is that Amp can directly use any ReactPHP components!
To install Amp, use Composer. The various Amp components are available in discrete repositories, so you don't have to install the entire framework—only what you need. The actual implementation of a PHP Amp server is much like the example shown for ReactPHP.
Let's now have a look at another framework that can operate in PHP async mode: Mezzio, formerly called Zend Expressive.
Using Mezzio with Swoole
The Mezzio framework (https://docs.mezzio.dev/) is the brainchild of Matthew Weier O'Phinney (https://mwop.net/) and represents a continuation of an older framework, Zend Framework, and a later one, Zend Expressive. Mezzio falls into the relatively new category of a micro framework. Micro frameworks do not have any reliance on the aging Model-View-Controller (MVC) software design pattern and are mainly oriented toward RESTful API development. In practical terms, micro frameworks support the principle of PHP middleware and operate with much less overhead and correspondingly greater speed.
In order to use a Mezzio application with Swoole, just the following three things are needed:
- Install the Swoole extension (described earlier in this chapter).
- Install the mezzio-swoole component, like this:
composer require mezzio/mezzio-swoole
- You would then need to run Mezzio using a Swoole server instance. This can be accomplished with the following command:
/path/to/project/vendor/bin/laminas mezzio:swoole:start
- In the configuration file for your Mezzio application, you would need to add the following key:
return [
'mezzio-swoole' => [
'swoole-http-server' => [
'host' => '0.0.0.0', // all IP addresses
'port' => 9501,
]
],
];
To gain further performance improvements, you should of course also rewrite the appropriate portions of your code to take advantage of PHP async functionality. Next, we have a look at a PHP extension that goes beyond async.
Working with the parallel extension
The parallel extension (https://www.php.net/parallel) was introduced to work with PHP 7.2 and above. Its purpose is to go the next step beyond PHP async and into the world of full-blown parallel processing. The parallel extension provides five key low-level classes that can form the basis for a parallel-processing application. Using this extension allows PHP developers to write parallel code much like the Go language. Let's start with parallelRuntime.
The parallelRuntime class
Each parallelRuntime instance spawns a new PHP thread. You can then use parallelRuntime::run() to schedule a task. The first argument to run() is Closure (an anonymous function). The optional second argument is $argv, representing input arguments passed to the task at runtime. parallelRuntime::close() is used to gracefully shut down a thread. When an error condition arises, a thread can be immediately exited using parallelRuntime::kill().
The parallelFuture class
A parallelFuture instance is created as a return value from parallelRuntime::run(). It acts much like a PHP async promise (described earlier in this chapter). This class has three methods, listed here, that perform the following actions:
- parallelFuture::value()
Returns the fulfilled value of the task
- parallelFuture::cancel()
Cancels the task that represents a promise failed state
- parallelFuture::cancelled()|done()
Returns task state if it's still unfulfilled
The parallelChannel class
The parallelChannel class allows developers to share information between tasks. Use the __construct() method or make() to create a channel. If no argument is supplied to __construct() or if a second argument to make() is not supplied, the channel is considered unbuffered. If an integer is supplied to __construct() or as a second argument to make(), the value represents the channel's capacity. You can then use the parallelChannel::send() and parallelChannel::recv() methods to send and receive data through the channel.
Unbuffered channels block calls to send() until there is a receiver and vice versa. Buffered channels, on the other hand, do not block until the capacity has been reached.
The parallelEvents class
The parallelEvents class is similar to the event loop described in the first section of this chapter. This class has addChannel() and addFuture() methods to add channels and/or future instances to monitor. The setBlocking() method allows the event loop to monitor events in either blocking or non-blocking modes. Use the setTimeout() method to set an overall control period (in milliseconds) for how long the loop is allowed to continue. Finally, the poll() method causes the event loop to poll for the next event.
Installing the parallel extension
The parallel extension can be installed with the pecl command or using precompiled binaries, just as any other non-standard PHP extension. It's extremely important to note, however, that this extension only works on Zend Thread Safety (ZTS) PHP installations. Accordingly, if using Docker, you would need to obtain a PHP ZTS image, or, if custom-compiling PHP, you would need to use either the --enable-zts (Windows) or --enable-maintainer-zts (non-Windows) configure utility flag.
Now that you have an idea of how to use a number of selected PHP extensions and frameworks in async mode, we'll look into the future and discuss PHP 8.1 fibers.
Learning about PHP 8.1 fibers
A Request for Comments (RFC) was published in March 2021 by Aaron Piotrowski and Niklas Keller, both PHP core team developers, outlining the case for including support for fibers in the PHP language core. The RFC was ratified at the end of the month and has now been implemented in the upcoming 8.1 version of PHP.
The fiber implementation is low-level, meaning that it is mainly designed to be used as part of a PHP async framework such as ReactPHP or Amp, or an extension such as the Swoole extension. Because this will, as of PHP 8.1 and beyond, be a core part of the language, developers will not have to worry so much about which extensions are loaded. Also, this greatly enhances PHP async frameworks as they now have low-level support, directly in the language core, greatly improving performance. Let's now have a look at the Fiber class itself.
Discovering the Fiber class
The PHP 8.1 Fiber class offers a bare-bones implementation upon which async framework and extension developers can build timers, event loops, promises, and other async artifacts.
Here is the formal class definition:
final class Fiber {
public function __construct(callable $callback) {}
public function start(mixed ...$args): mixed {}
public function resume(mixed $value = null): mixed {}
public function throw(Throwable $exception): mixed {}
public function isStarted(): bool {}
public function isSuspended(): bool {}
public function isRunning(): bool {}
public function isTerminated(): bool {}
public function getReturn(): mixed {}
public static function this(): ?self {}
public static function suspend(
mixed $value = null): mixed {}
}
Here is a summary of the Fiber class methods:
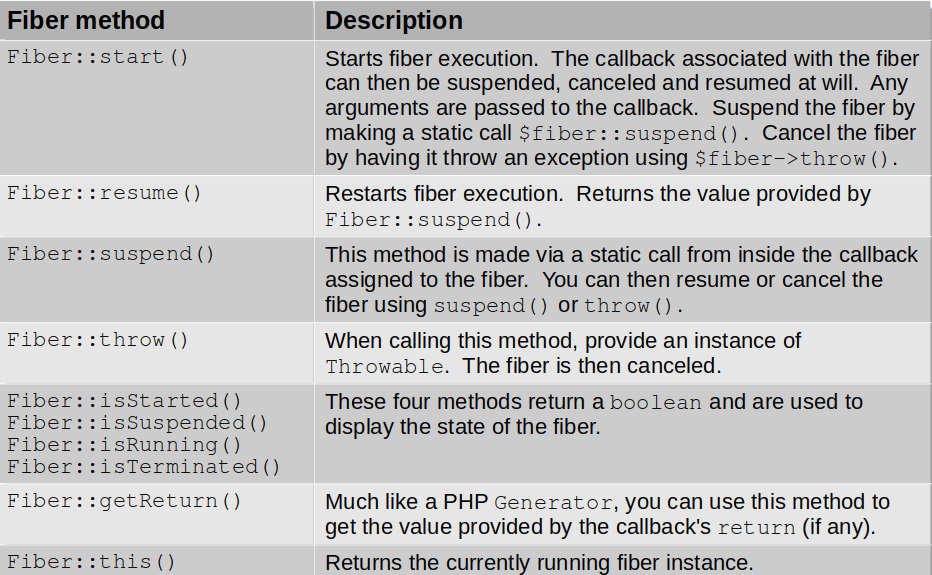
Table 12.3 – Fiber class method summary
As you can see from Table 12.3, after creating a Fiber instance, use start() to run the callback associated with the fiber. After that, you are free to suspend, resume, or cause the fiber to fail, using throw(). You can also just let the callback run in its own fiber, and use getReturn() to retrieve the returned information. You might also note that the is*() methods can be used to determine the fiber's state at any given moment.
Tip
For more information on the PHP 8.1 fibers implementation, please have a look at the following RFC: https://wiki.php.net/rfc/fibers.
Let's now have a look at an example that illustrates the use of fibers.
Using fibers
PHP 8.1 fibers form the basis of a PHP async application. Although the primary audience for fibers is framework and extension developers, any PHP developer can benefit from this class. To illustrate the problem PHP fibers can solve, let's have a look at a simple example.
Defining a sample program that performs blocking operations
In this example, written using the synchronous programming model, we perform three actions, as follows:
- Execute an HTTP GET request.
- Perform a database query.
- Write information to an access log.
Already having some knowledge of async programming, you realize that all three tasks represent blocking operations. Here are the steps we'll take:
- First, we define a PHP file to be included that defines the callbacks:
// /repo/ch12/php8_fibers_include.php
define('WAR_AND_PEACE',
'https://www.gutenberg.org/files/2600/2600-0.txt');
define('DB_FILE', __DIR__
. '/../sample_data/geonames.db');
define('ACCESS_LOG', __DIR__ . '/access.log');
$callbacks = [
'read_url' => function (string $url) {
return file_get_contents($url); },
'db_query' => function (string $iso2) {
$pdo = new PDO('sqlite:' . DB_FILE);
$sql = 'SELECT * FROM geonames '
. 'WHERE country_code = ?'
$stmt = $pdo->prepare($sql);
$stmt->execute([$iso2]);
return var_export(
$stmt->fetchAll(PDO::FETCH_ASSOC), TRUE);
},
'access_log' => function (string $info) {
$info = date('Y-m-d H:i:s') . ": $info ";
return file_put_contents(
ACCESS_LOG, $info, FILE_APPEND);
},
];
return $callbacks;
- Next, we define a PHP program that includes the callbacks' definition and executes them sequentially. We use a PHP 8 match {} construct to assign different arguments to pass to the appropriate callback. Finally, we return the number of bytes generated by the callback by simply returning a string and running strlen():
// /repo/ch12/php8_fibers_blocked.php
$start = microtime(TRUE);
$callbacks = include __DIR__ . '/php8_fibers_include.php';
foreach ($callbacks as $key => $exec) {
$info = match ($key) {
'read_url' => WAR_AND_PEACE,
'db_query' => 'IN',
'access_log' => __FILE__,
default => ''
};
$result = $exec($info);
echo "Executing $key" . strlen($result) . " ";
}
echo "Elapsed Time:" . (microtime(TRUE) - $start) . " ";
If we then run the program as is, the results are predictably abysmal, as we can see here:
root@php8_tips_php8_1 [ /repo/ch12 ]#
php php8_fibers_blocked.php
Executing read_url: 3359408
Executing db_query: 23194
Executing access_log: 2
Elapsed Time:6.0914640426636
The Uniform Resource Locator (URL) request to download Tolstoy's War and Peace took the most time and produced a byte count of over 3 million. The total elapsed time was a fraction over 6 seconds.
Let's now look at how the calling program could be rewritten using fibers.
Example program using fibers
From the PHP 8.1 Docker container, we can define a calling program that uses fibers. Here are the steps to do this:
- First, we include the callbacks, as we did earlier, like this:
// /repo/ch12/php8_fibers_unblocked.php
$start = microtime(TRUE);
$callbacks = include __DIR__
. '/php8_fibers_include.php';
- Next, we create a Fiber instance to wrap each callback. We then use start() to start the callback, supplying the appropriate information:
$fibers = [];
foreach ($callbacks as $key => $exec) {
$info = match ($key) {
'read_url' => WAR_AND_PEACE,
'db_query' => 'IN',
'access_log' => __FILE__,
default => ''
};
$fibers[$key] = new Fiber($exec);
$fibers[$key]->start($info);
}
- We then set up a loop and check in on each callback to see if it's finished. If so, we echo the results from getReturn() and unset the fiber:
$count = count($fibers);
$names = array_keys($fibers);
while ($count) {
$count = 0;
foreach ($names as $name) {
if ($fibers[$name]->isTerminated()) {
$result = $fibers[$name]->getReturn();
echo "Executing $name: "
. strlen($result) . " ";
unset($names[$name]);
} else {
$count++;
}
}
}
echo "Elapsed Time:" . (microtime(TRUE) - $start) . " ";
Please note that this example is for illustration only. It's far more likely that you would use an existing framework such as ReactPHP or Amp, both of which have been rewritten to take advantage of PHP 8.1 fibers. It's also important to note that even if multiple fibers are running simultaneously, the shortest runtime you can achieve is directly proportionate to the amount of time taken by the longest-running task. Let's now have a look at the effect of fibers on ReactPHP and Swoole.
Examining the effect of fibers on ReactPHP and Swoole
For this illustration, you need to open two separate command shells into the PHP 8.1 Docker container. Follow the directions given in the previous section, but open two command shells instead of one. We will then use the /repo/ch12/php8_chat_test.php program to test the effect of fibers. Let's run the first test, using the built-in PHP web server as a control.
Testing using the built-in PHP web server
In the first test, we use the built-in PHP web server and the conventional /repo/ch12/php8_chat_ajax.php implementation. Here are the steps we'll take:
- In both command shells, change to the /repo/ch12 directory, like this:
# cd /repo/ch12
- In the first command shell, run a standard HTTP server using the built-in PHP web server, with this command:
# php -S localhost:9501 php8_chat_ajax.php
- In the second command shell, execute the test program, as shown:
php php8_chat_test.php http://localhost:9501 1000 --no
The resulting output should look something like this:
root@php8_tips_php8_1 [ /repo/ch12 ]#
php php8_chat_test.php http://localhost:9501 1000 --no
From User: pduarte
Elapsed Time: 1.687940120697
As you can see, the conventional code, written using synchronous programming, came in at around 1.7 seconds for 1,000 iterations. Let's now have a look at running the same test using ReactPHP.
Testing using ReactPHP
In the second test, we use our /repo/ch12/php8_chat_react.php ReactPHP implementation. Here are the steps we'll take:
- In the first command shell, hit Ctrl + C to exit the built-in PHP web server.
- Exit and re-enter the first command shell using exit, followed by either init shell for Windows or ./init.sh shell for Linux or Mac.
- Start the ReactPHP server using this command:
# php php8_chat_react.php
- In the second command shell, execute the test program, like this:
php php8_chat_test.php http://localhost:9501 1000 --no
The resulting output should look something like this:
root@php8_tips_php8_1 [ /repo/ch12 ]#
php php8_chat_test.php http://localhost:9501 1000 --no
From User: klang
Elapsed Time: 1.2330160140991
From the output, you can see that ReactPHP benefits greatly from fibers. The total elapsed time was an impressive 1.2 seconds for 1,000 iterations!
This concludes our discussion of PHP 8.1 fibers. You now have an idea of what fibers are and how they can be used directly in your program code, as well as how they benefit external PHP async frameworks.
Summary
In this chapter, you learned the difference between conventional synchronous programming and asynchronous programming. Key terms such as event loops, timers, promises, and channels were covered. This knowledge gives you the ability to determine when a block of code is written using the asynchronous programming model, and how to rewrite portions of existing synchronous model applications to take advantage of asynchronous features.
You then learned about the Swoole extension and how it can be applied to existing application code to achieve performance improvements. You also learned about a number of other frameworks and extensions that operate in an asynchronous manner. You reviewed concrete code examples and now have a headstart on writing asynchronous code.
In the last section, you were introduced to PHP 8.1 fibers. You then reviewed a code example showing you how to create cooperative multitasking functions and class methods using PHP 8.1 fibers. You also saw how selected PHP async frameworks are able to benefit from PHP 8.1 fiber support, providing even more performance improvements.
This is the last chapter in the book. We hope you have enjoyed reviewing the vast array of new features and benefits made available in PHP 8. You also now have a deeper understanding of potential traps to avoid in object-oriented and procedural code, as well as various changes to PHP 8 extensions. With this knowledge, not only are you now in a position to write better code, but you also have a solid plan of action that minimizes the chance of application code failure following a PHP 8 migration.