Now that you’ve decided to use PHP to enrich your web pages, you need to make sure that you have everything you need to get on with the rest of this book. Although you can test everything on your remote server, it’s usually more convenient to test PHP pages on your local computer. Everything you need to install is free. In this chapter, I’ll explain the various options for Windows and macOS. The necessary components are normally installed by default on Linux.
Checking if your web site supports PHP
Creating a local testing setup with a ready-made package in Windows and macOS
Deciding where to store your PHP files
Checking the PHP configuration on your local and remote servers
Checking Whether Your Web Site Supports PHP
- 1.
Open your script editor, and type the following code into a blank page:
- 2.
Save the file as phpversion.php. It’s important to make sure that your operating system doesn’t add a .txt filename extension after the .php. If you’re using TextEdit on a Mac, make sure that it doesn’t save the file in Rich Text Format (RTF). If you’re at all unsure, use phpversion.php from the ch02 folder in the files accompanying this book.
- 3.
Upload phpversion.php to your web site in the same way you would an HTML page and then type the URL into a browser. Assuming you upload the file to the top level of your site, the URL will be something like www.example.com/phpversion.php.
- 4.
If you get a message that says something like “Parse error,” it means PHP is supported but that you have made a mistake in typing the code in the file. Use the version in the ch02 folder instead.
- 5.
If you just see the original code, it means PHP is not supported.
The code in this book uses features that are new to PHP 8. If your web server is running an older version of PHP, many of the techniques described in this book will not work.
Deciding Where to Test Your Pages
Unlike ordinary web pages, you can’t just double-click PHP pages in Windows File Explorer or Finder on a Mac and view them in your browser. They need to be parsed, or processed, through a web server that supports PHP. If your hosting company supports PHP, you can upload your files to your web site and test them there. However, you need to upload the file every time you make a change. In the early days, you’ll find you have to do this often because of a minor mistake in your code. As you become more experienced, you’ll still need to upload files frequently because you’ll want to experiment with different ideas.
Using a local test environment is the most efficient way to develop with PHP. The rest of this chapter is devoted to showing you how to do this, with instructions for both Windows and macOS.
What You Need for a Local Test Environment
A web server, which is a piece of software that displays web pages, not a separate computer
PHP
A MySQL or MariaDB database and phpMyAdmin, a web-based front end for administering the database
MariaDB (https://mariadb.org/) is a community-developed drop-in replacement for MySQL. The code in this book is fully compatible with both MySQL and MariaDB.
All the software you need is free. The only cost to you is the time it takes to download the necessary files, plus, of course, the time to make sure everything is set up correctly. In most cases, you should be up and running in less than an hour, probably considerably less. As long as you have at least 1 GB of free disk space, you should be able to install all the software on your computer—even one with modest specifications.
If you already have a PHP 8 test environment on your local computer, there’s no need to reinstall. Just check the section at the end of this chapter titled “Checking Your PHP Settings.”
The simplest way to set up a test environment is to use a package that installs Apache, PHP, MySQL (or MariaDB), and phpMyAdmin in a single operation. On my computers, I use XAMPP for Windows (www.apachefriends.org/index.html) and MAMP for macOS (www.mamp.info/en/). Other packages are available; it doesn’t matter which you choose.
Setting Up on Windows
Make sure that you’re logged on as an administrator before proceeding.
Getting Windows to Display Filename Extensions
By default, most Windows computers hide common three- or four-letter filename extensions, such as .doc or .html, so all you see in dialog boxes and Windows File Explorer is thisfile instead of thisfile.doc or thisfile.html.
- 1.
Open File Explorer (Windows key + E).
- 2.
Select View to expand the ribbon at the top of the File Explorer window.
- 3.
Select the “File name extensions” check box.
Displaying filename extensions is more secure—you can tell if a virus writer has attached an .exe or .scr executable file to an innocent-looking document.
Choosing a Web Server
Most PHP installations run on the Apache web server. Both are open source and work well together. However, Windows has its own web server, Internet Information Services (IIS), which also supports PHP. Microsoft has worked closely with the PHP development team to improve the performance of PHP on IIS to roughly the same level as Apache. So which should you choose?
Unless you need IIS for ASP or ASP.NET, I recommend that you install Apache, using XAMPP or one of the other all-in-one packages, as described in the next section. If you need to use IIS, you can install PHP from https://php.iis.net/.
Installing an All-in-One Package on Windows
There are two popular packages for Windows that install Apache, PHP, MySQL or MariaDB, phpMyAdmin, and several other tools on your computer in a single operation: XAMPP (www.apachefriends.org/index.html) and EasyPHP (www.easyphp.org). The installation process normally takes only a few minutes. Once the package has been installed, you might need to change a few settings, as explained later in this chapter.
Versions are liable to change over the lifetime of a printed book, so I won’t describe the installation process. Each package has instructions on its web site.
Setting Up on macOS
The Apache web server and PHP are preinstalled on macOS , but they’re not enabled by default. Rather than using the preinstalled versions, I recommend that you use MAMP, which installs Apache, PHP, MySQL, phpMyAdmin, and several other tools in a single operation.
To avoid conflicts with the preinstalled versions of Apache and PHP, MAMP locates all the applications in a dedicated folder on your hard disk. This makes it easier to uninstall everything by simply dragging the MAMP folder to the Trash if you decide you no longer want MAMP on your computer.
Installing MAMP
- 1.
Go to www.mamp.info/en/downloads/ and select the link for MAMP & MAMP PRO. This downloads a disk image that contains both the free and paid-for versions of MAMP.
- 2.
When the download completes, launch the disk image. You’ll be presented with a license agreement. You must click Agree to continue with mounting the disk image.
- 3.
Follow the onscreen instructions.
- 4.
Verify that MAMP has been installed in your Applications folder.
MAMP automatically installs both the free and paid-for versions in separate folders called MAMP and MAMP PRO. The paid-for version makes it easier to configure PHP and to work with virtual hosts, but the free version is perfectly adequate, especially for beginners. If you want to remove the MAMP PRO folder, don’t drag it to the Trash. Open the folder and double-click the MAMP PRO uninstall icon. The paid-for version requires both folders.
Testing and Configuring MAMP
- 1.
Double-click the MAMP icon in Applications/MAMP. If you’re presented with a panel inviting you to learn more about Standard View, this is a feature that’s new in the paid-for version only. To prevent the panel from being displayed each time you start MAMP, deselect the check box at the bottom left of the panel. Then click the Close button at the top left to dismiss the panel.
- 2.
In the MAMP control panel, set the PHP version drop-down menu to 8.0.2 or later (see Figure 2-1). If you get a warning that your site might not behave as expected in PHP 8, click OK. You can prevent this warning from appearing again by selecting the check box.

Selecting the PHP version in the MAMP control panel
- 3.
Click the Start icon at the top right of the MAMP control panel. Your default browser eventually launches and presents you with the MAMP welcome page.
- 4.
If your browser doesn’t launch automatically, click the WebStart icon at the top of the MAMP control panel.
- 5.
Check the URL in the browser address bar. It begins with localhost:8888. The :8888 indicates that Apache is listening for requests on the nonstandard port 8888.
- 6.
Minimize the browser and click the Preferences icon at the top left of the MAMP control panel.
- 7.
Select Ports at the top of the panel that opens. It shows that Apache and MySQL are running on ports 8888 and 8889 (see Figure 2-2).

Changing the Apache and MySQL ports
- 8.
Click the 80 & 3306 button as shown in Figure 2-2 to change the web and MySQL ports to the standard values: 80 for Apache and 3306 for MySQL.
- 9.
Click OK and enter your Mac password when prompted to restart the servers.
Tip Apache won’t restart if any other program is using port 80. If you can’t find what’s preventing Apache from using port 80, open the MAMP Preferences panel and click the MAMP default button. Then click OK again.
- 10.
When the servers have started up again, click the WebStart button in the MAMP control panel to load the welcome page into your browser. This time, the URL shouldn’t have a colon followed by a number appearing after localhost because Apache is now listening on the default port.
Where to Locate Your PHP Files (Windows and Mac)
XAMPP: C:xampphtdocs
EasyPHP: C:EasyPHPwww
IIS: C:inetpubwwwroot
MAMP: /Applications/MAMP/htdocs
To view a PHP page, you need to load it in a browser using a URL. The URL for the web server’s document root in your local testing environment is http://localhost/.
If you need to reset MAMP back to its default ports, you will need to use http://localhost:8888 instead of http://localhost.
If you store the files for this book in a subfolder of the document root called php8sols, the URL is http://localhost/php8sols/ followed by the name of the folder (if any) and file.
Use http://127.0.0.1/ if you have problems with http://localhost/. 127.0.0.1 is the loopback IP address all computers use to refer to the local machine.
Checking Your PHP Settings
After installing PHP, it’s a good idea to check its configuration settings. In addition to the core features, PHP has a large number of optional extensions. The all-in-one packages install all the extensions that you need for this book. However, some of the basic configuration settings might be slightly different. To avoid unexpected problems, adjust your configuration to match the settings recommended in the following pages.
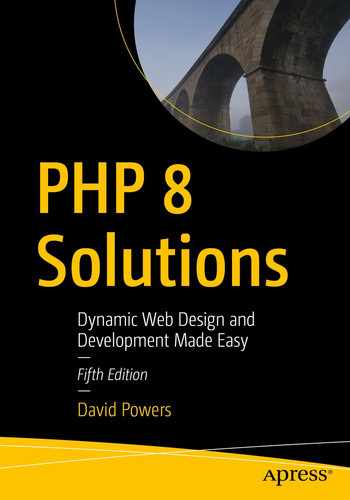
Displaying the Server Configuration with phpinfo()
PHP has a built-in command, phpinfo() , that displays details of how PHP is configured on the server. The amount of detail produced by phpinfo() can feel like massive information overload, but it’s invaluable for determining why something works perfectly on your local computer yet not on your live web site. The problem usually lies in the remote server having disabled a feature or not having installed an optional extension.
XAMPP: Click the Apache Admin button in the XAMPP control panel to launch the XAMPP welcome page in a browser. Then click the PHPInfo button at the top of the page.
MAMP: Scroll down to the PHP section of the MAMP welcome page and click the phpinfo link.
- 1.
Make sure that Apache or IIS is running on your local computer.
- 2.
Type the following in a script editor:
- 3.
Save the file as phpinfo.php in the server’s document root (see “Where to Locate Your PHP Files (Windows and Mac)” earlier in this chapter).
Caution Make sure your editor doesn’t add a .txt or .rtf extension after .php.
- 4.
Type http://localhost/phpinfo.php in your browser address bar and press Enter.
- 5.
You should see a page similar to that in Figure 2-3 displaying the version of PHP followed by extensive details of your PHP configuration.
Running the phpinfo() command displays full details of your PHP configuration.
- 6.
Make a note of the value for the Loaded Configuration File item. This tells you where to find php.ini, the text file that you need to edit in order to change most settings in PHP.
- 7.Scroll down to the section labeled Core and compare the settings with those recommended in Table 2-1. Make a note of any differences so you can change them as described later in this chapter.Table 2-1
Recommended PHP configuration settings
Directive
Local value
Remarks
display_errors
On
Essential for debugging mistakes in your scripts. If set to Off, errors result in a completely blank screen, leaving you clueless as to the possible cause.
error_reporting
32767
This sets error reporting to the highest level.
file_uploads
On
Allows you to use PHP to upload files to a web site.
log_errors
Off
With display_errors set to On, you don’t need to fill your hard disk with an error log.
- 8.The rest of the configuration page shows you which PHP extensions are enabled. Although the page seems to go on forever, the extensions are all listed in alphabetical order. To work with this book, make sure the following extensions are enabled:
gd: Enables PHP to generate and modify images and fonts.
Note If your testing environment is running on Windows and the gd extension is not listed, you can easily turn it on by following the instructions in the next section.
mysqli: Connects to MySQL/MariaDB. (Note the “i,” which stands for “improved.” Since PHP 7, the older mysql one is no longer supported.)
PDO: Provides software-neutral support for databases (optional).
pdo_mysql: Alternative method of connecting to MySQL/MariaDB (optional).
session: Sessions maintain information associated with a user and are used, among other things, for user authentication.
You should also run phpinfo() on your remote server to check which features are enabled. If the listed extensions aren’t supported, some of the code in this book won’t work when you upload your files to your web site. If PDO and pdo_mysql aren’t listed, you can use mysqli instead.
The output displayed by phpinfo( ) reveals a lot of information that could be used by a malicious hacker to attack your web site. Always delete the file from your remote server after checking your configuration.
If any of the settings in your setup are different from these recommendations, you will need to edit the PHP configuration file, php.ini, as described in the next section.
Editing php.ini
The PHP configuration file, php.ini, is a very long file, which tends to unnerve newcomers to programming, but there’s nothing to worry about. It’s written in plain text, and one reason for its length is that it contains copious comments explaining the various options. That said, it’s a good idea to make a backup copy before editing php.ini in case you make a mistake.
If you used an all-in-one package, such as XAMPP, on Windows, double-click php.ini in Windows File Explorer. The file opens automatically in Notepad.
If you installed PHP on IIS, php.ini is normally located in a subfolder of Program Files. Although you can open php.ini by double-clicking it, you won’t be able to save any changes you make. Instead, right-click Notepad and select Run as administrator. Inside Notepad, select File ➤ Open and set the option to display All Files (*.*). Navigate to the folder where php.ini is located, select the file, and click Open.
On macOS, use a plain-text editor to open php.ini. If you use TextEdit, make sure it saves the file as plain text, not Rich Text Format.
Lines that begin with a semicolon (;) are comments. Except for turning on the gd extension on Windows, the lines you need to edit do not begin with a semicolon.
Use your text editor’s Find functionality to locate the directives you need to change to match the recommendations in Table 2-1. Most directives are preceded by one or more examples of how they should be set. Make sure you don’t edit one of the commented examples by mistake.
Remove the semicolon from the beginning of the line.
On macOS and Linux, PHP normally needs to be compiled with the gd extension enabled, so this simple fix won’t work. Check with the site where you downloaded your PHP installation for any options that are available.
XAMPP: In the XAMPP control panel, click the Logs button alongside Apache and then select Apache (error.log).
MAMP: In /Applications/MAMP/logs, double-click apache_error.log to open it in Console.
EasyPHP: Right-click the EasyPHP icon in the system tray and select Log Files ➤ Apache.
IIS: The default location of log files is C:inetpublogs.
The most recent entry in the error log should give you an indication of what prevented the server from restarting. Use that information to correct the changes you made to php.ini. If that doesn’t work, be thankful you made a backup of php.ini before editing it. Start again with a fresh copy and check your edits carefully.
What’s Next?
Now that you’ve got a working test bed for PHP, you’re no doubt raring to go. The last thing I want to do is dampen any enthusiasm, but before using PHP in a live web site, you should have a basic understanding of the rules of the language. So, before jumping into the cool stuff, read the next chapter, which explains how to write PHP scripts. Even if you have extensive experience of PHP, be sure to check the sections that deal with changes in PHP 8.