11. Communicating with Others
Most of the previously discussed phrases worked within the ecosystem of the PHP script and the Web server in use. However, because some phrases can also be understood by others, this chapter covers some examples of this type. You can connect to remote servers in a variety of ways.
Connecting with HTTP Servers
<xmp>
<?php
echo file_get_contents('http://www.php.net/');
?>
</xmp>
Reading in an HTTP Resource (http-file.php)
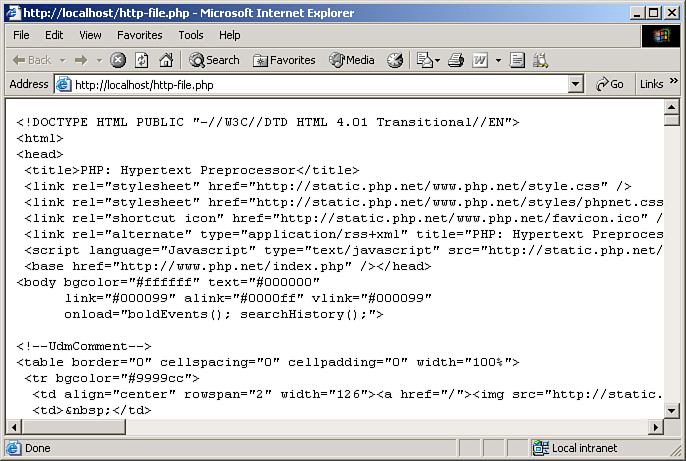
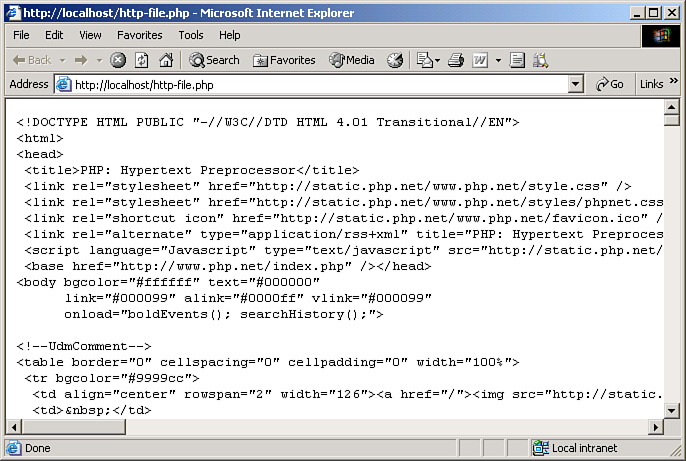
Hypertext Transfer Protocol (HTTP) is probably the protocol most often used from PHP to connect with others (apart from various database protocols). Starting with PHP 4.3, it is really easy to connect to such data sources because PHP’s stream support was vastly improved in that version. (Of course, using HTTP in the way this code shows was already possible in earlier PHP releases.) The idea is that when you use a file operation, you access a stream of data. In practice, it doesn’t really matter whether it’s a file on the local system, on a network share, or on a remote server connected via either HTTP, File Transfer Protocol (FTP), or any other supported protocol. Just provide the appropriate filename, and PHP takes care of the rest. The preceding code shows this: It opens the PHP home page, and prints its Hypertext Markup Language (HTML) code in the browser. With just one line of code, it cannot get much more simple. Figure 11.1 contains the output.
Figure 11.1. A one-liner prints the HTML markup of the PHP home page.
For security reasons, you can turn off this behavior in php.ini by setting allow_url_fopen to Off; so, you cannot rely on it on Web servers you cannot control—for instance, shared hosting at large Internet service providers (ISPs).
If you want to control the HTTP request by yourself, you can do so by using sockets. First, use fsockopen() to open a socket to the Web server, and if that works, you then send a well-formed HTTP request. The following code implements this, again querying the PHP home page:
<?php
$fp = @fsockopen('www.php.net', 80, $errno, $errstr, 30);
if ($fp) {
echo '<xmp>';
$request = "GET / HTTP/1.0
";
$request .= "Host: www.php.net
";
$request .= "Connection: Close
";
fwrite($fp, $request);
while (!feof($fp)) {
echo fgets($fp, 1024);
}
fclose($fp);
echo '</xmp>';
} else {
echo "Error: $errstr (#$errno)";
}
?>
Reading in an HTTP Resource Using Sockets (http-socket.php)
The output is the same, with one difference: The socket approach also returns all HTTP headers sent by the server, whereas the stream wrappers omit them.
When you must work with HTTP Secure (HTTPS) resources (Web sites secured with SSL [Secure Sockets Layer], for example), the two approaches still work, although with slight modification:
• When using file functions such as file_get_contents(), just provide an https:// uniform resource locator (URL).
• When using sockets, use an ssl:// URL.
Connecting with FTP Servers
file_get_contents('ftp://mirror.netcologne.de/apache.org/httpd/README.html')
<?php
$data = file_get_contents('ftp://mirror.netcologne.de/apache.org/httpd/README.html');
file_put_contents('Apache-README.html', $data);
echo 'File written.';
?>
Reading in an FTP File (ftp-file.php; excerpt)
When you are accessing FTP servers, PHP’s stream wrappers come in very handy, as well. You only have read access, but the access is binary safe nonetheless. This code shows how to download the current README file for Apache from an FTP server and save it to the local hard disk using file_get_contents(). Writing is also possible; just use file_put_contents() or the correct file mode for fopen(). Note, though, that both reading and writing simultaneously is not yet supported.
If you do not provide any credentials, PHP tries to log you in to the FTP server using a guest account most public FTP servers offer. You can, however, also provide the credentials yourself:
$data = file_get_contents('ftp://USER: [email protected]/');
This works for HTTP resources (see previous phrase), too!
PHP also comes with built-in support for FTP and a special set of functions that implement the complete FTP functionality defined in the associated Request For Comment (RFC). In the Windows distributions, this is enabled by default, whereas on other systems, PHP has to be configured with the switch --enable-ftp. Then, using the FTP server usually consists of the following steps:
1. Connect to the server using ftp_connect().
2. Log in using ftp_login().
3. Go to the target directory using ftp_chdir().
4. Read a file (ftp_get()) from or write a file (ftp_put()) to the FTP server.
5. Close the connection using ftp_close().
Because reading is more common than writing, the following shows the former task being executed. Again, the Apache README is fetched from an FTP server:
<?php
$ftp = @ftp_connect('mirror.netcologne.de');
$login = @ftp_login($ftp, 'anonymous', '[email protected]');
if ($ftp && $login) {
ftp_chdir($ftp, '/apache.org/httpd/ ');
ftp_get($ftp, 'Apache-README-ftp.html', 'README.html', FTP_ASCII);
echo 'File written.';
ftp_close($ftp);
} else {
echo 'Error!';
}
?>
Reading in an FTP file Using the Built-In Functions (ftp-functions.php)
Note that the syntax of ftp_get() is a bit strange. After the FTP resource, you first have to provide the local filename, and then you must provide the remote filename. (Intuitively, you would expect it to be the other way around.) The last parameter is the transfer mode: FTP_ASCII for text files, and FTP_BINARY for all other data.
Checking Whether a Server Is Still Reacting
<?php
$server = 'localhost';
$port = '80';
$status = 'unavailable';
$fp = @fsockopen($server, $port, $errno, $errstr, 10);
if ($fp) {
$status = 'alive, but not responding';
fwrite($fp, "HEAD / HTTP/1.0
");
fwrite($fp, "Host: $server:$port
");
if (strlen(@fread($fp, 1024)) > 0) {
$status = 'alive and kicking';
}
fclose($fp);
}
echo "The server is $status.";
?>
Checking the Status of a Server (serverstatus.php)
Suppose you have a Web server and you want to check periodically that it hasn’t crashed again. In this scenario, using a PHP script for this task is a good idea. Just open a socket to the server and wait. (The last parameter of fsockopen() is a timeout value.) After this time has elapsed, you know whether the server is online or offline.
This works well if only one server’s status must be checked. If there are several servers, this approach has some disadvantages. The call to fsockopen() might take up to the timeout value until the next command is executed. Therefore, all servers are checked sequentially and synchronously. This just takes too long for several servers. However, with PHP 5 and stream sockets, this can be done asynchronously. The code is a bit complicated, but Wez Furlong explains this approach in great detail at http://wezfurlong.org/blog/2005/may/guru-multiplexing/.
Creating a Web Service with NuSOAP
<?php
require_once 'nusoap.php';
$soap = new soap_server;
$soap->register('add');
$soap->service($HTTP_RAW_POST_DATA);
function add($a, $b) {
return $a + $b;
}
?>
A SOAP Web Service with NuSOAP (soap-nusoap-server.php)
At http://nusoap.sourceforge.net/, you will find NuSOAP, one of the best-known external SOAP classes for PHP. Some might even know its predecessor, SOAPx4. These days, releases are not issued very often, but the library is quite stable. You might also want to check the Subversion (SVN) repository for the most recent code. You might find several files there, but nusoap.php is the one you want.
Creating a Web Service with NuSOAP is really simple because the module takes care of all the painful things, including SOAP. Just follow these steps:
1. Write the function you want to expose as a Web method.
2. Instantiate the soap_server class.
3. Register your function with the SOAP server.
4. Call the service() method and submit $HTTP_RAW_POST_DATA as the parameter.
This code implements a SOAP server using NuSOAP. Figure 11.2 shows the output in the browser when you are trying to call the Web Service directly from the client. The error message says that the XML was empty—of course it is, because we didn’t send a request!
Figure 11.2. This error message is a good sign; the script seems to work (so far).
Automatically Generating WSDL with NuSOAP
<?php
require_once 'nusoap.php';
$soap = new soap_server;
$soap->configureWSDL('AddService', 'http://php.phrasebook.org/');
$soap->wsdl->schemaTargetNamespace = 'http://soapinterop.org/xsd/';
$soap->register(
'add',
array('a' => 'xsd:int', 'b' => 'xsd:int');
array('c' => 'xsd:int');
'http://soapinterop.org/'
);
$soap->service(isset($HTTP_RAW_POST_DATA) ? $HTTP_RAW_POST_DATA : '');
function add($a, $b) {
return $a + $b;
}
?>
A WSDL-Enabled Web Service with NuSOAP (wsdl-nusoap-server.php)
As mentioned previously, current Web Services almost always use WSDL. Writing WSDL manually is a real pain and very error prone, but most serious Web Services implementations for PHP can create WSDL automatically. However, because PHP is not a strongly typed language, the Web Services need some help.
To do so with NuSOAP, the code from the previous section must be expanded a bit. First, a method configureWSDL() must be called to provide the name and the namespace of the service. Then, the signature of the method must be provided (which parameters go in, which go out). Then, the server is started. However, this time whether $HTTP_RAW_POST_DATA is set is checked or not. This is because when it is not set, the user has made a GET request, so the user might just want the WSDL description.
Back to the WSDL: Figure 11.3 shows the Web Service in the browser when called using GET. A click on the link shows some information about the add() method. In Figure 11.4, you see what happens when you append ?WSDL to the URL of the script (or click on the WSDL link): The WSDL for the service is automatically generated. Imagine if you had to do this manually!
Figure 11.3. Now NuSOAP automatically generates an info page for the service.
Figure 11.4. This WSDL is generated by NuSOAP, not by the programmer.
Consuming a Web Service with NuSOAP
<?php
require_once 'nusoap.php';
$soap = new soapclient('http://localhost/wsdl-nusoap-server.php?wsdl', true);
$proxy = $soap->getProxy();
$result = $proxy->add(47, 11);
echo "47 + 11 = $result";
?>
Consuming the Web Service with NuSOAP (wsdl-nusoap-client.php)
Actually, using a NuSOAP service is even easier than creating one. You just have to load the WSDL file and then get a so-called proxy class. (That’s a local class that behaves just as if the Web Service is a local class, too.) So, you can call the Web Service’s methods directly, and NuSOAP takes care of all the rest (including opening a connection to the remote server, assembling and parsing XML, and so on).
To do this, the soapclient class (without the underscore character) must be instantiated, and then the getProxy() method creates the proxy class. The code implements this for the demo service from the previous example. Note the URL of the WSDL file: It’s the Web Service’s URL plus ?wsdl appended to the end; change the URL accordingly for your system.
Appending ?wsdl to the URL to get the WSDL description of a Web Service is an idea borrowed from Microsoft .NET (and now also used in other technologies). However, there the appendix is not case sensitive, whereas NuSOAP requires it to be in lowercase letters. Keep this in mind when working cross-platform.
Creating a Web Service with the PHP 5 SOAP Extension
<?php
$soap = new SoapServer(null, array('uri' => 'http://php.phrasebook.org/'));
$soap->addFunction('add');
$soap->handle();
function add($a, $b) {
return $a + $b;
}
?>
A Web Service with PHP 5 SOAP (soap-php5-server.php)
One of the key features of PHP 5 is the new SOAP extension. Because it is written in C, it is much faster than anything that is coded in PHP alone. However, the extension is relatively new, so there are still some hiccups and missing features. However, it often works well.
You have to configure PHP with --enable-soap to use the extension; Windows users have to add extension=php_soap.dll to their php.ini configuration file. Then, the extension is available, and writing a SOAP server is quite easy.
Again, it’s a small number of steps: Instantiate the SoapServer class, add your function with addFunction(), and, finally, call handle().
Consuming a Web Service with the PHP 5 SOAP Extension
<?php
$soap = new SoapClient('AddService.wsdl');
try {
$result = $soap->add(47, 11);
echo "47 + 11 = $result";
} catch (SoapFault $e) {
echo "Error: {$e->faultstring}";
}
}
Consuming the Web Service with PHP 5 SOAP (wsdl-php5-client.php)
Consumption is again easy, as long as you have a WSDL description. This code calls the Web Services and also catches any errors, thanks to PHP 5’s try-catch mechanism.
In an attempt to boost performance, PHP 5’s SOAP extension defaults to caching WSDL. The following are the standard settings from php.ini-recommended:
[soap]
; Enables or disables WSDL caching feature.
soap.wsdl_cache_enabled=1
; Sets the directory name where SOAP extension will put cache files.
soap.wsdl_cache_dir="/tmp"
; (time to live) Sets the number of seconds while cached file will be used
; instead of original one.
soap.wsdl_cache_ttl=86400
When developing a Web Service and maybe changing the WSDL, this is, of course, a no-brainer. Therefore, set soap.wsdl_cache_enabled to Off during development, but turn it on for production servers.
Using Ajax
Wikipedia lists several dozen different meanings for the term Ajax, including a soccer team from the Netherlands, two figures in Homer’s Iliad, and a household-cleaning product. However, since 2005, Ajax also stands for Asynchronous JavaScript + XML. The technology is far from new (the underlying technology, XML HTTP requests from JavaScript, is supported by recent versions of Internet Explorer, Firefox, Safari, and Chrome—also, XML is not required at all for this), but only after this weird term was coined did people actually start using it.
The basic principle is that JavaScript can now call a remote server and then process its return values without having to reload the whole page. Of course, this has little to do with PHP; however, some Ajax classes make using Ajax from within PHP very easy.
This phrase shows a very short demonstration of Ajax. This phrase uses the Sajax toolkit (the S stands for simple) available at www.modernmethod.com/sajax/. Many Ajax libraries and frameworks are available, so feel free to pick the one you like most; we are just picking a simple one here to focus on the combination of Ajax and PHP.
The complete code for this example is quite long because both PHP and JavaScript are needed. First, you need the server-side logic. For this, the Sajax toolkit is loaded, which comes as a single PHP file. You then “export” (register) all PHP functions you want to use from the client side. The following example has a small function that generates a random RGB color:
<?php
require_once 'Sajax.php';
sajax_init();
sajax_export('randomColor');
sajax_handle_client_request();
function randomColor() {
$color = '#';
for ($i=0; $i<3; $i++) {
$color .= dechex(rand(0, 255));
}
return $color;
}
?>
The Server-Side Part of the Application (ajax.php; excerpt)
On the client side, a call to the (PHP) function sajax_show_javascript() does most of the work; it creates some lines of JavaScript code that take care of the requests to the Web server in the background. Then, all PHP functions that have been registered before can be called on the client side by prepending x_ to the name of the function. One parameter you have to provide is the name of a callback function; this function is then called when the server side has responded to the request.
The following code calls the randomColor() PHP function every five seconds and then writes a text in this random color—all without server round-trips! Figure 11.5 shows the result:
<script type="text/javascript">
<?php
sajax_show_javascript();
?>
changeColor();
setInterval(changeColor, 5000);
function changeColor() {
x_randomColor(randomColor_callback);
}
function randomColor_callback(result) {
var text = '<span style="color: ' + result + ';">A colorful acronym ...</span>';
document.getElementById('output').innerHTML = text;
}
</script>
...
<div id="output"></div>
The Client-Side Part of the Application (ajax.php; excerpt)
Figure 11.5. The text appears, thanks to JavaScript code calling PHP.
Exchanging Data with the Server
In the preceding phrase, the data we exchanged with the server was quite trivial—a simple string. In real-world applications, however, we have more complex data we need to send from the client to the server and back. XML could be used as an exchange format, but it is bloated, and so does not fare well with high-performance applications. PHP’s serialize() and unserialize() methods could be used to convert complex information into a string that can be exchanged via HTTP, but there is no built-in counterpart functionality JavaScript offers.
The de facto standard for data exchange with JavaScript is JSON, JavaScript Object Notation. The unofficial home page at http://json.org/ explains the format in great detail, but basically JSON sums up the part of the JavaScript specification where arrays are explained. Take this string, for instance:
[
{"url": "http://json.org/", "text": "JSON"},
{"url": "http://php.net/", "text": "PHP"}
]
This is the syntax that can be used within JavaScript to define an array that contains two associative arrays (or objects, as some call it, despite these elements not really being objects). Modern browsers have an easy built-in functionality to convert such a string into a real JavaScript value (and there are workarounds for older versions), so JSON is ideal for Ajax applications.
Beginning with version 5.2, PHP supports JSON out of the box. The function json_encode() converts a serializable PHP value into JSON, and json_decode() converts a JSON string back into something PHP can work with. The following code essentially creates the preceding JSON string, minus the indentations and extra whitespace characters:
<?php
class LinkData {
public $url;
public $text;
public function __construct($url, $text) {
$this->url = $url;
$this->text = $text;
}
}
$data = array(
new LinkData('http://json.org/', 'JSON');
new LinkData('http://php.net/', 'PHP')
);
echo json_encode($data);
?>
The JSON Server Endpoint (json.php)
On the client side, JavaScript code can then call the PHP script and process the data. When using a JavaScript library like the popular jQuery (http://jquery.com/), working with the JSON data can be quite easy (see Figure 11.6). The following code displays the information contained in the JSON string in the form of a bulleted list:
<script type=""text/javascript" src="http://code.jquery.com/jquery-latest.js"></script>
<script type=""text/javascript">
$(function() {
$.getJSON("json.php", function(data) {
$.each(data, function(key, value) {
$("<a>").attr("href", value.url)
.html(value.text)
.wrap("<li>")
.parent()
.appendTo("ul");
});
});
});
</script>
...
<body>
<ul></ul>
</body>
The JSON Client, Using jQuery (json.html)
Figure 11.6. The JSON data is parsed and then displayed as a list, thanks to jQuery calling PHP code.


