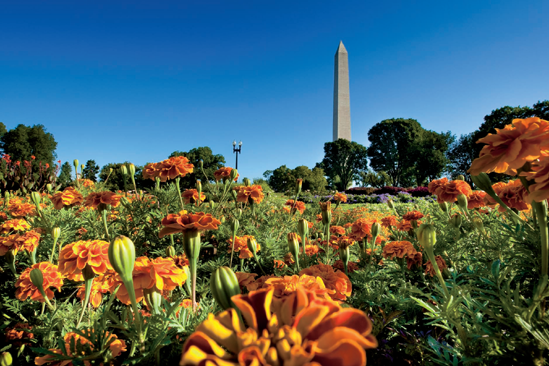
The Washington Monument from the northeast side of the Tidal Basin with the National Park Service's tulip library in the foreground (annuals are planted in place of the tulips after their season passes). Takenat ISO 400, f/20, 1/60 second.
At just over 555 feet high, the Washington Monument was built to commemorate George Washington, the first president of the United States. This monument is the tallest structure in Washington, D.C., and for a short time the world's tallest structure until the Eiffel Tower was completed in Paris, France in 1889.
When the engineers began work after a hiatus due to the American Civil War, they were faced with a dilemma: There was no more marble that matched the marble used to build the first 150-odd feet some 20 years prior. They contracted with a company to provide similar marble from Sheffield, Massachusetts, but they immediately ran into quality and delivery problems. Eventually, the monument was finished with marble from nearby Cockeysville, Maryland. Today, you can see the three different colors of the marble used in the monument: the first area of marble from the original construction, four rows of the Sheffield, Massachusetts, marble, and the rest from Cockeysville.
Figure 27.1. The best locations from which to photograph the Washington Monument: (A) the west end of the Lincoln Reflecting Pool, (B) the inner circle of the Washington Monument, (C) the park area just west of the monument, and (D) the Lincoln Memorial. Nearby photo ops: (3) Ford's Theatre, (4) Franklin Delano Roosevelt Memorial, (6) Korean War Veterans Memorial, (7) Lincoln Memorial, (10) National Archives, (11) National Mall, (12) National World War II Memorial, (14) Old Post Office, (16) Smithsonian Institution Castle, (18) Thomas Jefferson Memorial, (26) Vietnam Veterans National Memorial, (28) White House and President's Park.
The Washington Monument can be photographed from all over the city, but several iconic views stand out as the very best.
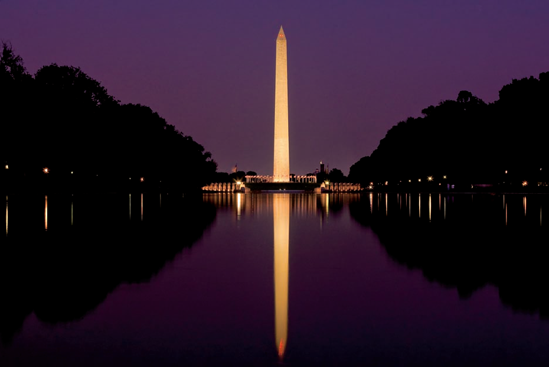
Figure 27.1 shows one of the photographs that you almost can't leave Washington, D.C., without making: the Washington Monument seen from the west end of the Lincoln Reflecting Pool. Here, you see the monument's slender lines elegantly reflected in the wide pool of water that forms a line between the Lincoln Memorial, the World War II Memorial, the Washington Monument, and the Capitol.
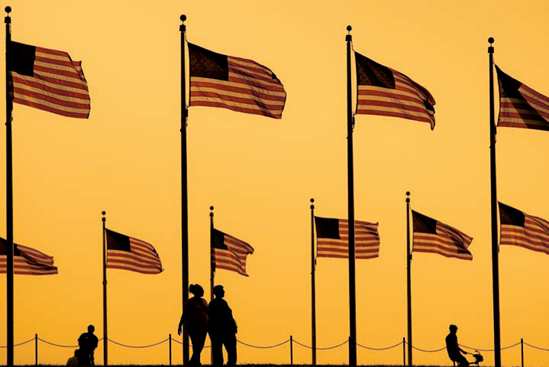
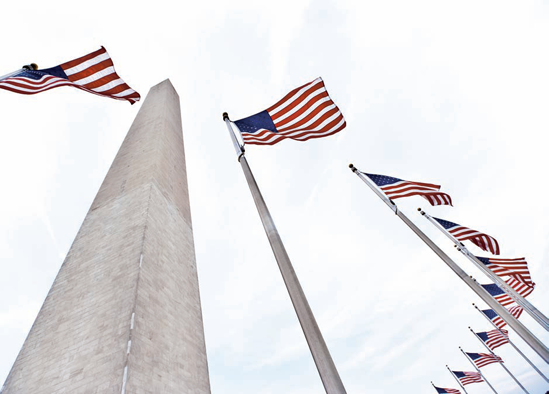
When you are right next to the monument, its 555-foot statue is breathtaking. Here, there are 50 flags that represent the 50 U.S. states, and capturing an image of the breeze flowing through the flags along with the top of the monument is a great sight (see Figure 27.2). There are a few different ways to make this shot. You can include one or many flags, and try experimenting with tilting your camera to let the flags and monument sweep through the frame.
In the park just east of 17th Street SW, you can get a clean view of the Washington Monument (see Figure 27.3). The monument's inner circle is gradually uphill from the western area of the park where you will be shooting from. For this reason, trees and other buildings can be hidden from view. Also, you can avoid seeing the entrance area, which isn't exactly a becoming part of the structure.
The top of the steps of the Lincoln Memorial is another great vantage point from which to photograph the monument. Here, you can do two different types of photos: one where you shoot with a wide-angle lens and include the columns in the frame (see Figure 27.4), and another where you can shoot an overall composition of the Reflecting Pool with the monument in the distance (see Figure 27.5).
For all the Washington Monument's 555-plus feet, you can probably photograph it from an equal number of locations. Keep an eye out as you are driving, walking, or riding, and you may discover a great one yourself.
Because there are so many views of the Washington Monument, there are quite a variety of equipment and methods you can use to get many different images.
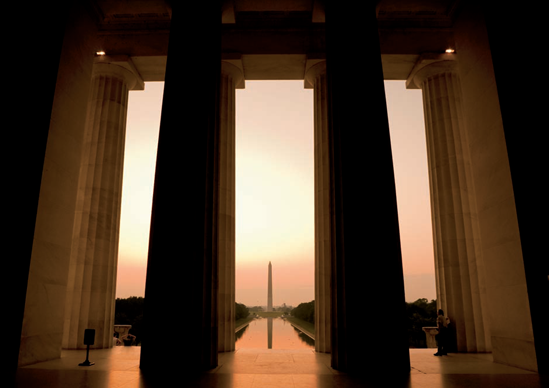
Figure 27.5. Looking east from within the Lincoln Memorial to the Washington Monument in the morning (see D on the map). Taken at ISO 640, f/8, 1/60 second with a 20mm lens.
For the shot from the Lincoln Reflecting Pool at night (refer to Figure 27.1), you need a tripod and, depending on the type of composition you are going for, a lens of between 35–70mm.
From the inner circle of the Washington Monument (refer to Figure 27.2), a 50mm lens works well if you are shooting a tighter shot of just a flag with the monument in the background. Here, you can also shoot with a very wide lens (such as a 17mm) if you want to get many flags in the frame.
Images taken in the park area west of the monument (refer to Figure 27.3) require a rather wide lens of between 17–24mm, depending on whether you shoot horizontally or vertically.
The image from the Lincoln Memorial requires a lens of about 20–24mm for the shot that has the memorial's columns in the foreground (refer to Figure 27.4). A 50mm lens works for the shot at the top of the steps here (refer to Figure 27.5).
Using a polarizing filter is a great idea when heading out to the Washington Monument, because most photos will have a large amount of sky as part of the composition. A polarizer adds intensity to a blue sky and enhances the contrast with any clouds.
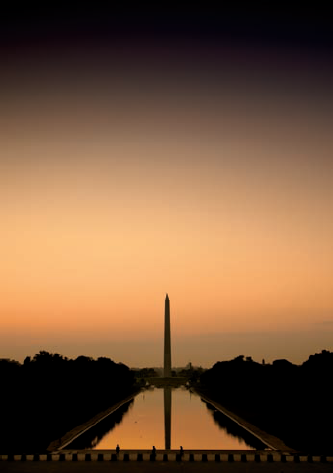
Figure 27.6. Looking east from the steps of the Lincoln National Memorial to the Washington Monument in the morning (see D on the map). Taken at ISO 400, f/10, 1/100 second with a 50mm lens.
Remember that polarizing filters cut about one to one and a half stops of light off the exposure (more important if you are already shooting in low light), and that they work best at 90-degree angles to the sun.
A tripod is generally tolerated by National Park Rangers as long as you do not use it within the inner circle of the Washington Monument or on the steps or within the Lincoln National Memorial. At these two locations, tripods are strictly forbidden.
You may see other photographers using one, but unless they have a permit from the National Park Service, they aren't allowed to do so. A small, table-top tripod can be used quite effectively for the photo of the Washington Monument at the west end of the Lincoln Reflecting Pool.
When shooting from the west end of the reflecting pool using a tripod at night or in low light (refer to Figure 27.1), you need to set your camera to either manual mode or Shutter Priority to use long shutter speeds. While this isn't necessary if you have a camera that has quality high ISO settings, long shutter speeds make it possible to shoot at lower ISO values for better quality photos. In addition, passing clouds become painterly in nature.
When using a long shutter speed, it doesn't hurt to set a higher aperture value to make sure that everything is tack sharp. Use your camera's self-timer or, if you have one, a cable release, to trip the shutter. If you are using a more advanced camera, you can also enable its Mirror Lockup function to reduce any camera vibration from the mirror swinging up and out of the way of the digital sensor.
You want to begin somewhere around 12 seconds at f/22 at ISO 200 — and you can vary this exposure as well. But keep in mind that if you want to get several different shots within a short time period (when the sun is setting, for example), using a higher ISO value can give you more time to shoot by shortening your shutter speeds. And nowadays the quality difference between ISO 100 and ISO 200 is hardly noticeable with modern cameras.
A higher aperture value not only keeps everything in focus because of its increased depth of field, but it also uses the central area of the lens, which is generally the sharpest area of any lens.
From the inner circle of the Washington Monument (refer to Figure 27.2), you can use your camera's Aperture Priority function to set a lower aperture value of, say, f/4 or f/5.6 so that you only get the flag in focus. Doing so leaves a little to the imagination, instead of having a straight everything-in-focus shot. Because the images here involve a lot of sky, images during the daylight hours may require adding some exposure by using your camera's exposure compensation feature or by dialing it in manually.
An easy way to do this is to set your camera to an automatic mode (for example, Program mode), note what its auto settings are when you compose your shot, switch to manual and set those same settings, and then increase the exposure by increasing the shutter speed by about one stop. Many cameras may think the bright sky and monument need to be darker than they really should be.
Finally, shots from the top of the steps at Lincoln Memorial (refer to figures 27.4 and 27.5) are a little harder because tripods aren't allowed here. If you get here well after the sun has set, you'll have to shoot with a very high ISO value, so try to get here when you can work with the light.
You'll likely need a fairly slow shutter speed, so be sure to stabilize your camera well to avoid camera-shake, which leads to fuzzy, unsharp images. Using a friend's shoulder works well for doing this. Either rest it on top or press it against the side of their shoulder while they stand still. This is where a smaller camera has more of an advantage, because it will be easier to hold still than a hulking dSLR with a big zoom lens.
Timing is rather important for getting great shots of the monument because the sky is a big part of the composition.
The Reflecting Pool shot (refer to Figure 27.1) can be done at pretty much anytime of the day, but the most evocative time is after the sun has gone down in the evening. With a glow still in the sky, you can capture the Washington Monument fully lit along with the National World War II Memorial circling it. Early morning is good too, because the monument will be silhouetted by the rising sun.
While at the inner circle of the monument (refer to Figure 27.2), it's very nice to have the sun come across the flags and monument at an acute angle. What's good about this shot is that you can go to whatever side has the best lighting, because it's the same for all 360 degrees. That said, a more minimalist style of photo could be had during midday when the sun is more overhead.
In the park just west of the monument (refer to Figure 27.3), a morning shot is a bit more technically hard to pull off because it is backlit by the morning sun, but when metered correctly it works out quite well (try using exposure compensation to increase the exposure when using a Priority Setting). The more traditional time to shoot here is at sunset, when the monument is lit by the warm evening sun. But even a nice, blue sky day works well here. During winter months when the sun is lower on the horizon, this shot would work during the day as well.
The view from the Lincoln Memorial is best in the early morning and early to late evening. In the morning, light fills the interior of the Lincoln's columns, while in the evening, there will be more contrast as the monument is lit more but less light is entering the interior of the Lincoln Memorial.
Because photographing the monument usually involves a lot of sky, the weather makes a huge impact to a photo. Whether it's a cloudy evening when the sun is weaving through the sky or when giant cumulonimbus clouds are towering over Washington, D.C., most all of the areas can be enhanced with interesting weather.
If it's raining, look for interesting reflections on the sidewalks or puddles. If the light is muddy and flat, concentrate on the flags and monument from the inner circle, and overexpose it a little bit to turn the sky white and create a stark, minimalist photo. If it's pouring rain, what happens if you shoot through your car or bus window? The goal is to capture a mood, and weather can help you out a lot here. There's a great photo to be made no matter what the weather, that is for sure.
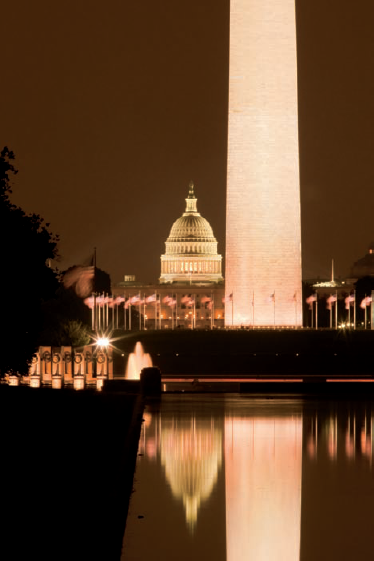
All the aforementioned shots can be taken at night as well, with perhaps the exception of the photos from the Lincoln Memorial (refer to figures 27.4 and 27.5) because using a tripod here isn't allowed. You can take a great night shot from the northwest end of the Lincoln Reflecting Pool (see Figure 27.6). Here, you can shoot along this end of the pool and get the National World War II Memorial, the Washington Monument, and the Capitol all in one shot.
The Washington Monument is covered in light at night, but the light pollution from the city makes a difference to how it looks against the sky. Low clouds on an overcast night can mean the orange glow of the sodium-vapor street lights will illuminate the night, which can give the scene quite a surreal look.
Also at night, the silhouettes of people against the base of the monument are fantastic with the flags in the photo.
In addition to the monument, the flags that surround it are very photographable (see Figure 27.7). People are always milling about here, whether they are tourists gazing in awe at the structure or locals out on a run. Stand farther away from them and use a longer lens, such as a 150mm or 200mm, to compress all elements of the scene together.
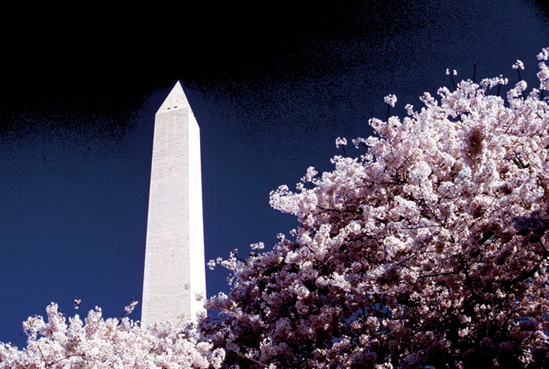
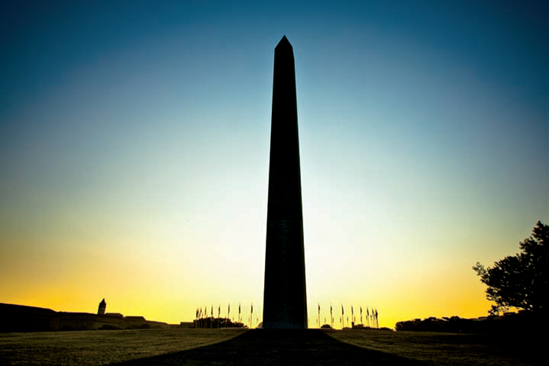
Also, by using a wide lens at the base of the monument, you can get some rather wild-looking shots. They don't look too much like the typical Washington Monument shots, but they can be very graphic and striking. Remember that Washington, D.C. is incomparable during cherry blossom season. Opportunities for gorgeous photos abound at the monument, as in other areas around the city (see Figure 27.8).