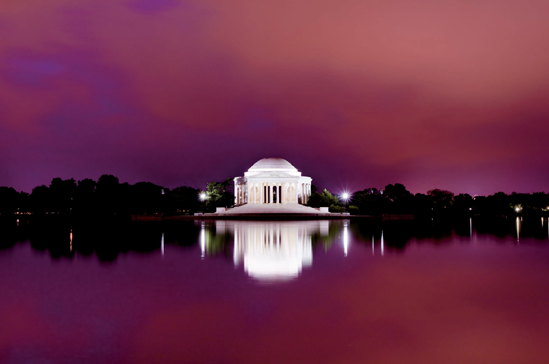
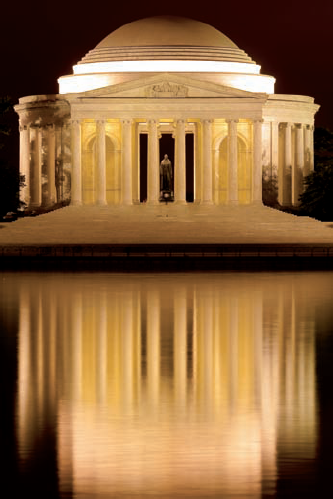
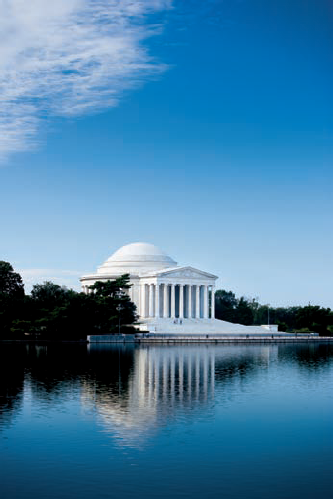
The Thomas Jefferson Memorial from across the Tidal Basin before sunrise. Taken at ISO 100, f/11, 30 seconds with a tripod.
The Thomas Jefferson Memorial honors the primary author of the Declaration of Independence and the third president of the United States. A lifelong student of philosophy, his eloquent prose articulated the principles of freedom for man as the basis for the British colonies' independence, and thus for the citizens of the future United States. In drafting the Declaration of Independence, his words helped form the philosophical foundation for the American-style of democratic government.
The Neoclassical monument, designed by John Russell Pope, was built in a style that Thomas Jefferson himself brought to U.S. shores with his design for the University of Virginia's rotunda. Likewise, the Jefferson Memorial's rotunda was built with 26 Ionic columns and contains a 19-foot tall statue of Jefferson inside (by Rudolph Evans), and within its walls are quotes by Jefferson throughout his career.
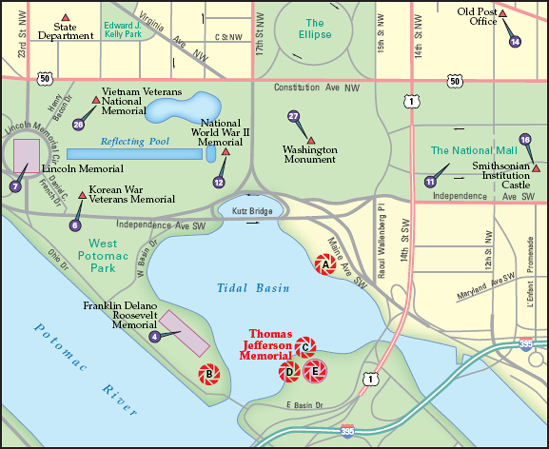
Figure 18.1. The best locations from which to photograph the Thomas Jefferson Memorial: (A) the northeast side of the Tidal Basin, (B) the southwest side of the Tidal Basin, (C) the Thomas Jefferson Memorial steps, (D) the westside outer walkway, and (E) the interior of the Memorial. Nearby photo ops: (7) Lincoln Memorial, (11) National Mall, (12) National World War II Memorial, (14) Old Post Office, (16) Smithsonian Institution Castle (26) Vietnam Veterans National Memorial, and (27) Washington Monument.
The Jefferson Memorial is a little bit of a hike from the Mall and there are no Metro stops nearby, but it is well worth the trip. It's considered by many Washington D.C. locals as one of the prettiest and most relaxing spots of the city's many popular monuments.
Definitely the iconic Jefferson Memorial image, Figure 18.1 uses the waters of the Tidal Basin to reflect the memorial, and it allows you to see the statue of Jefferson within the memorial.
There are several locations along the Tidal Basin from where you can photograph the Jefferson Memorial, and Figure 18.2 takes advantage of a clean foreground and its west-facing side. With a setting sun (and in this case a rising moon), it's a nice vantage point to capture the Ionic columns, its dome, and still get the silhouette of Jefferson's statue.
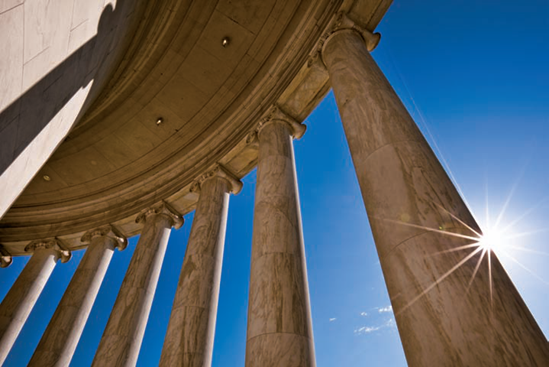
Close in, the steps of the Jefferson Memorial make a nice vantage point to capture the memorial's architecture as well as the sky beyond it (see Figure 18.3). These steps often get crowded during the spring and summer, so you either have to use that to your creative advantage or try to get here at a time before other visitors show up (arriving before 9 a.m. is a good idea).

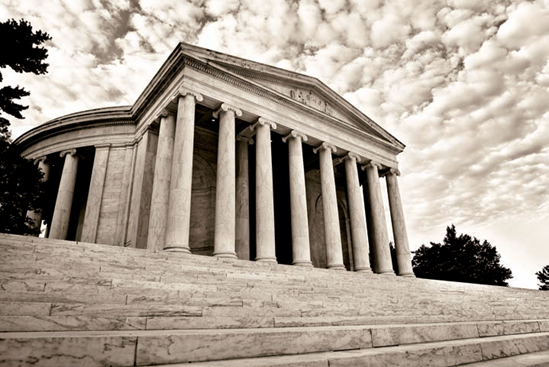
There are a variety of ways to photograph this side of the memorial. The east side could have the same possibilities, except there is a light post that gets in the way.
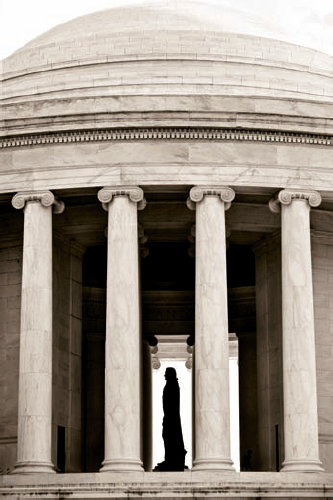
Figure 18.5. The Jefferson Memorial photographed from its westside outer walkway late in the morning (see D on the map). Taken at ISO 400, f/4, 1/1000 second with a 105mm lens.
There are two walkways around the memorial, an outer one and an inner. The outer one lets you shoot from a vantage point that's less under the memorial, and, therefore, you get a cleaner line, and you use a longer lens which limits any distortion that a wide-angle lens used closer-in would create (see Figure 18.4). You can make interesting pictures from both vantage points.
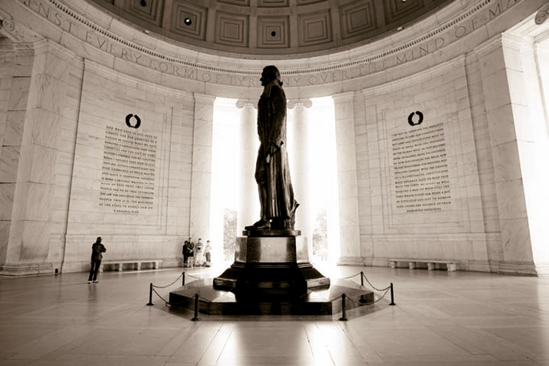
The interior of the memorial is beautiful, with graceful curves and light that bounces all around that creates a peaceful glow by day (see Figure 18.5).
The interior can be photographed at almost anytime during the day because of the abundant amount of light entering from all sides. However, crowds can become an issue, so getting here early in the morning is your best bet to keep your photos clear of other visitors — although other people in the frame do help to give a feeling of the sheer size of the Memorial. If there are a lot of people, you can move in towards the statue and shoot upwards.
The Jefferson Memorial can be photographed from a number of locations with a variety of lens options.
Like the Lincoln Memorial and Washington Monument, tripods are not allowed within the marble areas of the Jefferson Memorial, but are usually allowed in other areas.
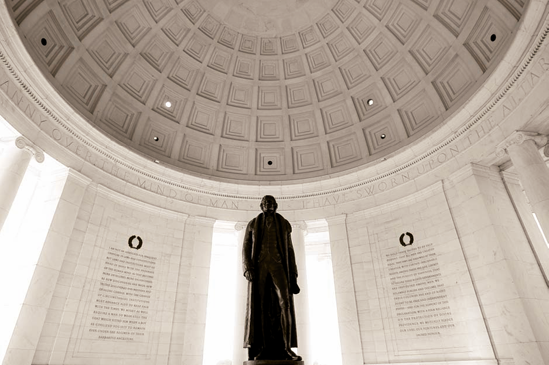
Figure 18.6. The interior of the Jefferson Memorial photographed during the morning (see E on the map). Taken at ISO 400, f/4, 1/125 second with a 20mm lens.
A photograph from the northeast side of the Tidal Basin can be shot with anything from a 35mm lens on up, but to get the classic shot you need something in the vicinity of 90–150mm, depending on your composition.
The other images require fairly standard focal lengths between 100–150mm. When photographing from up close to the memorial as well as inside it, you need wider lenses of around 24mm and 20mm. Keep in mind that the wider the lens, the more distortion of architectural features.
Using a polarizer for any shots with lots of sky in them helps increase contrast and deepen a blue sky. A graduated neutral density filter can also help tone down the sky and clouds above the memorial.
For images from the northeast area of the Tidal Basin, exposure is key. I recommend that you take multiple, bracketed exposures, meaning ones with more and less exposure over what you think (or your camera thinks) is the proper exposure. You can bracket your exposure by using either your camera's exposure compensation feature, using your camera's automatic bracketing function (if it has one), or by dialing them in manually.
Note that making bracketed exposures isn't the same thing as simply changing your aperture or shutter speed when using an automatic exposure setting.
For example, if you are using Aperture Priority mode and your camera says a scene is metering at 1/500 second at f/8 and you change your aperture to f/11, your camera will slow its shutter speed down to 1/250 second to keep the exposure consistent. The amount of light entering the camera is the same for each setting. However, if you take the original settings (1/500 second at f/8) and add 1 stop of exposure using your camera's exposure compensation dial, the camera will change the shutter speed while keeping the aperture the same (because you are using Aperture Priority mode), so the new exposure will be 1/250 second at f/8 — or 1 stop more exposure.
Similarly, if you are photographing at a shutter speed of 10 seconds at f/11 and want to keep the same shutter speed (let's say because the reflection of the Jefferson Memorial looks the best at that setting), you want to change the aperture to bracket your shot. So a shot with 1-stop more exposure would be set to 10 seconds at f/8, and a shot with 1-stop less exposure would be set to 10 seconds at f/16. Many photographers also do several brackets in 1/2-stop increments to make sure they get the perfect exposure. This, however, requires a camera to be capable of making half stop increments with either shutter speed or f/stop.
The standard method when bracketing is to change the value that makes the least difference to the image. You can bracket with ISO, although doing so changes your image quality. And you can bracket with aperture, but doing so changes your depth of field (and potentially your focus), and often you don't want to risk having the correct exposure but losing focus. So the shutter speed is the appropriate value to bracket with here. If, however, you were concerned about movement in the frame (such as with a flag or water), you could bracket with aperture, ISO, or even a combination of the three.
If you want to create black-and-white photographs (see Figure 18.6), the general rule of thumb is to shoot them in color and then convert them using software. Many cameras have black-and-white settings, and while these make the whole process very simple, they are also limiting you to whatever the camera thinks is the best settings for black and white. Although it may be right sometimes, you can't go back and add color to a black-and-white photo easily, whereas you can quite easily convert a color photo to a black-and-white photo.
Like all buildings that are outdoors, the time you decide to photograph the Jefferson Memorial makes a big difference to your image. However, because there are interior images here and it faces north, there's some more leeway.
The classic Tidal Basin shots are definitely best done when the light is low, such as dusk, dawn, or at night to get the most reflection. For the frontal shots of the Jefferson Memorial, late morning to afternoon actually works well because it faces north — the more even the light the easier it is to get a clean front shot of the memorial. The same goes for the interior: Clean, evenly illuminated shots are pretty easy to get during midday here, although when it's late or early in the day, the long shadows within the memorial can be quite nice. When shooting from the west, it's definitely best to use the setting sun, although very early morning here can look glorious as well.
The Jefferson Memorial is a good one to go to if the weather isn't working out. Cloudy days help to evenly light the inside of the memorial, and if you're shooting the exterior of the building, the even, shadowless light of overcast weather works well.
However, for images from the Tidal Basin where you're trying to get a good reflection (see Figure 18.7), you want the water to be as still as possible — which means no wind, no rain, and not even any previous rains that could mean more movement of water within the basin. (The rougher the water, however, the longer a shutter speed you want to use to try to even it out when using a tripod.)
Because the Jefferson Memorial is largely surrounded by water, there are more opportunities to get fog in the shot. Fog can be tough to deal with: Too much and you can't see your subject, too little and the image will just look flat. Often the key to good fog images is to increase your exposure to deal with its brightness, although it's a very narrow exposure window you have to get it right. Remember to bracket!
The Jefferson Memorial is also out on its own, compared to all other memorials, and there are few places to seek refuge from the elements other than within the memorial itself.
If you happen to be in Washington, D.C. for the blossoming of the city's famous cherry trees (usually around early April; check www.nps.gov/cherry for information on peak bloom dates), there are a few tricks that will enable you to make the most of photographing these spectacular blooms.
Recommended vantage points are along the Tidal Basin (where you can see either the Jefferson Memorial, as shown in Figure 18.8, or the Washington Monument) and the area adjacent to the Washington Monument. East Potomac Park's Ohio Drive SW is lined with them but doesn't offer views of the monuments or memorials.
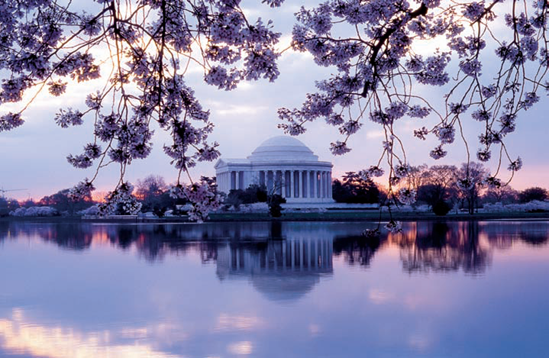
Figure 18.9. An early morning view of the Jefferson Memorial surrounded by cherry blossoms (see E on the map). Taken at ISO 200, f/22, 1/4 second with an 85mm lens and a tripod.
If you're going for close-up photos of the blossoms, use your camera's Macro function if it has one (often it's the Flower setting). If not, set your camera's zoom to its middle range and experiment with how close you can get to the flowers. Also try shooting through many of them, keeping only a few in focus and filling the entire frame with their color.
Try a trick of the trade: Photograph the flowers lit from the back, rather than the front. When lit from behind, the flowers glow with brilliant, saturated colors.
Because the cherry blossoms usually reflect a lot of light and can be very bright, some cameras will be thrown off and your photos may come out too dark. Try bracketing your exposures either manually, by using exposure compensation when using automatic or priority modes, or by using your camera's automatic bracketing feature, if it has one (of course this can also be done using a manual mode and adjusting your shutter speed or f-stop accordingly). Usually increasing exposure by 1/2 to 1 stop can help brightly lit photos have better color and brightness.
Night is a great time to come to the Jefferson because there are fewer people, although during the spring and summer the front may still be quite crowded even at 10 p.m. The water is often more calm at night as well, so reflections from the Tidal Basin can be better.
At night and low-light times your camera's white balance will have a big impact to the overall image. Rather than rely on its Auto white balance, it's a good idea to set either Daylight or another setting that won't try to constantly color balance a beautiful sunset or a colorful sunrise.
The unique rotunda and pillars make for interesting compositions, whether you photograph just the pillars (see Figure 18.9) or use them with the statue inside.
The idea of doing tighter shots of Jefferson's statue head is perhaps worth trying, but he seems to be always covered in cobwebs and other detritus.