23.3. How Can I Get the Best Shot?
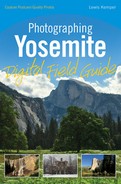
Sequioa trees are hard to capture! I like putting in some of the surrounding trees to give scale to the image and to show off the sequioa's tremendous girth (see figure 23.1). Using the right equipment will help you get a great shot.
Figure 23.1. One of the larger sequoia trees in the grove in context with some of the pines and firs on an autumn morning. Taken at ISO 100, f/20, 1/6 second with a 17mm lens.

23.3.1. Equipment
Because sequoia trees are so large, wide-angle lenses are needed in the grove.
23.3.1.1. Lenses
Most of the trees in the Tuolumne Grove are so big and so close it is almost impossible to find a tree that you can capture in its entirety. I like to photograph the bases of the trees with wide-angle lenses in the 14-24mm range and include some of the other trees in the forest for scale. You can also try using short telephoto lenses in the 70-200mm range to compress some of the dogwood blossoms against the red tree bark of the sequoia trees (see figure 23.2).
If you do try to capture a whole tree in this grove, you will definitely be pointing your camera upward. Doing this causes a lot of distortion and makes the trees appear to bend inward. You can use this to emphasize the height of the trees. If you want to have straight trees, you will need to fix them later in an image-editing program or use a tilt-shift lens. These lenses are designed for architectural work, where the front of the lens actually rises so you don't have to tilt the camera. These specialty lenses can be rented from camera stores that cater to professionals in most major cities.
Figure 23.2. Dogwoods and sequoia in Tuolumne Grove of the Giant Sequoias on a spring afternoon. Taken at ISO 100, f/20, 1/2 second with a 100-400mm telephoto zoom lens at 400mm.

23.3.1.2. Filters
Filters are not needed often when photographing the sequoia trees. The only filter that may be useful is a warming filter. A Tiffen 812 warming filter makes the red bark of the tree stand out a bit more without overpowering the rest of the colors in your image.
23.3.1.3. Extras
A tripod and electronic cable release allow you to keep the camera steady and allow you to use small apertures to get a larger depth of field. A bubble level allows you to keep the trees straight.
23.3.2. Camera settings
When photographing the sequoia trees of Tuolumne Grove, the highest priority is depth of field. You want to have everything in focus from the close foreground to the distant background.
ISO. Using the native ISO (the ISO recommended by your camera manufacturer) always gives you the best image. If you are using a tripod, it will not be difficult to use this native ISO. If you are holding the camera, you may want to boost the ISO to 400 or higher so that you can set the lens to a smaller aperture to ensure good depth of field and still have a fast enough shutter speed to be steady.
Exposure mode. Because depth of field is the foremost concern, using Aperture Priority mode, where you set the aperture and the camera sets the shutter speed, is the best choice. Choosing apertures in the f/11 to f/22 range will give you good depth of field and allow you to have sharp images throughout.
Exposure compensation. The lighting in the sequoia grove can be very harsh. You can see many bright highlights and dark shadows. Take your first image and check the LCD to see if you are losing detail in either the shadows or the highlights and make the necessary corrections. Depending on whether your meter is reading more from the shadows and overexposing your images or more from the highlights and underexposing your images, you may need to adjust exposure compensation in either the minus or plus direction to get a more even exposure.
White balance. Daylight white balance should work well for most images taken in this area. If you want to accentuate the red of the tree bark, you may want to try to set your white balance to Cloudy or Shade or 6500 Kelvin — if you set the white balance manually — to make the image warmer in color. Check on the LCD to make sure the green leaves are not looking too warm when you do this.
|

23.3.3. Exposure
The chances of getting a good image will be greatly enhanced if you pay attention to the direction and the quality of the light.
23.3.3.1. Ideal time to shoot
The ideal time to photograph in Tuolumne Grove is early in the morning or later in the evening when the light is more even and you can avoid the harsh contrast.
23.3.3.2. Working around the weather
Overcast days are the ideal time to photograph in the grove because you can avoid the harsh contrast found on sunny days. During a light rain is also a good time to go to the grove because the moisture helps saturate the colors. If you go in winter and there is snow on the ground, the light reflecting off the snow lightens the shadow areas and eliminates the harsh shadows.
23.3.3.3. Low-light and night options
Unless you have a powerful flashlight and plan to do light painting — lighting the trees with repeated strokes of the flashlight — this area is not very good for night photography.
23.3.3.4. Getting creative
To get creative in this area, try photographing from different vantage points. Instead of taking all your images from eye level, get down low and see how the whole perspective of the scene changes. Try using longer lenses, compressing the distances, and shooting the trees at a distance instead of trying to get up close. Another technique to try would be getting right up close to a tree such as the fallen tree in the upper grove or even the Tunnel Tree and placing your wide-angle lens up against the tree to distort the perspective as I did in this image of the fallen tree (see fig 23.3).
Figure 23.3. The fallen sequoia tree that you can crawl through, on an autumn morning. Taken at ISO 100, f/20, 1/5 second with a 17mm lens.


