
In this chapter, you will learn how to use Photoshop’s Brush, Paint Bucket, Eraser, Background Eraser, Magic Eraser, Smudge, and Gradient tools to embellish or edit a scanned image, or paint a picture from scratch. You will also learn how to use the Brushes palette to save and load brush libraries and create custom brush presets for the painting tools.
First, just to get started, let’s get acquainted with the Brush tool. In these instructions, you will choose an existing brush preset (brush tip) for the Brush tool, and then choose various options bar settings to customize how the tool applies pigment. In the next section, starting on page 213, you will learn how to customize a brush preset using a wide assortment of options on the Brushes palette.
Choose a layer. Create a selection on the layer if you want to restrict the brushstrokes to that area.
 Click the Brush tool (B),
  formerly called the Paintbrush tool.
Choose a Foreground color (see pages 179–182).
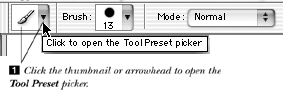
On the options bar:
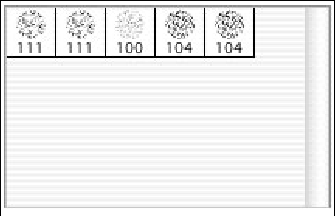
Click the Brush preset picker arrowhead, then double-click a brush
 . The picker will close automatically.
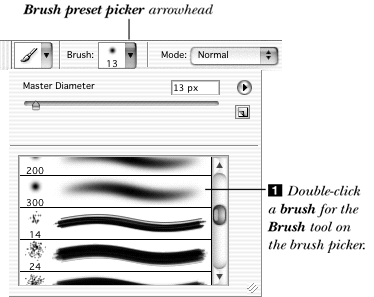
and
Choose a blending Mode (see “Blending modes” on pages 32–36).
and
Choose an Opacity percentage
 . At 100%, the stroke will completely cover underlying pixels.
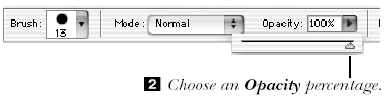
and
Choose a Flow percentage to control how quickly and smoothly the paint is applied.- Optional: Turn on the Airbrush option
 to have the brush continue to dispense paint for as long as you hold down the mouse button, simulating traditional airbrushing –.
 A Brush stroke created with the Airbrush option off
 A brush stroke created with the Airbrush option on
 Drag across any area of the picture. If you press and hold on a spot when the Airbrush option is on, the paintdrop will gradually widen (up to the brush’s maximum diameter), and become more dense and opaque.
Note: Click the “Lock transparent pixels” button
 on the Layers palette to have the brush recolor only non-transparent areas, not any fully transparent areas.
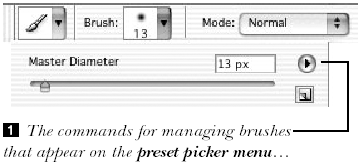
![]() Each brush preset has its own Master Diameter setting, but you can temporarily change the diameter of any brush preset.
Each brush preset has its own Master Diameter setting, but you can temporarily change the diameter of any brush preset.
Choose any tool that uses a brush (e.g., the Brush, Pencil, Dodge, Burn, or Eraser tool).
Right-click/Ctrl-click in the image window, move the Master Diameter slider
 , then press Enter/Return.
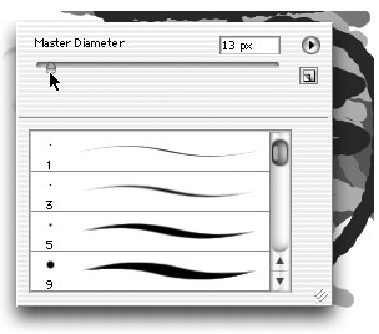 You can change the Master Diameter on the fly using the context menu.
This setting will remain in effect until you choose a different preset. If you choose a different preset, and then click back on the previous preset, the original Master Diameter will be restored.
Tip
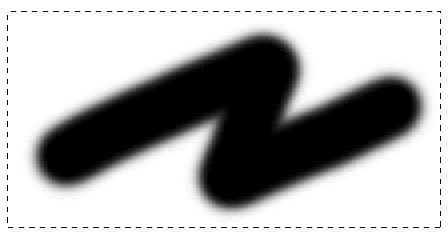
To draw a straight stroke, click once to begin the stroke, then Shift-click or Shift-drag in a different location to complete the stroke.
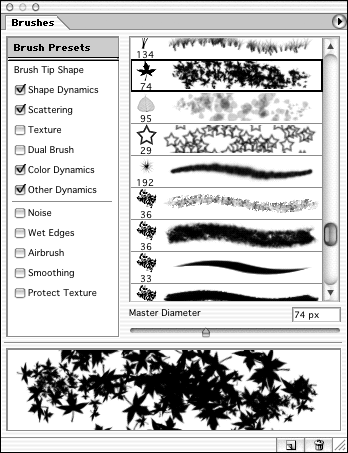
![]() The new Brushes palette offers a myriad of options for customizing brush tips for the Brush, Pencil, History Brush, Art History Brush, Clone Stamp, Pattern Stamp, Eraser, Background Eraser, Blur, Sharpen, Smudge, Dodge, Burn, and Sponge tools. The options are organized into categories, such as Shape Dynamics, Scattering, Texture, and Color Dynamics. You can also use the Brushes palette to choose options for a stylus or for an airbrush input device.
The new Brushes palette offers a myriad of options for customizing brush tips for the Brush, Pencil, History Brush, Art History Brush, Clone Stamp, Pattern Stamp, Eraser, Background Eraser, Blur, Sharpen, Smudge, Dodge, Burn, and Sponge tools. The options are organized into categories, such as Shape Dynamics, Scattering, Texture, and Color Dynamics. You can also use the Brushes palette to choose options for a stylus or for an airbrush input device.
The first step is to get acquainted with the palette. This is “Brushes Palette 101.”
Choose any of the tools that are listed above in the introductory paragraph.
To display the Brushes palette
: The Brushes palette
Choose Window > Brushes.
or
Click the Brushes palette button
 toward the middle of the options bar.
If you don’t see a list of categories on the left side of the palette, choose Expanded View from the palette menu. If the palette is just a bar, double-click the bar.
Check the box for any of the first six categories to activate the features for that category. If a category is dimmed, it means it’s not available for that tool. The categories are discussed in depth in the next set of instructions.
To display the pane for a category, click the category name. The options listed below the horizontal line are individual features; there is no pane for them.
To choose a different display option for the palette, click Brush Presets at the top of the palette, click the arrowhead in the circle on the right side of the palette, then choose Text Only, Small Thumbnail, Large Thumbnail, Small List, Large List, or Stroke Thumbnail from the menu. The Small options compact the list; the Large options allow you to see the brush shapes more clearly.
![]() Given the enormous range of options on the Brushes palette, your choices are endless. For example, you can make subtle adjustments to a hard-edged brush or create a simulation of a natural-media bristle brush. Start by editing the preset brushes that are supplied with Photoshop. Later, you’ll learn how to save your customized presets as well as create brand new brushes.
Given the enormous range of options on the Brushes palette, your choices are endless. For example, you can make subtle adjustments to a hard-edged brush or create a simulation of a natural-media bristle brush. Start by editing the preset brushes that are supplied with Photoshop. Later, you’ll learn how to save your customized presets as well as create brand new brushes.
Steps 2 through 9 in the following instructions are optional; just pick and choose which options you want to experiment with. And remember, though we talk here about applying “pigment,” the brushes are used with many other tools besides the Brush.
Note: A brush’s settings remain in effect until they’re changed.
Click Brush Presets
in the upper-left corner of the Brushes palette, then click a preset. Use the scroll arrows to scroll down the list, if necessary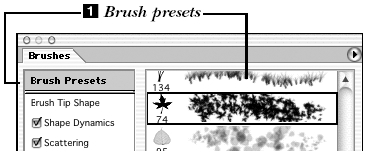
To change any of the basic shape or size settings for the brush, click Brush Tip Shape at the top of the list
, then watch the brush preview at the bottom of the palette as you make any of these changes: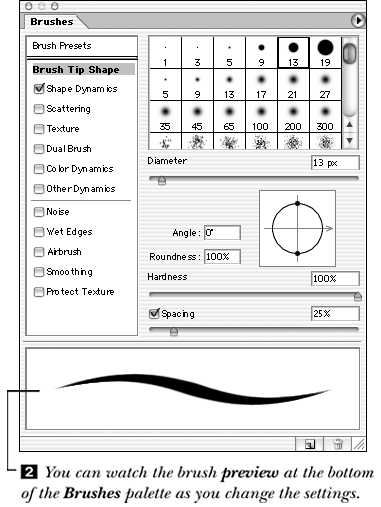
For the brush size, enter a Diameter value (1–2500 pixels) or move the slider. If the brush was originally created from a selection, you can check Use Sample Size to make the brush the same size as the original selection (see “To Create a Brush from an image” on page 223.)
Enter a new Angle or drag the arrowhead around the circle to alter the brush slant.
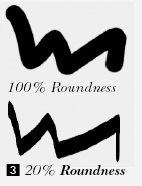
Enter a new Roundness value (0–100%) or drag one of the two tiny dark circles inward to make the brush tip more elliptical, less round
.
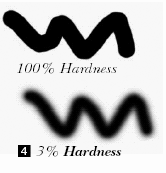
Change the Hardness value (0–100%) to feather or sharpen the edge of a round tip
 .
.
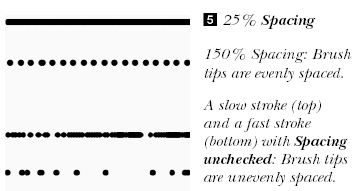
To control the distance between brush tips within the stroke, check Spacing, then enter or choose a value (1–1000%)
 .
.
To control how much variety there can be in the brush tip shape, click Shape Dynamics (click the words—the box will become checked automatically), then do any of the following:
Change the Size Jitter
, Angle Jitter, and Roundness Jitter values to establish variation parameters for those attributes. (“Jitter” means the amount of random variation that is allowed for that option.)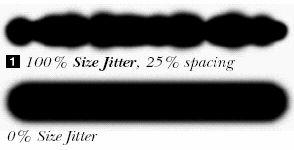
From the Control pop-up menus, choose what mouse or stylus feature that attribute looks to for the variation (see page 218).
Change the Minimum Diameter value for the brush size variations.
Change the Minimum Roundness value.
To control the placement of pigment in the stroke, click Scattering, then do any of the following:
Change the Scatter value
to control how far pigment can veer off the path drawn by the mouse. The lower the Scatter value, the more solid the stroke.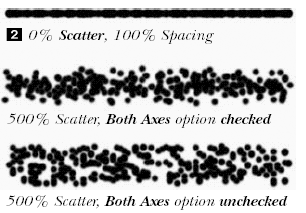
Check Both Axes to allow pigment to be scattered both along and perpendicular to the path. Uncheck Both Axes to have strokes be scattered perpendicular to, but not along, the path. Choose a Control option, if desired.
Change the Count value to control the stroke’s overall density (the amount of pigment).
Change the Count Jitter
value to control how much the Count (density) can vary.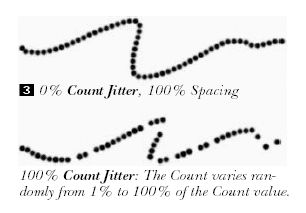
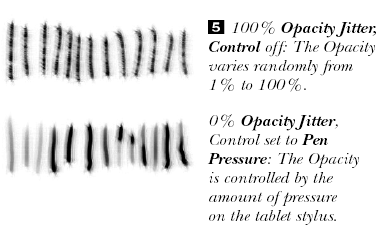
To use the texture from a pattern in a brush stroke, click Texture
, then do any of the following: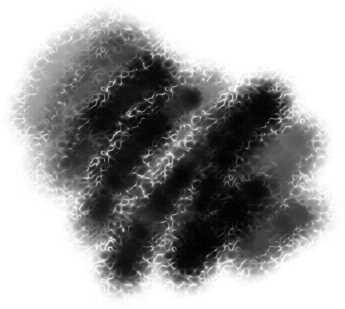 Painting with a texture brush with Pen Pressure chosen as the Opacity Jitter Control (see the following page).
Click the preset arrowhead, then choose a texture from the pattern picker.
Check Invert to swap the light and dark areas in the pattern.
Change the texture’s Scale (1–1000%).
Check Texture Each Tip to allow the Depth (covered next) to vary within each stroke. Uncheck this option to have the Depth value remain constant.
Choose a blending Mode to control how the texture mixes with the brush stroke.
Choose a Depth value
to control how deeply paint sinks into the texture. At a high Depth value, paint will be applied only to the high points in the texture, and the texture will appear more prominent. Choose a Minimum Depth to keep a texture from appearing too flat. Some brushes reveal texture more than others.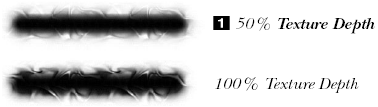
Choose a Depth Jitter value to control how much the Depth can vary. Choose an option from the Control pop-up menu to specify if and how the brush stroke can fade (see page 218).
Optional: As an added bonus to make the brush preset more interesting, add another preset to it. Click Dual Brush
, click a preset, then choose Diameter, Spacing, Scatter, and Count values.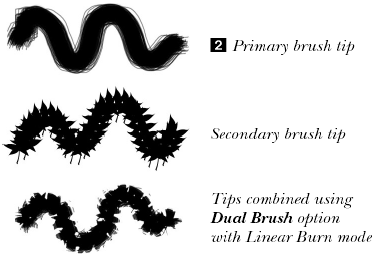
To control how much the color can vary as you use the brush, click Color Dynamics, then do any of the following:
Enter a Foreground/Background Jitter value
for the amount of variation between the Foreground and Background colors. Choose an option from the Control pop-up menu to specify if and how colors can fade.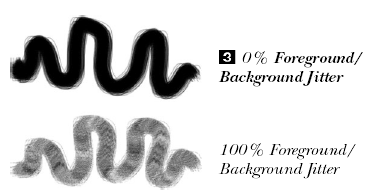
Enter Hue Jitter, Saturation Jitter, and Brightness Jitter values to establish variation parameters for those attributes.
Enter a Purity value to control how much of the Foreground color can appear in the stroke. The lower the Purity, the grayer the stroke.
To control how the overall stroke opacity can vary as you paint, click Other Dynamics, then do any of the following:
Change the Opacity Jitter
– for the amount the opacity can vary. Choose a Control option to control fading.
Change the Flow Jitter to control how smoothly the pigment is applied. A high Flow Jitter makes for a blotchy stroke; but that may be what you’re aiming for. Choose a Control option.
And last but not least (you’re almost done!), check any or all of these options:
Noise to add random grain to brush strokes to make them look rougher.
Wet Edges to simulate the buildup of pigment at the edges of the strokes, as in traditional watercolors
–. Strokes created with the Brush tool with Wet Edges checked
 More Wet Edges
 Wet Edges unchecked
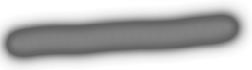 Wet Edges checked
Airbrush to allow a stroke to build up for as long as the mouse button is held down in the same spot. You can also press the
button on the options bar.Smoothing
– to convert straight segments into smooth curves.
 Smoothing is off: Straight segments and corners are visible in this rapidly-drawn stroke.
 Smoothing is on: This stroke was drawn as quickly as the one above, but it’s smooth and has no corners.
To apply the same texture pattern and scale to other brushes that currently use a texture option, or to which you add a texture option, check Protect Texture. This method will create a uniform surface texture for the entire canvas.
Tip
To copy the currently chosen texture and texture settings to the non-painting tools that have a Texture option, choose Copy Texture to Other Tools from the Brushes palette menu.
![]() If you want to make your brush strokes look more painterly, or to take advantage of the capabilities of a pressure-sensitive tablet, you can specify how gradually you want some or all of a brush preset’s attributes to vary (e.g., its opacity, size, texture).
If you want to make your brush strokes look more painterly, or to take advantage of the capabilities of a pressure-sensitive tablet, you can specify how gradually you want some or all of a brush preset’s attributes to vary (e.g., its opacity, size, texture).
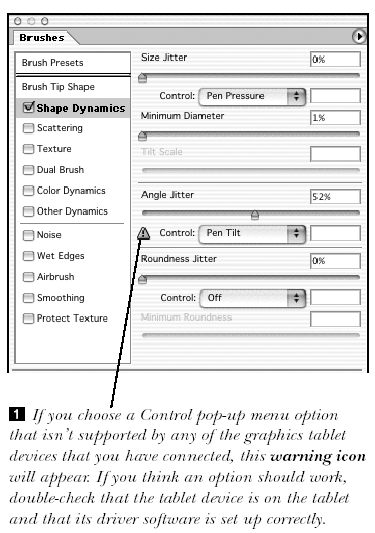
Some of the variation options work only with certain kinds of graphics tablets. For example, some tablet models may not sense the tilt of the stylus (Pen Tilt) or support airbrush devices. The Fade, Initial Direction, and Direction options, on the other hand, work with a mouse or with any other input device.
Display the Brushes palette.
Click any of these categories:
Shape Dynamics to choose variation controls for Size Jitter, Angle Jitter, or Roundness Jitter.
Scattering to choose variation controls for Scatter or Count Jitter.
Texture to choose variation controls for Depth Jitter.
Color Dynamics to choose variation controls for Foreground/Background Jitter.
Other Dynamics to choose variation controls for Opacity Jitter and Flow Jitter.
For any option that offers variation controls, choose one of these options from the Control pop-up menu (not all of these options will be available for every attribute)
: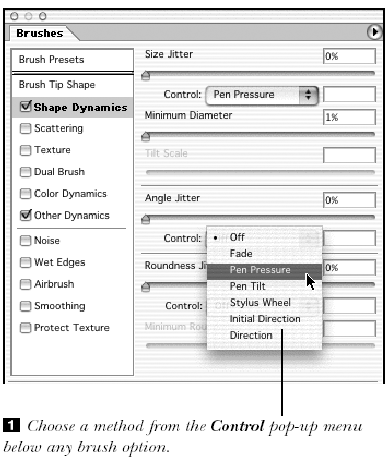
Off prevents fading.
Fade decreases the attribute over the length of the stroke, using the number of steps you specify.
Pen Pressure varies the attribute based on how hard you press with a stylus on a pressure-sensitive tablet.
Pen Tilt lets you control how a brush attribute varies by changing the angle at which you hold a stylus.
Airbrush Wheel lets you control the brush option using the wheel found on an airbrush input device (this is available for some pressure-sensitive tablets).
Initial Direction sets the angle of an option based on the direction in which you first drag the brush.
Direction sets the angle of an option based on the direction the mouse is dragged; the Direction changes as you drag.
Tip
If you have a pressure-sensitive graphics tablet, keep an eye out for any Jitter or Scatter attribute you find in the Brushes palette ![]() . To have an attribute vary randomly as you paint with a stylus or other tablet device, choose an option from the Control pop-up menu below any Jitter or Scatter attribute. For example, to allow the stylus to control opacity, choose an option from the Control pop-up menu below Opacity Jitter in the Other Dynamics pane.
. To have an attribute vary randomly as you paint with a stylus or other tablet device, choose an option from the Control pop-up menu below any Jitter or Scatter attribute. For example, to allow the stylus to control opacity, choose an option from the Control pop-up menu below Opacity Jitter in the Other Dynamics pane.
![]() Choosing Clear Brush Controls from the Brushes palette menu resets all the brush options to their defaults so you can start over. However, any custom settings that you chose for any presets will be wiped out if you choose this command (or if the current brush library is replaced). Follow these instructions if you want to preserve your customized brushes in a library for future use. Custom brushes that are saved and loaded as a library display as presets on the Brush Preset pane of the Brushes palette. These custom brushes can also be selected and modified at any time, and can be used with any tool.
Choosing Clear Brush Controls from the Brushes palette menu resets all the brush options to their defaults so you can start over. However, any custom settings that you chose for any presets will be wiped out if you choose this command (or if the current brush library is replaced). Follow these instructions if you want to preserve your customized brushes in a library for future use. Custom brushes that are saved and loaded as a library display as presets on the Brush Preset pane of the Brushes palette. These custom brushes can also be selected and modified at any time, and can be used with any tool.
Note: On page 222, you will learn how to save custom brushes as presets for specific tools (for example, a custom brush, including a Foreground color, for the Brush tool). Instead of saving brushes in a brush library, you will save them in a tool preset library.
Make sure Brush Presets is chosen at the top of the Brushes palette, then choose Save Brushes from the palette menu.
Enter a Name for the set. Keep the default extension for the brush library (.abr).
Choose a location in which to save the set, then click Save (Enter/Return). If you want the new brush library to display at the bottom of the Brushes palette menu, store the library in Adobe Photoshop 7 > Presets > Brushes > Adobe Photoshop Only, then relaunch Photoshop.
![]() Eleven brush libraries are supplied with Photoshop, in addition to the default brushes. Brushes that were also included in previous versions of Photoshop include Assorted Brushes, Calligraphic Brushes, Drop Shadow Brushes, Faux Finish Brushes, Natural Brushes, Natural Brushes 2, and Square Brushes. The Dry Media, Special Effect Brushes, Thick Heavy Brushes, and Wet Media Brushes are new
Eleven brush libraries are supplied with Photoshop, in addition to the default brushes. Brushes that were also included in previous versions of Photoshop include Assorted Brushes, Calligraphic Brushes, Drop Shadow Brushes, Faux Finish Brushes, Natural Brushes, Natural Brushes 2, and Square Brushes. The Dry Media, Special Effect Brushes, Thick Heavy Brushes, and Wet Media Brushes are new ![]() –
–![]() .
.
![]() Dry Media Brushes
Dry Media Brushes
![]() Special Effect Brushes
Special Effect Brushes
![]() Thick Heavy Brushes
Thick Heavy Brushes

![]() Wet Media Brushes
Wet Media Brushes
Click Brush Presets at the top of the Brushes palette, click the arrowhead in the circle on the right side of the Brushes palette, then choose a brush library name from the lower portion of the menu.
Click Append to add the additional brushes to the current picker.
or
Click OK to replace the current brushes on the picker with those in the library.
Tip
To append all brushes within a library to the current preset list, choose Load Brushes from the picker menu, locate the library you want to load, then click Load. Use this method to locate and open any brush library that isn’t in the default location (either the Adobe Photoshop 7 > Presets > Brushes folder or the Adobe Photoshop Only folder inside the Brushes folder).
The brushes that were on the brush preset picker when you last exit/quit Photoshop will still be there next time you launch Photoshop. Follow these instructions if you want to restore the default set.
![]() By turning a brush into a tool preset, you’ll preserve it for future use, and you will also be able to access it quickly. The presets you save for a particular brush are listed on the Tool preset picker on the far left side of the options bar when that brush is chosen. To create a variation on an existing brush, make your change, and then save the alteration with an appropriate name as a new tool preset. No brush variation is too minor to be saved this way. Even a color can be saved with a preset.
By turning a brush into a tool preset, you’ll preserve it for future use, and you will also be able to access it quickly. The presets you save for a particular brush are listed on the Tool preset picker on the far left side of the options bar when that brush is chosen. To create a variation on an existing brush, make your change, and then save the alteration with an appropriate name as a new tool preset. No brush variation is too minor to be saved this way. Even a color can be saved with a preset.
Create a custom brush.
On the options bar, click the Tool Preset picker thumbnail or arrowhead
.
or
Display the Tool Presets palette
.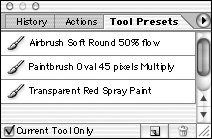 The Tool Presets palette has the same function as the Tool Preset picker.
Check Current Tool Only to have only brush tool presets display. (If unchecked, presets for all tools will display.)
Click the “Create new tool preset” button,
 enter a brush name , check Include Color to have the current Foreground color save with the preset, then click OK. The new tool preset will display on the Tool preset picker and palette (not on the Brushes picker or palette).
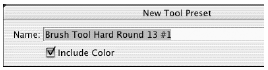 Check Include Color in the New Tool Preset dialog box to save the preset with the current Foreground color.
![]() Tool presets can also be saved in a library.
Tool presets can also be saved in a library.
From the Tool preset picker menu or the Tool Preset palette menu, choose Save Tool Presets.
Enter a name, choose a location for the library, then click OK. If you want the tool preset library to display at the bottom of the preset picker menu or palette menu when you relaunch Photoshop, save the preset file in the Adobe Photoshop 7 > Presets > Tools folder.
There are two ways to create a new brush. One way is to use the New Brush command. Or for an entirely different approach, you can use the Define Brush command to create a brush from imagery in an existing file.
If you modify an existing preset, you are actually modifying an unsaved copy of the preset—not the original brush that’s in the current library. If you like a brush, you should make a new brush from it and save it to a library so you can use it again.
Click the Brush preset picker arrowhead on the options bar, then choose New Brush from the Brush picker menu
.
or
Choose New Brush from the Brushes palette menu .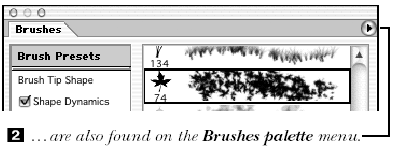
or
Right-click/Control-click a brush on the Brushes palette, then choose New Brush from the context menu.
Type a name for the new brush, then click OK.
To customize the brush, follow the steps starting on page 214. The new brush will appear after the last brush on the brush preset picker and on the Brushes palette. To save it to a library, see page 220.
Choose the Rectangular Marquee tool (M or Shift-M).
Marquee an area of a picture (maximum 1,000 by 1,000 pixels). Try using a distinct shape on a white background
. Select an area of an image.
Choose Edit > Define Brush.
Enter a Name for the new brush
, then click OK. Type a Name for the new brush.
Deselect the selection (Ctrl-D/Cmd-D), then choose the Brush tool. The new brush will appear after the last brush on the picker
. Adjust any of the settings for the brush by using Brushes palette.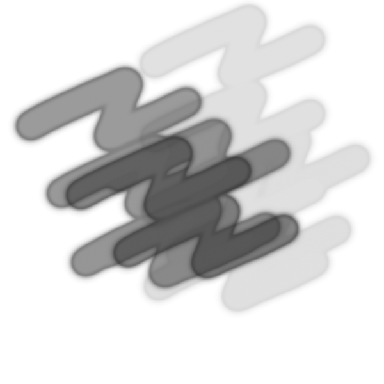 A custom brush used with the Brush tool at various opacities (Wet Edges checked)
![]() Deleting a brush has no effect on any existing strokes that have been created. (This is the opposite of what could potentially happen if you delete a brush in Adobe Illustrator).
Deleting a brush has no effect on any existing strokes that have been created. (This is the opposite of what could potentially happen if you delete a brush in Adobe Illustrator).
On the brush picker, click the brush you want to delete, choose Delete Brush from the picker menu, then click OK.
or
On the Brushes palette, click the brush you want to delete, choose Delete Brush from the palette menu, then click OK.
or
On the Brushes palette or brush preset picker, right-click/Control-click the brush you want to delete, choose Delete Brush from the context menu, then click OK.
In this section, you’ll learn how to use the Smudge, Paint Bucket, Eraser, Background Eraser, and Magic Eraser tools, and the Auto Erase function of the Pencil tool.
Choose a layer. Note: The Smudge tool can’t be used on an image in Bitmap or Indexed Color mode.
Choose the Smudge tool (R or Shift-R).

On the Smudge tool options bar
–: The left side of the Smudge tool options bar
 The right side of the Smudge tool options bar Click the Brush preset picker arrowhead, then click a brush; or click a brush on the Brushes palette.
and
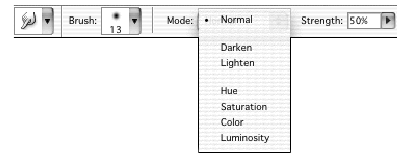
Choose a blending Mode (see pages 32–36). Try Normal to smudge all shades or colors, Darken to push dark colors into lighter colors, or Lighten to push light colors into darker colors.
and
Move the Strength slider below 100%.
Check Use All Layers on the options bar to start the smudge with colors from all the currently visible layers in the image (uncheck Finger Painting if you use this option). Or uncheck Use All Layers to smudge only with colors from the active layer. In either case, of course, pixels will be smudged only on the currently active layer.
To start the smudge with the Foreground color, check Finger Painting on the options bar. Uncheck Finger Painting to have the smudge start with the color under the pointer where the stroke begins. The higher the Strength percentage, the more the Foreground color will be applied.
Drag across an area of the image
–. Pause, if necessary, to allow the screen to redraw.
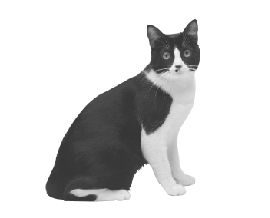
![]() The original image
The original image
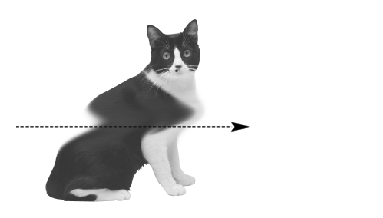
![]() Smudge—Normal mode
Smudge—Normal mode
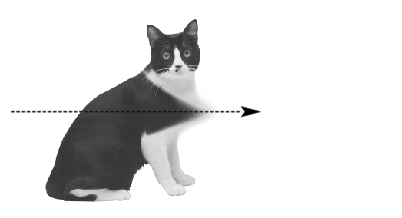
![]() Smudge—Darken mode
Smudge—Darken mode
![]() Smudge—Lighten mode
Smudge—Lighten mode
The Paint Bucket tool replaces pixels with the Foreground color or a pattern, and fills areas of a similar shade or color within a specified Tolerance range. You can use the Paint Bucket without creating a selection.
Choose a layer. If you don’t want to fill transparent areas on the layer, click the “Lock transparent pixels” button.
Note: The Paint Bucket tool won’t work on an image in Bitmap color mode.Choose the Paint Bucket tool (G or Shift-G).
 It’s on the Gradient tool pop-out menu.
On the Paint Bucket options bar
–: The left side of the Paint Bucket tool options bar
 The right side of the Paint Bucket tool options bar
Choose Fill: Foreground to fill with a solid color. Or choose Pattern, then click a pattern on the pattern picker.
and
Choose a blending Mode (press Shift + or Shift - to cycle through the modes). Try Multiply, Soft Light, or Color Burn.
and
Choose an Opacity percentage.
and
Enter a Tolerance value (0–255). The higher the Tolerance, the wider the range of colors the Paint Bucket can fill. Try a low number first.
and
Check Anti-aliased to smooth the edges of the fill area.
and
Check Contiguous to permit only areas that are contiguous to the one you click on to be filled, or uncheck this option to allow non-contiguous areas to be filled.
and
Check All Layers to have the Paint Bucket fill areas on the active layer based on colors the tool detects on all the currently visible layers, instead of just the colors it detects on the current layer.
Choose a Foreground color.
Click on the image
–. As you click, keep an eye on the little black spill in the tool pointer.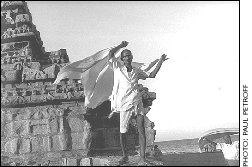 The original image
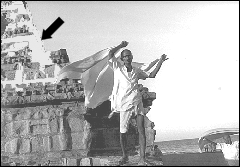 After clicking with the Paint Bucket tool, pixels that fall within the specified Tolerance range are recolored.
Choose a layer
. If you use the Eraser tool on a layer when the “Lock transparent pixels” button is on or use it on the Background of an image, the erased area will be replaced with the current Background color. If the “Lock transparent pixels” button is off for the layer, the erased area will be replaced with transparency.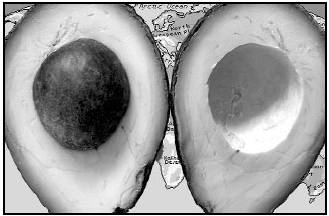 The original image
Choose the Eraser tool (E or Shift-E).

On the Eraser tool options bar
: The left side of the Eraser tool options bar Click the Brush preset picker arrowhead, then click a brush in the picker, or choose a brush from the Brushes palette.
and
Choose Mode: Brush, Pencil, or Block (square eraser)
and
Choose an Opacity percentage.
and
If you chose the Brush mode, you can choose a Flow percentage. The lower the Flow percentage, the rougher the erasure stroke.- Click the Airbrush button on or off.
If you’re going to erase the Background of the image or if “Lock transparent pixels” is on, choose a Background color.
Click on or drag across the layer
–. After erasing part of the avocados layer to reveal the map underneath it (Airbrush option on, 55% opacity), and erasing part of the map layer to white (Brush option, 100% opacity)
 A detail of the partially erased map layer
Tip
To restore areas on the current layer from a history state, move the History source icon to the desired state on the History palette, then use the Eraser tool with Erase to History checked on the options bar (or Alt-drag/Option-drag to turn on Erase to History temporarily). The Erase to History option won’t be available if you added a new layer or changed the number of pixels in (resampled) the file after using the eraser.
The Background Eraser tool erases to transparency or the current Background color by dragging. This tool’s strength is that you can control several criteria, such as whether the tool erases contiguous or non-contiguous pixels. By choosing your brush carefully, you can control how large the erasure will be and how soft the edges of the erased area will be.
Choose the Background Eraser tool (it has a scissors icon) (E or Shift-E).

To control where the erasure occurs, from the Limits pop-up menu on the options bar, choose
: The Background Eraser tool options bar
Discontiguous to erase all pixels within the current Tolerance range, whether or not they are next to one another. If you choose this option, also choose Once from the Sampling pop-up menu (see step 5).
or
Contiguous to erase only adjacent pixels within the current Tolerance range that match the first pixel that you click on.
or
Find Edges to erase contiguous pixels, but preserve object edges (high-contrast borders)
. With Find Edges chosen from the Limits pop-up menu on the Background Eraser tool options bar, the tool successfully erased the background area on this image.
Click the Brush tip thumbnail on the options bar to open the pop-up palette, then modify the tip size and/or shape.
Choose a Tolerance percentage. The higher the Tolerance value, the wider the range of colors similar to the first color clicked on will be erased.
From the Sampling pop-up menu on the options bar, choose:
Continuous to erase to transparency all the pixels you drag across within the current Tolerance range.
Once to erase to transparency only the pixels that closely match the first pixel you drag across. To erase only one color, choose Once and make the Tolerance 1%.
Background Swatch to erase only pixels that match the current Background color. Choose a Background color now. Use a low Tolerance with this option.
Optional: To protect a particular color from erasure, check Protect Foreground Color and make sure Once is chosen from the Sampling pop-up menu. Make the Foreground color square active on the Color palette, hold down Alt/Option, and then in the image window, click to sample the color that you want to protect. This can be anywhere on the image—background, foreground, whatever.
- If you’re using a pressure-sensitive tablet, you can set the brush size and tolerance to respond to pen pressure. Click the Brush tip thumbnail, then set these options using the pop-up palette.
Choose the layer from which you want to erase pixels.
Drag across the area of the image that you want to erase
–. The active part of the tool is the crosshair. The original image
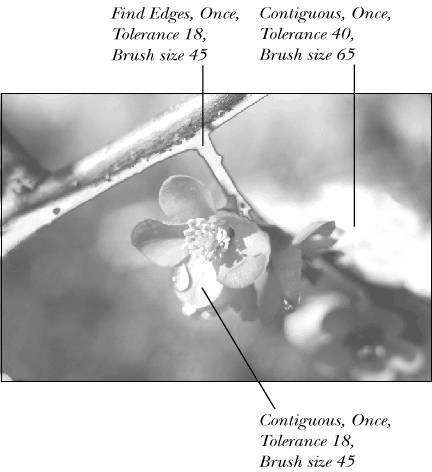 After using the Background Eraser tool with various options bar settings
If you’re unhappy with the results, undo or click on an earlier history state, change any of the parameters described in steps 2–5 starting on the previous page, then try again. To widen or narrow the range of colors that the tool erases, change the Tolerance value on the Background Eraser tool options bar.
The Magic Eraser tool erases by clicking with the mouse—not by dragging. It erases pixels that are similar in color to the pixel you click on, within a defined Tolerance range. It works like the Paint Bucket tool, except it removes, rather than adds, pixels from a layer. Used with an Opacity setting below 100%, the Magic Eraser tool can be used to make target areas of a layer partially transparent.
Choose the Magic Eraser tool (E or Shift-E).

On the Magic Eraser tool options bar
: The Magic Eraser tool options bar
Enter a Tolerance value. The higher the Tolerance, the wider the range of colors that will be erased. Enter a low Tolerance if you want to erase only colors that are very similar to the color you click on. Enter “0” to erase one color.
and
Check Anti-aliased to slightly soften the edges of the erased area.
and
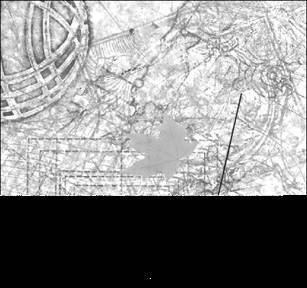
Check Contiguous to erase only pixels that are next to one another, or uncheck this option to erase similarly colored pixels throughout the layer
– (and , next page).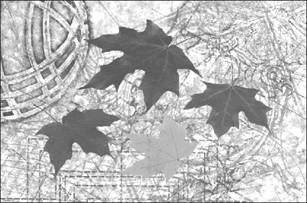 The original image
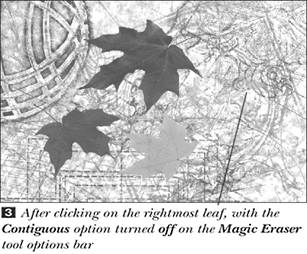
and
Check Use All Layers to have the Magic Eraser tool erase areas on the active layer based on colors the tool detects on all the currently visible layers. With this option unchecked, the tool will detect only the colors on the currently active layer. In either case, only pixels on the currently active layer will be erased.
and
Choose an Opacity percentage. Enter 100% to erase to transparency or a lower opacity to erase partially.
Choose the layer from which you want to erase pixels.
In the image window, carefully position the tool’s crosshair on the area that you want to erase, then click.
If the erasure is too large or too small, undo, change the Tolerance value on the Magic Eraser tool options bar, then try clicking again on the image.
The auto eraser (the Pencil tool with the Auto Erase option, actually) applies the Background color if you start dragging the mouse with the pointer over a Foreground color pixel. The tool paints the Foreground color if you begin dragging with the pointer over any other color.
Choose a Foreground color and a Background color. You can use the Eyedropper tool to sample a color from the image.
Choose a layer.
Choose the Pencil tool (B or Shift-B).

Check Auto Erase on the Pencil tool options bar.
Draw strokes on the image
. Start dragging with the pointer over a Foreground color pixel (if any) to apply the Background color. Start dragging with the pointer over a non-Foreground color pixel to apply the Foreground color.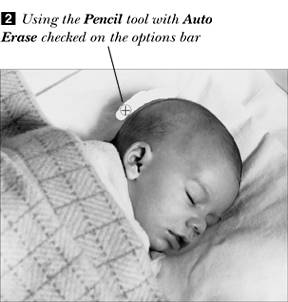
Tip
To make the color under the pointer into the Foreground color when using the Auto Erase function of the Pencil tool, Alt-click/Option-click the color, then drag.
In these “added bonus” instructions, you’ll learn a nice technique for applying tints to a grayscale image. By drawing colored strokes on a separate layer, you’ll have the flexibility to change the blending mode or opacity for your painting tool or for the color layer, or erase or dodge here or there—all without changing the underlying grayscale image at all.
Open a Grayscale mode image and convert it to RGB Color mode (Image > Mode > RGB Color).
Alt-click/Option-click the “Create new layer” button at the bottom of the Layers palette to add a new layer above the grayscale imagery, choose Mode: Color or Overlay for the new layer, then click OK.
Choose the Brush tool (B or Shift-B).
Choose a Foreground color.
From the Brush tool options bar:
Choose a brush from the brush picker (or from the Brushes palette).
and
Choose an Opacity percentage below 100%. Choose a low opacity for a subtle tint. You can change opacities between strokes. You can also lower the opacity of the whole layer via the Layers palette.
and
Choose a Flow percentage.and
Turn on the Airbrush option for a simulation of traditional airbrushing.Paint strokes on the new layer
.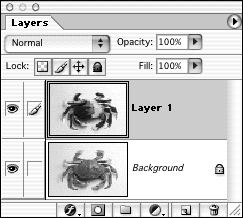 The color tints are on Layer 1. The original Background image still looks like it’s grayscale (even though the image is now in RGB Color mode).
Optional: Use the Eraser tool to remove areas of unwanted color, then repaint, if desired. Or use the Dodge tool at a low Exposure percentage to gently lighten the tints.
Optional: Try a different blending mode for the color layer. Try Multiply, Soft Light, Color Burn, or Color. You can also use the Channel Mixer to apply colors.