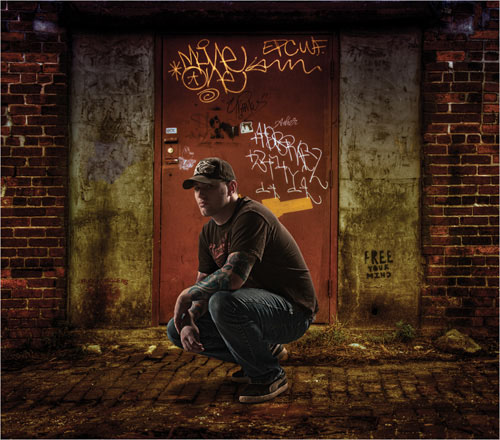
2. Basic Composite

I thought we’d jump right in with a basic composite. Here, we have a background and we have a person who was shot in a studio. The subject is a friend of mine, Justin. He practices mixed martial arts (MMA) and I took some studio portraits of him in his MMA gear. But, I also grabbed some photos of him in casual dress, as well. When I shot the photo we’re working with here, I had an idea—put him in a dark alley with a very grungy feel to it.

Planning Ahead
This is one tutorial where planning ahead really helped out. From the portrait shoot all the way to the background, I knew this was going to be a composite. I also knew it was going to be a full-body composite, which makes things a little more difficult. When that’s the case, there are a few things you can do to help make sure everything fits together nicely.

STEP ONE:
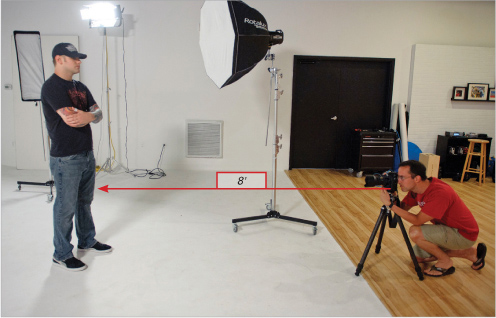
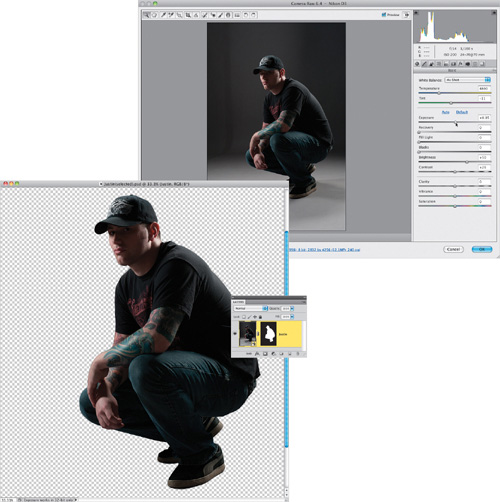
During the photo shoot of Justin (seen here), I knew that I would be compositing him onto a different background. So, the first thing I did was note the focal length on the lens I was using. I mostly shoot my portraits and backgrounds with the Nikkor 24–70mm f/2.8 lens, and the focal length of this portrait was 70mm. The next thing I did was note the camera height. I had the camera on a tripod about 2.5 feet off the ground. It’s really important that you shoot your background at the same height, or your subject’s feet won’t line up with the ground.
STEP TWO:
Finally, I noted how far away I was from the subject. In this example, I was about 8 feet away from Justin. Again, if you want your full-body composites to line up nicely, you’ll need to make sure you know the camera-to-subject distance, so you can use the same distance when shooting your background.
STEP THREE:
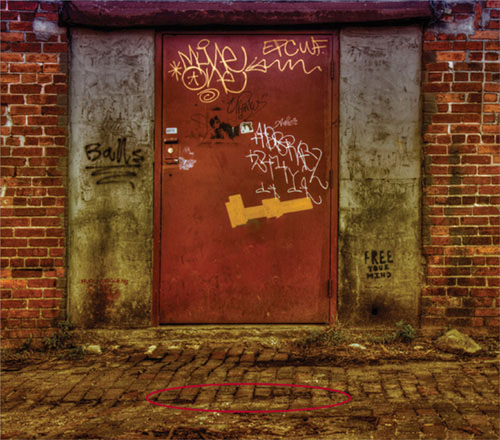
Now comes the background. Once I found a background I liked, I set the focal length of my 24–70mm lens to 70mm. I didn’t have my tripod, but I knew that I was 2.5 feet from the ground for the portrait, so I got on my knees (similar to how I was crouched in Step One) and got the camera position to nearly the same height. Then, I moved back until I was about 8 feet from where I envisioned placing the subject. Not 8 feet from the background, though. This is camera-to-subject distance, so I picked a mark on the ground (it was a crack in the street, circled here) where I envisioned placing Justin. Then I backed up 8 feet from there and took the photo.
STEP FOUR:
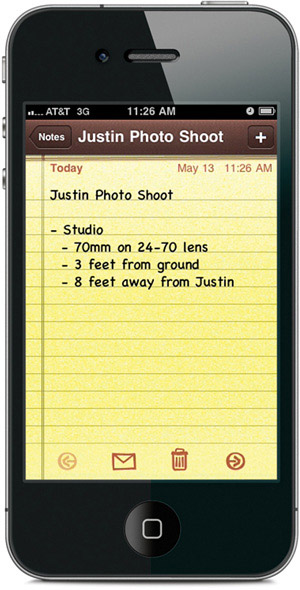
So, how do you remember all of this info? Write it all down on a piece of paper, or put it in your phone. I have an iPhone, and I use the built-in Notes app to write this stuff down. It all seems like a lot to remember, but trust me, if you’re doing a full-body composite, you’ll be thankful you did. You’ll see in this chapter that everything fits together really easily, because I took the time up front to keep the settings for the two separate shoots as close together as possible.
Prepping the Background
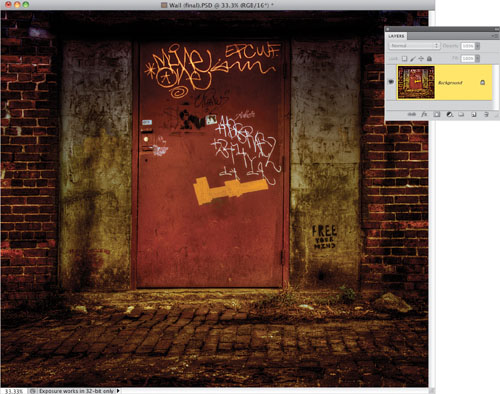
The background photo was taken specifically with a composite in mind—it was specifically for the shoot of Justin (the MMA fighter) I had done the day before. The sun was nearly down behind me, and was casting a warm light onto this doorway, and I remembered all of the details of Justin’s photo: how far he was from the camera, the camera angle, and the focal length that I used. So, I set myself up at the same perspective here and grabbed a couple of frames of this doorway.
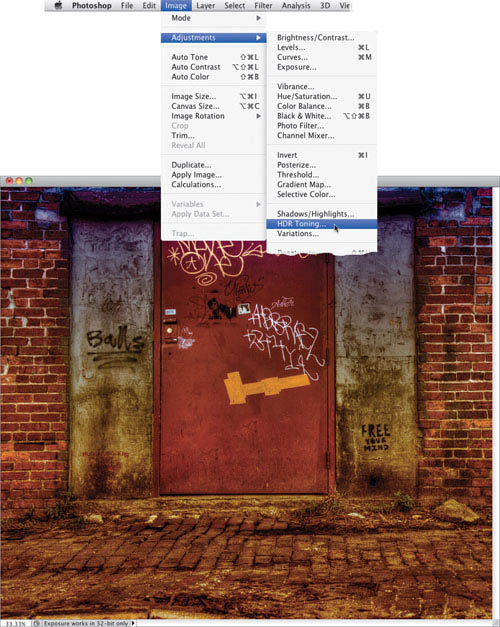
STEP ONE:
Open the background image for this example. First, let’s add a really grungy feel to it. It’s not an HDR photo, but we can fake it with a Photoshop adjustment, so go to Image>Adjustments>HDR Toning.
STEP TWO:
The adjustment comes with some presets at the top of its dialog. Choose Photorealistic High Contrast from the Preset pop-up menu to give us a starting place. Yep, I know it does crazy things to the photo, but we’ll tone it down a bit next.
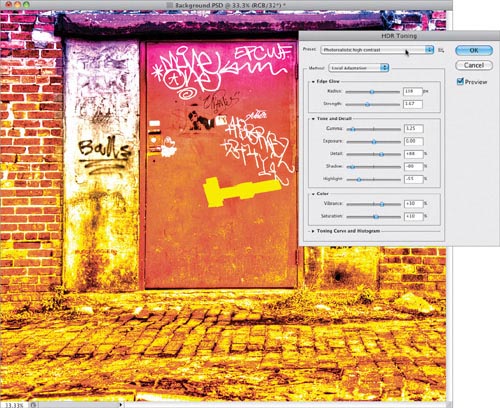
STEP THREE:
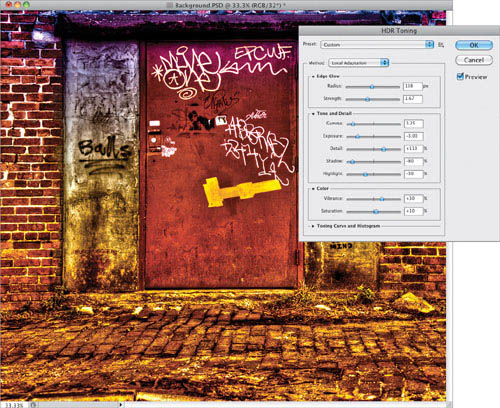
Bring the Exposure setting down to −3.00, which will darken the entire image. Then, increase the Highlight Detail amount to +110%. This should give us a really detailed and grungy look for our image. Click OK when you’re done.
STEP FOUR:
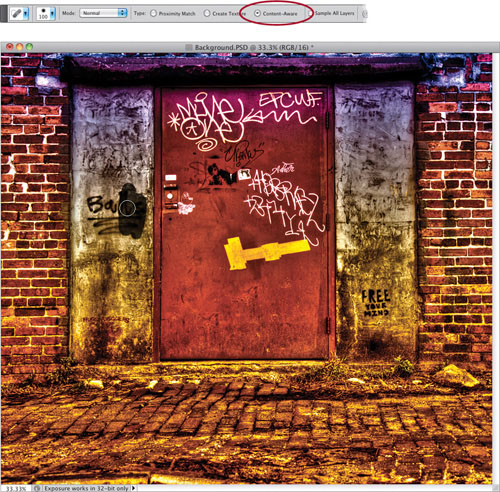
Now is a good time to clean up any distractions. I like most of the graffiti here, but there is one word on the wall on the left side of the door that I think I’ll remove. I’m not assuming the word means anything derogatory, mind you. Let’s assume it simply means that inside this door is an indoor sports facility where people play with various footballs, basketballs, baseballs, etc. Either way, it’s easy to remove. Press J to select the Spot Healing Brush (or press Shift-J until you get to it if you last used one of the other tools in the group), make sure the Content-Aware radio button in the Options Bar is turned on, and then paint over the graffiti on the left wall next to the door.
STEP FIVE:
It should disappear pretty quickly. If you see a repeating pattern left behind, try painting one more time on the wall and that should do it.

STEP SIX:
To really finish this background off, we’ll add an edge darkening effect to it. Press Command-J (PC: Ctrl-J) to duplicate the Background layer and then change the blend mode to Multiply (as shown here), which will darken the entire image. Use the Rectangular Marquee tool (M) to make a rectangular selection around the area where we’ll place our subject.
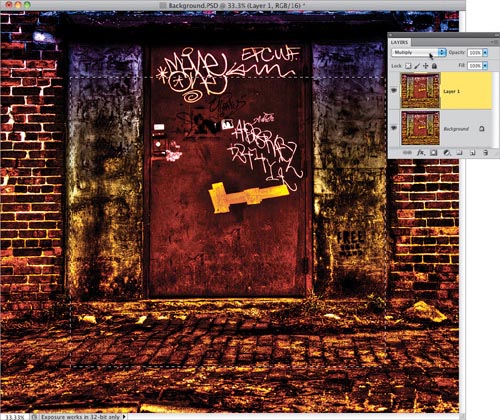
STEP SEVEN:
Go to the Select menu and choose Modify>Feather. Enter 200 pixels and click OK to soften the edges of the selection. You’ll see the edge of the selection gets rounder, but that’s about it. It doesn’t visibly get soft yet.

STEP EIGHT:
Head up to the Select menu one more time and go to Select>Inverse (or press Command-Shift-I [PC: Ctrl-Shift-I ]). This flips the selection because we really want the darkening effect applied on the edges, not the middle, right? Then, click on the Add Layer Mask icon at the bottom of the Layers panel and you’ll see the Multiply blend mode layer gets hidden in the middle (where our subject will be), but stays around the edges. We’re pretty much done with our background image, so go to File>Save and save it as a PSD file, and we’ll move on to the next step of the composite.

Prepping the Portrait
Like I mentioned, I took this portrait with the intention of placing Justin on a new a background. I took the portrait in the studio, and a few days later, while walking around an old bar district in Tampa, I shot the background that we just worked on. But it’s the tone and feeling of the photo we’ll work with here that sets the stage for the entire image.
STEP ONE:
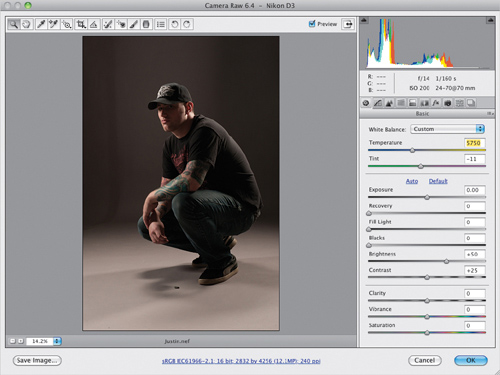
Open the photo of Justin. Since it’s a RAW file, it’ll open directly in Adobe Camera Raw. You’ll notice the background is a dark gray and, in Chapter 1, I talked about the best background to select people from. Well, dark gray isn’t it. I prefer a light gray instead, especially if the subject is wearing darker clothes, like Justin is. That said, we don’t always have a choice. Sometimes we have to work with what we’ve got, so we’ll cheat a little in the next step.
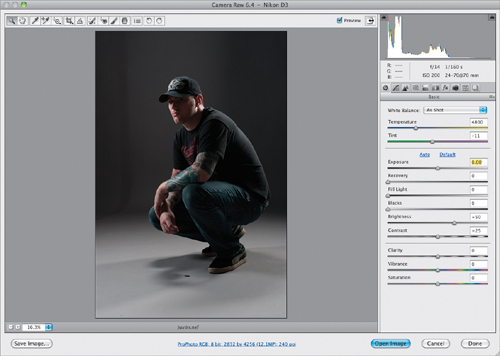
STEP TWO:
Increase the Exposure setting to +2.50. This overexposes the entire photo, but it brings the background to a lighter gray, which will work well for our selection. Don’t worry, we’ll come back and adjust it when we’re done with the selection.
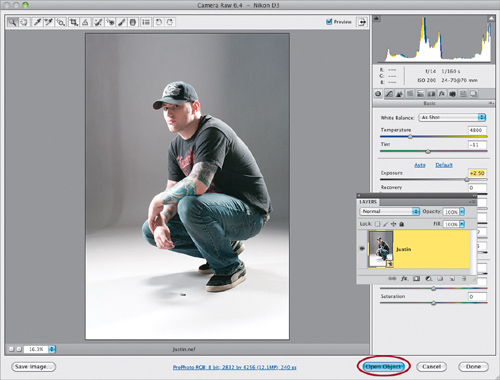
STEP THREE:
Press-and-hold the Shift key and you’ll see the Open Image button turn into the Open Object button at the bottom right of the Camera Raw window (circled here). Click that button to open the photo in Photoshop as a Smart Object. By working with the photo this way, we have the ability to go back and forth between Photoshop and Camera Raw if we ever want to adjust the photo later. It gives us a lot of flexibility, especially when we’re working on composites, because sometimes we need to change things as the entire composite begins to come together.
STEP FOUR:
Now that we’re in Photoshop, press W to select the Quick Selection tool from the Toolbox, and then use the tool to paint a selection around Justin. Photoshop will select the overall figure pretty fast. Keep in mind, though, it’s worth spending an extra couple of minutes here to zoom in and use a small brush to make sure you get all of the tiny edges that the larger brush will miss the first time around. Just paint again to add to the selection, or press-and-hold the Option (PC: Alt) key to remove part of the selection.

STEP FIVE:
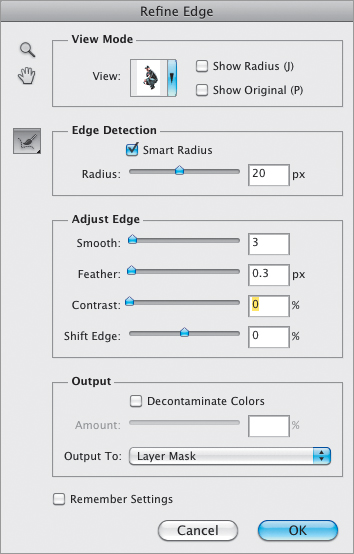
Once you get your selection looking good, click the Refine Edge button up in the Options Bar. Press the F key to toggle the View setting until the background turns white. This’ll be a good color to really see the edges of our selection. Turn on the Smart Radius checkbox and set the Radius to 20 px. Set the Smooth setting to 3, the Feather to 0.3 px, and the Output To pop-up menu to Layer Mask, and click OK.
STEP SIX:
Now, you’ll see that Justin has been masked out and put on a transparent background. Press Command-+ (PC: Ctrl-+) to zoom in on his shoulder on the left side of the photo. If you look around the edges of your selection, you may see some rough fringes or missed edges, like I have here. This happens a lot when the person in your photo is wearing something that matches the background too much.

STEP SEVEN:
Back in Chapter 1, we saw a quick way to fix this without having to tediously perfect the mask edge to make it perfect. First, press B to get the Brush tool and choose a smaller, soft-edged brush. Then, in the Options Bar, change the blend Mode of the brush to Overlay.
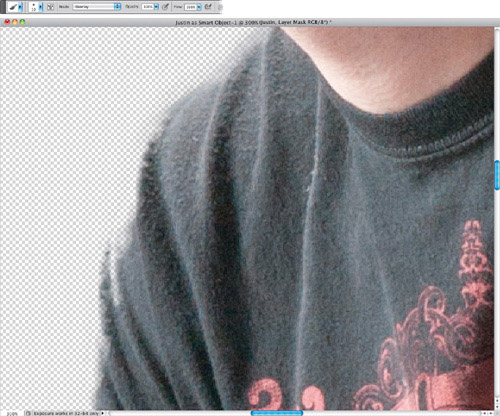
STEP EIGHT:
If it’s not targeted already, click on the layer mask to target it. In this case, part of the shirt is missing, so press D to set your Foreground color to white, and then paint along the edge where the shirt is missing (no need to be precise here, it’s okay if the brush extends beyond the edge). Photoshop starts revealing the missing edges of the shirt, but won’t bring the background back in. That’s because the Overlay blend mode is simply fixing the edge of the mask. Even though your brush may be larger and it looks like you’d bring the background back into view, it doesn’t.
STEP NINE:
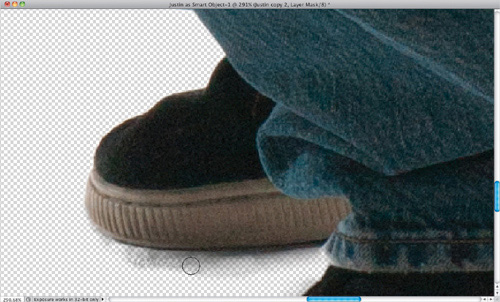
Continue the same process around the edges of the selection, until you clean everything up. Also, don’t forget, if you see too much of the background in any areas, the opposite also works. In this case, the area near his shoes had some background showing through. Press X to change your Foreground color to black and paint on the mask. Since you’re still in the Overlay blend mode for the brush, it’ll bring the edge in closer to whatever you’re selecting.
STEP 10:
Once the selection is done, we need to fix the overall exposure. Remember, this layer is a Smart Object, so this means we can go right back into Camera Raw and readjust the Exposure setting. So, double-click on the Smart Object layer’s thumbnail to open the Camera Raw window. Set the Exposure slider back down to around 0 and click OK to return to Photoshop. Now, go to File>Save and save the photo as a PSD file. We’re done with Justin, now let’s put him into the new background.
Creating the Composite
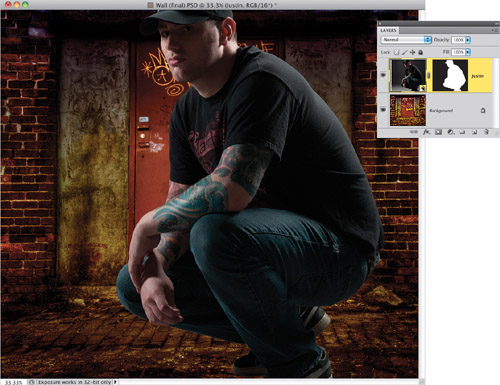
Let’s bring everything together now. Remember, our background photo was taken at a specific focal length, knowing exactly where we’d place the subject, so there wouldn’t be any perspective or distortion problems. By shooting this way, you’ll be amazed at how easily your subject fits into the background image. Our main goal here is to make it look realistic, and the shadows are going to play a big part in it.
STEP ONE:
Open the background image (if it’s not open already). Since we only need one layer for the background, go to Layer>Flatten Image to flatten it into one layer.
STEP TWO:
Open the photo of Justin where he’s been selected from the studio background (if you don’t still have it open) and use the Move tool (V) to drag him into the background image. Now, you should have two layers: the Background layer and the Smart Object layer with Justin on it.
STEP THREE:
As you can see, Justin is too big for the background, so click on his layer to target it and go to Edit>Free Transform (or press Command-T [PC: Ctrl-T]). Press-and-hold the Shift key and click-and-drag one of the corner handles inward to resize him and make the photo smaller (press Command-0 [zero;PC: Ctrl-0] if you can’t see the corner handles). Press Return (PC: Enter) to lock in the transformation when you’re done.

STEP FOUR:
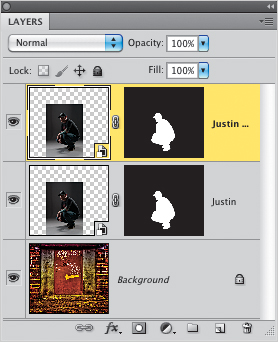
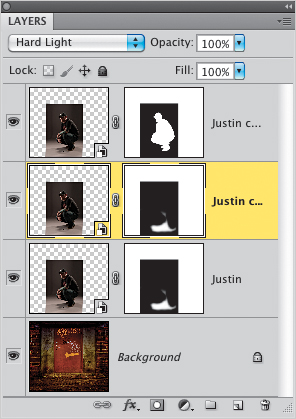
We’re missing one key thing to help pull this composite off—shadows. This isn’t true for all composites, though. If you’ve cropped the feet and don’t see the ground, then shadows aren’t as much of an issue. But any time you try to put someone standing in one scene into another scene, you need shadows to pull it off. The cool thing about the technique you’re about to see is that we’ll use the existing shadows, so we don’t have to create new ones. To start, press Command-J (PC: Ctrl-J) to make a copy of the Justin layer.
STEP FIVE:
Click on the layer mask on the original Justin layer and go to Edit>Fill. Set the Use pop-up menu to White and click OK to fill the layer mask with white (which reveals the original studio background again).
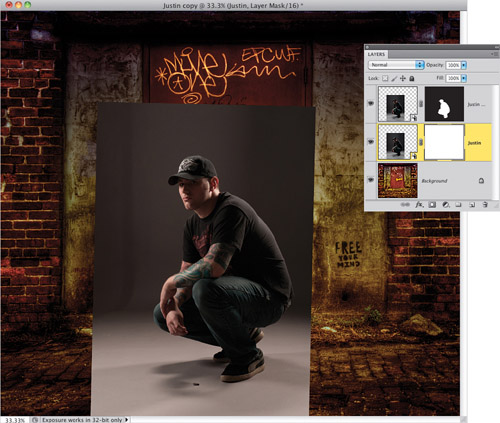
STEP SIX:
While we don’t want to keep everything from the studio background, we do want to keep the shadows and make them blend with the new background. So, change the layer blend mode to Hard Light and you’ll see a lot of the original background disappear (not all of it, but a lot). You’ll also notice the original shadows look like they blend in with the ground below his feet now.
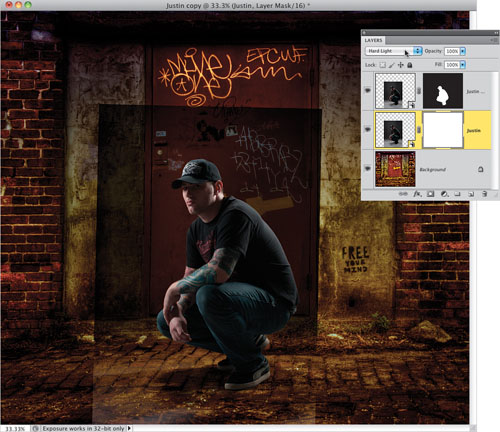
STEP SEVEN:
To get rid of the rest of the studio background, select the Brush tool (B), use a medium-sized, soft-edged brush, and make sure the Mode pop-up menu in the Options Bar is set to Normal. Since the layer mask is white right now, we want to paint with black, so press D, then X to set your Foreground color to black, and start painting away the remnants of the original studio background. Paint everywhere except the area around his feet where the original shadows now cast on the ground. Don’t worry if you paint over him, because we have another copy of him on the top layer.
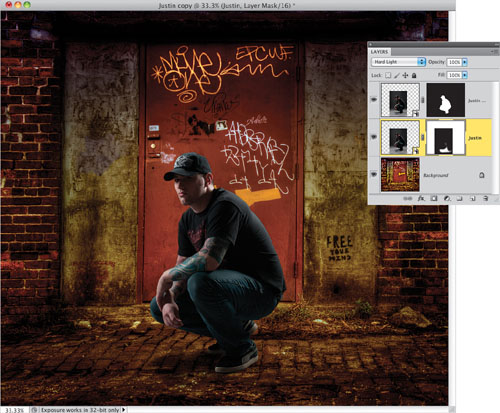
STEP EIGHT:
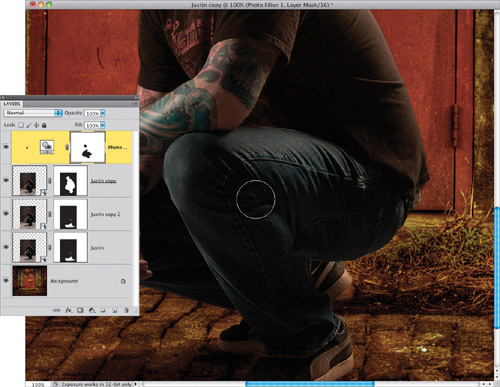
If you want to intensify the shadows (I think it would help here), then just press Command-J to duplicate the shadow layer and the shadows become even darker. If it’s too dark, just reduce the Opacity of the layer until the shadows look real. Cool huh? Instant shadows!
STEP NINE:
While we’re on the topic of shadows, I think we need to add one of our own right below his foot. These shadows are essential when someone is standing on the ground, because our feet usually cast a very dark and thin shadow on the ground right below them. So, zoom in on the front foot, then click on the Create a New Layer icon to create a new blank layer, and click-and-drag it below all of the other shadow layers, as seen here.
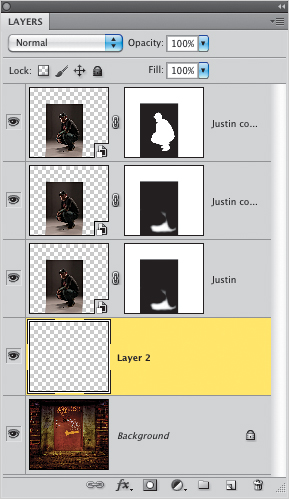
STEP 10:
With the Brush tool still active, choose a small, soft-edged brush from the Brush Picker, set your Foreground color to black, and paint a very slight shadow right under the shoe on the right. Keep it close to the shoe, though, as you don’t want this one to spread out. Remember, it’s just his shoe casting the shadow on the ground and because the shoe is so close to the ground, it’s not going to be a large shadow.
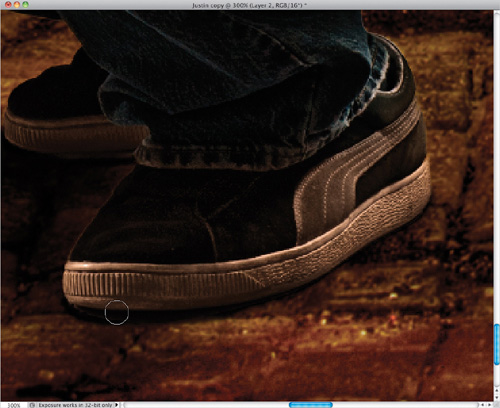
STEP 11:
Another telltale sign that Justin has been placed into the new background is the color. He’s got a cool/blueish color to him, while the background is very warm. Well, remember how the layer that Justin is on is a Smart Object layer? That means we can change the color temperature with just a few clicks. So, double-click on the topmost layer of Justin to reopen the image in Camera Raw. It’s going to vary for each photo, but for this one I moved the Temperature slider toward the right to 5750 to warm things up a bit. Click OK when you’re done to update the photo back in Photoshop.
STEP 12:
While we’re on the color temperature topic, I think his clothes still look too cool/blue for the environment he’s in. Remember, this is one of the main things we need to get right when compositing. But, I don’t want to warm the photo any further in Camera Raw, because it’s going to warm his skin, and I think we’re good there. So, this time, click on the Create New Adjustment Layer icon at the bottom of the Layers panel and choose Photo Filter. This adjustment is the compositor’s best friend. In the Adjustments panel, it defaults to Warming Filter (85), which works well for this photo. Just drag the Density slider to 70% to make it warmer.
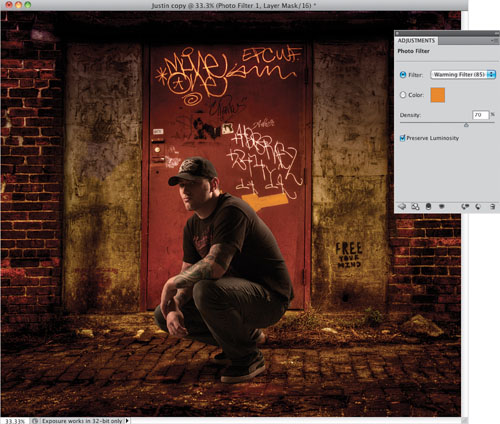
STEP 13:
Adding the Photo Filter adjustment warmed everything in the photo, but we only want to warm his clothes (mainly the back of his shirt, which would be picking up that warm light we see in the image). So, to make this happen, first go to Layer>Create Clipping Mask (or press Command-Option-G [PC: Ctrl-Alt-G]). This forces the Photo Filter layer to only affect the layer right below it (the selection of Justin).
STEP 14:
But, it’s still warming his skin. No sweat. The Photo Filter adjustment layer came with layer mask, so set your Foreground color to black and use the Brush tool to paint on his skin to remove the warming filter. Now, it only affects his clothing. In fact, I’d probably go a step further and paint on his jeans, too, since they’re already warm enough. We mostly want to warm the black shirt, so it looks like it’s absorbing all of that warm color we have in the photo.
STEP 15:
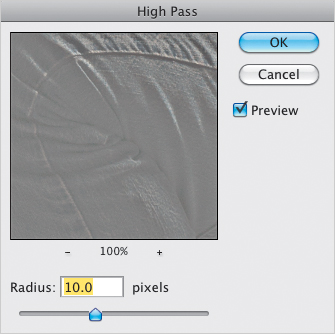
On this particular image, the background is already pretty gritty and edgy. So, let’s add some of that grit to the portrait, too. Click on the topmost layer with Justin on it to target it. Then, go to Filter>Other>High Pass, set the Radius to 10 pixels, and click OK.
STEP 16:
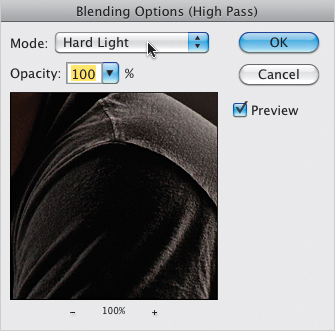
Of course, the layer looks horrible because it’s all gray now, but remember that this is a Smart Object layer. Since we’ve applied a filter to it, we get all kinds of advantages—one of them being blend modes. If you look at the layer in the Layers panel, you’ll see a tiny little icon, at the very bottom right, next to the words High Pass (circled here). Double-click that icon to open the Blending Options for the High Pass filter.
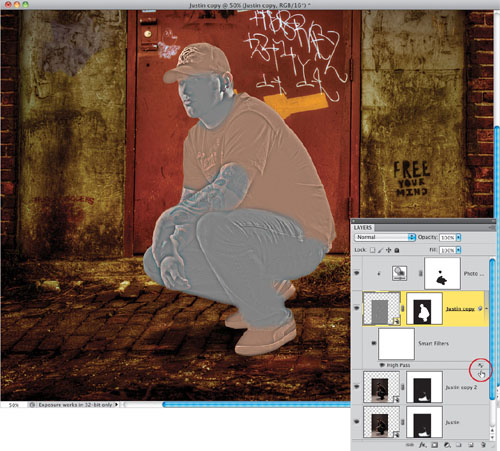
STEP 17:
Here, change the Mode setting to Hard Light to hide the gray, but keep all of that gritty detail. You can also reduce the Opacity in this dialog if it’s ever too gritty, but I think it looks good on this photo at 100%. Click OK when you’re done.
STEP 18:
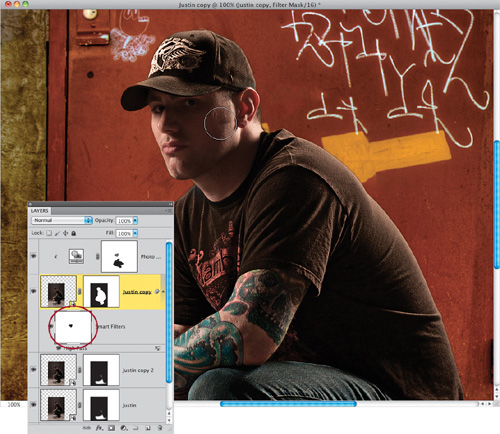
Okay, I like the gritty look everywhere but on his face. You’ll notice, though, that the High Pass filter has a layer mask (it’s circled in red here). This means we can paint the High Pass filter away from any parts of the photo where we don’t want it. So, click once on the mask to target it. With your Foreground color set to black, paint with a small, soft-edged brush over his face to hide the High Pass filter effect there, but keep it on the rest of his body.
STEP 19:
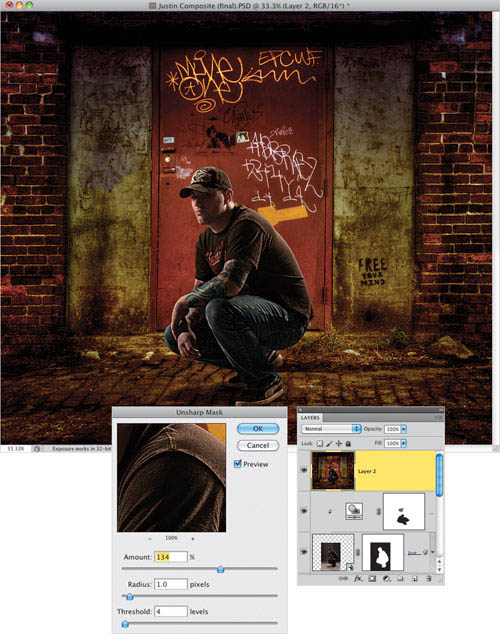
For the last step, let’s go ahead and sharpen the overall image. Click on the topmost layer and then press Command-Option-Shift-E (PC: Ctrl-Alt-Shift-E) to merge everything below it into one new layer at the top of the layer stack. Go to Filter>Sharpen>Unsharp Mask, use an Amount setting of 134, a Radius setting of 1, and a Threshold setting of 4, and then click OK.
Hopefully, you can see how this composite is pretty much all just finishing touches. We spent most of the time on shadows and color. But, when it came to perspective and angles, fitting Justin into this new background was simple because some extra time was taken up front to make sure the camera settings, distance, and height matched.
Final Image