
1. Selection Secrets
When Photoshop CS5 came out in 2010, the natural question I heard from a bunch of people was “What’s your favorite feature in CS5?” I’ve always been into HDR photography and I think everyone thought I’d say HDR Pro (the new and improved HDR feature in CS5). But it wasn’t. I immediately found that the new features in the Refine Edge dialog were my favorite, because just about everything we do in Photoshop involves a selection at some point.
Today, I still stand by my favorite feature from over a year ago. Refine Edge, combined with the Quick Selection tool, is absolutely the best selection tool I’ve found in Photoshop, and most of the selections that we’ll do in this book use this.
A Compositor’s Best Friends
When making selections, the Quick Selection tool and the newly enhanced Refine Edge dialog are going to become your best friends. I’ve demonstrated them in my classes since Photoshop CS5 came out and when people see the results, you can actually hear the oohs and aahs in the crowd. One of my favorite parts about them is that they’re really easy to use. The Quick Selection tool is basically a brush, so if you can use a brush, you can use it. And, Refine Edge has only a few settings that we really need to worry about. Trust me, you’ll have them mastered in no time and be well on your way to killer selections.
STEP ONE:
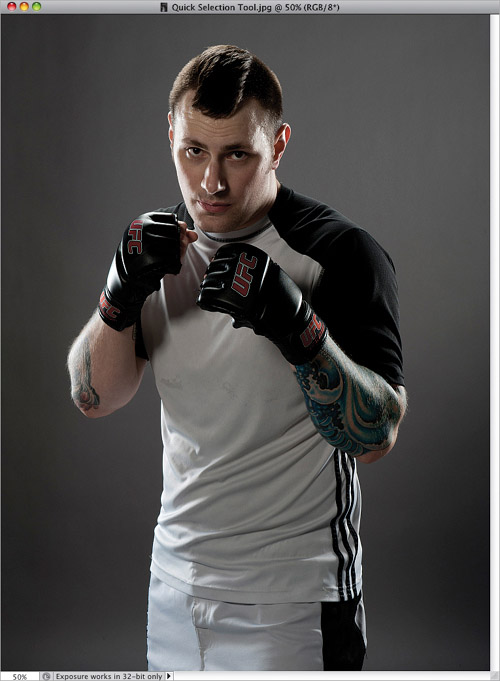
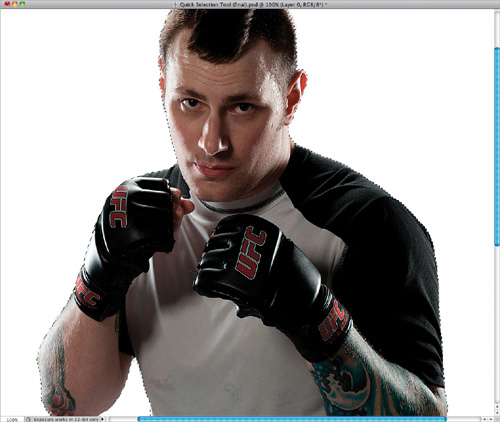
Go ahead and open a photo with a person you’d like to extract from the background. In this example, I’m using a photo of a person who is fairly well-defined all around, but there is a little more detail in his hair. Don’t worry, though, I just want to get through some of the basics in this tutorial. We’ll get to the flyaway hair stuff later in the chapter.
STEP TWO:
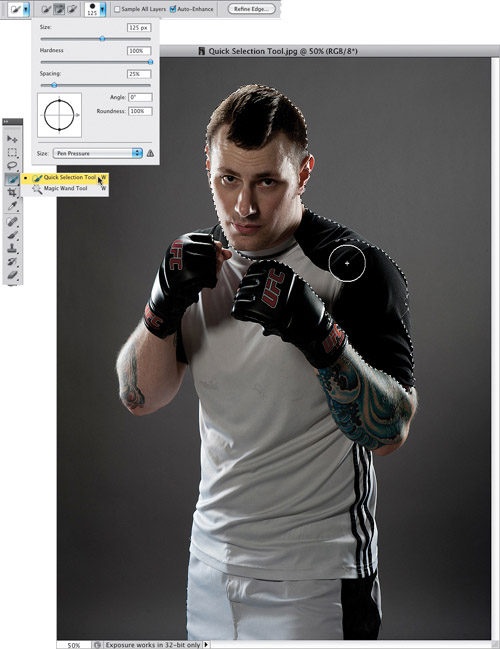
Grab the Quick Selection tool from the Toolbox (or just press W) and start painting over the subject in the photo. The Quick Selection tool works just like a brush. It’s got Size and Hardness settings in the Brush Picker (up in the Options Bar), just like most brushes do. So, if you’re selecting larger areas, then using a larger brush is faster. You can press the Right Bracket (]) key to quickly make the brush larger and paint in those areas.
STEP THREE:
The main idea behind the Quick Selection tool is that it’s quick. At this point, just use a large brush and try to get as much of the subject selected as possible, even if you miss some smaller areas or over-select some other parts. And you don’t have to make the entire selection in one brush stroke. If you look at the left side of the Options Bar, you’ll see three little icons: a brush with a dotted oval, a brush with a dotted oval and + (plus sign), and a brush with a dotted oval and − (minus sign). The Quick Selection tool is automatically always in Add mode (the middle icon; and you’ll see a + in the middle of your brush). This means every time you click-and-paint with the brush, it adds to the selection.
![]()
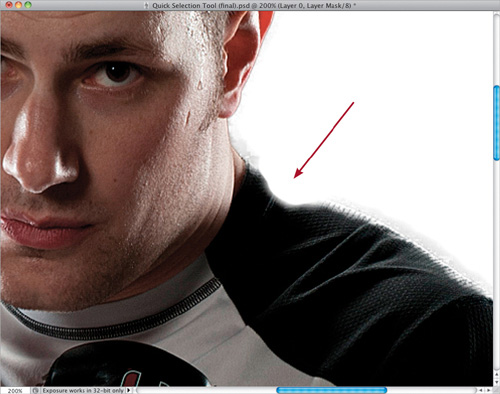
STEP FOUR:
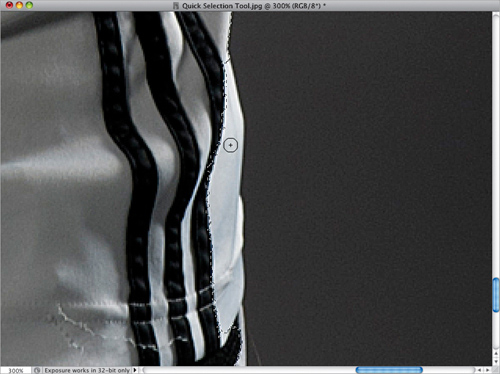
I noticed a small area near the right edge of his shirt that wasn’t selected. So, I zoomed in on this area (by pressing Command-+ [PC: Crtl-+] a couple times), made the brush smaller by pressing the Left Bracket ([) key, and painted in that area. Remember, the tool is automatically in Add mode, so it simply adds what I just painted on to the overall selection.
STEP FIVE:
The Quick Selection tool got a little overzealous in the bottom-left part of the photo (notice how I blamed the tool and not the user) and selected part of the background. No problem. Remember how I said the Quick Selection tool is always in Add mode? Well, you can temporarily put it into Subtract mode by pressing-and-holding the Option (PC: Alt) key. You’ll see the − (minus sign) symbol in the middle of your brush, which means that anything you paint will be removed from the current selection. Now, just paint over any areas that shouldn’t be selected.

STEP SIX:
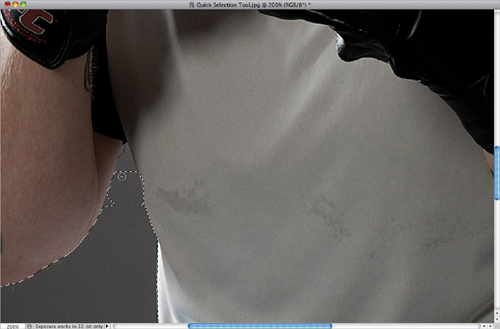
It’s a good idea to try and get most of the subject selected here. Even if you have to zoom in and spend a couple of minutes with a smaller brush, you’ll be happy you did. Here, it also selected too much under his arm on the left, so I’ll put the tool in Subtract mode again and paint to remove this from the selection. It doesn’t have to be perfect, but you’ll want to have a good selection around the subject before you move on.
STEP SEVEN:
Okay, now that we have a pretty good selection around the subject, let’s move on to the really good stuff—Refine Edge. At first glance, your selection may look really good, but it’s definitely not great yet. Whenever you have a selection tool and a selection active in Photoshop, you’ll see the Refine Edge button (circled here) become available in the Options Bar. Go ahead and click on it to open the Refine Edge dialog.
![]()
STEP EIGHT:
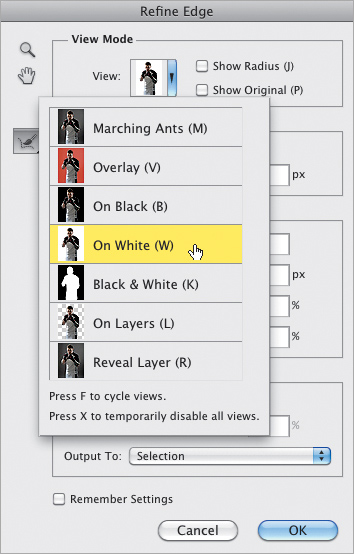
At the top of the dialog, there’s a View setting. This lets you see how your selection looks on various backgrounds. I usually choose On Black or On White from the pop-up menu here. Most of the time, I pick the one that most resembles the brightness of the background I’m going to place the subject into. That way, I can get a good preview of how they’re going to fit. In this example, white will give us a really good preview of the edge we’re working with (since his clothes are darker than a pure white), so I’m going to choose On White.
Tip: Experiment with Different Backgrounds
It’s always good to experiment with different background choices. If you usually choose black, then try switching to white once in a while. This way, you’ll get a worst-case preview of what your selection looks like and any problem areas you may have to watch out for later.
STEP NINE:
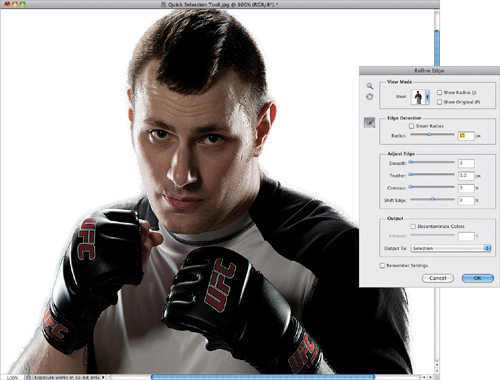
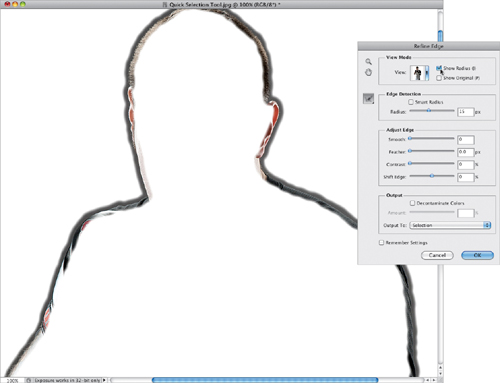
You’ll see that our selection is looking kinda jagged at this point. Well, the star of this dialog is the Edge Detection section (new in CS5), and it’s going to help out a lot. Its job is to automatically figure out what areas you want to keep around the edges of your selection and what areas you want to get rid of. So, the first thing I do is increase the Radius setting. This gives Photoshop some information about how far out from the existing edges of the selection you want to look for things that may need to be selected. If you don’t have wispy hair or any stray details that are really far out of the original selection (like in this example), then you can get by with a low setting of around 10–15 pixels or so.
STEP 10:
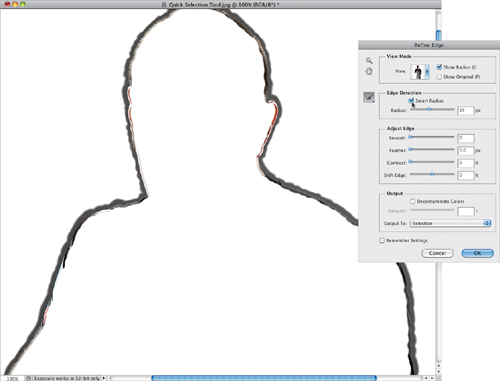
Try turning on the Show Radius checkbox at the top of the dialog. This gives you a preview of the Radius setting, so you can fine-tune just how far you need to drag the Radius slider. If you still don’t see the edges of what you eventually want selected, then you need to keep increasing the Radius setting until you do. If not, Photoshop won’t look that far outside your original selection for any more details to select.
STEP 11:
Right now, I have the Radius set to 15 pixels. This means that Photoshop will look within 15 pixels on either side of the selection for details. But, you’ll see there’s a Smart Radius checkbox above the Radius slider. Turning this checkbox on tells Photoshop to be a little smarter about what it chooses to select. If it sees a hard edge, it’ll automatically bring the radius in closer, so it doesn’t accidentally select something it shouldn’t. If it detects details near the edge (like hair), then it’ll hold the radius farther out, near the original Radius setting you chose.
STEP 12:
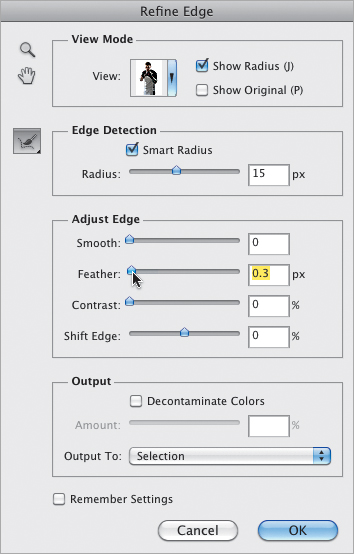
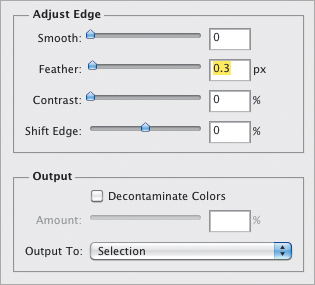
The rest of the dialog isn’t actually new to CS5—it’s been around for a while. The Smooth setting will smooth off any jagged edges, and most of the time, like now, I leave it set to 0 because I want all of the edges, like the hair on his arms and head. If the edges start to look too jagged, I’ll increase it to 5, maybe 10 at the most. The Feather setting makes the edges blurry or soft. Typically, you don’t want an extremely crisp edge no matter what the subject is. So, feathering has always been a selection trick we used to make things look more realistic, but it doesn’t have much of a place anymore. The Radius (and Smart Radius) settings work much better. But, I usually set Feather to a really small setting, like 0.3 pixels, anyway, just to soften the edge a tiny bit.
STEP 13:
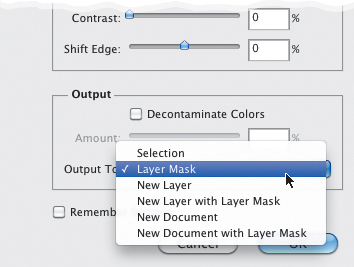
Contrast firms up any soft edges. It’s typically not something we’ll use for extracting people, though, because the Radius setting gives us such a good result. The Shift Edge setting tells Photoshop to shift the entire selection inward or outward depending on which way you move the slider. Again, we’ve done our work already, so you generally don’t need to move the selection edge at this point. Decontaminate Colors is only used when you have your subject on a colored background. We’ll talk more about what color to photograph people on later in this chapter, so for now just leave it turned off.
STEP 14:
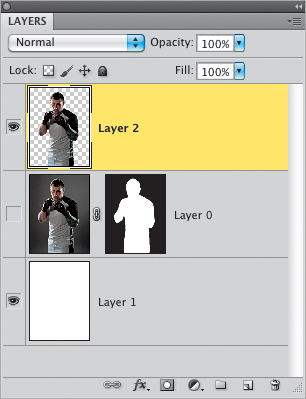
When you’re done with your selection and ready to move on, head down to the Output To pop-up menu at the bottom of the dialog. Instead of just outputting the results of this dialog to a selection, we can put it on a new layer with a layer mask, so we can always go back and change it if we need to. In fact, we’ll adjust the selection in the next tutorial. For now, though, just choose Layer Mask from the pop-up menu and then click OK.
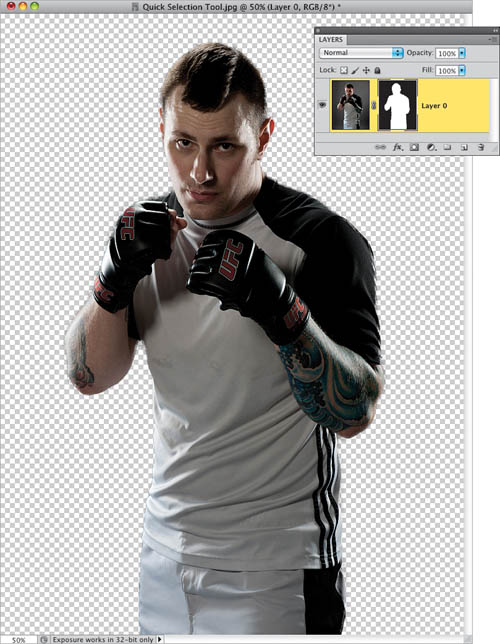
STEP 15:
Sweet! (FYI: I say “Sweet!” a lot.) You’ve successfully selected a person from a background. Now when you look in your Layers panel, you’ll see the original layer has a layer mask on it. Sometimes your selection will look perfect. If it does, then great, but sometimes it still needs a little more work. If that’s the case, then check out the next tutorial.
I know it seems like it took a lot of steps to do this, if you look back through the tutorial. But, really, it was just because I was explaining things as we went along. Most of the time, after I make a selection with the Quick Selection tool, I generally use the same settings in Refine Edge over and over. Trust me, you’ll develop a knack for it and, after the first few times you do it, you’ll see it only takes a few minutes.
Adjusting the Selection
In the last tutorial, we used the Refine Edge dialog to get Photoshop to do the bulk of the work when selecting someone from their background. Sometimes we get lucky and our selection looks awesome when it’s done. But other times, it needs a little adjusting. Since we created a mask along with our selection, it’s really easy to adjust. That’s the cool thing about layer masks for compositing—they let us go back and adjust the selection as much as we want with the Brush tool, so we can get really detailed if we need to.
STEP ONE:
We finished the last tutorial with our subject selected on his original layer with a layer mask, so all we see is a transparent background. (If you haven’t done the last tutorial yet, feel free to download the file and open it here to start from where I left off.)
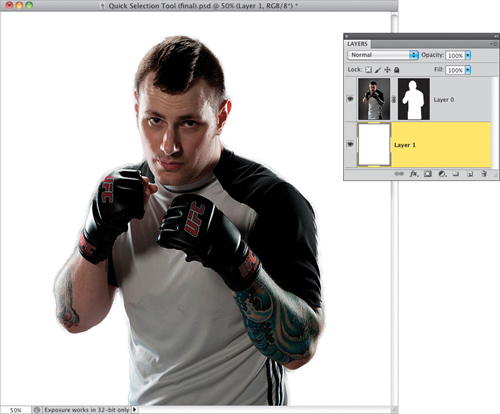
STEP TWO:
Before we go any further in adjusting the selection, let’s add a new background behind the subject, so we can see how things are looking. Command-click (PC: Ctrl-click) on the Create a New Layer icon at the bottom of the Layers panel to add a new blank layer below the existing layer. Then, with this new background layer active, choose Edit>Fill, and choose White from the Use pop-up menu, so our subject stands out pretty well from the new background.
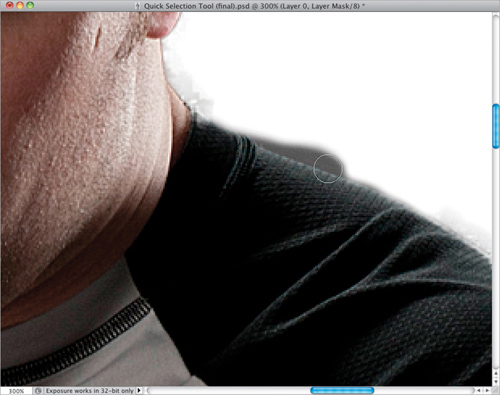
STEP THREE:
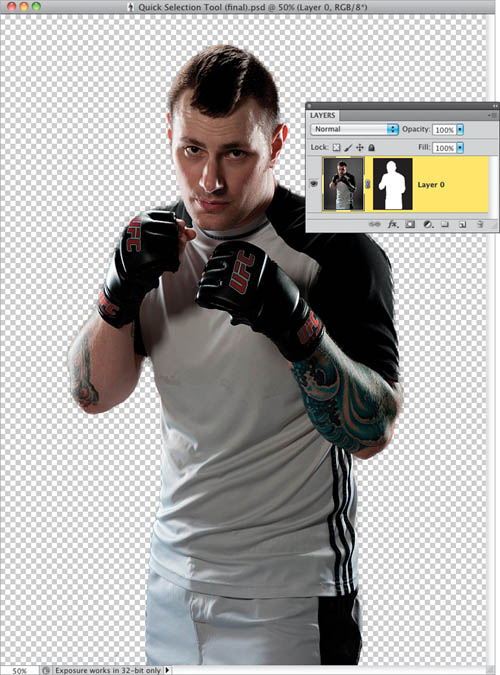
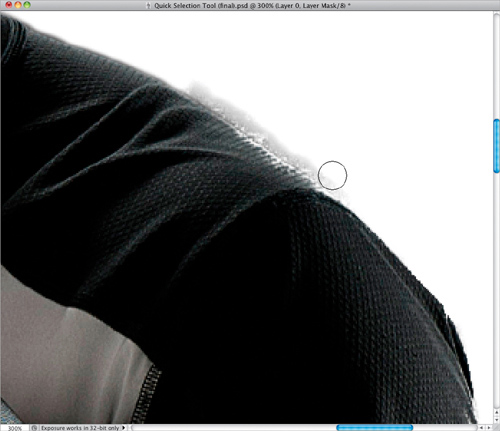
Now, get the Zoom tool (Z), zoom in, and start looking around the edges of the photo. If you’re lucky, everything looks awesome and there’s no more work to be done. Most of the time, though, you won’t be that lucky. In my example here, I noticed that some of his shirt is missing at the top of his shoulder on the right.
STEP FOUR:
To adjust the selection, we’ll use the layer mask that Refine Edge added to our layer. The way that the layer mask works is that wherever there is white on the layer mask, the image on the layer is visible. So, if you look at the layer mask, you’ll see that the white figure is the exact shape of our subject (what was selected in the last tutorial). Basically, wherever the layer mask is white, that part of the photo is selected. In fact, just to prove my point, press-and-hold the Command (PC: Ctrl) key and click on the layer mask. Photoshop will put a selection around whatever is white on that layer mask on your image. Go ahead and Deselect (Select>Deselect), since we don’t really need the selection just yet.

STEP FIVE:
In my case, I need to add to the selection. Remember, the selected areas are white on the layer mask, so I’m going to paint with white on the mask. First, make sure the layer mask is still active (you’ll see a black highlight border around it), then press D to set your Foreground color to white. Select the Brush tool (B) from the Toolbox and use the Left and Right Bracket keys on your keyboard to set the brush size to around 20 pixels. Zoom in on the shoulder (or other area) that was cut off and start painting until you see the rest of it appear.
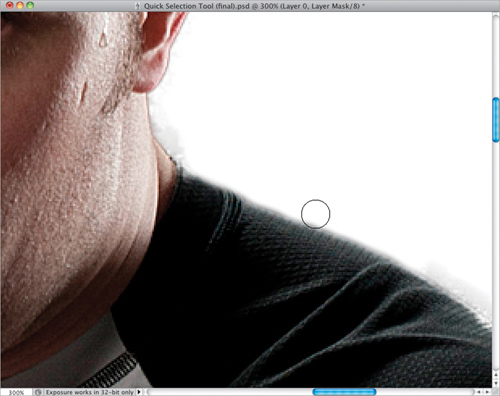
STEP SIX:
If you happen to paint too much and accidentally bring back some of the background, then press the X key to swap your Foreground and Background colors. Now you’ll be painting with black, which is the same as taking away from the selected area. Paint back over the photo and you’ll see those areas you don’t want to show (like that small area of the gray background in Step Five) disappear.
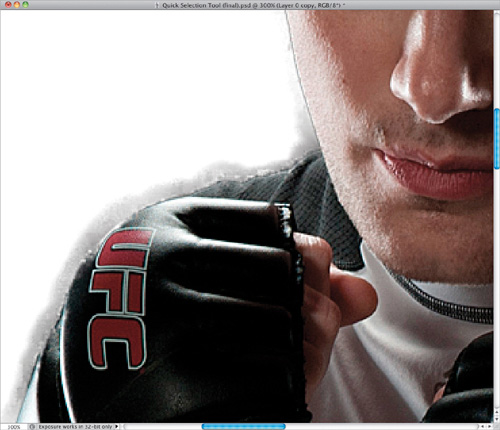
STEP SEVEN:
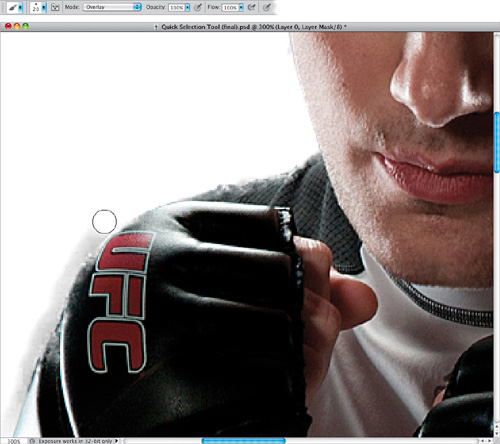
Ready for a really cool trick? Zoom in and look at the left side of the photo where he’s holding his hand up near his face. See how there’s a dirty fringe-like edge that follows the contour of his glove? This happens sometimes if your original background was too dark (like mine was here). Sure, you could paint on the mask in black very carefully to remove it, but there’s an easier way.
STEP EIGHT:
With the layer mask still active and the Brush tool still selected, up in the Options Bar, set the blend Mode to Overlay. Then, choose a brush size that is about the size of the fringe you see, set your Foreground color to black (because black will hide whatever we paint on), and start painting on that fringe.
STEP NINE:
Don’t worry if your brush starts to spill over onto the subject. Normally, if we weren’t using the Overlay blend mode for the brush, we’d start hiding part of his hand if we painted in black. But because of Overlay mode, Photoshop hides the fringe, but still keeps everything else the brush touches. Now, if you kept brushing over and over on the same area, you’d eventually ruin the edge. But one quick swipe with the brush will remove the fringe and keep the rest of what you selected intact. Best of all, you didn’t have to be very precise about it. Give it a try around the rest of him, if you see any other areas where the background shows through.
STEP 10:
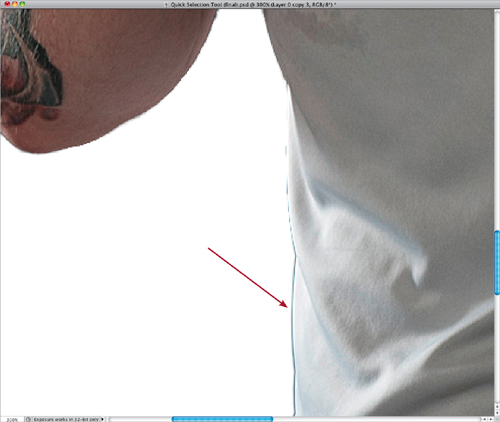
One last tip for pulling off a good selection: Zoom in on the left edge of his shirt, just above his shorts. Notice that really dark edge or fringe? It’s thin, but it’s definitely there. It doesn’t happen all the time, but I always zoom in to check for it.
STEP 11:
To fix this, we have to put our selection up on its own layer, because it won’t work on a layer with a layer mask. So, Command-click on the layer mask to load our selection around the subject.
STEP 12:
Click once on the layer thumbnail itself to target it, and then press Command-J (PC: Ctrl-J) to duplicate the selected area onto its own layer. Next, click on the little Eye icon to the left of the original layer to hide it, along with the layer mask (this hides it, but keeps it just in case you need to go back to it later). Now you’ll see the subject selected from his background on a separate layer, but without a layer mask.
STEP 13:
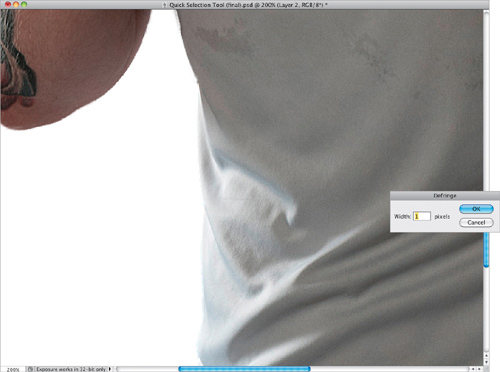
Go to Layer>Matting>Defringe, enter a Width setting of 1 pixel, and click OK. Most of the time, you’ll immediately see the fringe disappear. If it doesn’t, go to Edit>Undo and reapply Defringe with a 2-pixel setting instead. Like I said before, it doesn’t happen for all photos, but if you do see a small fringe around the edges, the Defringe feature works great.
Tip: Compare a Before/After
After applying Defringe, zoom in on the area that had the fringe and press Command-Z (PC: Ctrl-Z) to Undo and then Command-Z again to Redo to see the difference. Sometimes you’ll think “Eh, not that great” and other times you’ll think “Holy crap!!! That’s awesome!”
Extracting Hair
There’s one question that I get all the time whenever I’m out teaching Photoshop: “How do you select a person from one background and move them to another background with all of their hair intact?” Well, you’re in luck. If you followed along with the previous tutorials, you’ve already learned how to get yourself most of the way there. There’s just one small tool we need to help out with the hair.
STEP ONE:
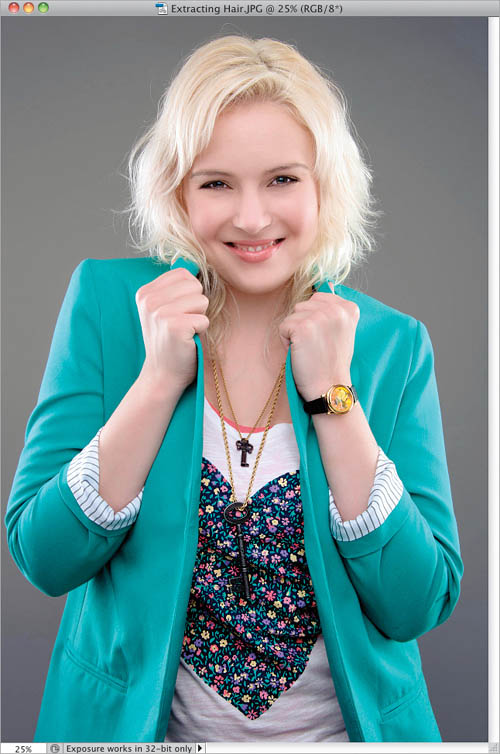
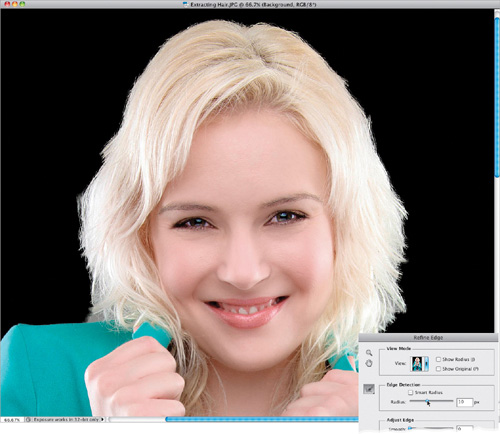
Go ahead and open a photo that has some wispy hair in it. While the subject here has got some clean, defined edges around her clothing, she definitely has some flyaway hair.
STEP TWO:
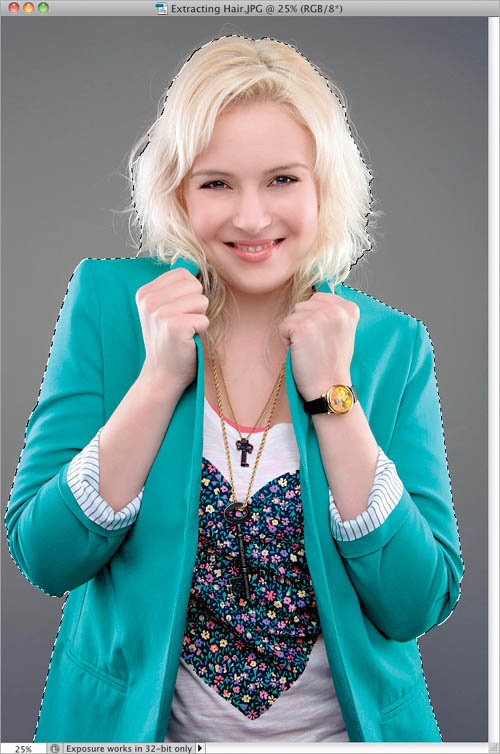
Use the Quick Selection tool (W) to put an overall selection around her. Just like we did earlier, spend a minute or two to get the selection as close as possible around all of the well-defined edges. But don’t worry about the hair—just get the overall selection close, like you see here. Don’t even try to select the hair edges at this point.
STEP THREE:
When you’re ready, click the Refine Edge button in the Options Bar to get the Refine Edge dialog. For starters, press the F key to cycle through the View settings until you get to black (since the black background shows off the hair selection really well).

Tip: View Shortcuts
Under the View pop-up menu, you’ll see each option has a letter next to it, which is a quick shortcut key to jump directly to that background view. It’s probably a good idea to memorize your favorites like B for black, W for white, and K for black and white.
STEP FOUR:
Now, drag the Radius slider to around 10, and you should immediately see a big improvement. Seriously folks, if you’ve ever doubted how powerful this Edge Detection stuff is, then take a look at what it’s doing here. Zoom in on the subject’s head, press the P key to see the original, and then press P again to see the current selection. All we’ve done so far is move one slider and we’re already starting to pick up more hair!
STEP FIVE:
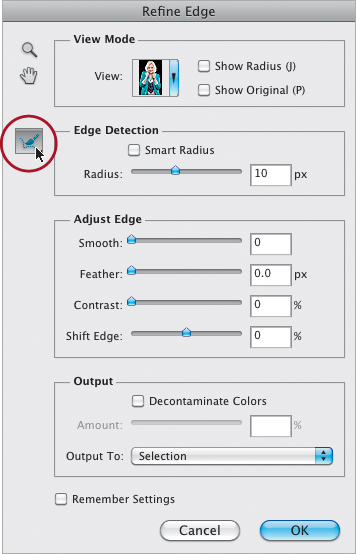
Okay, we still have some work to do. Notice how you can definitely see the gray peeking through around the edges of her hair, especially near her shoulders. This is where we call in the ringer. The big dog. The head honcho (okay, I’ll stop). The big kahuna here (sorry, last one) is the Refine Radius tool. It’s the little brush icon (circled here) just below the Zoom and Hand tools near the top left of the dialog.
STEP SIX:
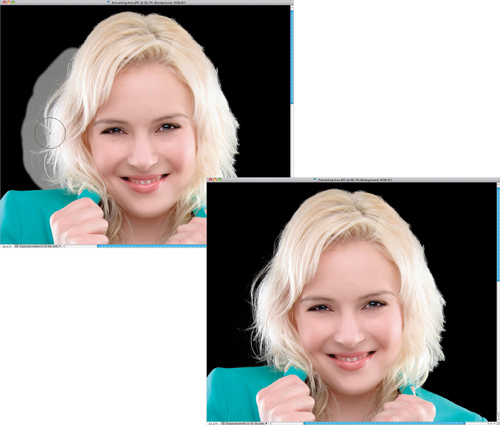
Just like other brushes in Photoshop, it has a size setting that can be controlled with the Left and Right Bracket keys. Go ahead and resize the brush, so it’ll cover the entire radius of any flyaway hair. Then simply start painting around the edges of the hair. As you paint, you’ll reveal part of the original background, so you can see just how far out you have to paint to get all of the hair selected. When you release your mouse button, sit back in awe as Photoshop selects the hair, but leaves out the background (sometimes it takes Photoshop a few seconds to catch up, so be patient when using this tool). I know I sound like a total Refine Edge fan boy, but you have to admit, this tool rocks!
STEP SEVEN:
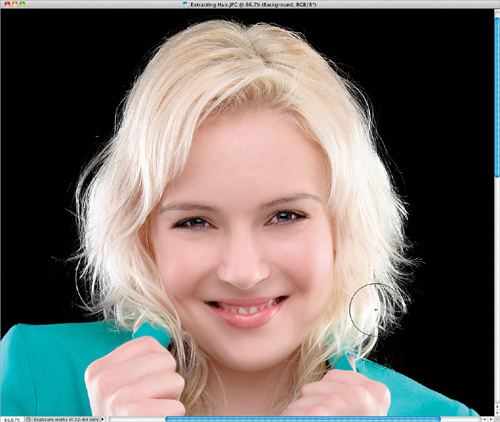
Now, continue to brush around the edges of the hair to bring all of the wispy hair edges back. You can paint in one long brush stroke around the entire head, or use smaller strokes in more concentrated areas. Honestly, I’ve tried both and I haven’t noticed better (or worse) results from either way.
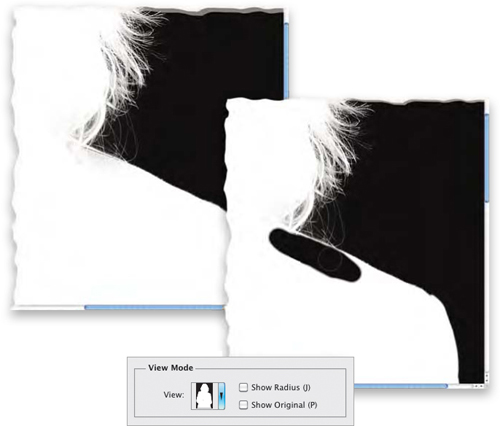
STEP EIGHT:
Every once in a while, you’ll use the Refine Radius tool and paint over an area that you didn’t want to paint over. You may notice it immediately, but sometimes it’s hard to spot. Either way, it’s always good to press the K key to set the View mode of Refine Edge to the On Black & White view, where you can see missed areas more clearly. Here, you can immediately see that we’re missing part of her jacket on the right where her shoulder meets her hair. So, press-and-hold the Option (PC: Alt) key and paint over that area to bring it back.
STEP NINE:
The selection is looking good now. So, just choose Layer Mask from the Output To pop-up menu at the bottom of the dialog, and click OK. Now, we have our subject selected from the background, with a layer mask.
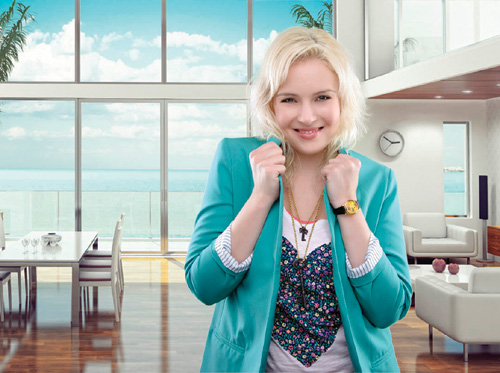
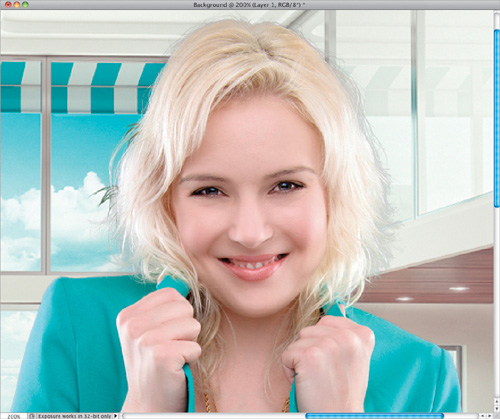
STEP 10:
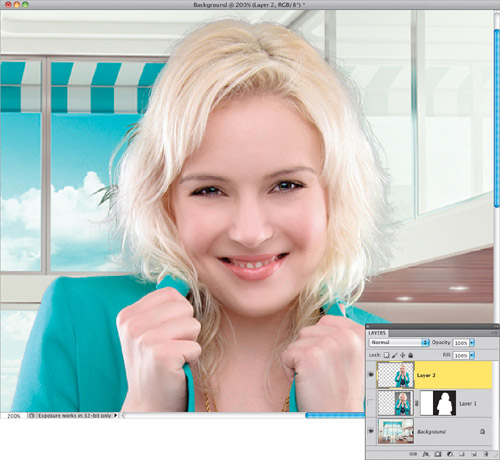
Open a background image to place the subject on. In this case, I’m using something that has a lot of bright natural light in it, since our subject has light on both sides of her hair and I think a bright background fits her best. Once the background is open, switch back to the photo of the subject, select the Move tool from the Toolbox (just press V), and then drag the photo of the subject onto the new background and position her on the right. If your subject is larger than the new background, press Command-T (Ctrl-T) to bring up Free Transform, press-and-hold the Shift key, and then click-and-drag a corner handle inward to resize (press Command-0 [Zero;PC: Ctrl-0] if you can’t see the corner handles). Press Return (PC: Enter) to lock in your transformation. Note: If you had to resize your subject to fit in the new background, you may see an outline of your layer mask. Just use a black brush to paint this away on the layer mask.

©ISTOCKPHOTO/EVIRGEN
STEP 11:
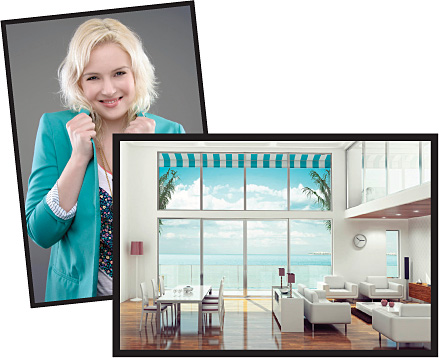
Things are looking pretty good. We’ve selected our subject and we have lots of hair detail selected along with her. But if you zoom in and really look closely at the edges, you’ll see we have a problem: there’s some gray left over from the original background. In the next tutorial, we’ll look at how to fix this.
Refining Hair
We’re seeing a problem with the image in the previous tutorial because we placed our subject on a bright background. If you recall, in the Refine Edge dialog, we were previewing the selection on a black background, so we didn’t see the original background coming through at all. That just goes to show that the background plays a big role in compositing. If we were keeping her on a dark background, we’d be fine and I wouldn’t bother with the edges. But, since that’s not the case, let’s take a look at several ways to refine the hair edges even more using the composite we created in the last tutorial.
Method #1: Inner Glow Layer Style
STEP ONE:
The first method is one of my favorites and has become my go-to technique for refining hair edges. Click on the Add a Layer Style icon at the bottom of the Layers panel and choose Inner Glow.
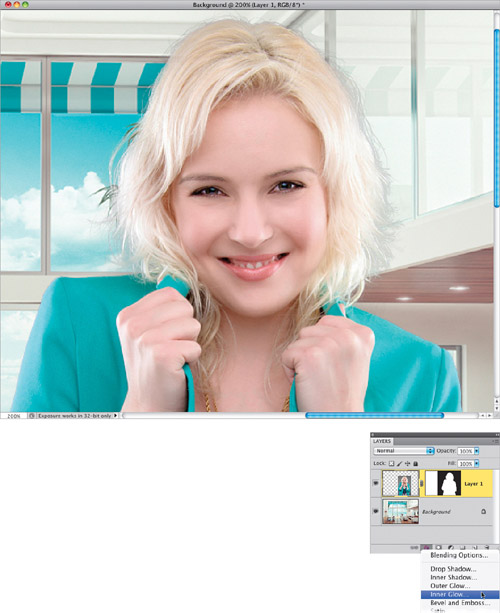
STEP TWO:
When the Layer Style dialog opens, click on the color swatch near the top of the dialog to open the Color Picker. With the Eyedropper, click on an area in the hair that is closest to the overall hair color around it (don’t click on any dark roots or shadows) and then click OK to close the Color Picker. This sets the color of the glow.
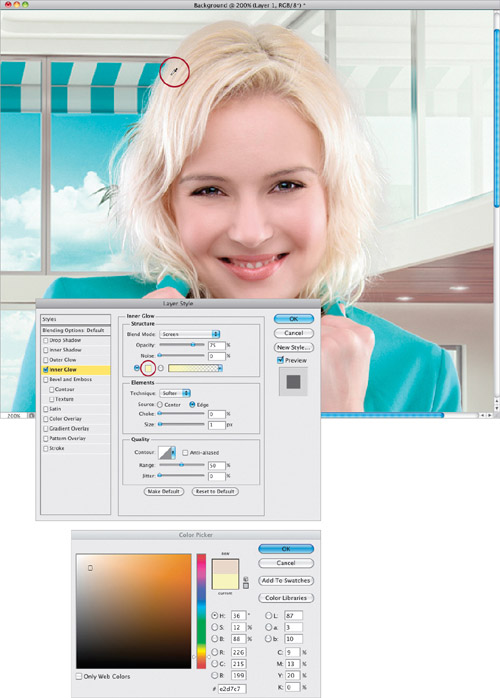
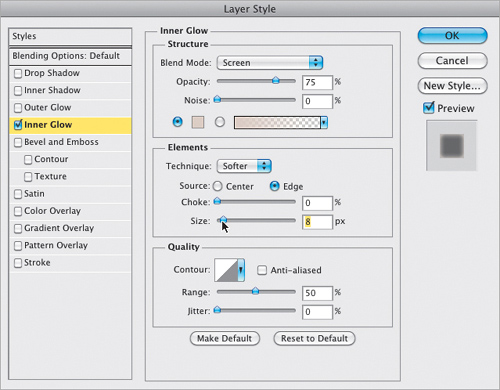
STEP THREE:
Depending on how far the gray background encroaches on the hair, adjust the Size setting to make sure you take all of it away. Then, if needed, adjust the Opacity setting at the top to make the fix brighter or darker, depending on how bright the background is. When you’re done, click OK.
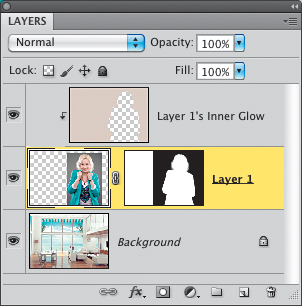
STEP FOUR:
This works great, but it does leave us with one tiny problem. The Inner Glow effect is applied to the entire photo, so even the edges of her jacket get the glow. Now, in this photo, I actually kinda like it. I think it works, since she’s got so much natural light coming from behind her to begin with. But if it doesn’t work for your particular photo, then we can always remove it from the parts we don’t want it to affect. Go to Layer>Layer Style>Create Layer. This puts the effect onto its own layer, so it’s no longer a layer style.
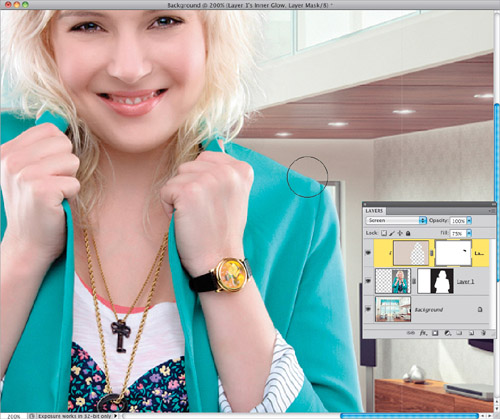
STEP FIVE:
Click on this new layer to make it active, then click on the Add Layer Mask icon at the bottom of the Layers panel. Select the Brush tool (B) and set your Foreground color to black. Then, just paint away the inner glow from any areas you don’t want it to affect. Again, this technique is my favorite and it’s the one I turn to the most when selecting hair.
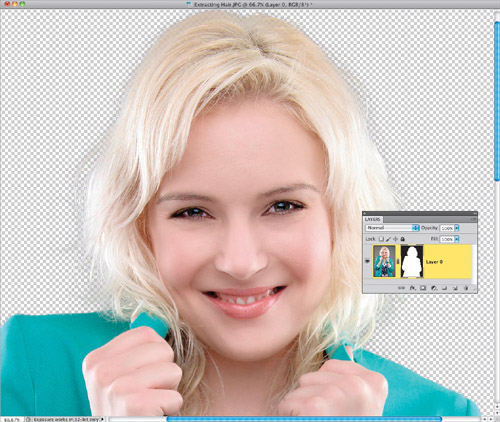
STEP SIX:
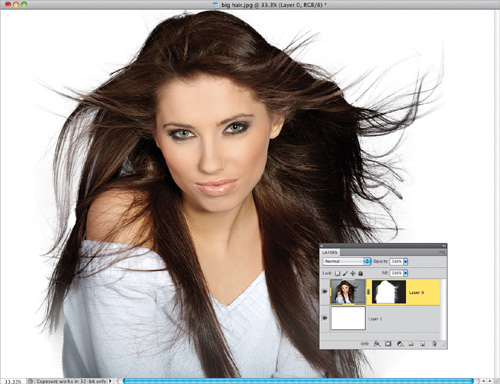
I just wanted to let you know this works for dark hair, too. You just have to change a few settings. Here’s another photo with crazy hair. In fact, I’m not sure it gets any crazier than this. I used the same exact steps as before to select her and her hair from the background. The subject is selected on her original layer with a layer mask and then I added a white layer below. Since it’s white, everything looks great.
STEP SEVEN:
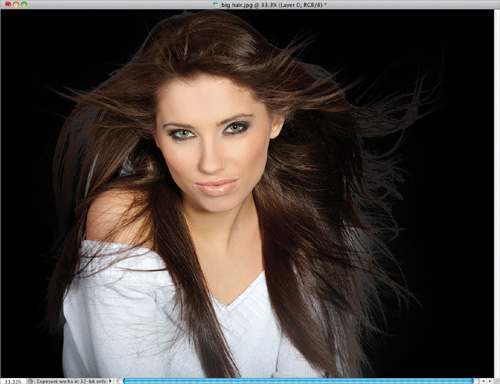
But look at what happens when I place her on a dark background. You’ll see remnants of the brighter background around the edges of her hair. Just a quick aside: In all honesty, I’d never place her on a black background to begin with. I just don’t think it looks right. She’s so brightly lit that she fits in perfectly with a bright background. To me, she looks fake and “pasted in” on the black background, regardless of what’s happening with the edges of her hair. That said, let’s try out the Inner Glow trick just to show you it works here, too.
STEP EIGHT:
Add the Inner Glow layer style just like before. But, this time, first change the Blend Mode from Screen to Multiply (at the top of the dialog), then click on the color swatch to open the Color Picker. Use the Eyedropper to sample a color from her hair and adjust the Size and Opacity settings.
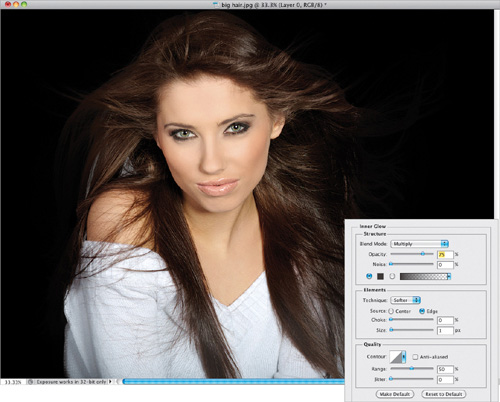
So, for brightly colored hair, use the Screen blend mode (the default) and for dark hair, use Multiply.
Method #2: Layer Matting Options
STEP ONE:
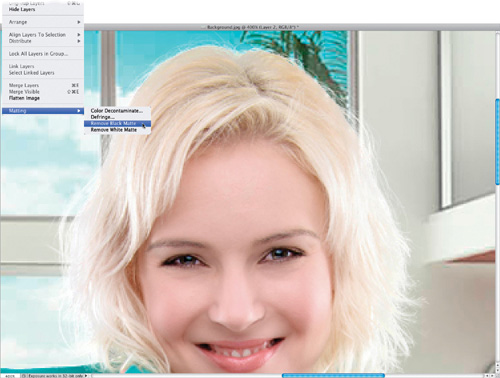
Another method for removing that fringe is to use the Matting options found under the Layer menu. You can’t use them on a layer with a layer mask, though, so you’ll want to make sure you’ve got your selection as good as possible before you do this. So, let’s go back to our blonde subject and Command-click (PC: Ctrl-click) on the layer mask to load it as a selection. Then, click on the layer thumbnail (not the mask) to target it and press Command-J (PC: Ctrl-J) to copy the selected area onto its own layer. Click on the Eye icon to the left of the original layer with the layer mask to hide them, so only the top copy layer is showing.
STEP TWO:
Go to Layer>Matting>Remove Black Matte. This removes those gray edges and sometimes it’s amazing how well it does. It does, though, have two bad side effects, which both affect this photo: (1) it tends to make the darker edges of the hair really bright, like it did here, and (2) sometimes it fries the edges of the hair—meaning they become really crispy. I know it sounds funny to say they’re fried or crisp, but it just tends to make the edges jagged and overly contrasty in certain places. Now, if the edges appear brighter (rather than darker, as they did in this example), then try using Layer>Matting>Remove White Matte.
Method #3: Dodge and Burn
STEP ONE:
I usually use the Dodge and Burn trick as a follow-up to one of the previous techniques. It’s really simple for fixing just a few small stray hairs and not the entire head. In our example, our subject has blonde hair. So, when the hair is light, select the Dodge tool from the Toolbox (or press O). Then, in the Options Bar, set the Range to Midtones, the Exposure to 10%, and turn on the Protect Tones checkbox.
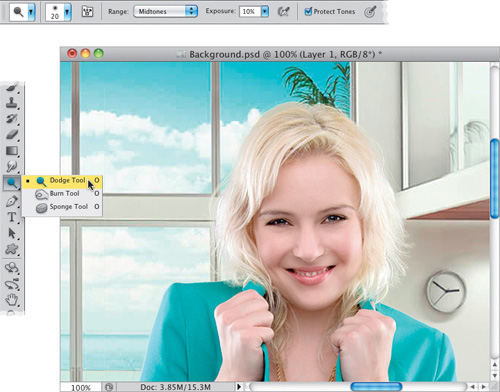
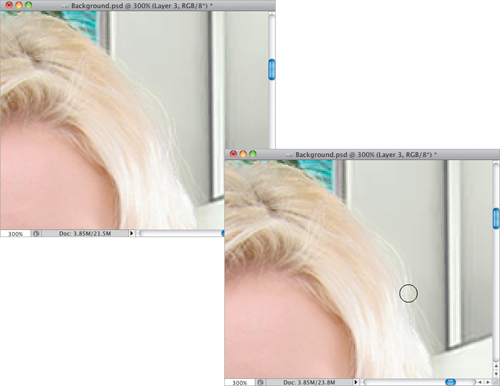
STEP TWO:
Now, just paint on the layer along the edges of the hair that are too dark. Each brush stroke will lighten them, since you’re only using 10% exposure (it’s like opacity). The same thing applies to darker hair with white fringes around it. The only difference is that you’ll use the Burn tool instead. It’s nested beneath the Dodge tool in the Toolbox (or just press Shift-O until you have it). Use the same settings, though.
The Best Background Color for Selecting & Extracting
There has been a lot of debate about what the best color is to photograph a person on so they’re easy to extract in Photoshop. Let’s put this one to rest and take a look at all of them (white, gray, black, and green). You’ll find that, as long as there’s a good amount of contrast between your subject and the background, just about anything will work. In fact, later in the book, you’ll see we don’t have real studio backdrops behind some of the people we’re working with. But, if you’re in a controlled environment (like a studio), when it comes to shooting specifically for compositing and extraction, there’s one color that just makes the most sense.
GRAY:
Let’s start with my favorite choice, gray. Actually, light gray. Here’s a photo of a woman on a white seamless backdrop that has no light aiming at it. The lighting setup is similar to one I wrote about in “10 Things You Need to Know About Compositing”—one light in front and one light on the side to get that nice edge/accent light on her body, face, and hair. Because there’s no light pointing at the background, it falls to a light gray. For me, and the selection tools I work with, light gray seems to work best. Once in a while, if the subject happens to be wearing gray, it can miss a few edges, but it’s always a quick, easy fix. For hair and detailed edges (the hardest part about selecting), gray seems to do the best job.

WHITE:
Here’s a photo of the same woman taken on the same white seamless backdrop, but here it has been lit. In the studio, to keep the background white, you need to point a light at it. If you take a photo of it with no light aimed toward it, the background turns a light (or dark) shade of gray, depending on what other lights are pointed toward it, and how far away the entire setup is from it. White actually works really well for extracting. In fact, I’ve found it’s one of the best colors for Refine Edge to work with. Here are the problems, though:
![]() When we point a light directly at the white background, some of that light inevitably reflects back to the subject and causes a bright light to wash over the edges of their body and clothing. If you’re placing them onto a brightly colored background, it’s not a huge problem. But, if you’re putting them on a darker background, it won’t look right. It’s hard to describe, but when you see it, there’s just something that looks off, because there’s so much bright light around them.
When we point a light directly at the white background, some of that light inevitably reflects back to the subject and causes a bright light to wash over the edges of their body and clothing. If you’re placing them onto a brightly colored background, it’s not a huge problem. But, if you’re putting them on a darker background, it won’t look right. It’s hard to describe, but when you see it, there’s just something that looks off, because there’s so much bright light around them.
![]() The other problem with the all white background is that we’re using one or two edge lights (check out “10 Things You Need to Know About Compositing” for more on lighting). These lights make the edges of the subject’s clothing and skin almost white. Not all-white mind you, but close enough to confuse Refine Edge and make selecting the hair and body a pain.
The other problem with the all white background is that we’re using one or two edge lights (check out “10 Things You Need to Know About Compositing” for more on lighting). These lights make the edges of the subject’s clothing and skin almost white. Not all-white mind you, but close enough to confuse Refine Edge and make selecting the hair and body a pain.

BLACK:
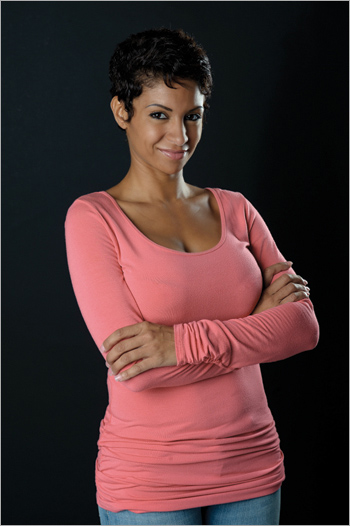
Here’s another photo of the same subject and the same lighting setup we saw with the gray backdrop, but this time we’re using a black backdrop. With no light pointing directly at the background (our main light will cast some light on it), the black stays mostly black. The problem with black is that dark clothes (which are pretty common) don’t give Photoshop enough contrast to select with. Even worse, someone with dark hair really presents a big problem. You have to make sure you light all of the hair to give enough separation for the selection tools to work. Otherwise, dark hair pretty much blends with the black background and is nearly impossible to select.
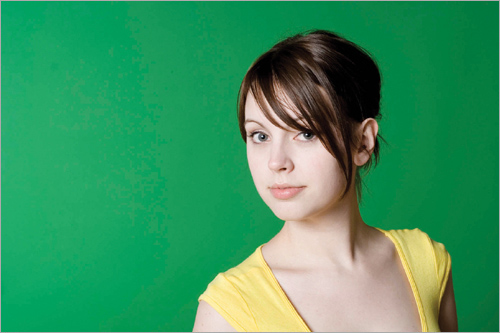
GREEN (OR BLUE):
Finally, here’s a different subject, with the same lighting setup, on a green backdrop. Green (or blue) has always been popular in the video world. A process called “keying” allows most video-related programs to automatically extract people from the background and place them on other backgrounds. Movies (especially those with lots of special effects) use this all the time. But, here’s why I don’t like it for compositing:
![]() The main reason I don’t like it is the green spill that can occur. Light picks up the color of any surface it hits, right? So if you’re lighting your subject in a studio, there’s a good chance that the lights you’re using can reflect off the background and spill green light onto the edges of your subject. There are ways around this, though. Standing a good distance in front of the background always helps to reduce the spillover, but that also means you need a studio with enough depth and space to accommodate.
The main reason I don’t like it is the green spill that can occur. Light picks up the color of any surface it hits, right? So if you’re lighting your subject in a studio, there’s a good chance that the lights you’re using can reflect off the background and spill green light onto the edges of your subject. There are ways around this, though. Standing a good distance in front of the background always helps to reduce the spillover, but that also means you need a studio with enough depth and space to accommodate.
![]() You need more lights. You have to light the background evenly, which usually requires at least one, if not two, lights. Then, you need to light your subject. So, lighting can quickly go from three lights to five.
You need more lights. You have to light the background evenly, which usually requires at least one, if not two, lights. Then, you need to light your subject. So, lighting can quickly go from three lights to five.
![]() It’s just more difficult. Chances are there’s a white backdrop nearby in a photo studio, but unless you’re set up only for compositing, green probably isn’t as close at hand as white.
It’s just more difficult. Chances are there’s a white backdrop nearby in a photo studio, but unless you’re set up only for compositing, green probably isn’t as close at hand as white.
I’m not saying that green backgrounds are always bad. If you’ve got the setup and are comfortable lighting it, it can work really well. It just takes a little more setup and know-how to do it. For me, a white background (and letting it turn to a light gray) is the way to go.