Chapter 8
Making and Modifying Selections
IN THIS CHAPTER
![]() Creating selections with the Lasso tools, Magic Wand, and more
Creating selections with the Lasso tools, Magic Wand, and more
![]() Using the Cookie Cutter tool
Using the Cookie Cutter tool
![]() Rubbing away pixels with the Eraser tools
Rubbing away pixels with the Eraser tools
![]() Saving and loading your selections
Saving and loading your selections
If all you want to do is use your photos in all their unedited glory, feel free to skip this chapter and move on to other topics. But if you want to occasionally pluck an element out of its environment and stick it in another or apply an adjustment to just a portion of your image, this chapter’s for you.
Finding out how to make accurate selections is one of those skills that’s well worth the time you invest. In this chapter, we cover all the various selection tools and techniques. We also give you tips on which tools are better for which kinds of selections. But remember that you usually have several ways to achieve the same result. Which road you choose is ultimately up to you.
Defining Selections
Before you dig in and get serious about selecting, let us clarify for the record what we mean by “defining a selection.” When you define a selection, you specify which part of an image you want to work with. Everything within a selection is considered selected. Everything outside the selection is unselected. After you have a selection, you can then adjust only that portion, and the unselected portion remains unchanged. Or you can copy the selected area into another image altogether. Want to transport yourself out of your background and onto a white, sandy beach? Select yourself out of that backyard BBQ photo, get a stock photo of the tropical paradise of your choice, and drag and drop yourself onto your tropics photo with the Move tool. It’s that easy.
When you make a selection, a dotted outline — dubbed a selection border, an outline, or a marquee — appears around the selected area. Elements, the sophisticated imaging program that it is, also allows you to partially select pixels, which allows for soft-edged selections. You create soft-edged selections by feathering the selection or by using a mask. Don’t worry: We cover these techniques in the section “Applying Marquee options,” later in this chapter.
 For all the selection techniques described in this chapter, be sure that your image is in Expert mode in the Photo Editor and not in Quick or Guided mode or in the Organizer.
Creating Rectangular and Elliptical Selections
If you can drag a mouse, you can master the Rectangular and Elliptical Marquee tools. These are the easiest selection tools to use, so if your desired element is rectangular or elliptical, by all means, grab one of these tools.
The Rectangular Marquee tool, as its moniker states, is designed to define rectangular (including square) selections. This tool is great to use if you want to home in on the pertinent portion of your photo and eliminate unnecessary background.
Here’s how to make a selection with this tool:
Select the Rectangular Marquee tool from the Tools panel.
The tool looks like a dotted square. You can also press M to access the tool. If the tool isn’t visible, press M again.
Drag from one corner of the area you want to select to the opposite corner.
While you drag, the selection border appears. The marquee follows the movement of your mouse cursor.
Release your mouse button.
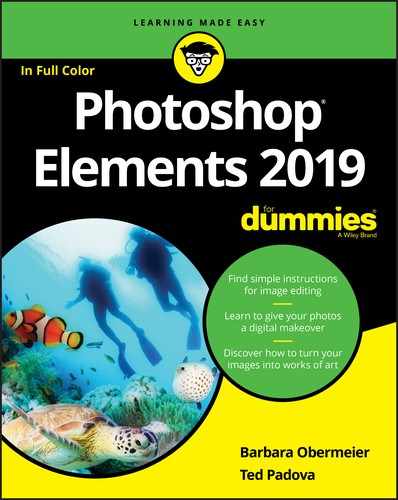
You have a completed rectangular selection, as shown in Figure 8-1.
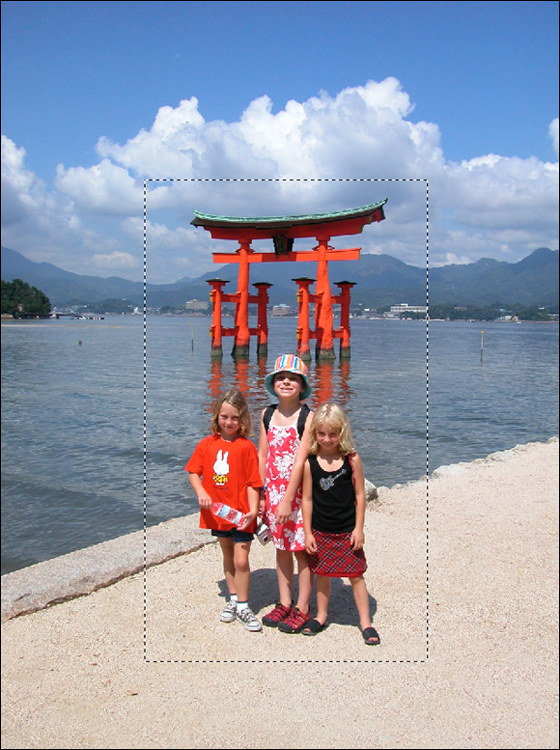
FIGURE 8-1: Use the Rectangular Marquee tool to create rectangular selections.
The Elliptical Marquee tool is designed for elliptical (including circular) selections. This tool is perfect for selecting balloons, clocks, and other rotund elements.
Here’s how to use the Elliptical Marquee:
Select the Elliptical Marquee tool from the Tools panel.
The tool looks like a dotted ellipse. You can also press M to access this tool if it’s visible; if it isn’t, press M again.
Position the crosshair near the area you want to select and then drag around your desired element.
With this tool, you drag from a given point on the ellipse. While you drag, the selection border appears.
When you’re satisfied with your selection, release the mouse button.
Your elliptical selection is created, as shown in Figure 8-2. If your selection isn’t quite centered around your element, simply move the selection border by dragging inside the border.

© happymay/Shutterstock Image #417438340
FIGURE 8-2: The Elliptical Marquee tool is perfect for selecting round objects.
 You can move a selection while you’re making it with either of the Marquee tools by holding down the spacebar while you’re dragging.
Perfecting squares and circles with Shift and Alt (Option on the Mac)
Sometimes you need to create a perfectly square or circular selection. To do so, simply press the Shift key after you begin dragging. After you make your selection, release the mouse button and then release the Shift key. You can also set the aspect ratio to 1:1 in the Tool Options.
When you’re making an elliptical selection, making the selection from the center outward is often easier. To draw from the center, first click the mouse button where you want to position the center, press Alt (Option on the Mac), and then drag. After making your selection, release the mouse button and then release the Alt (Option on the Mac) key.
If you want to draw from the center outward and create a perfect circle or square, press the Shift key as well. After you make your selection, release the mouse button and then release the Shift+Alt (Shift+Option on the Mac) keys.
Applying Marquee options
The Marquee tools offer additional options when you need to make precise selections at specific measurements. You also find options for making your selections soft around the edges.
The only thing to remember is that you must select the options in the Tool Options, as shown in Figure 8-3, before you make your selection with the Marquee tools. Options can’t be applied after the selection has already been made. The exception is that you can feather a selection after the fact by choosing Select ⇒ Feather.

FIGURE 8-3: Apply Marquee settings in the Tool Options.
Here are the various Marquee options available to you:
Feather: Feathering creates soft edges around your selection. The amount of softness depends on the value, from 0 to 250 pixels, that you enter by adjusting the slider. The higher the value, the softer the edges, as shown in Figure 8-4. Very small amounts of feathering can be used to create subtle transitions between selected elements in a collage or for blending an element into an existing background. Larger amounts are often used when you’re combining multiple layers so that one image gradually fades into another. If you want a selected element to have just a soft edge without the background, simply choose Select ⇒ Inverse and delete the background. See more on inversing selections in the “Modifying Your Selections” section, later in this chapter. For more on layers, see Chapter 9.
Don’t forget that those soft edges represent partially selected pixels.- Anti-aliasing: Anti-aliasing barely softens the edge of an elliptical or irregularly shaped selection so that the jagged edges aren’t quite so obvious. An anti-aliased edge is always only 1 pixel wide. We recommend leaving this option chosen for your selections. Doing so can help to create natural transitions between multiple selections when you’re creating collages.
- Aspect: The Aspect drop-down list contains three settings:
- Normal: The default setting, which allows you to freely drag a selection of any size.
- Fixed Ratio: Lets you specify a fixed ratio of width to height. For example, if you enter 3 for width and 1 for height, you get a selection that’s three times as wide as it is high, no matter what the size.
- Fixed Size: Lets you specify desired values for the width and height. This setting can be useful when you need to make several selections that must be the same size.
- Width (W) and Height (H): When you choose Fixed Ratio or Fixed Size from the Aspect drop-down list, you must also enter your desired values in the Width and Height text boxes. To swap the Width and Height values, click the double-headed arrow button between the two measurements.
Refine Edge: For details on this great option, see “Refining the edges of a selection,” later in this chapter.
The default unit of measurement in the Width and Height text boxes is pixels (px), but that doesn’t mean that you’re stuck with it. You can enter any unit of measurement that Elements recognizes: pixels, inches (in), centimeters (cm), millimeters (mm), points (pt), picas (pica), or percentages (%). Type your value and then type the word or abbreviation of your unit of measurement.

© Mikadun/Shutterstock Image #65367541
FIGURE 8-4: Feathering creates soft-edged selections.
Making Freeform Selections with the Lasso Tools
You can’t select everything with a rectangle or an ellipse. Life is just way too freeform for that. Most animate, and many inanimate, objects have undulations of varying sorts. Luckily, Elements anticipated the need to capture these shapes and provided the Lasso tools.
The Lasso tools enable you to make any freehand selection you can think of. Elements generously provides three types of Lasso tools:
- Lasso
- Polygonal
- Magnetic
Although all three tools are designed to make freeform selections, they differ slightly in their methodology, as we explain in the sections that follow.
To use these tools, all that’s really required is a steady hand. You’ll find that the more you use the Lasso tools, the better you become at your tracing technique. Don’t worry if your initial lasso selection isn’t super-accurate. You can always go back and make corrections by adding and deleting from your selection. To find out how, see the section “Modifying Your Selections,” later in this chapter.
If you find that you really love the Lasso tools, you may want to invest in a digital drawing tablet and stylus. This device makes tracing (and also drawing and painting) on the computer more comfortable. It better mimics pen and paper, and many users swear that they’ll never go back to a mouse after trying it out. This is especially handy for laptop users. Accurately drawing on a trackpad can make you downright cranky.
Selecting with the Lasso tool
Using the Lasso tool is the digital version of tracing an outline around an object on a piece of paper. It’s that easy. And you have only three choices in the Tool Options — Feather, Anti-aliasing, and Refine Edge. To find out more about Feather and Anti-aliasing, see the section “Applying Marquee options,” earlier in this chapter. For the scoop on Refine Edge, see the section “Refining the edges of a selection,” later in this chapter.
Here’s how to make a selection with the Lasso tool:
Select the Lasso tool from the Tools panel.
It’s the tool that looks like a rope. You can also just press the L key. If the Lasso tool isn’t visible, press L to cycle through the various Lasso flavors.
Position the cursor anywhere along the edge of the object you want to select.
The leading point of the cursor is the protruding end of the rope, as shown in Figure 8-5. Don’t be afraid to zoom in to your object, using the Zoom tool — or, more conveniently, pressing Control++ (⌘ ++ on the Mac) — if you need to see the edge more distinctly. In this figure, we started at the top of the sunflower.
Hold down the mouse button and trace around your desired object.
Try to include only what you want to select. While you trace around your object, an outline follows the mouse cursor.
 Try not to release the mouse button until you return to your starting point. When you release the mouse button, Elements assumes that you’re done and closes the selection from wherever you released the mouse button to your starting point; if you release the button too early, Elements creates a straight line across your image.
Continue tracing around the object and return to your starting point; release the mouse button to close the selection.
You see a selection border that matches your lasso line. Look for a small circle that appears next to your lasso cursor when you return to your starting point. This icon indicates that you’re closing the selection at the proper spot.
© Aleksey Stemmer/Shutterstock Image #80233594
FIGURE 8-5: The Lasso tool makes freeform selections.
Getting straight with the Polygonal Lasso tool
The Polygonal Lasso tool has a specific mission in life: to select any element whose sides are straight. Think pyramids, stairways, skyscrapers, barns — you get the idea. It also works a tad differently from the Lasso tool. You don’t drag around the element with the Polygonal Lasso. Instead, you click and release the mouse button at the corners of the element you’re selecting. The Polygonal Lasso tool acts like a stretchy rubber band.
Follow these steps to select with the Polygonal Lasso tool:
Select the Polygonal Lasso tool from the Tools panel.
You can also press the L key to cycle through the various Lasso tools. The tool looks like a straight-sided lasso rope.
Click and release at any point to start the Polygonal Lasso selection line.
We usually start at a corner.
Move (don’t drag) the mouse and click at the next corner of the object. Continue clicking and moving to each corner of your element.
Notice how the line stretches out from each point you click.
Return to your starting point and click to close the selection.
Be on the lookout for a small circle that appears next to your lasso cursor when you return to your starting point. This circle is an indication that you’re indeed closing the selection at the right spot.Note: You can also double-click at any point, and Elements closes the selection from that point to the starting point.
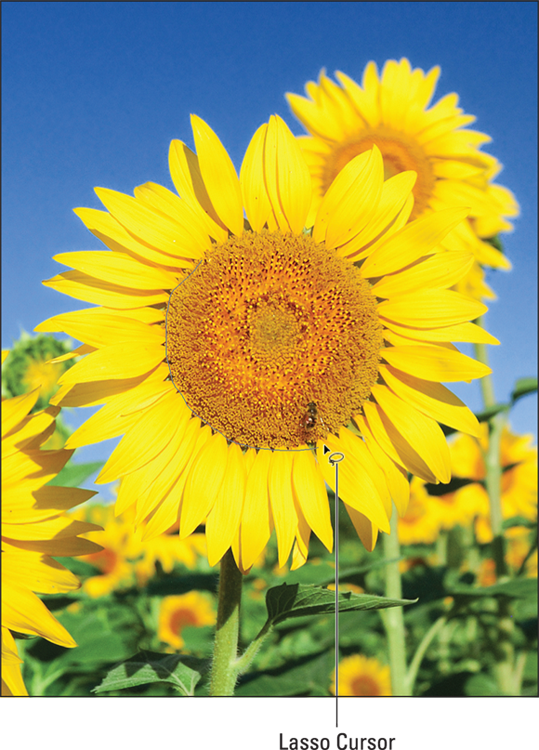
After you close the polygonal lasso line, a selection border appears, as shown in Figure 8-6.
© WitR/Shutterstock Image #91826000
FIGURE 8-6: After you close the polygonal lasso line, Elements creates a selection border.
Snapping with the Magnetic Lasso tool
The third member of the Lasso team is the Magnetic Lasso. We aren’t huge fans of this Lasso tool, which can sometimes be hard to work with. However, we show you how it works so that you can decide whether to use it. The Magnetic Lasso tool works by defining the areas of the most contrast in an image and then snapping to the edge between those areas, as though the edge has a magnetic pull.
You have the most success using the Magnetic Lasso tool on an image that has a well-defined foreground object and high contrast between that element and the background — for example, a dark mountain range against a light sky.
The Magnetic Lasso tool also has some unique settings, which you can adjust in the Tool Options before you start selecting:
- Width: Determines how close to the edge (between 1 and 256 pixels) you have to move your mouse before the Magnetic Lasso tool snaps to that edge. Use a lower value if the edge has a lot of detail or if the contrast in the image is low. Use a higher value for high-contrast images or smoother edges.
- Contrast: Specifies the percentage of contrast (from 1 percent to 100 percent) that’s required before the Magnetic Lasso snaps to an edge. Use a higher percentage if your image has good contrast between your desired element and the background.
- Frequency: Specifies how many fastening points (from 1 to 100) to place on the selection line. The higher the value, the greater the number of points. As a general rule, if the element you want to select has a smooth edge, keep the value low. If the edge has a lot of detail, try a higher value.
- Tablet Pressure (pen icon): If you’re the proud owner of a pressure-sensitive drawing tablet, select this option to make an increase in stylus pressure cause the edge width to decrease.
Follow these steps to use the Magnetic Lasso tool:
Select the Magnetic Lasso tool from the Tools panel.
You can also press the L key to cycle through the various Lasso tools. The Magnetic Lasso tool looks like a straight-sided lasso with a little magnet on it.
Click the edge of the object that you want to select to place the first fastening point.
Fastening points anchor the selection line, as shown in Figure 8-7. You can start anywhere; just be sure to click the edge between the element you want and the background you don’t want.
Continue to move your cursor around the object without clicking.
While the selection line gets pinned down with fastening points, only the newest portion of the selection line remains active.
If the Magnetic Lasso tool starts veering off the desired edge of your object, back up your mouse and click to force down a fastening point. Conversely, if the Magnetic Lasso tool adds a fastening point where you don’t want one, press Backspace (Delete on the Mac) to delete it. Successive presses of the Backspace or Delete key continue to remove the fastening points.
If the Magnetic Lasso isn’t cooperating, you can temporarily switch to the other Lasso tools. To select the Lasso tool, hold down Alt (Option on the Mac), click the mouse button, and drag. To select the Polygonal Lasso tool, hold down Alt (Option on the Mac) and click.Return to your starting point and click the mouse button to close the selection.
You see a small circle next to your cursor, indicating that you’re at the right spot to close the selection. You can also double-click, whereby Elements closes the selection from where you double-clicked to your starting point. The selection border appears when the selection is closed.

FIGURE 8-7: The Magnetic Lasso tool snaps to the edge of your element and places fastening points to anchor the selection.
Working Wizardry with the Magic Wand
The Magic Wand tool is one of the oldest tools in the world of digital imaging. This beloved tool has been around since Photoshop was in its infancy and Elements was not yet a twinkle in Adobe’s eye. It’s extremely easy to use, but you’ll have a somewhat harder time predicting what selection results it will present.
Here’s how the Magic Wand tool works: You click inside the image, and the Magic Wand tool makes a selection. This selection is based on the color of the pixel you clicked. If other pixels are similar in color to your target pixel, Elements includes them in the selection. What’s sometimes hard to predict, however, is how to determine how similar the color has to be to get the Magic Wand tool to select it. Fortunately, that’s where the Tolerance setting comes in. In the sections that follow, we first introduce you to this setting and then explain how to put the Magic Wand to work.
Talking about Tolerance
The Tolerance setting determines the range of color that the Magic Wand tool selects. The range of color is based on brightness levels, ranging from 0 to 255:
- Setting the Tolerance to 0 selects one color only.
- Setting the Tolerance to 255 selects all colors, or the whole image.
The default setting is 32, so whenever you click a pixel, Elements analyzes the value of that base color and then selects all pixels whose brightness levels are between 16 levels lighter and 16 levels darker.
What if an image contains a few shades of the same color? It’s not a huge problem. You can make multiple clicks of the Magic Wand to pick up additional pixels that you want to include in the selection. You can find out how in the section “Modifying Your Selections,” later in this chapter. Or you can try a higher Tolerance setting. Conversely, if your wand selects too much, you can lower your Tolerance setting.
So you can see by our talk on tolerance that the Magic Wand tool works best when you have high-contrast images or images with a limited number of colors. For example, the optimum image for the Wand would be a solid black object on a white background. Skip the wand if the image has a ton of colors and no real definitive contrast between your desired element and the background.
Wielding the Wand to select
To use the Magic Wand tool and adjust its Tolerance settings, follow these steps:
Select the Magic Wand tool from the Tools panel.
It looks like a wand with a starburst on the end. You can also just press A to cycle through the Magic Wand, Quick Selection, and Selection Brush tools. Or you can choose any of the tools and then select your desired tool in the Tool Options.
Click anywhere on your desired element, using the default Tolerance setting of 32.
The pixel you click determines the base color.If the Pixel Gods are with you and you selected everything you want on the first click, you’re done. If your selection needs further tweaking, like the top image shown in Figure 8-8, continue to Step 3.
Specify a new Tolerance setting in the Tool Options.
If the Magic Wand selects more than you want, lower the Tolerance setting. If the wand didn’t select enough, increase the value. While you’re poking around in the Tool Options, here are a couple more options to get familiar with:
- Sample All Layers: If you have multiple layers and enable this option, the Magic Wand selects pixels from all visible layers. Without this option, the tool selects pixels from the active layer only. For more on layers, see Chapter 9.
- Contiguous: Forces the Magic Wand to select only pixels that are adjacent to each other. Without this option, the tool selects all pixels within the range of tolerance, whether or not they’re adjacent to each other.
- Anti-aliasing: Softens the edge of the selection by one row of pixels. See the section “Applying Marquee options,” earlier in this chapter, for details.
- Refine Edge: Click the Refine Edge button. In the Refine Edge dialog box, clean up your selection by moving the Smooth slider to reduce the amount of jagginess in your edges. Feather works like the Feather option discussed in the “Applying Marquee options” section, earlier in the chapter. Move the Shift Edge slider to the left or right to decrease or increase the selected area, respectively. For even more details, see the section “Refining the edges of a selection,” later in this chapter. We explain yet another way to refine edges (which you don’t find in the Tool Options) in “Applying the Grow and Similar commands,” also later in this chapter.
Click your desired element again.
Unfortunately, the Magic Wand tool isn’t magical enough to modify your first selection automatically. Instead, it deselects the current selection and makes a new selection based on your new Tolerance setting. If it still isn’t right, you can adjust the Tolerance setting again. Try, try again.

© Brocreative/Shutterstock Image #264071576
FIGURE 8-8: The Magic Wand selects pixels based on a specified Tolerance setting.
Modifying Your Selections
It’s time for a seventh-inning stretch in this chapter on selection tools. In this section, you find out how to refine that Marquee, Lasso, or Magic Wand selection to perfection.
You’re not limited to the manual methods described in the following sections or even to keyboard shortcuts. You can also use the four selection option buttons on the left side of the Tool Options to create a new selection (the default), add to a selection, subtract from a selection, or intersect one selection with another. Just choose your desired selection tool, click the selection option button you want, and drag (or click if you’re using the Magic Wand or Polygonal Lasso tool).
Adding to, subtracting from, and intersecting a selection
Although the Marquee, Lasso, and Magic Wand tools do an okay job of capturing the bulk of your selection, if you take the time to add or subtract a bit from your selection border, you can ensure that you get only what you really want:
Add: If your selection doesn’t quite contain all the elements you want to capture, you need to add those portions to your current selection border. To add to a current Marquee selection, simply press the Shift key and drag around the area you want to include. If you’re using the Polygonal Lasso, click around the area. And if you’re wielding the Magic Wand, just press the Shift key and click the area you want.
You don’t have to use the same tool to add to your selection that you used to create the original selection. Feel free to use whatever selection tool you think can get the job done. For example, it’s very common to start off with the Magic Wand and fine-tune with the Lasso tool.- Subtract: Got too much? To subtract from a current selection, press the Alt (Option on the Mac) key and drag the marquee around the pixels you want to subtract. With the Alt (Option on the Mac) key, use the same method for the Magic Wand and Polygonal Lasso as you do for adding to a selection.
- Intersect two selections: Get your fingers in shape. To intersect your existing selection with a second selection, press Shift+Alt (Shift+Option on the Mac) and drag with the Lasso or Marquee tools. Or, if you’re using the Magic Wand or Polygonal Lasso, press those keys and click rather than drag. Your selection now includes only the area common to both selections.
Avoiding key collisions
If you read the beginning of this chapter, you found out that by pressing the Shift key, you get a perfectly square or circular selection. We tell you in the section “Adding to, subtracting from, and intersecting a selection,” earlier in this chapter, that if you want to add to a selection, you press the Shift key. What if you want to create a perfect square while adding to the selection? Or what if you want to delete part of a selection while also drawing from the center outward? Both require the use of the Alt (Option on the Mac) key. How in the heck does Elements know what you want? Here are two tips to avoid keyboard collisions — grab your desired Marquee tool:
- To add a square or circular selection, press Shift and drag. While you drag, keep the mouse button pressed, release the Shift key for just a second, and then press it again. Your added selection area suddenly snaps into a square or circle. You must then release the mouse button and then release the Shift key.
- To delete from an existing selection while drawing from the center outward, press Alt (Option on the Mac) and drag. While you drag, keep the mouse button pressed, release the Alt (Option on the Mac) key for just a second, and then press it down again. You’re now drawing from the center outward. Again, release the mouse button first and then release the Alt (Option on the Mac) key.
You can also use the selection option buttons in the Tool Options.
Painting with the Selection Brush
If you like the organic feel of painting on a canvas, you’ll appreciate the Selection Brush. Using two different modes, you can either paint over areas of an image that you want to select or paint over areas you don’t want to select. This great tool also lets you first make a basic selection with another tool, such as the Lasso, and then fine-tune the selection by brushing additional pixels into or out of the selection.
Here’s the step-by-step process of selecting with the Selection Brush:
Select the Selection Brush from the Tools panel.
It looks like a paintbrush with a dotted oval around the tip. Or simply press the A key to cycle through the Selection Brush, Quick Selection, and Magic Wand tools. You can also select any of these tools and then choose your desired tool in the Tool Options.
This tool works in either Expert or Quick mode.Specify your Selection Brush options in the Tool Options.
Here’s the rundown on each option:
Mode: Choose Selection if you want to paint over what you want to select or Mask if you want to paint over what you don’t want.
If you choose Mask mode, you must choose some additional overlay options. An overlay is a layer of color (that shows onscreen only) that hovers over your image, indicating protected or unselected areas. You must also choose an overlay opacity between 1 and 100 percent (which we describe in the Tip at the end of these steps). You can change the overlay color from the default red to another color. This option can be helpful if your image contains a lot of red.
- Brush Presets Picker: Choose a brush from the presets drop-down list. To load additional brushes, click the downward-pointing arrow to the right of Default Brushes and choose the preset library of your choice. You can select the Load Brushes command from the panel menu (top-right down-pointing arrow).
- Size: Specify a brush size, from 1 to 2,500 pixels. Enter the value or drag the slider.
- Hardness: Set the hardness of the brush tip, from 1 to 100 percent. A harder tip creates a crisper, more defined stroke.
Paint the appropriate areas:
If your mode is set to Selection: Paint over the areas you want to select.
You see a selection border. Each stroke adds to the selection. (The Add to Selection button in the Tool Options is selected automatically.) If you inadvertently add something you don’t want, simply press the Alt (Option on the Mac) key and paint over the undesired area. You can also click the Subtract from Selection button in the Tool Options. After you finish painting what you want, your selection is ready to go.
If your mode is set to Mask: Paint over the areas that you don’t want to select.
When you’re done painting your mask, choose Selection from the Selection/Mask drop-down list or simply choose another tool from the Tool Options, in order to convert your mask into a selection border. Remember that your selection is what you don’t want.
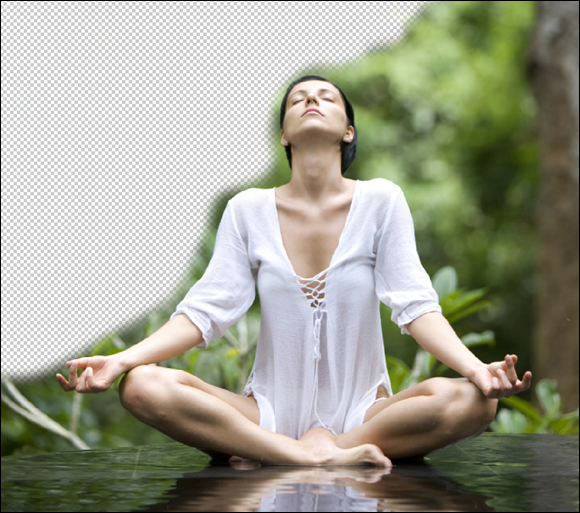
While you paint, you see the color of your overlay. Each stroke adds more to the overlay area, as shown in Figure 8-9. In the example, the sky is masked (with a red overlay) to replace it with a different sky. When working in Mask mode, you’re essentially covering up, or masking, the areas you want to protect from manipulation. That manipulation can be selecting, adjusting color, or performing any other Elements command. Again, if you want to remove parts of the masked area, press Alt (Option on the Mac) and paint.
If you painted your selection in Mask mode, your selection border is around what you don’t want. To switch to what you do want, choose Select ⇒ Inverse.

© Hanis/iStockphoto #2054524
FIGURE 8-9: The Selection Brush allows you to make a selection (right) by creating a mask (left).
Which mode should you choose? Well, it’s up to you. But one advantage to working in Mask mode is that you can partially select areas. By painting with soft brushes, you create soft-edged selections. These soft edges result in partially selected pixels. If you set the overlay opacity to a lower percentage, your pixels are even less opaque, or “less selected.” If this partially selected business sounds vaguely familiar, it’s because this is also what happens when you feather selections, as we discuss in the section “Applying Marquee options,” earlier in this chapter.
Painting with the Quick Selection Tool
Think of the Quick Selection tool as a combination Brush, Magic Wand, and Lasso tool. Good news — it lives up to its “quick” moniker. Better news — it’s also easy to use. The best news? It gives pretty decent results, so give it a whirl.
Here’s how to make short work of selecting with this tool:
Select the Quick Selection tool from the Tools panel.
The tool looks like a wand with a marquee around the end. It shares the same Tools panel space with the Selection Brush tool and the Magic Wand tool. You can also press the A key to cycle through the Quick Selection, Selection Brush, and Magic Wand tools.
This tool works in either Expert or Quick mode.Specify the options in the Tool Options.
Here’s a description of the options:
- New Selection: The default option enables you to create a new selection. There are also options to add to and subtract from your selection.
- Size: Choose your desired brush size. Specify the diameter, from 1 to 2,500 pixels.
- Brush Settings: With these settings, you can specify hardness, spacing, angle, and roundness. For details on these settings, see Chapter 13.
- Sample All Layers: If your image has layers and you want to make a selection from all the layers, select this option. If you leave it deselected, you will select only from the active layer.
- Auto-Enhance: Select this option to have Elements automatically refine your selection by implementing an algorithm.
Drag or paint the desired areas of your image.
Your selection grows as you drag, as shown in Figure 8-10. If you stop dragging and click in another portion of your image, your selection includes that clicked area.
Add to or delete from your selection, as desired:
- To add to your selection, press the Shift key while dragging across your desired image areas.
- To delete from your selection, press the Alt (Option on the Mac) key while dragging across your unwanted image areas.
You can also select the Add to Selection and Subtract from Selection options in the Tool Options.
If you need to fine-tune your selection, click the Refine Edge option in the Tool Options and then change the settings, as desired.
The settings are explained in detail in the “Refining the edges of a selection” section, later in this chapter.
Note: If your object is fairly detailed, you may even need to break out the Lasso or another selection tool to make some final cleanups. Eventually, you should arrive at a selection you’re happy with.

© Serega K Photo and Video/Shutterstock Image #67221406
FIGURE 8-10: Paint a selection with the Quick Selection tool.
Selecting with the Auto Selection Tool
If the selection tools described so far in this chapter seem a little too taxing, this tool is made for you. The Auto Selection tool lives up to its name by quickly and easily selecting your desired object. This intelligent tool takes your rough selection, analyzes the pixels, and determines the object it thinks you want within that rough selection. It then snaps to that object.
Here’s how to use this genius tool:
Select the Auto Selection tool from the Tools panel.
The tool looks like a wand with three small yellow stars around the end, as shown in Figure 8-11. It shares the same Tools panel space with the Quick Selection, Selection Brush, and Magic Wand tools. You can also press the A key to cycle through those tools. Note that, by default, the New Selection option is highlighted.
This tool works in either Expert or Quick mode.- Choose which tool you want to use to make your rough selection in the Tool Options. You can choose from the Rectangular and Elliptical Marquee tools or the Lasso and Poloygonal Lasso tools.
- Specify other options in the Tool Options:
- Sample All Layers: If your image has layers and you want to make a selection from all the layers, select this option. If you leave it deselected, you will select only from the active layer.
- Constrain Selection: This option will keep your marquee selections perfectly square or circular.
Make a rough selection around the desired object in your image.
We used the Lasso tool and selected the girl, as shown in Figure 8-11.
When you release your mouse after making the selection, Elements smartly analyzes the pixels and snaps to your selected object, as shown in Figure 8-11.
Add or subtract from your selection as needed.
- To add to your selection, press the Shift key while dragging across your desired image areas.
- To delete from your selection, press the Alt key (Option key on the Mac) while dragging across your unwanted image areas.
You can also select the Add to Selection and Subtract from Selection options in the Tool Options.
If you need to fine-tune your selection, click the Refine Edge option in the Tool Options and adjust the settings, as desired.
The settings are explained in detail in the “Refining the edges of a selection” section, later in this chapter.

FIGURE 8-11: The Auto Selection tool easily and quickly selects your object.
If you think the Auto Selection tool is a game changer, you must check out the Background Changer Guided Edit. This edit, found under the Special Edits in Guided mode, lets you change the background in your image and even add a custom background.
Fine-Tuning with the Refine Selection Brush
As we mention in the beginning of this chapter, being able to make selections quickly and accurately is a coveted skill. Luckily, Elements has an additional tool to make this skill easier to obtain. The Refine Selection Brush helps you to add or delete portions of your selection by automatically detecting edges of your desired element.
Here’s how to refine your selections with this tool:
Make your selection using the Quick Selection tool, Selection Brush, or any other selection tool, for that matter.
Elements doesn’t care how you make your initial selection, as long as you have one. Don’t worry if it isn’t perfect. That’s where the Refine Selection Brush comes in.
Select the Refine Selection Brush.
This tool shares a tool slot with the Quick Selection tool, Magic Wand, Selection Brush, and Smart Selection tool.
Your cursor appears as two concentric circles, as shown in Figure 8-12. The outer circle reflects the Tolerance setting to detect an edge. For more on tolerance, see “Talking about Tolerance,” earlier in this chapter.
Specify the settings in the Tool Options.
Here’s a description of the options:
- Size: Use the slider to adjust your brush diameter from 1 to 2,500 pixels.
- Snap Strength: Use the slider to adjust your snap strength from 0 to 100%. Snap Strength indicates the intensity of the pull.
- Selection Edge: Use the slider to determine how hard or soft you want your edge. If you have an object that has wispier edges, such as hair, fur, or feathers, moving the slider more toward soft may be more effective in getting your desired selection. If you set your mode to Add and press and hold your cursor on your object, the selection within your concentric circles grows. Specifically, the lighter colored area around your center circle, called the selection edge, grows. This represents your object’s edge. Be sure to include your entire edge within this area. Note that you can also “paint” the edge with the Refine Selection Brush tool. Getting the selection you want on a complex object may take a bit of experimentation and refining using the options, but hang in there and you should get the detail you want.
- Add/Subtract: Choose this mode to either add to or subtract from your selection.
- Push: Place your cursor inside the selection to increase your selection within the diameter of the outer circle of your cursor. It will snap to the edge of the element closest to the cursor. Place your cursor outside the selection to decrease your selection within the diameter of the outer circle.
- Smooth: If your selection border looks a little too jagged, use this mode to smooth your selection edge.
- View: Choose an option to view the selection. Options include viewing your selected object against a white or black background. Or you can choose Overlay to view it against a red semi-opaque overlay. Note that with the Overlay option, you can adjust the corresponding opacity of that overlay.
- Continue to use the Refine Selection Brush to perfect your selection until you’re satisfied.
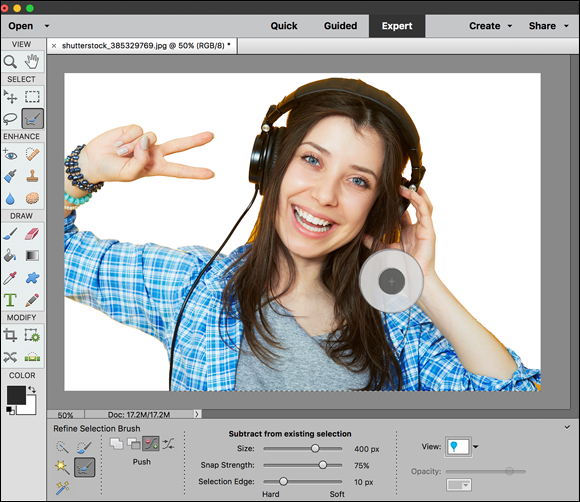
© Max kegfire/Shutterstock Image #385329769
FIGURE 8-12: Use the Refine Selection Brush to fine-tune your selection.
Working with the Cookie Cutter Tool
The Cookie Cutter tool is a cute name for a pretty powerful tool. You can think of it as a Custom Shape tool for images. But, whereas the Custom Shape tool creates a mask and just hides everything outside the shape, the Cookie Cutter tool cuts away everything outside the shape. The preset libraries offer you a large variety of interesting shapes, from talk bubbles to Swiss cheese. (We’re not being funny here — check out the food library.)
Here’s the lowdown on using the Cookie Cutter:
Select the Cookie Cutter tool from the Tools panel.
There’s no missing this tool; it looks like a flower. You can also press the C key. The Cookie Cutter shares a space with the Crop and Perspective Crop tools. If you don’t see it, press C until you do, or select the Crop tool and then select the Cookie Cutter in the Tool Options.
Specify your options in the Tool Options.
Here’s the list:
- Shape: Choose a shape from the Custom Shape picker preset library. To load other libraries, click the Shapes pop-up menu and choose one from the submenu.
- Geometry Options: These options let you draw your shape with certain parameters:
- Unconstrained: Enables you to draw freely.
- Defined Proportions: Enables you to keep the height and width proportional.
- Defined Size: Crops the image to the original, fixed size of the shape you choose. You can’t make it bigger or smaller.
- Fixed Size: Allows you to enter your desired width and height.
- From Center: Allows you to draw the shape from the center outward.
- Feather: This option creates a soft-edged selection. See the section “Applying Marquee options,” earlier in this chapter, for more details.
- Crop: Click this option to crop the image into the shape. The shape fills the image window.
Drag your mouse on the image to create your desired shape, size the shape by dragging one of the handles of the bounding box, and position the shape by placing the mouse cursor inside the box and dragging.
You can also perform other types of transformations, such as rotating and skewing. You can use these functions by dragging the box manually or by entering values in the Tool Options. For more on transformations, see Chapter 10.
Click the Commit button on the image or press Enter to finish the cutout.
See Figure 8-13 to see the image cut into a leaf shape. If you want to bail out of the bounding box and not cut out, you can always click the Cancel button on the image or press Esc.

© Evgeniya Moroz/Shutterstock Image #86044411
FIGURE 8-13: Crop your photo into interesting shapes with the Cookie Cutter.
Eliminating with the Eraser Tools
The Eraser tools let you erase areas of your image. Elements has three Eraser tools: the regular Eraser, the Magic Eraser, and the Background Eraser. The Eraser tools look like those pink erasers you used in grade school, so you can’t miss them. If you can’t locate them, you can always press E to cycle through the three tools.
When you erase pixels, those pixels are history — they’re gone. So before using the Eraser tools, always have a backup of your image stored somewhere. Think of it as a cheap insurance policy in case things go awry.
The Eraser tool
The Eraser tool enables you to erase areas on your image to either your background color or, if you’re working on a layer, a transparent background, as shown in Figure 8-14. For more on layers, check out Chapter 9.

© samdiesel/iStockphoto Image #6164396
FIGURE 8-14: Erase either to your background color (left) or to transparency (right).
To use this tool, simply select it and drag through the desired area on your image, and you’re done. Because it isn’t the most accurate tool on the planet, remember to zoom way in and use smaller brush tips to do some accurate erasing.
You have several Eraser options to specify in the Tool Options:
- Brush Presets Picker: Click the drop-down list to access the Brush presets. Choose a brush. Again, additional brush libraries are available on the Brush list. (Click the down-pointing arrow in the top-right corner.)
- Size: Slide the Size slider and choose a brush size between 1 and 2,500 pixels.
- Opacity: Specify a percentage of transparency for your erased areas. The lower the Opacity setting, the less it erases. Opacity isn’t available in Block mode.
- Type: Select Brush, Pencil, or Block. When you select Block, you’re stuck with one size (a 16-x-16-pixel tip) and can’t select other preset brushes.
The Background Eraser tool
The Background Eraser tool, which is savvier than the Eraser tool, erases the background from an image while being mindful of leaving the foreground untouched. The Background Eraser tool erases to transparency on a layer. If you use this tool on an image with only a background, Elements converts the background into a layer.
The key to using the Background Eraser is to carefully keep the hot spot, the crosshair at the center of the brush, on the background pixels while you drag. The hot spot samples the color of the pixels and deletes that color whenever it falls inside the brush circumference. But if you accidentally touch a foreground pixel with the hot spot, it’s erased as well. And the tool isn’t even sorry about it! This tool works better with images that have good contrast in color between the background and foreground objects, as shown in Figure 8-15. If your image has very detailed or wispy edges (such as hair or fur), and you’re up for a challenge, layer masking can also provide good results. We describe layer masks in Chapter 9.
© webphotographeer/Stockphoto Image #5213985
FIGURE 8-15: The Background Eraser erases similarly colored pixels sampled by the hot spot of your brush cursor.
Here’s the rundown on the Background Eraser options:
- Brush Settings: Click the Brush Settings button to bring up the settings to customize the Size, Hardness, Spacing, Roundness, and Angle of your brush tip. The Size and Tolerance settings at the bottom are for pressure-sensitive drawing tablets.
- Limits: Discontiguous erases all similarly colored pixels wherever they appear in the image. Contiguous erases all similarly colored pixels that are adjacent to those under the hot spot.
- Tolerance: The percentage determines how similar the colors have to be to the color under the hot spot before Elements erases them. A higher value picks up more colors, whereas a lower value picks up fewer colors. See the section “Talking about Tolerance,” earlier in this chapter, for more details.
The Magic Eraser tool
You can think of the Magic Eraser tool as a combination Eraser and Magic Wand tool. It selects and erases similarly colored pixels simultaneously. Unless you’re working on a layer with the transparency locked (see Chapter 9 for more on locking layers), the pixels are erased to transparency. If you’re working on an image with just a background, Elements converts the background into a layer.
Although the Magic Eraser shares most of the same options with the other erasers, it also offers unique options:
- Sample All Layers: Samples colors using data from all visible layers but erases pixels on the active layer only.
- Contiguous: Selects and erases all similarly colored pixels that are adjacent to those under the hot spot.
- Anti-aliasing: Creates a slightly soft edge around the transparent area.
Using the Select Menu
In the following sections, we breeze through the Select menu. Along with the methods we describe in the “Modifying Your Selections” section, earlier in this chapter, you can use this menu to further modify selections by expanding, contracting, smoothing, softening, inversing, growing, and grabbing similarly colored pixels. If that doesn’t satisfy your selection needs, nothing will.
Selecting all or nothing
The Select All and Deselect commands are no-brainers. To select everything in your image, choose Select ⇒ All or press Ctrl+A (⌘ +A on the Mac). To deselect everything, choose Select ⇒ Deselect or press Ctrl+D (⌘ +D on the Mac). Remember that you usually don’t have to Select All. If you don’t have a selection border in your image, Elements assumes that the whole image is fair game for any manipulation.
Reselecting a selection
If you sacrifice that second cup of coffee to steady your hand and take the time to carefully lasso around your desired object, you don’t want to lose your selection before you have a chance to perform your next move. But all it takes is an inadvertent click of your mouse while you have an active selection border to obliterate your selection. Fortunately, Elements anticipated such a circumstance and offers a solution: If you choose Select ⇒ Reselect, Elements retrieves your last selection.
One caveat: The Reselect command works for only the last selection you made, so don’t plan to reselect a selection you made last Tuesday or even just five minutes ago, if you selected something else after that selection. If you want to reuse a selection for the long term, save it as we explain in the section “Saving and loading selections,” later in this chapter.
Inversing a selection
You know the old song lyric: “If you can’t be with the one you love, love the one you’re with.” Well, making selections in Elements is kind of like that. Sometimes it’s just easier to select what you don’t want rather than what you do want. For example, if you’re trying to select your beloved in his senior photo, it’s probably easier to just click the studio backdrop with the Magic Wand and then inverse the selection by choosing Select ⇒ Inverse.
Feathering a selection
In the “Applying Marquee options” section earlier in this chapter, we describe how to feather a selection when using the Lasso and Marquee tools by entering a value in the Feather box in the Tool Options. Remember that this method of feathering requires that you set the Feather value before you create your selection. What we didn’t tell you is that there’s a way to apply a feather after you make a selection.
Choose Select ⇒ Feather and enter your desired amount from 0.2 to 250 pixels. Your selection is subsequently softened around the edges.
This method is actually a better way to go. Make your selection and fine-tune it by using the methods we describe earlier in this chapter. Then apply your feather. The problem with applying the feather before you make a selection happens when you want to modify your initial selection. When you make a selection with a feather, the marquee outline of the selection adjusts to take into account the amount of the feathering. So the resulting marquee outline doesn’t resemble your precise mouse movement, making it harder to modify that selection.
Refining the edges of a selection
The Refine Edge option enables you to fine-tune the edges of your selection. It doesn’t matter how you got the selection, just that you have one. You can find the command in the Tool Options of the Magic Wand, Lasso, and Quick Selection tools. And, of course, you can find it on the Select menu. Here’s the scoop on each setting for this option, as shown in Figure 8-16:
- View Mode: Choose a mode from the pop-up menu to preview your selection. Hover your cursor over each mode to get a tooltip. For example, Marching Ants shows the selection border. Overlay lets you preview your selection with the edges hidden and a semi-opaque layer of color in your unselected area. On Black and On White show the selection against a black or white background. Show Original shows the image without a selection preview. Show Radius displays the size of the area in which the edge refinement is happening.
- Smart Radius: Select this option to have Elements automatically adjust the radius for hard and soft edges near your selection border. If your border is uniformly hard or soft, you may not want to select this option. This enables you to have more control over the radius setting.
- Radius: Specifies the size of the selection border you will refine. Increase the radius to improve the edge of areas with soft transitions or a lot of detail. Move the slider while looking at your selection to find a good setting.
- Smooth: Reduces jaggedness along your selection edges.
- Feather: Move the slider to the right to create an increasingly softer, more blurred edge.
- Contrast: Removes artifacts while tightening soft edges by increasing the contrast. Try using the Smart Radius option before playing with Contrast.
- Shift Edge: Decreases or increases your selected area. Slightly decreasing your selection border can help to defringe (eliminate undesirable background pixels) your selection edges.
- Decontaminate Colors: Replaces background fringe with the colors of your selected element. Because decontamination changes the colors of some of the pixels, you will have to output to, or create, another layer or document to preserve your current layer. To see the decontamination in action, choose Reveal Layer for your View mode. Chapter 9 explains how to work with layers.
- Amount: Changes the level of decontamination.
- Output To: Choose whether you want to output your refined, decontaminated selection to a selection on your current layer, layer mask, layer, layer with layer mask, new document, or new document with layer mask.
- Refine Radius tool: Select the Paintbrush tool on the left and brush around your border to adjust the area you’re refining. To understand exactly what area is being included or excluded, change your View mode to Marching Ants. Use the right and left brackets to decrease and increase the brush size.
- Erase Refinements tool: Use this tool (which looks like an Eraser), also located on the left, to clean up any unwanted refinements made with the Refine Radius tool.
- Zoom tool: Allows you to zoom in to your image to see the effects of your settings.
- Hand tool: Enables you to pan around your image window to see the effects of your settings.

FIGURE 8-16: Fine-tune your selection with Refine Edge.
Using the Modify commands
Although the commands on the Modify submenu definitely won’t win any popularity contests, they may occasionally come in handy. Here’s the scoop on each command:
- Border: Selects the area, from 1 to 200 pixels, around the edge of the selection border. By choosing Edit ⇒ Fill Selection, you can fill the border with color.
- Smooth: Rounds off any jagged, raggedy edges. Enter a value from 1 to 100 pixels, and Elements looks at each selected pixel and then includes or deselects the pixels in your selection based on your chosen value. Start with a low number, like 1, 2, or 3 pixels. Otherwise, your selection may be less accurate.
- Expand: Enables you to increase the size of your selection by a given number of pixels, from 1 to 100. This command is especially useful if you just barely missed getting the edge of an elliptical selection and need it to be a little larger.
- Contract: Decreases your selection border by 1 to 100 pixels. When you’re compositing multiple images, you often benefit by slightly contracting your selection if you plan to apply a feather. That way, you avoid picking up a fringe of background pixels around your selection.
Applying the Grow and Similar commands
The Grow and Similar commands are often used in tandem with the Magic Wand tool. If you made an initial selection with the Magic Wand but didn’t quite get everything you want, try choosing Select ⇒ Grow. The Grow command increases the size of the selection by including adjacent pixels that fall within the range of tolerance. The Similar command is like Grow except that the pixels don’t have to be adjacent to be selected. The command searches throughout the image and picks up pixels within the Tolerance range.
These commands don’t have their own Tolerance options. They use whatever Tolerance value is displayed on the Tool Options when the Magic Wand tool is selected. You can adjust that Tolerance setting to include more or fewer colors.
Saving and loading selections
At times, you toil so long over a complex selection that you really want to save it for future use. Saving it is not only possible but highly recommended. It’s also a piece of cake. Here’s how:
- After you perfect your selection, choose Select ⇒ Save Selection.
In the Save Selection dialog box that appears, leave the Selection option set to New Selection and enter a name for your selection, as shown in Figure 8-17.
The operation is automatically set to New Selection.
- Click OK.
- When you want to access the selection again, choose Select ⇒ Load Selection and choose a selection from the Selection drop-down list.

FIGURE 8-17: Save your selection for later use to save time and effort.