14. Creative Techniques
If you’ve read through earlier chapters of this book, you’ve learned how to use specific formatting, retouching, and painting tools in Photoshop Elements. In this chapter, you’ll explore some specific Photoshop Elements tools and work environments, and develop techniques to help you create a number of different projects from start to finish. We’ll first take a look at Photomerge, a feature that automates much of the work required to stitch together multiple images into a single panorama. Next, we’ll explore a couple of techniques for creating animation using the Layers palette and the Save for Web dialog. Finally, we’ll look at a couple of methods for using the power of transparency and layers for creating compelling composite images.
Creating Panoramas
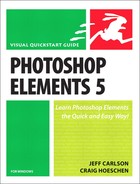
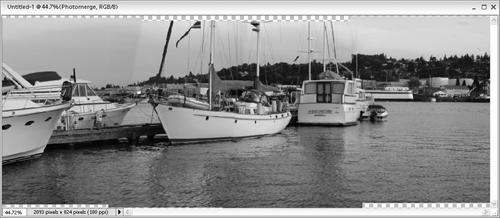
With Photoshop Elements, you can create wide, panoramic images that would be difficult to capture with a single shot from a standard camera. If you’ve ever taken a series of photographs and tried “stitching” them together with tape or glue to assemble a continuous panoramic photo, you know how frustrating this can be. The Photomerge command does this for you automatically. Photomerge analyzes your individual photos and assembles them into a single image (Figure 14.1). From there, you can manually move and rotate your images, adjust for slight exposure differences, and correct for distorted perspective—all problems particular to merging images together.
Figure 14.1. Photomerge combines several separate photos into a single panoramic picture.

Taking pictures for panoramas
If you’re getting ready to snap some scenic photos and know you want to assemble them into a panorama later, making a few camera adjustments will make it easier to assemble a seamless panorama.
• Use a consistent zoom level when taking the pictures.
• Use a consistent focus. If your subject matter is far away, set your camera’s focus to infinity, if that option is available.
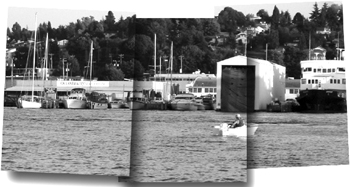
• Use consistent exposure. A panorama with widely varied lighting will be difficult to merge seamlessly. Set your camera’s exposure manually or lock the exposure setting if possible. Photomerge can make slight adjustments for images with different exposures, but it is not as effective when the image exposure varies greatly (Figure 14.2).
Figure 14.2. Images with different lighting exposures can be more difficult to merge than a series of images with consistent exposures.

• If possible, use a tripod. You can take pictures for a panorama with a handheld camera, but you might find it difficult to keep all of the images perfectly level (Figure 14.3).
Figure 14.3. Photomerge does its best to merge images that are rotated slightly. When shooting panoramic photos, try using a tripod to ensure that all your shots have consistent angles.
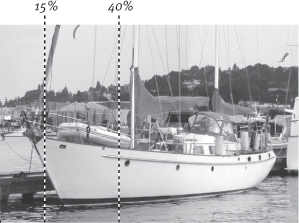
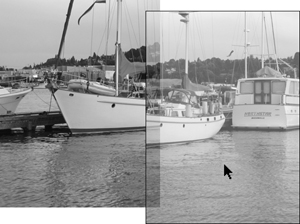
• Overlap sequential images by about 15 to 40 percent (Figure 14.4). Photomerge looks for similar detail in the edges of your images to match consecutive pictures. Try to capture as much detail through-out the frame to give Photomerge more reference points to match up. A large area of clear sky will be difficult to merge automatically, whereas an image containing unique, discernable shapes like peaked rooflines, or the boats in our example, make the best candidates.
Figure 14.4. The more your images overlap, the better your chances of successfully merging them together. Try for an overlap of between 15 and 40 percent.
 Tips
Tips
• Try taking two versions of panorama images: one with the camera held horizontally and one with the camera held vertically. See which option makes a better panorama.
• You’re not limited to creating horizontal panoramas. You can also create vertical panoramas of tall subjects, such as skyscrapers or redwood trees.
• Some digital cameras include a feature that helps you compose multiple overlapping photos when you shoot.
Assembling images into a panorama
To create a panoramic image, you select the images you want to merge and then let Photomerge work its magic. You may end up with a perfectly seamless image on the first try, but chances are good that you’ll need to make some additional adjustments before you’re completely satisfied.
To create a panorama
1. Open the images you want to merge to create your panorama in the Editor, or select them in the Organizer.
If you want to make any adjustments, such as tonal corrections or cropping, make your corrections first, before you begin assembling the images together.
2. From the File menu, choose New > Photomerge Panorama.
The Photomerge dialog appears (Figure 14.5). Any images that are open in Photoshop Elements will appear in the Source Files list. If you need to delete a file from the list, select it and then click the Remove button.
Figure 14.5. Browse for photos to merge in the first Photomerge dialog.

3. If you want to add more images, click the Browse button to open the Open dialog; then navigate to the folder containing the images that you want to merge.
4. When you have all of the images you want in the Source Files list, click OK.
Photoshop Elements automatically opens the images in the Source Files list (if they’re not already open), and with a little behind-the-scenes trickery, merges them into a single panorama in the Photomerge dialog (Figure 14.6).
Figure 14.6. The main Photomerge dialog provides a work area, where you adjust your images, and a Lightbox, where Photoshop Elements stores images that you aren’t yet using. You’ll also find additional tools and navigational aids on both sides of the dialog.

Don’t worry if your panorama isn’t perfect. Photomerge’s tools can adjust your images.
5. You may see an alert message telling you that some images can’t be assembled. If Photomerge can’t find enough common details in your images, it will place some images in the Lightbox section of the dialog. It may also place images off to the side of the panorama.
If your images aren’t matching up correctly, or if they appear in the Lightbox rather than the work area section of the dialog, see “To reposition images in the panorama” later in this chapter.
6. If your images have matched up correctly and you want to explore different perspective or blending options, see “Enhancing perspective in a panorama” later in this chapter.
7. When you are satisfied with your merged composition, click OK.
Photoshop Elements creates a new image file of your panorama, leaving your original files unaffected (Figure 14.7).
Figure 14.7. When you click OK to save a new Photomerge composition, your merged images open in a new Elements file.
Tips
• Once you click OK to create your panorama, there’s no returning to the Photomerge dialog to make further adjustments. If you’re not happy with the way your panorama rendered, you’ll just need to start over from the beginning. Refer to the following topics for further instruction on how to make additional adjustments to your panorama before you click the OK button.
• If seams are still visible in the panorama, try touching up those areas with the Clone tool.
Adjusting images within a panorama
The Photomerge function doesn’t always work quite as well as you might hope. You may find the images loosely arranged or even scattered in the work area. Some images may have not made it into the work area at all, but may have been placed in the Lightbox instead. Photoshop Elements tries its best to merge the images automatically, but sometimes it needs a little help. Fortunately, the Photomerge dialog makes it fairly easy to make the necessary adjustments.
To reposition images in the panorama
1. If one of your images is in the Lightbox area (just above the main preview area), add it to the work area by dragging it from the Lightbox (Figure 14.8).
Figure 14.8. Drag or double-click an image in the Lightbox to move it to the work area.

If you want to remove an image from the panorama, you can also drag images from the work area back into the Lightbox.
Once all the images are in the work area, they still may not be lined up perfectly.
2. Check that the Select Image tool is highlighted in the Photomerge dialog (Figure 14.9).
Figure 14.9. The Select Image tool in the Photomerge dialog.

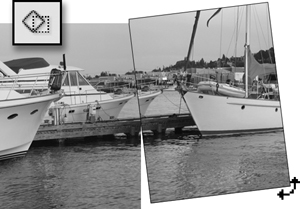
3. Drag the image over the image it should merge with. As you drag, the image becomes partially transparent so that you can more easily line it up with the one below it (Figure 14.10).
Figure 14.10. When you drag one image over another, the top image becomes semitransparent, allowing you to align the images.
4. When the two images match up, release the mouse button.
If Snap to Image is selected in the dialog, any two overlapping images will automatically try to match up with one another (Figure 14.11). If Snap to Image is not selected, Photomerge allows you to align the overlapping image manually.
Figure 14.11. Images that share similar detail merge automatically when Snap to Image is enabled.

Turning off Snap to Image allows you to move the images in small increments if they are not matching up exactly. You may also need to rotate an image slightly to make it match up with its neighbor correctly.
5. Select the Rotate Image tool in the Photomerge dialog, then drag to rotate the selected image (Figure 14.12).
Figure 14.12. You can rotate images to help align them in the work area.
The Photomerge dialog offers several options for moving through its work area while composing your panoramas, including its own built-in navigator.
6. To navigate through the work area, do one of the following:
• Select the Move View tool (the hand icon) in the dialog and drag in the work area.
• In the Navigator, drag the view box. This changes the view in the work area (Figure 14.13).
Figure 14.13. Drag the view box in the Navigator to change the view in the work area.

• Use the scroll bars at the bottom and left edges of the work area.
7. To change the zoom level in the work area, do one of the following:
• Select the Zoom tool in the dialog and click in the work area to zoom in.
• Hold down the Alt key while clicking to zoom out.
• Move the slider under the thumbnail in the Navigator (Figure 14.14).
Figure 14.14. Move the slider under the Navigator window to zoom in and out in the work area.

• Click the Zoom icons under the thumbnail in the Navigator section of the dialog.
Enhancing perspective in a panorama
You may find that some panoramas you create appear a little flat, or just not quite right, particularly as they progress out toward the edges. That’s because even the most sophisticated camera lens has a tendency to flatten what little depth or perspective is present in the landscapes or objects they capture. Photomerge lets you restore that lost perspective to create a more natural-looking panoramic image. In addition, you can adjust the vanishing point (the point where natural perspective recedes into the distance) to help draw attention to a specific area or object in your panorama. Photomerge even provides an option to correct unwanted distortion that may appear as a result of using the Perspective feature, and another that will adjust for minor exposure differences between images that sometimes become more noticeable when you apply perspective.
To add perspective to a panorama
1. In the Settings section of the dialog, select the Perspective option (Figure 14.15).
Figure 14.15. Click the Perspective radio button to add exaggerated perspective to your merged composition.

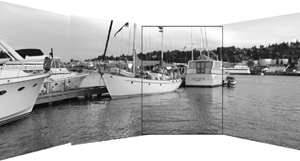
The outside edges of the panorama are distorted, creating a more dramatic, and sometimes more realistic, perspective view (Figure 14.16). The middle of the center image is designated as the vanishing point, and the outside images appear to recede into its center. The vanishing point image is identified by a blue outline when it’s selected.
Figure 14.16. When you select the Perspective setting, Photomerge adjusts and distorts the images to create the illusion of a vanishing point. Here, the vanishing point image is identified by the blue outline.
2. To make a different image the vanishing point image, first select the Set Vanishing Point tool (Figure 14.17).
Figure 14.17. The Set Vanishing Point tool.

3. Click a different image in the work area. The panorama changes the perspective to make it look as if the other images now recede into the new Vanishing Point image (Figure 14.18).
Figure 14.18. When you change the Vanishing Point image, the other images adjust and distort in response to change the perspective.

4. If the perspective option doesn’t give you the effect you’d hoped for, select the Normal option in the Settings section of the dialog to return your panorama to its original state.
You can also remove the perspective from your panorama by dragging the Vanishing Point image to the Lightbox.
Sometimes the perspective effect can be a little severe, creating more distortion in your image than you think is acceptable. Use the Cylindrical Mapping feature (described in the following task) to reduce this distortion.
To make further adjustments to your panorama
• To compensate for any distortion created by the Perspective setting, click the Cylindrical Mapping box; then click the Preview button (Figure 14.19).
Figure 14.19. The Cylindrical Mapping check box helps even out some of the distortion caused by the Perspective setting.
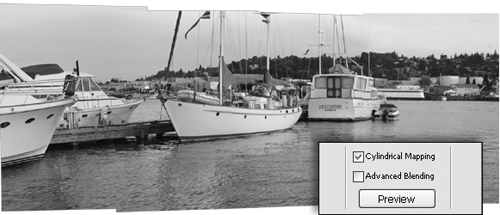
The panorama is adjusted again, this time removing the shape distortion created by the Perspective check box.
Note that any adjustments you make with the Cylindrical Mapping check box are visible only in Preview mode. Note also that you can’t work on the panorama while in Preview mode, and that the cylindrical mapping isn’t applied to your panorama until you click OK in the Photomerge dialog.
• To compensate for slight variations in exposure or lighting in the separate images, click the Advanced Blending box; then click the Preview button.
Photoshop Elements attempts to even out the color differences. As with Cylindrical Mapping, this setting is visible only in Preview mode.
Tips
• Even after you’ve used the cylindrical mapping feature to correct some of the perspective distortion, you may still find that your image’s edges are a little raggedy. Use Photoshop Elements’ Crop tool to remove those rough edges and give your panorama a nice, crisp rectangular border (Figure 14.20).
Figure 14.20. After you have rendered the panorama in the Photomerge dialog, you can use the Crop tool to trim the image.

• Before you print your final panorama, take the time to examine its size in the Image Size dialog (from the File menu, choose Resize > Image Size). Depending on the size and resolution of the images you’ve used, your panoramas can quickly grow to exceed the standard paper stock sizes for your printer (which are usually no larger than 8.5 × 14 or 11 × 17 inches). Once you’ve determined the final image dimensions, use either the Image Size dialog or the controls in the Print Preview dialog to resize your image so that it will fit on whatever paper stock you have available.
Creating Animated GIFs
In Chapter 12, “Preparing Images for the Web,” we discussed GIF files, but we decided to wait until this chapter of special techniques to delve into one of the more interesting uses of GIFs—animation. GIF animations are widely used on Web pages as a device to help draw special attention to particular icons, graphics, or logos. But they can also be used as a way to deliver compact little “movies” from a limited number of video images, or from a single still photo. In addition to posting animated GIFs to the Web, you can share them with friends by including them as email attachments. To view your animation, all your recipients need to do is open the GIF file from within their Web browser.
Animated GIFs contain a sequence of images that are displayed sequentially, like a flipbook, creating the illusion of motion (Figure 14.21). Like all GIF files, they can be displayed in most Web browsers and have a relatively small file size because of their compression and limited color palette.
Figure 14.21. Animated GIFs create the illusion of motion by sequentially displaying a series of frames.

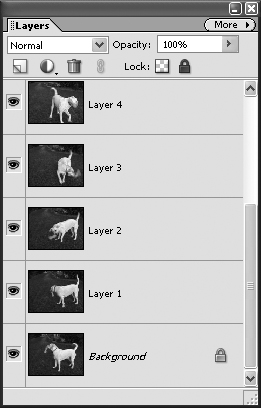
Photoshop Elements creates the individual frames of an animated GIF file from the individual layers in an image file, so you’ll need to create your animation in a file with multiple layers. The bottom layer on the Layers palette is always the first frame of the animation, so you’ll build your animated GIF file from the bottom up (Figure 14.22).
Figure 14.22. The bottom layer of the Layers palette becomes the first frame of an animated GIF file.
To prepare a layered file for animation
1. Open all of the images you want to use as frames for your animated GIF file.
2. Select the image that you want to use as the first frame of the animated GIF file (Figure 14.23).
Figure 14.23. Collect all of the files you want to use to build your animation; then choose the image file that you want for the first frame.

3. Choose File > Save As and save the image as an Elements file with a new name.
This will be the layered “source” file for creating your animated GIF.
4. Click to select the image window of the image that you want to use as the next frame in your animation; then, from the Select menu, choose All, or press Ctrl+A.
5. From the Edit menu, choose Copy, or press Ctrl+C.
6. Select the image with the first frame; then, from the Edit menu, choose Paste, or press Ctrl+V.
The second image is pasted on top of the first image and is represented by a new layer on the Layers palette (Figure 14.24).
Figure 14.24. When you paste a selection into an image, it creates a new layer on the Layers palette.

7. Repeat steps 4 through 6 for each additional frame, continuing to add layers to the first image.
8. Save your image.
Tip
• With animated GIFs, less can be more. You may be surprised at how few frames you need to convey motion. Start with a small number of frames (5 or 6 are probably adequate) and then add more only if you think they’re needed.
To create an animated GIF
1. Open the layered file you’ve built as the source for your animation.
(If you don’t have a layered file ready, see the preceding task, “To prepare a layered file for animation.”)
2. From the File menu, choose Save for Web, or press Alt+Shift+Ctrl+S to open the Save for Web dialog (Figure 14.25).
Figure 14.25. Open the Save for Web dialog to make additional changes to your animated GIF file.

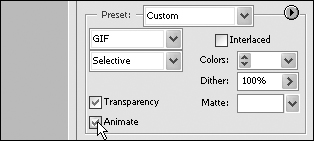
3. Choose GIF in the Preset area of the dialog; then select the Animate check box (Figure 14.26).
Figure 14.26. Select a GIF setting; then click the Animate check box.
4. Click the Play button to move the animation one frame forward (Figure 14.27).
Figure 14.27. Click the Play button to step through the frames of your animation, one frame at a time.

You can use the Play button and the other control buttons to step through the animation, but the animation will not show in real time.
5. In the Animation section, set the options for frame delay and looping.
• Frame delay sets the amount of time that each frame is displayed before the next frame appears. You can set the frame delay for as short as one-tenth of a second and as long as 10 seconds.
• When the Loop check box is selected, your animation will play continuously. If Loop is not checked, your animation will play once through all of its frames and then stop.
6. Click the Preview In button to view the animated GIF file in a Web browser.
You may need to return to Photoshop Elements and adjust your settings and preview again. When you are satisfied, close the browser.
7. Still in the Save For Web dialog, click the OK button.
The Save Optimized As dialog opens.
8. In the Save Optimized As dialog, type a new name for your animation and verify that GIF is selected for the optimization format.
9. Choose a location for your file, then click Save.
The Save Optimized As and Save For Web dialogs automatically close, and your animated GIF is saved to the location you specified.
Creating motion from a still image
Another method for creating the illusion of motion in Photoshop Elements is to start with a single still image, duplicate the image onto a series of separate layers, and then slightly shift each layer either horizontally or vertically. When saved as an animation, it will appear as if a camera is slowing panning through a scene. You’ve probably seen this technique used in documentaries, where for lack of film or video footage, the camera pans slowly over an archival photograph.
In this example, we’ll shift successive frames horizontally to create the illusion of panning across the Grand Canyon. You can use this same technique with photos of large family groups or any other instance when you want to control exactly where your viewer’s attention is drawn. This technique can be particularly effective when used along with the wide panoramic images you create using Photomerge Panorama.
To mimic camera movement in an animated GIF file
1. Open the image you want to use as the source file for your animation—in this case, a wide panorama (Figure 14.28).
Figure 14.28. Start with a source image that’s larger than the final size of the animated GIF image.

2. Create a new file with either the width or height dimensions (or both) smaller than those of your source image.
Since we’ll be panning from side to side across our image, we’ve made the width of our new file about half that of the source image.
3. Drag the large image into the file you just created (Figure 14.29).
Figure 14.29. Drag the larger source image into the final animated GIF project image window.

A new layer is created on the Layers palette.
4. On the Layers palette, drag the background layer to the trash.
The new image layer becomes the only layer in the file. Remember that the bottom layer always becomes the first frame of an animated GIF file. Since the first layer in any new file is empty, we’ve deleted it so as not to include a blank frame in our animation.
5. Select the Move tool and drag the image to compose your first frame.
In this example, we dragged the image all the way to its left edge, since we want to create the illusion of panning from left to right (Figure 14.30).
Figure 14.30. Position the first (bottom) image layer for the first frame of your animation.

Notice that even though you can see only a portion of the original, source image, it’s all still there, hidden outside the borders of the image window.
6. On the Layers palette, drag the layer to the Create a New Layer icon. A duplicate is created (Figure 14.31).
Figure 14.31. Duplicate the bottom image layer to create the second frame of your animation.

7. With the Move tool still selected, move the new layer a little to the left in the image window.
A portion of the image that had been hidden beyond the right edge of the image window comes into view, and a portion originally visible disappears beyond the left edge (Figure 14.32).
Figure 14.32. Move the new layer in the image window. Since the layer is larger than the final image size, it still contains information beyond its frame.

8. On the Layers palette, drag the new top layer onto the Create a New Layer icon; then drag this new layer a little farther to the left in the image window.
Continue to repeat the process, creating successive layers and gradually moving the image through the image window.
9. Choose File > Save for Web and follow steps 3 through 9 from the “To create an animated GIF” task earlier in this chapter.
Compositing Images
Combining multiple images to create a single merged image is called compositing, and the possibilities for compositing are endless. You can combine different digital photos or scanned images to create effects that range from subtle to spectacular to silly. For example, you can replace a landscape’s clear blue sky with a dramatic sunset, create complex, multilayered photo collages, or replace the face of the Mona Lisa with that of your Uncle Harold. We’ll explore just a few of the ways you can composite images with Photoshop Elements.
Photoshop Elements lets you combine pictures in ways that would be difficult or even impossible to accomplish in the darkroom. The selection tools let you isolate the parts of an image you want to use, and the Layers palette provides a powerful and elegant tool for combining and merging different image elements. Although you can do some compositing without the aid of the Layers palette (cloning parts of an image from one file to another, for example), layers give you much more flexibility to move, adjust, and modify one area of an image while leaving other areas untouched.
In the following example of an image for a travel agency brochure, we want the composite image to look as if it were an original unretouched photograph.
To replace part of an image with another image
1. Open an image that contains an area you want to replace.
We’ll call this the “target” image.
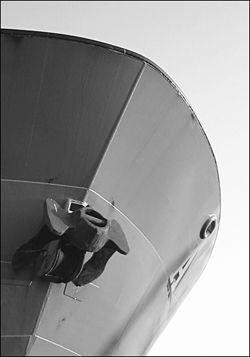
In the example, the sky isn’t very interesting, and we want to add a more dramatic background (Figure 14.33). Even though the sky and the ship are both blue, the edges are well defined, so the image is a good candidate for the Background Eraser tool.
Figure 14.33. We’ll enhance this image by replacing its lackluster background.
2. From the toolbox, select the Background Eraser tool; then adjust its brush size and tolerance values.
We set the tolerance value fairly low because the sky and the ship both contain a lot of blue. If we set the tolerance value higher, a broader range of pixels may be selected, and some parts of the ship might be erased. (For more information on using the Background Eraser tool, see “Erasing Backgrounds and Other Large Areas” in Chapter 10, “Painting and Drawing.”)
3. Position the Background Eraser tool along the outside edge of the foreground shape (the ship). Making sure that the brush crosshairs are over the background (sky), drag along the edge to erase the background. Continue to erase the background until the area is completely transparent (Figure 14.34).
Figure 14.34. Use the Background Eraser tool to remove the sky and create a transparent background.

4. Open the image that you want to use to replace the transparent pixels in your original image.
We’ll call this the “source” image.
5. Select the Move tool and drag the source image into the target image (Figure 14.35).
Figure 14.35. Drag the source image (the sky) into the target image (the ship).

In the example, the sky image is larger than the empty background area, which allows flexibility in positioning the new sky in the composition.
If you like, you can also use the selection tools to select just a portion of the source image, then drag just that selection into the target image.
6. On the Layers palette, drag the source layer below the target layer (Figure 14.36).
Figure 14.36. Move the sky layer below the ship layer on the Layers palette and adjust the position in the image window.

7. In the image window, use the Move tool to adjust the position of the source image until you’re satisfied with the composition.
If you want, you can use the image adjustment tools on each layer to create a more natural-looking composition.
Tip
• It’s always good practice to save a copy of your composition retaining the layers in case you want to make further adjustments. Layered files should be saved as Photoshop Elements (PSD) files.
Creating whimsical composite images
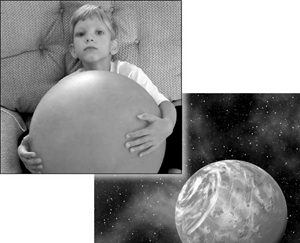
In many cases, as in the previous example, you composite images to improve them in a way that isn’t obvious to the viewer. You don’t want to draw attention to your work; you just want to improve the image (as in the ship and sky example). But sometimes you want your audience to wonder how you created that cool special effect. This composite for an elementary school astronomy fair poster is an image that looks pretty realistic, if a little fantastical (Figure 14.37).
Figure 14.37. This final composite image was created from two separate images.

To combine images
1. Open two images that you want to composite (Figure 14.38).
Figure 14.38. Here, we used a picture of a boy and a photograph of space to create an otherworldly image.
2. Use the selection tools and/or eraser tools to isolate part of the source image.
In this case, we’ll use the Background Eraser tool to erase the background from the boy, leaving the area around him transparent (Figure 14.39). This way, he’ll insert nicely into the target image, with no messy halos or edges around his body.
Figure 14.39. Use the Background Eraser tool (or other selection tool) to isolate the source image.

3. Copy the area of the source image that you want to composite.
4. Paste that selection into the target image (Figure 14.40).
Figure 14.40. After pasting the source image (the boy) into the target image, the source image is placed on a new layer above the target image. That makes it easy to drag the image of the boy into its proper position.

This creates a new layer.
5. Using the Move tool, position and resize the source image (top layer) to match the target image (bottom layer).
6. If you like, you can add layer styles to enhance the image.
In this example, we chose the Low option in the Drop Shadow section of the Layer Styles palette to create an effective drop shadow on the boy’s hand (Figure 14.41).
Figure 14.41. The original composite lacked a little realism (left), so we added a drop shadow layer effect below the boy’s hands (right) to complete the effect.

Creating new composite images
In the previous examples, we simply combined different objects we’d photographed in order to enhance those objects. In these types of compositions, the source images (the ship and little boy) were still recognizable; they were just composited into new backgrounds or environments.
A second compositing technique combines digital photos or scanned objects to create something entirely new, and in the process the individual replacement images used become barely recognizable. (A classic example of the old adage, “the whole is better than the sum of its parts.”) In the next example, we’ll combine multiple layers to create a collage for a quilting Web site (Figure 14.42). We’ll use the Custom Shape tool to create a layer group, and then we’ll apply layer styles to a text layer.
Figure 14.42. This image is a composite of two image layers: a shape layer and a text layer with layer styles applied.

To create a layered photo collage
1. Open the two images you want to combine (Figure 14.43).
Figure 14.43. Open the images you want to composite.
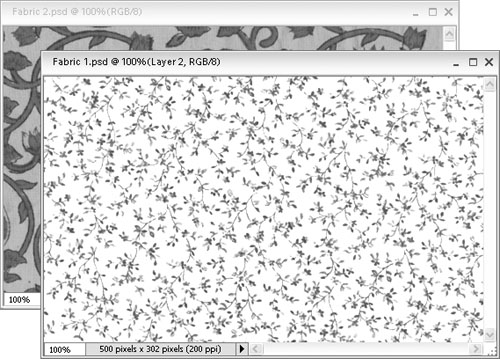
We’re going to combine scans of two contrasting fabrics to create the look of a quilt.
2. Select the Custom Shape tool and choose a shape from the menu on the options bar (Figure 14.44). We chose the Tile 4 option, because it looks like a diamond quilt pattern.
Figure 14.44. Select a custom shape that you’ll use to define the shape of one of your composite layers.
![]()
3. In the background image file, drag the Custom Shape tool to create the shape pattern. Hold down the Ctrl key and drag inside the shape to reposition it if necessary.
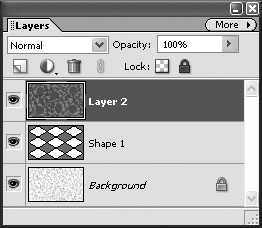
A new layer with the shape is created (Figure 14.45).
Figure 14.45. Draw the Custom Shape so that it fills a large portion of the image window.

Now we’ll use the shape to create a mask for the other fabric layer.
4. Copy and paste the foreground image into the Background image file.
The foreground image creates a new layer in the Background image file, immediately above the shape layer we just created (Figure 14.46).
Figure 14.46. Paste the layer you want to composite above the custom shape layer.
5. Make sure that the foreground image is selected; then, from the Layer menu, choose Group with Previous, or press Ctrl+G.
A layer group is created. The foreground image now shows only within the area of the custom shape below it. The fabrics look as if they have been quilted together in a pattern (Figure 14.47).
Figure 14.47. When you create a layer group, the bottom layer acts as a mask, allowing the layer above to show through only those areas in the bottom layer that would otherwise appear opaque.

6. Select the Text tool, then click in the image and enter your text.
Select the Move tool and position the text if necessary.
For this example, we used a bold typeface and set the text color to white (Figure 14.48).
Figure 14.48. Create a new text layer on top of the other layers.

7. With the text layer selected on the Layers palette, choose a layer style from the Artwork and Effects palette and click the Apply button.
We chose Simple Pillow Emboss from the Bevels styles (Figure 14.49).
Figure 14.49. Choose an Emboss option from the Bevels styles in the Styles and Effects palette.

8. From the subcategory drop-down menu on the Artwork and Effects palette, choose Visibility.
9. Select the Ghosted option and click the Apply button (Figure 14.50).
Figure 14.50. Choose an option from the Visibility styles in the Artwork and Effects palette.

The text looks like it has been quilted into the fabric.
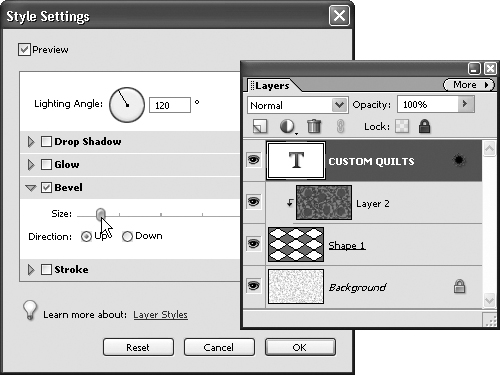
10. To make further adjustments to the embossing effect, double-click the Layer Style icon on the text layer on the Layers palette.
The Style Settings dialog appears, where you can make adjustments to the Layer style you have applied (Figure 14.51).
Figure 14.51. Use the Style Settings dialog to adjust your layer styles.