
Chapter 6. Fixing and Retouching Photos
In This Chapter
Straightening a Crooked Photo 117
Repairing Flaws and Imperfections 119
Blending with the Smudge Tool 131
Using the Tonal Adjustment Tools 132
Erasing Backgrounds and Other Large Areas 134
Removing a Foreground Image from Its Background 136
Removing Objects from a Scene 138
Merging Portions of Multiple Photos 144
How often have you thumbed through photo albums and found images you wished were better composed or lit more evenly? Or maybe you’ve sorted through shoeboxes from the attic, disappointed that time and age have taken their toll on those wonderful old photographs of your dad in his high school band uniform and your grandparents honeymooning at the lake. Until recently, there was no simple way to correct or repair photographs regardless of whether they were out of focus, water damaged, or poorly composed.
Happily, things have changed. In this chapter, you’ll learn how to perform a wide variety of photo fixes, from cropping and straightening to removing blemishes. I also discuss several clever and time-saving features such as the Photomerge Scene Cleaner, which removes unwanted objects from photos, the Smart Brush tool for painting effects on an image, and much more.
Cropping an Image
Professional photographers almost always use cropping techniques to achieve that perfect composition. In spite of all the advances in film and digital cameras, rarely is a picture taken with its subjects perfectly composed or its horizon line set at just the proper level. More often than not, subjects are off-center, and unwanted objects intrude into the edge of the picture frame. Photoshop Elements offers two simple and quick methods for cropping your images.
To crop an image using the Crop tool:
- Select the Crop tool from the toolbox (or press C)
 .
.
 The Crop tool.
 - In the image window, drag to define the area of the image you want to keep
 .
.
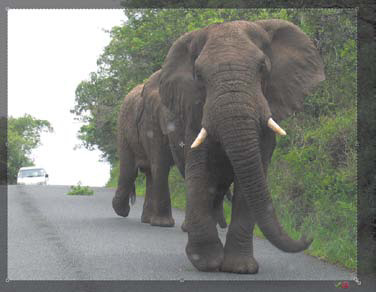 Elements highlights the image that will be preserved and dims the portions to be deleted.
The image outside the selected area is dimmed to indicate the portions that will be deleted.
- If you want to modify your selection, move the pointer over one of the eight handles on the edges of the selection; then drag the handle to resize the selection
 .
.
 You can easily move and resize the area you choose to crop by dragging the handles around the perimeter of the cropping selection.
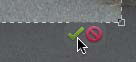
 - When you’re satisfied with your crop selection, double-click within the selection, press Enter, or click the Commit button on the lower corner of the selection
 .
.
 The Commit and Cancel buttons appear on the lower edge of the crop selection.
The image is cropped to the area you selected
 .
.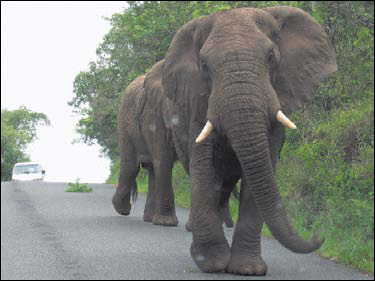 The final, cropped image.
If you’re just not satisfied with your selection and want to start over, click the Cancel button.
Tip
In the options bar, click the Clear button to remove any entries in the Width, Height, or Resolution text fields.
To resize an image to specific dimensions using the Crop tool:
- Follow steps 1–3 on the previous page to specify an area to crop.
- From the Aspect Ratio drop-down menu, choose a common photo size
 .
.
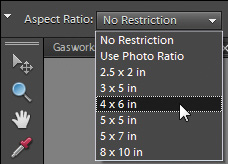 Use the Aspect Ratio drop-down menu to choose common photo dimensions.
Or, in the options bar, enter a size in the Width and Height fields
 . The double-arrow button between the fields swaps values, making it easy to turn a horizontal crop area into a vertical one, and vice-versa.
 The Width and Height fields let you specify a custom aspect ratio.
 - If you need to change the image’s resolution, edit the Resolution field; you can define it in pixels per inch or pixels per centimeter using the associated drop-down menu. However, see the sidebar on the next page for important information.
- Double-click within the selection, press Enter, or click the Commit button to crop the photo.
Tip
If you’re planning to print your photos using a commercial print service, be sure to crop your images to a standard size first. The images that digital cameras create don’t match standard photo aspect ratios, which can lead to prints with black bars around the edges.
Tip
You can define color and opacity options for the Crop tool shield (the dimmed area that surrounds your cropped selection) in the Display and Cursors area of the Preferences dialog. The default color is black, and the default opacity is 75 percent.
To crop an image using the Rectangular Marquee tool:
- Select the Rectangular Marquee tool from the toolbox, or press M.
- In the image window, drag to define the area of the image you want to keep
 .
.
 Drag with the Rectangular Marquee tool to define the part of the image you want to crop.
 - From the Image menu, choose Crop. The image is cropped to the area you selected.
The Crop Tool Size and Resolution Options
Used together, the Crop tool’s Aspect Ratio and Resolution options can lead you down a slippery slope, introducing unexpected image quality problems—foremost among them, unwanted resolution upsampling, which creates a fuzzy, ghosted, and generally out-of-focus effect. For more information on upsampling, see the “Downsampling vs. Upsampling” sidebar in Chapter 3.
As an example, open a 4 × 5-inch image with a resolution of 150 pixels per inch. Select the Crop tool, choose “4 × 6 in” from the Aspect Ratio drop-down menu, and enter 150 in the Resolution field. Define the area you want to crop (which by definition will be a smaller area than the original 4 × 5 image), and then crop.
The area you crop from the original image, no matter the selected size, will be forced up to 4 × 6, and will introduce upsampling ![]() .
.
![]() Be cautious when using the Crop tool’s size and resolution options. Here, an image was cropped with a final size defined that was larger than the original image (top). During cropping, the image was upsampled, sacrificing image quality (bottom). Both detail boxes are shown at 100 percent.
Be cautious when using the Crop tool’s size and resolution options. Here, an image was cropped with a final size defined that was larger than the original image (top). During cropping, the image was upsampled, sacrificing image quality (bottom). Both detail boxes are shown at 100 percent.
You can use the Aspect Ratio drop-down menu to control the Width and Height ratios of your cropping selection; just leave the Resolution text field blank, and use the Image Size dialog (after you crop) to set the image resolution.
Straightening a Crooked Photo
Sometimes even your most carefully composed photos may be just a little off angle, with a not-quite-level horizon line or tilted portrait subjects. The nifty Straighten tool makes short work out of getting your crooked photos back into alignment.
Or, perhaps you’ve scanned an image that shifted when you closed the scanner cover. Elements can automatically straighten it, with the option of cropping it to a clean rectangle.
To use the Straighten tool:
- Select the Straighten tool from the toolbox, or press P .
 The Straighten tool.
 - Using a horizon line or other subject as a point of reference, click and drag from one side of the photo to the other.
When you release the mouse button, your image rotates and aligns along the new horizontal plane you defined
. With the Straighten tool, you simply click and drag within a tilted photo (top) to align it perfectly (bottom).
 - Use either the Crop or Marquee Selection tool to remove any extra border area introduced while straightening.
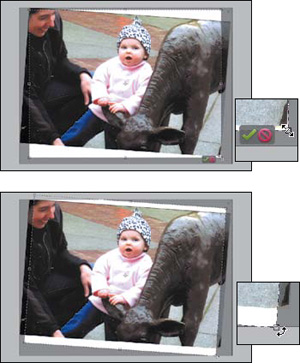
To straighten a scanned image:
From the Image menu, choose one of the following:
• Rotate > Straighten and Crop Image.
• Rotate > Straighten Image.
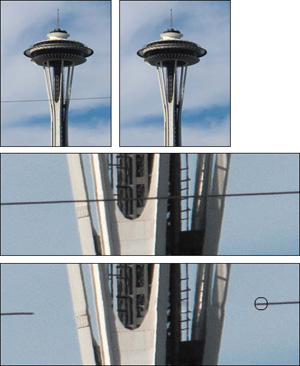
The Straighten and Crop Image command will do its best to both straighten the image and delete the extra background surrounding the image. The Straighten Image command simply straightens without cropping ![]() .
.
![]() A scanned image (top) is automatically straightened (center) or straightened and cropped (bottom).
A scanned image (top) is automatically straightened (center) or straightened and cropped (bottom).
Both methods have their own sets of limitations. Rotate and Straighten works best if there is a space of at least 50 extra pixels or so surrounding the image. If this surrounding border is much smaller, Elements can have a difficult time distinguishing the actual photograph from the border and may not do a clean job of cropping.
Although you’ll still need to manually crop your image after using the Straighten Image command, this method is probably a better choice, because you avoid the risk of Elements indiscriminately cropping out areas of your image you may want to keep.
For the surest control, however, straighten your images using the Crop tool as described in the next procedure.
To straighten a scanned image using the Crop tool:
- Select the Crop tool from the toolbox.
- In the image window, drag to select the area of the image you want to crop and straighten.
- Move the pointer outside the edge of the selection area until it changes to a rotation pointer .
 After you define a preliminary cropping selection (top), rotate the selection so it aligns with your image border (bottom).
 - Drag outside of the selection until its edges are aligned with the image border.
- Drag the selection handles, as necessary, to fine-tune the positioning; then press Enter .
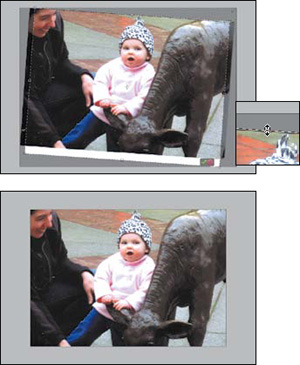 Make final adjustments to your cropping selection (top) before Elements automatically crops and straightens the image.
The image is cropped and automatically straightened.
Repairing Flaws and Imperfections
Little maladies, such as torn edges, water stains, scratches, even specks of dust left on a scanner’s glass or the camera’s sensor, are the bane of the photo-retouch artist, and are problems all too common when you set to the task of digitizing and restoring old photographs. Even if you’re shooting digitally, dust on the lens or the camera sensor can cause unwanted pixels and flaws. To the rescue come three similar but distinctly different repair and retouch tools.
The Spot Healing Brush tool is the perfect tool for removing small imperfections like dust or tiny scratches. With a single click, the Spot Healing brush samples (copies) pixels from around the area of a trouble spot and creates a small patch that covers up the flaw and blends in smoothly with its surrounding area.
The Clone Stamp tool is versatile not just for cleaning up and restoring photos, but for any number of special effects and enhancements. It works on the simple principle of copying and duplicating (cloning) image pixels from one part of an image to another. Although ideal for repairing tears or holes in photographs, it can also be used to add or duplicate objects in a photograph. For example, you can create a hedgerow from one small bush or add clouds to a cloudless sky.
The Healing Brush tool operates like a combination of the Clone Stamp and Spot Healing Brush tools. As with the Clone Stamp tool, it first samples pixels from one area of your image to another. Then, like the Spot Healing Brush tool, it blends those pixels seamlessly with the area you want to repair ![]() .
.
![]() With just a little patience and the Healing Brush and Clone Stamp tools, imperfections caused by a poor scan or dust on the camera lens can be easily removed or repaired.
With just a little patience and the Healing Brush and Clone Stamp tools, imperfections caused by a poor scan or dust on the camera lens can be easily removed or repaired.
To clean up small areas with the Spot Healing Brush tool:
- Select the Spot Healing Brush tool from the toolbox, or press J .
 The Spot Healing Brush tool.
 - On the options bar, select a healing method from the radio buttons.
• Proximity Match samples pixels from around the edge of your brush shape to create the patch over the area you want to repair.
• Create Texture uses the pixels directly beneath the brush shape to create a soft, mottled texture.
• Content-Aware uses advanced algorithms to intelligently fill the affected area (see the sidebar on the next page for more information).
- On the options bar, select a brush size using the brush Size slider.
Try to size your brush to fit snugly around the flaw you’re covering.
- Click and release the mouse button to apply the patch .
 With a single mouse click, each dust speck is removed.
Clone and Healing Overlays
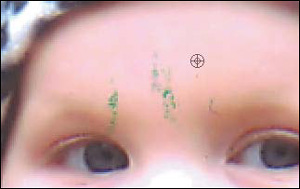
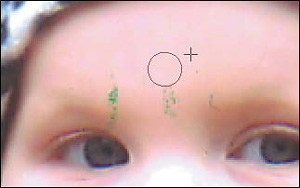
Photoshop Elements has an interesting retouching tool in its arsenal: the overlay. When using the Healing Brush or the Clone Stamp tools, set the origin point and then press Alt+Shift. A translucent overlay of the image appears; the mouse pointer remains fixed on the origin point, so you can see what will be drawn when you click the mouse button ![]() . With this approach, you don’t have to click blindly and hope that the edit you’re about to make is the one you envisioned.
. With this approach, you don’t have to click blindly and hope that the edit you’re about to make is the one you envisioned.
![]() The overlay lets you preview what will be drawn (left) when you start drawing (right).
The overlay lets you preview what will be drawn (left) when you start drawing (right).
To make the overlay appear whenever the tool is selected, click the Overlay Options button in the options bar (just to the right of the All Layers checkbox) and enable the Show Overlay checkbox.
Making Content-Aware Repairs
The Spot Healing Brush tool utilizes one of the best new features in Photoshop Elements 9: content-aware fill. Using technology borrowed from Photoshop CS5, the Spot Healing Brush can not only sample surrounding pixels to make repairs, but can also reconstruct areas based on the image’s content.
In most cases, the practical benefit is less time spent making repairs, because Photoshop Elements is applying more “thought” to how to fix an area. You don’t need to go over it several times with the Clone Brush as you would have in the past.
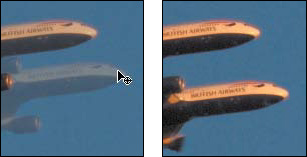
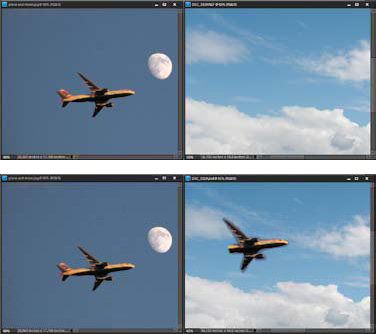
For example, when removing power lines from a photo, the Spot Healing Brush also intelligently fills in more complicated areas of the landmark as well as the blue sky ![]() .
.
![]() I painted over the power line (just once) using the Spot Healing Brush set to Content-Aware.
I painted over the power line (just once) using the Spot Healing Brush set to Content-Aware.
You can also attempt more dramatic content-aware repairs successfully ![]() and
and ![]() . (Of course, results will vary depending on the content of the image.)
. (Of course, results will vary depending on the content of the image.)
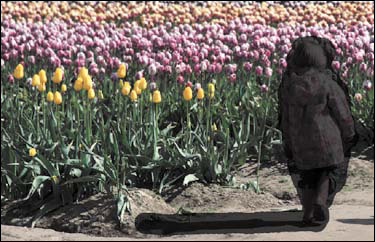
![]() Painting over the girl and her shadow…
Painting over the girl and her shadow…
![]() …fills the space with content that wasn’t there before.
…fills the space with content that wasn’t there before.
To retouch an image with the Clone Stamp tool:
- Select the Clone Stamp tool from the toolbox, or press S .
 The Clone Stamp tool.
 - On the options bar, select a brush size using the brush Size slider.
The brush size you choose will vary depending on the area you have available to clone from and the area you’re trying to repair. Larger brush sizes work well for larger open areas like skies or simple, even-toned backdrops, whereas smaller brushes work well for textured surfaces or areas with a lot of detail.
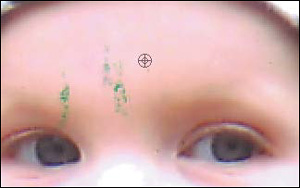
- Move the pointer over the area of your image you want to clone (the pointer becomes a circle, representing the brush size you’ve specified), and then hold down the Alt key.
The pointer becomes a target
 .
. Clearly, someone needs to clean his scanner! Once you’ve found an area of your image you want to clone, hold down the Alt key; your pointer turns into a bull’s-eye target. Click to set that area as the origin.
 - Click once to select the area you want to sample; then, release the Alt key and move the pointer to the area to which you want the clone applied
 .
.
 Drag the Clone Stamp tool over the portion of the image you want to replace. As you drag, crosshairs appear, providing a constant reference point of the cloned pixels as you paint over the image.
 - Hold down the mouse button, and drag to “paint” the cloned portion over the new area.
The original image is replaced with a clone of the sampled image.
To copy images from one picture to another with the Clone Stamp tool:
- Select the Clone Stamp tool from the toolbox and then select a brush size from the options bar.
- Still on the options bar, check that the Aligned option is selected
 .
.
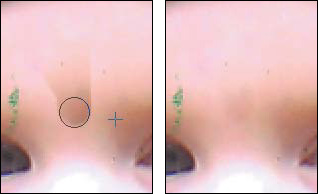
 The Aligned option gives you control over where the Clone Stamp tool samples image pixels.
With the Aligned option selected, the Clone Stamp tool will always copy pixels relative to the initial sampling point, even if you release the mouse button and press it again to continue. With the Aligned option deselected, each time you release the mouse button and press to resume cloning, you will copy pixels starting from the initial sampling point
 .
. Using the image on the left as a source, the image in the middle was cloned with the Aligned option selected. Although the mouse button was released and depressed several times, the image was still copied relative to the initial sampling point. The image on the right was cloned with the Aligned option deselected. Notice that each time the mouse button was released and depressed, the clone again started from the initial reference point.
 - Holding down the Alt key, click in the first picture to select the area you want to sample.
- Click the second picture’s image window to make it active, and then drag to paint a clone of the sampled image.
- The original image in the second picture is replaced with a clone of the sampled image from the first
 .
.
 The Clone tool provides a controlled method for combining parts of one image with another.
Tip
Before experimenting with the Clone tool, it’s good practice to first create a new, blank image layer. Creating a separate layer not only protects your original image by leaving it unchanged, but it gives you more creative flexibility. You can apply different cloned areas to different layers and then compare the effect of each by turning the layer visibility settings off and on. And if you apply different cloned areas on separate layers, you can experiment further by applying different blending mode and opacity settings to each clone. See Chapter 8, “Working with Layers.”
To remove flaws with the Healing Brush tool:
- In the toolbox, select the Healing Brush tool from beneath the Spot Healing Brush tool
 .
.
 The Healing Brush tool.
 - From the Mode drop-down menu on the options bar, check that Normal is selected
 .
.
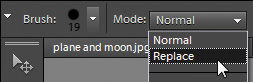 Although several healing modes are available, most often the Healing Brush tool works best in Normal mode.
Normal mode blends sampled pixels with the area you’re repairing to create a smooth transition with the area surrounding the repair. Replace mode does little more than duplicate the behavior of the Clone Stamp tool. For information on the other effect modes available from the drop-down menu, see “About Opacity and Blending Modes” in Chapter 8.
- On the options bar, select a brush size using the brush Size slider.
The brush size you choose will vary depending on the area you have available to sample from and the area that you’re trying to repair.
- Move the pointer over the area of your image you want to sample and hold down the Alt key. The pointer becomes a target
 .
.
 Once you’ve found an area of your image to use as a patch, hold down the Alt key and click to select it. Your pointer turns into a bull’s-eye target.
 - Click once to select the area you want to sample; then release the Alt key and move the pointer to the area you want to repair.
- Hold down the mouse button and drag to “paint” the sampled image over the new area
 .
.
 As you draw, the Healing Brush picks up the pixels relative to the origin point, just like the Clone Stamp tool (left). After you release the mouse button, Elements blends the values in the area (right).
The sampled image blends with the repair area to cover any flaws and imperfections.
Applying Patterns
Although some of Photoshop Elements’ patterns can be a little gimmicky, others, like many of the fabric and rock textures, can be useful when you’re trying to repair or retouch a damaged or aged photograph. For example, you might use one of the abstract stone patterns to camouflage a particularly damaged background in an old photo that would be difficult to salvage by any other method. The pattern sets provide objects as varied as flowers, stone faces, and textured artist’s surfaces, and can be applied using two methods. If you have a large area of the same tonal value or color, you can use the Paint Bucket tool. On the other hand, if you have a smaller area made up of varying colors or textures, use the Pattern Stamp tool.
To apply a pattern to a selected area with the Paint Bucket tool:
- Select the Paint Bucket tool from the toolbox, or press K .
 The Paint Bucket tool.
 - On the options bar, click the Pattern checkbox.
- Still on the options bar, click to open the pattern picker .
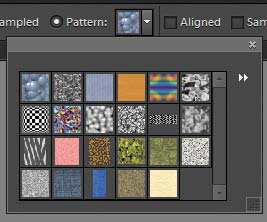 You can choose from a variety of patterns in the pattern picker on the options bar.
 - Click to choose from the list of default patterns, or click the down-arrow button to the right of the thumbnail image to open the Pattern palette menu.
- Select from the list of pattern sets in the bottom section of the menu.
The pattern picker displays the new pattern library.
- Return to the image window and click in the area where you want to apply the pattern. The pattern is painted in the image .
 Click the Paint Bucket tool in any large area where you want to apply a pattern. Here, a floral pattern was selected to create brand-new living room wallpaper.
To apply a pattern with the Pattern Stamp tool:
- In the toolbox, select the Pattern Stamp tool from beneath the Clone Stamp tool.
If you hold the Alt key while clicking the Clone Stamp tool in the toolbox, you can toggle between the Clone Stamp and Pattern Stamp tools. Or, if the Clone Stamp tool is already selected, you can select the Pattern Stamp tool from the options bar.
- On the options bar, select a brush size using the brush Size slider.
If you like, you can also make opacity and blending changes.
- Pick a pattern by following steps 3 through 5 in the previous procedure.
- Once you’ve chosen a pattern, return to the image window, hold down the mouse button, and then drag to paint the pattern in your image .
 Position the pattern brush anywhere in your image to paint a pattern.
Tip
The Paint Bucket tool fills areas based on tonal value and color, so you’ll have the most success filling areas composed of similar values, such as blank walls or clear, cloudless skies. You can adjust the behavior of the Paint Bucket tool by entering different values in the Tolerance text field on the options bar, but the results are a little unpredictable, and the process involves some trial and error.
Tip
In addition to the Pattern panel’s default mode of Small Thumbnail, you can view patterns as Text Only, Large Thumbnail, Small List, or Large List. As a further aid, if Show Tool Tips is selected in the General Preferences dialog, simply hover over any pattern thumbnail for a second or two to reveal a small pop-up descriptive name of that pattern.
Mount a Photo on Canvas
You can create an interesting textured effect for almost any photo by using patterns from the Artist Surfaces set.
- In the Layers panel, create a new layer above your original photo layer.
- From the Pattern panel menu in the options bar, choose the Artist Surfaces pattern set, and then choose from one of the artist surfaces.
- With the pattern layer selected, apply a blend mode (try Multiply) to combine the photo and pattern layers.
- If you like, adjust the pattern layer’s opacity setting.
Your photo will appear to be printed on the textured artist surface
. Any photo can be made to appear rendered on a variety of fine art surfaces.
Sharpening Image Detail
Generally speaking, you probably want most of your photos to be in focus—which can be surprisingly difficult to achieve, depending on surrounding movement, zoom level, or even just plain shaky fingers (maybe cut back on the caffeine). Even then, photos may not quite “pop” the way you’d like them to. In addition, any time you resize an image by resampling, pixels may be lost in the process, and so you also lose some degree of image detail.
Elements offers an Auto Sharpen command, but you may want more control. Look to the Adjust Sharpness command, which finds pixels with different tonal values and slightly increases the contrast between those adjoining pixels, creating a sharper edge. The resulting correction can help to enhance detail and bring blurred or fuzzy areas throughout an image into clearer focus.
To sharpen an image:
- From the Enhance menu, choose Adjust Sharpness to open the Adjust Sharpness dialog .
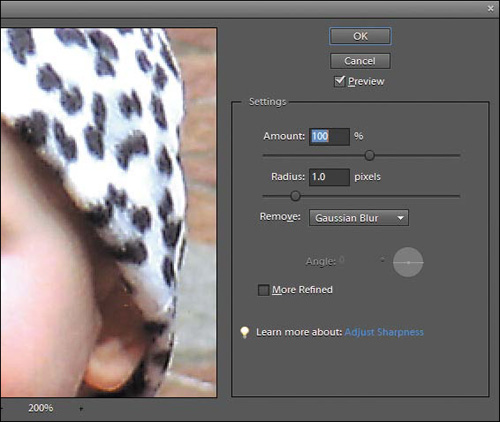 The Adjust Sharpness dialog’s sliders adjust the degree of sharpening you apply.
 - Make sure the Preview box is checked; then drag the following sliders to adjust the image’s sharpness:
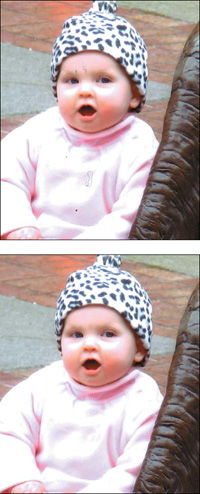
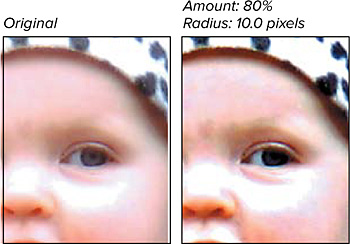
• The Amount slider sets the percentage of contrast applied to the pixels and so determines the degree of sharpness you apply. For high-resolution images (those above around 150 pixels per inch), set the Amount slider to between 150 and 200 percent. For low-resolution images, use settings somewhere around 30 to 80 percent
.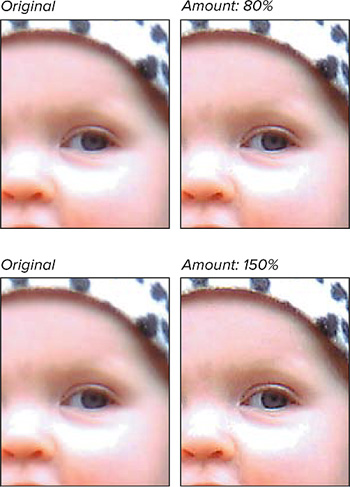 The Amount slider controls the percentage of sharpness applied to your image. The difference here is most pronounced around the eyelid and in the pattern on the hat. Also, the sharpening appears too aggressive in the 150 percent version when zoomed-in so close, but at normal size may look just fine. Feel free to experiment quite a bit to achieve your desired image.
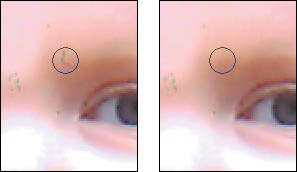
• The Radius slider determines the number of pixels surrounding the contrasting edge pixels that will also be sharpened. Although the radius can be set all the way to 64, you should never have to enter a value much higher than 2, unless you’re trying to achieve a strong, high-contrast special effect
. The Radius slider controls the number of pixels included in any sharpened edge. Smaller numbers include fewer pixels, and larger numbers include more pixels (exaggerated here for effect).
• The More Refined checkbox offers higher quality, but requires more processing time and power. If you’re experimenting with the settings, keep this option disabled until you reach the level of sharpening you want.
• The Remove drop-down menu offers three types of correction: Gaussian Blur applies the effect to the entire image; Lens Blur detects edges in its sharpening; and Motion Blur works to reverse the blur caused by camera movement. If Motion Blur is enabled, adjust the Angle setting to match the angle of the movement
.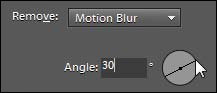 If the blur is caused by movement of the camera or subject, Motion Blur can compensate.
• Use the preview area to see a detailed view of your image as you apply the changes. You can move to a different area of an image by holding down the mouse button and dragging with the hand pointer in the preview screen. You can also zoom in or out of an area using the minus and plus buttons below the preview.
- When you’re satisfied with the results, click OK to close the dialog and apply the changes.
Enhancing Image Detail
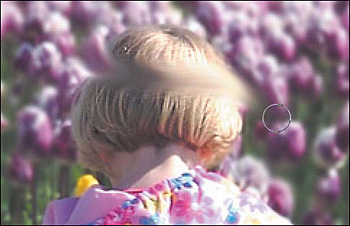
The Adjust Sharpness command works best on entire images or large portions of images. A couple of other tools are better suited for making sharpening and focus adjustments in smaller, more specific areas of an image. Not surprisingly, the Blur tool softens the focus in an image by reducing the detail, and the Sharpen tool helps bring areas into focus. For instance, you can create a sense of depth by blurring selected background areas while keeping foreground subjects in focus, or enhance the focus of a specific foreground subject so that it better stands out from others.
To blur a specific area or object:
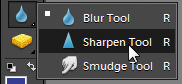
- Select the Blur tool from the toolbox, or press R .
 The Blur tool.
 - On the options bar, select a brush size using the brush Size slider.
If you want, you can also select a blend mode and enter a Strength percentage. The higher the percentage, the more the affected area is blurred.
- Move the brush pointer to the area of your image you want to blur; then hold down the mouse button and drag through the area .
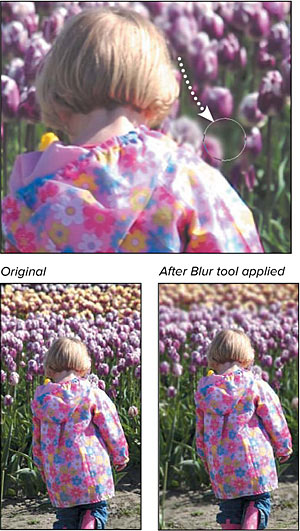 Drag the brush through the area you want to blur. You can resize the brush as you work on larger and smaller areas.
As you drag, the area is blurred.
Tip
Working on a portrait? Another tool to consider is the Surface Blur filter (Filter > Blur > Surface Blur), which smooths surface areas like skin without blurring edges. It’s an easy way to minimize wrinkles and other sharp details in faces.
To sharpen a specific area or object:
- Select the Sharpen tool from the toolbox, or press R to toggle through the enhance tools to the Sharpen tool .
 The Sharpen tool.
 - On the options bar, select a brush size.
If you prefer, choose a blend mode and enter a Strength percentage. The higher the percentage, the more the affected area is sharpened.
- Move the brush pointer to the area of your image you want to sharpen; then hold down the mouse button and drag through the area .
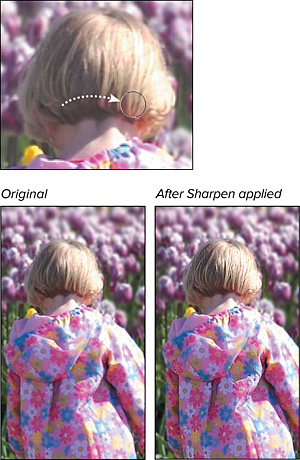 I can pull more detail out of the girl’s hair and coat by dragging the Sharpen tool over that area.
As you drag, the area is sharpened.
Tip
Use the Blur and Sharpen tools together when you want to draw attention to a particular person or object. First, use the Blur tool to soften the focus and detail of the subjects you want to appear to recede into the background. Then use the Sharpen tool to bring the subject of primary interest into sharp focus.
Blending with the Smudge Tool
The Smudge tool is one of those specialty tools that’s a little hard to classify. It’s grouped with the Blur and Sharpen tools in the toolbox and is often used for retouching tasks. The Smudge tool’s closest cousin may be the Blur tool, because it can also be used to soften edges and transitions in an image. But its real strength lies in its ability to push and pull image pixels around in your picture. Drag the tool through an area, and its pixels smear and blend with the adjacent pixels as if you were pulling a brush through freshly applied paint. Use the Smudge tool in backgrounds and other areas where you may need to smooth flaws or imperfections and where retaining detail isn’t critical. With a little practice, you can also create some convincing painterly effects by varying the length and direction of the brushstrokes.
To use the Smudge tool:
- Select the Smudge tool from the toolbox, or press R to toggle through the enhance tools to the Smudge tool .
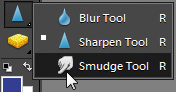 The Smudge tool.
 - On the options bar, select a brush size using the brush Size slider.
Just as with the Blur and Sharpen tools, you can select a blend mode and enter a Strength percentage. The higher the percentage, the more the affected area is smudged.
- Move the brush pointer to the area of your image you want to smudge; then hold down the mouse button and drag through the area .
 The Smudge tool can easily do more harm than good, so use it sparingly.
As you drag, the area is softened and blended.
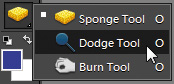
Using the Tonal Adjustment Tools
In traditional photography, technicians control darkness and lightness values on specific parts of an image by masking one area of film while exposing another. In the process, selected areas are either burned in (darkened) or dodged (lightened). The Burn and Dodge tools replicate this effect without the bother of creating masks. Drag an adjustable tool’s brush pointer through the area you want to affect. If one portion of an image is dramatically overexposed or washed out, and another portion is underexposed, the Dodge and Burn tools can be used to target and correct just those specific problem areas.
The Sponge tool increases or decreases the intensity of the color. Use the Sponge tool to bring colors back to life in badly faded, older photographs; or, work in the opposite direction, pulling the color out of a newer photo to create an antique effect.
To lighten a portion of an image with the Dodge tool:
- Select the Dodge tool from the toolbox, or press O to toggle to the Dodge tool .
 The Dodge tool.
 - On the options bar, select a brush size using the brush Size slider. Choose a size appropriate to your image (between 20 and 40 pixels is a good start).
Using the Range and Exposure settings, you can also select a specific tonal range to lighten (shadows, midtones, or highlights) and control the amount of lightness applied
.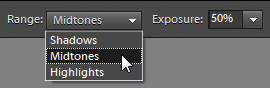 Select the part of the tonal range you most want to affect with Photoshop Elements’ tonal adjustment tools. With both the Dodge and Burn tools, you can choose to limit your changes to just the shadow, midtone, or highlight areas.
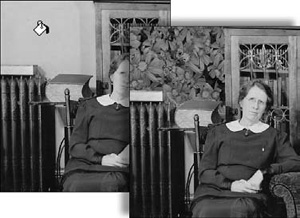
 - Move the brush pointer to the area of your image you want to lighten; then hold down the mouse button and drag through the area .
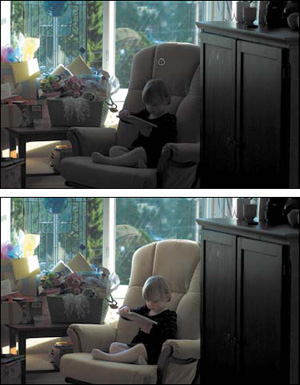 Drag the Dodge or Burn brush through any area to lighten or darken the pixels while preserving image detail. Here, I’ve used the Dodge tool to lighten the child and chair, keeping the tones in the window (which would get blown out if I were to lighten the entire image).
To darken a portion of an image with the Burn tool:
- Select the Burn tool from the toolbox, or press O to toggle through the tonal adjustment tools to the Burn tool .
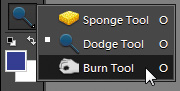 The Burn tool.
 - In the options bar, select a brush size using the brush Size slider.
If you like, you can also select a specific tonal range to darken (shadows, midtones, or highlights) and control the amount of darkness applied with the Exposure setting.
- Move the brush pointer to the area of your image you want to darken; then hold down the mouse button and drag through the area .
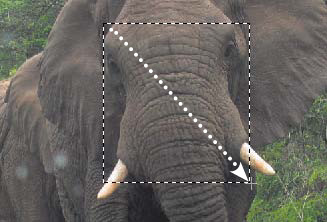
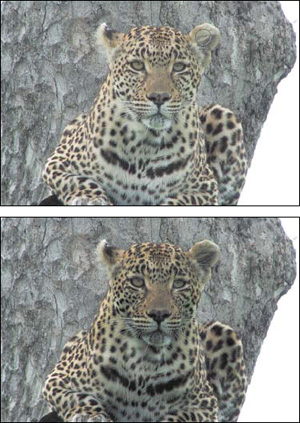 In this image, the leopard is washed out and blends into the background (top). The Burn tool added some much needed form and dimension by darkening the pixels in the shadow and midtone areas (bottom).
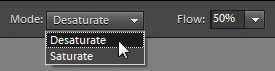
To adjust the color saturation with the Sponge tool:
- Select the Sponge tool from the toolbox, or press O to toggle through the tonal adjustment tools to the Sponge tool.
- On the options bar, select a brush size using the brush Size slider.
- From the Mode drop-down menu on the options bar, select whether you want to saturate (add) or desaturate (subtract) color .
 On the options bar, choose whether you want the Sponge tool to add or subtract color.
You can also adjust the amount of color to be added or subtracted using the Flow percentage slider.
- Move the brush pointer to the area of your image where you want to change the color’s intensity; then hold down the mouse button and drag through the area.
Erasing Backgrounds and Other Large Areas
The Background Eraser tool is an intelligent (and really quite amazing) feature. Not only does it remove the background from around very complex shapes, but it does so in a way that leaves a natural, softened, anti-aliased edge around the foreground object left behind. Additionally, because the Background Eraser tool always erases to transparency, if you use it to remove the background from even a flattened layer, it automatically converts that layer to a floating, transparent one. This allows you to easily place a new background behind a foreground image, or to move it into a different photo composition altogether.
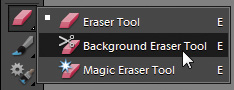
To use the Background Eraser tool:
- Select the Background Eraser tool from beneath the Eraser tool in the toolbox .
 The Background Eraser tool.
Alternatively, you can press E to select the Eraser tool and then press E again to toggle to the Background Eraser tool.
- On the options bar, select a size using the brush Size slider.
- From the Limits drop-down menu, select one of the limit modes .
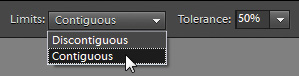 The Limits drop-down menu controls which pixels beneath the brush are sampled and erased.
Contiguous mode erases any pixels within the brush area that are the same as those currently beneath the crosshairs, as long as they’re touching one another.
Discontiguous mode erases all pixels within the brush area that are the same as those beneath the crosshairs, even if they’re not touching one another.
- Select a Tolerance value using the Tolerance slider . The value controls which pixels are erased according to how similar they are to the pixels beneath the eraser crosshairs. Higher Tolerance values increase the range of colors that are erased, and lower values limit the range of colors erased.
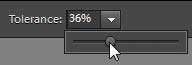 Use the Tolerance slider to increase or decrease the number of pixels sampled based on their similarity to one another.
 - In the image window, position the eraser pointer on the edge where the background and foreground images meet, and then drag along the edge.
The background portion of the image is erased, leaving behind the foreground image on a transparent background
. The brush erases only pixels similar to those directly below the crosshairs, so the entire background can be completely erased while leaving the foreground image intact. Begin by placing the crosshairs of the brush in the background portion of the image (top), then drag the brush along the outside edge of the foreground object to erase the background (bottom). Continue around the edge of the fore-ground object until it’s completely separated from the background.
Tip
It’s okay if the circle (indicating the brush size) overlaps onto the foreground image, but be sure to keep the crosshairs over just the background area. The Background Eraser tool, of course, doesn’t really know the difference between background and foreground images, and is simply erasing based on the colors selected, or sampled, beneath the crosshairs. If the crosshairs stray into the foreground image, that part of the image will be erased, too.
Tip
There’s a third eraser tool—the Magic Eraser tool—that I’ve chosen not to cover here because, frankly, it doesn’t work very well. It operates on the same principle as the Magic Wand tool by deleting like pixels based on color or tonal value. That’s all well and good, but you’re not given any feedback or opportunity to modify your selection. You just click, and poof—a large area of color is gone. Since the erasure typically is either not quite enough or a little too much, you undo, reset the tolerance, try again, undo—well, you get the idea.
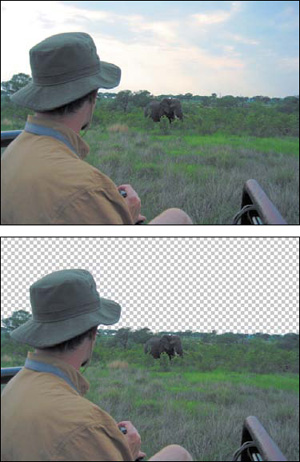
Removing a Foreground Image from Its Background
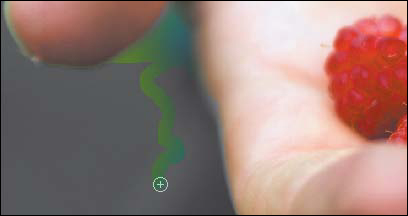
The Magic Extractor works much the same way as the Background Eraser tool, but distinguishes itself with speed and added control. Using brushes, mark and identify first the foreground image you want to save, and then the background image you want to delete. A set of additional tools helps you to fine-tune your foreground and background selections.
To use the Magic Extractor tool:
- From the Image menu, choose Magic Extractor to open the Magic Extractor dialog .
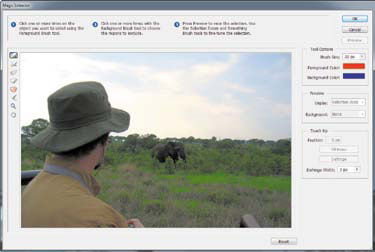 Open the Magic Extractor dialog.
 - From the tool area on the left side of the dialog, select the Foreground Brush tool .
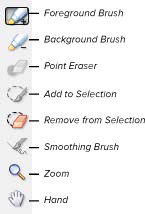 The Magic Extractor tool set.
 - Use the brush Size slider, if necessary, to adjust the size of your brush, and then use the brush to mark the foreground area of the image—the area of the image you want to preserve.
You can mark the foreground with a series of either dots or scribbles, or a combination of the two. The idea is to use the brush to get a good cross-sampling of all the different pixel colors and tones in the foreground
.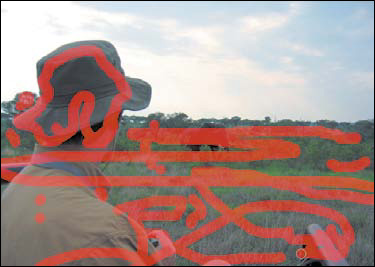 Identify the foreground area with a series of dots and scribbles.
 - Select the Background Brush tool, and in the same manner, mark the area of the image you want to remove.
- Click the Preview button to see the results of your work .
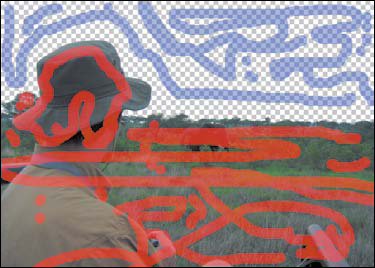 Click Preview to see the changes you’ve made to your image in the preview window.
Use the Zoom and Hand tools to get a closer look at the transitions between the foreground image and the background.
- If necessary, use one of the touch-up tools to modify or clean up the transitions between the foreground image and background:
• The Point Eraser tool removes portions of marks you’ve made. When you remove a portion of a mark from the background area, for instance, you’re telling the Magic Extractor that you don’t want to erase pixels of a particular tonal or color range.
• The Add to Selection tool allows you to paint back in areas of the foreground image that may have been mistakenly removed along with the background.
• The Remove from Selection tool works like an eraser to remove areas of the foreground image.
• The Smoothing Brush softens the transition between the foreground image and transparent background by adding a halo of deleted background color to the edge of the foreground image.
- If necessary, use the options in the Touch Up area of the dialog to further refine the foreground image.
- Click OK to finish .
 The Magic Extractor identified the foreground and background areas of the image, and then deleted the background.
Tip
In the Magic Extractor dialog, you can only Undo (Ctrl+Z) the action of two tools: the Remove from Selection tool and the Smoothing Brush tool. But if you’re not happy with the results you’re getting, you can start over by either clicking the Reset or Cancel buttons. Clicking the Reset button will undo every action in the Preview window, but will leave the dialog open, whereas clicking Cancel will exit the dialog altogether without applying any changes.
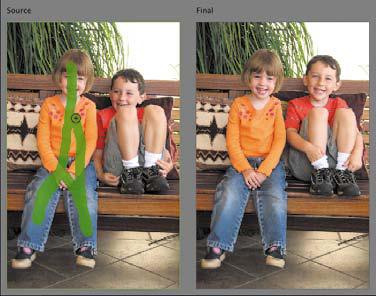
Removing Objects from a Scene
You’ve probably seen the photo on the Web or forwarded via e-mail from a friend: A couple in full wedding attire are exchanging vows on the beach, the ocean meeting the sky in the background, and…what’s that? Yes, a topless sunbather is walking into the frame, ruining an otherwise romantic wedding photo. In Elements, however, that photo would be easily salvageable.
The Photomerge Scene Cleaner lets you take a collection of similar images and selectively “paint out” objects you’d prefer weren’t in the photo. Select two or more images that contain an element you want to remove; scenes where people are moving are ideal, because Elements takes areas from the background and superimposes them over the person you wish to hide. (In fact, the early name for Scene Cleaner was “Tourist Remover.”)
To remove objects from a scene:
- Open two or more photos of the scene you want to clean in the Editor, and select them in the Project Bin.
- Choose File > New > Photomerge Scene Cleaner; or, go to the Guided Edit pane and click Scene Cleaner under the Photomerge heading.
The first image appears in the Source pane on the left, with an empty Final pane on the right.
- Choose the image that will be the basis for the finished photo and drag it to the Final pane .
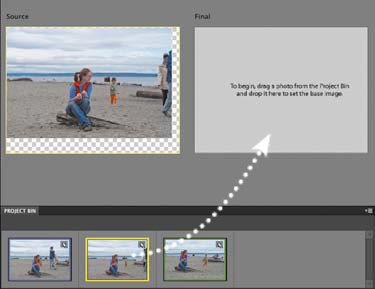 Drag the photo you want to use as a base into the Final pane.
 - Click a photo in the Project Bin that contains background in the area where you want to remove an object from the Final image .
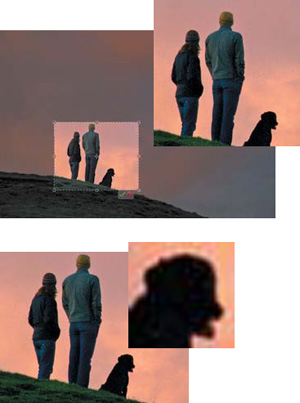
 I need to remove the little girl from the Final image, so I click a photo that has a corresponding empty area—in this case, a shot after she’s taken a few steps—to load into the Source pane.
 - With the Pencil tool selected, draw over the object to be removed in the Final image . Elements copies that area from the selected Source image to make the object vanish.
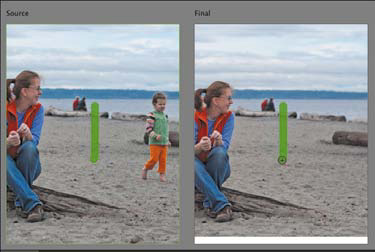 Drawing over the girl in the Final image at right grabs the corresponding pixels from the Source, removing her.
Repeat steps 4 and 5 to remove other objects from the scene. (Move the mouse pointer off the Final image to preview it without pencil strokes.) The ink color corresponds to the outline surrounding each source image, so you can easily tell which areas are being used. You can also click the Show Regions checkbox to view the patchwork Elements created
. Two people appeared at the edge of the Final photo, so here I click a third photo (with the blue outline) and paint them out in the Source image. With regions visible, you can see which portions are being copied.
 - To fine-tune the effect, you may need to use the Eraser tool to erase some of your pencil marks in the Final image.
- Click Done. Elements saves the image in a new layered file.
Tip
Depending on how well the source images lined up, you may need to crop the final image to remove blending irregularities ![]() .
.
![]() I’ve cropped the final photo to remove artifacts left over from blending the images.
I’ve cropped the final photo to remove artifacts left over from blending the images.
Tip
Elements attempts to align the source images based on their contents, but sometimes things end up a little off. If that’s the case, click the Advanced Options expansion triangle to reveal the Alignment tool, which you can use to mark three points the images share. Click the Align Photos button to realign them.
Tip
Click the Pixel Blending checkbox to get a higher-quality, but slower and more processor-intensive, result.
Tip
A tool like Photomerge Scene Cleaner is a great reason to take multiple shots of a scene while you’re shooting. With digital photography, you can fire off lots of exposures and end up with plenty of choices.
Recomposing a Scene
When you’re taking photos, especially photos of groups, it’s not always possible to line people up the way you’d like them to appear. The Recompose tool can help by shifting objects that you choose while retaining a workable background. Like the Photomerge Scene Cleaner, the tool lets you paint areas of an image to choose which objects to retain and which to merge or remove.
Unlike the Photomerge tools, however, the Recompose tool doesn’t sport its own interface. It’s a cousin to the Crop tool, and performs its magic when you adjust an image’s borders.
To recompose a scene:
- Choose the Recompose tool from the toolbox, or press C . The image gains control handles as if you were using the Crop tool.
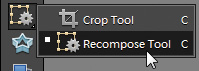 The Recompose tool.
 - Drag a handle to resize the image . The tool calculates which areas can be removed or compressed.
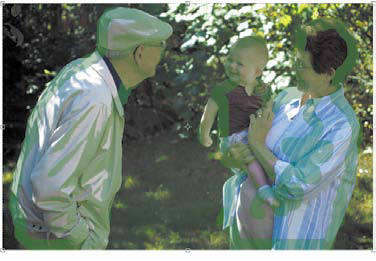
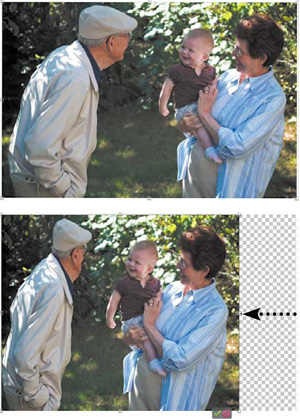 We want to bring the man and baby closer together. Drag a handle to recompose the scene. In this case, however, the man’s face is compressed.
If you like the end result, click the Commit button to finish. If the effect needs more attention, click the Cancel button (or press Esc) and continue to the next step.
- To gain greater control over which areas are preserved, use the marking tools in the options bar. With the Mark for Protection brush, paint areas that should remain intact . Use the Mark for Removal brush to specify areas that should definitely be removed.
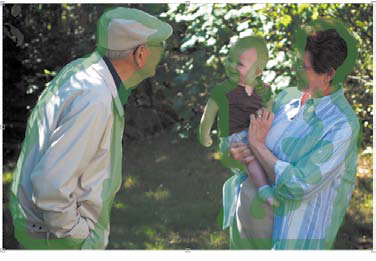 The Mark for Protection Brush preserves its painted pixels.
 - Drag a handle again to resize the image . You may need to fine tune the marked areas to get a smoother result.
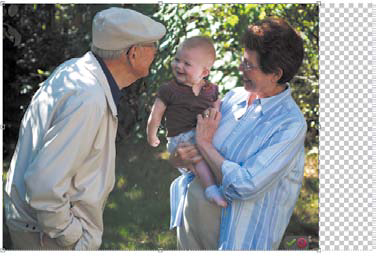 Areas marked for protection are left unharmed, while the background gets compressed.
 - Click the Commit button to apply the edit.
Tip
You’ll probably want to switch to the Crop tool after committing the edit to remove the area that’s no longer used in the image.
Tip
Is something unwanted in the middle of your scene? Use the Mark for Removal tool to completely paint it out; Elements removes those pixels first.
Tip
Choose a size from the Preset menu in the options bar to restrain how the image is resized (for example, to keep the original aspect ratio).
Tip
Figuring that this feature would get the most use in bringing people together (or moving them apart), Adobe added a button on the options bar: Highlight Skin Tones. Click it to apply the Mark for Protection brush to areas matching skin tones ![]() .
.
![]() Highlight Skin Tones marks people (or people-colored things) for protection.
Highlight Skin Tones marks people (or people-colored things) for protection.
Compositing Images
Combining multiple images to create a single merged image is called compositing. You can combine different digital photos or scanned images to create effects that range from subtle to spectacular to silly. For example, you can replace a landscape’s clear blue sky with a dramatic sunset; create complex, multilayered photo collages; or replace the face of the Mona Lisa with that of your Uncle Harold.
To replace part of an image with another image:
- Open an image that contains an area you want to replace. I’ll call this the “target” image.
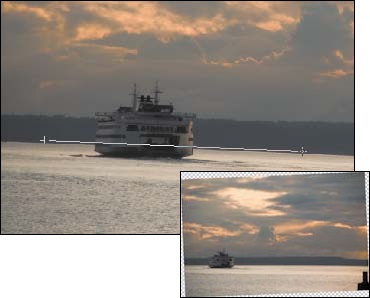
In this example, the sky isn’t as dynamic as it could be
. Since the edges are well defined, the image is a good candidate for the Background Eraser tool. I’ll enhance this image by replacing its background with something more dynamic.
 - From the toolbox, select the Background Eraser tool; then adjust its brush size and tolerance values.
- Position the Background Eraser tool along the outside edge of the foreground shape (the tower). Making sure the brush crosshairs are over the background (sky), drag along the edge to erase the background. Continue to erase the background until the area is completely transparent .
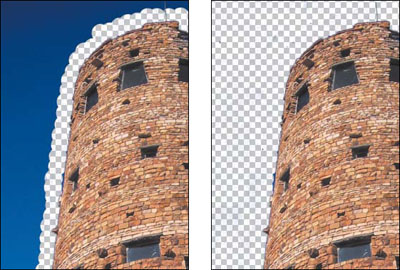 Use the Background Eraser tool to remove the sky and create a transparent background.
 - Open the image you want to use to replace the transparent pixels in your original image. I’ll call this the “source” image.
- Select the Move tool and drag the source image into the target image .
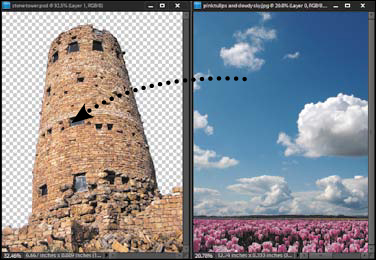 Drag the source image (the sky) into the target image (the tower).
In the example, the sky image is larger than the empty background area, which allows flexibility in positioning the new sky in the composition.
If you like, you can also use the selection tools to select just a portion of the source image, then drag just that selection into the target image.
- On the Layers panel, drag the source layer below the target layer . (For more information about layers, see Chapter 8.)
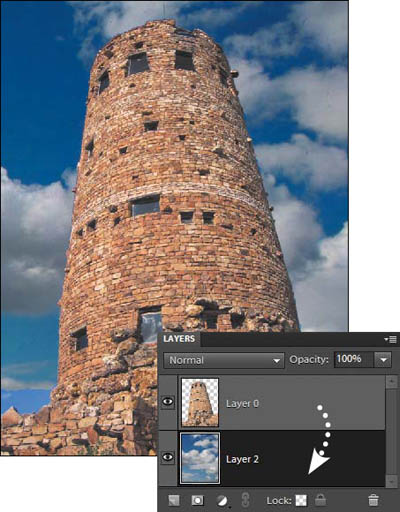 Move the sky layer below the tower layer on the Layers panel and adjust the position in the image window.
 - In the image window, use the Move tool to adjust the position of the source image until you’re satisfied with the composition.
Tip
It’s always good to save a copy of your composition retaining the layers in case you want to make further adjustments. Layered files should be saved as Photoshop Elements (PSD) files.
Tip
Instead of using the Background Eraser tool, you could have just as easily used the Magic Extractor in Step 3 to clear the background.
Merging Portions of Multiple Photos
My instructions were simple: Get a good photo of my niece and nephew together. It sounds easy, but you can’t assume that a five-year-old and his little sister will sit still. If it weren’t for my camera’s ability to shoot three frames per second, I think I’d still be trying to get the shot.
Elements makes that quandary much easier with Photomerge, an impressive feature that lets you combine areas of multiple photos into one nearly seamless composition.
To merge portions of multiple photos:
- Open two or more similar photos in the Editor.
- Select the photos you want to use in the Project Bin. (If you don’t initially, Elements will ask you to do so.)
- Choose File > New > Photomerge Group Shot; or, in the Edit pane, click the Guided heading and then click Group Shot under Photomerge .
 Choose the feature in the Guided Edit pane.
The first image appears in the Source pane on the left, with an empty Final pane on the right.
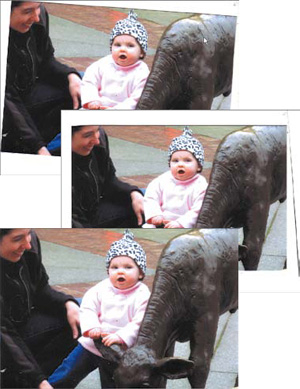
- Drag one of the images to the Final pane . This image is the end result, so it should have the fewest imperfections (such as people’s heads turned away from the camera, motion blur, or other issues).
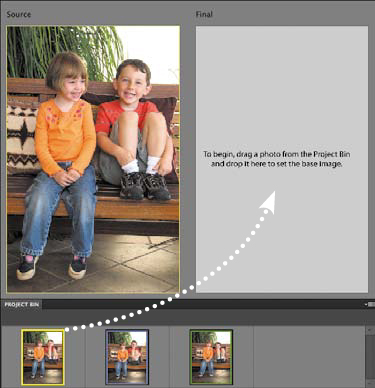 Drag the photo you want to use as a base into the Final pane. In this case, the boy’s facial expression is my favorite of the three, so I’m building on the first image.
 - Click to select a photo in the Project Bin that contains an element (a better facial expression, for example) you want merged into the Final pane. The photo appears in the Source pane .
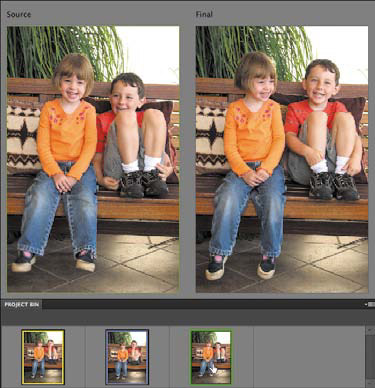 I like the girl’s expression in the third image, so I’ve clicked it in the Project Bin to load it into the Source pane. Elements uses colored borders to help you track which photo is which.
 - Select the Pencil tool (if it’s not already selected) and, in the Source pane, draw over the area you want to transfer to the Final image . When you release the mouse button, Elements incorporates that area into the Final image.
 Elements calculates the pixels surrounding the areas I’ve drawn and merges them into the Final image.
Repeat Steps 5 and 6 for other areas you want to merge
.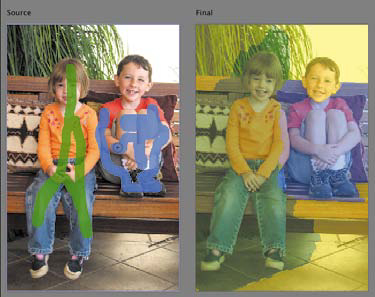 I drew over the boy’s legs from the second image to merge them into the Final image. I’ve also enabled the Show Regions option to see how Elements has patched the photo together.
 - Elements does an amazing job of automatically merging images, but it’s not perfect. If you need to adjust some areas, use the Eraser tool to edit the drawing lines in the Source pane .
 In the previous figure, the girl’s left arm ended up deformed as a result of the merge. To remedy, I used the Eraser tool to shave some of the blue line on the boy’s right arm.
 - Click Done to exit the Photomerge interface. Elements saves the image in a new layered file.
Tip
After you exit Photomerge, you may still need to perform some clean-up editing on the image in the Full Edit mode. The merged image appears on a new layer above the Source image. Use the Clone Stamp tool (or the other tools covered in this chapter) to fine-tune the image.
Tip
Elements attempts to align the source images based on their contents, but sometimes things end up a little off—due to different image sizes, slightly different camera angles, and so forth. If that’s the case, click the Advanced Options expansion triangle to reveal the Alignment tool, which you can use to mark three points the images share. Click the Align Photos button to realign them.
Tip
Click the Pixel Blending checkbox to get a higher-quality, but slower and more processor-intensive, result.
Tip
The Faces option under Photomerge works similarly to Group Shot, but requires you to set alignment points first. It’s great rainy-day fun!
Using the Smart Brush
In Chapter 4, I touched on the Touch Up edits found in the Guided Edit mode, which let you select an area and apply common fixes such as intensifying a blue sky or brightening a person’s teeth (see “Making Touch Up Edits”). Those tools are simplified front ends for the Smart Brush found in Full Edit mode.
The Smart Brush applies many more effects—called Smart Paints—than the four offered in the Guided Edit pane, and you can also edit the appearance of a Smart Paint effect after you’ve applied it.
What’s behind the magic? Each Smart Paint application is a new adjustment layer; a layer mask defines the area where the effect is applied (see Chapter 8 for more on working with layers).
To apply a Smart Paint effect:
- With an image open in Full Edit mode, select the Smart Brush tool from the toolbox or press F.
 The Smart Brush tool.
 - In the Smart Paint menu that automatically appears, choose an effect; click the drop-down menu at top to list categories of effects , and then click a Smart Paint style to use it.
 The Smart Paint menu and category drop-down menu list the various Smart Brush effects.
 - Paint over an area of your photo. Elements creates a selection and applies the Smart Paint effect .
 Paint the area to be affected by the Smart Paint effect (Reverse–Black And White shown here).
You can adjust the brush size using the Brush pop-up menu in the options bar.
Tip
When you apply a new Smart Paint to an image, a new selection is created. To switch easily between multiple Smart Paint areas, click the layer pin that appears. Right-clicking the pin brings up options for refining the area, deleting the effect, or hiding the selection border.
To edit a Smart Paint selection area:
• Once you start painting, the brush is in Add to Selection mode so additional areas you paint are added to the selection.
• To apply the Smart Paint to a different area of the image, click the New Selection button and begin painting.
• To deselect part of the Smart Paint area, click the Subtract from Selection button in the Options bar or in the floating toolbar that accompanies the selection ![]() .
.
![]() The selection tools appear above the Smart Paint area.
The selection tools appear above the Smart Paint area.
• Click the Refine Edge button on the options bar to feather, contract or expand, or smooth the edge. The Inverse checkbox inverts the selection.
• To fine-tune the selection, switch to the Detail Smart Brush tool (press F again). The selection border disappears, letting you add to, or subtract from, the mask that defines the area ![]() .
.
![]() Use the Detail Smart Brush tool to draw directly on the layer mask for a more precise selection.
Use the Detail Smart Brush tool to draw directly on the layer mask for a more precise selection.
To change Smart Paint settings:
In the Layers panel, double-click the adjustment layer that corresponds with the Smart Paint effect ![]() .
.

![]() Smart Paints are actually just adjustment layers.
Smart Paints are actually just adjustment layers.
The dialog that appears depends on the effect you chose; for example, Blue Skies applies a gradient to the area, so the Gradient Fill dialog appears. You can then edit the gradient ![]() .
.

![]() The Blue Skies Smart Paint effect applies a gradient fill to the selected area, which you can edit (but please, not like this, I beg you).
The Blue Skies Smart Paint effect applies a gradient fill to the selected area, which you can edit (but please, not like this, I beg you).
Tip
Some Smart Paints, such as the Black and White Yellow Filter, are not editable. Double-clicking the layer reveals that the effect was created in the full version of Photoshop. That actually means Elements has no interface or capability to edit the effect, even though the program is clearly capable of applying it.
Matching the Style of Another Image
One of the best ways to improve one’s photography is to emulate what other people have done. I may not have a burning desire to become a landscape photographer (which requires getting up really early in the morning for the best light), but when I’m in the right environment you can bet I’m thinking, “I want this shot to look like something Ansel Adams would have made.”
Alas, I’m not Ansel Adams, but with the help of Photoshop Elements, I can get my images a little closer to his style. The Photomerge Style Match feature examines a source image and attempts to replicate its style to one of your images.
Adobe provides a handful of source images, but you can also use one of your own (or one you downloaded from the Internet).
To match the style of another image:
- Open the image you want to edit in the Editor.
- Choose File > New > Photomerge Style Match, or click the item under Photomerge in the Guided Edit pane.
- Drag a style image from the Style Bin below the previews . Elements analyzes the source and does its best to apply the same style to your image.
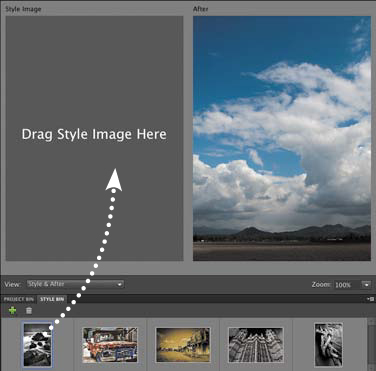 Adobe provides a few source photos in the Style Bin. Drag one to the Style Image area.
 - To match the coloring of the style image, such as a black-and-white or sepia image, click the Transfer Tones checkbox .
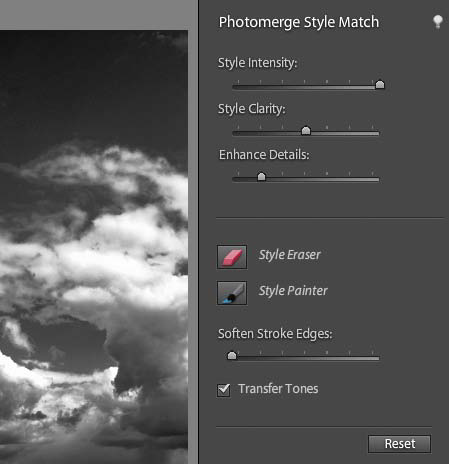 Enabling the Transfer Tones option carries over custom coloring, such as a black and white image.
 - Adjust how the effect is applied by manipulating the following sliders:
• Style Intensity affects the overall amount of the matched style.
• Style Clarity adjusts the contrast level of the style.
• Enhance Details adjusts the sharpness of the effect.
- If you don’t like the effect, click the Reset button or select a different photo as the style image.
- Click Done to apply the effect.
To apply a style to selected areas:
- After applying the style to the entire image, click the Style Eraser button.
- Paint the areas where you want the original image to show through . The brush size and intensity is controlled on the options bar.
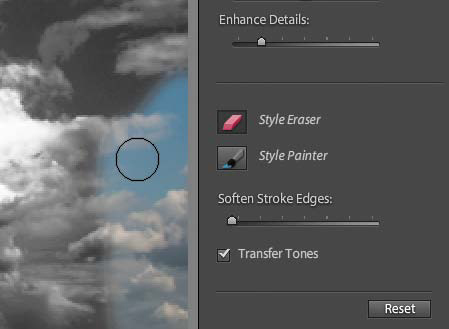 The style is applied to the entire image, but you can erase areas to further control how the effect appears.
Use the Style Painter brush to reapply the style to areas where needed.
- To feather the edges of your area, drag the Soften Stroke Edges slider.
To add style source images:
- In the Style Bin, click the Add (+) button
- From the drop-down menu, choose Add Style Images from Organizer to bring up the Add Photos dialog. (Choosing the hard disk option presents a regular Open dialog to let you find a file.)
- Click the checkbox next to images you want to add to the Style Bin . To narrow the number of options, use the filters in the Add Photos From area.
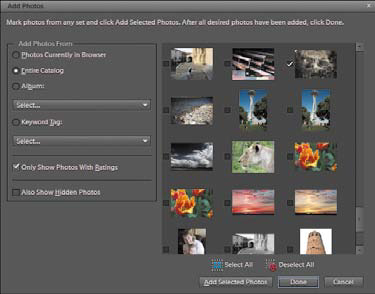 Use your own images as style sources.
 - Click the Add Selected Photos button to add the pictures, then click Done.
Tip
There is no Undo command when erasing selected areas, so you need to repaint them to get the style back (or just click Reset and then reapply the style image).
Tip
I find the Style Match feature to be heavy-handed at times; it often posterizes images and blows out highlights. For this reason, I typically reduce the Enhance Details slider. You can also pull back on the Style Intensity amount, but that also minimizes the Transfer Tones feature.
Creating Panoramas
With Photoshop Elements, you can create wide, panoramic images that would be difficult to capture with a single shot from a standard camera. The Photomerge Panorama command analyzes your individual photos and assembles them into a single panoramic image ![]() .
.
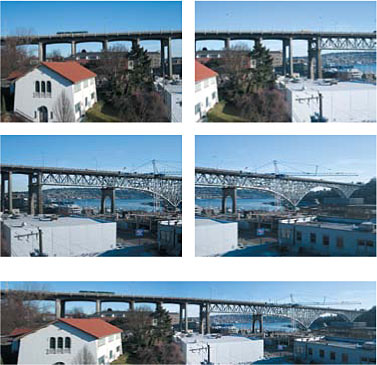
![]() Photomerge combines several separate photos into a single panoramic picture.
Photomerge combines several separate photos into a single panoramic picture.
Taking pictures for panoramas
If you’re getting ready to snap some scenic photos and know you want to assemble them into a panorama later, making a few camera adjustments will make it easier to assemble a seamless panorama.
• Use a consistent zoom level when taking the pictures.
• Use a consistent focus. If your subject matter is far away, set your camera’s focus to infinity, if the option is available.
• Use consistent exposure. A panorama with widely varied lighting will be difficult to merge seamlessly. Set your camera’s exposure manually or lock the exposure setting if possible. Photomerge Panorama can make slight adjustments for images with different exposures, but it is not as effective when the image exposure varies greatly.
• If possible, use a tripod. You can take pictures for a panorama with a handheld camera, but you might find it difficult to keep all of the images perfectly level.
• Overlap sequential images by about 15 to 40 percent ![]() . Photomerge looks for similar detail in the edges of your images to match consecutive pictures. Try to capture as much detail throughout the frame to give Photomerge more reference points to match up.
. Photomerge looks for similar detail in the edges of your images to match consecutive pictures. Try to capture as much detail throughout the frame to give Photomerge more reference points to match up.
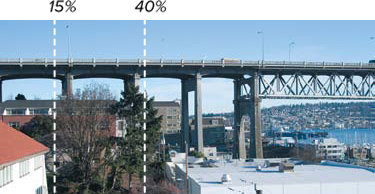
![]() The more your images overlap, the better your chances of successfully merging them. Try for an overlap of between 15 and 40 percent.
The more your images overlap, the better your chances of successfully merging them. Try for an overlap of between 15 and 40 percent.
Tip
Try taking two versions of panorama images: one with the camera held horizontally and one with the camera held vertically. See which option makes a better panorama.
Tip
You’re not limited to creating horizontal panoramas. You can also create vertical panoramas of tall subjects, such as skyscrapers or redwood trees.
Tip
Some digital cameras include a feature that helps you compose multiple overlapping photos when you shoot.
Assembling images into a panorama
To create a panoramic image, select the images you want to merge and then let Photomerge work its magic.
To create a panorama:
- Open the images you want to merge.
If you want to make any adjustments, such as tonal corrections or cropping, make your corrections first, before you begin assembling the images.
- From the File menu, choose New > Photomerge Panorama. The Photomerge dialog appears .
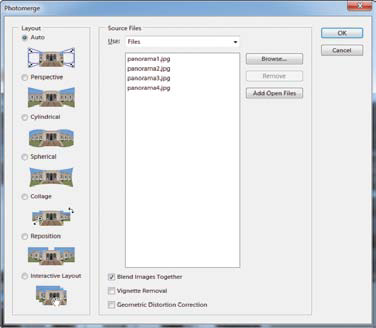 Browse for photos to merge in the Photomerge dialog.
 - Click the Add Open Files button to use the images from Step 1. If you need to delete a file from the list, select it and then click the Remove button.
If you want to add more images, click the Browse button to open the Open dialog; then navigate to the folder containing the images you want to merge.
- Choose a panorama style from the Layout column based on your source images. For example, you’d choose Cylindrical if you shot a 360-degree revolution around one point.
The Interactive Layout option works differently than the rest, as you’ll see on the following pages; for now, don’t choose it.
- When you have all of the images you want in the Source Files list, click OK.
Photoshop Elements automatically merges them into a single image
. When you click OK, your merged images open in a new Elements file.
 - Elements can attempt to fill in the empty area using its content-aware technology. In the dialog that appears, choose whether to apply the fix ( and ).
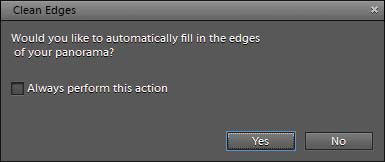 Choose to fill in the edges using content-aware technology.
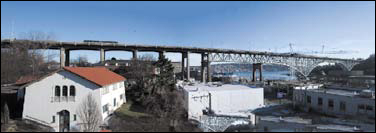 The edges are filled in (with varying levels of success due to the image contents, especially at the bottom).
Tip
You may see an alert message telling you that some images can’t be assembled. If Photomerge can’t find enough common details in your images, it will ignore those files. See the next page for a solution.
Tip
Once you click OK to create your panorama, there’s no returning to the Photomerge dialog to make further adjustments. If you’re not happy with the way the panorama rendered, you’ll need to start over. Refer to the following topics for further instruction on how to make additional adjustments to your panorama before you click the OK button.
Tip
Use the Crop tool to remove those rough edges and give your panorama a nice, crisp rectangular border ![]() .
.
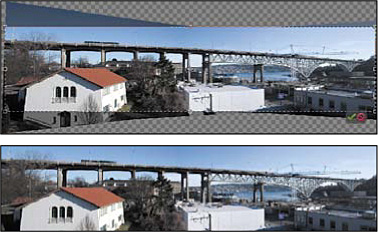
![]() After creating the panorama, you can use the Crop tool to trim the image.
After creating the panorama, you can use the Crop tool to trim the image.
Tip
Before you print your final panorama, take the time to examine its size in the Image Size dialog (from the File menu, choose Resize > Image Size). Depending on the size and resolution of the images you’ve used, your panoramas can quickly grow to exceed the standard paper stock sizes for your printer (which are usually no larger than 8.5 x 14 or 11 x 17 inches). Once you’ve determined the final image dimensions, use either the Image Size dialog or the controls in the Print Preview dialog to resize your image so it will fit on whatever paper stock you have available.
Adjusting images using the Interactive Layout
When you choose the Interactive Layout option in the initial Photomerge dialog, Elements merges the selected images, but then opens a new window where you can fine-tune the composition.
To reposition images in the panorama:
- If you want to remove an image from the panorama before repositioning it, drag it from the work area into the Lightbox (just above the main preview area) .
 Drag an image in the work area to the Lightbox.
 - Check that the Select Image tool is highlighted in the Photomerge dialog .
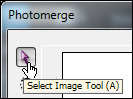 The Select Image tool.
 - Drag the image over the image with which it should merge. As you drag, the image becomes partially transparent so you can more easily line it up with the one below it .
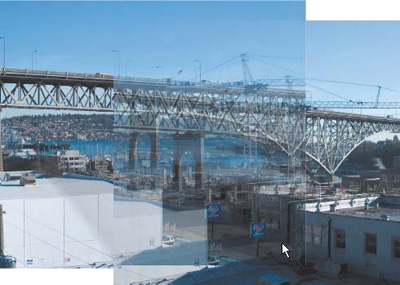 When you drag one image over another, the top image becomes semitransparent, allowing you to align the images.
 - When the two images match up, release the mouse button.
If Snap to Image is selected in the dialog, any two overlapping images will automatically try to match up with one another. If Snap to Image is not selected, Photomerge allows you to align the overlapping image manually.
Turning off Snap to Image allows you to move the images in small increments if they are not matching up exactly. You may also need to rotate an image slightly to make it match up with its neighbor correctly.
- Select the Rotate Image tool, and then drag to rotate the selected image if needed .
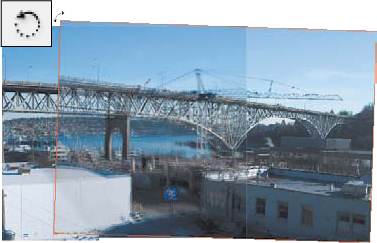 You can rotate images to help align them in the work area.
The Photomerge dialog offers several options for moving through its work area while composing your panoramas, including its own built-in navigator.
- To navigate through the work area, do one of the following:
• Select the Move View tool (the hand icon) in the dialog and drag in the work area.
• In the Navigator, drag the view box. This changes the view in the work area
. Drag the view box in the Navigator to change the view in the work area.
• Use the scroll bars at the bottom and right edges of the work area.
- To change the zoom level in the work area, do one of the following:
• Select the Zoom tool in the dialog and click in the work area to zoom in.
• Hold down the Alt key while clicking to zoom out.
• Move the slider under the thumbnail in the Navigator.
• Click the Zoom icons under the thumbnail in the Navigator section of the dialog.
Tip
You may see some tonal variation as a result of merging the images in the Interactive Layout (as in the images on the next page). However, Elements smooths those when the final panorama is constructed.
Enhancing perspective
Even the most sophisticated camera lenses tend to flatten what little depth or perspective is present in the landscapes or objects they capture. Photomerge Panorama lets you restore that lost perspective to create a more natural-looking panoramic image. In addition, you can adjust the vanishing point (the point where natural perspective recedes into the distance) to help draw attention to a specific area or object in the panorama.
To add perspective to a panorama:
- In the Settings section of the dialog, select the Perspective option .
 Click the Perspective radio button to add exaggerated perspective to your merged composition.
The outside edges of the panorama are distorted, creating a more dramatic, and sometimes more realistic, perspective view
. The middle of the center image is designated as the vanishing point, and the outside images appear to recede into its center. The vanishing point image is identified by a blue outline when it’s selected.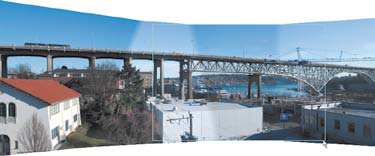 When you select the Perspective setting, Photomerge adjusts and distorts the images to create the illusion of a vanishing point. Here, the vanishing point image is identified by the light blue outline.
 - To make a different image the vanishing point image, first select the Set Vanishing Point tool.
- Click a different image in the work area. The panorama changes the perspective to make it look as if the other images now recede into the new Vanishing Point image .
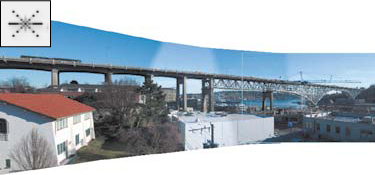 When you change the Vanishing Point image, the other images adjust and distort in response to change the perspective.
 - If the perspective option doesn’t give you the effect you’d hoped for, select the Reposition Only option in the Settings section of the dialog to return your panorama to its original state.
You can also remove the perspective from your panorama by dragging the Vanishing Point image to the Lightbox.
Correcting Red Eye
When you’re in an indoor or darkened space, your pupils grow larger to let in more light. The pupils can’t shrink fast enough to compensate for a camera’s flash, so when that light reflects off the back of the eye, it causes red eye. Many cameras pre-flash before the picture is actually snapped, giving the subject’s pupils a chance to contract and greatly reduce the effects of red eye. But chances are you still have some older photos lying around you’d like to repair. The Red Eye Removal tool offers an effective way to remove red eye, simply by changing pixels from one color to another.
To remove red eye from a photo:
- Select the Red Eye Removal tool from the toolbox, or press Y .
 The Red Eye Removal tool.
 - On the options bar, set the Pupil Size slider to match the proportional size of the pupil (the red part of the eye that you want to turn black) to the colored portion of the eye. Then, use the Darken Amount slider to control the darkness of the retouched pupil .
 Two sliders on the options bar help you to adjust red eye removal.
Although these settings are not inconsequential, the defaults of 50 percent work fine in most cases I’ve tried.
- If necessary, zoom in on the area you want to correct; then click and drag to draw a selection over the colored portion of one eye .
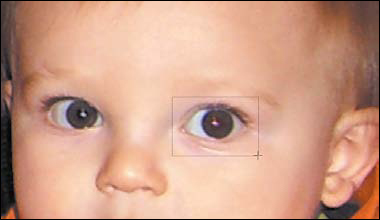 To remove red eye, draw a selection around the eye and release the mouse button.
 - Release the mouse button to remove the red eye effect. If you’re not quite satisfied with the results the first time, press Ctrl+Z to undo the operation, and then repeat steps 2 through 4, revising the option bar settings or changing the size of the selection before you click and drag.