
1. From Camera to Computer
Importing Your Images
This may seem like a pretty elementary place to start, but let’s face it; you can’t do anything to your photographs until you get them into your computer. Believe it or not, this is where the workflow can really go wrong for a lot of people. What do I mean? Well, being organized is the main component for a fast and efficient workflow. By developing a plan for how and where to store your photos, you will be well on your way to working faster and being able to find your photographs later when you need them. The first step in this process is importing your images.
I can’t tell you how many times I’ve looked through someone else’s computer hard drive and found images scattered about in numerous folders with no rhyme or reason to the organizational structure. If you are lucky, all your images might be located in the My Pictures folder, but that’s not always the case. The best way to combat this chaos is to organize your images from the moment that you import them to your computer. So let’s check out the Lightroom Import function and start importing some photos.
Poring Over the Picture
Importing Photos from Your Camera or Card Reader
I love taking photographs. Working with my camera and accessories to capture a moment is one of my most fulfilling experiences. But what have I really done up to that point? I have captured the image on a memory card and probably looked at it on the camera’s LCD screen. There’s not a lot else you can do with an image while it sits in your camera, so importing it into your computer is the next logical step.
Adobe Photoshop Lightroom allows you to perform this process either by connecting your camera to the computer or by removing the card from the camera and using a connected card reader. Let’s start importing pictures from your camera. To do this, you’ll need a USB cable, which most likely was included with your camera when you bought it.
Before attaching your camera to the computer, read your camera’s manual for any specific instructions related to this procedure.
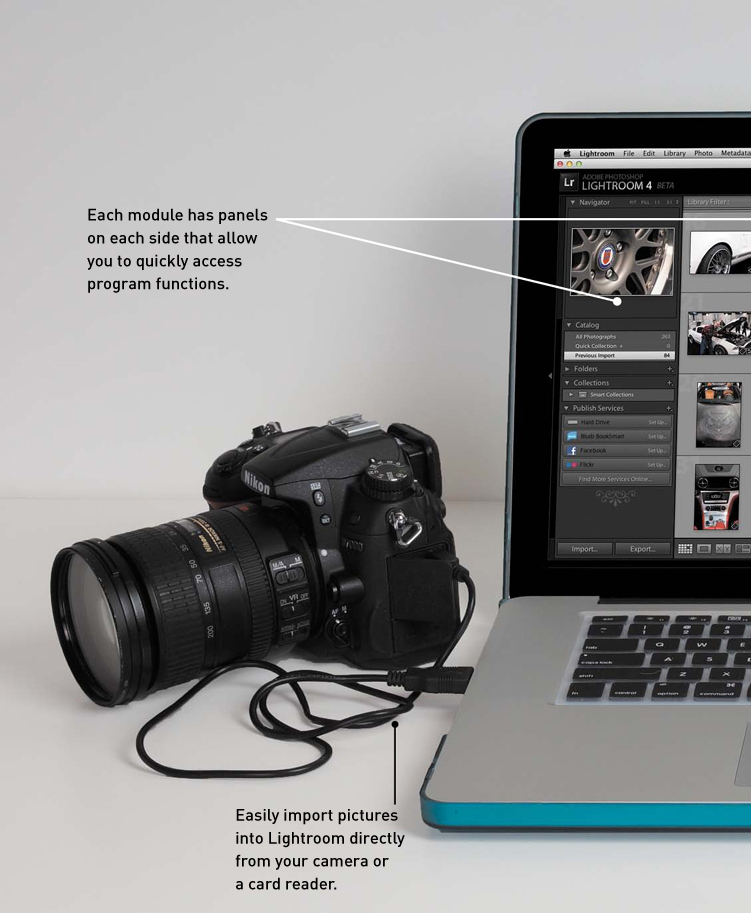
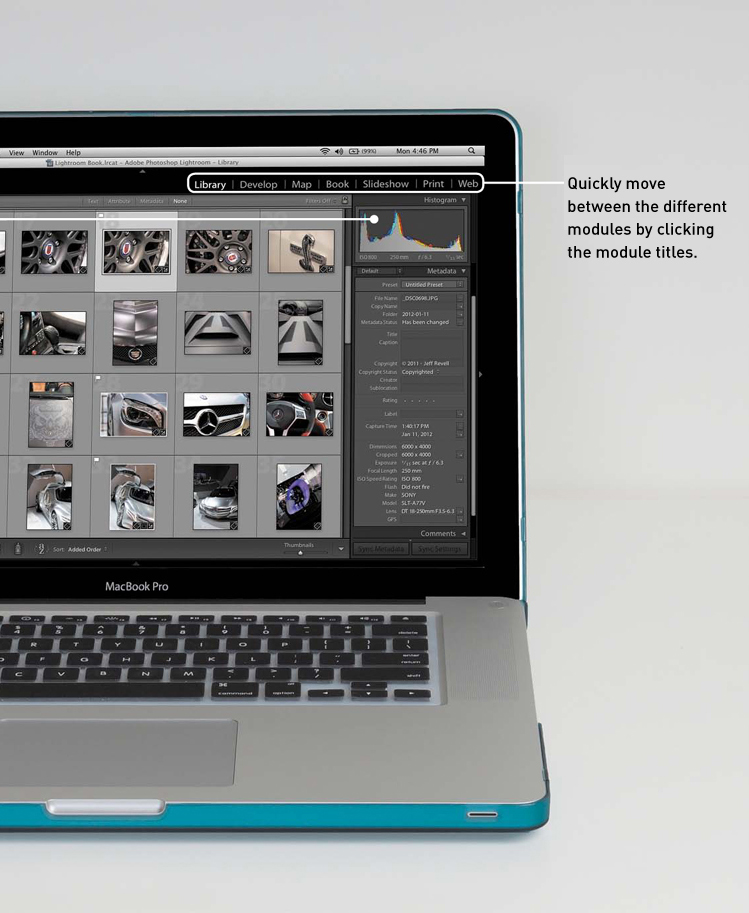
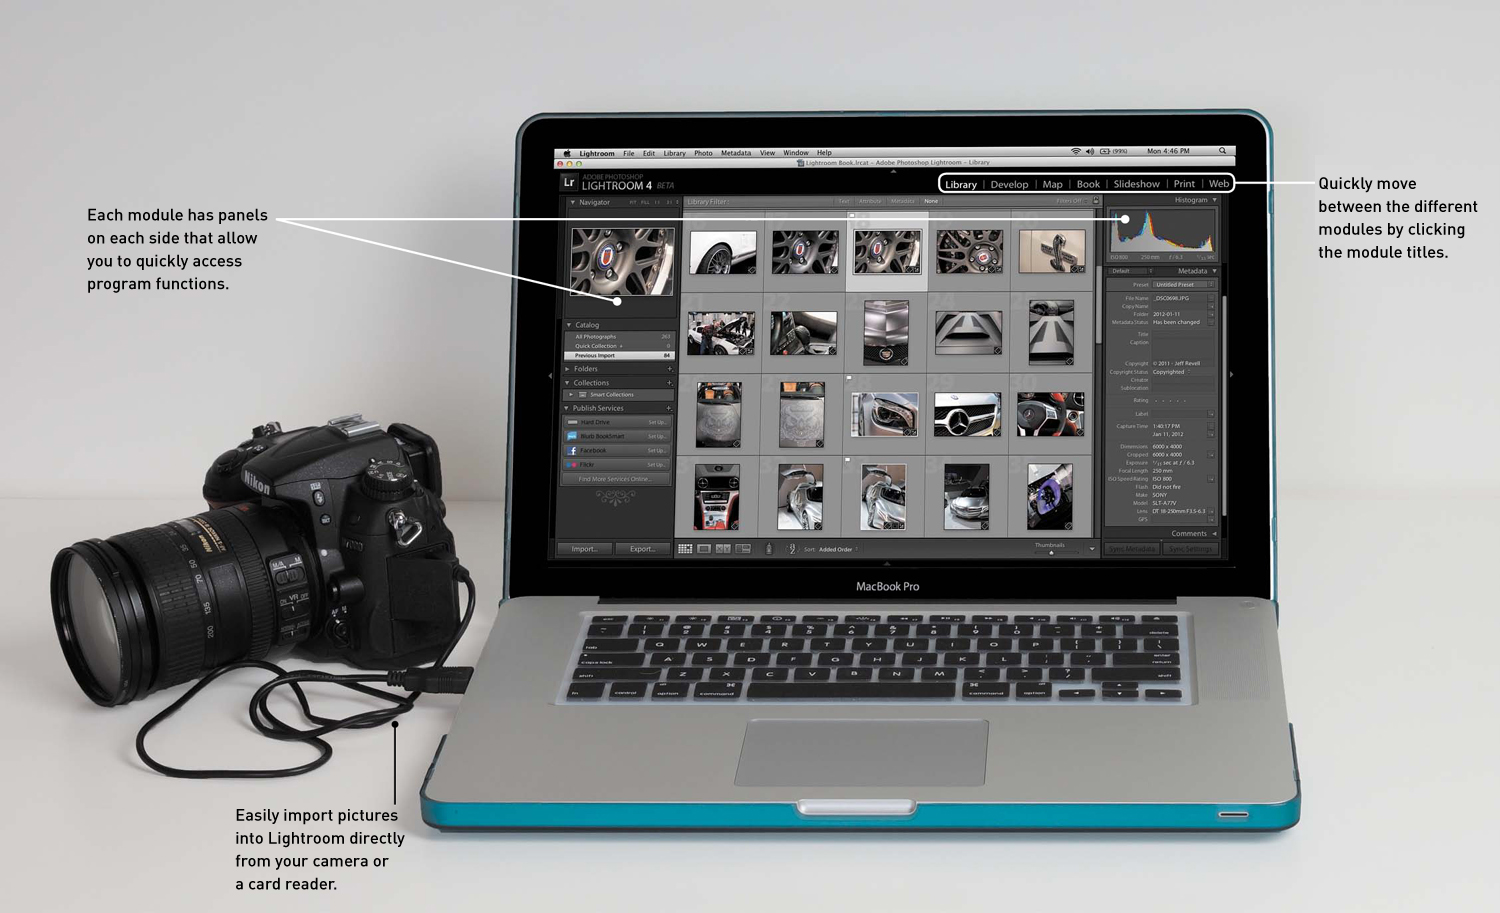
When you have the camera attached and turned on, open Lightroom and then click the Import button located at the bottom of the left panel in the Library module (Figure 1.1) (the keyboard shortcut for performing this action is Shift+Command+I for Mac or Shift+Ctrl+I for Windows).
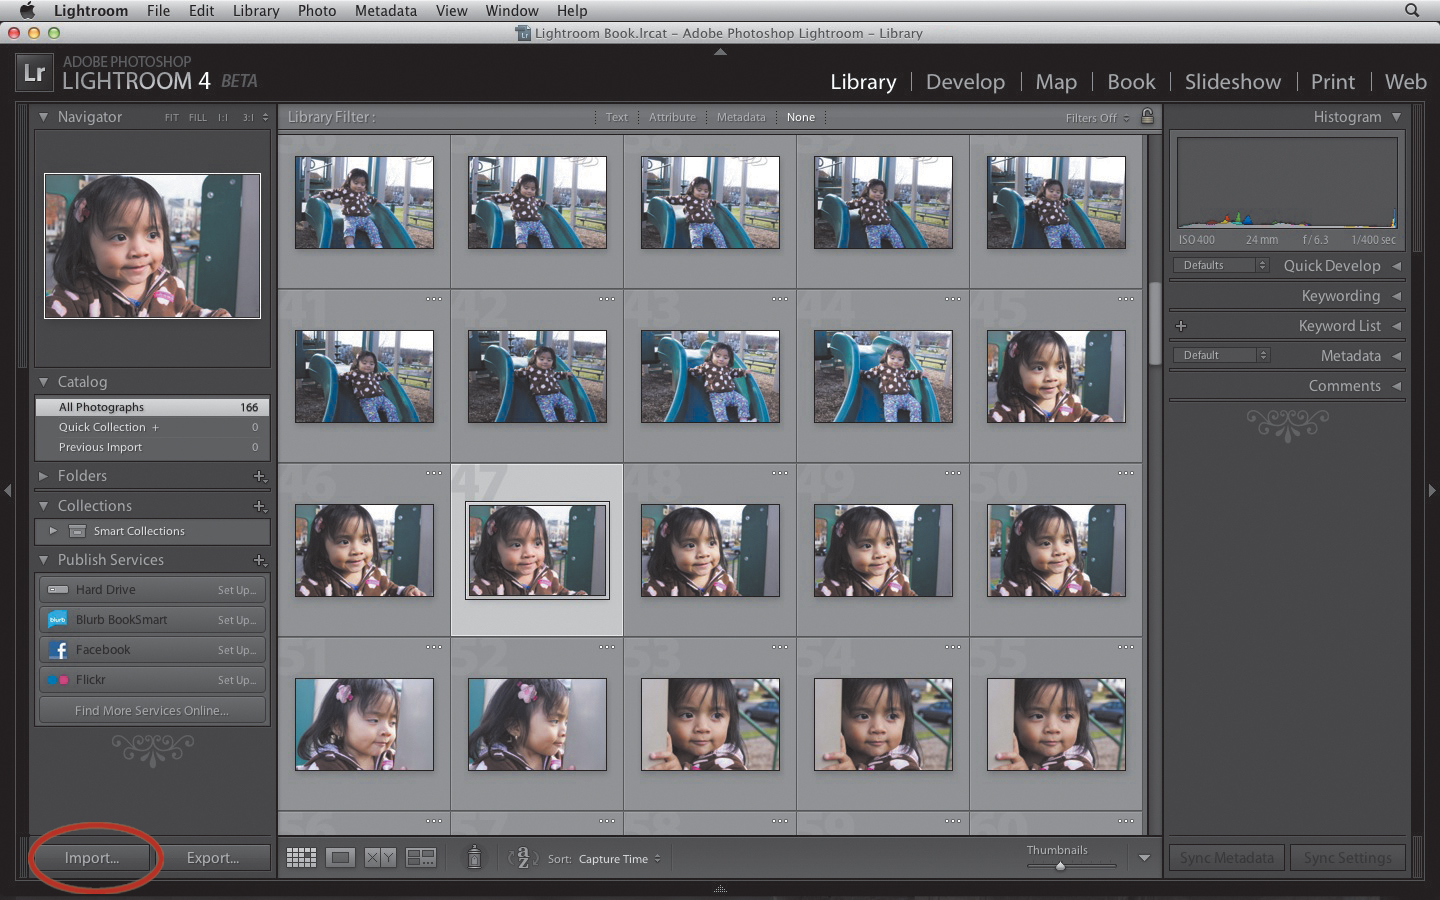
Figure 1.1 Click the Import button to open the Lightroom Import dialog.
If the Import dialog looks like Figure 1.2, click the Show More Options arrow located in the bottom-left corner of the box. This will open the full dialog, which also lets you preview all of the images that you are getting ready to import.
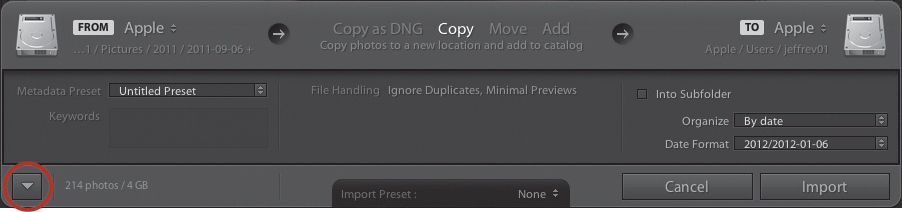
Figure 1.2 Click the down arrow to see all of the Import options.
After opening the Import dialog, you’ll need to make some decisions before moving forward. You’ll first need to make sure that your source is selected (Figure 1.3). Lightroom typically looks for any attached cameras or card readers and defaults to them for importing. The source location is at the top-left side of the dialog and is identified by the FROM label.

Figure 1.3 The name of your camera or memory card should appear in the top-left section of the dialog.
The next step is to determine how the images will be moved onto the computer. If you look in the center section of the Import title bar, you’ll find options for saving your files (Figure 1.4). The default method is to copy your images from the camera or card. This creates an exact copy and leaves the originals intact in the camera. Another option is to Copy as DNG. DNG is Adobe’s name for Digital Negative files and was created as an alternative to the various types of raw files. It is meant to provide the same functionality with the added bonus of being open source and ensuring archival dependability so that images can be opened years down the road.
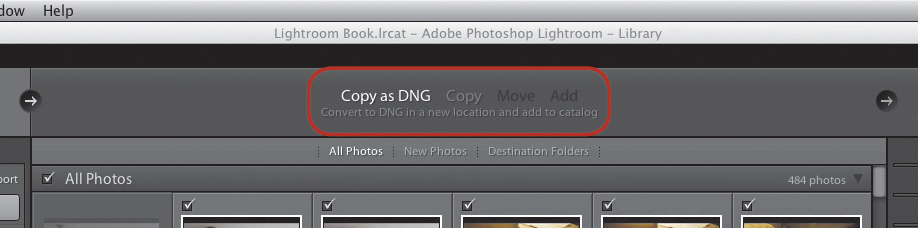
Figure 1.4 You can choose to copy or copy and convert to DNG in the top section of the dialog.
Another benefit to saving your files as DNGs is that the format takes up less physical space on a hard drive than most raw formats. Of course, this is a moot point if you are shooting in the JPEG format (more on this later).
Once you have decided to either copy your files or convert them to DNG, you then need to decide how to organize your images. The right side of the title bar shows the destination location for your imported photos. The default location is the Pictures folder, but you can easily change this to another location by clicking the drive icon (Figure 1.5). Select Other Destination from the pop-up menu, and then select the desired folder in the Choose Destination Folder dialog (Figure 1.6). You can also choose to create a new folder instead of using an existing one.

Figure 1.5 Click the top-right section of the Import dialog to set your download destination.
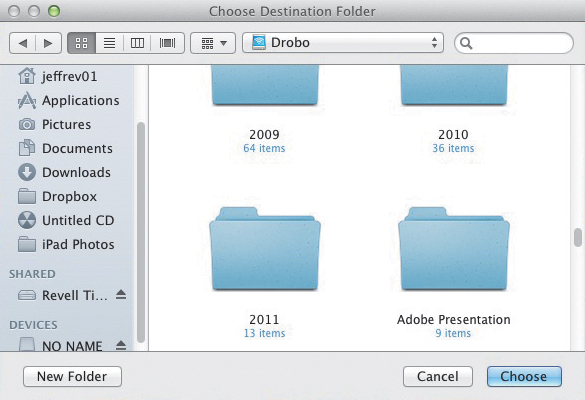
Figure 1.6 Navigate to the destination folder, click it to select it, and then click Choose.
File Handling
Now that the basic import information is all set, you need to address some options in the panel on the right. The first module is labeled File Handling, and it does a couple of important tasks for you. Render Preview lets you choose how the image previews are rendered. The preview is how the image looks in the Library viewer, and your choice here determines how much time the import takes as well as how long it takes to see the fully rendered 100 percent preview in the Library. If you select Minimal (Figure 1.7), Lightroom imports your images and generates a low-resolution thumbnail that appears in the Library. When you click the Loupe view (E key) to see an enlarged version, it will take a little while for Lightroom to render the view.
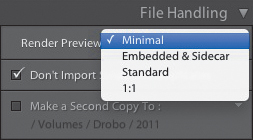
Figure 1.7 To select your preview quality preference, click the Render Preview drop-down menu.
The Embedded & Sidecar option imports the low-resolution JPEG thumbnail that your camera created and that is embedded in your image file, and uses it as the initial preview thumbnail in the Library until it can build higher-quality thumbnails. The embedded JPEG is the same image that you see on the back of your camera when you take a photo.
The Standard option imports a low-resolution thumbnail and also builds higher-resolution previews for when you double-click a thumbnail to enlarge it. It can take a while for Lightroom to build these previews, especially if you have some high-resolution images.
The 1:1 option takes the longest of all the previews because it builds a full, 100 percent resolution preview for each imported file. Although this option takes the longest, you won’t have to wait to see an enlarged preview in Lightroom or even the 1:1 zoomed-in view.
Tip
Large image previews, such as those created in the 1:1 mode, can take up some serious space on your hard drive, which is why you can have Lightroom discard them after a period of time. The default is 30 days, but you can also choose One Day, One Week, or Never if you always want them available. To set this option, look for Catalog Settings in the Lightroom menu or Edit menu in Windows. The preview options are located in the File Handling section of the Catalog Settings dialog.
My personal preference for previews is to use the Minimal setting. This means that I can access my images in the Library much faster and can start sorting them right away. If I want to see a larger view of the image, it takes just a few seconds for it to render. Also, there is no sense wasting processing time rendering previews for images that might be discarded later.
Another option you need to address in the File Handling module is the Don’t Import Suspected Duplicates check box. It’s quite probable that you will shoot some photos, import them into Lightroom, and then shoot more pictures without deleting the previous images. By selecting this option, Lightroom will look at the images on the card and determine if they have already been imported. If so, they will be grayed out on your import screen and automatically not selected, which can be a huge time-saver.
File Renaming
Normally, I leave my filenames as they are when importing, but you might prefer using a filename that has a little more meaning than DSC_1511.NEF. If so, click the File Renaming module and select the Rename Files check box (Figure 1.8). Then click the Template drop-down menu and select the type of file naming convention you want to use. You’ll have several options to choose from. Depending on the selected option, there will be other fields in the box that you’ll need to address to complete the process. For example, let’s say you did a portrait shoot and want to import those images with a custom name.
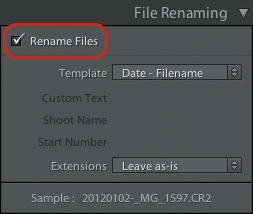
Figure 1.8 Select the Rename Files check box if you want to change the image filenames during import.
1. Click the Template drop-down menu, and select Shoot Name – Sequence (Figure 1.9).
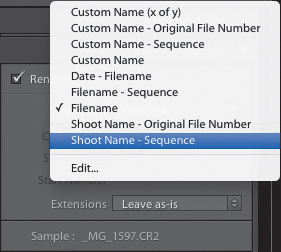
Figure 1.9 Select Shoot Name – Sequence if you want to name your files by photo shoot.
2. Click in the Shoot Name box and type the name of the shoot (Figure 1.10).
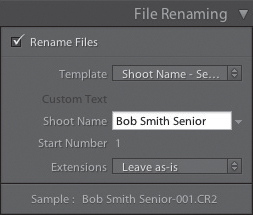
Figure 1.10 Enter a unique name in the Shoot Name box.
3. Select the Start Number for the sequence to make sure that it starts with the number that you want. All images will be added and labeled sequentially starting with this number.
4. Look at the filename example at the bottom of the module to ensure that it looks the way you want it to; then import your images.
Just remember to adjust the filename option every time you import new images.
Apply During Import
During the import process, I like to do a few things that not only help keep me organized, but also let me add some personal data to my images, such as copyright and contact info. This is very helpful if I plan on selling or displaying my images online. It’s also a quick way to add some image processing to all the imported photos using a Lightroom preset.
When you click the Apply During Import module, you’ll see a Develop Settings drop-down menu (Figure 1.11). These are preset processing settings that will change the overall look of your image. They originate in the Develop module and will be covered in more detail in Chapter 3, but a quick scan through the choices will be self-explanatory. There are presets for creating black and whites and adjusting color effects, and general selections for adding some visual impact to your images.
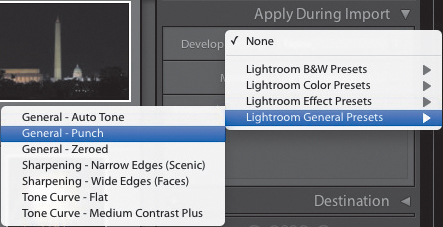
Figure 1.11 You can choose from several Develop presets during the import process.
Generally, I don’t use any of the Lightroom presets because these settings will be applied to all of the imported images, which is probably not what I want. I like to apply the settings individually in the Develop module where I can see the results for each image. However, I do like to create my own Develop Settings that I always apply to my photos during import, such as basic sharpening and clarity boosting. I’ll cover this process later in Chapter 3.
Creating a Metadata Preset
The one thing that I consistently add to all of my imported images is copyright/contact information. This is done via the Metadata drop-down menu (Figure 1.12). But before you can add this type of info, you first need to create your metadata preset.
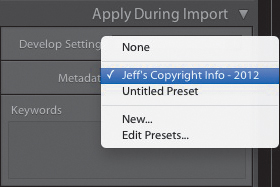
Figure 1.12 You can apply your own copyright info in the Apply During Import section.
1. Click the Metadata drop-down menu and select New (Figure 1.13).
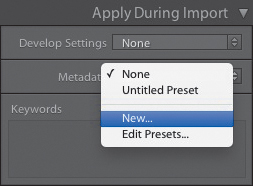
Figure 1.13 Select New in the Metadata drop-down menu to create your own unique copyright template.
2. When the Metadata dialog opens, fill in the Preset name; then scroll down to the IPTC Copyright section, and fill in all of the appropriate info (Figure 1.14).
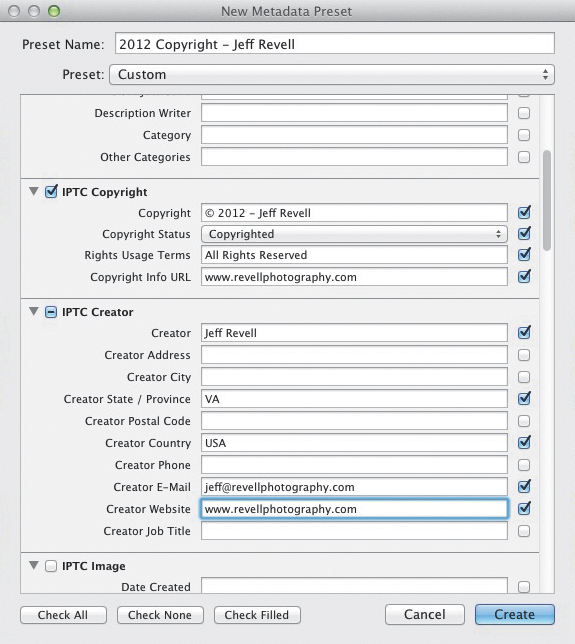
Figure 1.14 Fill in the appropriate sections of the metadata preset and then click Create to finalize the preset.
3. In the next section, place a check mark next to IPTC Creator and then fill in all of the personal contact information that you want embedded in the image.
4. Deselect any of the options that you don’t want to appear in the metadata.
5. Fill in any of the remaining sections as you see fit, and then click the Create button.
The new metadata preset will be selected by default and will then be added to all of your images during import.
Tip
Adding copyright and contact information is extremely important if you plan on doing anything commercially with your images, especially online. If someone finds the image and wants to license or buy a copy, that person can look at the metadata and find all of your contact information to reach you. It’s also a good practice in terms of asserting your rights over the image. However, simply adding a copyright message is not enough to protect your images. For complete protection, your images should be registered with the National Copyright Office. In the United States, check out www.copyright.gov for more information.
Adding Keywords
The other significant piece of information that you can add in the Apply During Import section is keywords. Keywords are descriptive words or phrases that help you organize and search for your images later on. You can assign multiple keywords to your images if you want (Figure 1.15). Just remember that any keywords that you add during the import process will be added to all of the imported photos, so make sure they are applicable, especially if you are importing photos from several different shooting events at the same time. You can also add keywords after import from within the Library module.
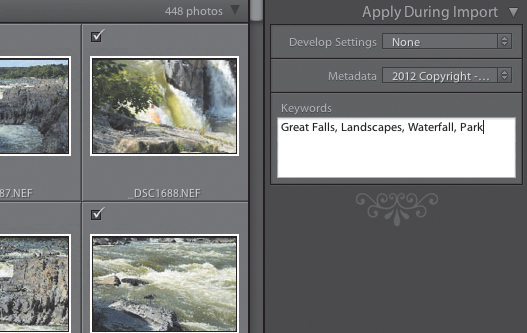
Figure 1.15 Type descriptive words in the Keyword section to apply them to the imported images.
Destination
The last setting you need to configure before importing your images is the folder location for your images. The default setting organizes your images by date and places them into folders by year and then by the date the images were taken. Lightroom looks at the metadata that is embedded in the images by the camera for this information, so if you plan on using this option, you should make sure your camera is set to the proper date. There are several options for how the folders will be labled, for example, 2012-01-06 or January 06 (Figure 1.16). Just choose the option that is right for you.
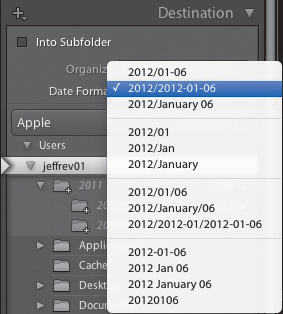
Figure 1.16 Lightroom uses the date as the default download folder name.
If you aren’t keen on using dates and would like to use unique folder names, choose the Organize Into One Folder option (Figure 1.17). Then select the folder from the folder tree where you would like all of the images to be stored. You can also select the Into Subfolder option, which allows you to create a subfolder with the name of your choice inside the folder you select.
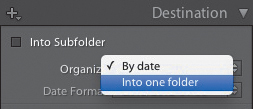
Figure 1.17 You can change the Destination option so that all of your images are imported into a single folder.
I like to use the date option because I associate my photos with the dates they are taken. It’s just the way my mind works. But you should select the method that best suits your preferences.
Selecting Files for Import
Up until now you have just selected the parameters for importing your images. Now it’s time to look at the images you’re getting ready to import. The center section of the Import dialog should be displaying thumbnails of all of the images that are ready for import. This thumbnail layout is called the Grid view. You can adjust the size of the thumbnails by moving the thumbnail slider at the bottom right of the image preview area. If you want a larger view of one of your images, click the thumbnail to select it and then press the E key to enter Loupe view. To go back to Grid view, just press the G key.
Notice that all of the thumbnails have a check mark located in the top-left corner of each image. This check mark is your way of designating which images you want Lightroom to import. If you have previously imported some of the images from your memory card, those thumbnails will be grayed out with no check mark option (Figure 1.18).
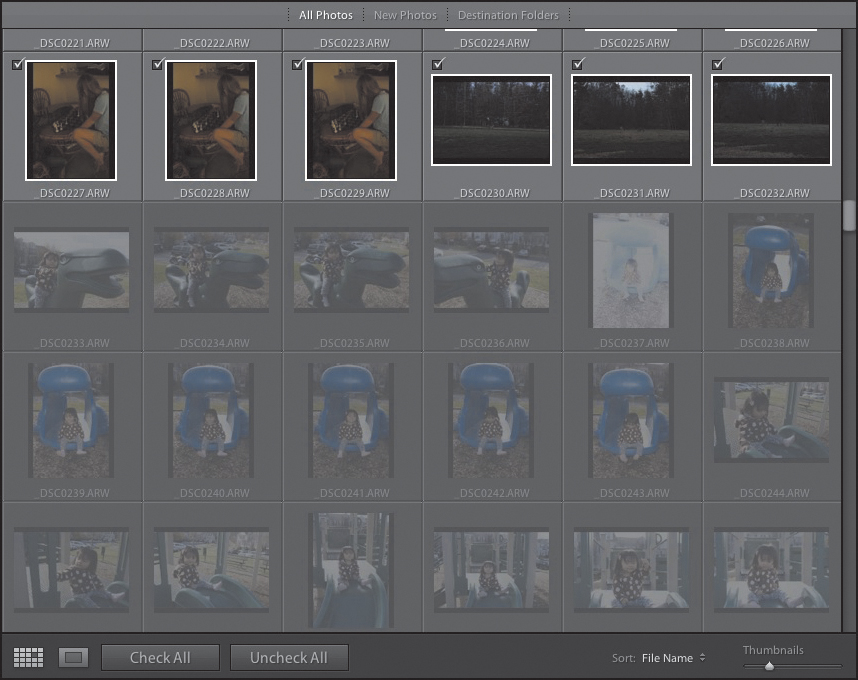
Figure 1.18 Lightroom will ignore previously imported photos by default.
If this is the case and you want to only view those images that have not yet been imported, click New Photos on the bar above the thumbnails (Figure 1.19). The Destination Folders option will divide the thumbnails into sections by date.
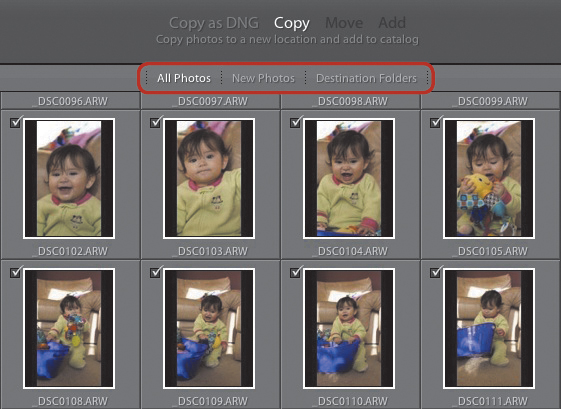
Figure 1.19 You can change how Lightroom displays the photos to be imported by changing the options above the thumbnail previews.
The nice thing about looking at your images prior to importing is that it gives you a chance to only import the images you want to keep. If you’re like me, there will always be a few photos that aren’t worth looking at because the exposure was really messed up or the camera misfired, or whatever. For those images you do not want to import, simply deselect the image and Lightroom will not import it (Figure 1.20).
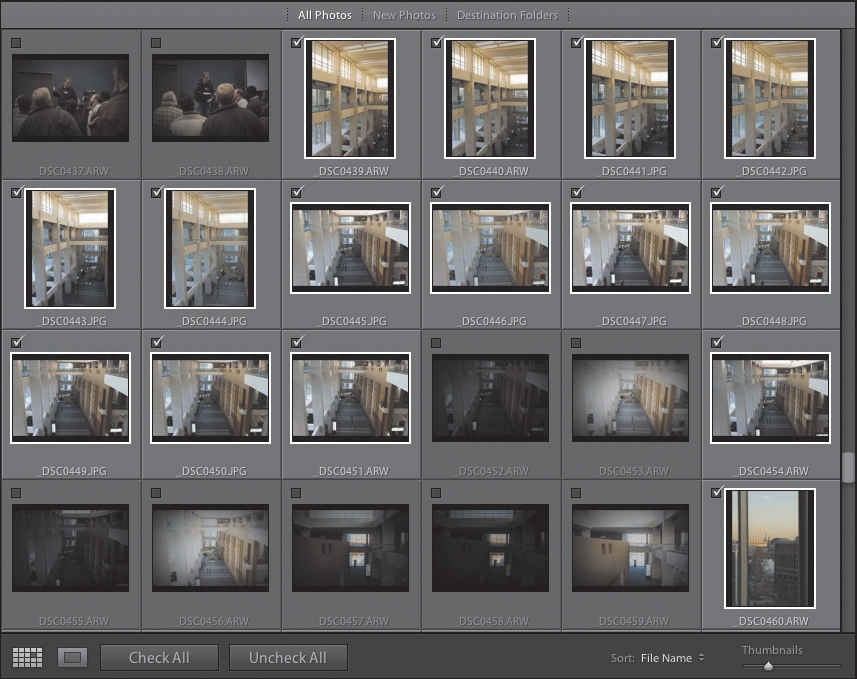
Figure 1.20 To skip images during import, just remove the thumbnail check mark.
You may also have just a few images out of a large group that you want to import. Instead of deselecting several thumbnails, just click the Uncheck All button at the bottom of the Grid view, and then select the few images you do want to import.
When you have all your options set and selections made, click the Import button at the bottom right of the dialog. Lightroom will take you back to the Library view where you can watch all of your photos pop up in the image preview screen. The Import progress bar at the top left of your screen indicates the status of the import process (Figure 1.21).
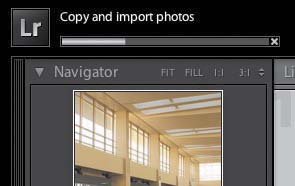
Figure 1.21 Lightroom displays the status of your import in the upper-left corner.
Adding Images Already on Your Computer
Chances are that you already have images stored on your computer, but that doesn’t mean that you can’t use them in Lightroom. The fact is that Lightroom makes adding existing images easy, and you’ll find it easier to get organized after you add them to your catalog. To add images, access the Library module in Lightroom by pressing Command+Alt+1 (Ctrl+Alt+1) and then click the Import button. When the Import dialog opens, click Add in the top bar (Figure 1.23). Then locate the files you want to add to Lightroom. In the left panel you’ll find the Source drop-down menu. Use the menu to locate the folder where your photos are stored on your computer. Just navigate to the desired folder and Lightroom will show you thumbnails in the preview area of all your images (Figure 1.24). You can also select the Include Subfolders check box if you want to include images that might be in subfolders within the folder you selected. So, for example, if you want to add all the images in your Pictures folder, just click on that folder with the Include Subfolders check box selected and Lightroom will add all files and folders. If you only want to add specific images, deselect the Include Subfolders check box.

Figure 1.23 To add files already on your computer, change the import option to Add.
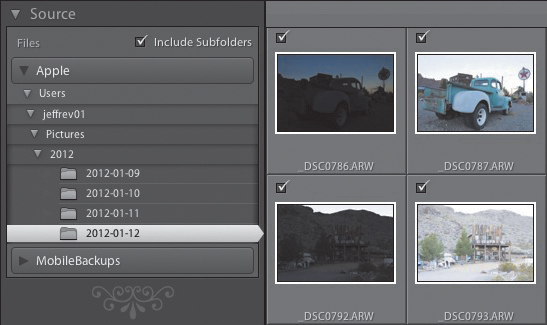
Figure 1.24 Locate the images to be added in the Source section of the Import dialog.
After you have identified the folder(s), go to the preview area and look at the thumbnails to make sure you are adding only the photos you want. By default, all images will have a check mark, so if you don’t want an image added, just deselect it.
Finally, add any metadata or keywords that you want, and then click the Import button. The great thing about adding images is that Lightroom won’t move them or create copies. All your images will stay where you originally stored them, but you’ll be able to work on them easily from within the Lightroom catalog.
Creating Your Own Import Preset
After you have set all of the options in the Import dialog, you might want to create your own preset to save time the next time you import photos. It only takes a couple of seconds to do.
1. After setting all of your options, in the Import Preset section at the bottom of the Import dialog, select None to bring up the options (Figure 1.25).

Figure 1.25 Select the None option to open the pop-up menu to access the preset options.
2. Choose Save Current Settings as New Preset.
3. Type a name for the preset, and then click the Create button (Figure 1.26).
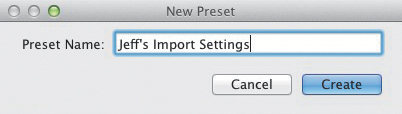
Figure 1.26 Name your preset.
4. The next time you want to import photos, click the Import Preset drop-down menu and select your preset (Figure 1.27).
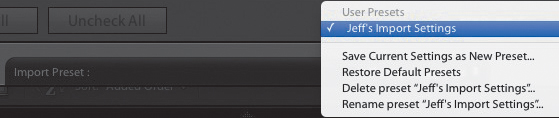
Figure 1.27 Select the new preset to make it active for the current import session.
Tethered Capture
If you like to shoot in a studio or other controlled situation where you can connect your camera to your computer, you might want to check out the built-in Tethered Camera option. Tethered capture means that your camera is connected to your computer via a USB cable, and every photo you take is automatically imported into Lightroom. This setup isn’t for everyone, and not every camera will work. But if you have a supported camera and a desire to see your images stream into Lightroom so that you can see them in large previews, this feature is for you.
Using Tethered Capture
To determine if your camera is supported in Tethered Capture, launch your web browser and search for “Lightroom Tethered Camera Support.” You should easily find a link to an Adobe support article that will list all of the supported cameras. In a nutshell, tethered support is almost exclusive to Canon and Nikon DSLR cameras.
1. To start the tether operation, connect your camera to your computer via USB (a 10- to 15-foot USB cable is desirable for more shooting freedom).
2. Choose File > Tethered Capture > Start Tethered Capture (Figure 1.28).
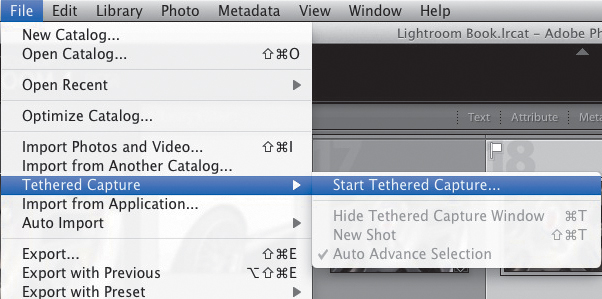
Figure 1.28 Go to the File menu to start using Tethered Capture.
3. Set your tethering options in the Tethered Capture Settings dialog and click OK (Figure 1.29).
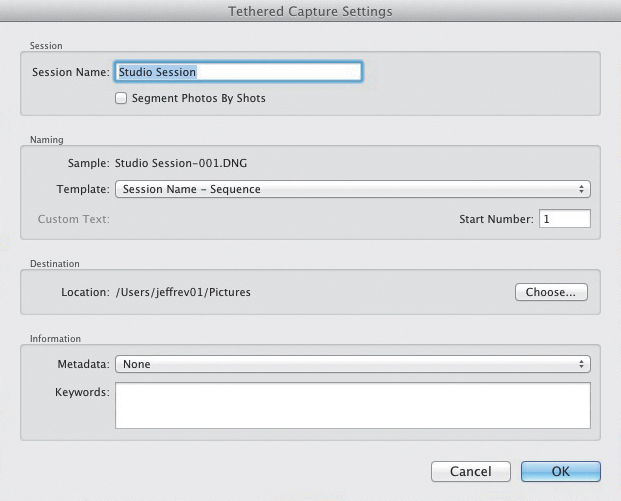
Figure 1.29 Set tethered options before beginning the session.
4. When the Tether control bar opens, turn on your camera and press the shutter button to make sure it is on and awake (Figure 1.30). You should see your camera’s name in the Tether control bar as well as the current camera settings.

Figure 1.30 The control bar is used for tethered camera import.
5. Start taking photos. You can either use the camera’s shutter release or click the gray circle on the Tether control bar to take photos.
As you start taking photos, the images will appear in your image preview area. To see the enlarged preview, press E to switch from the thumbnail (Grid) view to the enlarged Loupe view. Every time you press the shutter, the image will be added to your catalog and will appear as an enlarged preview.
Auto Importing from a Folder
Auto importing is one of those Lightroom features that many people don’t really know about. But once you set it up, you’ll use it all the time. So here’s how it works: You set up a folder in your computer as a watched folder. Lightroom will then watch the folder for new content. When you add images to the folder, Lightroom will automatically import them to a more permanent location and add them to your catalog. I love using this option for when I take pictures using my mobile phone, because all I have to do is drag them into the folder and Lightroom does the rest.
Setting Up Auto Import
You need to set a few options prior to using the Auto Import feature.
1. Choose File > Auto Import > Auto Import Settings (Figure 1.31).
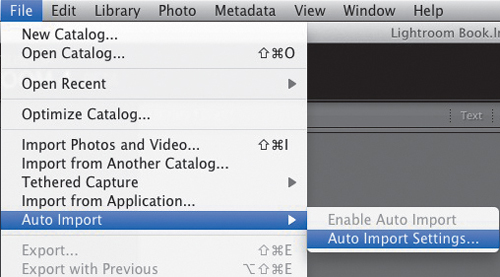
Figure 1.31 The Auto Import Settings are accessed from the File menu.
2. When the Auto Import Settings dialog opens, click Choose in the Watched Folder section and then select or create a watched folder (remember that images won’t remain in that folder, so it might be a good idea to create a new folder) (Figure 1.32).
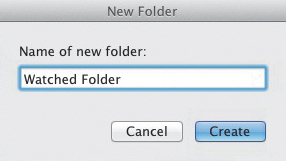
Figure 1.32 Name the new watched folder.
3. Set the destination folder where you want Lightroom to move the images during import.
4. Finish setting up the rest of the Import options, and then select the Enable Auto Import check box at the top of the dialog. Click OK (Figure 1.33).
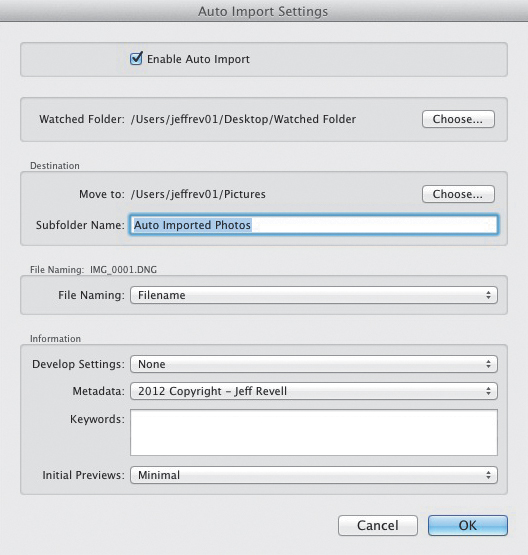
Figure 1.33 The Auto Import Settings dialog.
The Auto Import is now ready to roll. Simply add images to your watched folder and Lightroom will do the rest. If you want to turn off Auto Import, just choose File > Auto Import > Enable Auto Import to turn it off. To turn it back on, choose Enable Auto Import again.
Chapter 1 Assignments
You might have already imported images using the Import dialog, but here are a few tasks to practice just in case you haven’t.
Make a Plan
Take a look at how your photos are currently stored on your computer. Are they scattered around in different folders based on what you were doing or thinking at the time? Well, it’s time to get organized. Spend a few minutes thinking about how best to organize your images. Sketch out a tree diagram to help you plot your future imports.
Getting Started with What You Already Have
Because you have just looked at your computer files to find your photos, why not import them into Lightroom now so that you can start your organization efforts right away? Remember that you can import a single image as well as whole folders and subfolders. Start by importing just a few images before adding them all to Lightroom so that you can become familiar with the process.
Time to Move from Camera to Computer
Even if you don’t have a card full of images waiting to import, I’m sure you can find something to point your camera at so you can practice importing those images into Lightroom. Or, if you are like some people I know, you probably have several months worth of images just waiting to be loaded onto your computer. Well, there’s no time like the present. Hook up your camera or card reader and move your images to their new home.
Presets Make the Job Go Faster
While taking the time to set up options for import, why not take a few extra seconds and create an Import preset. You don’t have to use it every time, and you can always delete it. But a well-thought-out preset will save you a lot of time in the future.
Share your results with the book’s Flickr group!
Join the group here: flickr.com/groups/photoshoplightroomfromsnapshotstogreatshots