
2. Keeping Track
Finding and Sorting Your Images
In Chapter 1 I covered the import process to successfully download your images, but that is just the first step. Your photographs will be of no use if you can’t find them when you need them. For this reason, it is important to be organized from the start. Fortunately, Lightroom has many good tools to help you keep your images neat and tidy.
In this chapter you’ll learn about tagging and sorting images, and creating collections to help you organize your photos so that in the future you will have a much easier time finding the picture you want to use. You will also have a much easier method of eliminating the photos that you don’t want.
Let’s head on over to the Library and start sorting some images.
Poring Over the Picture
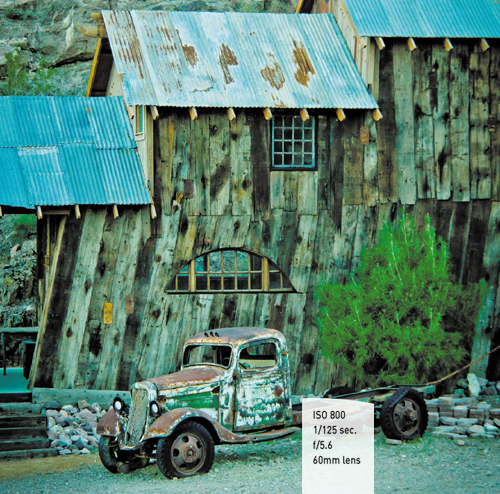
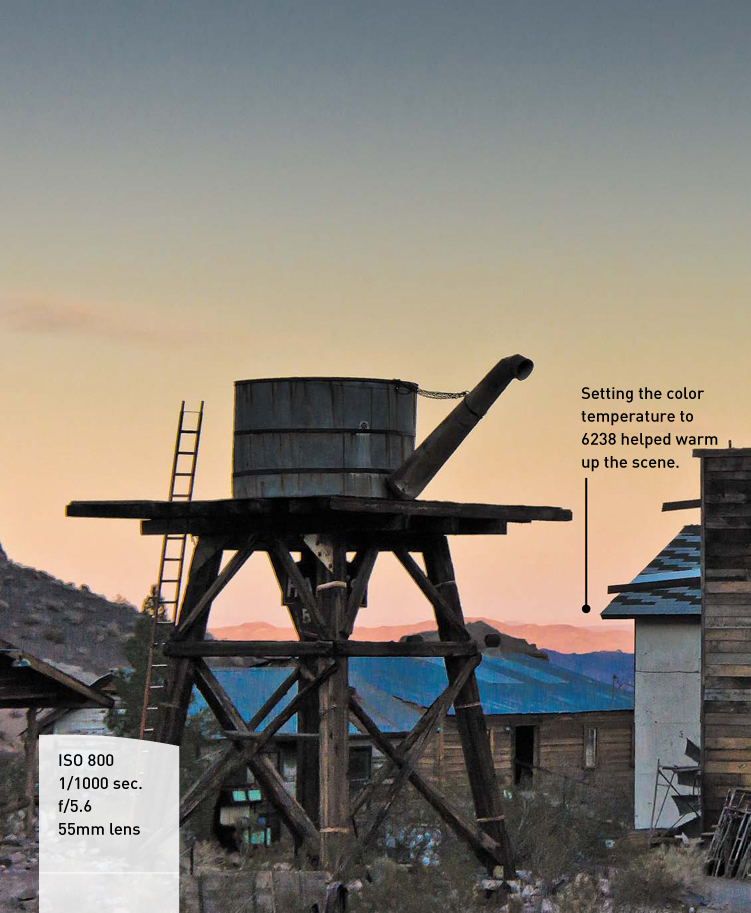
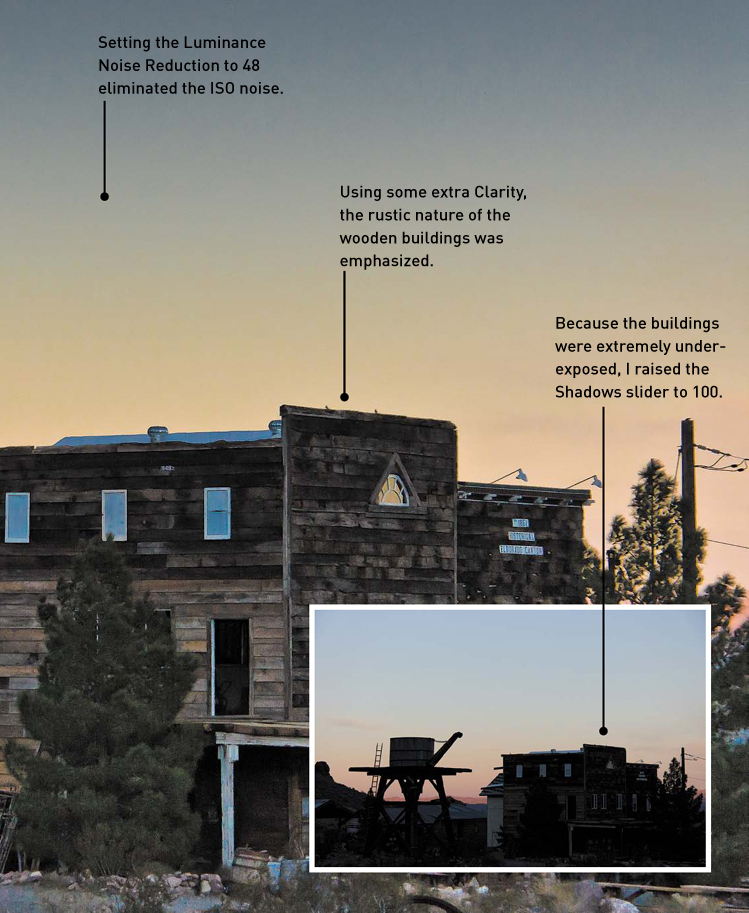
I came across this great location while driving in southern Nevada. Unfortunately, it was getting late in the afternoon, and the sun was quickly slipping behind the surrounding mountains, making the whole scene a bit dark. This shot required the use of a higher ISO, which meant there would be some noise in the image. Also, the exposure was based on the brightest part of the sky to keep it colorful, but that meant that the buildings and foreground would be underexposed. Fortunately, Lightroom has several tools to fix all of these problems.

Tagging Images with Keywords
After you’ve imported your photographs, you’ll have quite a few ways to find them within the Library. One of my favorite ways to keep track of my images is to assign keywords to them. Lots of people think that keywords are only used when you’ll be shooting stock photography and need keywords for people to find your photos. This is true; but I use them for all of my photography as a way to quickly find images by subject matter.
Lightroom offers you several ways to assign keywords, and it’s one of the easiest methods for quickly locating images by topic. Let’s say, for example, you like to take photographs of flowers. If you mark all of your flower photos with the keyword flower, you’ll then be able to see your entire collection of flower photos grouped together, even if they were shot and uploaded on different days. One of the great benefits of assigning keywords to your images is that you can apply multiple words so that your images will appear in a variety of categories. For example, if you use the keywords flower and red every time you take a picture of a red flower, you can then locate all the similarly tagged images with just a few mouse clicks.
In the Keywording panel in the Library is a section called Keyword Tags where you can add custom keywords for your images (Figure 2.1).
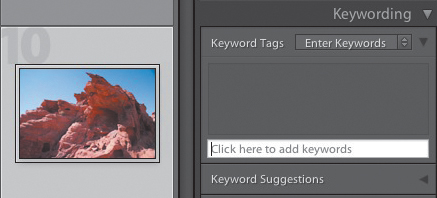
Figure 2.1 Add new keywords by typing them in the Keywording panel.
The easiest way to create a keyword tag is to click the image that you want to assign the keyword to, click inside the text box, and then type the keyword that you want to use for your image. One of the nice features of the text box is that it dynamically shows you existing keywords as you begin to type. So, for instance, if I’ve already used the keyword Valley of Fire and I have additional images I want to tag with this keyword, I just have to type the letter V into the text box and I’ll see the words Valley of Fire appear below the text box. Then all I have to do is click it to fill in the rest (Figure 2.2).
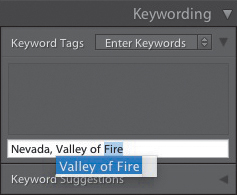
Figure 2.2 Existing keywords will pop up as you type.
If you want to assign multiple keywords, just add a comma after typing each word. Press Enter when you’re done, and you’ll see that the keywords you just typed are now in the box above the text entry field. It’s important to remember that keywords will only be assigned to selected images. After the keywords are assigned, a tag appears on the bottom-right section of the image thumbnail(s) (Figure 2.3).
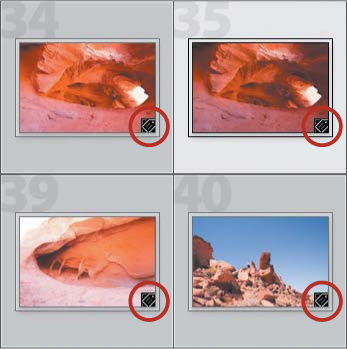
Figure 2.3 A small tag lets you know the image has a keyword assigned to it.
The great thing about keywording in Lightroom is that it remembers past keywords used and displays them in a suggestion list for you to quickly pick from. Of course, this list will grow as you increase the number of keywords you use, and as a result will not display every keyword ever used. Instead, Lightroom will suggest keywords that were used in recent imports (Figure 2.4).
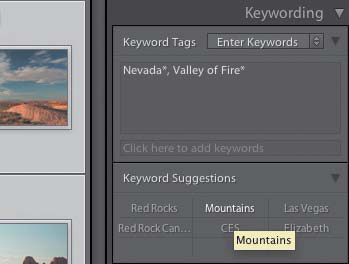
Figure 2.4 Recent keywords will be offered as suggestions.
Another nice feature in the Keywording panel is Keyword Sets, which allows you to create customized sets of keywords that you can use to tag specific types of photography. So, for example, if you shoot weddings, you can create a set that is specific to the types of photos you might take, such as Bride, Groom, Group, Reception, Ceremony, and so on. In fact, if you click the drop-down menu in the Keyword Set section, you’ll find a preset for Wedding Photography (Figure 2.5). You can edit these sets by clicking the keyword set list and then choosing Edit Set. You can then choose the set you want to edit and the keywords for that set. You are limited to nine words per set, so choose carefully (Figure 2.6).
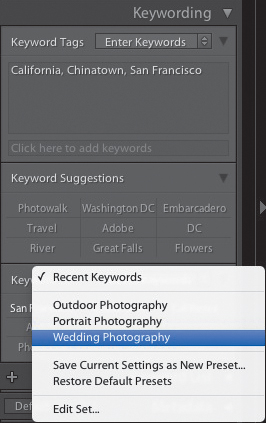
Figure 2.5 The Keyword Set selection menu.
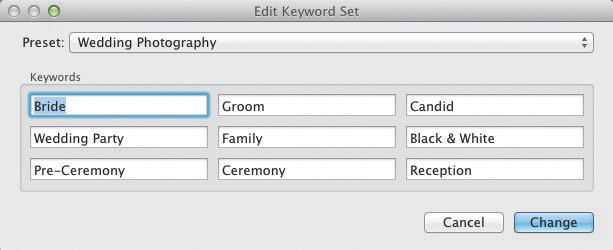
Figure 2.6 The Keyword Set editing dialog.
Assigning Keywords to Multiple Images
Assigning keywords is a pretty simple process. Just select the image thumbnails, type the keyword you want to assign in the Add Keyword panel, and press Enter. You can also drag and drop a keyword from the Keyword List onto any thumbnail to tag it.
Any of the following three methods will work with a group of images. Select the images that you want to add the keyword tag to and do one of the following:
• In the Keywording panel click in the text box to add your keyword.
• Click the keyword in the Keyword Suggestions section.
• Locate the keyword that you want to add in the Keyword List and drag it onto one of the selected images.
Choose the method that you prefer. After you’ve added the keyword tag, you’ll see the total number of photos with that keyword in the Keyword List (Figure 2.7). To see just those keyworded images in the image preview area, click the right arrow next to the number of images that have that keyword assigned (the arrow appears when you hover your mouse over the keyword in the list). Lightroom will hide all other images that don’t have that keyword tag. This is a great way to filter your images to quickly locate the images you want to see.
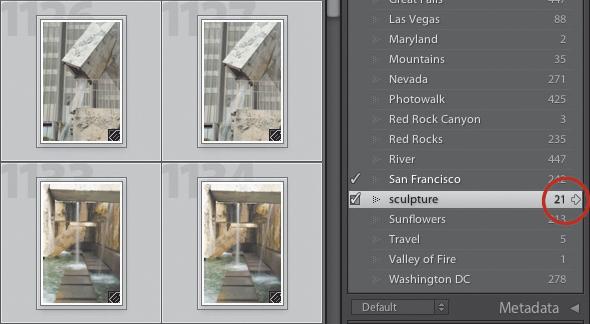
Figure 2.7 Click the arrow to display images with a particular keyword tag.
Whenever you filter your images, Lightroom will display only that selected group. To remove the filter, go to the Filter bar above the preview window and click None.
Sorting Images
Using keywords is a great way to categorize your photos, but there are numerous ways to sort images within the Library to help you separate the wheat from the chaff. After importing images from a photo shoot, I first like to get rid of all of the images that just don’t make the grade—for example, those photos that are poorly exposed, out of focus, or simply just bad shots. They have no place in my Library or on my hard drive.
Flagging Photos
One of the fastest methods for sorting photos is to use flags. You can quickly tag your photos with two different flags by using keyboard shortcuts as you view your imported images. You add the Picks flag to an image by pressing the P key. I usually use this flag for my best shots. You can also add this flag to a group of images by selecting them and pressing the P key.
For images that you want to throw away, you can use the Rejects flag. To add a Rejects flag to an image, just select it and press the X key. As with the Picks flag, you can also reject groups of images by selecting them and pressing the X key.
As you start sorting with flags, a white flag appears in the top-left corner of the thumbnails for your Picks and a black flag with a small X in it for the Rejects. Also, the rejected images will be grayed out (Figure 2.8). This is just another visual tool to help you easily see which images have been rejected.
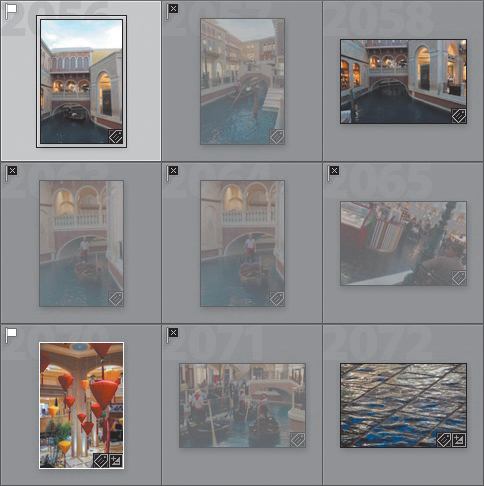
Figure 2.8 Rejected photos are grayed out and display a black flag with an X in it.
The fastest way to sort your images using their new flagged status is to go to the Filter bar above the preview window, and on the far-right side of the bar click the drop-down menu labeled No Filter and select Flagged (Figure 2.9). This option opens a new Attributes Filter bar. Simply click the flag status that you want, and the images will be filtered and displayed in the preview area (Figure 2.10).

Figure 2.9 Select the Flagged option from the Library Filter menu.

Figure 2.10 Clicking a flag displays the images with that attribute.
One of the main reasons I use the Rejects flag is that it makes deleting images from my catalog a snap. Once all of the flawed images have been flagged as Rejects, you can click the Photo menu and then choose Delete Rejected Photos. You can also use the shortcut keys for this command by pressing Command+Delete (Ctrl+Backspace). A dialog will then appear asking if you want to delete the images from your hard drive or just remove them from the Lightroom catalog. I don’t see any reason to take up valuable hard drive space with rejected photos, so I select the Delete from Disk option, but the choice is yours (Figure 2.11).
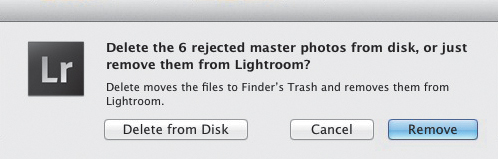
Figure 2.11 Deleting rejected images gives you the option of removing them from the catalog or deleting them from the disk.
The other two filtering options in the Attributes Filter bar display Flagged photos (Picks) or photos with unflagged status. As previously stated, I use the Picks flag to mark my absolute best images that I want to work with so that I can quickly filter them from the rest of the photos in the collection. This doesn’t mean that I get rid of any images without a flag; it’s just a method I use to sort the best from the rest. When you’re done sorting, you can quickly return to an unfiltered status by clicking None in the Filter bar.
Stars and Colors
Although I prefer to sort using the Picks method, I sometimes like to use the star ratings and color labels as a method of sorting. These are very fast sorting tools that have shortcuts assigned to them to make your workflow move faster. To add a star rating, click an image, and then press a key from 1 to 5 to set the star rating (pressing the 1 key assigns one star and so on). I like to use this method while previewing my images in Loupe view because it allows me to see a more detailed version of the image while applying the rating.
Rating Images in Loupe View
Follow these steps to assign star ratings to your images in Loupe view.
1. Select the first image you want to review by clicking it, and then press the E key.
2. Hold down the Shift key while pressing the desired number key that corresponds to the star rating you want for that image.
3. Press G to return to Grid view when you’re done.
Holding down the Shift key while applying the rating allows you to add the star and move to the next image automatically. You don’t have to do it that way, but it’s a very efficient method for rating a lot of images.
Another quick method for sorting images is to assign color labels to them. Lightroom lets you use five different colors for sorting: Red (6), Yellow (7), Green (8), Blue (9), and Purple. The numbers in parentheses are the keyboard shortcuts for labeling with each color. Purple has no key assigned to it, so you’ll need to use the menus to assign this color label. You can apply any label by choosing Photo > Set Color Label and then choosing the desired color. This option is also available by Control-clicking or right-clicking an image, selecting Set Color Label, and then selecting the color (Figure 2.12). You can also add color labels using the same sorting method as previously discussed with the star ratings: Go to Loupe view, hold down the Shift key, and press the number for the desired color label. This will assign the color label and advance to the next image.
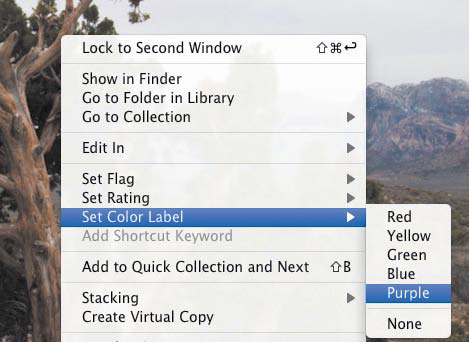
Figure 2.12 The Purple color label can only be added from the menu.
After you’ve assigned your stars and colors, you can sort your images using the same method that you used for flagged photos. Press the G key to access Grid view, click the drop-down menu on the Filter bar, and select Rated to activate filtering by stars. The default is one star with the filter set for Rating is Greater Than or Equal To. To change this setting, click the ≥ symbol to the left of the stars and change the option to Less Than or Equal To or Equal To (Figure 2.13). You can also use the Attribute filters to sort the color-labeled images just as you would the flagged and starred photos. Click the appropriate color box, and only those images will appear in the preview window.
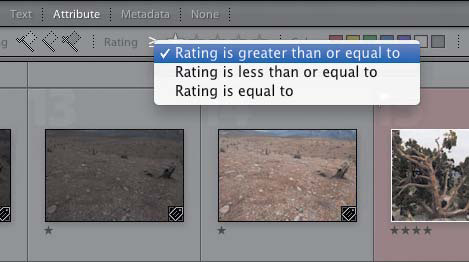
Figure 2.13 You can change how the star ratings are sorted.
The greatest benefit of using these sorting tools is that you aren’t restricted to just one. Your images can have star ratings, color labels, and be flagged as Picks. This gives you a ton of options for sorting and narrowing down your collection of photos to just the one(s) you want (Figure 2.14).
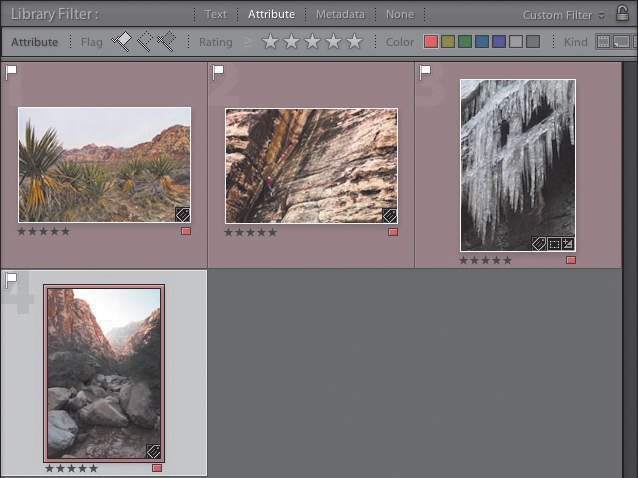
Figure 2.14 You can filter by selecting multiple attributes.
Catalogs and Collections
Throughout the chapter, you’ve seen the words catalog and collection pop up from time to time. The catalog refers to the entire group of images that you are working with in Lightroom, and collections let you sort your images into useful groups for quick access. You can have only one catalog open in Lightroom at a time, but you can create a multitude of collections within the catalog depending on your sorting needs.
Working with Multiple Catalogs
The first time you opened Lightroom, you were given a default catalog to work with. The catalog is where Lightroom stores all of the information about the images that you import. It doesn’t actually contain the images (they live in the folder locations that you set up during import), but it is where the database of information lives for all of the photos. Anything you do to an image in Lightroom—such as adding a rating, develop settings, and keywords—and even the location of your images are saved in this catalog. Most folks I know work in the default catalog all the time and have no need to create a new one. I also know people who create a new catalog for every shoot they do. Some folks will create catalogs every year or half year to keep catalogs organized and smaller so they are more efficient to work in.
One reason to create a new catalog is when you find that your current one becomes too slow to work in. This can happen after you have amassed several thousand images in it. Lightroom is a very fast program, but after adding about 25,000 images, it can start slowing down due to the sheer amount of information that it has to keep track of. No matter the reason for creating a new catalog, if you want to make a new one, it’s a pretty easy and straightforward process.
Creating a New Catalog
Follow these steps to create a new Lightroom catalog for your photos.
1. Choose File > New Catalog to open the Create Folder with New Catalog dialog.
2. Select a location and catalog name (Figure 2.15).
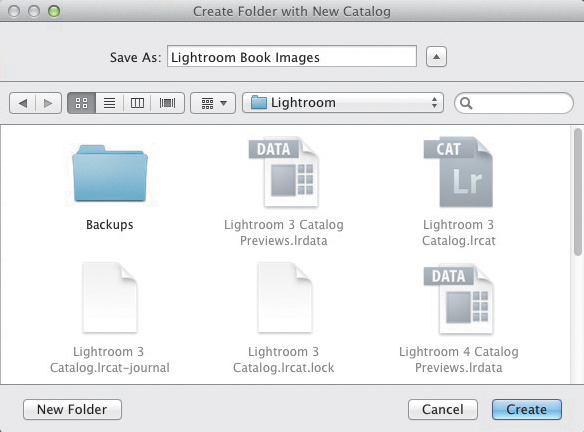
Figure 2.15 Creating a new Lightroom catalog.
3. Click the Create button (Save button in Windows).
Once the new catalog is created, you’ll see a brand-new, blank Lightroom workspace that looks just like the first time you opened the program. This is your new blank canvas for adding photos that are separate from the default catalog. You’ll only be able to access new imports in this catalog; nothing from the previous catalog will be available. If at some time you need to work with images in the old catalog or another catalog that you created, choose File > Open Catalog or press Shift+Command+O (Ctrl+O). Then select the catalog you want to work with (Figure 2.16). The Lightroom catalogs use the extension .lrcat and should be the only files available for selection.
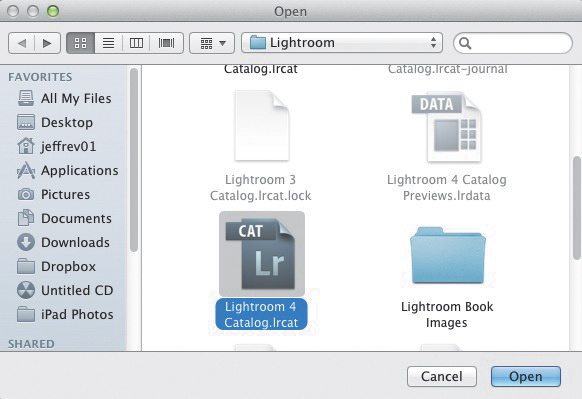
Figure 2.16 Select the Lightroom catalog file that you want to work with and click Open.
When selecting a location for the catalog, Lightroom will point you to your Pictures folder by default. I prefer to store my catalogs in the Lightroom folder, which is usually located in the Pictures (My Pictures in Windows) folder. It’s your choice, but it makes sense to keep them together if you plan on switching back and forth between catalogs.
If you work with several different catalogs, you can choose File > Open Recent. This command shows you a list of your most recently used catalogs and allows you to select the one you want to work in. When you decide to change catalogs, Lightroom will quickly close and then reopen in the new catalog. It’s just the way the application works when switching catalogs. Lightroom will display a warning screen before switching so that you know that it will relaunch with a new catalog open. You can disable this message by selecting the Don’t Show Again check box.
Creating Collections
Probably the most popular method for grouping images is to create collections. Collections are groups of photos that you want to keep together for quick access without having to sort through everything in your catalog. How you choose to group your collections is completely up to you. The easiest way to create a collection is to choose Library > New Collection or simply press Command+N (Ctrl+N), which will bring up the Create Collection dialog. Then all you have to do is name the collection. You can also decide if you want the collection to be Top level (see “Collection sets” next) and whether or not you want to include any selected images in the new collection (Figure 2.17).
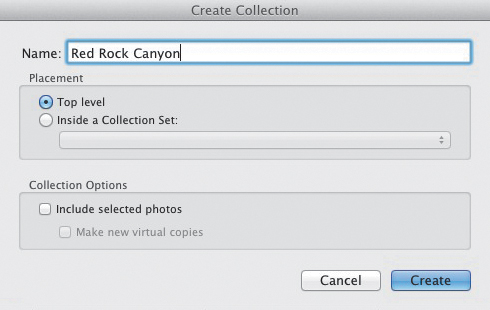
Figure 2.17 The Create Collection dialog.
You have a few different ways to add images to your collections. The first is to select them all prior to creating the collection and then select the “Include selected photos” option. This will automatically add the images as the collection is created. If you want to add them after the fact or add new images to the collection after it is created, you can simply drag and drop them onto the collection title, which is located in the Collections panel on the left side of the screen (Figure 2.18). If you don’t see your collection in the panel, click the arrow on the Collections panel to expand the panel and see its contents.
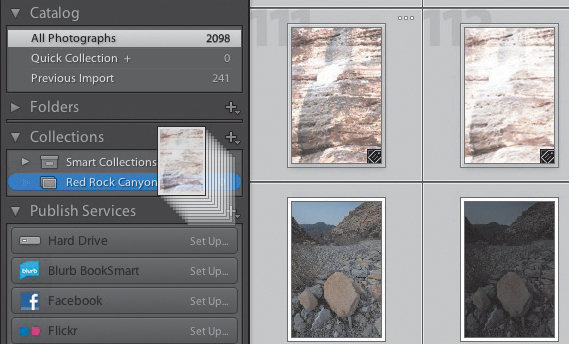
Figure 2.18 You can drag and drop images directly on a collection title to add them.
Collection Sets
Sometimes you might want to group similar collections to help keep your images organized. This can be very handy as you start to accumulate many collections. To do this, you can create Collection Sets. A Collection Set is nothing more than a collection of collections. So, for example, if I had several different landscape shoots, I might want to create a top-level collection called Landscapes. Then I could put all of my different landscape collection shoots within this set. It’s just a nice way of organizing your groups of photos.
You can create a set by choosing Library > New Collection Set or by clicking the plus (+) symbol on the Collections panel and then choosing Create Collection Set from the pop-up menu (Figure 2.19). When the dialog opens, type the name for the set and click the Create button (Figure 2.20). To add previous collections to the new set, simply click and drag the set title in the Collections panel onto the new Collection Set title. You can also add new collections to the set using the New Collection dialog: When you’re creating a new collection, change the Placement option from Top level to Inside a Collection Set, and then choose which collection you want it included in (Figure 2.21).

Figure 2.19 You can create a Collection Set by clicking the plus (+) symbol.

Figure 2.20 Name the new Collection Set.
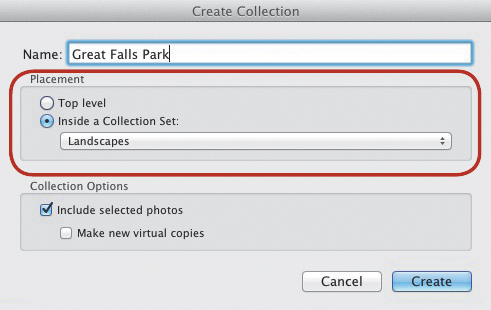
Figure 2.21 New collections can be added to an existing Collection Set.
Smart Collections
Smart Collections are like collections on autopilot. Some default Smart Collections are already set up for you, and some are created as you tag your images with stars or colors. Some of the default Smart Collections include Past Month, Recently Modified, Video Files, and Without Keywords. As you can see, it’s pretty easy to figure out what criteria the collection is using to gather images. To create your own Smart Collection, choose Library > New Smart Collection or click the plus (+) symbol on the Collections panel, and then choose Create Smart Collection from the pop-up menu.
The Smart Collection dialog lets you configure any number of filters so that your collection can contain a broad range of images, like File Type is JPEG, or a very specific range, like label color is Red, keyword is Nevada, and the camera aperture is f/2.8 or larger (Figure 2.23). You can add more specific filters to exactly target those images that you want.
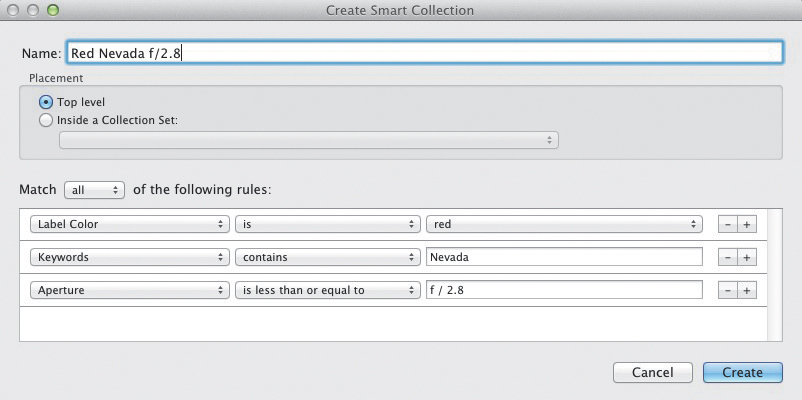
Figure 2.23 You can add your own rules to customize a Smart Collection.
I use Smart Collections all the time to make quick groups of images for my books. I first create a new Smart Collection using the criterion “Label Color is Blue.” Then I start looking through my catalog of images for shots that I think will work well as illustrations in my book. When I find a shot, I select it and press the 9 key to assign a Blue label to it. I continue doing this as I sort through my images until I think I have what I need. Then I access my Collections panel and look at my Smart Collection for Blue labels. All of the photos that I want to work with appear in that collection. There’s no need for me to drag them into the collection because the simple act of labeling them automatically adds them to the collection. It really is a super fast way to group images together.
Quick Collections
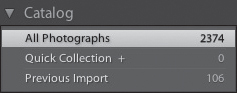
At times you’ll need to make a small collection of images that you’ll need only for a short period of time, so creating a collection might be a little too much effort. A perfect example would be those times when you want to send a group of photos in an email, but they first need to be adjusted in the Develop module. In those instances, you could put them into a Quick Collection. To do this, select the images that you want to add and press the B key. There is only one Quick Collection. So, to see the images that you have added to it, access the Catalog panel and click Quick Collection. This will filter out all other images and display only those items you have added to the collection. You can tell an image is part of the Quick Collection because it will have a dark circular mark in the upper-right portion of the thumbnail (Figure 2.24). When you are finished with the images, all you have to do is select them and press the B key once more to remove them from the Quick Collection.
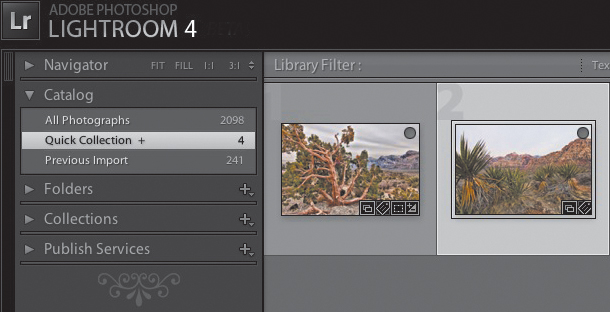
Figure 2.24 Press the B key to add images to the Quick Collection.
Adding images to a collection does not remove them from the main catalog. It simply references them as part of a group. It’s possible to have the same image in several different collections at the same time. It’s also important to know that any changes you make to that image will be reflected in all the collections in which it is a member. If you want to have different-looking versions of an image, you’ll need to create virtual copies (see Chapter 3).
Using Filters to Find Photos
I’ve covered several tools to help you categorize and group images to be able to find them later when you need them, but sometimes the photo you want is the one that you didn’t add to a collection or assign a keyword. Fear not; you can still narrow down your search using the Library Filters. I’ve already discussed the Attributes filters, which allow you to filter by star ratings, color labels, and flagged status. However, there are a couple of other Library Filters that you may also find handy for searching your catalog.
Text and Metadata Filters
The Text filter looks at all of the word-based information associated with your images to help you filter and locate them. Selecting the Text filter option allows you to set certain variables used by the filter. The first option sets where you want the filter to look. It is set to Any Searchable Field by default, but you can narrow it down to more specific locations, such as filenames, captions, metadata, and so on. The second option sets the inclusion/exclusion variables, like contains, or starts with, or contains all. Just choose the one that is appropriate for your search. With the Text filter, you can also type the text you want to look for in the searchable text field. For example, if I wanted to find images that I knew were in a folder called New Orleans but forgot to keyword them, I’d just need to set my Text filter to Any Searchable Field > Contains > New and the filter would locate all the images in the New Orleans folder (Figure 2.25).
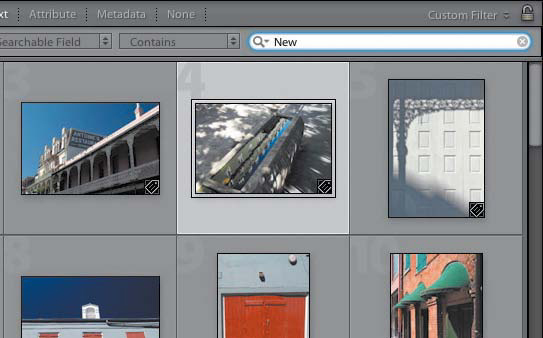
Figure 2.25 Typing the word New in the Text filter pulled up these images from my New Orleans folder.
If you really want to get in the weeds, nothing beats the Metadata filter. You can set up numerous searchable fields to home in on the images you want. For example, if I needed to find a shot for one of my books that was taken with my Nikon D7000, at a high ISO, with a lens focal length of 17mm, and had a portrait orientation, I could perform that search with the Metadata filter and find all the images that met those criteria (Figure 2.26).

Figure 2.26 You can sort by any number of criteria using the Metadata filter.
To change the metadata search fields, click the name of the search field in the title for each column to bring up the searchable items list (Figure 2.27). Select the metadata attribute that you want to use. Then select the exact item for that attribute, for example, ISO 1600. Do that for as many different search items as you want to use, and the results will appear in the preview window below the Library Filter.

Figure 2.27 The Metadata filter selection menu.
Changing View Options in the Library
Thus far, you have been looking at images using the Grid view, which is also referred to as the thumbnail view. You can switch to Grid view at any time by pressing the G key. In fact, pressing the G key will move you out of any of the other modules, like Develop or Print, and bring you to the Library module. While in Grid view, you can see an enlarged view of your selected image by pressing the E key to enter Loupe view. This is not a 100 percent view, but it does fill the image preview section with a single image view, which is usually large enough to do most editing work (Figure 2.28).
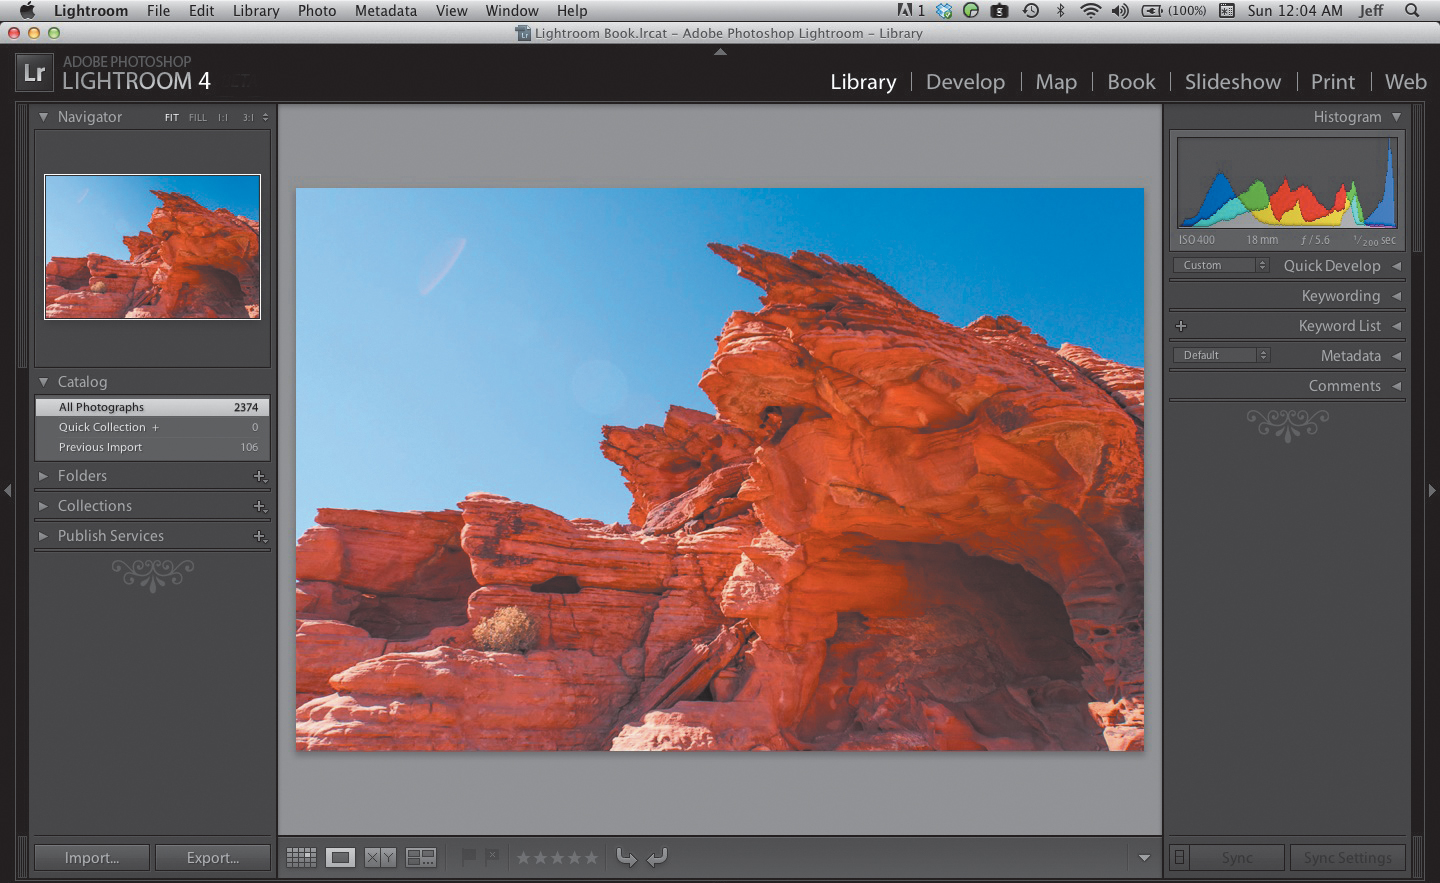
Figure 2.28 The Loupe view displays a large image preview.
You can also put an image into Loupe view by pressing the Enter key or by double-clicking the thumbnail. To move between images while in Loupe view, press the left or right arrow keys. You can also use the Filmstrip view below the preview window to move quickly between images. I usually have the Filmstrip view in auto-hide mode so that it only appears when I move my mouse to the bottom of the screen.
Tip
The thumbnails in Grid view can be resized by adjusting the slider located in the bottom-right portion of the preview window.
Zooming in
Sometimes the Loupe view is not sufficient, and you’ll need to see a zoomed in version of the image. Zoom view is handy for looking at fine details when sharpening an image or looking for dust spots.
To quickly zoom into an image, just press the Z key. You can also zoom in by pressing the Enter key twice in Grid view or once in Loupe view. Or, click once on the image in Loupe view to enter Zoom view or twice while in Grid view. When the image is in Zoom view, your cursor will look like a hand and you’ll be able to move the image around to look at different parts. You can also use the Navigator panel to move around the image as well as change the Zoom view (Figure 2.29). A rectangle will appear in the panel to show you where you are looking in the preview area. You can move this rectangle around as well to see different parts of the image. Different view magnification shortcuts are provided at the top of the panel. Just click Fit, Fill, 1:1, or 3:1 to change the magnification. You can also change the 3:1 setting to a different ratio by clicking the up and down arrows to the right of 3:1 and then selecting a new ratio from the pop-up options.
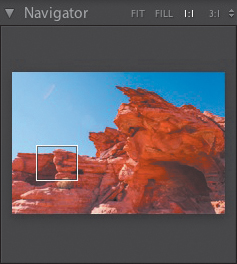
Figure 2.29 The Navigator lets you see which area is being displayed in the Zoom view.
Turn Out the Lights
Sometimes all of the panels and menus can be a distraction when viewing your images. If you want to isolate the image, press the L key to turn on Lights Out mode. Pressing L once will darken everything but the preview window. Press L again and everything will go black except your photo. Press L once more to return to normal view. You can use the left and right arrow keys to change images in the view while in Lights Out mode.
Comparing Images
If you want to do side-by-side comparisons of your images, you can use Compare view. Just select two images from the Grid or Filmstrip, and then press the C key. Your images will be placed beside one another for you to compare. This mode works fairly well, but my favorite way of narrowing down a selection of images to just a few is by using a method that my friend Scott Kelby taught me. Here’s how it works.
1. Create a collection containing all of the images that you want to work with.
2. In Grid view or Loupe view quickly select the better images in the collection by using the P key to flag them.
3. After you’ve flagged all of the better photos, access the Attributes filter and click the “Filter based on flagged status” option.
4. Now that you have a smaller group of good images, select the first eight and press the N key to enter Survey view.
5. Review each image and decide whether to keep or remove it. To eliminate it from Survey view, click the X on the image or Command-click (Ctrl-click) on the thumbnail.
6. When you’ve narrowed down the selection to your best images, press the G key to return to Grid view. The images that were in Survey view will automatically be selected when you return to Grid view. Press the 5 key to assign a 5 star rating to them.
7. Select the next group of eight images and repeat steps 5 and 6. Do this until you have selected and surveyed all of the flagged images.
8. Return to the Library Filters and click on the 5 star filter attribute to narrow down the photos to just the flagged images with 5 stars.
9. Press Command+A (Ctrl+A) to select all of the remaining images.
10. Press Command+N (Ctrl+N) to create a new collection and name it [active collection name]+Picks (Figure 2.30).
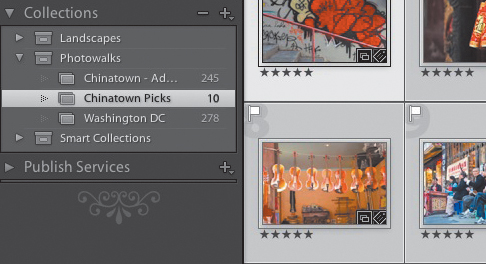
Figure 2.30 After sorting, the best images are now in their own collection.
11. Make sure that Placement is set to Next to Collection, select the “Include selected photos” check box, and then click Create.
You now have a collection of your best images from the photo shoot. It seems like a lot of steps, but after you go through the process once or twice it will become second nature. It will also enhance your ability to sort through lots of images and narrow them down to your very best work.
Chapter 2 Assignments
Here are a few exercises to help you practice different techniques to organize your photos.
Become Familiar with the Library
Your sorting and tagging tasks will be easier if you are comfortable with how your workspace is organized. Adjust your thumbnails so that you can see them clearly. In Loupe view use the left and right arrow keys to review your images. If you want to remove the panels, press the Tab key to slide them out of the way.
Keywords Are the Key
Look at some of your images in Grid view and see if they have some qualities in common. Create a keyword and tag these images. Remember that you can use multiple keywords on one image. After you have assigned a few different keywords, isolate those images in the preview window by selecting the arrow next to the keyword in the Keyword List.
Time for Some Collections
Remember that keywords and collections are different yet very similar. Create a collection called Email and add some photos to the collection that you can send to family and friends. (If you aren’t sure how to email photos quite yet, don’t worry. You’ll learn how in Chapter 8.)
Sort Some Images
If you’ve spent time tagging your images with keywords and flags, it’s time to do some sorting. Use the Library Filters to sort your picks. Try flagging your rejected images so that you can remove them from the catalog. Try sorting with the Metadata filters. Playing with the different sorting and filtering options is the best way to learn how to use them. Don’t worry; you won’t hurt any of your images by filtering them.
Share your results with the book’s Flickr group!
Join the group here: flickr.com/groups/photoshoplightroomfromsnapshotstogreatshots