
Client 5—Using a Typed DataSet
The VB clients that you've seen so far have used untyped DataSets to manage data retrieved from a PostgreSQL server. Untyped DataSets are useful when you don't know the structure of the data at the time you create an application. In most cases, you will know the layout of the data that you're working with so a typed (or strong) DataSet is more useful. A typed DataSet exposes data in the form of objects. An untyped DataSet exposes data in the form of a group of collections.
For example, if you load a copy of the customers table into an untyped DataSet, you'll find that the DataSet contains a collection of DataTable objects (in this case, the collection contains a single DataTable). That DataTable contains a collection of DataColumn objects (one DataColumn for each column in the customers table) that describe the columns in the DataTable. The DataTable also contains a collection of DataRow objects (one DataRow object for each row read from the customers table). To access the customers table (within the DataSet), you would refer to DataSet.Tables(0). To access a row within the customers table, you would write DataSet.Tables(0).Rows(5). To access a value within a row (within the customers table), you would write DataSet.Tables(0).Rows(5).Items(2).
On the other hand, if you load a copy of the customers table into a (properly) typed DataSet, you would find that the DataSet contains a member named customers. customers is a an extension (subclass) of the DataTable class. Inside of the customers object, you'll find a DataColumn named columncustomer_id, a DataColumn named columncustomer_name, a DataColumn named columnphone, and so on. Each DataColumn describes the corresponding column. The customers object (inside of the DataSet) also contains a collection of Items. Each member of the Items collection is an object of type customersRow and contains a single row from the database. An object of type customersRow contains (among other things) an Integer member named customer_id, a String member named customer_balance, a Date member named birth_date, and so on.
A typed DataSet is a class derived from DataSet. A typed DataTable is a class derived from DataTable. That means that you can still access the tables within a typed DataSet through the Rows collection, you can still access the DataColumns within a typed DataTable through the Columns collection, and you can still access the DataRows within a typed DataTable through the Rows collection. But your code will be much more readable (and much more resilient in the face of schema changes) if you access the named (and strongly typed) objects instead.
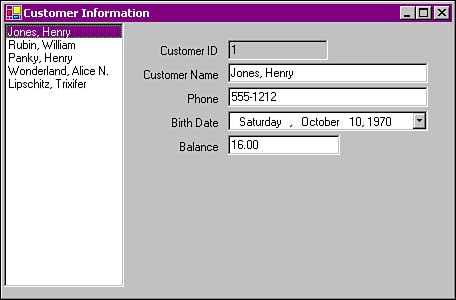
To demonstrate the power offered by typed DataSets, I'll show you one more VB.NET client application. This client (client5) displays a row from the customers table in a form (see Figure 18.7). client5 loads a typed DataSet with the result set of the query SELECT * FROM customers ORDER BY customer_id. The ListBox that you see on the left side of the window is bound to the customer_name member of the DataSet. The other fields, Customer ID, Customer Name, Phone, and so on, are bound to other strongly typed members of the DataSet. As you scroll through the customer names in the ListBox, the other fields follow along. And it only takes six lines of code.
Before you can create this application, you need a typed DataSet. In the last segment of this chapter, I'll show you a tool (included in the source code for this book) that will generate a typed DataSet for any PostgreSQL table. You can skip ahead to that section to generate your own typed DataSet or you can use the DataSet that comes with the source code for this book. You'll find both (the tool and the typed DataSet) in the ch18 subdirectory.
Once you have the typed DataSet loaded on your computer, create a new VB project and add a reference to the Npgsql.dll library (just like you've done for the other clients in this chapter).
Next, add the typed DataSet to the project. The tools that I've used to produce the customers typed DataSet create two separate files, and the project requires both files. The first file is named customers.xsd and it's an XML description of the customers table (in fact, customers.xsd is an XMLSchema). The second file is named customers.vb—it's a VB source file that defines the customers DataTable, the customersRow DataRow, and so on. To add the DataSet files to the project, open the Project menu and click Add Existing Item. When the Add Existing Item finder appears, navigate to the directory that holds the typed DataSet, select the customers.vb file and the customers.xsd file (hold down the Ctrl key to select multiple files), and then click Open. Visual Studio reads through both files and adds the new class descriptions (customers, customersRow, and so on) to the project database. Once you've added the typed DataSet to your project, Visual Studio will incorporate the new classes in its IntelliSense code-completion mechanism.
Now you're ready to create a typed DataSet object. Open the Data tab (in the Toolbox window) and double-click the DataSet tool. When the Add DataSet dialog appears choose Typed DataSet and select customerForm._public from the drop-down list box. Change the name of the new DataSet to m_dsPublic. You may be wondering why the typed DataSet is named public instead of customers. A DataSet can hold more than one table. If you added the rentals and tapes tables to the DataSet, you'd have to come up with a distinct name for the DataSet (distinct from the names of the tables within the DataSet). The tool that I've used to create the typed DataSet assigns the PostgreSQL schema name (public in this case) to the DataSet.
Add a new NpgsqlConnection object, change its name to m_conn, and fill in the ConnectionString property. client5 uses this connection to interact with the PostgreSQL server.
Add a new NpgsqlCommand object, changes its name to m_cmd, and set the Connection property to m_conn. That links the new command object (m_cmd) to the connection object that you created in the previous step (m_conn). In the earlier client applications, the user typed in the text of each query. In this application, you know, at design time, that you want to display all customers, so you can formulate the query now. Set the CommandText property to SELECT * FROM customers ORDER BY customer_id. client5 will execute this command when the form loads.
Add a new NpgsqlDataAdapter object, change its name to m_da, and set the SelectCommand property to m_cmd. That links the new adapter to the command object that you created in the previous step. This DataAdapter will fill the m_dsPublic DataSet by executing the query stored in the m_cmd command object.
Double-click the form background and add the code shown in Listing 18.13 to the Form1_Load()subroutine.
Listing 18.13. Filling a Typed DataSet
1 Private Sub Form1_Load(...) Handles MyBase.Load 2 Try 3 m_da.Fill(m_dsPublic, "customers") 4 Catch ex As ConstraintException 5 6 Catch ex As Exception 7 MessageBox.Show(ex.Message, "Query Failed") 8 End Try 9 End Sub |
The Form1_Load() subroutine executes as soon as the client5 application starts. The call to m_da.Fill() fills the m_dsPublic DataSet by executing the query contained in m_da.SelectCommand (which happens to be a reference to m_cmd). You may have noticed that there's an extra argument in this invocation of Fill(). (The invocations you've seen in the previous clients supplied a single argument.) The second argument tells Fill() which DataTable to load in the m_dsPublic DataSet. If you don't provide a table name, Fill() makes one up. If you do that, the DataSet will contain two DataTables: an empty customers DataTable and an untyped DataTable named Table. (Fill()'s not very original when it comes to making up table names.)
Notice that the call to Fill() is wrapped in a complex Try/Catch block. The first Catch clause will intercept any ConstraintException exceptions thrown by Fill(). Fill() will throw a ConstraintException exception when it finds a NULL value in a column that prohibits NULL values. You may be thinking that you'll never run into that sort of problem because the PostgreSQL server won't let you store a NULL value in a column that prohibits NULL values. Unfortunately, the Npgsql typed DataSet generator isn't smart enough to figure which columns allow NULL values and which columns prohibit NULL values. Instead, Npgsql assumes that every column prohibits NULL values. That means that Fill() will throw an exception if it encounters any NULL values. I've included an empty Catch clause so that VB will ignore ConstraintException errors. If you prefer, you can modify the DataColumn objects in the customers DataTable before calling Fill(), like this:
...
m_dsPublic.customers.phoneColumn.AllowDBNull      = True
m_dsPublic.customers.birth_dateColumn.AllowDBNull = True
m_dsPublic.customers.balanceColumn.AllowDBNull    = True
m_da.Fill(m_dsPublic, "customers")
...
If Fill() throws any other type of exception, the code at line 7 displays an error message to the user.
At this point, you're ready to create the user-interface for this application. Open the Windows Forms tab (in the Toolbox window), select the ListBox tool, and drag out a rectangle that covers the left third of the form. Change the name of the new ListBox to m_customerList. This ListBox will display customer names. You don't have to write any code to manage the ListBox; you simply bind it to the DataSet. Binding a ListBox is a two-step process—you bind the control itself to a DataSet, and then bind the Text property to a particular column within the DataSet. Change the DataSource property (in the DataBindings section of the Properties window) to m_dsPublic. That binds the ListBox to the m_dsPublic DataSet. Now click the DisplayMember property. The drop-down list displays the columns defined in the customers table. Choose customer_name. That tells the ListBox (which is bound to the customers table) to display the customer_column column of each row in the DataSet.
If you run the application at this point, you'll see that the ListBox displays the customer names stored in the customers table. Close the application and you can start painting the rest of the form.
Click the Label tool (in the Windows Forms tab), drag out a rectangle on the form, and change the Text to Customer ID. (You can change the object name too, but you don't define Label names in a typical application unless you have to refer to a Label in the code.)
Click the TextBox tool, drag out a rectangle to the right of the Customer ID label, and change the name of the new control to m_customerID. The m_customerID TextBox will display the customer_id value of the current row (that is, the row selected in the m_customerList ListBox). Change the DataBindings.Text property to m_dsPublic - customers.customer_id. That binds the Text property (that is, the string displayed in the TextBox) to the customer_id column.
Follow the same procedure to add Label and TextBox for the customer_name, phone, birthdate, and balance columns. Be sure to bind each control to the appropriate member of the m_dsPublic.customers DataTable.
You may want to bind the birth_date column to a DateTimePicker instead of binding to a TextBox. Because m_dsPublic.customers.birth_date is strongly typed (it's a Date object), you can wire it up to a DateTimePicker control or to a MonthCalendar control. That's another advantage to using a typed DataSet instead of an untyped DataSet. The values in the DataTables have real data types. You can treat a date/time value as a DateTime object, or a numeric value as a Decimal object (or Integer as appropriate).
Table 18.2 shows how Npgsql maps PostgreSQL data types into .NET data types.
| PostgreSQL Data Type | .NET Data Type |
|---|---|
| varchar | String |
| text | String |
| char | String |
| bpchar | String |
| bytea | Byte[] |
| bool | Boolean |
| int2 | Int16 |
| int4 | Int32 |
| int8 | Int64 |
| float4 | Single |
| float8 | Double |
| numeric | Decimal |
| money | Decimal |
| date | DateTime |
| time | DateTime |
| timetz | DateTime |
| timestamp | DateTime |
| timestamptz | DateTime |
| point | Npgsql.NpgsqlPoint |
| box | Npgsql.NpgsqlBox |
| lseg | Npgsql.NpgsqlLSeg |
| path | Npgsql.NpgsqlPath |
| polygon | Npgsql.NpgsqlPolygon |
| circle | Npgsql.NpgsqlCircle |
| anything else | String |
When you've finished adding labels and control for each column in the customers table, go ahead and run the application. As you scroll through the customers listed on the left side of the window (in the ListBox), you'll see that the other controls follow along. Not too bad for six lines of code. To complete this application, you may want to add Commit and Rollback buttons and wire them up like you did in the previous application (client4).
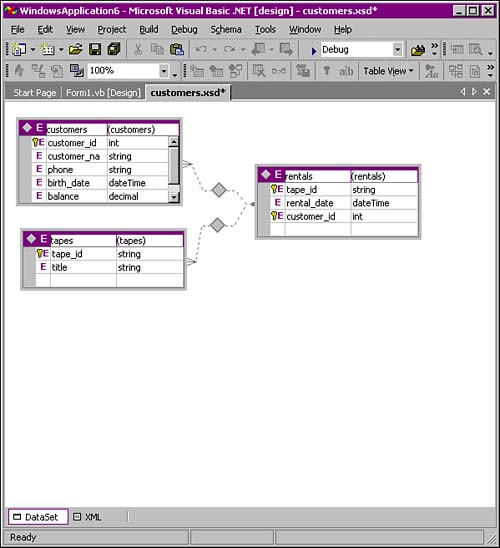
You can see that typed DataSets add a lot of power to your application. They also add a lot of power to the Visual Studio development environment. In fact, if you have a typed DataSet that contains more than one table, you can define the relationships between the tables using Visual Studio's graphical schema editor (see Figure 18.8).
Creating a Typed DataSet
The sample source code for this book includes a VB.NET project named GenDataSet that you can use to generate a typed DataSet for any PostgreSQL table. Figure 18.9 shows this application in action.

I won't explain the entire application here (it's not very big, but you've seen most of the code already in previous clients). Instead, I'll describe two subroutines that you'll find in the application.
The first subroutine, LoadTree(), loads the TreeView control that you see on the left side of the window. A TreeView control is perfect when you need to display hierarchical information. In this case, the TreeView displays a list of the tables defined in a PostgreSQL database, grouped into schemas. My database contains three schemas (information_schema, pg_catalog, and public) so you see three nodes at the top of the hierarchy. I've expanded the public node to display the child tables defined in that schema.
Listing 18.14 shows the LoadTree() subroutine.
Listing 18.14. Loading a TreeView Control
1 Private Sub LoadTree() 2 Dim tables As _public.pg_tablesDataTable 3 Dim table As _public.pg_tablesRow 4 Dim r As Integer 5 Dim prevSchemaName As String = "" 6 Dim schemaNode As TreeNode 7 Dim node As TreeNode 8 9 tables = m_dsPgTables.pg_tables 10 11 For r = 0 To tables.Rows.Count - 1 12 13 table = tables(r) 14 15 If (table.schemaname <> prevSchemaName) Then 16 prevSchemaName = table.schemaname 17 schemaNode = m_tvPgTables.Nodes.Add(prevSchemaName) 18 End If 19 20 node = schemaNode.Nodes.Add(table.tablename) 21 node.Tag = table 22 Next r 23 End Sub |
To load the TreeView (which is named m_tvPgTables), I'll read through a DataSet (m_dsPgTables) built from the the query SELECT * from pg_tables ORDER by schemaname,tablename. At line 9, I extract a reference to the pg_tables member of the DataSet (just so I have a shorter name to type in). The result (tables) is a typed DataTable. The For loop that covers lines 11 through 22 will iterate through each row in tables. At line 13, I extract a reference to the current row and I end up with an object (table). The table object contains a member named schemaname, a member named tablename, a member named tableowner, and so on: Each member corresponds to a column in the pg_tables view. Because I want to group the tables into separate schemas, I'll need to keep track of three different levels in the TreeView hierarchy. As I read through each table in the result set, I'll add a new node to the TreeView root whenever I encounter a new schema. (Remember, I'm reading pg_tables in schemaname order.) The If statement at line 15 takes care of figuring out when the schema name changes, adds a new node for each schema, and stores a reference (schemaNode) to that node. The code at line 20 adds a new node for each table—every table becomes a child of the most recent schemaNode. Line 21 adds a tag to the new node. In .NET-speak, a tag is a property that's reserved for your own private use. (In other words, if you have a chunk of data that you want to associate with a node, create an object to hold the data and store a reference to the object in node.Tag.) As you'll see in a moment, the tag that we assign to the TreeView node gives you a way to get back to the DataRow associated with that node.
You can follow a similar procedure to populate any TreeView with a hierarchy of data. Just be sure to sort the result set in the proper order and keep a reference to the most recently added parent node(s).
The last subroutine I'd like to show you takes care of generating an XML DataSet. The m_tvPgTables.AfterSelect() subroutine (shown in Listing 18.15) is invoked when you click on a table name displayed in the TreeView.
Listing 18.15. Creating an XMLSchema (a Typed DataSet)
1 Private Sub m_tvPgTables_AfterSelect(...)Handles m_tvPgTables.AfterSelect 2 If (e.Node.Tag Is Nothing) Then 3 Exit Sub 4 End If 6 7 Dim table As public.pg_tablesRow = e.Node.Tag 8 Dim da As Npgsql.NpgsqlDataAdapter 9 Dim tableName As String = table.tablename 10 Dim schemaName As String = table.schemaname 11 Dim query As String 12 13 query = "SELECT * FROM " + schemaName + "." + tableName + " LIMIT 0" 14 da = New Npgsql.NpgsqlDataAdapter(query, m_conn) 15 16 m_ds = New DataSet 17 da.FillSchema(m_ds, SchemaType.Source) 18 19 m_ds.DataSetName = schemaName 20 m_ds.Tables(0).TableName = tableName 21 m_dsXML.Text = m_ds.GetXmlSchema() 22 m_currentTableName = tableName 23 End Sub |
This subroutine translates a pg_tablesRow into an XML schema definition (which .NET abbreviates as XSD). When this subroutine is invoked, e.Node contains a reference to the node that holds the focus in the TreeView. (In other words, e.Node points to the currently selected node.) As you saw in the previous listing, e.Node.Tag points to the pg_tablesRow associated with the selected node. Once you have a reference to the pg_tablesRow, you know the name of the table (table.tablename)and the schema in which the resides (table.schemaname).
The easiest way to discover the layout of the selected table is to construct and execute a query that nabs every column in the table. We don't really need any of the data here, just the metadata. Line 13 constructs a query guaranteed to return zero rows, but it returns the metadata that we need. (The “LIMIT 0” clause ensures that PostgreSQL won't send any rows back to us.)
The code at line 14 creates a new NpgsqlDataAdapter object that uses the query that we just built. Notice that I'm using a new constructor here—in the past, I've always created a NpgsqlDataAdapter using a single-argument constructor. In this case, the constructor turns the query text into an NpgsqlCommand object and stuffs that object into its own SelectCommand property.
Line 16 creates a new (empty) DataSet object. The call to da.FillSchema() (at line 17) executes the SelectCommand and copies the resulting metadata into the m_ds DataSet.
At this point, m_ds is a DataSet that contains the metadata for a single table, but the DataSet name and table name are incorrect. (The DataSet is named “NewDataSet and m_ds.Tables(0) is named “Table”.) We want to produce a typed DataSet whose name matches the name of the schema where the table resides. The code at line 19 copies the schemaName into the DataSet. We want the typed DataSet to contain a table whose name matches the table that we're defining, so the code at line 20 copies the tableName into the first table in the DataSet. If you created a typed DataSet for the customers table (which is defined in the public schema), you'll end up with a DataSet named public that contains a single DataTable named customers.
Line 21 is where the real magic occurs. The call to m_ds.GetXmlSchema() returns the XmlSchema for every table in the m_ds DataSet. (There's only one DataTable in there at this point.) Sort of anticlimactic isn't it? You call one function and you get back a complete schema definition. The rest of the GenDataSet application takes care of writing the XmlSchema (it's just a String at this point) to a text file so you can import it into a Visual Studio project.
Just in case you're wondering what an XmlSchema looks like, here's the schema generated for the customers table:
<?xml version="1.0" encoding="utf-8"?>
<xs:schema id="public" xmlns="" xmlns:xs="http://www.w3.org/2001/XMLSchema"
   xmlns:msdata="urn:schemas-microsoft-com:xml-msdata">
  <xs:element name="public" msdata:IsDataSet="true">
    <xs:complexType>
      <xs:choice maxOccurs="unbounded">
        <xs:element name="customers">
          <xs:complexType>
            <xs:sequence>
              <xs:element name="customer_id" type="xs:int" />
              <xs:element name="customer_name" type="xs:string" />
              <xs:element name="phone" type="xs:string" />
              <xs:element name="birth_date" type="xs:dateTime" />
              <xs:element name="balance" type="xs:decimal" />
            </xs:sequence>
          </xs:complexType>
        </xs:element>
      </xs:choice>
    </xs:complexType>
  </xs:element>
</xs:schema>
If you have an XmlSchema stored in a file (XmlSchema filenames typically end with .xsd), you only have half of a solution. You still need a .NET class the defines the DataTable and DataRow extensions. Fortunately, Visual Studio comes with a tool that will generate such a class file for you: xsd. To produce a class file from a .xsd file, run the following command:
C:> xsd /language:vb /dataset data-set-name.xsd
For example, to convert the customers.xsd file into a customers.vb class file, execute the following command:
C:> xsd /language:vb /dataset customers.xsd
Microsoft (R) Xml Schemas/DataTypes support utility
[Microsoft (R) .NET Framework, Version 1.1.4322.573]
Copyright (C) Microsoft Corporation 1998-2002. All rights reserved.

Writing file 'C:customers.vb'.
Now you have a schema description (customers.xsd) and a class file (customers.vb) that contains the source code for a typed DataSet extension named public (which contains a single DataRow extension named customers). And just in case you missed in, see the section titled “Client 5—Using a Typed DataSet” earlier in this chapter to learn how to use both components.