
![]()
Extending the Pipeline
ASP.NET Web API is a framework. The key defining attribute of a framework is that it controls the execution flow and calls the application-specific code written by a developer like you at the appropriate time. You don’t call the framework but it calls your code, in line with the Hollywood principle of “don’t call us, we’ll call you.” The most fundamental lever that you use to harness the power of the ASP.NET Web API framework in building a service is the controller, the ApiController subclass that you write. It is the business end where all the application-specific action happens.
ASP.NET Web API framework receives an HTTP request and goes about processing it. At some point during the processing, it calls the action method you have implemented in the ApiController subclass, passing in the parameters, and formats the output returned by your method to ultimately send an HTTP response back to the client. The sequence of steps from the time a request is received to the time the response is sent back defines the processing architecture of ASP.NET Web API. See Figure 8-1.

Figure 8-1. The ASP.NET Web API pipeline
ASP.NET Web API, being a framework, has various points of extensibility built in for us to hook our code in and extend the processing. We have already seen some of them in the preceding chapters: creating a new media type formatter deriving from MediaTypeFormatter, creating a new model binder implementing IModelBinder, creating a new value provider implementing IValueProvider, and creating a new parameter binding by deriving from HttpParameterBinding. There are other extensibility points available as well, but in this chapter I cover the message handlers, filters, and controller selectors. For a detailed illustration of the pipeline and extensibility points, refer to the chart from Microsoft available for download at http://www.microsoft.com/en-us/download/details.aspx?id=36476.
8.1 Creating a Message Handler
In this exercise, you will create a message handler that simply reads a request header and adds a response header. In the ASP.NET Web API pipeline, the first message handler to run is HttpServer. All of the other, custom message handlers run after HttpServer. A custom message handler is a class that inherits from the class DelegatingHandler. HttpServer gets to look at the request before any other message handler. For the outgoing response, the last handler in the chain gets to see the output first and HttpServer gets to see the response last.
This is a great model because your important handlers get to see the request first, and they are the last ones to do anything with the response. If a bad request (whatever the criteria are for the request to be classified bad) comes in, your important handlers see it first, and they can decide whether the inner handlers should be allowed to see the request or it should be stopped at that point in the pipeline. Similarly, on the way out, the important handlers get to decide as late as possible in the pipeline whether to send the response out, stop it, or make a last-minute alteration to the response. See Figure 8-2 for an illustration of the call sequence.
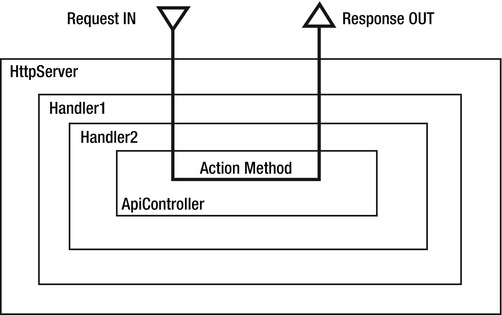
Figure 8-2. The levels of message handlers can be compared to Chinese boxes
- You will use the same solution containing the four TalentManager.* projects from Chapter 7 for this exercise. For this reason, a prerequisite to working on this chapter is that you complete all the exercises in Chapter 7.
- If you prefer, you can make a copy of the entire folder containing the solution and other files from Chapter 7 and start making changes for this chapter. Open the solution in Visual Studio.
- Create a message handler class named MyImportantHandler
in the project TalentManager.Web, as shown in Listing 8-1. The lines of code shown in bold type are run as part of the request handling. When the execution hits await, this message handler yields control to the next handler in the pipeline, and so on until control goes to the action method of the controller, which runs and creates the response and returns it to the pipeline. The response flows in the reverse order and ultimately reaches the response-handling part of our handler (all the lines below the await line), and the response variable is set to the response. We can do what we want with the response, such as inspecting headers and adding our own headers and so on, and return the response to the next component in the pipeline.
Listing 8-1. The MyImportantHandler Class
using System;
using System.Linq;
using System.Net;
using System.Net.Http;
using System.Threading;
using System.Threading.Tasks;

public class MyImportantHandler : DelegatingHandler
{
    private const string REQUEST_HEADER = "X-Name";
    private const string RESPONSE_HEADER = "X-Message";
    private const string NAME = "Voldemort";

    protected override async Task<HttpResponseMessage> SendAsync(HttpRequestMessage request,
                                                                    CancellationToken cancellationToken)
    {
        // Inspect and do your stuff with request here
        string name = String.Empty;

        if (request.Headers.Contains(REQUEST_HEADER))
        {
            name = request.Headers.GetValues(REQUEST_HEADER).First();
        }

        // If you are not happy for a reason,
        // you can reject the request right here like this
        if (NAME.Equals(name, StringComparison.OrdinalIgnoreCase))
            return request.CreateResponse(HttpStatusCode.Forbidden);

        var response = await base.SendAsync(request, cancellationToken);

        // Inspect and do your stuff with response here
        if (response.StatusCode == HttpStatusCode.OK &&
                                        !String.IsNullOrEmpty(name))
        {
            response.Headers.Add(RESPONSE_HEADER,
                String.Format("Hello, {0}. Time is {1}",
                            name,
                                DateTime.Now.ToString("MM/dd/yyyy hh:mm:ss.fff tt")));
        }

        return response;
    }
} - Create another handler class that is the duplicate of the MyImportantHandler class. Name it MyNotSoImportantHandler.
- In the message handler MyNotSoImportantHandler, change REQUEST_HEADER to X-Name2, RESPONSE_HEADER to X-Message2, and the hard-coded name Voldemort to Potter, as shown in Listing 8-2.
Listing 8-2. Changes to MyNotSoImportantHandler
public class MyNotSoImportantHandler : DelegatingHandler
{
    private const string REQUEST_HEADER = " X-Name2";
    private const string RESPONSE_HEADER = " X-Message2";
    private const string NAME = " Potter";

    // The rest of the code is the same as MyImportantHandler
} - Put breakpoints in the lines string name = String.Empty; and if (response.StatusCode == HttpStatusCode.OK && ... in both the handlers, as shown in Figure 8-3. The first breakpoint is for the request part and the second one is for the response part.
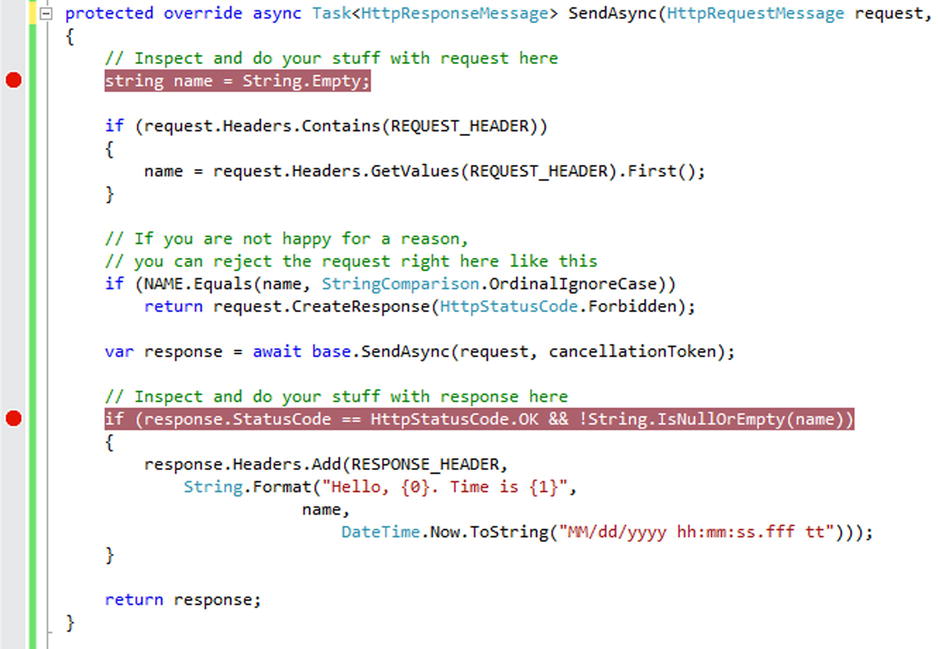
Figure 8-3. Breakpoints in the message handler
- Register the handlers in the Register method of WebApiConfig in the App_Start folder. The order does matter. MyImportantHandler must be added to the MessageHandlers collection before MyNotSoImportantHandler, as shown in Listing 8-3.
Listing 8-3. Registering the Message Handlers
public static class WebApiConfig
{
    public static void Register(HttpConfiguration config)
    {
        config.Routes.MapHttpRoute(
            name: "DefaultApi",
            routeTemplate: "api/{controller}/{id}",
            defaults: new { id = RouteParameter.Optional }
        );

        config.MessageHandlers.Add(new MyImportantHandler());
        config.MessageHandlers.Add(new MyNotSoImportantHandler());
    }
} - Add a breakpoint in the starting brace of the action method public HttpResponseMessage Get(int id) {} in EmployeesController.
- Rebuild the solution and run the TalentManager.Web project in Visual Studio by pressing F5.
- Make a GET request from Fiddler to the URI http://localhost:39188/api/employees/1. Remember to replace port 39188 with the actual port that your application runs on. Do include two request headers, X-Name: Badri and X-Name2: Badri, in the Request Headers textbox in Fiddler. The request message will be as follows:
GET http://localhost:39188/api/employees/1 HTTP/1.1
X-Name: Badri
X-Name2: Badri
Host: localhost:39188 - The first breakpoint to be hit is the one on the request-handling part of the MyImportantHandler class. Press F5.
- The second breakpoint to be hit is in the request-handling part of the MyNotSoImportantHandler class. Again press F5.
- The third breakpoint to be hit is the one on the action method of the controller.
- The fourth breakpoint to be hit is in the response-handling part of the MyNotSoImportantHandler class. Press F5.
- Finally, the last breakpoint to be hit is in the response-handling part of the MyImportantHandler class.
- Thus, the request is first seen by MyImportantHandler, followed by MyNotSoImportantHandler before the action method runs. On the way out, the response is first seen by MyNotSoImportantHandler, followed by MyImportantHandler. As you can see from the following response message, the X-Message2 header was added by MyNotSoImportantHandler before X-Message was added by MyImportantHandler.
HTTP/1.1 200 OK
X-Message2: Hello, Badri. Time is 04/18/2013 07:41: 22.864PM
X-Message: Hello, Badri. Time is 04/18/2013 07:41: 23.723PM
Date: Thu, 18 Apr 2013 14:11:24 GMT
Content-Length: 91

{"Id":1,"FirstName":"John","LastName":"Human","DepartmentId":1,"RowVersion":"AAAAAAAAF3U="} - It is clear now that MyImportantHandler sees the request first and sees the response last. This way, it has the ultimate control over the proceedings. If MyImportantHandler deems that MyNotSoImportantHandler must not see the request, it can stop the execution at that point itself. Let us now see how MyImportantHandler can stop a request from being processed further in the pipeline. When the value coming in the header X-Name is Voldemort, MyImportantHandler sends a status code of 403 - Forbidden and short-circuits the pipeline execution.
- Issue a GET to http://localhost:39188/api/employees/1 with two request headers: X-Name: Voldemort and X-Name2: Badri.
- The breakpoint on the request-handling part of the MyImportantHandler class is hit.
- Press F5 now. No other breakpoints will be hit. Since MyImportantHandler returns a 403 - Forbidden because the name matches Voldemort, pipeline execution is short-circuited and neither MyNotSoImportantHandler nor the controller action has an opportunity to see the request.
- Issue a GET to http://localhost:39188/api/employees/1 with two request headers: X-Name: Badri and X-Name2: Potter.
- The first breakpoint to be hit is in the request-handling part of the MyImportantHandler class. Press F5.
- The second breakpoint to be hit is in the request-handling part of the MyNotSoImportantHandler class. Again press F5.
- The third breakpoint to be hit is in the response-handling part of the MyImportantHandler class. Press F5.
- Other breakpoints, including that in the action method, are not hit.
- Since MyImportantHandler allows the request through and MyNotSoImportantHandler short-circuits the pipeline this time by sending a 403 status code, the response-handling part of MyImportantHandler, which occurs before MyNotSoImportantHandler in the pipeline, still runs. However, none of the components after MyNotSoImportantHandler in the pipeline, such as the controller, will be able to see the request.
We have registered our handlers as global handlers, so they will be plugged into the pipeline for all the routes. It is possible to configure the handlers specifically for a route, as per-route message handlers.
- Modify the Register method of WebApiConfig in the App_Start folder. Comment out the registration of handlers as global handlers. To hook these handlers specifically to a route, pass them into MapHttpRoute, as shown in Listing 8-4.
Listing 8-4. Registering the Per-Route Handlers
using System.Web.Http;
using System.Web.Http.Dispatcher;

public static class WebApiConfig
{
    public static void Register(HttpConfiguration config)
    {
        var handler = new MyImportantHandler()
        {
            InnerHandler = new MyNotSoImportantHandler()
            {
                InnerHandler = new HttpControllerDispatcher(config)
            }
        };

        config.Routes.MapHttpRoute(
            name: "premiumApi",
            routeTemplate: "premium/{controller}/{id}",
            defaults: new { id = RouteParameter.Optional },
            constraints: null,
            handler: handler
        );

        config.Routes.MapHttpRoute(
            name: "DefaultApi",
            routeTemplate: "api/{controller}/{id}",
            defaults: new { id = RouteParameter.Optional }
        );

        //config.MessageHandlers.Add(new MyImportantHandler());
        //config.MessageHandlers.Add(new MyNotSoImportantHandler());
    }
} - Rebuild the solution and then run the TalentManager.Web project from Visual Studio.
- With the breakpoints on, make a GET to http://localhost:39188/api/employees/1 with two request headers: X-Name: Badri and X-Name2: Badri. Remember to replace port 39188 with the actual port that your application runs on. None of the breakpoints in the message handlers will be hit this time, since the handlers are configured for a different route. Of course, the breakpoint in the action method does get hit.
- Make a GET to http://localhost:39188/premium/employees/1 with two request headers: X-Name: Badri and X-Name2: Badri. All five breakpoints will be hit, just like when we configured the handlers as global message handlers. Since the two message handlers are configured as per-route handlers for the premium route, the breakpoints on the two message handlers are hit, and only for the requests on the premium route.
8.2 Creating an Exception Filter
An exception filter runs when a controller method throws any unhandled exception. To create an exception filter, you must implement the IExceptionFilter interface or derive from the ExceptionFilterAttribute abstract class (which implements the IExceptionFilter interface) and override the OnException method. In this exercise, you will create an exception filter.
- We will continue to use the project from Exercise 8.1 for this exercise.
- EmployeesController has an action method to handle PUT, as shown in Listing 8-5.
Listing 8-5. The PUT Action Method
public void Put(int id, Employee employee)
{
    repository.Update(employee);
    uow.Save();
} - If you do not have the JSON representation of Employee handy, make a GET to http://localhost:39188/api/employees/1 and get the JSON like so:
{"Id":1,"FirstName":"John","LastName":"Human","DepartmentId":1,"RowVersion":"AAAAAAAAB9Q="} - Issue a PUT to http://localhost:39188/api/employees/1 with a request header of Content-Type: application/json and a request body of {"Id":1,"FirstName":"Johnny","LastName":"Human","DepartmentId":1}. Note the missing RowVersion field.
- You will get a 500 - Internal Server Error status code and a concurrency exception.
{"Message":"An error has occurred.","ExceptionMessage":"Store update, insert, or delete statement affected an unexpected number of rows (0). Entities may have been modified or deleted since entities were loaded. Refresh ObjectStateManager entries.","ExceptionType":" System.Data.OptimisticConcurrencyException","StackTrace":" at System.Data.Mapping.Update.Internal.UpdateTranslator.ValidateRowsAffected(Int64 rowsAffected, UpdateCommand source)
 at System.Data.Mapping.Update.Internal.UpdateTranslator.Update(IEntityStateManager stateManager, IEntityAdapter adapter)
 at System.Data.EntityClient.EntityAdapter.Update(IEntityStateManager entityCache)
 at System.Data.Objects.ObjectContext.SaveChanges(SaveOptions options)
 at System.Data.Entity.Internal.InternalContext.SaveChanges()"}
- Though the exception details are very useful for debugging, you will not want to send this information in production. You can disable it by including the following line in the Register method of WebApiConfig in the App_Start folder:
config.IncludeErrorDetailPolicy = IncludeErrorDetailPolicy.Never; - Repeat the PUT and you will still get a 500 status code, but the message will not include the stack trace: {"Message":"An error has occurred."}.
- This is not very useful to the consumer, since it just says that an error has occurred, which is already obvious because of the 500 status code.
- Create a class ConflictExceptionHandlerAttribute in the TalentManager.Web project deriving from ExceptionFilterAttribute, as shown in Listing 8-6. This exception filter runs when an Entity framework call results in DbUpdateConcurrencyException. It creates an error response with a status code of 409 - Conflict and a nice message.
Listing 8-6. The ConflictExceptionHandlerAttribute Class
using System.Data.Entity.Infrastructure;
using System.Net;
using System.Net.Http;
using System.Web.Http.Filters;

public class ConflictExceptionHandlerAttribute : ExceptionFilterAttribute
{
    public override void OnException(HttpActionExecutedContext context)
    {
        string message = "Changes not saved because of missing or stale ETag. ";
        message += "GET the resource and retry with the new ETag";

        if (context.Exception is DbUpdateConcurrencyException)
        {
            context.Response = context.Request.CreateErrorResponse(
                                    HttpStatusCode.Conflict,
                                        message);
        }
    }
} - You can use this as a global filter, but let us apply it to the PUT action method in the EmployeesController class of TalentManager.Web, as shown in Listing 8-7.
Listing 8-7. A PUT Action Method with an Exception Filter
[ConflictExceptionHandler]
public void Put(int id, Employee employee)
{
    repository.Update(employee);
    uow.Save();
} - Rebuild the solution and issue a PUT to http://localhost:39188/api/employees/1 with a request header of Content-Type: application/json and a request body of {"Id":1,"FirstName":"Johnny","LastName":"Human","DepartmentId":1}.
- The response is as follows. This is better than a generic 500 status code.
HTTP/1.1 409 Conflict
Cache-Control: no-cache
Content-Type: application/json; charset=utf-8
Date: Fri, 19 Apr 2013 04:50:07 GMT
Content-Length: 110

{"Message":"Changes not saved because of missing or stale ETag. GET the resource and retry with the new ETag"}
8.3 Creating an Action Filter to Handle Concurrency
In this exercise, you will create an action filter. Building on Exercise 8.2, you will use ETags to implement optimistic concurrency. ETags are typically associated with web caching, but they can also be used for optimistic concurrency management.
Concurrency management is essential to ensure data integrity in multiuser environments such as the web. Since HTTP is stateless, locking a resource before the update, as we do in pessimistic locking, is not a feasible option. A better approach is to be optimistic that there will be no intermediate changes between the time of the read and the subsequent update, and failing the update if there is an intermediate change.
As part of the GET response, the web API sends an ETag in the ETag response header. Subsequently, if the same resource has to be updated through a PUT, the client sends the same ETag in the If-Match request header. If the ETag sent by the client matches the ETag in the database (the row_version column of type timestamp), the table is updated. If there is a mismatch, a status code of 409 – Conflict is sent back to the client. The client can follow this with a fresh GET and retry the update. See Figure 8-4.
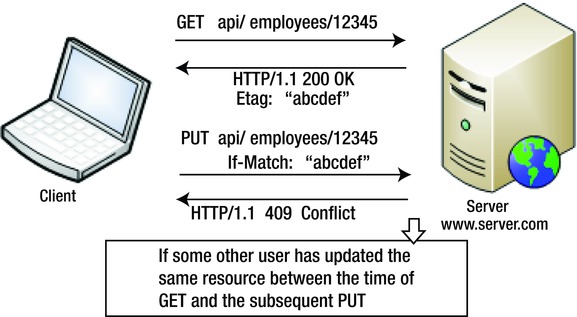
Figure 8-4. The ETag for optimistic locking
In this exercise, you will create an action filter that sets the ETag response header based on the row_version column of the employee table. We have been sending the version information as part of the response message body, but the standard way of doing that is to use the ETag response header. Also, when we issue a PUT from Fiddler, we send the version information in the request message body. The standard way of doing this is to send the same information in the If-Match request header.
The action filter you create as part of this exercise will take the version information from the RowVersion property of the EmployeeDto on the way out and copy that data into the ETag response header, immediately after the controller completes executing the action method for GET. Also, the filter will take the version information from the If-Match request header and copy that to the RowVersion property of the EmployeeDto parameter on the way in, just before the controller starts executing the action method for PUT.
- We will continue to use the project from Exercise 8.2 for this.
- In the TalentManager.Domain, create an interface IVersionable, as shown in Listing 8-8. Any domain and DTO class that would need to be concurrency-checked will implement this interface.
Listing 8-8. The IVersionable Interface
public interface IVersionable
{
        byte[] RowVersion { get; set; }
} - In the project TalentManager.Domain, modify the classes Department and Employee so that they implement this interface. Since we already have the RowVersion property, we just need to indicate that these classes implement IVersionable, as shown in Listing 8-9.
Listing 8-9. The Department and Employee Classes Implementing IVersionable
public class Employee : IIdentifiable, IVersionable
{
    public int Id { get; set; }

    public string FirstName { get; set; }

    public string LastName { get; set; }

    // Foreign key association
    public int DepartmentId { get; set; }

    // Independent association
    public virtual Department Department { get; set; }

    public byte[] RowVersion { get; set; }
}

public class Department : IIdentifiable, IVersionable
{
    public int Id { get; set; }

    public string Name { get; set; }

    public byte[] RowVersion { get; set; }
} - As in the previous step, make the EmployeeDto class in the Models folder of the TalentManager.Web project implement IVersionable: public class EmployeeDto: IVersionable { ... }. You will need to add the using TalentManager.Domain; directive to the EmployeeDto class, since the IVersionable interface is part of TalentManager.Domain.
- Create a class named OptimisticLockAttribute deriving from ActionFilterAttribute in the TalentManager.Web project, as shown in Listing 8-10. This code does the following:
- a. The overridden OnActionExecuted method runs in the pipeline after the action method of the controller executes. Thus, it has access to the object returned by the action method.
- b. This method checks whether the HTTP method is GET.
- c. If so, it retrieves the object returned by action method, which is in Response.Content. An assumption I make here is that Response.Content will be only ObjectContent and not anything else, such as StringContent. The Value property holds the actual object.
- d. If this object implements the IVersionable interface, we take the value from the rowVersion property and set that in the ETag header after wrapping it with double quotes.
Listing 8-10. The OptimisticLockAttribute with OnActionExecuted
using System;
using System.Linq;
using System.Net.Http;
using System.Net.Http.Headers;
using System.Web.Http.Controllers;
using System.Web.Http.Filters;
using TalentManager.Domain;

public class OptimisticLockAttribute : ActionFilterAttribute
{
    // OnActionExecuting method goes here

    public override void OnActionExecuted(HttpActionExecutedContext context)
    {
        var request = context.Request;

        if (request.Method == HttpMethod.Get)
        {
            object content = (context.Response.Content as ObjectContent).Value;

            if (content is IVersionable)
            {
                byte[] rowVersion = ((IVersionable)content).RowVersion;

                var etag = new EntityTagHeaderValue(""" +
                                        Convert.ToBase64String(rowVersion) + """);

                context.Response.Headers.ETag = etag;
            }
        }
} - Complete the action filter, overriding the OnActionExecuting method, as shown in Listing 8-11. This method works as follows:
- a. The overridden OnActionExecuting method runs in the pipeline before the action method of the controller executes. It has access to the action method parameter, since model binding happens before this method.
- b. This method checks whether the HTTP method is PUT.
- c. If so, it checks whether the request has the If-Match header.
- d. We retrieve the value from the header and set it in the RowVersion property of the parameter of the action method, provided the parameter object implements IVersionable.
Listing 8-11. The OptimisticLockAttribute with OnActionExecuting
public override void OnActionExecuting(HttpActionContext context)
{
    var request = context.Request;
    if (request.Method == HttpMethod.Put)
    {
        EntityTagHeaderValue etagFromClient = request.Headers.IfMatch.FirstOrDefault();
        if (etagFromClient != null)
        {
            var rowVersion = Convert.FromBase64String(
                                        etagFromClient.Tag.Replace(""", String.Empty));

            foreach (var x in context.ActionArguments.Values.Where(v => v is IVersionable))
            {
                ((IVersionable)x).RowVersion = rowVersion;
            }
        }
    }
} - EmployeesController has action methods to handle GET for employee by ID and PUT. Modify the methods by applying the OptimisticLock attribute on these two methods, as shown in Listing 8-12. Also, the PUT method is modified to have EmployeeDto as the parameter, and AutoMapper is used to map EmployeeDto to Employee before saving it to the database.
Listing 8-12. The GET by ID and PUT Action Methods
[OptimisticLock]
public HttpResponseMessage Get(int id)
{
    var employee = repository.Find(id);
    if (employee == null)
    {
        var response = Request.CreateResponse(HttpStatusCode.NotFound,
                                                 "Employee not found");

        throw new HttpResponseException(response);
    }

    return Request.CreateResponse<EmployeeDto>(
                        HttpStatusCode.OK,
                        mapper.Map<Employee, EmployeeDto>(employee));
}

[OptimisticLock]
[ConflictExceptionHandler]
public void Put(int id, EmployeeDtoemployeeDto)
{
    var employee = mapper.Map<EmployeeDto, Employee>(employeeDto);

    repository.Update(employee);
    uow.Save();
} - Rebuild the solution and issue a GET to http://localhost:39188/api/employees/1. Remember to replace port 39188 with the actual port that your application runs on. The request and response are as follows. Some of the headers are removed for brevity. The response has the ETag header with a value the same as the RowVersion property. Note the ETag value somewhere, since you will need the value a few steps later.
Request
GET http://localhost:39188/api/employees/1 HTTP/1.1
Host: localhost:39188

Response
HTTP/1.1 200 OK
Content-Type: application/json; charset=utf-8
ETag: "AAAAAAAAF44="
Content-Length: 93

{"Id":1,"FirstName":"Johnny","LastName":"Human","DepartmentId":1, "RowVersion":"AAAAAAAAF44="} - Issue a PUT to http://localhost:39188/api/employees/1. Do not include the If-Match header in the request. The request and response are as follows. They are the same as the output we got in Exercise 8.2.
Request
PUT http://localhost:39188/api/employees/1 HTTP/1.1
Host: localhost:39188
Content-Type: application/json
Content-Length: 65

{"Id":1,"FirstName":"Johnny","LastName":"Human","DepartmentId":1}

Response
HTTP/1.1 409Conflict
Content-Type: application/json; charset=utf-8
Date: Fri, 19 Apr 2013 17:13:20 GMT
Content-Length: 110

{"Message":"Changes not saved because of missing or stale ETag. GET the resource and retry with the new ETag"} - Issue a PUT to http://localhost:39188/api/employees/1. This time, include the If-Match header in the request and use the value you got in the ETag header in the response to GET. The resource (employee) is successfully updated. The request and response are as follows. You can query the table and verify that the update is successful.
Request
PUT http://localhost:39188/api/employees/1 HTTP/1.1
Host: localhost:39188
Content-Type: application/json
Content-Length: 65
If-Match: " AAAAAAAAF44="

{"Id":1,"FirstName":"Johnny","LastName":"Human","DepartmentId":1}

Response
HTTP/1.1 204 No Content - In Fiddler, go back to the Composer tab and click Execute. Basically, you are repeating the request in the previous step. Your request will fail this time with a 409 - Conflict and a message that Changes not saved because of missing or stale ETag. GET the resource and retry with the new ETag. This occurs because the earlier ETag you used to successfully update the employee is stale now.
- To update again, you will need to do a GET and get the current ETag and perform the update. Thus, we have implemented optimistic concurrency checking using ETags.
8.4 Creating a Controller Selector for Versioning
In this exercise, you will create a custom controller selector to implement a simple versioning system for your web API. As part of the ASP.NET Web API pipeline processing, a controller is selected to handle the request. The controller selection logic is implemented in the SelectController method of the DefaultHttpControllerSelector class. This class implements the IHttpControllerSelector interface. The SelectController method calls another public virtual method, named GetControllerName. This method simply returns the controller name from the route data. You will override this method to implement your own logic.
You have EmployeesController, which is selected when the request comes to the URI such as this: http://localhost:39188/api/employees/1. As you make changes to the action methods, some client applications may stop working if the changes you made are breaking changes. Versioning your web API is a technique that helps prevent this situation. In our case, you will leave the base version of EmployeesController untouched and make the breaking changes to the next version of EmployeesController, say 2.0. The older clients will work off version 1.0, while the newer clients that need the enhanced version with new functionality can work off version 2.0. There are multiple ways versioning can be done. Some of them are as follows:
- Include the version information in the URI, for example /api/v2/employees.
- Use a request header, for example X-Version: 2.
- Use a query string, for example /api/employees?v=2.
- Use media types with the client asking for a version through the Accept header.
- Use a field in the request body.
- Tie the end user identity (or client identity) to a specific version.
In this exercise, we will use the header approach. Versioning is a complex topic, and all of the preceding options have pros and cons that you must weigh for the requirements you have at hand. I do not intend to give you a production-strength versioning solution through this exercise. The objective here is just to demonstrate how you can select a controller class on the fly by implementing a custom controller selector.
- As with the other exercises in this chapter, you will continue to use the same project—the project from Exercise 8.3—for this exercise.
- Create a copy of EmployeesController by copying and pasting EmployeesController to the Controller folder in Visual Studio. Rename the file to EmployeesV2Controller. Ensure that the class and the constructor are appropriately named as EmployeesV2Controller. Set a breakpoint in the action method handling GET, which is public HttpResponseMessage Get(int id) {...}, in both the controller classes: EmployeesController and EmployeesV2Controller.
- In TalentManager.Web, create a class with a name of MyControllerSelector
, deriving from DefaultHttpControllerSelector, as shown in Listing 8-13. At this point, it does nothing more than return the controller name returned by the base class, and you will get the same behavior as with the out-of-the-box controller selector.
Listing 8-13. MyControllerSelector (Incomplete)
using System;
using System.Linq;
using System.Net;
using System.Net.Http;
using System.Web.Http;
using System.Web.Http.Controllers;
using System.Web.Http.Dispatcher;

public class MyControllerSelector : DefaultHttpControllerSelector
{
    public MyControllerSelector(HttpConfiguration configuration) : base(configuration) {}

    public override string GetControllerName(HttpRequestMessage request)
    {
        string controllerName = base.GetControllerName(request);

        // Our customization Step 1 goes here

        // Our customization Step 2 goes here

        return controllerName;
    }
} - Since we have a controller with a name containing the version (EmployeesV2Controller), a request can be made directly to it: http://localhost:39188/api/employeesv2/1. We will first ensure that those requests fail by adding the code shown in Listing 8-14 to the GetControllerName method. Copy and paste Listing 8-14 to replace the comment // Our customization Step 1 goes here.
Listing 8-14. The GetControllerName Method
// Having controllers like EmployeesV2Controller or EmployeesV3Controller is
// our internal business. A client must not make a request directly like /api/employeesv2.

int version;
int length = controllerName.Length;
if (Int32.TryParse(controllerName.Substring(length - 1, 1), out version))
{
    if (controllerName.Substring(length - 2, 1).Equals("V", StringComparison.OrdinalIgnoreCase))

    {
        string message = "No HTTP resource was found that matches the request URI {0}";

        throw new HttpResponseException(
                    request.CreateErrorResponse(
                        HttpStatusCode.NotFound,
                            String.Format(message, request.RequestUri)));
    }
} - Add the logic to format the controller name corresponding to the version requested in the header, as shown in Listing 8-15. Copy and paste Listing 8-15 to replace the comment // Our customization Step 2 goes here. This code does the following:
- a. It checks for the request header X-Version. If present, it takes the version from the value contained in this header.
- b. The controller name we have formatted is set in the controllerName variable, which is returned as the output of this method.
- c. Finally, it ensures that the controller name we have come up with exists in the mapping created by the base class. The GetControllerMapping method returns the mapping. There is no real need for this step, since if you send an invalid controller name, it will fail anyway. By doing this check, however, we can send a better error message to the end user.
Listing 8-15. The GetControllerName Method (Continuation)
// If client requests a specific version through the request header, we entertain it
if (request.Headers.Contains("X-Version"))
{
    string headerValue = request.Headers.GetValues("X-Version").First();

    if (!String.IsNullOrEmpty(headerValue) &&
                            Int32.TryParse(headerValue, out version))
    {
        controllerName = String.Format("{0}v{1}", controllerName, version);

        HttpControllerDescriptor descriptor = null;
        if (!this.GetControllerMapping().TryGetValue(controllerName, out descriptor))
        {
            string message = "No HTTP resource was found that matches the request URI {0} and version {1}";

            throw new HttpResponseException(
                        request.CreateErrorResponse(
                            HttpStatusCode.NotFound,
                                String.Format(message, request.RequestUri, version)));
        }
    }
} - Plug in our custom implementation, replacing the out-of-box implementation in the Register method of WebApiConfig in the App_Start folder:
config.Services.Replace(typeof(IHttpControllerSelector), new MyControllerSelector(config)); - There will be other lines of code in the Register method, but those lines will not alter the outcome of this exercise. You can just add this line to the end of the Register method.
- Rebuild the solution.
- Make a GET request to http://localhost:39188/api/employeesv2/1. Notice the suffix v2 in the URI. Remember to replace port 39188 with the actual port that your application runs on. You will get a 404 - Not Found withthe message No HTTP resource was found that matches the request URI http://localhost:39188/api/employeesv2/1. Thus, we have prevented the requests coming in directly to our version-suffixed controller classes.
- Run the project TalentManager.Web in Visual Studio.
- Set a breakpoint in the line return controllerName; in the class MyControllerSelector in TalentManager.Web.
- Make a GET request to http://localhost:39188/api/employees/1 without any headers. When the breakpoint in MyControllerSelector is hit, inspect the controllerName variable, which is about to be returned. It will be “employees”. Press F5 to continue.
- The breakpoint in the action method of EmployeesController will be hit, indicating that EmployeesController is selected. Press F5 to finish execution.
- Make another GET to http://localhost:39188/api/employees/1 with a request header of X-Version: 2. When the breakpoint in MyControllerSelector is hit, inspect the controllerName variable, which is about to be returned. It will be “employeesv2” this time. Press F5 to continue. The breakpoint in the action method of EmployeesV2Controller will be hit, indicating that EmployeesV2Controller is selected this time. Press F5 to finish execution.
- Make another GET to http://localhost:39188/api/employees/1 with a request header of X-Version: 3. We don’t have a controller for this version, and so there will be no entry for the corresponding controller, EmployeesV3Controller in the mapping returned by the GetControllerMapping method of the base class. An exception is thrown. Press F5 to continue, and we get a 404 and the message No HTTP resource was found that matches the request URI http://localhost:39188/api/employees/1 and version 3.
![]() Note When a nonnumeric value appears in the X-Version request header, our selector switches to EmployeesController. This is just by design and can be changed to send back an error.
Note When a nonnumeric value appears in the X-Version request header, our selector switches to EmployeesController. This is just by design and can be changed to send back an error.
Summary
ASP.NET Web API, being a framework, is in control of the execution flow and calls the application-specific code written by a developer like you at the appropriate time. You don’t call the framework code but it calls your code, in line with the Hollywood principle. The ASP.NET Web API framework receives an HTTP request and goes about processing it. At some point during the processing, it calls the action method you have implemented in the ApiController subclass, passing in the parameters, and formats the output returned by your method to ultimately send an HTTP response back to the client. The sequence of steps that happens from the time a request is received to the time the response is sent back defines the processing architecture of ASP.NET Web API.
Because it is a framework, ASP.NET Web API also has various points of extensibility built in, allowing us to hook our code in and extend the pipeline processing. In this chapter, I covered three of them: the message handlers, filters, and controller selectors. Message handlers run earlier in the pipeline and they run for all the requests. The lowest granularity possible is per-route. Filters run just before the execution of the action method. A filter can be applied to an action method or a controller (in which case it runs for all the action methods of that specific controller) or globally in the WebApiConfig class (in which case it runs for all requests). The controller selector runs before the filters. The default implementation of the controller selector is DefaultHttpControllerSelector, which implements the IHttpControllerSelector interface. The SelectController method selects the controller for a given request.