Now that we’ve learned about adjusting and correcting contrast and other tonal issues, we’ll look at correcting color problems, as well as other aspects of working with color.
An Overview of Color Problems
Tutorial 8: Reviving a Faded Color Photo Using Levels
Tutorial 9: Correcting Color Using Curves
Tutorial 10: Color Correction Using Color Balance (BoltBait’s Plugin Pack Required)
Tutorial 11: Turning a Color Photo into Black and White (BoltBait’s Plugin Pack Required)
Tutorial 12: Using the Sepia Adjustment
Tutorial 13: Colorizing a Black and White Photo
Chapter Conclusion
An Overview of Color Problems

This old color photograph with severe color loss
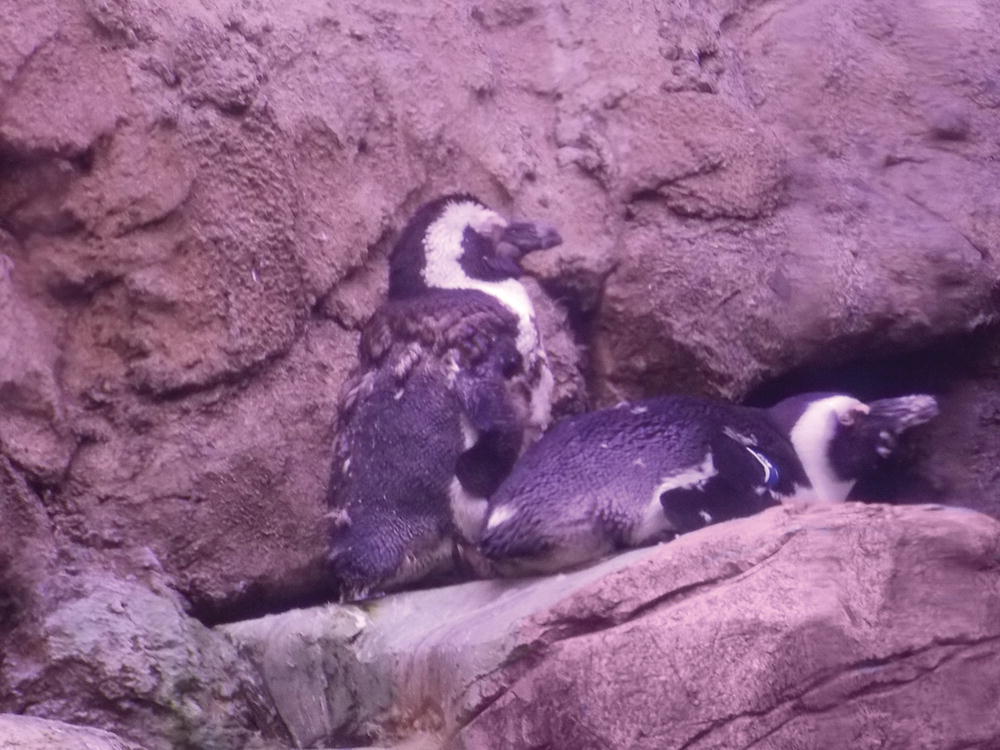
This image has a magenta color cast
- 1.
Open the practice image Ch5_Faded_Color_Fix in Paint.NET.
- 2.
Duplicate the Background layer by clicking the Duplicate Layer tab at the bottom of the Layers Window.
- 3.
Double-click the duplicate layer’s preview thumbnail to launch the Layer Properties dialog; rename the layer Faded Color Fix, or something similar—then click OK.
- 4.
Open the Levels Adjustment dialog (Adjustments ➤Levels)—if necessary, click Reset to restore the dialog to the default settings.
- 5.
Disable the green and blue color channels by unchecking their respective boxes, leaving the red color channel active (Figure 5-3).

Disable the green and blue color channels
- 6.
On the Input Histogram side of the Levels Adjustment, move the white point (top) slider down until the numeric readout is 235—this is about where the graph representing the lighter image data begins for the red channel (Figure 5-4).

Move the slider until the readout is 235
- 7.
Now, make sure the red and blue channels are disabled and make the green color channel active—move the white and black point sliders toward the image data shown in the graph for the green channel until the numeric readouts are 229 and 84 (Figure 5-5).
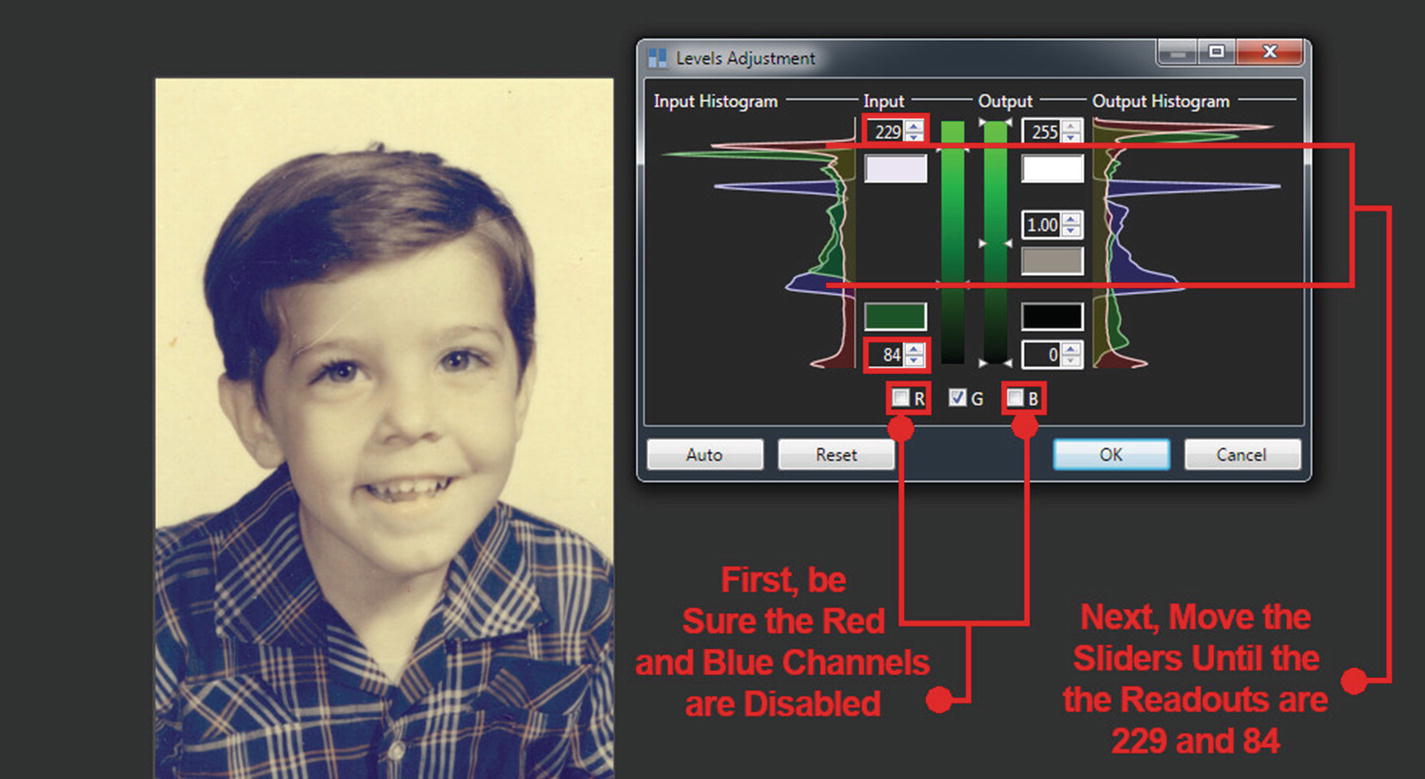
Make the adjustments shown to the green color channel
- 8.
Now, make sure the red and green channels are disabled and make the blue color channel active—move the white and black point sliders toward the image data shown in the graph for the blue channel until the numeric readouts are 191 and 63 (Figure 5-6), then click OK.
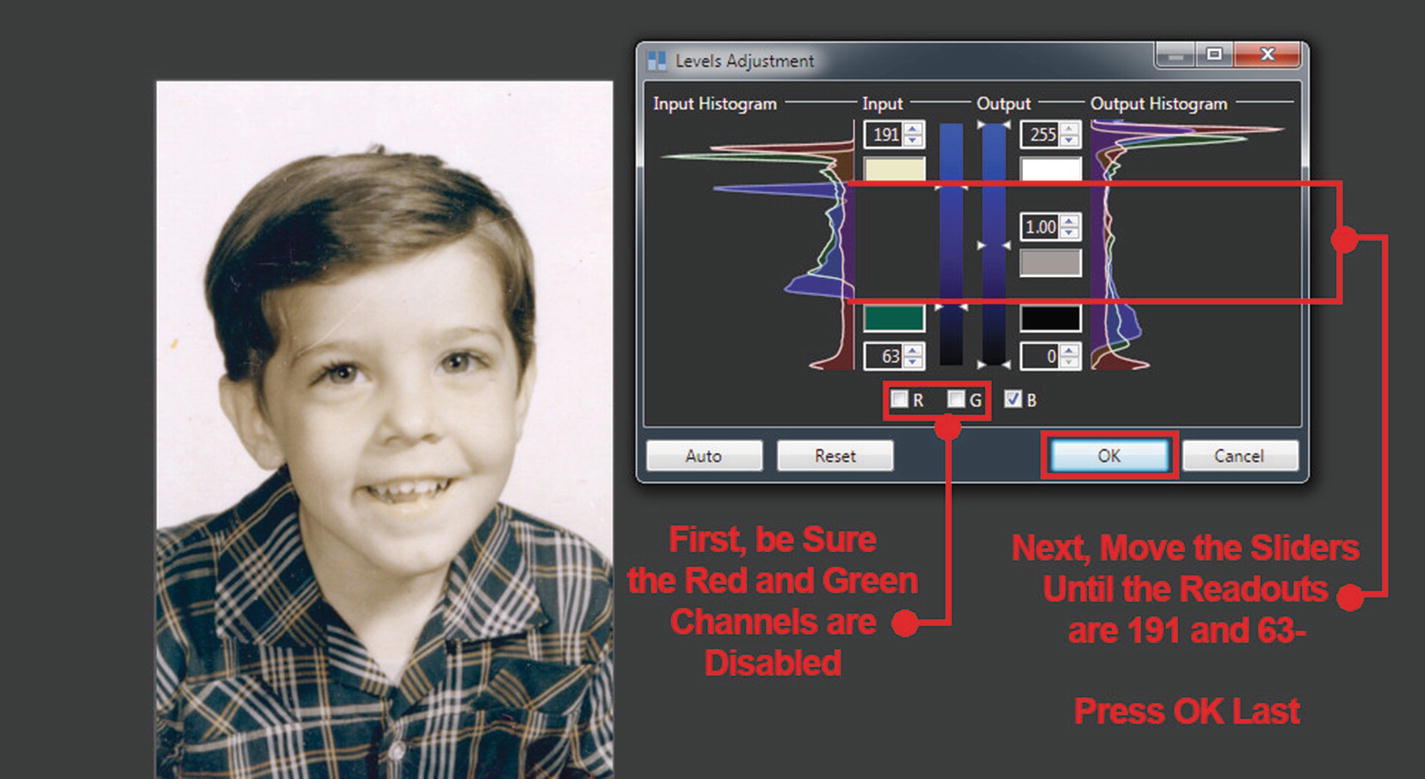
Make the adjustments shown to the blue color channel
- 9.
Sharpen the image slightly (Effects ➤ Photo ➤ Sharpen); set the amount to 2, then click OK.
The before and after comparison
Even though this image ended up with good results, some photos with severe color loss may be improved, but still need more work than using the Levels Adjustment by itself can completely fix.
- 1.
Open the practice image Ch5_Curves_Color_Correction in Paint.NET.
- 2.
Duplicate the Background layer by clicking the Duplicate Layer tab at the bottom of the Layers Window.
- 3.
Double-click the duplicate layer’s preview thumbnail to launch the Layer Properties dialog; rename the layer Color Fix, or something similar—then click OK.
- 4.
Launch the Curves Adjustments dialog (Adjustments ➤ Curves).
- 5.
Set the Transfer Map to RGB—this allows each color channel to be adjusted individually.
- 6.
First, disable the green and blue channels, then move the line (adjusting the red channel) to the grid area shown in Figure 5-8—the approximate X/Y coordinates should be 96/158.

Make the adjustment shown to the red color channel
- 7.
Next, make sure the red and blue channels are disabled, and make the green channel active; move the line just slightly to the grid area to the approximate X/Y coordinates shown in Figure 5-9.
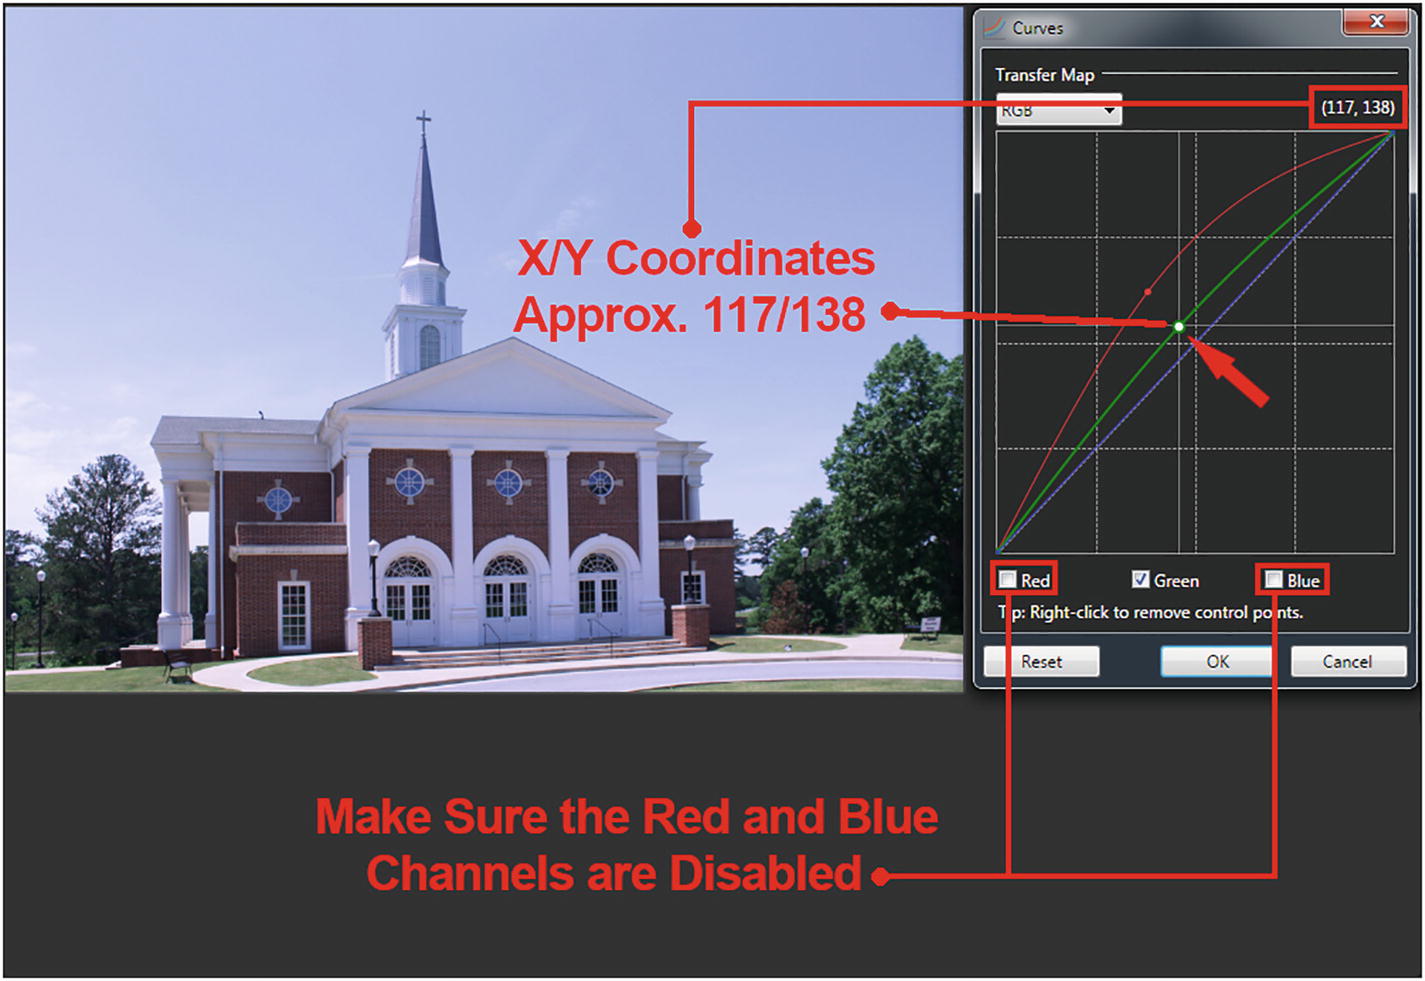
Make the adjustment shown to the green color channel
- 8.
Next, make sure the red and green channels are disabled, and make the blue channel active; move the line to the grid area to the approximate X/Y coordinates shown in Figure 5-10, then click OK.
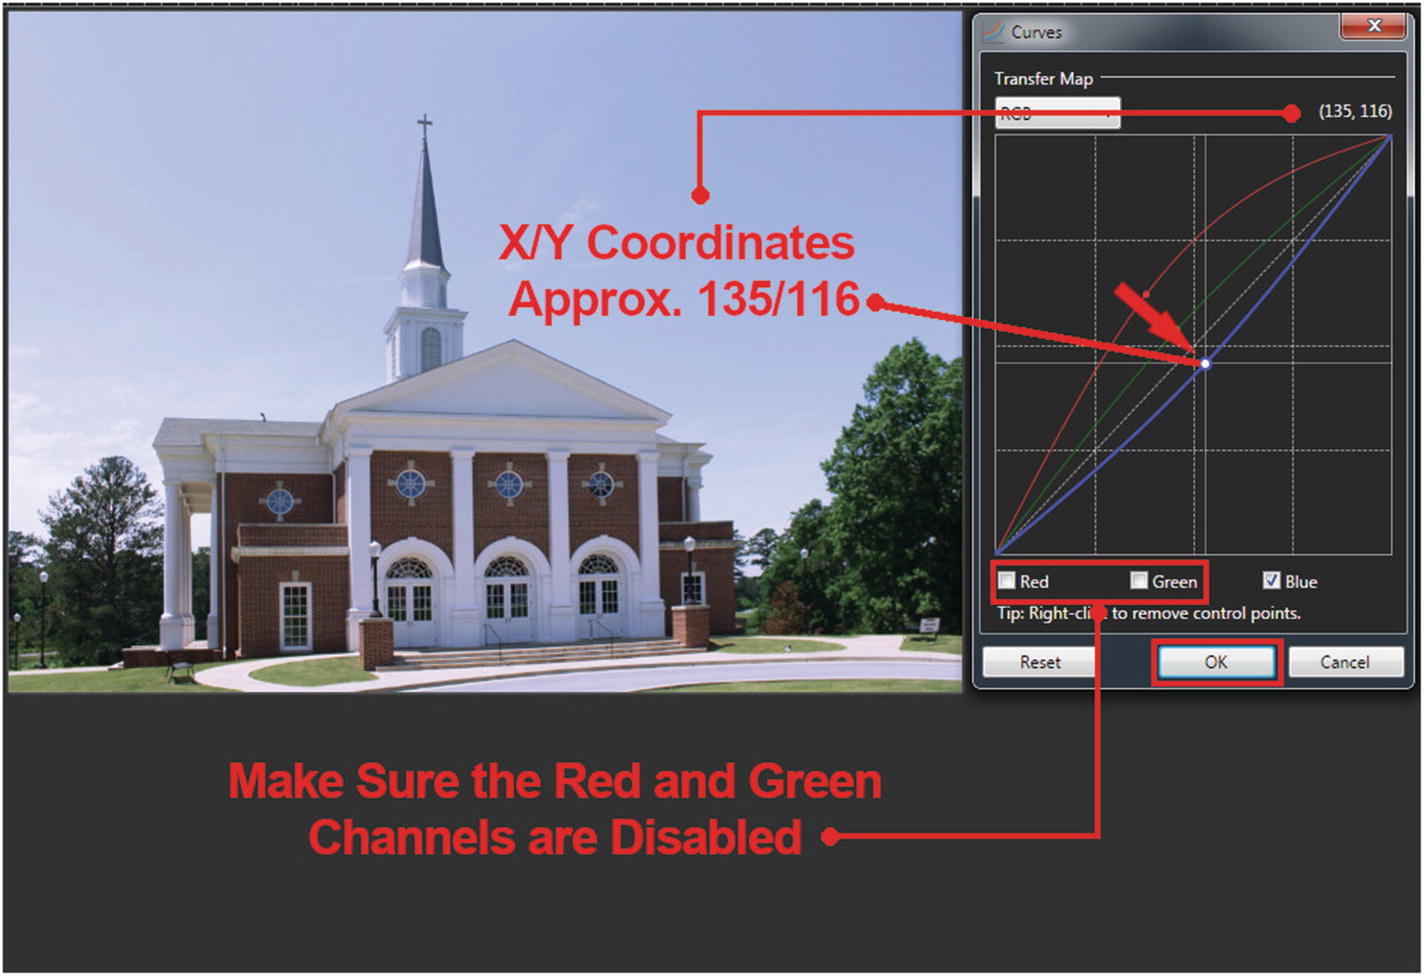
Make the adjustment shown to the blue color channel, then click OK
- 9.
Sharpen the image slightly (Effects ➤ Photo ➤ Sharpen); set the amount to 2, then click OK.
- 10.
Now, the color has been balanced and the image looks much better, but let’s add a finishing touch to further enhance it by making the sky a deeper blue; duplicate the layer named Color Fix (or whatever name you gave it) by clicking the Duplicate Layer tab at the bottom of the Layers Window.
- 11.
Double-click the layer preview thumbnail image to open the Layer Properties dialog—change the blend mode to Multiply, then click OK (Figure 5-11).
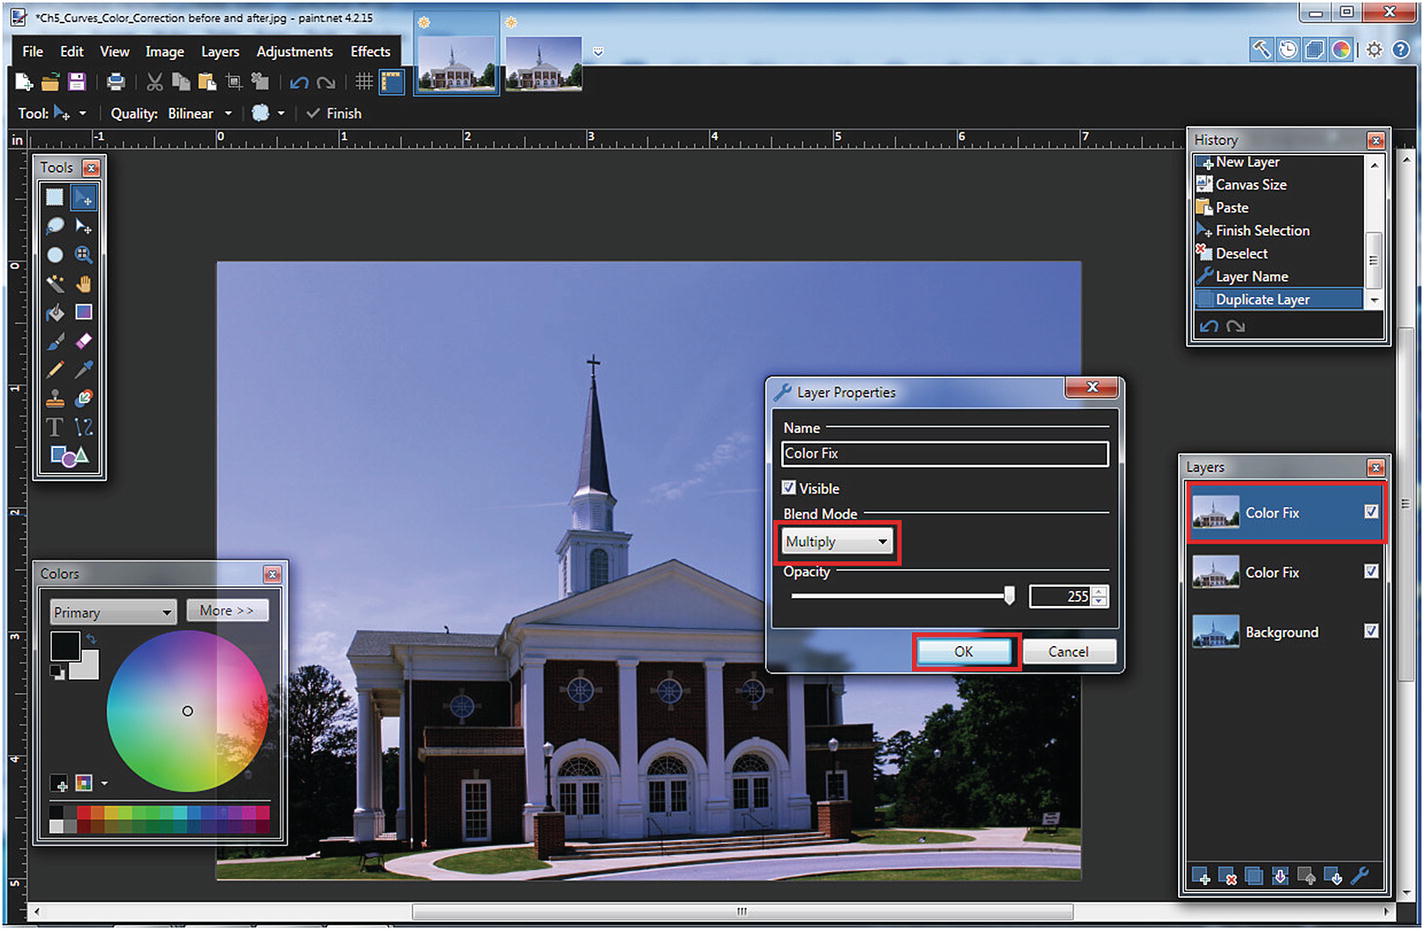
Set the blend mode to Multiply
- 12.
Make sure the Primary Color is set to Black.
- 13.
Select the Gradient Tool (G); with the tool set to Linear and Transparency Mode, click and drag about 60% of the way down as shown in Figure 5-12 and press Enter to finish the gradient.
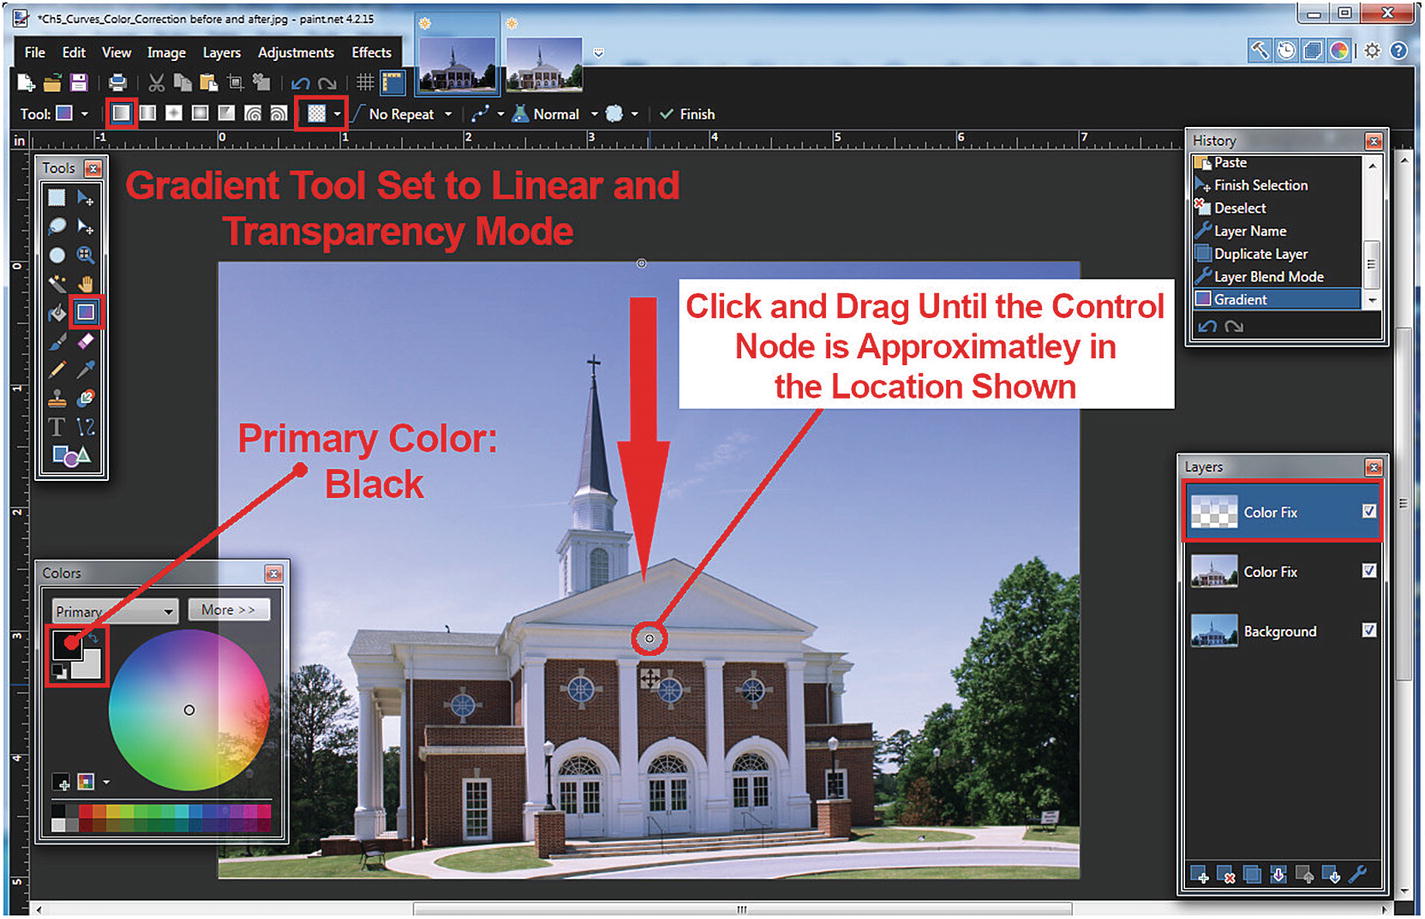
Drawing a gradient with the settings shown makes the sky a deeper blue

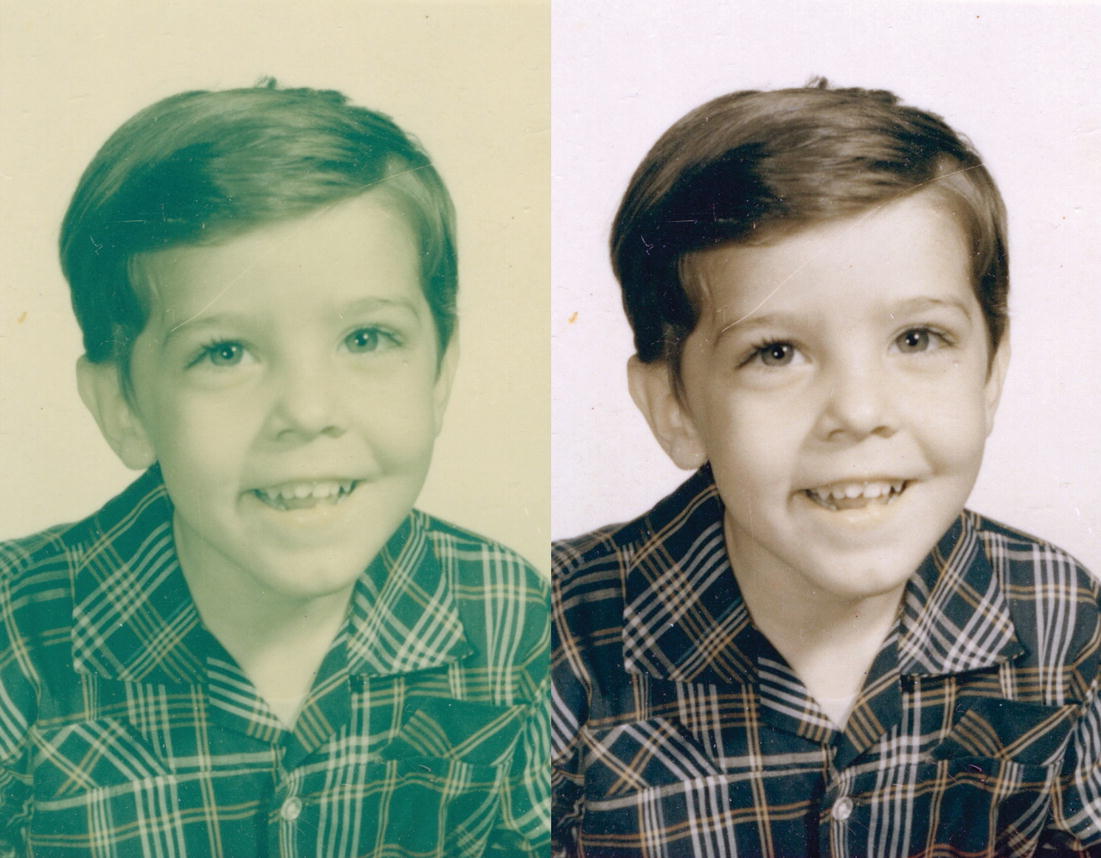
The before and after comparison
- 1.
Open the practice image Ch5_Color_Balance in Paint.NET.
- 2.
Duplicate the Background layer by clicking the Duplicate Layer tab at the bottom of the Layers Window.
- 3.
Open the Color Balance dialog (Adjustments ➤ Color Balance).
- 4.
Move the Magenta/Green slider to the right until the setting is on 20, move the Yellow/Blue slider to the right until the setting is –5, and move the Contrast slider to the right until the setting is 20 (Figure 5-14)—click OK when done.
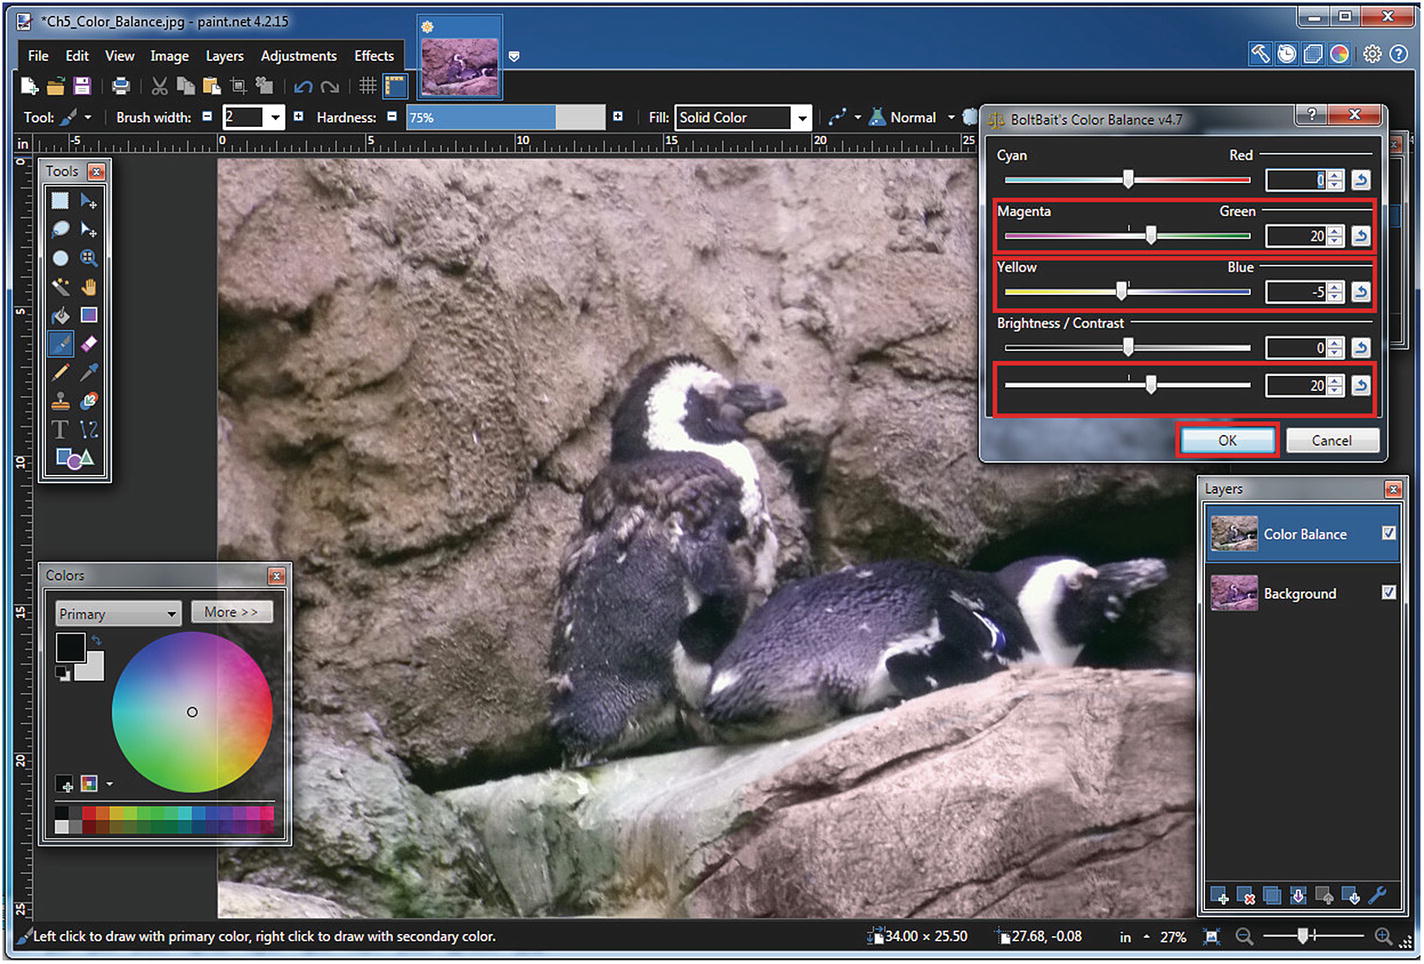
Use the settings shown to offset the color cast and boost the contrast slightly
- 5.
Sharpen the image slightly (Effects ➤ Photo ➤ Sharpen); set the amount to 3, then click OK (this image was shot through a glass window, so it isn’t as crisp as it might have otherwise been).
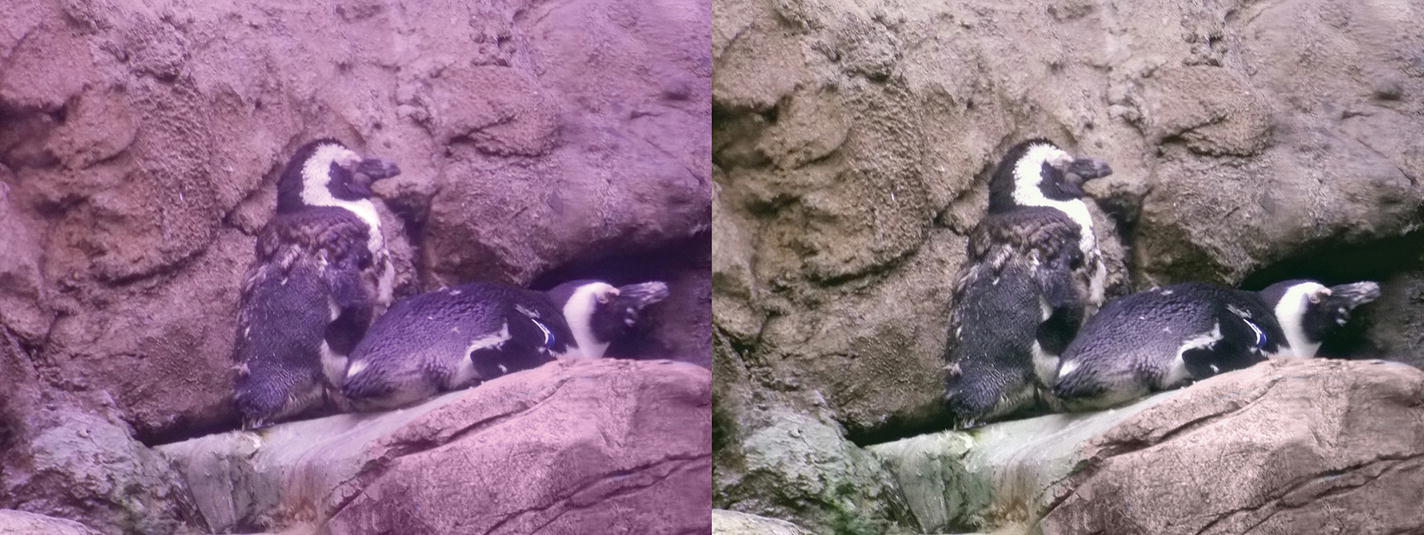
The before and after comparison

Paint.NET’s one-click Black and White Adjustment
- 1.
Open the practice image Ch5_Color_to_Black_and_White in Paint.NET.
- 2.
Duplicate the Background layer by clicking the Duplicate Layer tab at the bottom of the Layers Window—rename the layer Black and White (or something similar).
- 3.
Open BoltBait’s Black and White + dialog (Adjustments ➤ Black and White)—see Figure 5-17.

BoltBait’s Black and White + plugin
- 4.
As shown in Figure 5-18, select the Average Method setting, and increase the Brightness to 4, and decrease the Contrast to 10.

Using the Average Method with slight adjustments in Brightness and Contrast
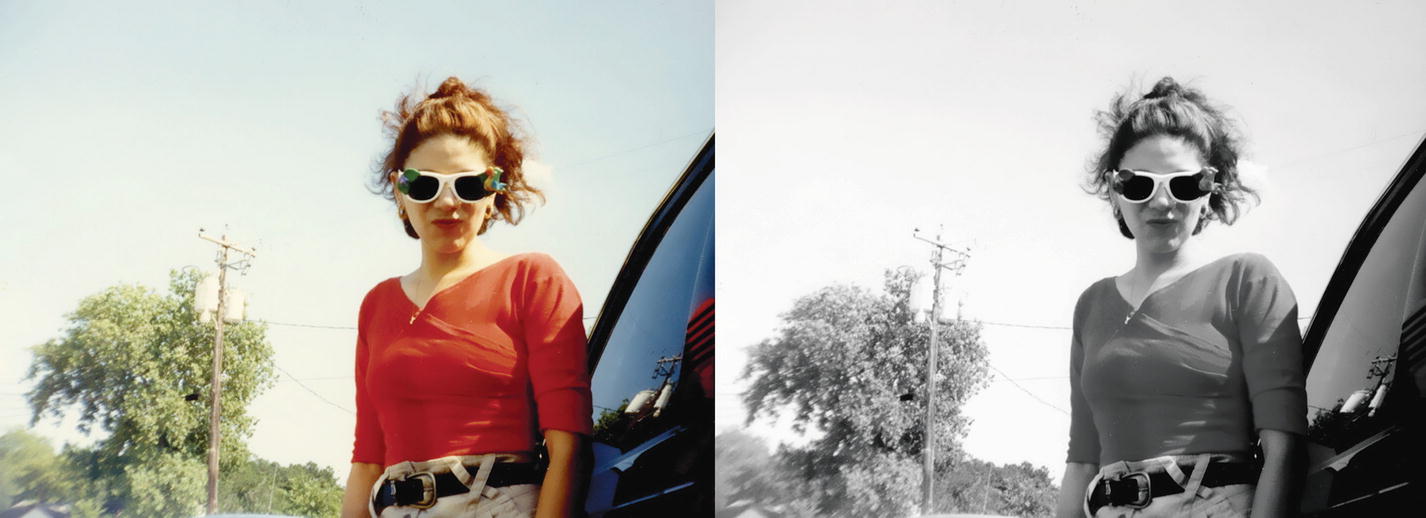
The before and after comparison
Paint.NET Method
Luminosity Method
Average Method
Lightness Method
Maximum Method
Minimum Method
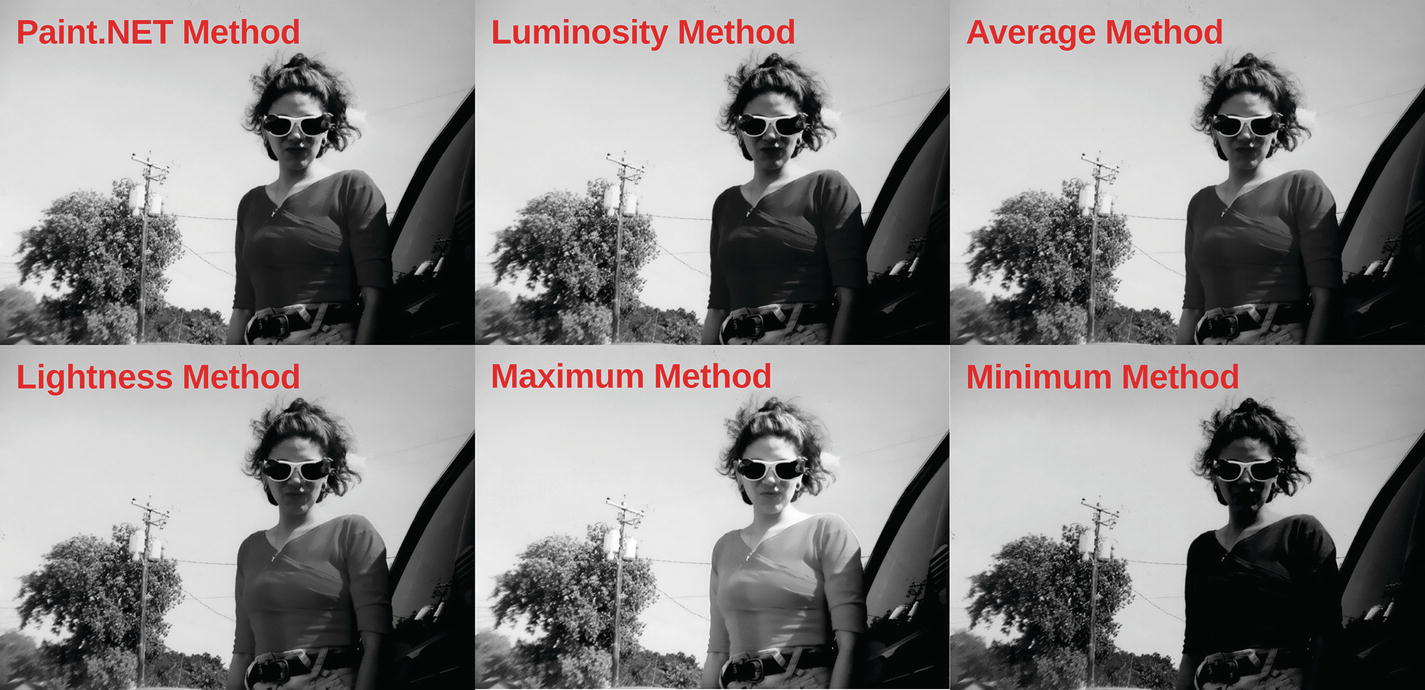
The presets used in BoltBait's Black and White + plugin
The G’MIC-Qt plugin for Paint.NET offers a wide variety of filters—among them is a filter for black and white conversions that offers even more control for fine-tuning the results. The G’MIC-Qt plugin will be covered in the Appendix of this book.
This is an easy lesson that you may find useful (and fun) in working with your own family photos.
In this tutorial, we’ll crop a color contemporary image for better composition, then apply the Sepia Adjustment to give it an antique look:
- 1.
Open the practice image Ch5_Color_to_Sepia in Paint.NET.
- 2.We’ll now crop the image for better composition—using the Rectangle Select Tool (S), make a selection (approximate is okay) around the cabin as shown in Figure 5-21, then crop (Image ➤ Crop to Selection).
 Figure 5-21
Use the Rectangle Select Tool to crop the image as shown
Note Cropping the image in this manner utilizes (although somewhat roughly) the Rule of Thirds, which is essentially placing the subject off-center using a grid dividing the image into nine sections. There’s a detailed tutorial about using the Rule of Thirds in a Paint.NET forum page that can be found here: https://forums.getpaint.net/topic/12282-cropping-photographs-the-rule-of-thirds/.
- 3.
Duplicate the Background layer by clicking the Duplicate Layer tab at the bottom of the Layers Window—rename the layer Sepia (or something similar).
- 4.
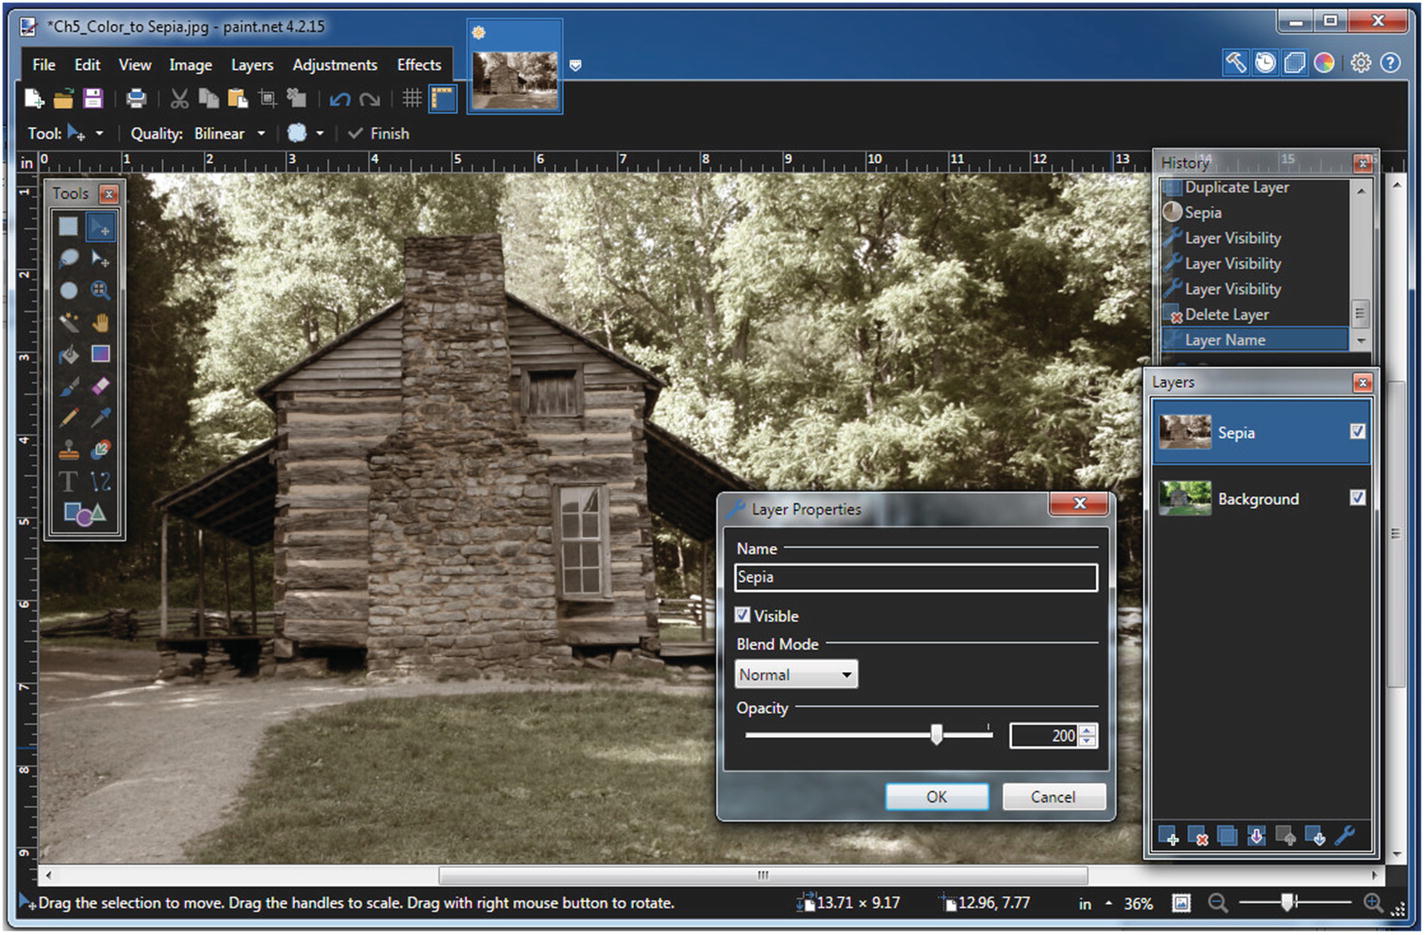
Apply the Sepia Adjustment as shown in Figure 5-22 (Adjustment ➤ Sepia).

Apply the Sepia Adjustment
- 5.
Sharpen the image slightly (Effects ➤ Photo ➤ Sharpen); set the amount to 2, then click OK.
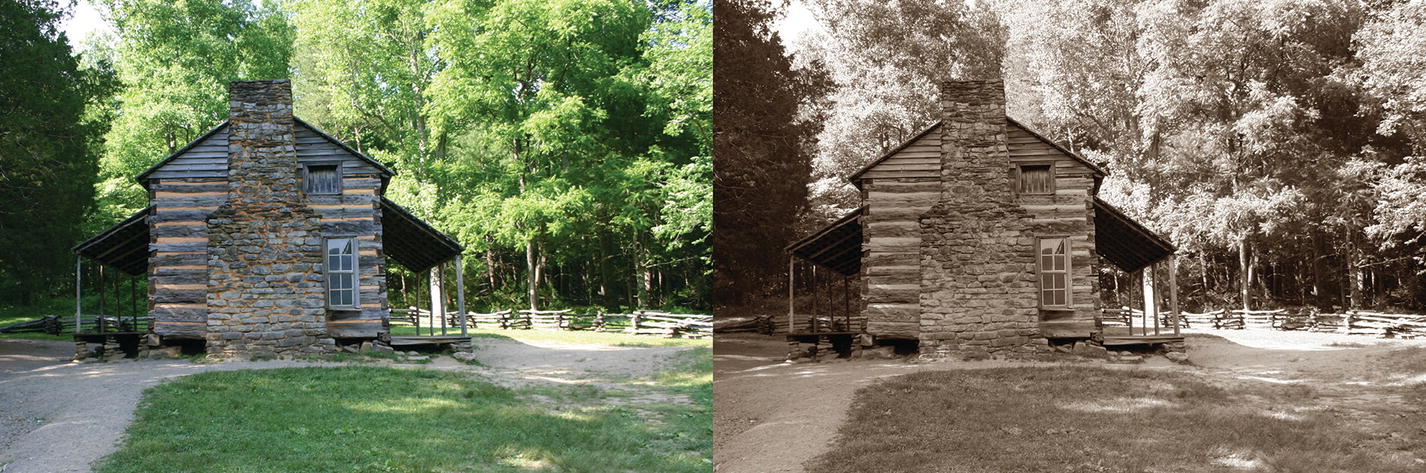
The before and after comparison
Lower the layer opacity for subtle color
- 1.
Open the practice image Ch5_Colorize in Paint.NET.
- 2.
Duplicate the Background layer by clicking the Duplicate Layer tab at the bottom of the Layers Window.
- 3.
Using the Lasso Select Tool (S,S), draw a selection around the hair, face, and exposed flesh (Figure 5-25)—it should extend just a little outside the edges to make sure these areas are completely selected.
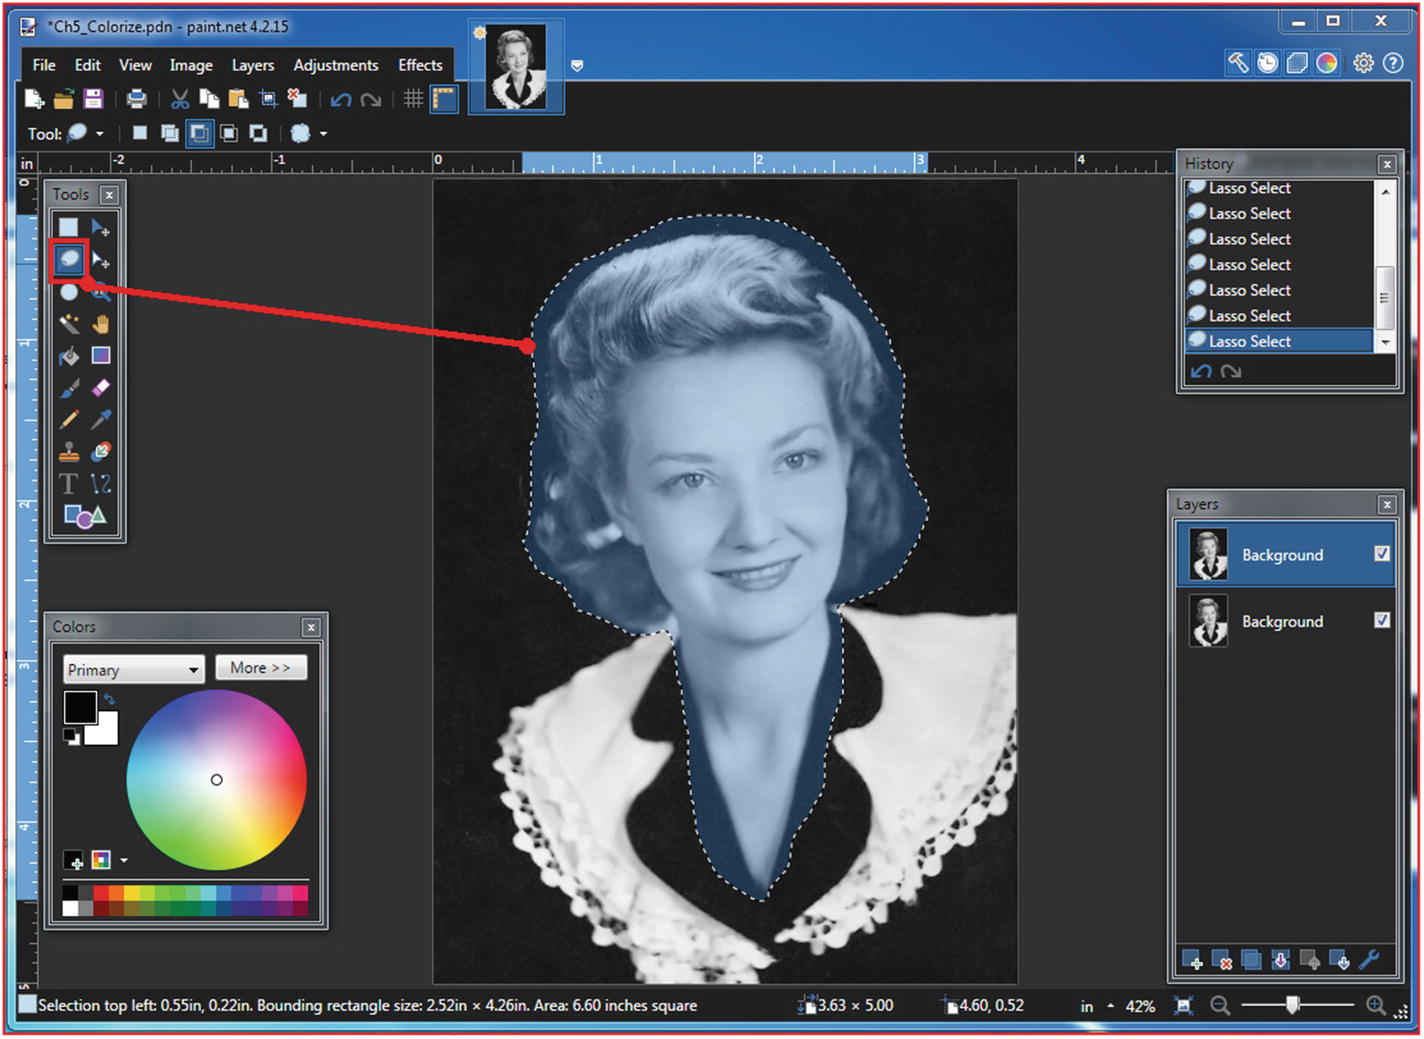
Make a selection as shown using the Lasso Select Tool
- 4.
Copy the selected area (Edit ➤ Copy).
- 5.
Paste into a new layer (Edit ➤ Paste into New Layer)—rename the layer Flesh Tone (or something similar).
- 6.
Open the Hue/Saturation dialog (Adjustments ➤ Hue/Saturation).
- 7.
Move the Saturation slider to the right until the numeric value is 150—click OK when done (Figure 5-26).
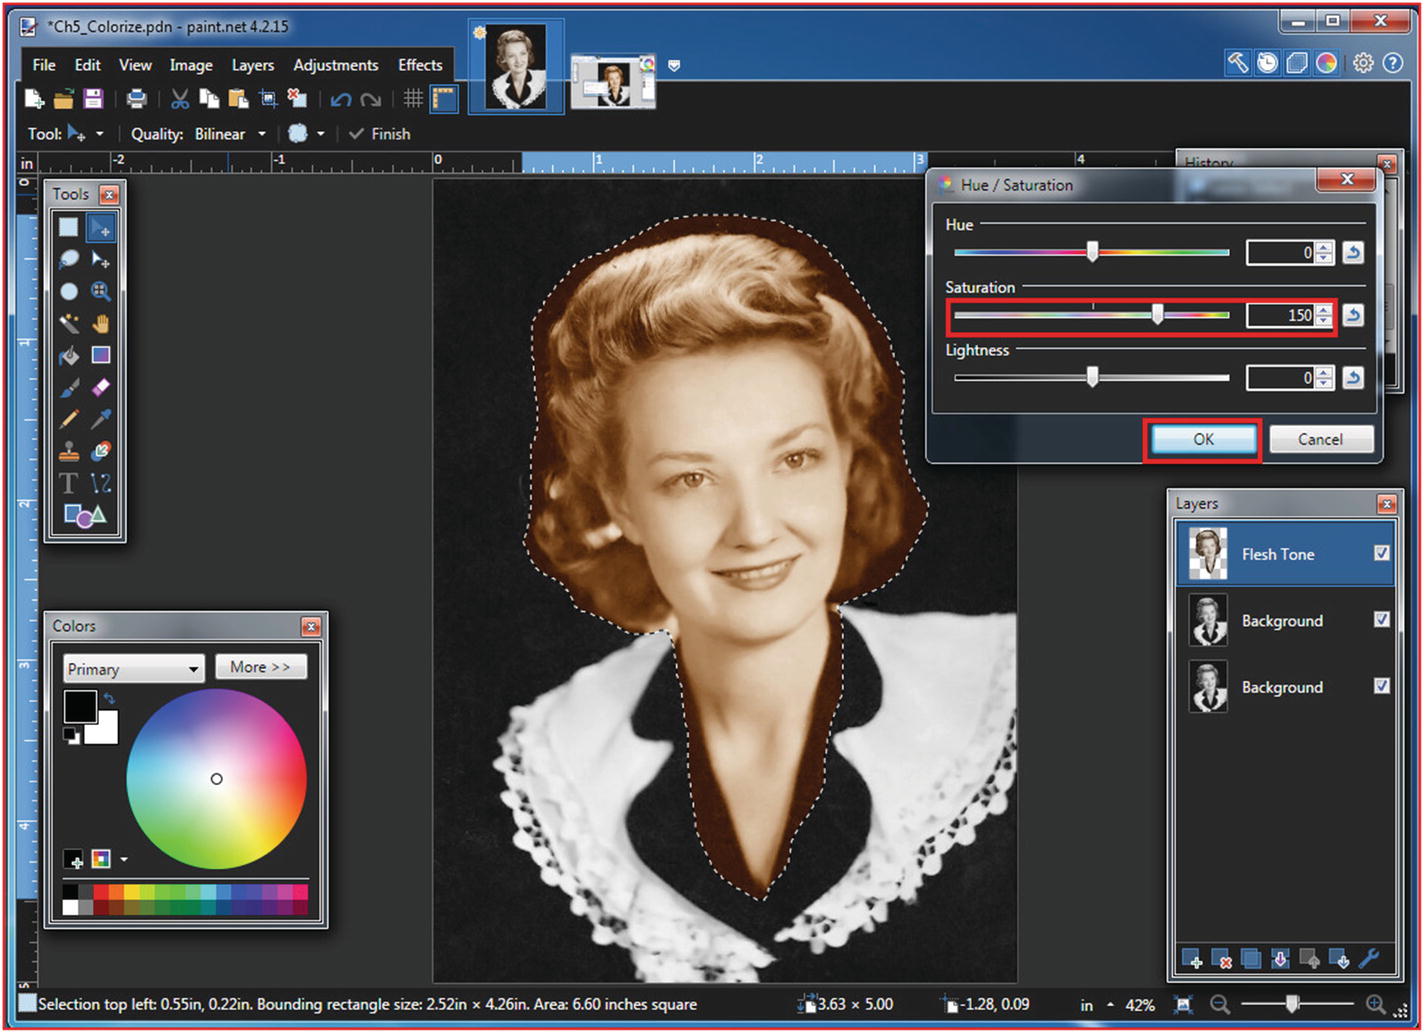
Move the Saturation slider until the value reads 150, then click OK
- 8.
Using the Eraser Tool (E), set the brush width to about 50 pixels and the hardness to 50%—erase the excess color (vary the brush width and zoom in as needed) as shown in Figure 5-27.

Use the Eraser Tool to remove the excess color, varying the brush width as needed
- 9.
Using the Lasso Tool (S,S), draw a selection around the hair as shown in Figure 5-28.

Make a selection as shown using the Lasso Select Tool
- 10.
Copy the selected area (Edit ➤ Copy).
- 11.
Paste into a new layer (Edit ➤ Paste into New Layer)—rename the layer Hair.
- 12.
Now, we’ll change the hair color a bit; open the Hue/Saturation dialog (Adjustments ➤ Hue/Saturation).
- 13.
Move the Hue slider slightly to the right until the numeric value is 12—click OK when done (Figure 5-29).
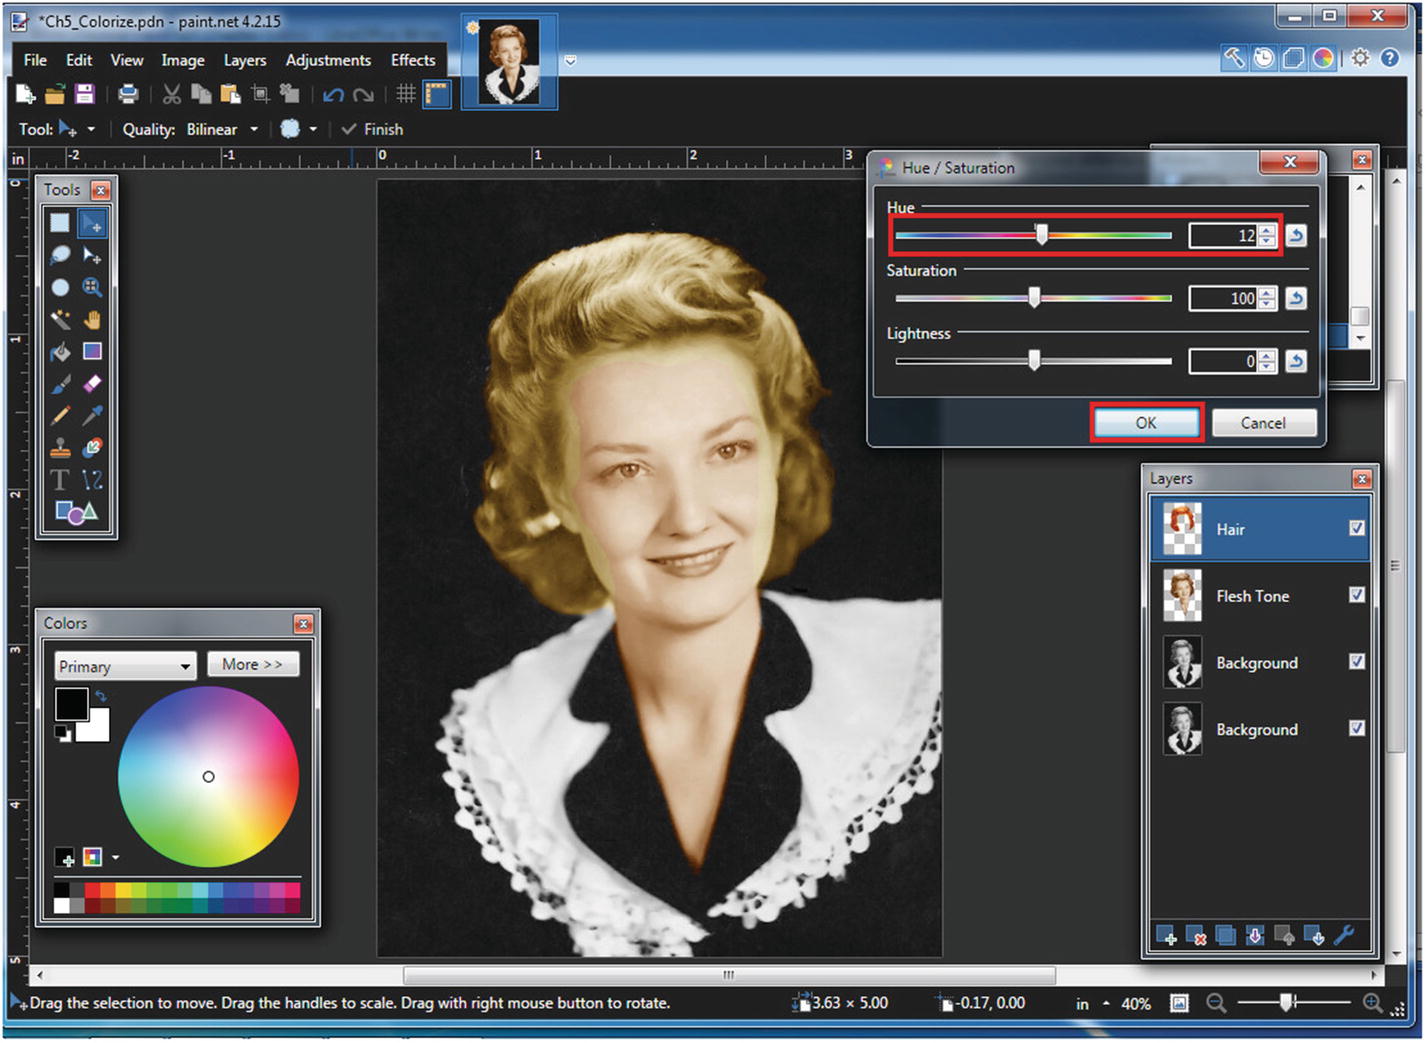
Move the Hue slider until the value reads 12, then click OK
- 14.
Set the Primary Color to red.
- 15.
Add a new layer by clicking the Add New Layer tab on the bottom of the Layers Window.
- 16.
Double-click the layer preview thumbnail to open the Layer Properties dialog—change the Blend Mode to Overlay and rename it Cheeks, then click OK.
- 17.
Using the Paintbrush Tool (B), set the brush width to about 75 pixels and the hardness to 0—apply red to the cheeks as shown in Figure 5-30.

Apply red to the cheeks as shown
- 18.
Now, we’ll give the cheeks just a hint of red—reopen the Layer Properties dialog and lower the layer opacity to 50 (Figure 5-31), then click OK.
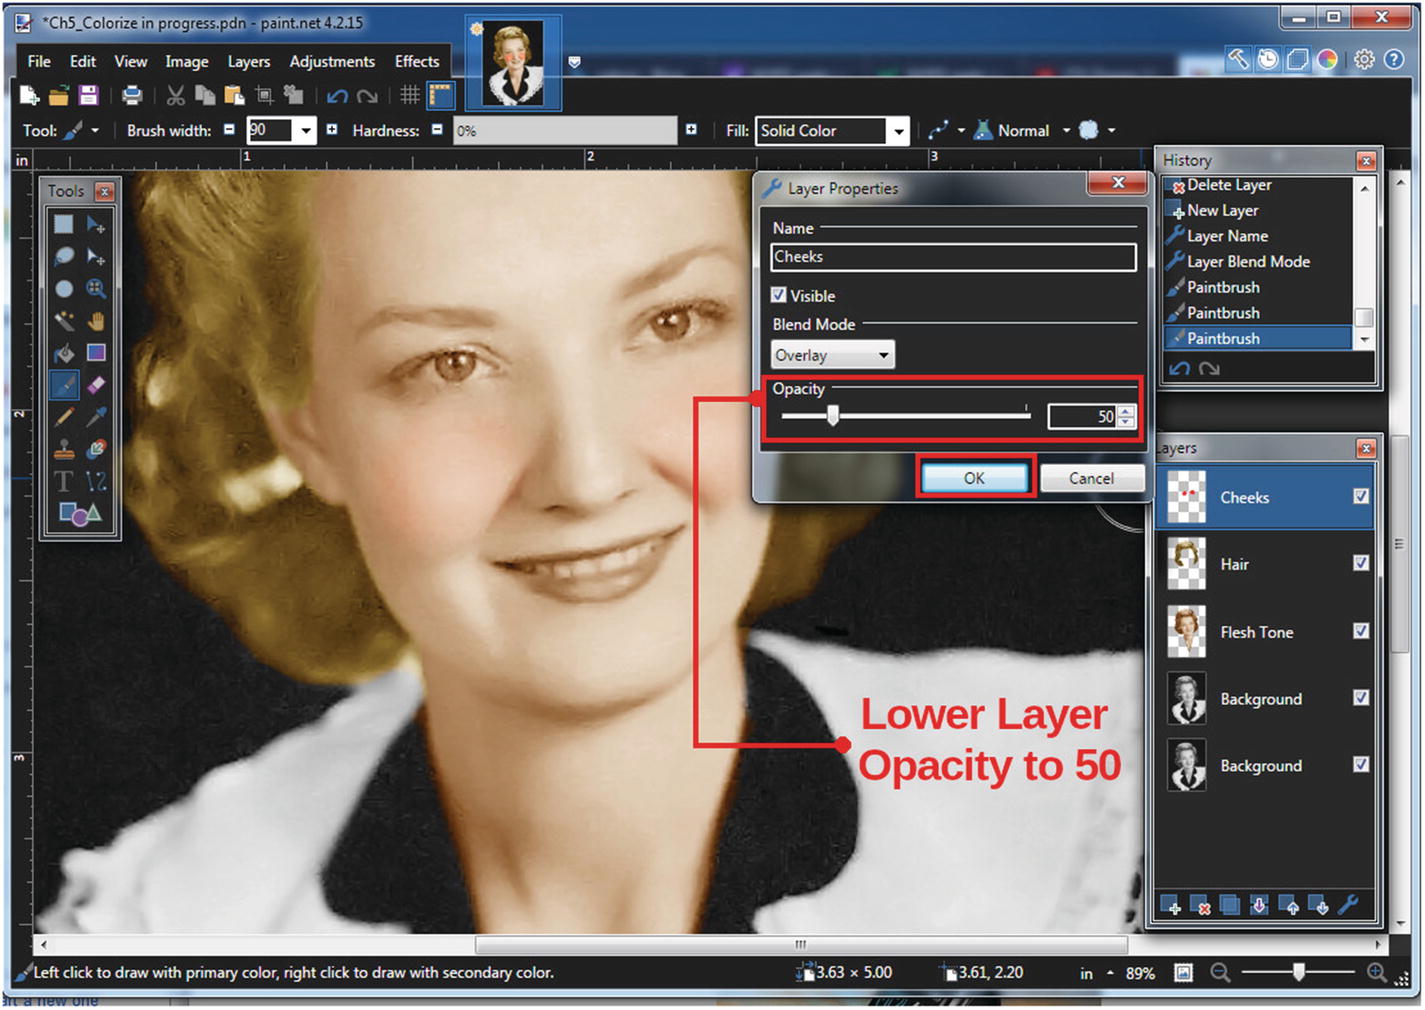
Lower the layer opacity to 50 for just a hint of red in the cheeks
- 19.
Add a new layer by clicking the Add New Layer tab on the bottom of the Layers Window.
- 20.
Double-click the layer preview thumbnail to open the Layer Properties dialog—change the Blend Mode to Overlay and rename it Lips.
- 21.
Lower the layer opacity to 70, then click OK.
- 22.
Using the Paintbrush Tool (B), set the brush width to about 7 pixels and the hardness to 0—apply red to the lips as shown in Figure 5-32 (zoom in and adjust the brush width as needed).
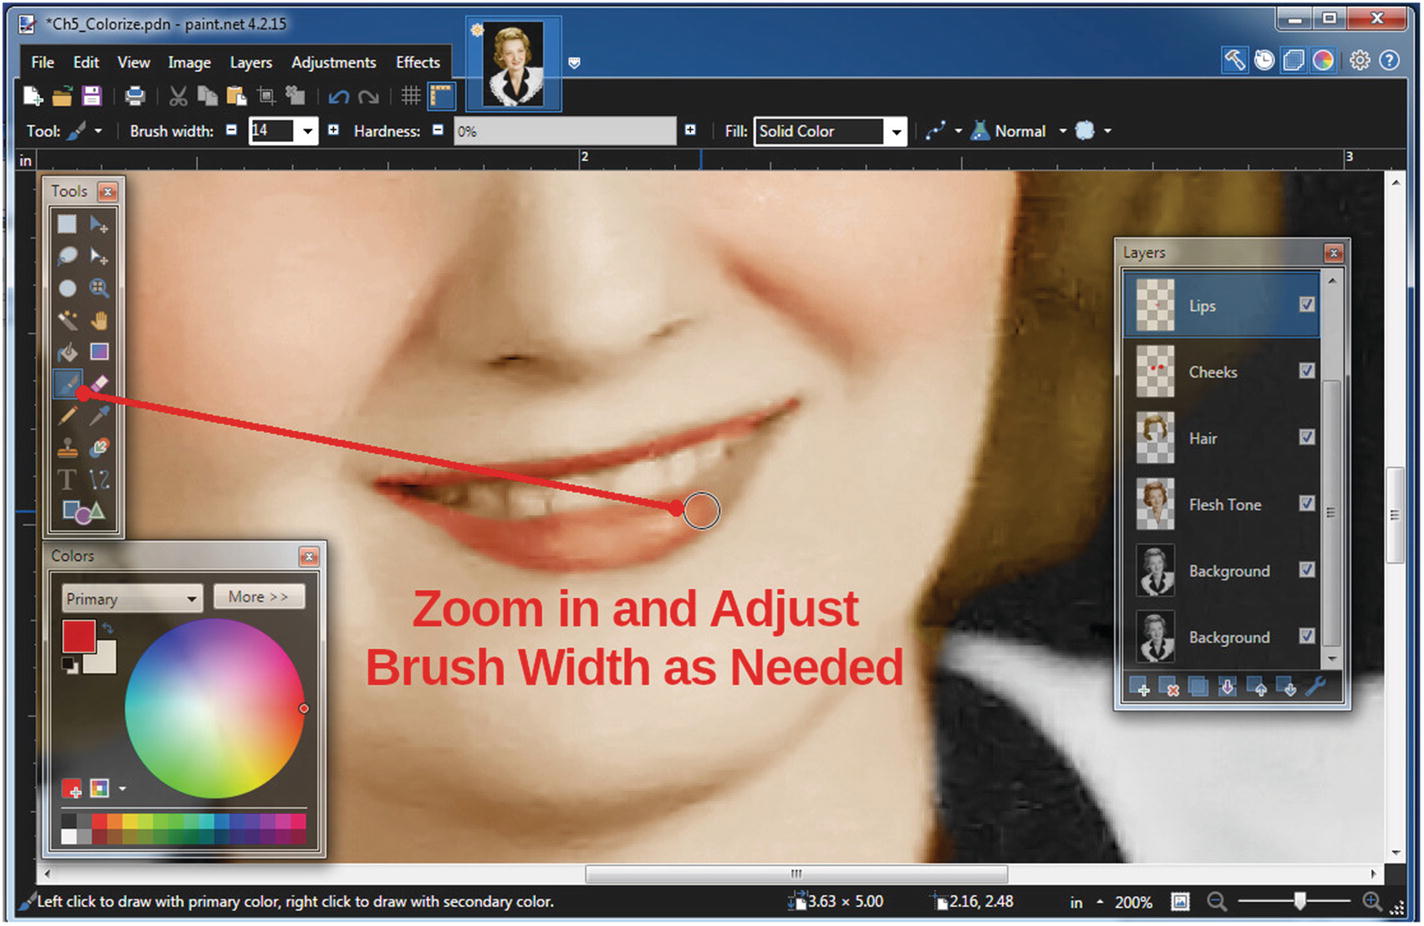
Apply red to the lips as shown
- 23.
Set the Primary Color to green.
- 24.
Add a new layer by clicking the Add New Layer tab on the bottom of the Layers Window.
- 25.
Double-click the layer preview thumbnail to open the Layer Properties dialog—change the Blend Mode to Overlay and rename it Eyes.
- 26.
Lower the layer opacity to 55, then click OK.
- 27.
Using the Paintbrush Tool (B), set the brush width to about 15 pixels and the hardness to 0—apply green to the iris of each eye as shown in Figure 5-33 (zoom in and adjust the brush width as needed).

Apply green to the iris of each eye as shown
- 28.
Set the Primary Color to white.
- 29.
Add a new layer by clicking the Add New Layer tab on the bottom of the Layers Window.
- 30.
Double-click the layer preview thumbnail to open the Layer Properties dialog—change the Blend Mode to Overlay and rename it Teeth-Eye Whites.
- 31.
Lower the layer opacity to 80, then click OK.
- 32.
Now we’ll brighten the whites of the eyes and the teeth. Using the Paintbrush Tool (B), set the brush width to about 10 pixels and the hardness to 0—apply white to the white of each eye and the teeth as shown in Figure 5-34 (zoom in and adjust the brush width as needed).

Apply white to each eye (the eye whites only) and teeth as shown
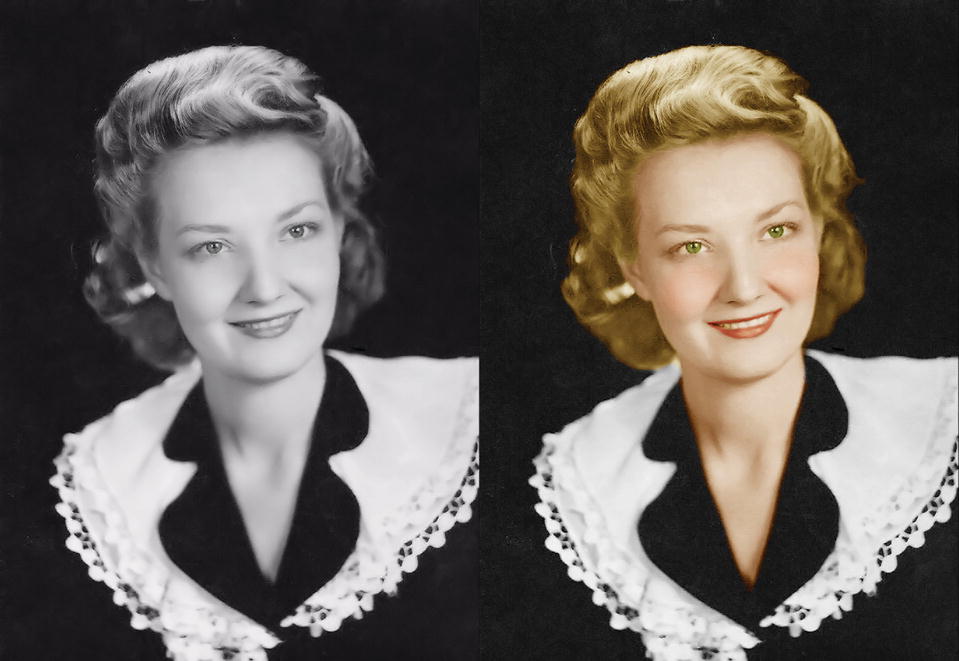
Before and after comparison
Chapter Conclusion
We covered a lot in this chapter and covered a great deal about working with color images.
An Overview of Color Problems
Reviving a Faded Color Photo Using Levels
Correcting Color Using Curves
Color Correction Using Color Balance (BoltBait’s Plugin Pack Required)
Turning a Color Photo into Black and White (BoltBait’s Plugin Pack Required)
Using the Sepia Adjustment
Colorizing a Black and White Photo
In the next chapter, we’ll look at modifying, retouching, and restoring photographs.